> ## Documentation Index
> Fetch the complete documentation index at: https://auth0.com/llms.txt
> Use this file to discover all available pages before exploring further.
# Auth0 B2B Connect で Ory を設定する
> エンタープライズのシングルサインオンを実現するため、OIDC IDプロバイダーである Auth0 B2B Connect にフェデレーションするよう Ory を設定します。
export const ReleaseStageNotice = ({feature, stage, plans, contact, terms}) => {
const stageTextMap = {
"beta": "Beta",
"ea": "早期アクセス"
};
const stageText = stageTextMap[stage] || "製品リリース段階";
const prsLink = "/docs/troubleshoot/product-lifecycle/product-release-stages";
const linkify = (text, url) => {
return {text};
};
const includeDetails = (plans, contact, terms) => {
const hasDetails = terms || plans || contact;
if (!hasDetails) return null;
return
{plans && <>この機能は{linkify(`${plans}プラン`, "https://auth0.com/pricing")}でご利用いただけます。 }
{contact && "参加をご希望の場合は、" + contact + "までお問い合わせください。 "}
{terms && <>この機能を使用することにより、Oktaの該当する無料トライアル規約および{linkify("Master Subscription Agreement", "https://www.okta.com/legal")}に同意したものとみなされます。}
;
};
return
{feature}機能は現在、{linkify(stageText, prsLink)}です。
{includeDetails(plans, contact, terms)}
;
};
[Ory](https://www.ory.sh)は、最新のアプリケーション向けにAPIファーストの認証、認可、ユーザーフェデレーションを提供する、オープンソースのエンタープライズグレードのIDプラットフォームです。Auth0 B2B ConnectへフェデレーションするようにOryを構成すれば、OpenID Connect (OIDC) のIDプロバイダーとして機能させ、既存のOry認証スタックにエンタープライズシングルサインオン (SSO) を追加できます。
認証の仕組み
```mermaid theme={null}
sequenceDiagram
participant User
participant Application as Your Application
participant Ory as Ory
participant Auth0 as Auth0 B2B Connect
participant EnterpriseIdP as Enterprise IdP
Note over User,Ory: Login initiation
User->>Application: Initiates login
Application->>Ory: Sends authentication request
Note over Ory,Auth0: Route to Auth0
Ory->>Ory: Identifies user as enterprise user
Ory->>Auth0: Routes authentication request
Note over Auth0,EnterpriseIdP: Enterprise IdP federation
Auth0->>EnterpriseIdP: Sends authentication request (OIDC)
User->>EnterpriseIdP: Authenticates with corporate credentials
EnterpriseIdP-->>Auth0: Returns OIDC token
Note over Ory,Application: Token issuance and session
activate Ory
Auth0-->>Ory: Returns federation result
Ory-->>Application: Issues token
deactivate Ory
Application->>Application: Validates token, bootstraps session
Application-->>User: Grants access
```
1. ユーザーがアプリケーションでログインを開始します。
2. アプリケーションがOryに認証リクエストを送信します。
3. Oryはユーザーをエンタープライズユーザーと判別し、リクエストをAuth0 B2B Connectにルーティングします。
4. Auth0 B2B ConnectはOpenID Connect (OIDC) を使用して、ユーザーの企業IDプロバイダー (例:OktaやMicrosoft Entra ID) に認証リクエストを送信します。
5. ユーザーは企業IDプロバイダーで社内の認証情報を使って認証を行います。
6. 企業IDプロバイダーはOIDCトークンをAuth0 B2B Connectに返します。
7. Auth0 B2B Connectはドメインディスカバリーを実行し、フェデレーションの結果をOryに返します。
8. Oryはアプリケーションにトークンを発行します。
9. アプリケーションはトークンを検証し、セッションを初期化して、ユーザーにアクセスを許可します。
前提条件
Auth0 B2B Connect Enterprise を Ory で使用するには、次のものが必要です。
* [B2B Connect - Enterprise](/docs/ja-jp/get-started/b2b-connect-enterprise) が有効になっている Auth0 テナント
* [エンタープライズ接続](/docs/ja-jp/authenticate/enterprise-connections) (例: Okta) へのドメインディスカバリーを有効にした [Auth0 Organization](/docs/ja-jp/manage-users/organizations) の作成。詳しくは [Create Organization Domains](/docs/ja-jp/manage-users/organizations/configure-organizations/create-org-domains) をご覧ください。
* Ory Network Console から Ory Network Developer Tier プロジェクトにアクセスできること
* 既存の Ory OAuth 2.0 アプリケーション
エンタープライズ Home Realm Discovery (HRD) の利用には Ory B2B Organizations が必須です。ネイティブの自動ドメインルーティングは、検証済みのメールドメインとアップストリームのIDプロバイダー (SAML または OIDC) を Organization に直接リンクすることで実現されます。これにより Ory は、[Identifier-First ログインフロー](/docs/ja-jp/authenticate/login/auth0-universal-login/identifier-first)の中でユーザーをエンタープライズ SSO へ自動的にリダイレクトします。
新しいB2B Connect統合を作成するには、次の手順に従います。
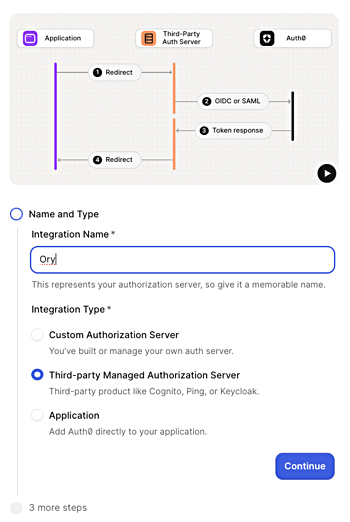
1. [**Auth0 Dashboard > Applications > B2B Connect**](https://manage.auth0.com/dashboard/#/b2b-integrations)に移動し、**+Create Integration**を選択してB2B Connectウィザードを開始します。
2. **Integration Name** (統合名) を入力します (例:「Ory」) 。
3. **Integration Type**で、**Third-party Managed Authorization Server**を選択します。
4. **Continue**を選択します。
 5. **Authentication Protocol**で、**OIDC** (OpenID Connect) を選択します。
6. **Continue**を選択します。
7. **Application Callback URL**を入力します。これはOryのOIDC認証プロバイダーのリダイレクトURIで、形式は次のとおりです。
```text lines theme={null}
https://YOUR_ORY_DOMAIN/self-service/methods/oidc/callback/YOUR_PROVIDER_ID
```
A. `YOUR_PROVIDER_ID`は、Oryコンソールで確認できるIDプロバイダーのエイリアスに置き換えます。この値がまだ分からない場合は、後から次のURLにあるB2B Connectの**Settings**タブで**Application Callback URL**を更新できます。
```text lines theme={null}
https://YOUR_AUTH_DOMAIN/dashboard/YOUR_REGION/YOUR_TENANT_NAME/b2b-integrations/YOUR_B2B_CONNECT_CLIENT_ID/settings
```
8. **Continue**を選択します。
9. 確認画面で**Done**を選択してウィザードを完了します。
5. **Authentication Protocol**で、**OIDC** (OpenID Connect) を選択します。
6. **Continue**を選択します。
7. **Application Callback URL**を入力します。これはOryのOIDC認証プロバイダーのリダイレクトURIで、形式は次のとおりです。
```text lines theme={null}
https://YOUR_ORY_DOMAIN/self-service/methods/oidc/callback/YOUR_PROVIDER_ID
```
A. `YOUR_PROVIDER_ID`は、Oryコンソールで確認できるIDプロバイダーのエイリアスに置き換えます。この値がまだ分からない場合は、後から次のURLにあるB2B Connectの**Settings**タブで**Application Callback URL**を更新できます。
```text lines theme={null}
https://YOUR_AUTH_DOMAIN/dashboard/YOUR_REGION/YOUR_TENANT_NAME/b2b-integrations/YOUR_B2B_CONNECT_CLIENT_ID/settings
```
8. **Continue**を選択します。
9. 確認画面で**Done**を選択してウィザードを完了します。
Settings タブから credentials をコピーする
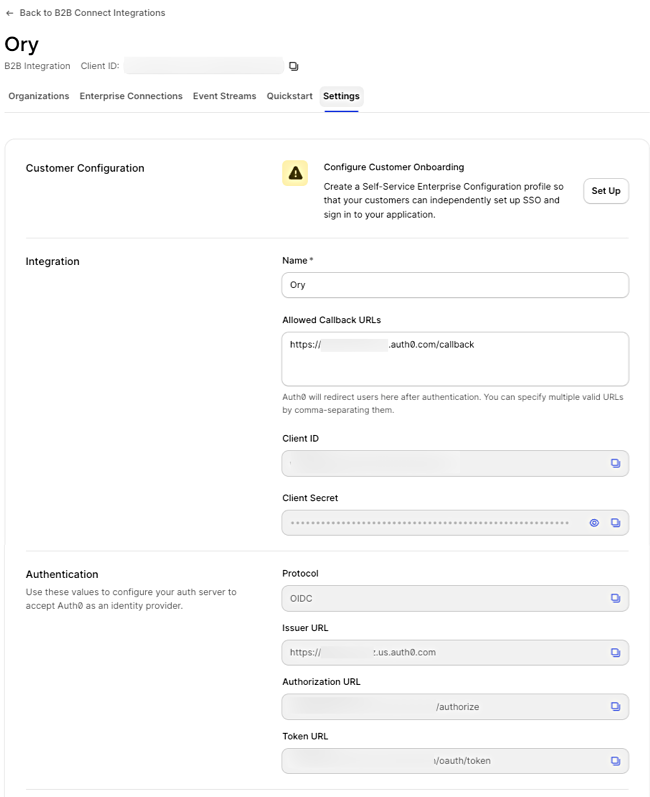
セットアップウィザードが完了したら、作成した統合を選択し、Ory の設定に使用する値を **Settings** タブからコピーします。コピーする項目は次のとおりです。
* Client ID
* Client Secret
* 発行者 URL
 Ory Console を使用して、Ory Developer Tier プロジェクトのソーシャルサインイン用 OIDC provider として Auth0 B2B Connect を設定します。
Auth0をIdPとして追加するには、Ory Consoleで次の手順に従います。
1. ワークスペースを選択します。
2. **Authentication**に移動し、\*\*Social Sign-In (OIDC)\*\*を選択します。
3. **Add new OpenID Connect provider**を選択します。
表示された**Redirect URI**を、Auth0 Dashboardで、手順7の**Settings**タブにあるAuth0 B2B Connectアプリケーションの**Allowed Callback URLs**に追加してください。
4. **Label**には、サインイン画面でユーザーに表示される名前を設定します。
5. B2B ConnectのSettingsタブにある**Client ID**を入力します。
6. B2B ConnectのSettingsタブにある**Client Secret**を入力します。
7. B2B ConnectのSettingsタブにある**発行者 URL**を**Tenant URL**フィールドに入力します。
8. **Save**を選択します。
Ory Console を使用して、Ory Developer Tier プロジェクトのソーシャルサインイン用 OIDC provider として Auth0 B2B Connect を設定します。
Auth0をIdPとして追加するには、Ory Consoleで次の手順に従います。
1. ワークスペースを選択します。
2. **Authentication**に移動し、\*\*Social Sign-In (OIDC)\*\*を選択します。
3. **Add new OpenID Connect provider**を選択します。
表示された**Redirect URI**を、Auth0 Dashboardで、手順7の**Settings**タブにあるAuth0 B2B Connectアプリケーションの**Allowed Callback URLs**に追加してください。
4. **Label**には、サインイン画面でユーザーに表示される名前を設定します。
5. B2B ConnectのSettingsタブにある**Client ID**を入力します。
6. B2B ConnectのSettingsタブにある**Client Secret**を入力します。
7. B2B ConnectのSettingsタブにある**発行者 URL**を**Tenant URL**フィールドに入力します。
8. **Save**を選択します。
IDプロバイダーを検証する
1. 既存のOry OAuth 2クライアントと統合されたアプリケーションでサインインフローを開始し、**Sign in with Auth0**ボタンが表示され、Auth0へ正常にリダイレクトされることを確認します。
2. Auth0のログイン画面でメールアドレスを入力します。Auth0のドメインディスカバリーが動作し、認証を完了するためにアップストリームのIdP (Oktaなど) へリダイレクトされます。