> ## Documentation Index
> Fetch the complete documentation index at: https://auth0.com/llms.txt
> Use this file to discover all available pages before exploring further.

# M2Mアクセスにアプリケーションを構成する

> Auth0 DashboardやManagement APIを使用して、M2Mアクセスにアプリケーションを構成する方法について説明します。

export const AuthCodeBlock = ({filename, icon, language, highlight, children}) => {
  const [displayText, setDisplayText] = useState(children);
  const [copyText, setCopyText] = useState(children);
  const wrapperRef = React.useRef(null);
  useEffect(() => {
    let unsubscribe = null;
    function init() {
      if (!window.autorun || !window.rootStore) {
        return;
      }
      unsubscribe = window.autorun(() => {
        let processedChildrenForDisplay = children;
        let processedChildrenForCopy = children;
        for (const [key, value] of window.rootStore.variableStore.values.entries()) {
          const escapedKey = key.replaceAll(/[.*+?^${}()|[\]\\]/g, (String.raw)`\$&`);
          let displayValue = value;
          if (key === "{yourClientSecret}" && value !== "{yourClientSecret}") {
            displayValue = value.substring(0, 3) + "*****MASKED*****";
          }
          processedChildrenForDisplay = processedChildrenForDisplay.replaceAll(new RegExp(escapedKey, "g"), displayValue);
          processedChildrenForCopy = processedChildrenForCopy.replaceAll(new RegExp(escapedKey, "g"), value);
        }
        setDisplayText(processedChildrenForDisplay);
        setCopyText(processedChildrenForCopy);
      });
    }
    if (window.rootStore) {
      init();
    } else {
      window.addEventListener("adu:storeReady", init);
    }
    return () => {
      window.removeEventListener("adu:storeReady", init);
      unsubscribe?.();
    };
  }, [children]);
  useEffect(() => {
    if (!wrapperRef.current) return;
    const originalWriteText = navigator.clipboard.writeText.bind(navigator.clipboard);
    let isOverriding = false;
    const handleClick = e => {
      const button = e.target.closest('[data-testid="copy-code-button"]');
      if (!button || !wrapperRef.current.contains(button)) return;
      isOverriding = true;
      navigator.clipboard.writeText = text => {
        if (isOverriding) {
          isOverriding = false;
          navigator.clipboard.writeText = originalWriteText;
          return originalWriteText(copyText);
        }
        return originalWriteText(text);
      };
      setTimeout(() => {
        if (isOverriding) {
          isOverriding = false;
          navigator.clipboard.writeText = originalWriteText;
        }
      }, 100);
    };
    const wrapper = wrapperRef.current;
    wrapper.addEventListener('click', handleClick, true);
    return () => {
      wrapper.removeEventListener('click', handleClick, true);
      if (navigator.clipboard.writeText !== originalWriteText) {
        navigator.clipboard.writeText = originalWriteText;
      }
    };
  }, [copyText]);
  return <div ref={wrapperRef}>
      <CodeBlock filename={filename} icon={icon} language={language} lines highlight={highlight}>
        {displayText}
      </CodeBlock>
    </div>;
};

export const codeExample1 = `curl --request POST \\
  --url 'https://{yourDomain}/api/v2/client-grants' \\
  --header 'authorization: Bearer MGMT_API_ACCESS_TOKEN' \\
  --header 'content-type: application/json' \\
  --data '{
    "client_id": "CLIENT_ID",
    "audience": "API_IDENTIFIER",
    "scope": [
        "scope1",
        "scope2"
    ],
    "organization_usage": "ORG_USAGE",
    "allow_any_organization": false
  }'
`;

export const codeExample2 = `curl --request PATCH \\
  --url 'https://{yourDomain}/api/v2/client-grants/CLIENT_GRANT_ID' \\
  --header 'authorization: Bearer MGMT_API_ACCESS_TOKEN' \\
  --header 'content-type: application/json' \\
  --data '{
    "organization_usage": "ORG_USAGE",
    "allow_any_organization": false
  }'
`;

export const codeExample3 = `curl -X PATCH --location "https://{yourDomain}/api/v2/clients/{CLIENT_ID}" \\
  --header 'authorization: Bearer MGMT_API_ACCESS_TOKEN' \\
  --header 'content-type: application/json' \\
  --data '{
    "default_organization": "ORGANIZATION_ID",
	  "flows": ["client_credentials"]
  }'
`;

アプリケーションを作成したら、以下の手順に従って、マシンツーマシンアクセスにアプリケーションを構成します。

1. アクセスが必要なAPIのそれぞれについて、[組織の動作を定義](#define-organization-behavior)します。
2. アプリケーションが（すべての組織ではなく）特定の組織にのみアクセスする場合は、それら特定の組織へのアクセスに必要なAPIのそれぞれについて、[M2Mアクセスを認可](/docs/ja-jp/manage-users/organizations/organizations-for-m2m-applications/authorize-m2m-access)します。

## 組織の動作を定義する

APIのそれぞれについて、アプリケーションが組織を使用しなければならないのか、あらゆる組織にアクセスできるのか、明示的に関連付けられている組織だけにアクセスできるのかなど、アプリケーションがクライアントの資格情報フローで組織をどのように使用するのかを構成することができます。

以下の表は、M2Mアクセスに組織の動作を定義するフィールドをまとめたものです。

### 組織の動作を定義するフィールドの表

| **フィールド**                                                                    | **説明**                                                                                                                                                                                                                                                                                                      | **APIでのマッピング**                                                                                                                                                                                                                                                       |
| :--------------------------------------------------------------------------- | :---------------------------------------------------------------------------------------------------------------------------------------------------------------------------------------------------------------------------------------------------------------------------------------------------------- | :------------------------------------------------------------------------------------------------------------------------------------------------------------------------------------------------------------------------------------------------------------------- |
| Organization Support（組織対応）                                                   | クライアントの資格情報フローを通したアクセスでアプリケーションが組織をどのように使用するか決定します。<br /><br />オプションには以下が含まれます：<br /><ul><li><strong>None（なし）：</strong> アプリケーションは組織を使用<i>してはいけません</i>。これはデフォルト値です。</li><li><strong>Optional（任意）：</strong> アプリケーションは組織の使用を選択できます。</li><li><strong>Required（必須）：</strong> アプリケーションは組織を使用しなければなりません。</li></ul> | Organization Support（組織対応）は`organization_usage`にマッピングされます。<br /><br />オプション：<br /><ul><li><strong>［None（なし）］</strong>は`deny`にマッピングします</li><li><strong>［Optional（任意）］</strong>は`allow`にマッピングします</li><li><strong>［Required（必須）］</strong>は`required`にマッピングします</li></ul> |
| Allow machine-to-machine access to any organization（任意の組織にマシンツーマシンアクセスを許可する） | クライアント資格情報フローの使用でアプリケーションが任意の認証情報組織にアクセスできるのか、明示的に関連付けられている組織のセットに制限されるのかを決定します。デフォルトではこの動作は許可されません。<br /><br /><strong>警告：</strong> 任意の組織にマシンツーマシンアクセスを許可すると、明示的に関連付けられていない組織にも、アプリケーションがアクセスできるようになります。信頼済みの内部アプリケーションにのみ有効化してください。<br />                                                                 | ［Allow machine-to-machine access to any organization（任意の組織にマシンツーマシンアクセスを許可する）］は`allow_any_organization`にマッピングされます。<br /><br />オプション：<br /><ul><li>選択は`true`にマッピングします</li><li>選択解除は`false`にマッピングします</li></ul>                                                         |

### アプリケーションに組織の動作を定義する

アプリケーションに組織の動作を定義するには、[Auth0 Dashboard](https://manage.auth0.com/)または[Management API](https://auth0.com/docs/api/management/v2)を使用します。

<Tabs>
  <Tab title="Auth0 Dashboard">
    マシンツーマシンアプリケーションでは、Auth0 Dashboardを介してOrganizationの動作を定義します：

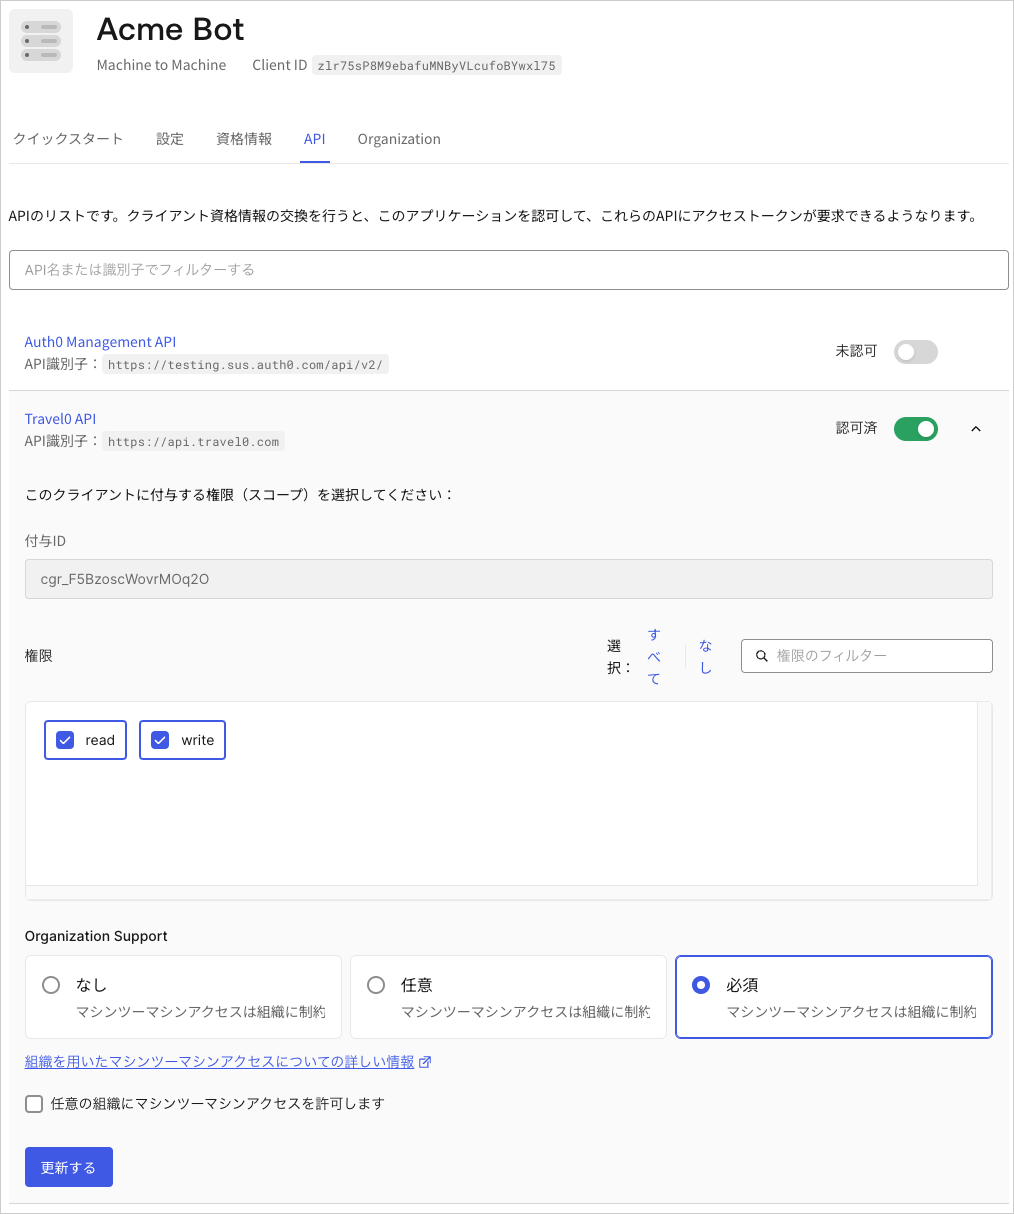
    1. **［Auth0 Dashboard］>［Applications（アプリケーション）］** に移動して、Organizationsを構成するアプリケーションを選択します。
    2. **［APIs］** タブに切り替え、 アクセスを構成したいAPIの`client_grant`詳細を展開します。
    3. [Organizationの動作定義のテーブル](#define-organization-behavior-table)での説明に従い、適切な設定を行います。
    4. **［Save（保存）］** を選択します。

    <Frame>
      <img src="https://mintlify.s3.us-west-1.amazonaws.com/auth0/docs/images/ja-jp/cdy7uua7fh8z/2GYvtLuuDm1mgyLivYeqJh/d309738b9a7cc473a2b0f0c5a5196bbc/Acme_Bot_-_API_config__1_.png" alt="null" />
    </Frame>

    または、マシンツーマシンアプリケーションではない場合：

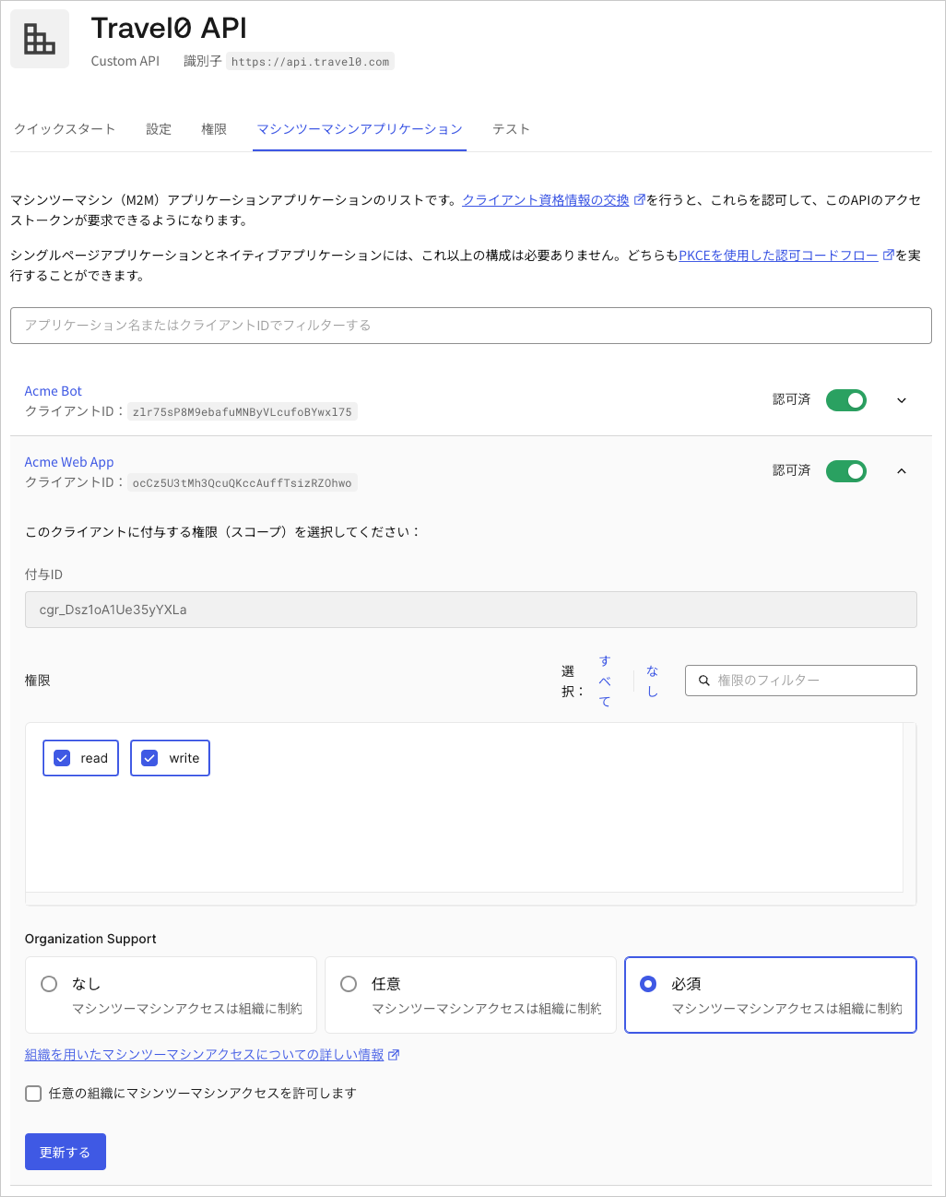
    1. **［Auth0 Dashboard］>［APIs］** に移動して、Organizationアクセスを構成したいAPIを選択します。
    2. **［Machine To Machine Applications（マシンツーマシンアプリケーション）］** タブに切り替えます。このタブには、マシンツーマシンアプリケーションだけでなく、すべてのアプリケーションが表示されます。アプリケーションを見つけます。
    3. アクセスを許可するには、アプリケーションのトグルをクリックしてからアプリケーションをクリックし、構成の詳細を展開します。
    4. [Organizationの動作定義のテーブル](#define-organization-behavior-table)での説明に従い、適切な設定を行います。
    5. **［Save（保存）］** を選択します。

    <Frame>
      <img src="https://mintlify.s3.us-west-1.amazonaws.com/auth0/docs/images/ja-jp/cdy7uua7fh8z/6wvsRl1mL4AbKzg5ycP8Pj/428494a27ae641b42f78c1d089512f23/Travel0_API_-_M2M_Config_-_Small.png" alt="null" />
    </Frame>
  </Tab>

  <Tab title="Mangement API">
    Management APIを使用して、アプリケーションに対するOrganizationの動作を定義することもできます。`client_grant`オブジェクトは、アプリケーションのAPIへのアクセスを制御します。アプリケーションがアクセスする必要のあるAPIごとに`client_grant`を構成する必要があります。M2Mアクセスに`client_grant`を構成するには、[クライアントの許可の作成](https://auth0.com/docs/api/management/v2/client-grants/post-client-grants)または[クライアントの許可の更新](https://auth0.com/docs/api/management/v2/client-grants/patch-client-grants-by-id)エンドポイント、および[Organizationの動作定義のテーブル](#define-organization-behavior-table)を使用して、該当する設定を更新します。

    次のコードサンプルは、M2Mアクセスのある`client_grant`オブジェクトを作成します：

    <AuthCodeBlock children={codeExample1} language="bash" />

    次のコードサンプルは、M2Mアクセスのある`client_grant`オブジェクトを更新します：

    <AuthCodeBlock children={codeExample2} language="bash" />
  </Tab>
</Tabs>

## デフォルトの組織を設定する

クライアントによっては、[クライアントの資格情報フロー](/docs/ja-jp/get-started/authentication-and-authorization-flow/client-credentials-flow)で標準以外のフィールドに対応しないものもあります。そのため、必要な`organization`パラメーターを`/oauth/token`エンドポイントに送信できません。そのようなクライアントにはデフォルトの組織を設定して、`none`（なし）が指定され、組織対応がAPIに`required`（必須）な場合に、アプリケーションからのあらゆるクライアント資格情報要求に自動で適用することができます。

<Callout icon="file-lines" color="#0EA5E9" iconType="regular">
  API（例：対象オーディエンス）に対して`organization_usage=require`が指定されている場合、デフォルトの組織が適用されます。
</Callout>

以下の表は、M2Mアクセスにデフォルトの組織を設定するフィールドをまとめたものです。

### デフォルトの組織を設定するフィールドの表

| **フィールド**                                                                 | **説明**                             | **APIでのマッピング**                                                                                                                                                                                                                       |
| :------------------------------------------------------------------------ | :--------------------------------- | :----------------------------------------------------------------------------------------------------------------------------------------------------------------------------------------------------------------------------------- |
| Default Organization for Machine-to-Machine Access（マシンツーマシンアクセスにデフォルトの組織） | 組織を含まないクライアント資格情報の要求に適用する組織を定義します。 | M2Mアクセスにデフォルトの組織は、以下のプロパティを持つdefault\_organizationオブジェクトにマッピングされます。<ul><li>`organization_id`：使用する組織のIDです</li><li>`flows`：デフォルトの組織に使用する認証フローです。<p><br />この設定はUIでは表示されることなく、デフォルトの`["client_credentials"]`<br /></p>が使用されます。</li></ul> |

### アプリケーションにデフォルトの組織を設定する

アプリケーションにデフォルトの組織を設定するには、[Auth0 Dashboard](https://manage.auth0.com/)または[Management API](https://auth0.com/docs/api/management/v2)を使用します。

<Tabs>
  <Tab title="Auth0ダッシュボード">
    Auth0 Dashboardからアプリケーションのデフォルトの組織を有効にする方法:

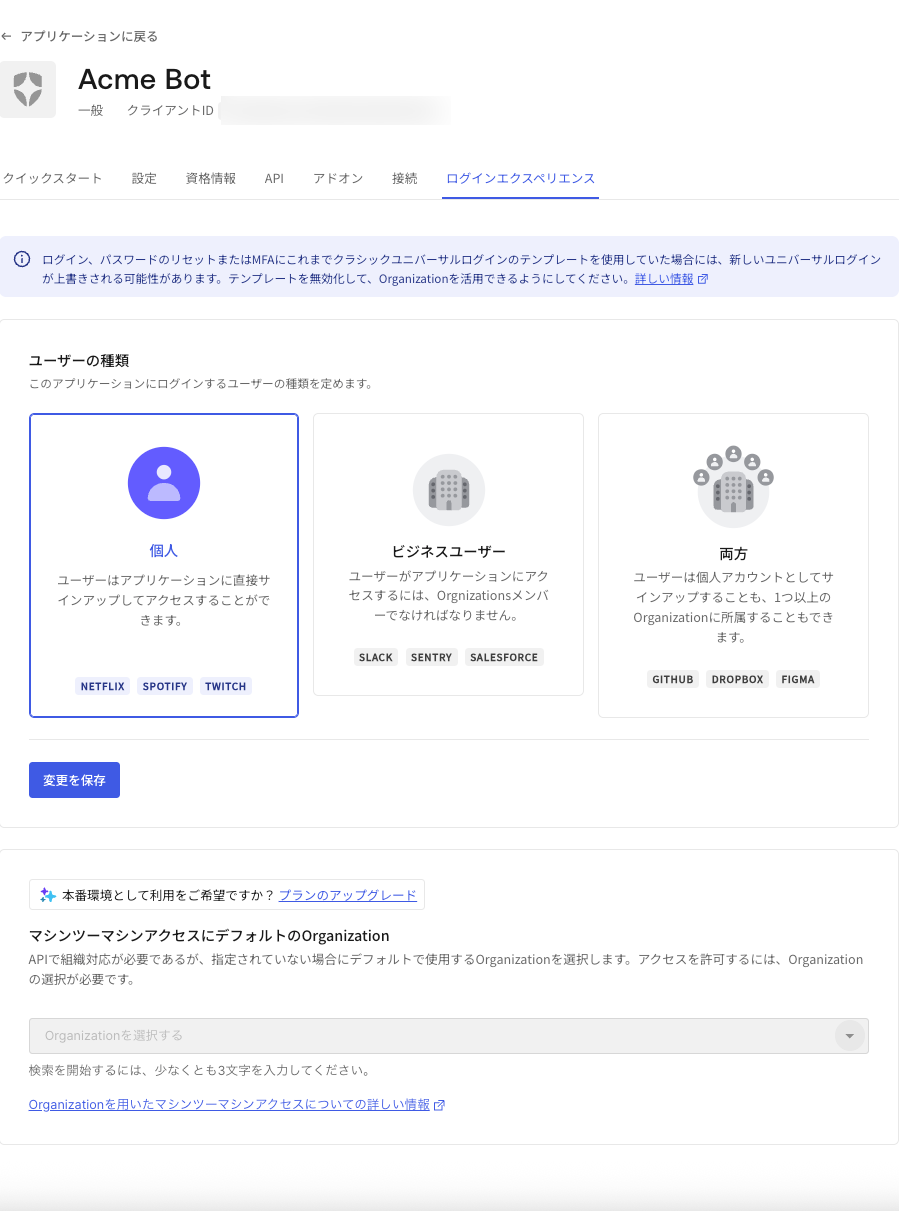
    1. **［Auth0 Dashboard］ > ［Applications（アプリケーション）］** に移動し、構成するアプリケーションを選択します。
    2. **［Organizations（組織）］** タブを選択します。
    3. [［Set default organization table（デフォルト組織テーブルの設定）］](#set-default-organization-table)の説明に従って、適切な設定を行います。
    4. ［Save（保存）］をクリックします。

    <Frame>
      <img src="https://mintlify.s3.us-west-1.amazonaws.com/auth0/docs/images/ja-jp/cdy7uua7fh8z/29rhTFMnYDp7TbGS9S6b5J/59974080b8101829082e863864040ec1/2025-07-18_15-56-20.png" alt="null" />
    </Frame>
  </Tab>

  <Tab title="Mangement API">
    アプリケーションのデフォルトの組織は、「[クライアントの作成](https://auth0.com/docs/api/management/v2/clients/post-clients)」または「[クライアントの更新](https://auth0.com/docs/api/management/v2#!/Clients/patch_clients_by_id)」エンドポイントで設定できます。現在サポートされているフロー値は`client_credentials`のみです。

    次のコードサンプルは、デフォルトの組織を持つクライアントを更新します。

    <AuthCodeBlock children={codeExample3} language="bash" />
  </Tab>
</Tabs>