React Native
By Steve Hobbs
This tutorial demonstrates how to add user login to a React Native application using Auth0. We recommend that you log in to follow this quickstart with examples configured for your account.
I want to integrate with my app
15 minutesI want to explore a sample app
2 minutesGet a sample configured with your account settings or check it out on Github.
This Quickstart is for the React Native framework. To integrate Auth0 into your Expo application, please refer to the Expo Quickstart
Configure Auth0
Get Your Application Keys
When you signed up for Auth0, a new application was created for you, or you could have created a new one. You will need some details about that application to communicate with Auth0. You can get these details from the Application Settings section in the Auth0 dashboard.
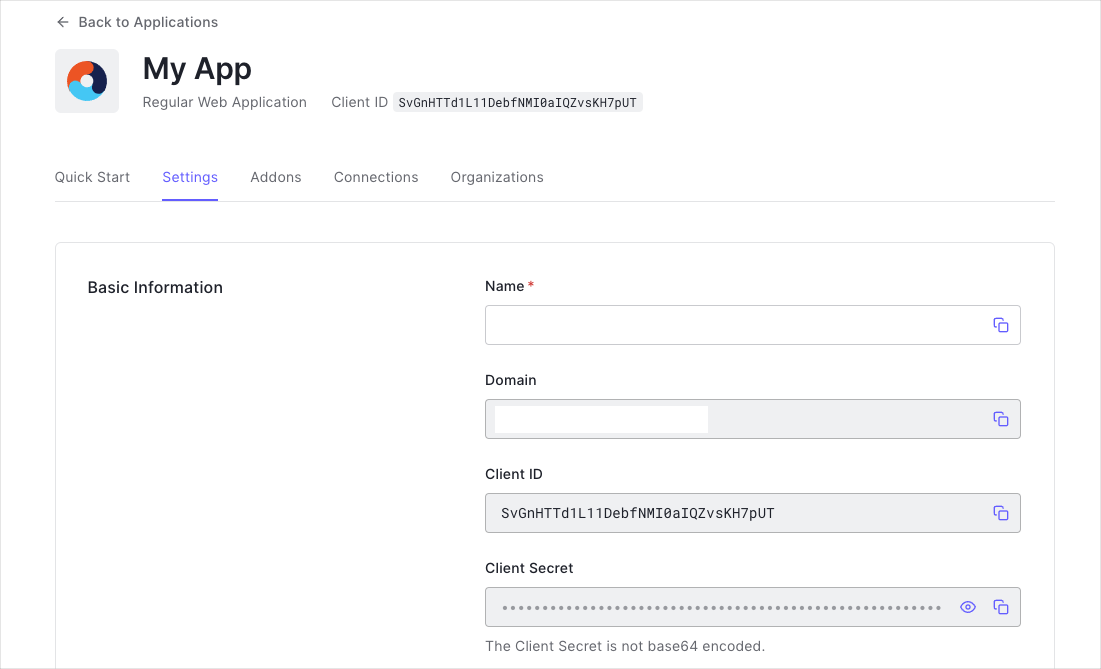
You need the following information:
- Domain
- Client ID
Install Dependencies
In this section, you will install the React Native Auth0 module.
Yarn
yarn add react-native-auth0Was this helpful?
npm
npm install react-native-auth0 --saveWas this helpful?
Additional iOS step: install the module Pod
Our SDK requires a minimum iOS deployment target of 13.0. In your project's `ios/Podfile``, ensure your platform target is set to 13.0.
platform :ios '13.0'Was this helpful?
CocoaPods is the iOS package management tool the React Native framework uses to install itself into your project. For the iOS native module to work with your iOS app, first install the library Pod. If you're familiar with older React Native SDK versions, this is similar to the previous linking a native module. The process is now simplified:
Change directory into the ios folder and run pod install.
cd ios
pod install
Was this helpful?
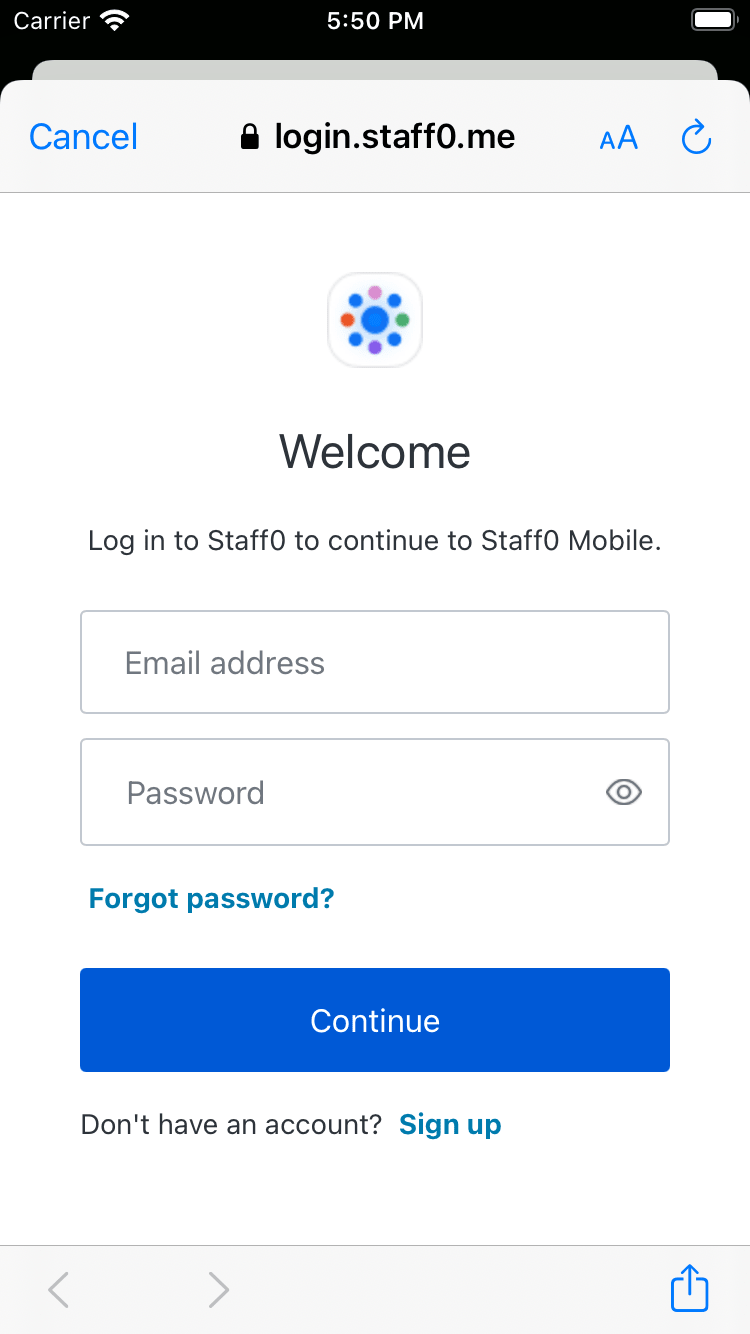
First, you must provide a way for your users to log in. We recommend using the Auth0 hosted login page.
Integrate Auth0 in Your Application
Configure Android
Open your app's build.gradle file (typically at android/app/build.gradle) and add the following manifest placeholders. The value for auth0Domain should contain your Auth0 application settings as configured above.
android {
    defaultConfig {
        // Add the next line
        manifestPlaceholders = [auth0Domain: "{yourDomain}", auth0Scheme: "${applicationId}.auth0"]
    }
    ...
}
Was this helpful?
Configure iOS
In the file ios/<YOUR PROJECT>/AppDelegate.mm add the following:
#import <React/RCTLinkingManager.h>

- (BOOL)application:(UIApplication *)app openURL:(NSURL *)url
            options:(NSDictionary<UIApplicationOpenURLOptionsKey, id> *)options
{
  return [RCTLinkingManager application:app openURL:url options:options];
}
Was this helpful?
Next, add a URLScheme using your App's bundle identifier.
In the ios folder, open the Info.plist and locate the value for CFBundleIdentifier
<key>CFBundleIdentifier</key>
<string>$(PRODUCT_BUNDLE_IDENTIFIER)</string>
Was this helpful?
Below this value, register a URL type entry using the value of CFBundleIdentifier as the value for the CFBundleURLSchemes.
<key>CFBundleURLTypes</key>
<array>
    <dict>
        <key>CFBundleTypeRole</key>
        <string>None</string>
        <key>CFBundleURLName</key>
        <string>auth0</string>
        <key>CFBundleURLSchemes</key>
        <array>
            <string>$(PRODUCT_BUNDLE_IDENTIFIER).auth0</string>
        </array>
    </dict>
</array>
Was this helpful?
Note this value as you'll be using it to define the callback URLs below. If desired, you can change it using XCode in the following way:
- Open the
ios/<YOUR PROJECT>.xcodeprojfile or runxed ioson a Terminal from the app root. - Open your project's or desired target's Build Settings tab and find the section that contains "Bundle Identifier".
- Replace the "Bundle Identifier" value with your desired application's bundle identifier name.
For additional information please read react native docs.
Configure Callback and Logout URLs
The callback and logout URLs are the URLs that Auth0 invokes to redirect back to your application. Auth0 invokes the callback URL after authenticating the user, and the logout URL after removing the session cookie.
If the callback and logout URLs are not set, users will be unable to log in and out of the application and will get an error.
Go to the settings page of your Auth0 application and add the corresponding URL to Allowed Callback URLs and Allowed Logout URLs, according to the platform of your application. If you are using a custom domain, use the value of your custom domain instead of the Auth0 domain from the settings page.
iOS
BUNDLE_IDENTIFIER.auth0://{yourDomain}/ios/BUNDLE_IDENTIFIER/callbackWas this helpful?
Android
PACKAGE_NAME.auth0://{yourDomain}/android/PACKAGE_NAME/callbackWas this helpful?
Add login to your app
Import the useAuth0 hook and the Auth0Provider component from the react-native-auth0 package.
import {useAuth0, Auth0Provider} from 'react-native-auth0';Was this helpful?
Next, wrap your application in the Auth0Provider component, providing your Auth0 domain and Client ID values:
const App = () => {
  return (
    <Auth0Provider domain={"{yourDomain}"} clientId={"{yourClientId}"}>
      {/* your application */}
    </Auth0Provider>
  );
};
Was this helpful?
Finally, present the hosted login screen using the authorize method from the useAuth0 hook. See this usage example showing logging in on a button click:
const LoginButton = () => {
    const {authorize} = useAuth0();

    const onPress = async () => {
        try {
            await authorize();
        } catch (e) {
            console.log(e);
        }
    };

    return <Button onPress={onPress} title="Log in" />
}
Was this helpful?
Checkpoint
Add a button component that calls authorize when clicked. Verify that you are redirected to the login page and then back to your application.
Add logout to your app
To log the user out, redirect them to the Auth0 log out endpoint by importing and calling the clearSession method from the useAuth0 hook. This method removes their session from the authorization server.
See this usage example of a button that logs the user out of the app when clicked:
const LogoutButton = () => {
    const {clearSession} = useAuth0();

    const onPress = async () => {
        try {
            await clearSession();
        } catch (e) {
            console.log(e);
        }
    };

    return <Button onPress={onPress} title="Log out" />
}
Was this helpful?
Checkpoint
Add a button that calls clearSession when clicked. Verify that you are logged out of the application when clicked.
Show user profile information
The useAuth0 hook exposes a user object that contains information about the authenticated user. You can use this to access decoded user profile information about the authenticated user from the ID token.
If a user has not been authenticated, this property will be null.
const Profile = () => {
    const {user} = useAuth0();

    return (
        <>
            {user && <Text>Logged in as {user.name}</Text>}
            {!user && <Text>Not logged in</Text>}
        </>
    )
}
Was this helpful?
Checkpoint
Add a component to your app that uses the user prop to display information about the user on the screen.