> ## Documentation Index
> Fetch the complete documentation index at: https://auth0.com/llms.txt
> Use this file to discover all available pages before exploring further.
# PHP API
export const AuthCodeBlock = ({filename, icon, language, highlight, children}) => {
const [displayText, setDisplayText] = useState(children);
const [copyText, setCopyText] = useState(children);
const wrapperRef = React.useRef(null);
useEffect(() => {
let unsubscribe = null;
function init() {
if (!window.autorun || !window.rootStore) {
return;
}
unsubscribe = window.autorun(() => {
let processedChildrenForDisplay = children;
let processedChildrenForCopy = children;
for (const [key, value] of window.rootStore.variableStore.values.entries()) {
const escapedKey = key.replaceAll(/[.*+?^${}()|[\]\\]/g, (String.raw)`\$&`);
let displayValue = value;
if (key === "{yourClientSecret}" && value !== "{yourClientSecret}") {
displayValue = value.substring(0, 3) + "*****MASKED*****";
}
processedChildrenForDisplay = processedChildrenForDisplay.replaceAll(new RegExp(escapedKey, "g"), displayValue);
processedChildrenForCopy = processedChildrenForCopy.replaceAll(new RegExp(escapedKey, "g"), value);
}
setDisplayText(processedChildrenForDisplay);
setCopyText(processedChildrenForCopy);
});
}
if (window.rootStore) {
init();
} else {
window.addEventListener("adu:storeReady", init);
}
return () => {
window.removeEventListener("adu:storeReady", init);
unsubscribe?.();
};
}, [children]);
useEffect(() => {
if (!wrapperRef.current) return;
const originalWriteText = navigator.clipboard.writeText.bind(navigator.clipboard);
let isOverriding = false;
const handleClick = e => {
const button = e.target.closest('[data-testid="copy-code-button"]');
if (!button || !wrapperRef.current.contains(button)) return;
isOverriding = true;
navigator.clipboard.writeText = text => {
if (isOverriding) {
isOverriding = false;
navigator.clipboard.writeText = originalWriteText;
return originalWriteText(copyText);
}
return originalWriteText(text);
};
setTimeout(() => {
if (isOverriding) {
isOverriding = false;
navigator.clipboard.writeText = originalWriteText;
}
}, 100);
};
const wrapper = wrapperRef.current;
wrapper.addEventListener('click', handleClick, true);
return () => {
wrapper.removeEventListener('click', handleClick, true);
if (navigator.clipboard.writeText !== originalWriteText) {
navigator.clipboard.writeText = originalWriteText;
}
};
}, [copyText]);
return
{displayText}
;
};
##### By Evan Sims
This guide demonstrates how to integrate Auth0 with a PHP backend API using the Auth0 PHP SDK.We recommend that you log in to follow this quickstart with examples configured for your account.
**New to Auth0?** Learn [how Auth0 works](/docs/get-started/auth0-overview) and read about [implementing API authentication and authorization](/docs/get-started/authentication-and-authorization-flow) using the OAuth 2.0 framework.
## Configure Auth0 APIs
### Create an API
In the [APIs](https://manage.auth0.com/#/apis) section of the Auth0 dashboard, click **Create API**. Provide a name and an identifier for your API, for example, `https://quickstarts/api`. You will use the identifier as an `audience` later, when you are configuring the Access Token verification. Leave the **Signing Algorithm** as **RS256**.
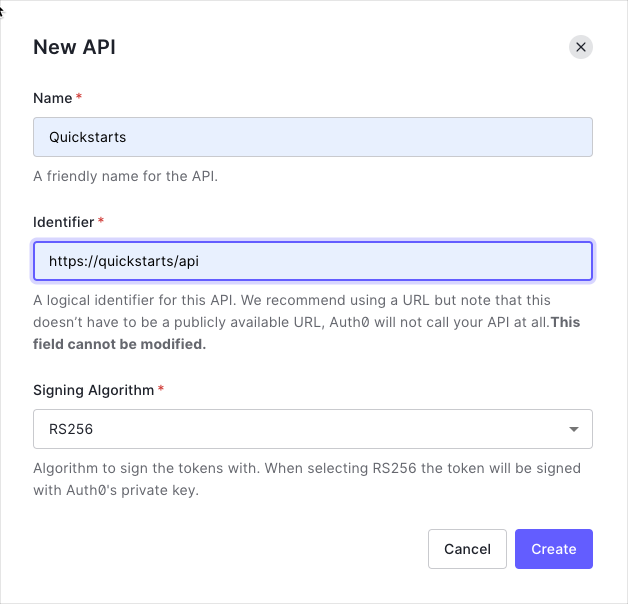
By default, your API uses RS256 as the algorithm for signing tokens. Since RS256 uses a private/public keypair, it verifies the tokens against the public key for your Auth0 account. The public key is in the [JSON Web Key Set (JWKS)](/docs/secure/tokens/json-web-tokens/json-web-key-sets) format, and can be accessed [here](https://\{yourDomain}/.well-known/jwks.json).
### Define permissions
Permissions let you define how resources can be accessed on behalf of the user with a given access token. For example, you might choose to grant read access to the `messages` resource if users have the manager access level, and a write access to that resource if they have the administrator access level.
You can define allowed permissions in the **Permissions** view of the Auth0 Dashboard's [APIs](https://manage.auth0.com/#/apis) section.
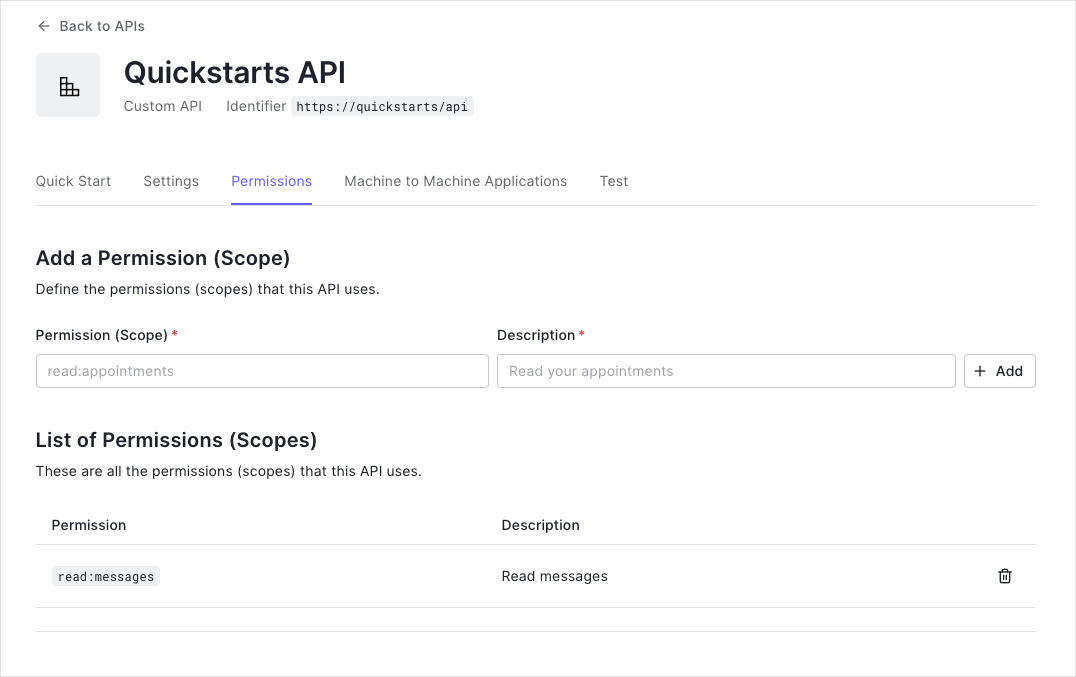
This example uses the `read:messages` scope.
This example demonstrates:
* How to check for a JSON Web Token (JWT) in the `Authorization` header of an incoming HTTP request.
* How to check if the token is valid, using the [JSON Web Key Set (JWKS)](/docs/secure/tokens/json-web-tokens/json-web-key-sets) for your Auth0 account. To learn more about validating Access Tokens, see [Validate Access Tokens](/docs/secure/tokens/access-tokens/validate-access-tokens).
## Integrating your PHP Backend API
Let's create a sample application that authorizes an Auth0-signed token with a backend API we've written in PHP. We'll take a simple approach here, appropriate for the written format. Still, you should check out the accompanying [Quickstart app on GitHub](https://github.com/auth0-samples/auth0-php-api-samples/) for a more robust example.
### Installing HTTP Client and Messaging Factories
The Auth0 PHP SDK supports many PHP-FIG standards to offer maximum interoperability with your project's architecture, but two of particular importance are [PSR-17](https://www.php-fig.org/psr/psr-17/) and [PSR-18](https://www.php-fig.org/psr/psr-18/). These standards allow you to "plugin" networking components of your choice to handle messaging and requests. You will need to install compatible libraries in your project for the SDK to use.
The most prolific networking library for PHP is Guzzle, although many are available to pick from within the PHP community. Let's use Guzzle for this sample application:
```bash theme={null}
composer require guzzlehttp/guzzle guzzlehttp/psr7 http-interop/http-factory-guzzle
```
### Installing the PHP SDK
The Auth0 PHP SDK requires [Composer](https://getcomposer.org/doc/00-intro.md#installation-linux-unix-macos), a tool for dependency management in PHP. Composer allows you to declare the dependent libraries your project needs and installs them for you. Please ensure Composer is installed and accessible from your shell before continuing.
Run the following shell command within your project directory to install the Auth0 PHP SDK:
```bash theme={null}
composer require auth0/auth0-php
```
This will create a `vendor` folder within your project and download all the dependencies needed to use the Auth0 PHP SDK. This will also create a `vendor/autoload.php` file used in the sample to load all necessary classes for your application to function. It's important you require this autoload file in your project for the SDK to work.
### Configure the SDK
To begin, let's create a `.env` file within the root of your project directory to store our sample application's configuration and fill in the environment variables:
export const codeExample = `# The URL of our Auth0 Tenant Domain.
# If we're using a Custom Domain, be sure to set this to that value instead.
AUTH0_DOMAIN='https://{yourDomain}'
# Our Auth0 application's Client ID.
AUTH0_CLIENT_ID='{yourClientId}'
# Our Auth0 application's Client Secret.
AUTH0_CLIENT_SECRET='{yourClientSecret}'
# Our Auth0 API's Identifier.
AUTH0_AUDIENCE='YOUR_API_IDENTIFIER'`;
As PHP isn't able to read our `.env` file by itself, we'll want to install a library to help with that. Although we'll be using a particular library for our sample application's purposes, any 'dotenv' loader of preference will work in a real-world application. From our project directory, let's run the following shell command to install the library:
```bash lines theme={null}
composer require vlucas/phpdotenv
```
Next, let's create the PHP source file we'll be using for these code samples, `index.php`, and let's configure an instance of the Auth0 PHP SDK for our sample application:
```php lines theme={null}
load();
// Now instantiate the Auth0 class with our configuration:
$auth0 = new \Auth0\SDK\Auth0([
'strategy' => \Auth0\SDK\Configuration\SdkConfiguration::STRATEGY_API,
'domain' => $_ENV['AUTH0_DOMAIN'],
'clientId' => $_ENV['AUTH0_CLIENT_ID'],
'clientSecret' => $_ENV['AUTH0_CLIENT_SECRET'],
'audience' => ($_ENV['AUTH0_AUDIENCE'] ?? null) !== null ? [trim($_ENV['AUTH0_AUDIENCE'])] : null,
]);
```
### Authenticating the user
For this sample application, we're focusing on [authorization](https://auth0.com/intro-to-iam/authentication-vs-authorization/). There's numerous routes you could go for authenticating your users before they hit your backend API for authorization, such as using [Auth0s SPA.js library](https://github.com/auth0/auth0-spa-js). This approach is demonstrated in [this Quickstart app accompanying Github project](https://github.com/auth0-samples/auth0-php-api-samples/). Regardless of the approach you take, this sample application expects you to pass your Access Token to it through a request parameter or header to work.
### Authorizing an Access Token
First, we need to extract the JSON Web Token (JWT) from the incoming HTTP request. Let's look for a `?token` parameter in a GET request or an `HTTP_AUTHORIZATION` or `Authorization` header.
```php lines theme={null}
// 👆 We're continuing from the steps above. Append this to your index.php file.
$jwt = $_GET['token'] ?? $_SERVER['HTTP_AUTHORIZATION'] ?? $_SERVER['Authorization'] ?? null;
```
Next, let's decode the token, if one is present:
```php lines theme={null}
// 👆 We're continuing from the steps above. Append this to your index.php file.
// If a token is present, process it.
if ($jwt !== null) {
// Trim whitespace from token string.
$jwt = trim($jwt);
// Remove the 'Bearer ' prefix, if present, in the event we're getting an Authorization header that's using it.
if (substr($jwt, 0, 7) === 'Bearer ') {
$jwt = substr($jwt, 7);
}
// Attempt to decode the token:
try {
$token = $auth0->decode($jwt, null, null, null, null, null, null, \Auth0\SDK\Token::TYPE_TOKEN);
define('ENDPOINT_AUTHORIZED', true);
} catch (\Auth0\SDK\Exception\InvalidTokenException $exception) {
// The token wasn't valid. Let's display the error message from the Auth0 SDK.
// We'd probably want to show a custom error here for a real world application.
die($exception->getMessage());
}
}
```
Depending on how you configure your API routing, how exactly you integrate these checks might look a little different, but the principle is the same: check the token, and in the event your API endpoint requires authorization, deny access if the token isn't valid or acceptable:
```php lines theme={null}
// 👆 We're continuing from the steps above. Append this to your index.php file.
// Is the request authorized?
if (defined('ENDPOINT_AUTHORIZED')) {
// Respond with a JSON response:
echo json_encode([
'authorized' => true,
'data' => $token->toArray()
], JSON_PRETTY_PRINT);
exit;
}
// Issue a HTTP 401 Unauthorized status:
http_response_code(401);
// Respond with a JSON response:
echo json_encode([
'authorized' => false,
'error' => [
'message' => 'You are NOT authorized to be here!'
]
], JSON_PRETTY_PRINT);
```
### Caching
This works, but in a real-world application, we'll want to use caching to ensure we don't hit our Auth0 rate limits or slow down our application with unnecessary network requests. The Auth0 PHP SDK supports a caching interface called [PSR-6](https://www.php-fig.org/psr/psr-6), which you can plug [any compatible caching library](https://packagist.org/providers/psr/cache-implementation) into for the SDK to fit in nicely with your architecture.
For our sample, let's use the [Symfony caching component](https://symfony.com/doc/current/components/cache.html) library. From our root project directory, issue the following shell command:
```bash lines theme={null}
composer require symfony/cache
```
Next, we need to update our SdkConfiguration to tell the SDK to use it:
```php lines theme={null}
// ✋ Insert this BEFORE the token handling we added in the step above, so the SDK uses the cache.
$tokenCache = new \Symfony\Component\Cache\Adapter\FilesystemAdapter();
$auth0->configuration()->setTokenCache($tokenCache);
```
Our sample application will now cache our token-related network requests.
##### What can you do next?
| [Configure other identity providers](/docs/authenticate/identity-providers) | [Enable multifactor authentication](/docs/secure/multi-factor-authentication) |
| ------------------------------------------------------------------------------------------------------------------------------ | ----------------------------------------------------------------------------- |
| [Learn about attack protection](/docs/secure/attack-protection) | [Learn about rules](/docs/customize/rules) |
| [Edit on GitHub](https://github.com/auth0/docs/edit/master/articles/quickstart/backend/aspnet-core-webapi/01-authorization.md) | |
***