> ## Documentation Index
> Fetch the complete documentation index at: https://auth0.com/llms.txt
> Use this file to discover all available pages before exploring further.
# Django
export const AuthCodeBlock = ({filename, icon, language, highlight, children}) => {
const [displayText, setDisplayText] = useState(children);
const [copyText, setCopyText] = useState(children);
const wrapperRef = React.useRef(null);
useEffect(() => {
let unsubscribe = null;
function init() {
if (!window.autorun || !window.rootStore) {
return;
}
unsubscribe = window.autorun(() => {
let processedChildrenForDisplay = children;
let processedChildrenForCopy = children;
for (const [key, value] of window.rootStore.variableStore.values.entries()) {
const escapedKey = key.replaceAll(/[.*+?^${}()|[\]\\]/g, (String.raw)`\$&`);
let displayValue = value;
if (key === "{yourClientSecret}" && value !== "{yourClientSecret}") {
displayValue = value.substring(0, 3) + "*****MASKED*****";
}
processedChildrenForDisplay = processedChildrenForDisplay.replaceAll(new RegExp(escapedKey, "g"), displayValue);
processedChildrenForCopy = processedChildrenForCopy.replaceAll(new RegExp(escapedKey, "g"), value);
}
setDisplayText(processedChildrenForDisplay);
setCopyText(processedChildrenForCopy);
});
}
if (window.rootStore) {
init();
} else {
window.addEventListener("adu:storeReady", init);
}
return () => {
window.removeEventListener("adu:storeReady", init);
unsubscribe?.();
};
}, [children]);
useEffect(() => {
if (!wrapperRef.current) return;
const originalWriteText = navigator.clipboard.writeText.bind(navigator.clipboard);
let isOverriding = false;
const handleClick = e => {
const button = e.target.closest('[data-testid="copy-code-button"]');
if (!button || !wrapperRef.current.contains(button)) return;
isOverriding = true;
navigator.clipboard.writeText = text => {
if (isOverriding) {
isOverriding = false;
navigator.clipboard.writeText = originalWriteText;
return originalWriteText(copyText);
}
return originalWriteText(text);
};
setTimeout(() => {
if (isOverriding) {
isOverriding = false;
navigator.clipboard.writeText = originalWriteText;
}
}, 100);
};
const wrapper = wrapperRef.current;
wrapper.addEventListener('click', handleClick, true);
return () => {
wrapper.removeEventListener('click', handleClick, true);
if (navigator.clipboard.writeText !== originalWriteText) {
navigator.clipboard.writeText = originalWriteText;
}
};
}, [copyText]);
return
{displayText}
;
};
##### By Evan Sims
This tutorial demonstrates how to add user login to a Python web application built with the Django framework and Authlib OAuth library.We recommend that you log in to follow this quickstart with examples configured for your account.
**New to Auth?** Learn [How Auth0 works](/docs/get-started/auth0-overview), how it [integrates with Regular Web Applications](/docs/get-started/architecture-scenarios/sso-for-regular-web-apps) and which [protocol](/docs/get-started/authentication-and-authorization-flow) it uses.
## Configure Auth0
### Get Your Application Keys
When you signed up for Auth0, a new application was created for you, or you could have created a new one. You will need some details about that application to communicate with Auth0. You can get these details from the [Application Settings](https://manage.auth0.com/#/applications) section in the Auth0 dashboard.
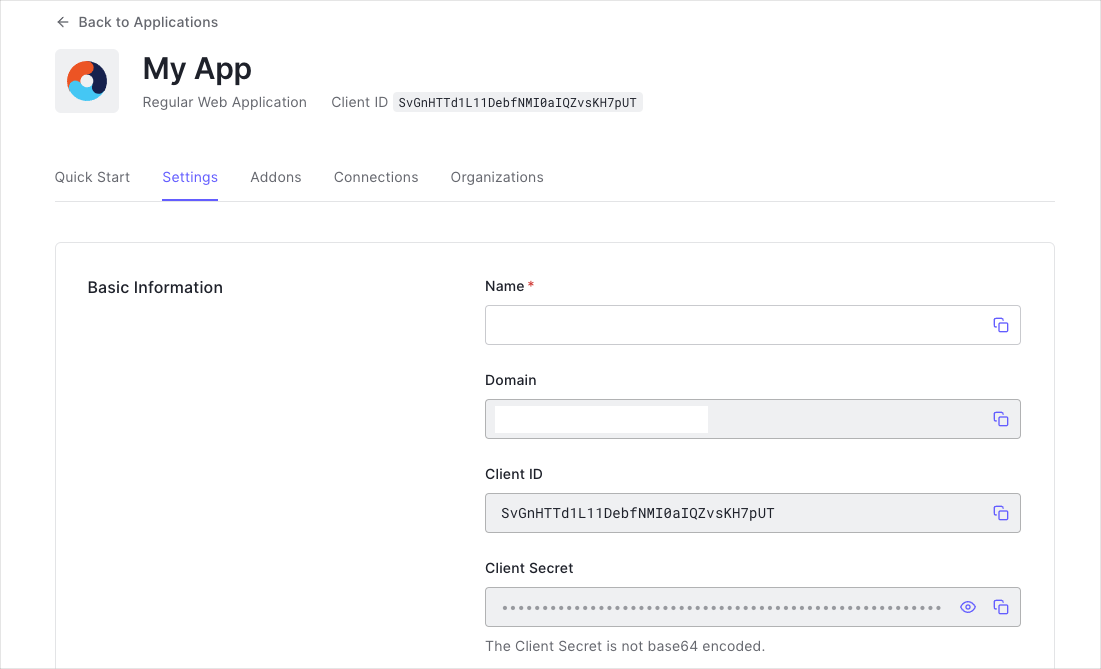
You need the following information:
* **Domain**
* **Client ID**
* **Client Secret**
If you download the sample from the top of this page, these details are filled out for you.
### Configure Callback URLs
A callback URL is a URL in your application where Auth0 redirects the user after they have authenticated. The callback URL for your app must be added to the **Allowed Callback URLs** field in your [Application Settings](https://manage.auth0.com/#/applications). If this field is not set, users will be unable to log in to the application and will get an error.
If you are following along with the sample project you downloaded from the top of this page, the callback URL you need to add to the **Allowed Callback URLs** field is `http://localhost:3000/callback`.
### Configure Logout URLs
A logout URL is a URL in your application that Auth0 can return to after the user has been logged out of the authorization server. This is specified in the `returnTo` query parameter. The logout URL for your app must be added to the **Allowed Logout URLs** field in your [Application Settings](https://manage.auth0.com/#/applications). If this field is not set, users will be unable to log out from the application and will get an error.
If you are following along with the sample project you downloaded from the top of this page, the logout URL you need to add to the **Allowed Logout URLs** field is `http://localhost:3000`.
## Create application
For this guide we demonstrate how to integrate Auth0 with a Python application using the [Django framework](https://www.djangoproject.com/) and [Authlib](https://authlib.org/). Let's start by ensuring Django is installed on your system. From your shell, run the following command:
```bash lines theme={null}
pip install django~=4.0
```
If you already have a Python application setup, you can skip to the next step. Otherwise, let's create our new application project. From your shell, run the following command, and switch to the new project folder:
```bash lines theme={null}
django-admin startproject webappexample
cd webappexample
```
## Install dependencies
For this integration you'll need few library dependencies, such as Authlib. Go ahead and create a `requirements.txt` file in your project directory, and include the following:
```txt lines theme={null}
# 📁 requirements.txt -----
authlib ~= 1.0
django ~= 4.0
python-dotenv ~= 0.19
requests ~= 2.27
```
You should now run `pip install -r requirements.txt` from your shell to make these dependencies available to your project.
## Configure your .env file
Next, create an `.env` file in your project directory. This file will hold your client keys and other configuration details.
export const codeExample = `# 📁 .env -----
AUTH0_CLIENT_ID={yourClientId}
AUTH0_CLIENT_SECRET={yourClientSecret}
AUTH0_DOMAIN={yourDomain}`;
## Update settings.py
You'll want to make some minor changes to your `webappexample/settings.py` file to read those `.env` values. At the top of the file, add these imports:
```py lines theme={null}
# 📁 webappexample/settings.py -----
import os
from dotenv import load_dotenv, find_dotenv
```
Next, beneath the 'BASE\_DIR' definition, add the following:
```py lines theme={null}
# 📁 webappexample/settings.py -----
# Add the following line after 'BASE_DIR = ...'
TEMPLATE_DIR = os.path.join(BASE_DIR, "webappexample", "templates")
```
Next, find the `TEMPLATES` variable and update the `DIRS` value to add our `TEMPLATE_DIR` string. This tells Django where to look for our template files, once we create them. Keep any other content of this array the same.
```py lines theme={null}
# 📁 webappexample/settings.py -----
TEMPLATES = [
{
# Leave other lines as they are; we're just updating `DIRS`.
"DIRS": [TEMPLATE_DIR],
},
]
```
Finally, at the end of this file, add the following:
```py lines theme={null}
# 📁 webappexample/settings.py -----
# Load environment definition file
ENV_FILE = find_dotenv()
if ENV_FILE:
load_dotenv(ENV_FILE)
# Load Auth0 application settings into memory
AUTH0_DOMAIN = os.environ.get("AUTH0_DOMAIN")
AUTH0_CLIENT_ID = os.environ.get("AUTH0_CLIENT_ID")
AUTH0_CLIENT_SECRET = os.environ.get("AUTH0_CLIENT_SECRET")
```
## Setup your application
Now you're ready to start writing your application. Open the `webappexample/views.py` file in your project director.
Begin by importing all the libraries your application will be making use of:
```py lines theme={null}
# 📁 webappexample/views.py -----
import json
from authlib.integrations.django_client import OAuth
from django.conf import settings
from django.shortcuts import redirect, render
from django.urls import reverse
from urllib.parse import quote_plus, urlencode
```
Now you can configure Authlib to handle your application's authentication with Auth0:
```py lines theme={null}
# 👆 We're continuing from the steps above. Append this to your webappexample/views.py file.
oauth = OAuth()
oauth.register(
"auth0",
client_id=settings.AUTH0_CLIENT_ID,
client_secret=settings.AUTH0_CLIENT_SECRET,
client_kwargs={
"scope": "openid profile email",
},
server_metadata_url=f"https://{settings.AUTH0_DOMAIN}/.well-known/openid-configuration",
)
```
You can learn more about the configuration options available for Authlib's OAuth `register()` method from [their documentation.](https://docs.authlib.org/en/latest/client/frameworks.html#using-oauth-2-0-to-log-in)
## Setup your route handlers
For this demonstration, we'll be adding 4 routes for your application: your login, callback, logout and index routes.
### Triggering authentication with /login
When visitors to your app visit the `/login` route, they'll be redirected to Auth0 to begin the authentication flow.
```py lines theme={null}
# 👆 We're continuing from the steps above. Append this to your webappexample/views.py file.
def login(request):
return oauth.auth0.authorize_redirect(
request, request.build_absolute_uri(reverse("callback"))
)
```
### Finalizing authentication with /callback
After your users finish logging in with Auth0, they'll be returned to your application at the `/callback` route. This route is responsible for actually saving the session for the user, so when they visit again later, they won't have to sign back in all over again.
```py lines theme={null}
# 👆 We're continuing from the steps above. Append this to your webappexample/views.py file.
def callback(request):
token = oauth.auth0.authorize_access_token(request)
request.session["user"] = token
return redirect(request.build_absolute_uri(reverse("index")))
```
### Clearing a session with /logout
As you might expect, this route handles signing a user out from your application. It will clear the user's session in your app, and briefly redirect to Auth0's logout endpoint to ensure their session is completely clear, before they are returned to your home route (covered next.)
```py lines theme={null}
# 👆 We're continuing from the steps above. Append this to your webappexample/views.py file.
def logout(request):
request.session.clear()
return redirect(
f"https://{settings.AUTH0_DOMAIN}/v2/logout?"
+ urlencode(
{
"returnTo": request.build_absolute_uri(reverse("index")),
"client_id": settings.AUTH0_CLIENT_ID,
},
quote_via=quote_plus,
),
)
```
### There's no place like /home
Last but not least, your home route will serve as a place to either render an authenticated user's details, or offer to allow visitors to sign in.
```py lines theme={null}
# 👆 We're continuing from the steps above. Append this to your webappexample/views.py file.
def index(request):
return render(
request,
"index.html",
context={
"session": request.session.get("user"),
"pretty": json.dumps(request.session.get("user"), indent=4),
},
)
```
### Register your routes
Finally, you'll need to tell Django how to connect these new routes. Replace the contents of your `webappexample/urls.py` file with the following:
```py lines theme={null}
# 📁 webappexample/urls.py -----
from django.urls import path
from . import views
urlpatterns = [
path("", views.index, name="index"),
path("login", views.login, name="login"),
path("logout", views.logout, name="logout"),
path("callback", views.callback, name="callback"),
]
```
## Add templates
Now we just need to create the simple template files used in the routes about (during `render()` calls).
Create a new sub-directory within the `webappexample` folder named `templates`, and create a `index.html` file:
```html lines theme={null}
# 📁 webappexample/templates/index.html -----
Auth0 Example
{% if session %}
Welcome {{session.userinfo.name}}!
Logout
{% else %}
Welcome Guest
Login
{% endif %}
```
## Run your application
You're ready to run your application! From your project directory, open a shell and use:
```bash lines theme={null}
python3 manage.py migrate
python3 manage.py runserver 3000
```
Your application should now be ready to open from your browser at `http://localhost:3000`.
##### What can you do next?
| [Configure other identity providers](/docs/authenticate/identity-providers) | [Enable multifactor authentication](/docs/secure/multi-factor-authentication) |
| ---------------------------------------------------------------------------------------------------------- | ----------------------------------------------------------------------------- |
| [Learn about attack protection](/docs/secure/attack-protection) | [Learn about rules](/docs/customize/rules) |
| [Edit on GitHub](https://github.com/auth0/docs/edit/master/articles/quickstart/native/flutter/01-login.md) | |