> ## Documentation Index
> Fetch the complete documentation index at: https://auth0.com/llms.txt
> Use this file to discover all available pages before exploring further.
# PHP
export const AuthCodeBlock = ({filename, icon, language, highlight, children}) => {
const [displayText, setDisplayText] = useState(children);
const [copyText, setCopyText] = useState(children);
const wrapperRef = React.useRef(null);
useEffect(() => {
let unsubscribe = null;
function init() {
if (!window.autorun || !window.rootStore) {
return;
}
unsubscribe = window.autorun(() => {
let processedChildrenForDisplay = children;
let processedChildrenForCopy = children;
for (const [key, value] of window.rootStore.variableStore.values.entries()) {
const escapedKey = key.replaceAll(/[.*+?^${}()|[\]\\]/g, (String.raw)`\$&`);
let displayValue = value;
if (key === "{yourClientSecret}" && value !== "{yourClientSecret}") {
displayValue = value.substring(0, 3) + "*****MASKED*****";
}
processedChildrenForDisplay = processedChildrenForDisplay.replaceAll(new RegExp(escapedKey, "g"), displayValue);
processedChildrenForCopy = processedChildrenForCopy.replaceAll(new RegExp(escapedKey, "g"), value);
}
setDisplayText(processedChildrenForDisplay);
setCopyText(processedChildrenForCopy);
});
}
if (window.rootStore) {
init();
} else {
window.addEventListener("adu:storeReady", init);
}
return () => {
window.removeEventListener("adu:storeReady", init);
unsubscribe?.();
};
}, [children]);
useEffect(() => {
if (!wrapperRef.current) return;
const originalWriteText = navigator.clipboard.writeText.bind(navigator.clipboard);
let isOverriding = false;
const handleClick = e => {
const button = e.target.closest('[data-testid="copy-code-button"]');
if (!button || !wrapperRef.current.contains(button)) return;
isOverriding = true;
navigator.clipboard.writeText = text => {
if (isOverriding) {
isOverriding = false;
navigator.clipboard.writeText = originalWriteText;
return originalWriteText(copyText);
}
return originalWriteText(text);
};
setTimeout(() => {
if (isOverriding) {
isOverriding = false;
navigator.clipboard.writeText = originalWriteText;
}
}, 100);
};
const wrapper = wrapperRef.current;
wrapper.addEventListener('click', handleClick, true);
return () => {
wrapper.removeEventListener('click', handleClick, true);
if (navigator.clipboard.writeText !== originalWriteText) {
navigator.clipboard.writeText = originalWriteText;
}
};
}, [copyText]);
return
{displayText}
;
};
##### By Evan Sims
This guide demonstrates how to integrate Auth0 with a PHP application using the Auth0 PHP SDK.We recommend that you log in to follow this quickstart with examples configured for your account.
**New to Auth?** Learn [How Auth0 works](/docs/get-started/auth0-overview), how it [integrates with Regular Web Applications](/docs/get-started/architecture-scenarios/sso-for-regular-web-apps) and which [protocol](/docs/get-started/authentication-and-authorization-flow) it uses.
## Configure Auth0
### Get Your Application Keys
When you signed up for Auth0, a new application was created for you, or you could have created a new one. You will need some details about that application to communicate with Auth0. You can get these details from the [Application Settings](https://manage.auth0.com/#/applications) section in the Auth0 dashboard.
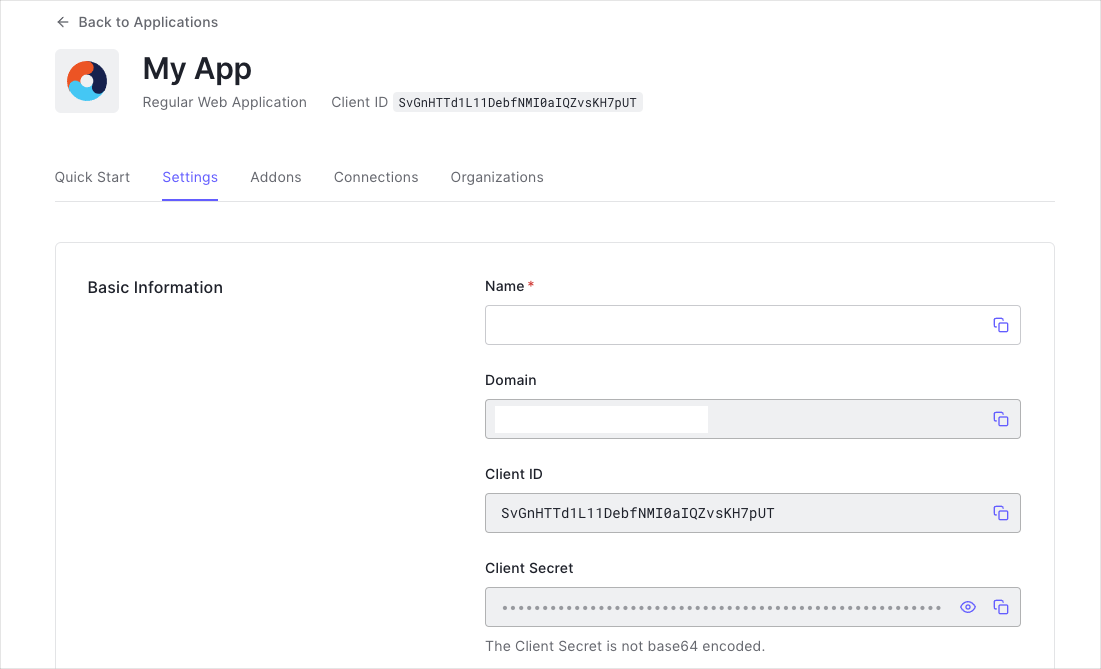
You need the following information:
* **Domain**
* **Client ID**
* **Client Secret**
If you download the sample from the top of this page, these details are filled out for you.
### Configure Callback URLs
A callback URL is a URL in your application where Auth0 redirects the user after they have authenticated. The callback URL for your app must be added to the **Allowed Callback URLs** field in your [Application Settings](https://manage.auth0.com/#/applications). If this field is not set, users will be unable to log in to the application and will get an error.
If you are following along with the sample project you downloaded from the top of this page, the callback URL you need to add to the **Allowed Callback URLs** field is `http://127.0.0.1:3000/`.
### Configure Logout URLs
A logout URL is a URL in your application that Auth0 can return to after the user has been logged out of the authorization server. This is specified in the `returnTo` query parameter. The logout URL for your app must be added to the **Allowed Logout URLs** field in your [Application Settings](https://manage.auth0.com/#/applications). If this field is not set, users will be unable to log out from the application and will get an error.
If you are following along with the sample project you downloaded from the top of this page, the logout URL you need to add to the **Allowed Logout URLs** field is `http://127.0.0.1:3000`.
## Integrate your PHP application
Let's create a sample application that authenticates a user with a PHP application. We'll take a simple approach here, appropriate for the written format. Still, you should check out the accompanying [Quickstart app on GitHub](https://github.com/auth0-samples/auth0-php-web-app/) for a more robust example.
### Installing HTTP Client and Messaging Factories
The Auth0 PHP SDK supports many [PHP-FIG](https://www.php-fig.org) standards offering interoperability options with your architecture. Two of particular importance are [PSR-17](https://www.php-fig.org/psr/psr-17/) and [PSR-18](https://www.php-fig.org/psr/psr-18/). These standards allow you to plug-in networking components of your choice to handle messaging and requests. You will need to install compatible libraries in your project for the SDK to use.
The most prolific networking library for PHP is [Guzzle](https://docs.guzzlephp.org/), although many are available to pick from within the PHP community. Let's use Guzzle for this sample application. Once again, from your project directory, run the following shell command:
```bash lines theme={null}
composer require guzzlehttp/guzzle guzzlehttp/psr7 http-interop/http-factory-guzzle
```
### Installing the PHP SDK
The Auth0 PHP SDK requires [Composer](https://getcomposer.org/doc/00-intro.md#installation-linux-unix-macos), a tool for dependency management in PHP. Composer allows you to declare the dependent libraries your project needs and installs them for you. Please ensure Composer is installed and accessible from your shell before continuing.
Run the following shell command within your project directory to install the Auth0 PHP SDK:
```bash lines theme={null}
composer require auth0/auth0-php
```
This will create a `vendor` folder within your project and download all the dependencies needed to use the Auth0 PHP SDK. This will also create a `vendor/autoload.php` file used in the sample to load all necessary classes for your application to function. It's important you require this autoload file in your project for the SDK to work.
### Configuring the SDK
To begin, let's create a `.env` file within the root of your project directory to store our sample application's configuration and fill in the environment variables:
export const codeExample = `# Your Auth0 application's Client ID
AUTH0_CLIENT_ID={yourClientId}
# The URL of your Auth0 tenant domain
AUTH0_DOMAIN={yourDomain}
# Your Auth0 application's Client Secret
AUTH0_CLIENT_SECRET={yourClientSecret}
# A long, secret value used to encrypt the session cookie.
# This can be generated using \`openssl rand -hex 32\` from your shell.
AUTH0_COOKIE_SECRET=
# A url your application is accessible from. Update this as appropriate.
AUTH0_BASE_URL=http://127.0.0.1:3000`;
As PHP isn't able to read our `.env` file by itself, we'll want to install a library to help with that. Although we'll be using a particular library for our sample application's purposes, in a real world application any 'dotenv' loader of preference will work. From our project directory, let's run the following shell command to install the library:
```bash lines theme={null}
composer require vlucas/phpdotenv
```
Next, let's create the PHP source file we'll be using for these code samples, `index.php`, and let's configure an instance of the Auth0 PHP SDK for our sample application:
```php lines theme={null}
load();
// Now instantiate the Auth0 class with our configuration:
$auth0 = new \Auth0\SDK\Auth0([
'domain' => $_ENV['AUTH0_DOMAIN'],
'clientId' => $_ENV['AUTH0_CLIENT_ID'],
'clientSecret' => $_ENV['AUTH0_CLIENT_SECRET'],
'cookieSecret' => $_ENV['AUTH0_COOKIE_SECRET']
]);
```
### Setting up your application routes
Modern PHP applications use a routing pattern to pass incoming HTTP requests to the code that handles them, determining what should happen when our users visit a particular "page" in our app. There is no single, correct way of implementing routing in your application, and there are many libraries to choose from to implement it. We'll be using one particular library for our sample application's purposes, but feel free to select your own in a real-world application.
From our project directory, let's run the following shell command to install the routing library:
```bash lines theme={null}
composer require steampixel/simple-php-router
```
Next, let's open our `index.php` back up and give our application life. Start by importing the routing library and defining our sample application's route's full URLs as named constants for convenience sake, as we'll need to reference them in a few places through our sample application:
```php lines theme={null}
// 👆 We're continuing from the steps above. Append this to your index.php file.
// Import our router library:
use Steampixel\Route;
// Define route constants:
define('ROUTE_URL_INDEX', rtrim($_ENV['AUTH0_BASE_URL'], '/'));
define('ROUTE_URL_LOGIN', ROUTE_URL_INDEX . '/login');
define('ROUTE_URL_CALLBACK', ROUTE_URL_INDEX . '/callback');
define('ROUTE_URL_LOGOUT', ROUTE_URL_INDEX . '/logout');
```
Now we can move on to adding our application's route handling logic, and the SDK integrations:
## Checking for a session
The Auth0 PHP SDK has a convenient method for checking if our user has authenticated and returned their profile, `getCredentials()`. Let's install this on our index route to print the user profile if they're logged in or report that they need to login.
```php lines theme={null}
// 👆 We're continuing from the steps above. Append this to your index.php file.
Route::add('/', function() use ($auth0) {
$session = $auth0->getCredentials();
if ($session === null) {
// The user isn't logged in.
echo 'Please log in.
';
return;
}
// The user is logged in.
echo '';
print_r($session->user);
echo '
';
echo 'You can now log out.
';
});
```
We can access all the properties of our user's profile from the `user` property response, which is an array. So, for example, we can pull the user's nickname using `$session->usernickname`, or their email address from `$session->useremail`. The structure is a normalized user profile, which you can learn more about [here](https://auth0.com/docs/users/normalized-user-profiles).
It's important to note that the content of the user profile will vary depending on the social provider(s) you use, so you should never assume that a particular value will always be there within your application logic. Use PHP language constructs like `isset` or null coalescence to gracefully handle a value's presence, or lack thereof, for example:
```php lines theme={null}
// ✋ We don't need to include this in our sample application, it's just an example.
$name = $session->user['name'] ?? $session->user['nickname'] ?? $session->user['email'] ?? 'Unknown';
```
## Logging in
Now let's create our /login route, which will use the Auth0 PHP SDK's `login()` method to set up the user session and return a customized URL to Auth0's Universal Login Page for this user to login.
```php lines theme={null}
// 👆 We're continuing from the steps above. Append this to your index.php file.
Route::add('/login', function() use ($auth0) {
// It's a good idea to reset user sessions each time they go to login to avoid "invalid state" errors, should they hit network issues or other problems that interrupt a previous login process:
$auth0->clear();
// Finally, set up the local application session, and redirect the user to the Auth0 Universal Login Page to authenticate.
header("Location: " . $auth0->login(ROUTE_URL_CALLBACK));
exit;
});
```
## Handling authentication callback
After our users return from authenticating with the Auth0's Universal Login Page, they'll return to our sample application at our callback route, `/callback` which we'll handle in this step.
When Auth0 passes our users back to us, it includes a few essential parameters in the query of the HTTP request. The Auth0 PHP SDK's `exchange()` method handles working with those, so finishing our authentication flow is straightforward:
```php lines theme={null}
// 👆 We're continuing from the steps above. Append this to your index.php file.
Route::add('/callback', function() use ($auth0) {
// Have the SDK complete the authentication flow:
$auth0->exchange(ROUTE_URL_CALLBACK);
// Finally, redirect our end user back to the / index route, to display their user profile:
header("Location: " . ROUTE_URL_INDEX);
exit;
});
```
## Logging out
Last but not least, let's properly handle logging our users out. The `logout()` method of the Auth0 PHP SDK handles clearing our sample application's session cookies, redirecting the user to Auth0's [/logout endpoint](https://auth0.com/docs/logout) (which logs out Auth0 session layer and any identify provider session layers), and then return the user to our / index route.
```php lines theme={null}
// 👆 We're continuing from the steps above. Append this to your index.php file.
Route::add('/logout', function() use ($auth0) {
// Clear the user's local session with our app, then redirect them to the Auth0 logout endpoint to clear their Auth0 session.
header("Location: " . $auth0->logout(ROUTE_URL_INDEX));
exit;
});
```
## Run your app!
Last but not least, we need to tell our routing middleware to actually route requests:
```php lines theme={null}
// 👆 We're continuing from the steps above. Append this to your index.php file.
// This tells our router that we've finished configuring our routes, and we're ready to begin routing incoming HTTP requests:
Route::run('/');
```
That's it! You're ready to run your new application; once again, from your project directory, run the following shell command:
```bash lines theme={null}
php -S 127.0.0.1:3000 index.php
```
Open your browser to [http://127.0.0.1:3000](https://127.0.0.1:3000) and try it out.
##### What can you do next?
| [Configure other identity providers](/docs/authenticate/identity-providers) | [Enable multifactor authentication](/docs/secure/multi-factor-authentication) |
| ---------------------------------------------------------------------------------------------------------- | ----------------------------------------------------------------------------- |
| [Learn about attack protection](/docs/secure/attack-protection) | [Learn about rules](/docs/customize/rules) |
| [Edit on GitHub](https://github.com/auth0/docs/edit/master/articles/quickstart/native/flutter/01-login.md) | |