Token Based Authentication Made Easy
Learn about token based authentication and how to easily implement JWT in your applications.

Token Based Authentication
A token is a piece of data that has no meaning or use on its own, but combined with the correct tokenization system, becomes a vital player in securing your application. Token based authentication works by ensuring that each request to a server is accompanied by a signed token which the server verifies for authenticity and only then responds to the request.
JSON Web Token (JWT) is an open standard (RFC 7519) that defines a compact and self-contained method for securely transmitting information between parties encoded as a JSON object. JWT has gained mass popularity due to its compact size which allows tokens to be easily transmitted via query strings, header attributes and within the body of a POST request.
Why Use Tokens?
The use of tokens has many benefits compared to traditional methods such as cookies.
- Tokens are stateless. The token is self-contained and contains all the information it needs for authentication. This is great for scalability as it frees your server from having to store session state.
- Tokens can be generated from anywhere. Token generation is decoupled from token verification allowing you the option to handle the signing of tokens on a separate server or even through a different company such us Auth0.
- Fine-grained access control. Within the token payload you can easily specify user roles and permissions as well as resources that the user can access.
These are just some of the benefits JSON Web Tokens provide. To learn more check out this blog post that takes a deeper dive and compares tokens to cookies for managing authentication.
Anatomy of a JSON Web Token
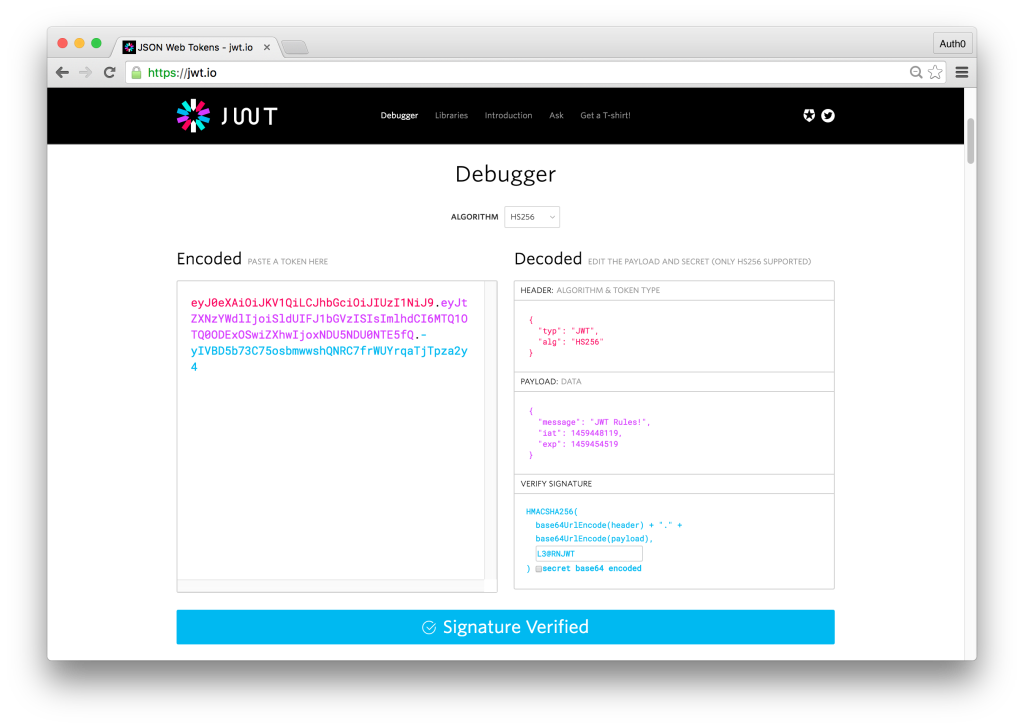
A JSON Web Token consists of three parts: Header, Payload and Signature. The header and payload are Base64 encoded, then concatenated by a period, finally the result is algorithmically signed producing a token in the form of header.claims.signature. The header consists of metadata including the type of token and the hashing algorithm used to sign the token. The payload contains the claims data that the token is encoding. The final result looks like:
eyJ0eXAiOiJKV1QiLCJhbGciOiJIUzI1NiJ9.eyJtZXNzYWdlIjoiSldUIFJ1bGVzISIsImlhdCI6MTQ1OTQ0ODExOSwiZXhwIjoxNDU5NDU0NTE5fQ.-yIVBD5b73C75osbmwwshQNRC7frWUYrqaTjTpza2y4Tokens are signed to protect against manipulation, they are not encrypted. What this means is that a token can be easily decoded and its contents revealed. If we navigate over the jwt.io, and paste the above token, we’ll be able to read the header and payload – but without the correct secret, the token is useless and we see the message “Invalid Signature.” If we add the correct secret, in this example, the string L3@RNJWT, we’ll now see a message saying “Signature Verified.”
In a real world scenario, a client would make a request to the server and pass the token with the request. The server would attempt to verify the token and, if successful, would continue processing the request. If the server could not verify the token, the server would send a 401 Unauthorized and a message saying that the request could not be processed as authorization could not be verified.
JSON Web Token Best Practices
Before we actually get to implementing JWT, let’s cover some best practices to ensure token based authentication is properly implemented in your application.
- Keep it secret. Keep it safe. The signing key should be treated like any other credentials and revealed only to services that absolutely need it.
- Do not add sensitive data to the payload. Tokens are signed to protect against manipulation and are easily decoded. Add the bare minimum number of claims to the payload for best performance and security.
- Give tokens an expiration. Technically, once a token is signed – it is valid forever – unless the signing key is changed or expiration explicitly set. This could pose potential issues so have a strategy for expiring and/or revoking tokens.
- Embrace HTTPS. Do not send tokens over non-HTTPS connections as those requests can be intercepted and tokens compromised.
- Consider all of your authorization use cases. Adding a secondary token verification system that ensure tokens were generated from your server, for example, may not be common practice, but may be necessary to meet your requirements.
For more information and best practices, visit the 10 Things You Should Know About Tokens blog post.
Token Based Authentication Made Easy
Token based authentication and JWT are widely supported. JavaScript, Python, C#, Java, PHP, Ruby, Go and others have libraries to easily sign and verify JSON web tokens. Let’s implement an API and see how quickly we can secure it with JWT.
We’ve chosen to build our API with NodeJS as it requires the least amout of setup. Let’s take a look the code for our implementation of JWT.
// Load in our dependencies
var express = require('express');
var jwt = require('jsonwebtoken');

var app = express();

// Register the home route that displays a welcome message
// This route can be accessed without a token
app.get('/', function(req, res){
  res.send('Welcome to our API');
})

// Register the route to get a new token
// In a real world scenario we would authenticate user credentials
// before creating a token, but for simplicity accessing this route
// will generate a new token that is valid for 2 minutes
app.get('/token', function(req, res){
  var token = jwt.sign({username:'ado'}, 'supersecret',{expiresIn: 120});
  res.send(token)
})

// Register a route that requires a valid token to view data
app.get('/api', function(req, res){
  var token = req.query.token;
  jwt.verify(token, 'supersecret', function(err, decoded){
    if(!err){
      var secrets = {'accountNumber' : '938291239','pin' : '11289','account' : 'Finance'};
      res.json(secrets);
    } else {
      res.send(err);
    }
  })
})

// Launch our app on port 3000
app.listen('3000');
To test our current API, let’s run the application and navigate to localhost:3000. We’ll see just the message “Welcome to our API.” Next, navigate to the localhost:3000/api route and we’ll see a JWT error message which will say that we didn’t get a token. Navigate to the localhost:3000/token route and you will see a new token generated. Copy this token, then navigate to localhost:3000/api?token={ADD-COPIED-TOKEN-HERE} and you will see the intended response which is the company financial accounts.
With just a few lines of code we were able to secure our API endpoint. We didn’t cover handling proper user authentication before generating a token. We’ll do this with Auth0 next.
JWT Authentication with Auth0
We will need to make some slight modifications to our code to showcase the authentication flow with Auth0. Let’s examine the changes below:
// Load in our dependencies
var express = require('express');
var jwt = require('express-jwt');

var jwtCheck = jwt({
  secret: new Buffer('{YOUR-APP-SECRET}', 'base64'),
  audience: '{YOUR-APP-CLIENT-ID}'
});

var app = express();

// Rather than checking for a token within our controller
// we'll use a middleware so if the token is invalid we'll
// stop further execution of the request
app.use('/api', jwtCheck);

app.get('/', function(req, res){
  res.send('Welcome to our API');
})

app.get('/api', function(req, res){
  var secrets = {'accountNumber' : '938291239','pin' : '11289','account' : 'Finance'};
  res.json(secrets);
})

app.listen('3000');
To test that this works, let’s start the server and navigate to localhost:3000/api. We see a message saying that we didn’t send an authorization token. Let’s head over to the Auth0 Playground, add in our credentials and get a token. Add the following code on the playground:
var domain = '{YOUR-AUTH0-DOMAIN}.auth0.com';
var clientID = '{YOUR-APP-CLIENT-ID}';

var lock = new Auth0Lock(clientID, domain);
lock.show({
  focusInput: false,
  popup: true,
}, function (err, profile, token) {
  alert(token)
});
To make sure that we can get a token, we’ll need to navigate to our app settings in the Auth0 Dashboard and add https://auth0.github.io/playground to our list of allowed callback URLs. Now let’s login or create an account on the Auth0 Playground and we will get an popup revealing our token.
To check the contents our token, we can decode it at jwt.io. To verify the token, we will need our Auth0 app’s Client Secret and we will need to check the box secret base64 encode. Doing this, we should now see the message “Signature Verified.”
To test that our API works with this token, we need to make a GET request to localhost:3000/api and send the token in an Authorization header. The simplest way to do this is to use an app like Postman which simplifies API endpoint testing. When making the call add an Authorization header and for the value add Bearer {TOKEN}. When the call is made the jwtCheck middleware will examine the request, ensure it has the Authorization header in the correct format, extract the token, verify it and if verified process the rest of the request. We used just the default settings to showcase the capabilities of JWT but you can learn much more via the docs.
Use Cases for Token Based Authentication
We’ve seen how easy it is to implement JWT authentication and secure our API. To conclude, let’s examine use cases where token based authentication is best suited for.
- Platform-as-a-Service Applications – exposing RESTful APIs that will be consumed by a variety of frameworks and clients.
- Mobile Apps – implementing native or hybrid mobile apps that interact with your services.
- Single Page Applications (SPA) – building modern applications with frameworks such as Angular and React.
For additional resources on getting started with JSON Web Tokens check out this post.
Sign up for free
Start building today and secure your apps with the Auth0 identity platform today.