
TL;DR: In this post, you will learn how to build a Symfony API server from scratch. You will also take it a step further to secure some of the endpoints. You'll use Auth0 to handle authentication and authorization. The complete source code for this tutorial can be found here on GitHub.
Prerequisites
To follow along with this tutorial, you should have reasonable knowledge of Object-Oriented Programming in PHP and basic knowledge of building applications with Symfony. You will also need the following:
- Composer globally installed on your computer to manage dependencies
- Symfony CLI installed on your computer. Follow the instructions here to set it up for your operating system.
- An Auth0 account. You can sign up for a free Auth0 account here.
- Angular CLI globally installed on your computer. Please note that you don't have to be proficient in building applications with Angular. It is only required here to test the API that we will build.
What You'll Build
You will build a simple Symfony API server with three different endpoints. Each endpoint will return different types of messages depending on the access the user has.
Public endpoint
GET /api/messages/public
This endpoint should be exposed to anyone unauthorized. It is expected to return the following message:
{
  "message": "The API doesn't require an access token to share this message."
}
Protected endpoint
GET /api/messages/protected
This endpoint will be protected against unauthorized access. Only authorized users with a valid access token in their HTTP request header will be able to see the following message:
{
  "message": "The API successfully validated your access token."
}
Admin endpoint
GET /api/messages/admin
Similar to the protected endpoint, this requires the access token to contain a read:admin-messages permission to access the admin data. This is often referred to as Role-Based Access Control (RBAC).
Getting Started
Here you will start building the Symfony API by setting up and installing a new Symfony application and its required dependencies.
Scaffolding the Symfony application
To begin, open your terminal, navigate to your preferred development directory, and issue the following command to scaffold a new project using Composer:
composer create-project symfony/website-skeleton api-symfony-server
Once the installation process is completed, switch to the new directory you just created:
cd api-symfony-server

```bash
cp .env .env.local
This file is ignored by Git as it matches an existing pattern in .gitignore (which Symfony generated). One of the benefits of this file is that it helps to store your credentials outside of code to keep them safe.
Next, update the DATABASE_URL parameter in .env.local so that the app uses an SQLite database instead of the PostgreSQL default. To do that, comment out the existing DATABASE_URL entry and uncomment the SQLite option so that it matches the example below.
DATABASE_URL="sqlite:///%kernel.project_dir%/var/data.db"
NOTE: The database will be created in the var directory in the project's root directory and be named
data.db.
Running the application
Make sure you're in the main project directory and using the Symfony CLI, start the application with the following command:
symfony serve
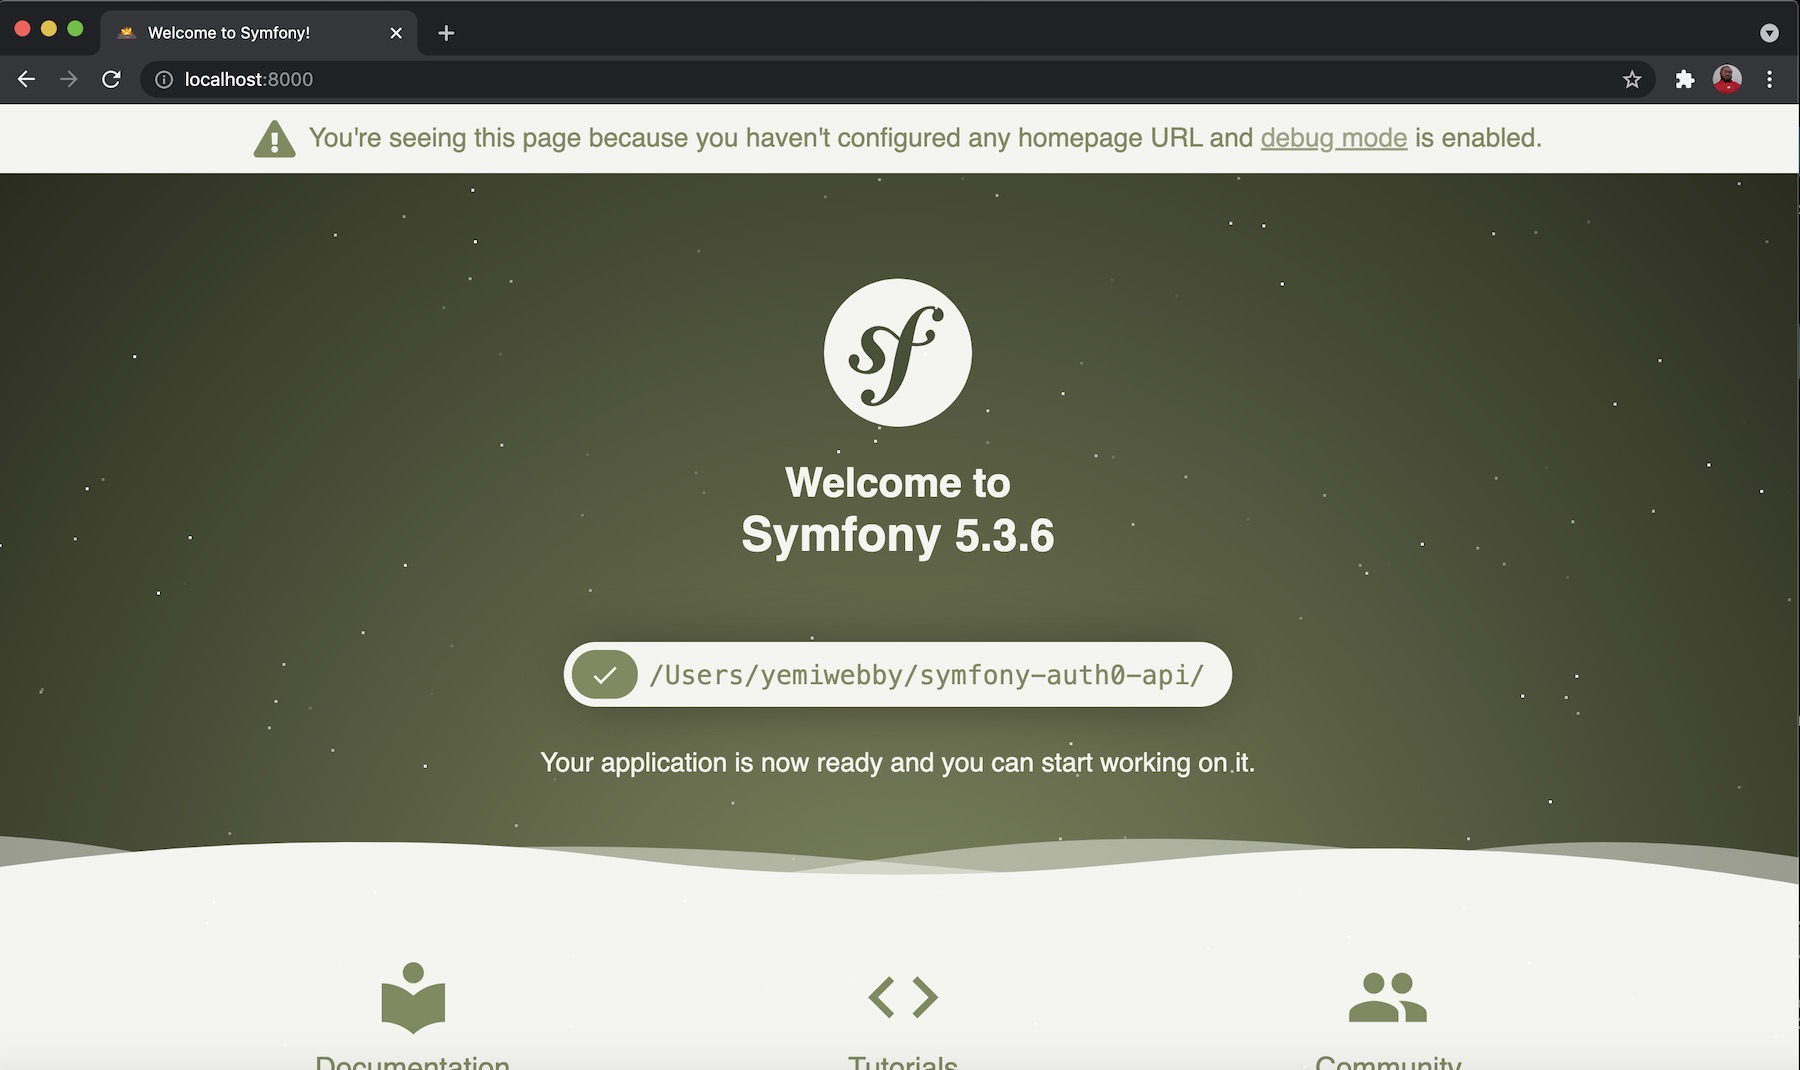
Navigate to http://localhost:8000 to view the default homepage of the new Symfony application:
Building the API
In this section, we will focus on creating controllers that will handle the logic for each endpoint mentioned earlier. We will start with the public endpoint and gradually proceed to handle other endpoints.
Stop the application from running using CTRL + C and then hit Enter
Create controllers and configure each endpoint
Start by issuing the following command from the terminal within the root directory of your project to create a Controller:
php bin/console make:controller APIController
You will see the following output:
 created: src/Controller/APIController.php
 created: templates/api/index.html.twig

  Success!

 Next: Open your new controller class and add some pages!
Locate the newly created controller in src/Controller/APIController.php and update its content with the following:
// src/Controller/APIController.php
<?php

namespace App\Controller;

use Symfony\Bundle\FrameworkBundle\Controller\AbstractController;
use Symfony\Component\HttpFoundation\JsonResponse;
use Symfony\Component\HttpFoundation\Response;
use Symfony\Component\Routing\Annotation\Route;

/**
 * @Route("/api/messages")
 */
class APIController extends AbstractController
{
    /**
     * @Route("/public", name="public")
     */
    public function publicAction()
    : JsonResponse
    {
        return $this->json(["message" => "The API doesn't require an access token to share this message."], Response::HTTP_OK);
    }

    /**
     * @Route("/protected", name="protected")
     */
    public function protectedAction()
    : JsonResponse
    {
        return $this->json(["message" => "The API successfully validated your access token."], Response::HTTP_OK);
    }

    /**
     * @Route("/admin", name="admin")
     */
    public function adminAction(): JsonResponse
    {
        return $this->json(["message" => "The API successfully recognized you as an admin."], Response::HTTP_OK);
    }
}
From the snippet above, this controller contains three different methods:
publicAction()protectedAction()adminAction()
Each is designed to handle /public, /protected, and /admin endpoints and returns the appropriate messages, respectively.
Back in the terminal, start the application again with symfony serve and open up an API testing tool such as Postman to test each endpoint.
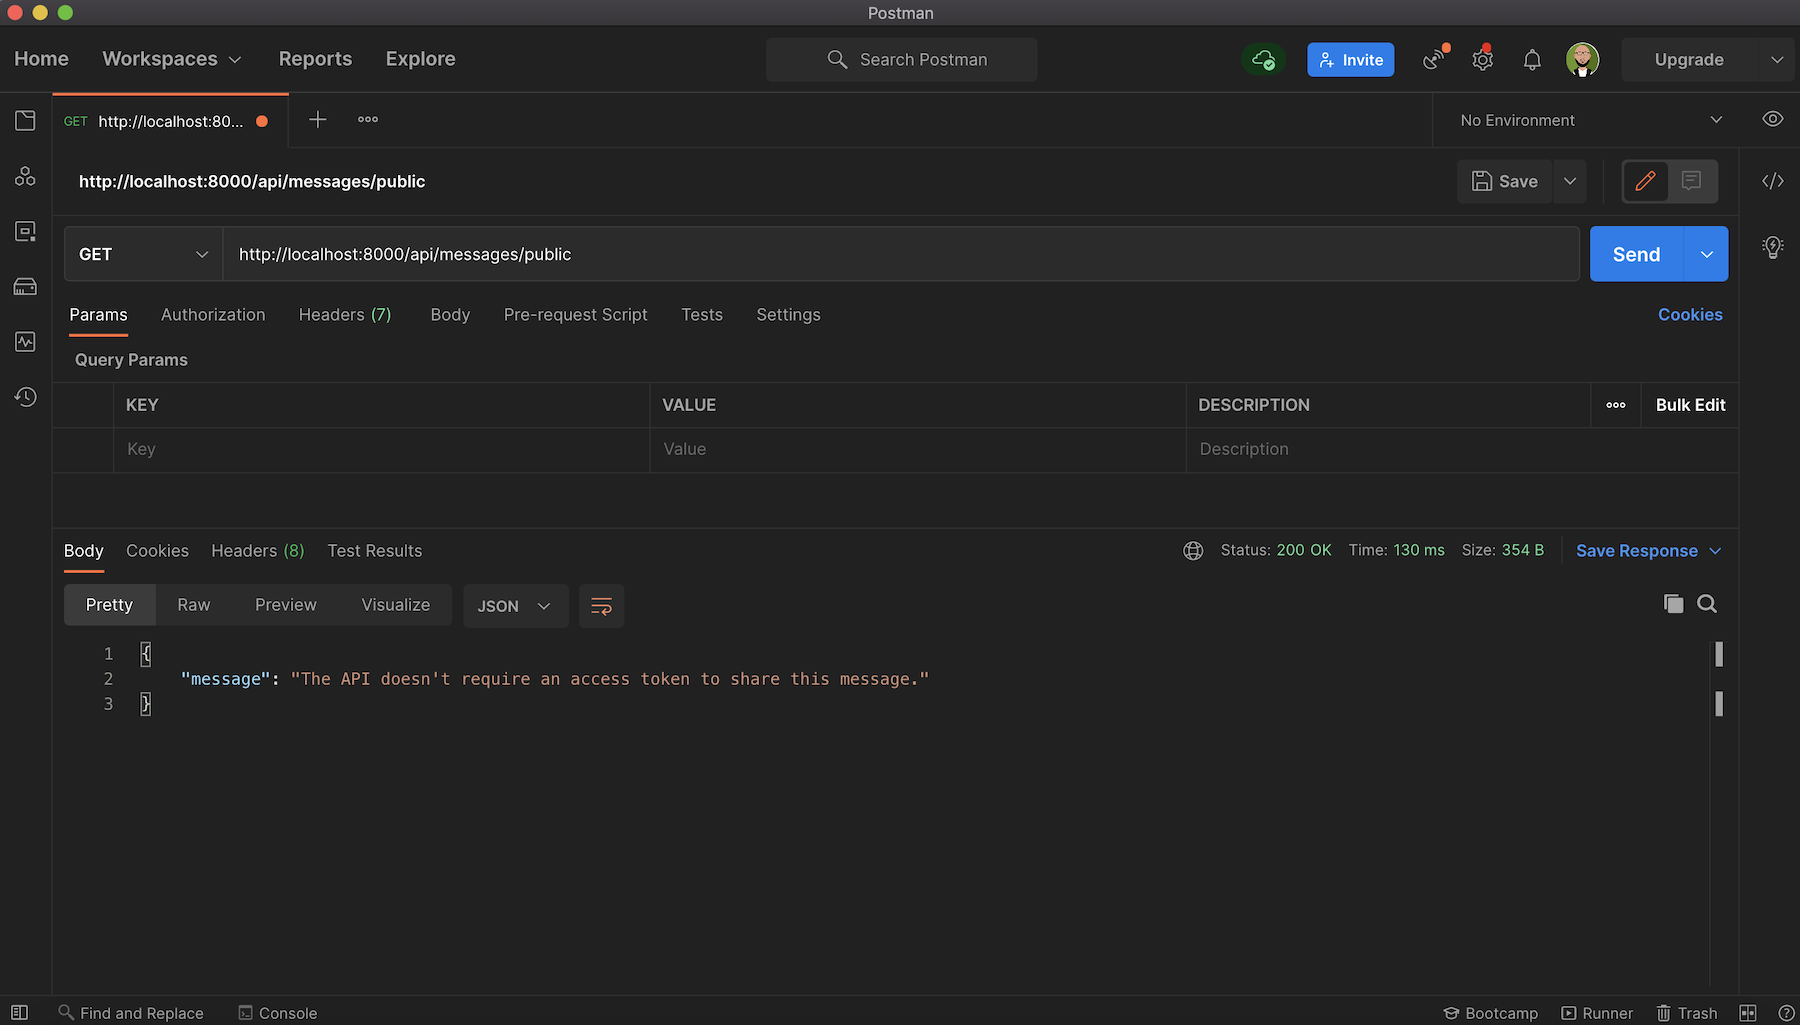
Start with the public endpoint. Create a new GET request to this endpoint http://localhost:8000/api/messages/public. You will get the message The API doesn't require an access token to share this message, as shown below:
Next, try out the protected endpoint on http://localhost:8000/api/messages/protected.
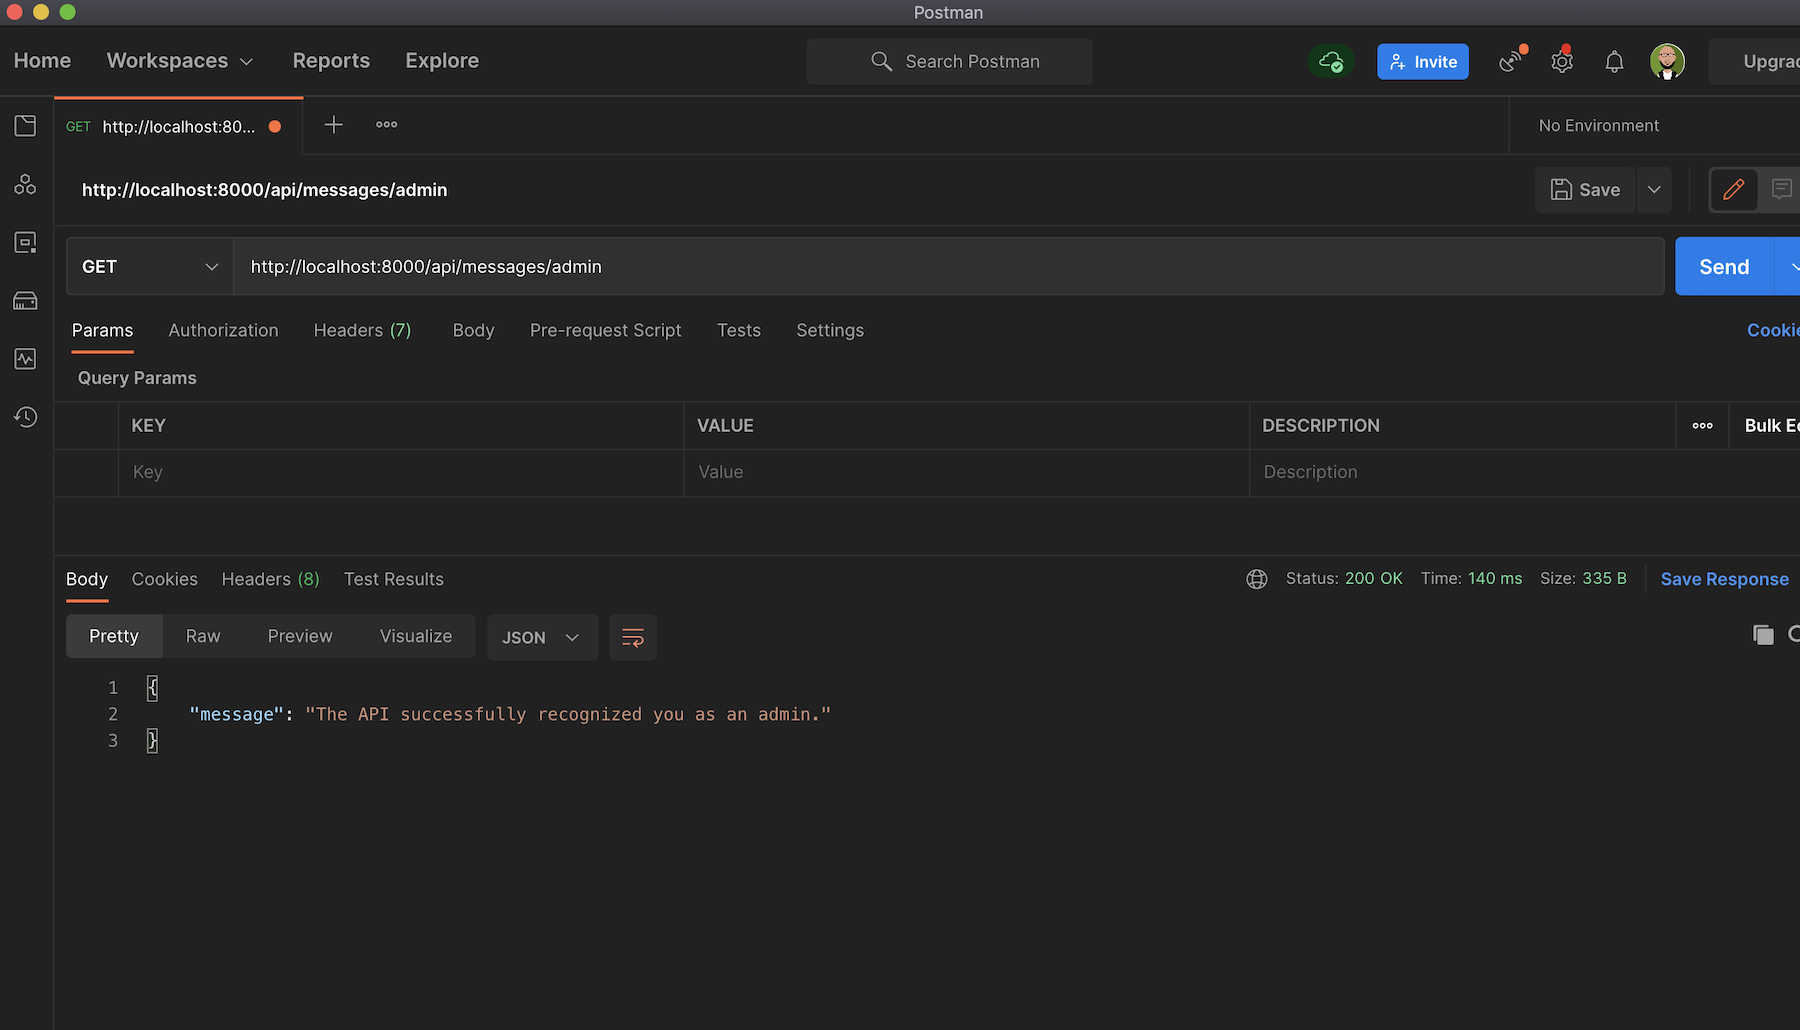
And lastly, the admin endpoint on [http://localhost:8000/api/messages/admin] (http://localhost:8000/api/messages/admin) will give you the message The API successfully recognized you as an admin.:
At the moment, all the created endpoints can be accessed by anyone. Of course, this is not what we want. You need to ensure that /protected and /admin endpoints are exposed to authorized users only. You will start the configuration in the next section.
If you haven't yet, make sure you create a free Auth0 account now.
Securing protected and admin endpoints
You will use Auth0 to secure the endpoints (protected and admin). To do that, you will need to head back to your Auth0 dashboard and configure an API.
To begin, navigate to the API section of your Auth0 management dashboard by clicking "Applications"> "APIs". If you have created any APIs before, this will show you the list of all APIs for your account, but for this tutorial, go ahead and click on the "CREATE API" button and set up a new one.

Provide a friendly name such as Symfony API Server for the API and set its identifier to https://localhost:8000. You are free to use any name and identifier, but if you want to follow this tutorial exactly, you should maintain the values above. Leave the signing algorithm as RS256 and click on the "Create" button to proceed. You will need the values from here later in the tutorial.
Install dependencies and configure authentication
To secure the GET /api/messages/protected and GET /api/messages/admin endpoints you will use the JWT authentication bundle for Symfony named auth0/jwt-auth-bundle.
Stop the application from running using CTRL + C and run the following command to install the bundle using composer:
composer require auth0/jwt-auth-bundle:"~4.0"
After installing the bundle in your project, you should find a new file located at config/packages/jwt_auth.yaml. If not, create the file and paste the following content in it:
jwt_auth:
  domain: "%env(AUTH0_DOMAIN)%"
  client_id: "%env(AUTH0_CLIENT_ID)%"
  audience: "%env(AUTH0_AUDIENCE)%"
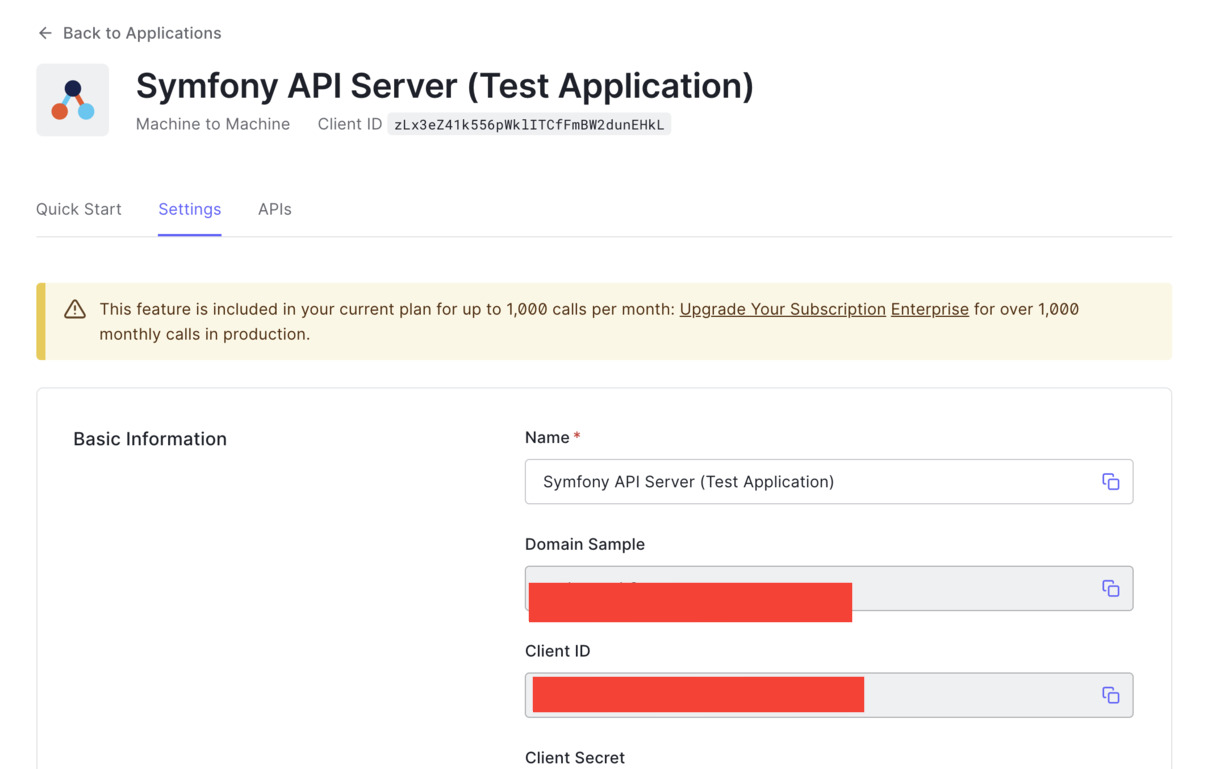
Earlier, when you created an API, Auth0 also automatically created a test application for your API. This will be the Auth0 application that will hold your users. You can find this by clicking Applications > Applications, then selecting the Test Application from the list that matches what you named your API. If you named it the same as in this tutorial, it will be "Symfony API Server (Test Application)". You can also select and use any other applications for your account. But for this tutorial, click on the test application, and you will see a page as shown here:
Open .env.local file and update the values of the environment variables below:
CLIENT_ORIGIN_URL=http://localhost:4040
AUTH0_AUDIENCE=http://localhost:8000
AUTH0_DOMAIN=YOUR_AUTH0_DOMAIN
AUTH0_CLIENT_ID=YOUR_AUTH0_ID
AUTH0_CLIENT_SECRET=YOUR_AUTH0_CLIENT_SECRET
Ensure to replace YOUR_AUTH0_DOMAIN, YOUR_AUTH0_CLIENT_ID, and YOUR_AUTH0_CLIENT_SECRET placeholders with the appropriate values as obtained from your Auth0 Dashboard.
Setting up User and User provider
Handling authentication and authorization requires Auth0 to be aware of the currently authenticated user. This is the job of a User provider in Symfony, as it helps to reload a user from the session and load the user for other specific features like using username or email for authentication.
If users of our API were stored in the database, creating a custom user provider might not be necessary, but here, we will load users from a custom location (Auth0), hence the need to create one.
To begin with, navigate to the src folder and create a new folder named Security and within the newly created folder, create another one and call it User. Next, create the user class within the User folder and name it WebServiceUser.php. Open the newly created file and paste the following code into it:
<?php

namespace App\Security\User;

use Symfony\Component\Security\Core\User\EquatableInterface;
use Symfony\Component\Security\Core\User\UserInterface;

class WebServiceUser implements
    UserInterface, EquatableInterface {

    private $roles;
    private $jwt;

    public function __construct($jwt, $roles) {

        $this->roles = $roles;
        $this->jwt = $jwt;
    }

    /**
     * @inheritDoc
     */
    public function getRoles()
    : array {

        return $this->roles;
    }

    /**
     * @inheritDoc
     */
    public function getPassword()
    : ?string {

        return null;
    }

    /**
     * @inheritDoc
     */
    public function getSalt()
    : ?string {

        return null;
    }

    public function isEqualTo(UserInterface $user)
    : bool {

        if (!$user instanceof WebServiceUser) {
            return false;
        }

        return $this->getUsername() === $user->getUsername();
    }

    /**
     * @inheritDoc
     */
    public function getUsername() {

        return $this->jwt["email"] ?? $this->jwt["sub"];
    }

    /**
     * @inheritDoc
     */
    public function eraseCredentials() {
    }

    public function getUserIdentifier() {
        return $this->jwt["email"] ?? $this->jwt["sub"];
    }
}
Here, the WebServiceUser class implements two different interfaces:
- UserInterface — represents the interface that all User classes must implement
- EquatableInterface — used to test if two objects are equal in security and re-authentication context
Next, create a file in the User folder and name it WebServiceAnonymousUser.php. This will return the anonymous user. Use the following content for it:
<?php

namespace App\Security\User;

class WebServiceAnonymousUser extends WebServiceUser {

    public function __construct() {

        parent::__construct(null, ['IS_AUTHENTICATED_ANONYMOUSLY']);
    }

    public function getUsername() {

        return null;
    }
}
To wrap thing up, create another file within the User folder and name it WebServiceUserProvider.php. Once you are done, paste the following code in it:
<?php

namespace App\Security\User;

use Auth0\JWTAuthBundle\Security\Core\JWTUserProviderInterface;
use Symfony\Component\Security\Core\Exception\UnsupportedUserException;
use Symfony\Component\Security\Core\User\UserInterface;
use Symfony\Polyfill\Intl\Icu\Exception\NotImplementedException;


class WebServiceUserProvider implements JWTUserProviderInterface {

    public function loadUserByJWT($jwt)
    : WebServiceUser {
        $data = ['sub' => $jwt->sub];
        $roles = [];
        $roles[] = 'ROLE_OAUTH_AUTHENTICATED';

        return new WebServiceUser($data, $roles);
    }

    public function getAnonymousUser()
    : WebServiceAnonymousUser {

        return new WebServiceAnonymousUser();
    }

    public function loadUserByUsername($username) {

        throw new NotImplementedException('method not implemented');
    }

    public function refreshUser(UserInterface $user) {

        if (!$user instanceof WebServiceUser) {
            throw new UnsupportedUserException(
                sprintf('Instances of "%s" are not supported.', get_class($user))
            );
        }

        return $this->loadUserByUsername($user->getUsername());
    }

    public function supportsClass($class)
    : bool {

        return $class === 'App\Security\User\WebServiceUser';
    }

    public function loadUserByIdentifier(string $identifier)
    {
        throw new NotImplementedException('method not implemented');
    }
}
This class implements the JWTUserProviderInterface from the Auth0 bundle installed earlier, which specifies the important methods that the WebServiceUserProvider class must implement. These methods are:
loadUserByJWT: it receives the decoded JWT Access Token and returns a User.getAnonymousUser: returns an anonymous user that represents an unauthenticated one (usually represented by the roleIS_AUTHENTICATED_ANONYMOUSLY)
Creating a Guard Authenticator
Next, we need to create a guard authenticator in Symfony. To do that, create a new file within the src/Security/User folder and name it GuardAuthenticator.php. Open the new file and use the following content for it:
<?php


namespace App\Security\User;


use Auth0\JWTAuthBundle\Security\Guard\JwtGuardAuthenticator;
use Symfony\Component\HttpFoundation\JsonResponse;
use Symfony\Component\HttpFoundation\Request;
use Symfony\Component\Security\Core\Exception\AuthenticationException;

class GuardAuthenticator extends JwtGuardAuthenticator
{
    public function start(Request $request, AuthenticationException $authException = null)
    {
        $responseBody = [
            'message' => 'No authorization token was found',
        ];

        return new JsonResponse($responseBody, JsonResponse::HTTP_UNAUTHORIZED);
    }
}
This GuardAuthenticator extends the JwtGuardAuthenticator class from the jwt bundle and checks if an access token is present in an HTTP request header. If not, it returns an appropriate message.
Configure the Security Provider
Before configuring the security provider, create a service for WebServiceUserProvider. Services are a great way to make your applications easier to maintain and adapt to new requirements. You can create one by adding this code to the bottom of config/services.yaml file:
parameters:

services:
    ...
    # 👇  new code starts here
    web_service_user_provider:
        class: App\Security\User\WebServiceUserProvider
        arguments: ["@jwt_auth.auth0_service"]
Lastly, modify the security.yaml file located in config/packages/security.yaml file such that it contains the following:
- The
web_service_user_providerservice - The secured area that you want to authenticate using an access token
- The
access_controlsection with the roles needed for each route You can replace it completely with the following:
security:
  enable_authenticator_manager: true

  # https://symfony.com/doc/current/security.html#where-do-users-come-from-user-providers
  providers:
    #        users_in_memory: { memory: null }
    web_service_user_provider:
      id: App\Security\User\WebServiceUserProvider
  firewalls:
    dev:
      pattern: ^/(_(profiler|wdt)|css|images|js)/
      security: false
    secured_area:
      pattern: ^/api
      stateless: true
      guard:
        authenticators:
          id: App\Security\User\GuardAuthenticator
      provider: web_service_user_provider
  # Easy way to control access for large sections of your site
  # Note: Only the *first* access control that matches will be used
  access_control:
    - { path: ^/api/messages/public, roles: PUBLIC_ACCESS }
    - { path: ^/api/messages/protected, roles: ROLE_OAUTH_AUTHENTICATED }
    - { path: ^/api/messages/admin, roles: ROLE_OAUTH_AUTHENTICATED }
Now, you can test this again with Postman by accessing the protected route. Start the application by running symfony serve and access http://localhost:8000/api/messages/protected. You will receive a message indicating that "No authorization token was found" as shown below:
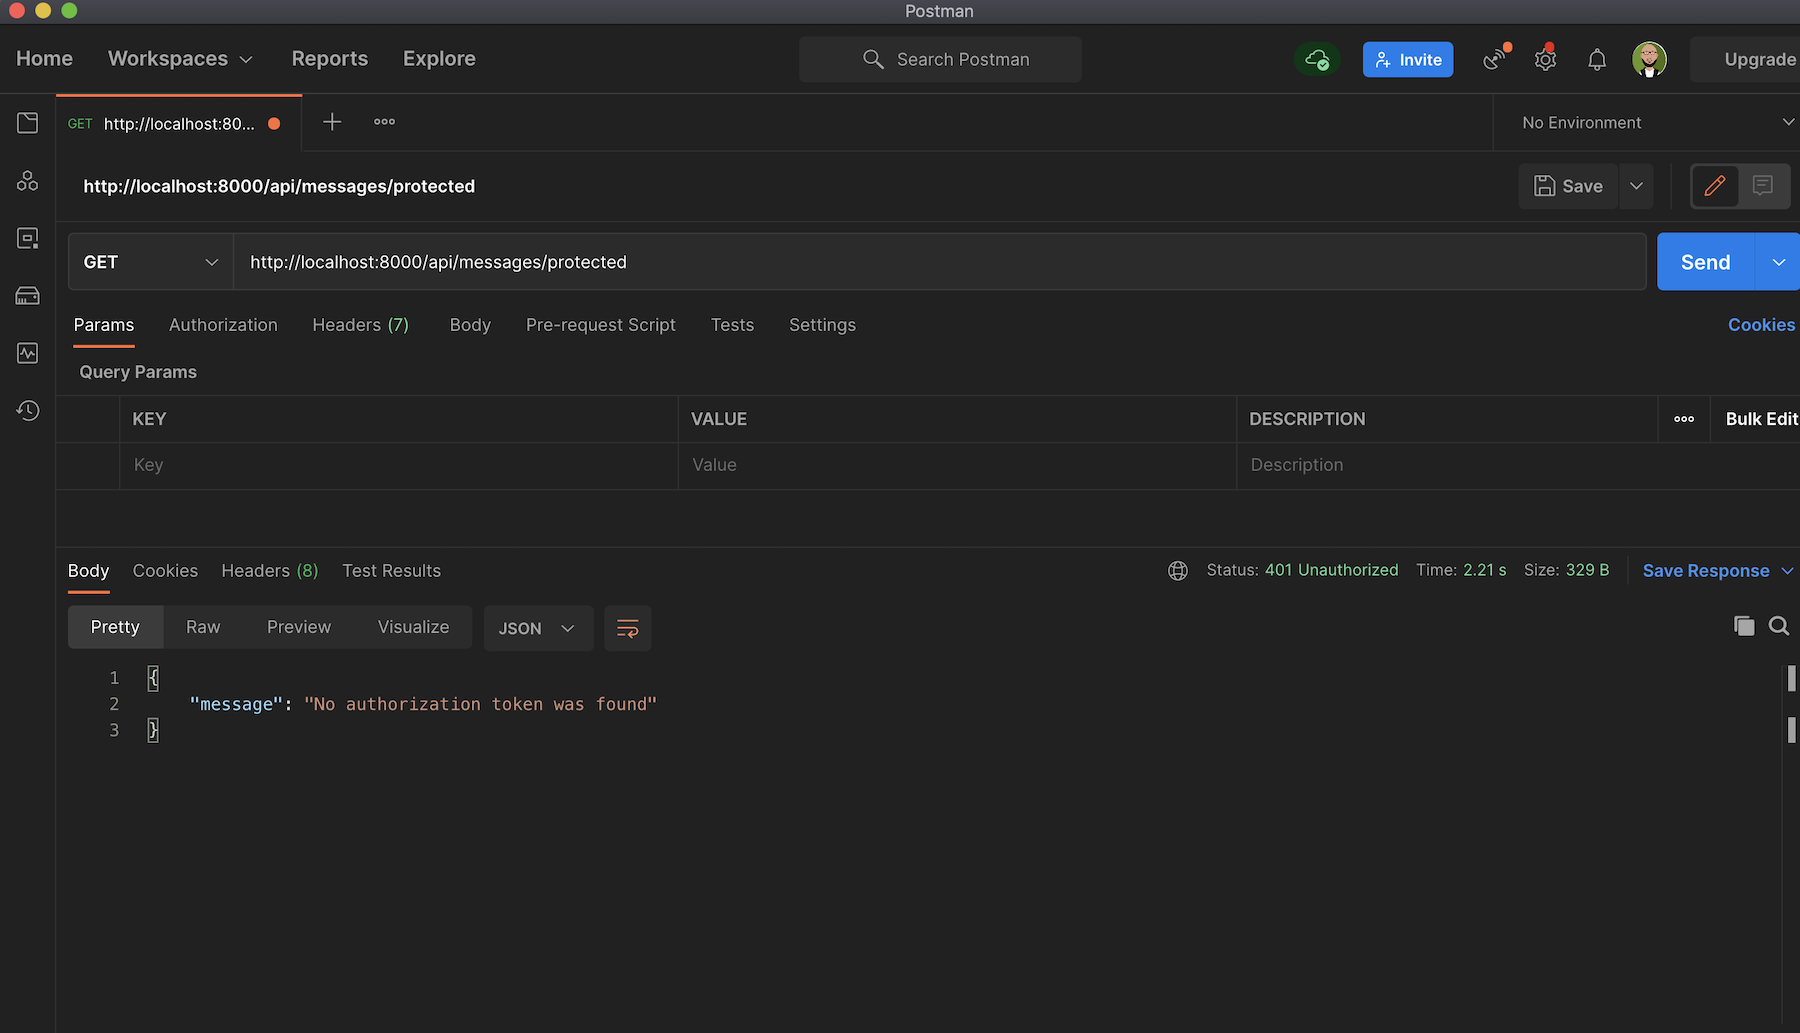
This is because you need an access token to successfully retrieve contents from the /protected endpoint.
Obtain a token and authorize the test application
Generating an access token on the fly will require your client application to get authorized by Auth0, but as a proof of concept, for now, you will obtain and use a test token for your API from the Auth0 Dashboard. To do this, navigate to the API section in your Auth0 Dashboard and click on the API that you created earlier. Next, click on the Test tab and scroll down to copy the access_token shown under the Response subtitle.
Open up Postman again and select Bearer Token from the Authorization tab and then paste the Access Token:
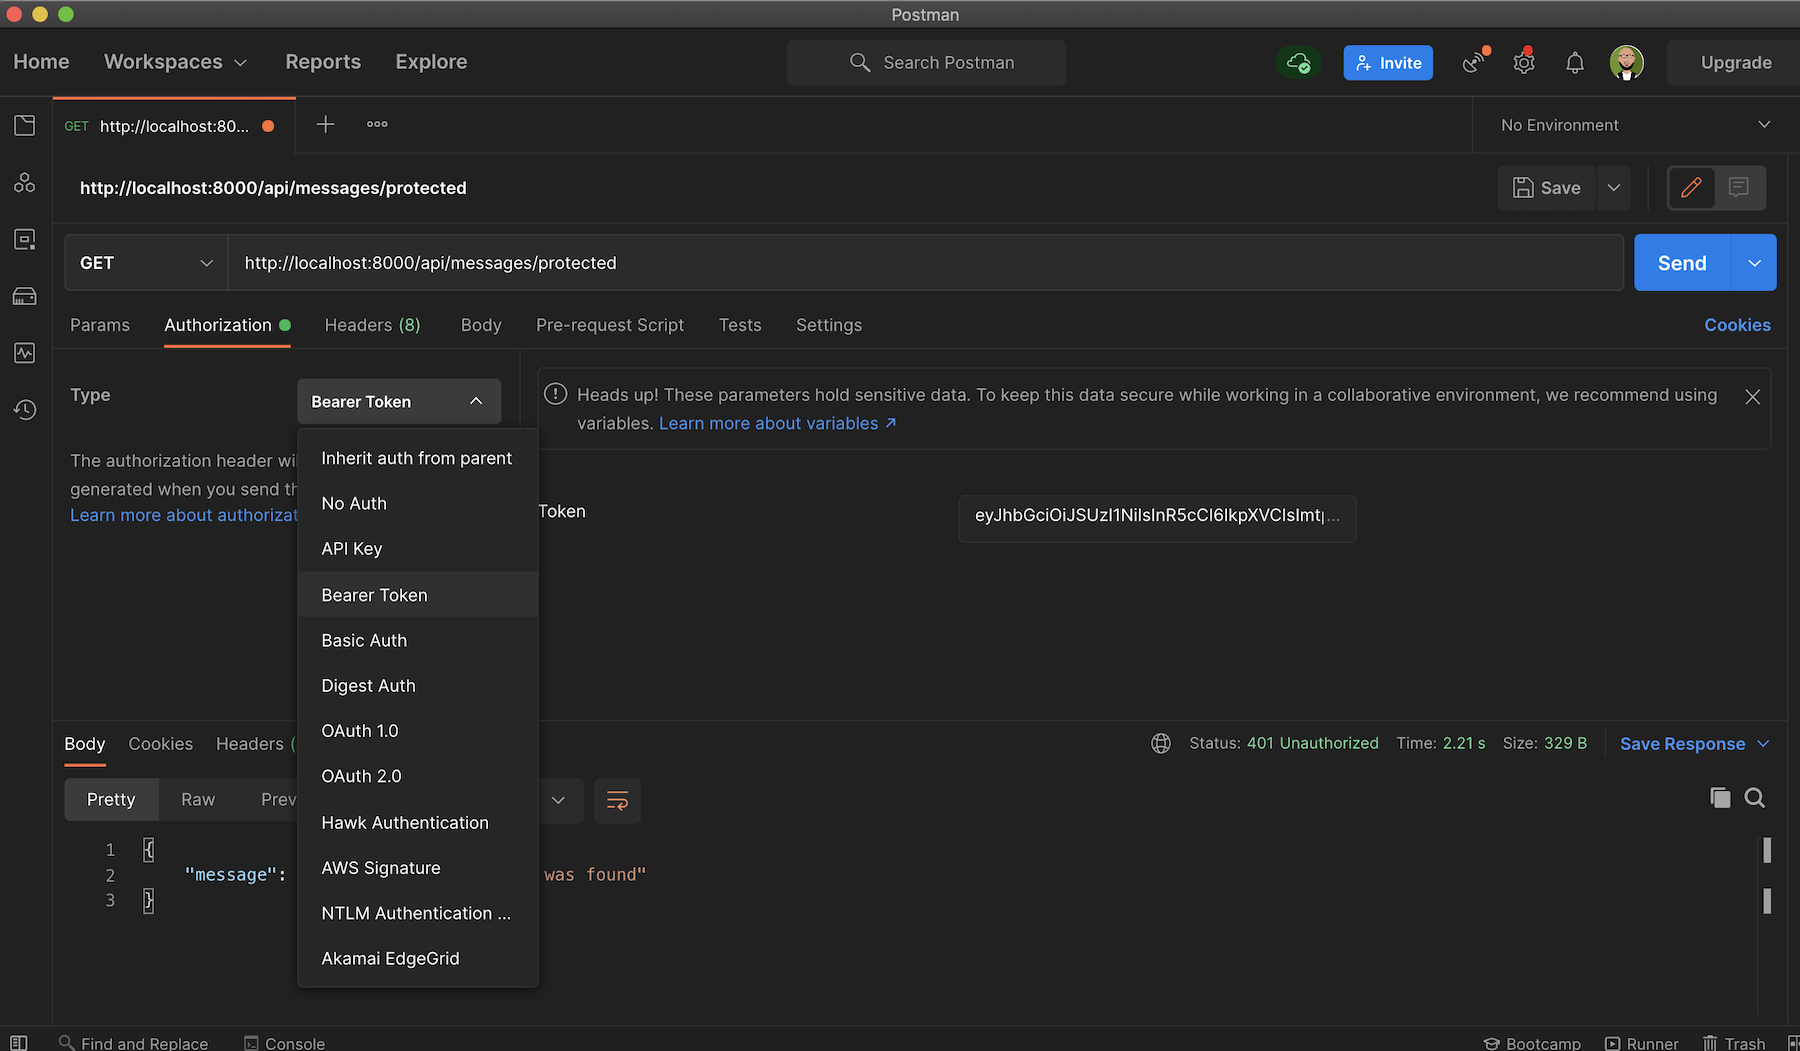
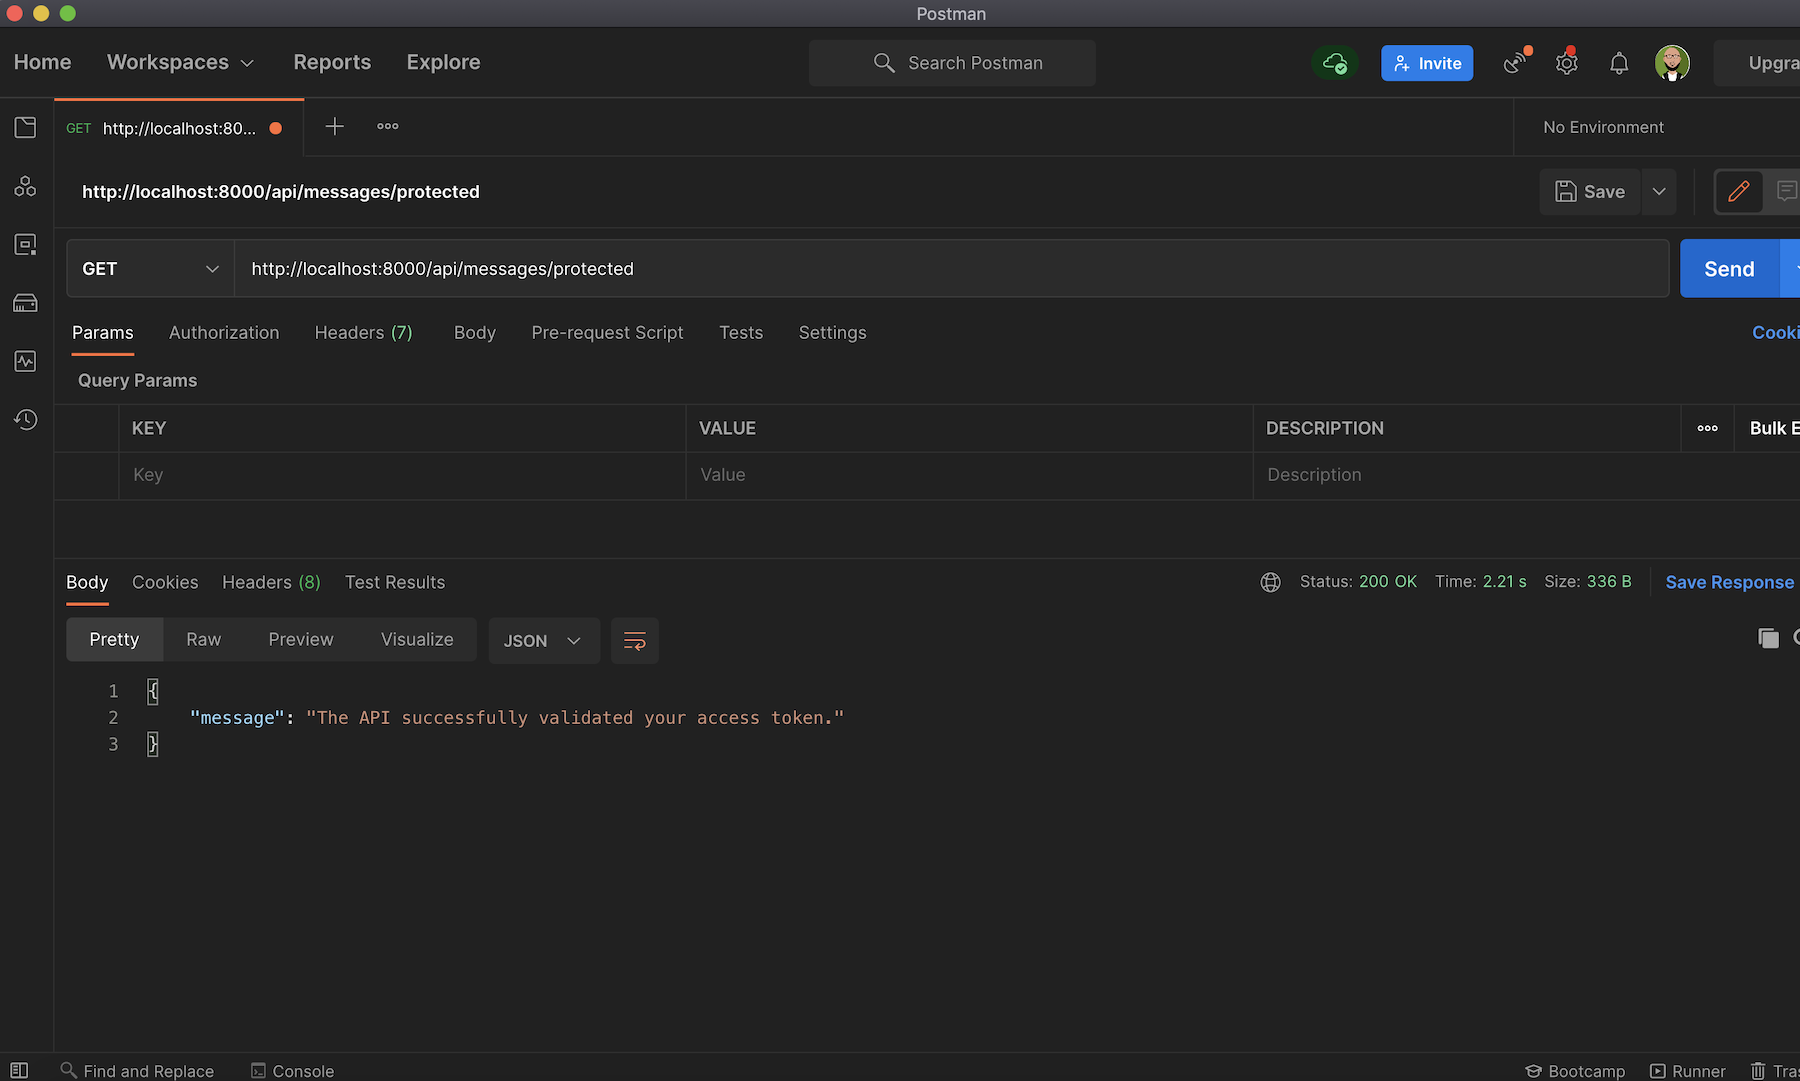
Now you can try out the protected api/messages/protected endpoint, and you'll get the message The API successfully validated your access token., as shown below:

Implementing Role-Based Access Control for the API
As mentioned earlier, the GET /api/messages/admin endpoint requires the access token to contain a read:admin-messages permission to access the admin data. This is often referred to as Role-Based Access Control (RBAC), where permissions have to be assigned to users based on their role within an organization.
In this section, to implement and configure this access control, you will do the following:
- Enable RBAC (Role-Based Access Control) Settings within your Auth0 Dashboard
- Create an
adminrole within the Dashboard - Create specific permission.
read:admin-messagesto be precise. - Add the newly created permission to the
adminrole. - Assign the new role to a particular user
Enable RBAC Settings
For role-based access control (RBAC) to work properly, you must enable it for your API using either the Dashboard or the Management API.
Navigate to your Auth0 Dashboard and click on APIs, then select the API created earlier Symfony API Server, and scroll down to the RBAC Settings section:
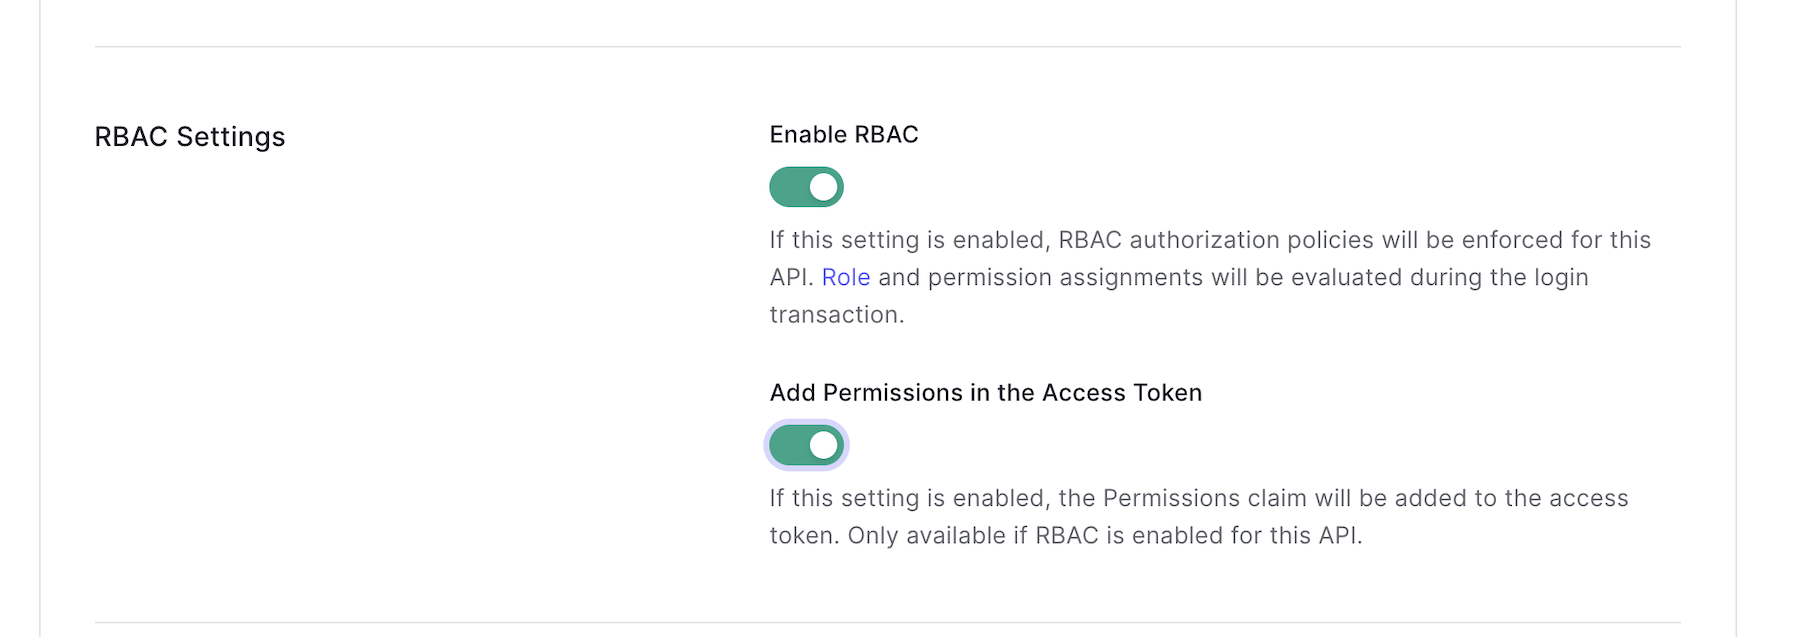
Enable RBAC by toggling both buttons here: "Enable RBAC" and "Add Permissions in the Access Token". This will enforce role-based access control authorization policies for any endpoint of choice and ensure that the permissions claim is added to the access token. Click on the Save button to update the changes.
Create an Admin Role
You can create roles using Auth0's Dashboard or the Management API. The roles can be used with the API Authorization Core feature set.
Go to the following:
- Dashboard
- Click on User Management from the side menu bar
- Click on Roles
- Next, click on the Create role button
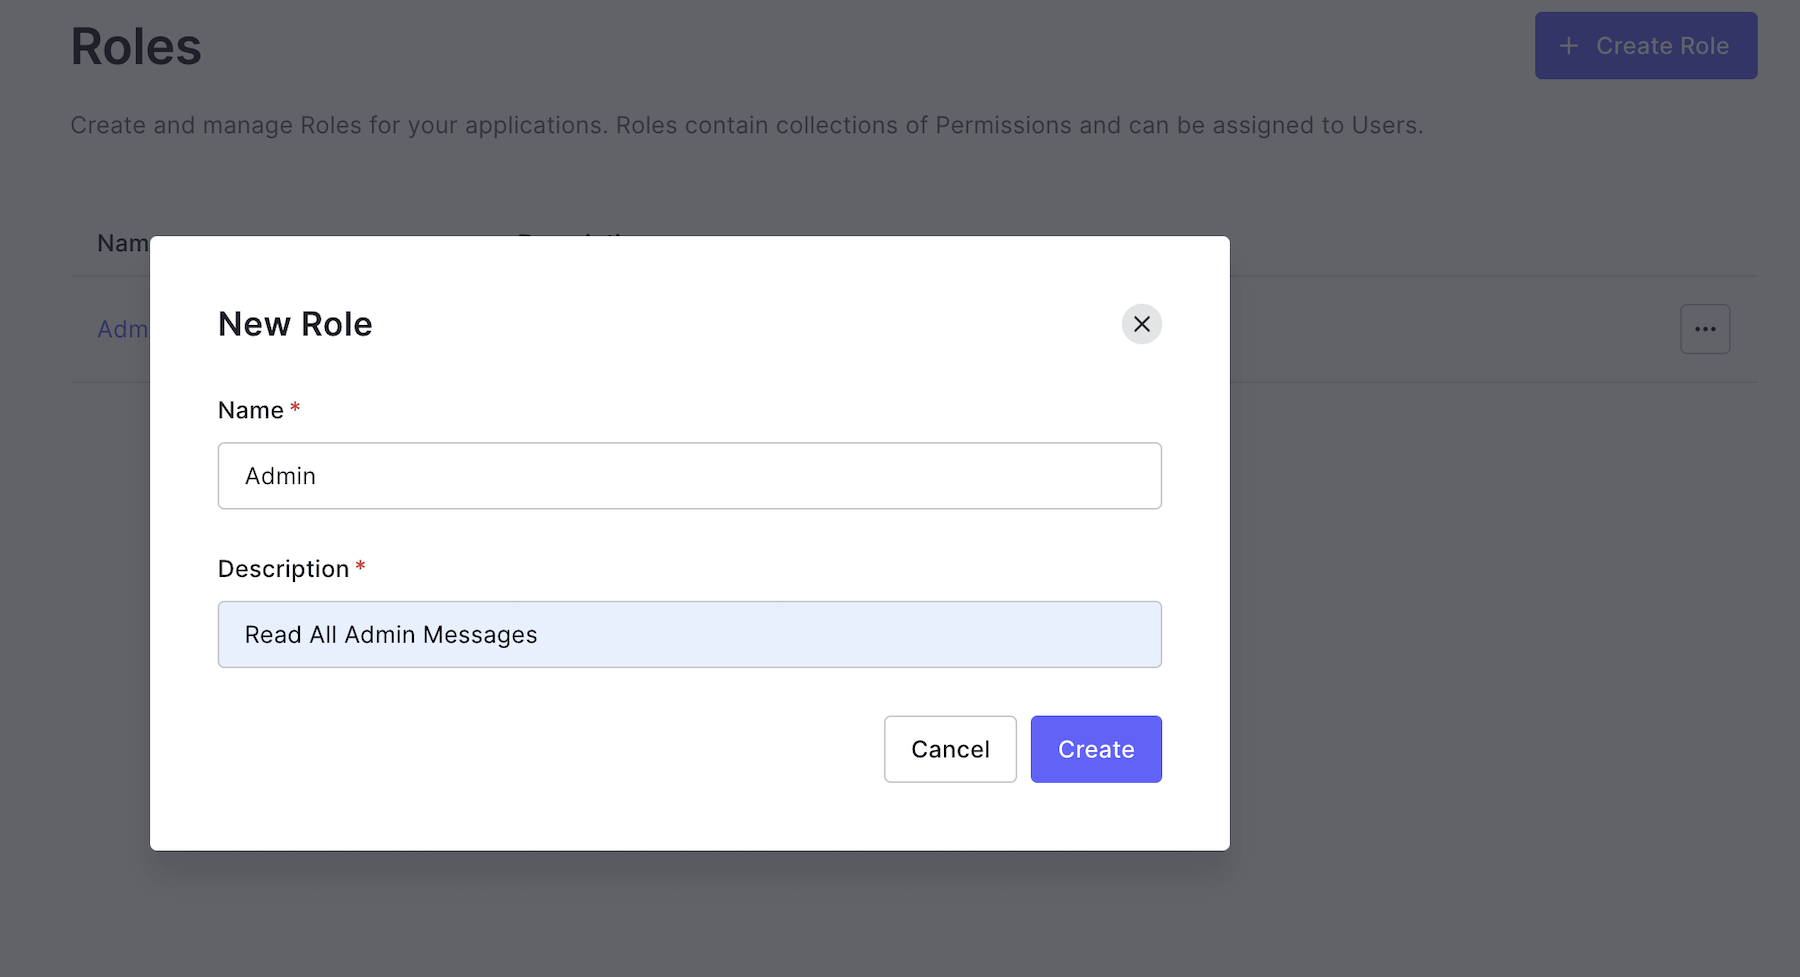
Give the role a name, such as "Admin" and add a description, such as "Read all admin messages":
Create permissions
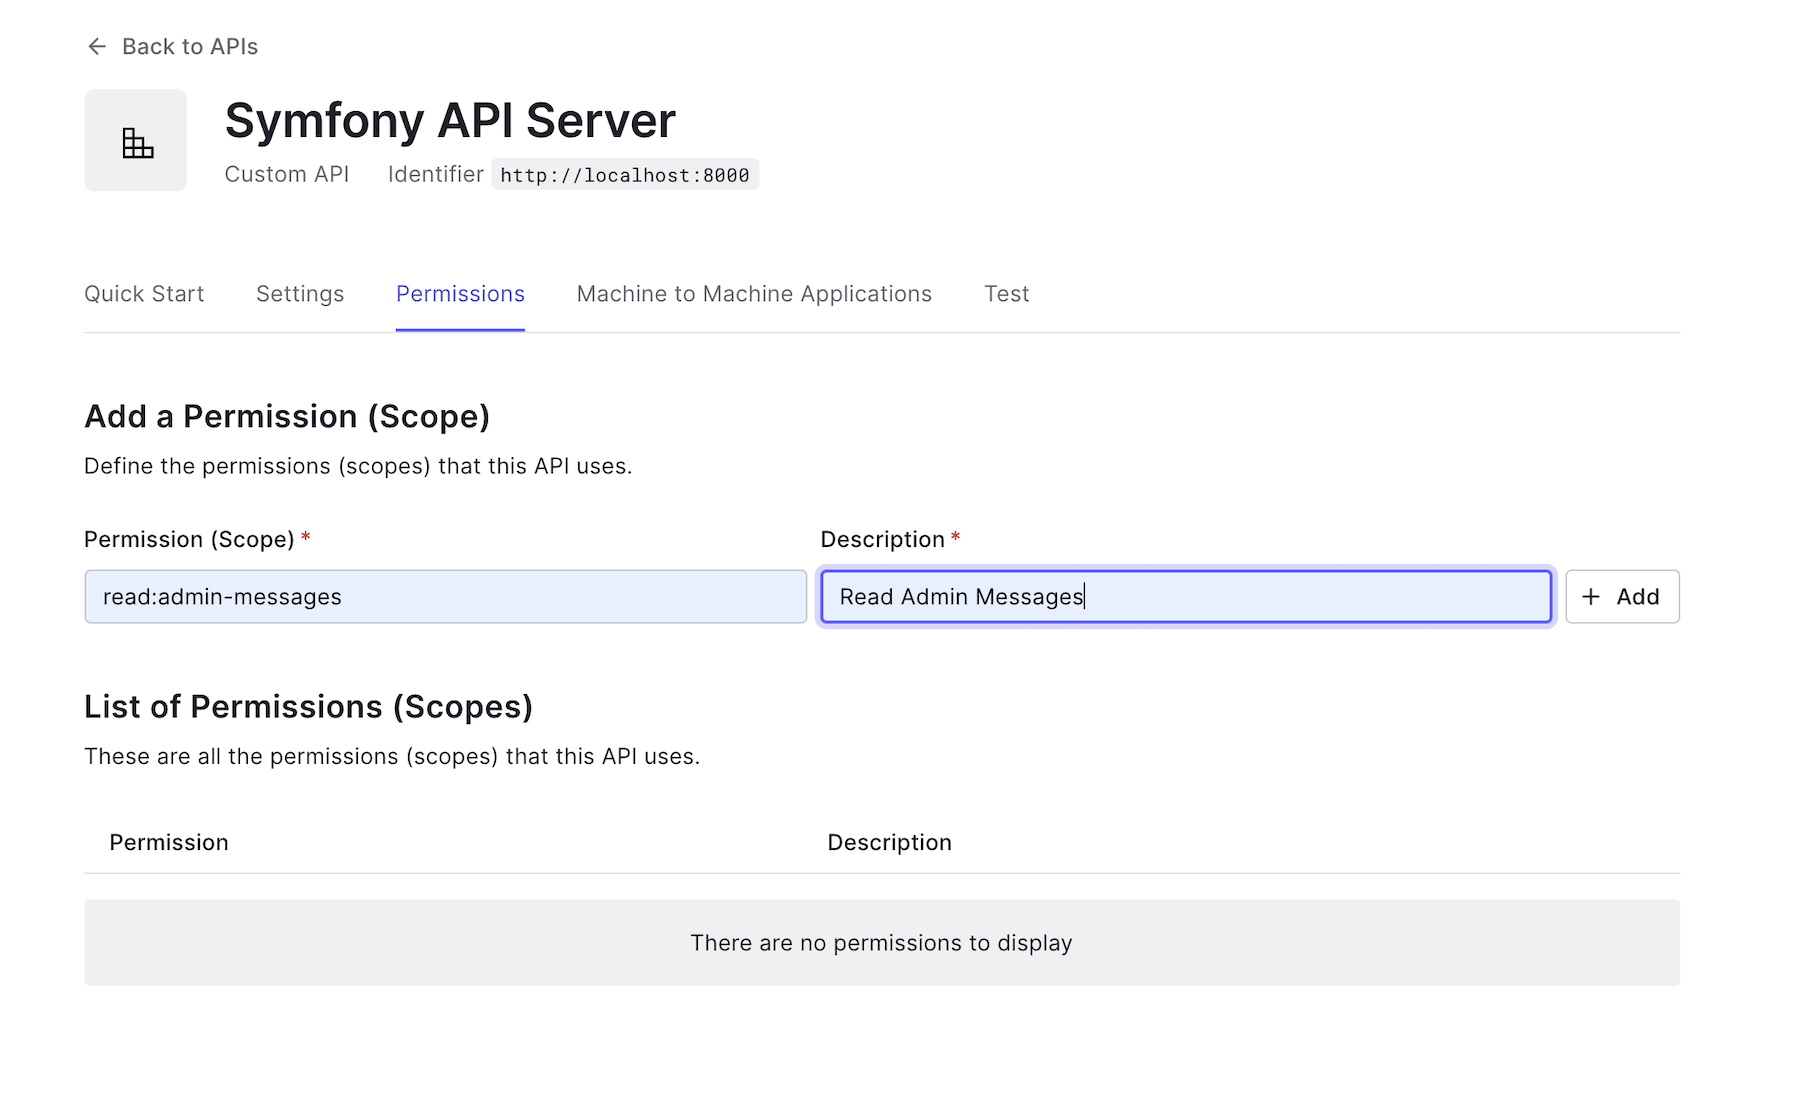
Go back to the Symfony API Server page from the API menu in the dashboard, and click on the "Permissions" tab from the same page to define permission and its scope.
Under "Permission (Scope), paste read:admin-messages. For "Description", put "Read admin messages". Make sure you click "Add" to save the permission.
Add permissions to roles
Now that you have created the Admin role and its corresponding permission, the next thing to do is to add the permission to the newly created role.
Go back to the "Roles" page in "User Management"> "Roles".

Click on the Admin role that you created earlier, and then click on the Permissions tab. Now click on the Add Permissions button. You will see a page like this:
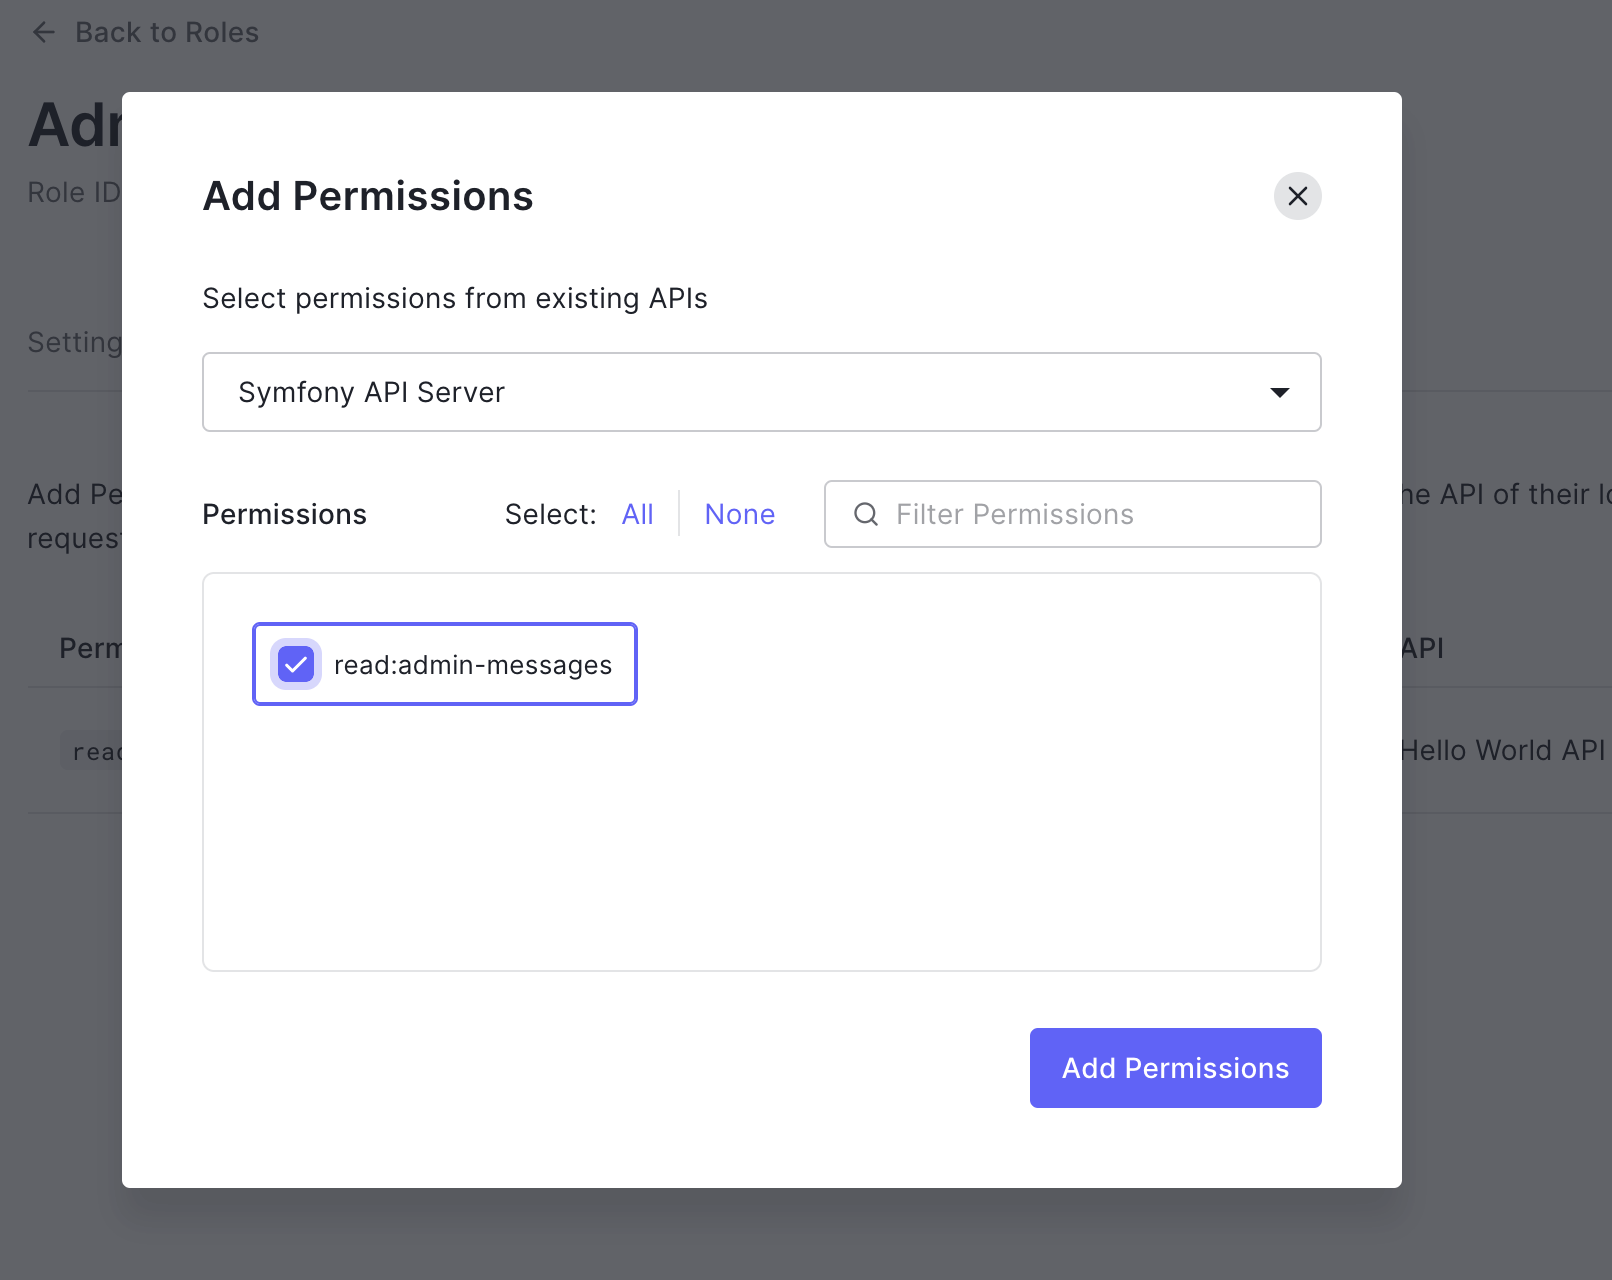
Select the API from the list; in our case, that would be Symfony API Server. Check the box next read:admin-messages to indicate the permission for the Admin role. Finally, click on the Add Permissions to save the changes.
Assign roles to users
There are two ways to assign a role to a user. You can choose a user from the Users list and then assign a role, or you can go to the User Details (user profile) page for an individual user and choose a role to assign in the Roles tab. You will stick with the Users list in this tutorial.
To do that:
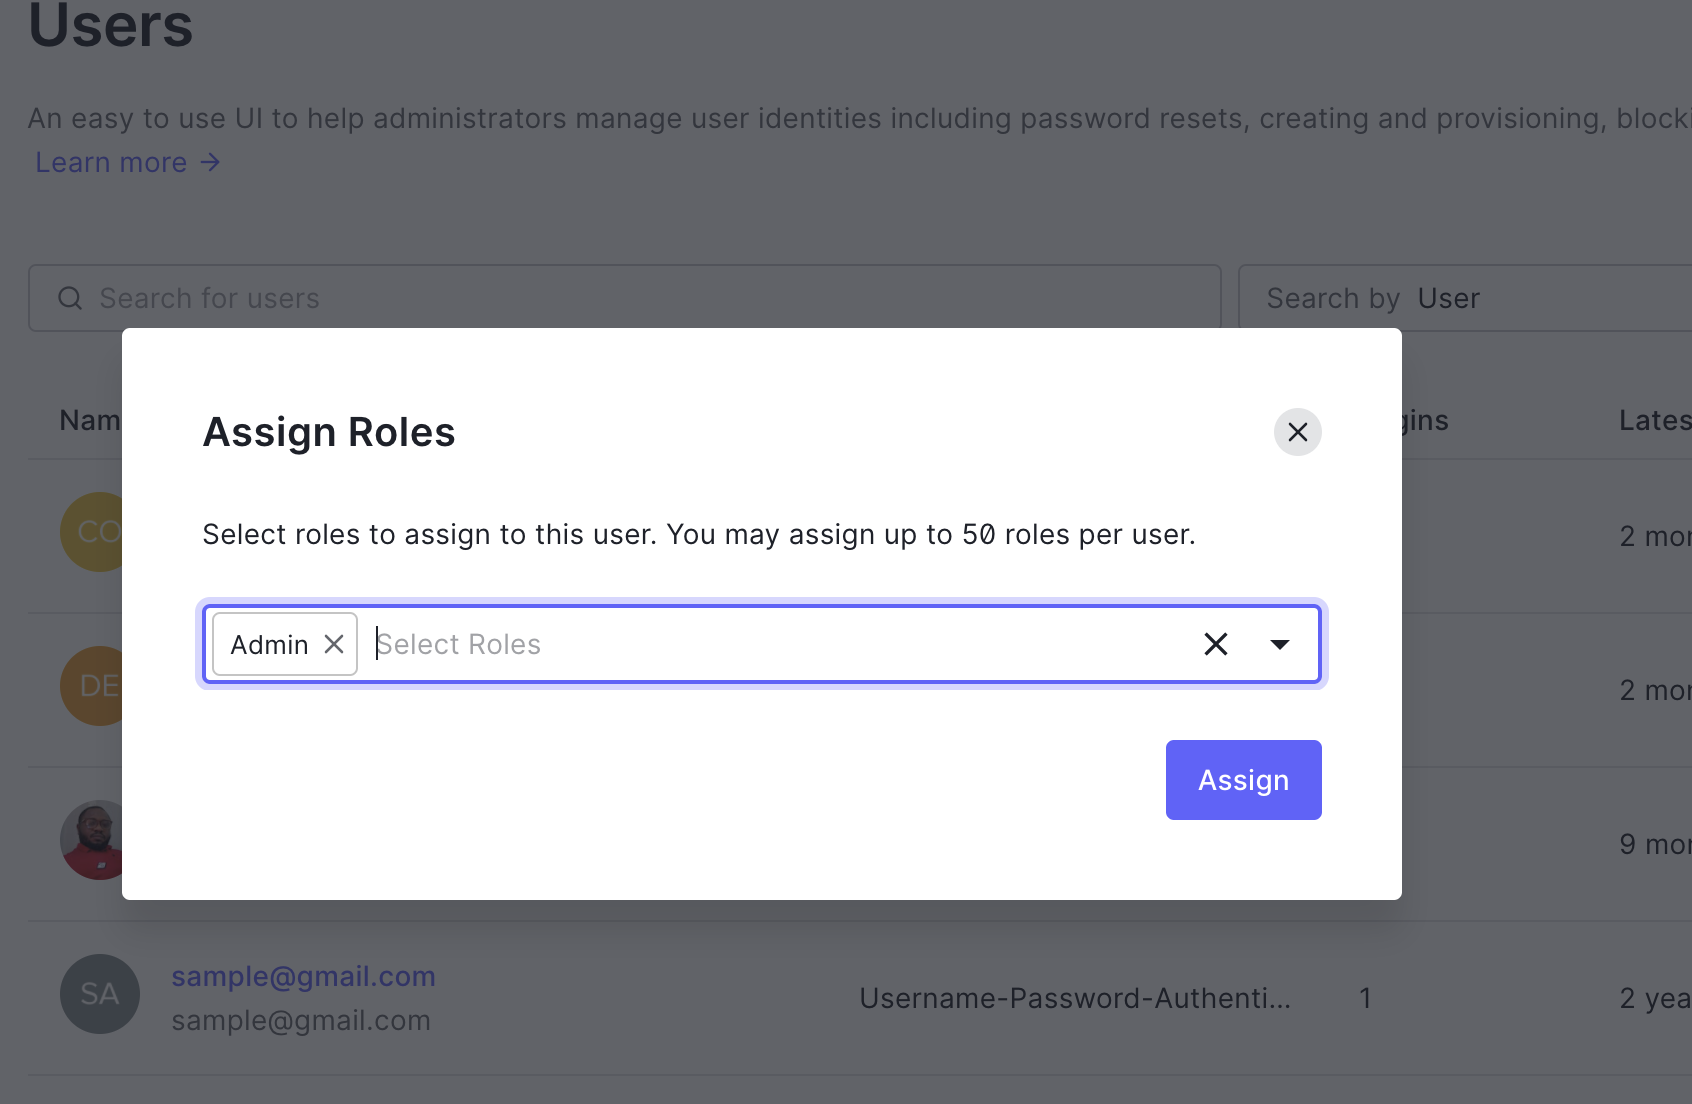
- Go to Dashboard > User Management > Users.
- Click "..." next to the user you want to modify, and select Assign Roles.
- Choose the role (s) you wish to assign, then click Assign
Updating Web Service User Provider
At this point, once a user is authenticated via the API, the access token that will be returned will either contain a read:admin-messages permission or not. To check for this permission before allowing the user to access admin data, you will update the src/Security/User/WebServiceUserProvider.php file as shown below:
...
class WebServiceUserProvider implements JWTUserProviderInterface {

    public function loadUserByJWT($jwt)
    : WebServiceUser {
        $data = ['sub' => $jwt->sub];
        $roles = [];
        $roles[] = in_array('read:admin-messages', $jwt->permissions) ? 'ROLE_ADMIN' : 'ROLE_OAUTH_AUTHENTICATED';

        return new WebServiceUser($data, $roles);
    }
    ...
}
Here, you checked if the read:admin-messages is present in the permissions array or not. If present, then a role of a ROLE_ADMIN will be assigned to the authenticated user. Otherwise, a role of ROLE_OAUTH_AUTHENTICATED would be assigned.
Also, open config/packages/security.yaml and update its content as shown here:
security:
  enable_authenticator_manager: true

  # https://symfony.com/doc/current/security.html#where-do-users-come-from-user-providers
  providers:
    #        users_in_memory: { memory: null }
    web_service_user_provider:
      id: App\Security\User\WebServiceUserProvider
  firewalls:
    dev:
      pattern: ^/(_(profiler|wdt)|css|images|js)/
      security: false
    secured_area:
      pattern: ^/api
      stateless: true
      guard:
        authenticators:
          id: App\Security\User\GuardAuthenticator
      provider: web_service_user_provider
  role_hierarchy:
    ROLE_ADMIN: [ROLE_OAUTH_AUTHENTICATED, ROLE_ALLOWED_TO_SWITCH]
  # Easy way to control access for large sections of your site
  # Note: Only the *first* access control that matches will be used
  access_control:
    - { path: ^/api/messages/public, roles: PUBLIC_ACCESS }
    - { path: ^/api/messages/protected, roles: ROLE_OAUTH_AUTHENTICATED }
    - { path: ^/api/messages/admin, roles: ROLE_ADMIN }
From the snippet above, you updated the role for the api/messages/admin endpoint.
Creating an event subscriber
Once an unauthorized user tries to access any of the /api/messages/admin endpoints without the appropriate permission, an exception will be thrown, indicating that such access is forbidden.
In this section, you will create an event subscriber that will listen to the forbidden event and return an appropriate message. To do that, create a folder named EventSubscriber within the src directory, and then create a new file named ExceptionSubscriber.php within it. Open the newly created file and use the following content for it:
<?php

namespace App\EventSubscriber;

use Symfony\Component\EventDispatcher\EventSubscriberInterface;
use Symfony\Component\HttpKernel\Event\ExceptionEvent;
use Symfony\Component\HttpKernel\Exception\AccessDeniedHttpException;
use Symfony\Component\HttpKernel\KernelEvents;
use Symfony\Component\HttpFoundation\JsonResponse;
use Symfony\Component\HttpFoundation\Response;

class ExceptionSubscriber implements EventSubscriberInterface
{
    public static function getSubscribedEvents()
    {
        return [
            KernelEvents::EXCEPTION => ['onKernelException']
        ];
    }

    public function onKernelException(ExceptionEvent $event)
    {
        $exception = $event->getThrowable();
        if ($exception instanceof AccessDeniedHttpException) {
            $event->setResponse(new JsonResponse([
                'message' => "Insufficient scopes.",
            ], Response::HTTP_UNAUTHORIZED));
            $event->stopPropagation();
        }
        return $exception;
    }
}
With all the required changes made, run the API server by issuing the following command:
symfony serve
Testing the Admin Endpoint
As mentioned, unlike other endpoints created so far, the GET /api/messages/admin endpoint requires that the access token contains the read:admin-messages permission. Since it's a bit difficult and not advisable to manipulate the access token from the Machine-to-Machine application on the Auth0 Dashboard, we will take a different approach and use a client application to simulate and test the client-server interaction.
This is the best way, for now, to ensure that we have an interface for users to:
- Log in and Logout
- Retrieve user profile information
- Protect application routes
- Make secure calls to an API
Note: Feel free to use your client app, if any, for this process.
To use a pre-built client app, issue the following command from the terminal to clone the app from GitHub:
git clone https://github.com/auth0-sample-gallery/spa_angular_typescript_hello-world.git hello-world-demo
This will clone the demo application within a new folder named hello-world-demo in your development directory.
Before installing the project's dependencies, ensure that you have Angular CLI installed. You can verify by issuing this command from the terminal on your system.
ng --version
The output will be the details of the current version of Angular CLI that you have installed on your system. If not installed, follow the instructions here to configure Angular CLI globally.
Move into the new project's folder and issue the following command to install the required dependencies:
// Change directory
cd hello-world-demo

// Install dependencies
npm install
The starter project uses a custom stylesheet to style and layout the application, so you don't have to make any changes.
Connect client application to Auth0
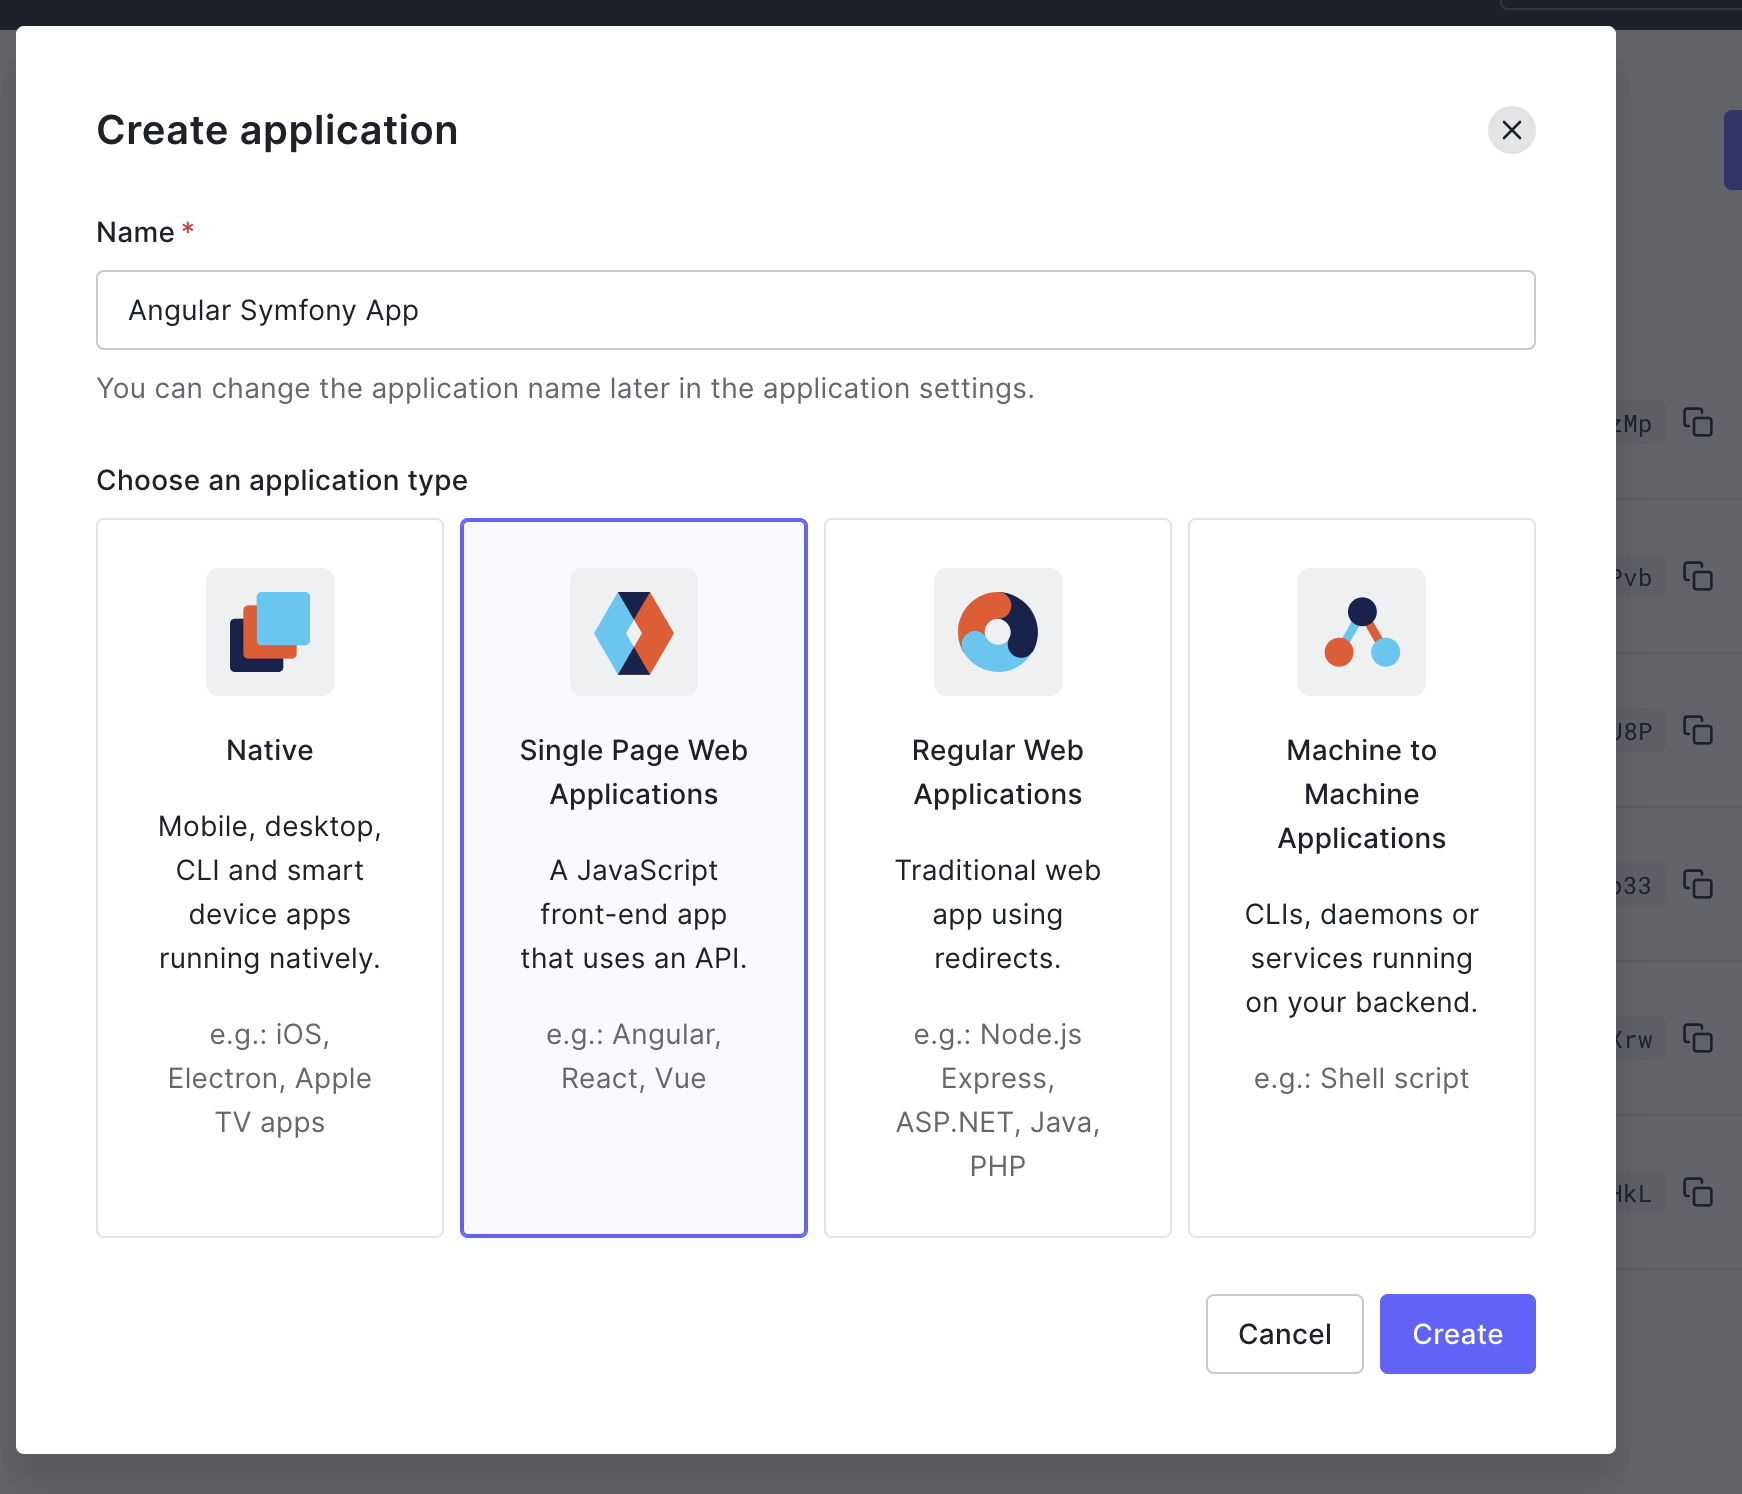
Next, you need to connect this application to Auth0. Back in your Auth0 dashboard, click on "Applications" > "Applications" > "Create Application".
Give it a name like "Angular Symfony App" and select "Single Page Web Applications" for the application name. Finally, click "Create".
The Angular demo application will redirect users to the Auth0 Login page whenever an authentication request is made. Auth0 will then redirect back with the necessary credentials.
For that redirection to happen securely, you must specify the URL to which Auth0 can redirect once it validates a user's credentials. Back in the Auth0 dashboard, select the application created for your API, click on the Settings tab on that page, and scroll down to locate the following fields:
- Allowed Callback URLs
- Allowed Web Origins
- Allowed Logout URLs
Use http://localhost:4040 as the value for each of the fields because the Client application will be accessible on that URL during development. Click on the Save Changes to proceed.
With the URLs properly specified, connect the client application with Auth0 by creating a new file named env.json in the root directory of the client application and populating it as shown here:
{
  "domain": "YOUR_AUTH0_DOMAIN",
  "clientId": "YOUR_AUTH0_CLIENT_ID",
  "audience": "http://localhost:8000",
  "apiServerUrl": "http://localhost:8000"
}
Make sure you fill in "Domain" and "Client ID" with your values from the Application page in the Auth0 dashboard. Now, go ahead and run the application using the following command:
ng serve
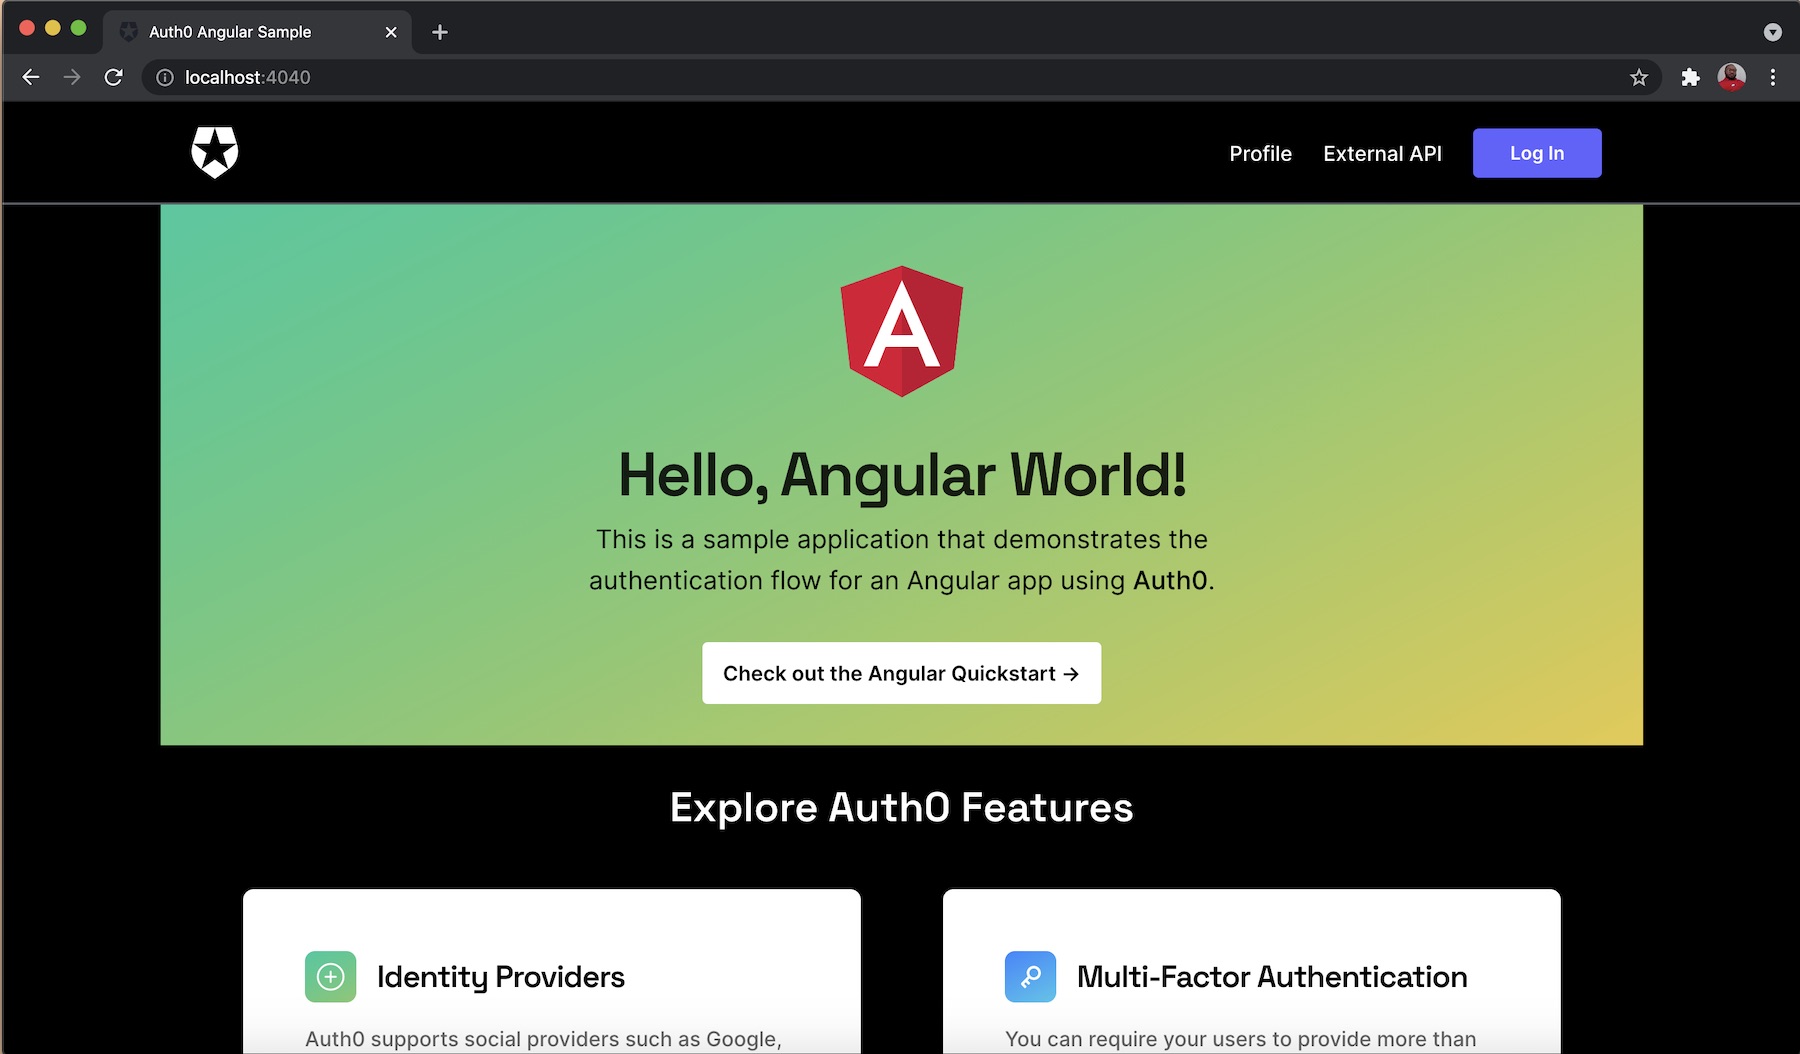
Navigate to http://localhost:4040 to access the application.
Enable communication between the client application and Symfony API Server
By default, browsers have security measures that disable interaction and sharing of resources between applications of different domains unless it is explicitly allowed by any of the applications. This means that sending HTTP requests from the client application to the Symfony API will be disabled at the moment. To enable communication between both apps, you will need to enable CORS (Cross-Origin Resource Sharing).
To enable the Symfony API, you will need to use the Nelmo Bundle. Run the following command to install it:
composer require nelmio/cors-bundle
Once the installation process is completed, a default configuration file named nelmio_cors.yaml will be generated in the config/packages folder as shown here:
nelmio_cors:
  defaults:
    origin_regex: true
    allow_origin: ["%env(CORS_ALLOW_ORIGIN)%"]
    allow_methods: ["GET", "OPTIONS", "POST", "PUT", "PATCH", "DELETE"]
    allow_headers: ["Content-Type", "Authorization"]
    expose_headers: ["Link"]
    max_age: 3600
  paths:
    "^/": null
The default configuration specified here would suffice as it stated all the appropriate HTTP verbs. Next, navigate to the .env.local file and update its content as shown below:
####> nelmio/cors-bundle ###
CORS_ALLOW_ORIGIN='^https?://(localhost|127.0.0.1)(:[0-9]+)?$'
####< nelmio/cors-bundle ###
Here, we specified that the localhost URL should be allowed.
Finally, start the Symfony server with:
symfony serve
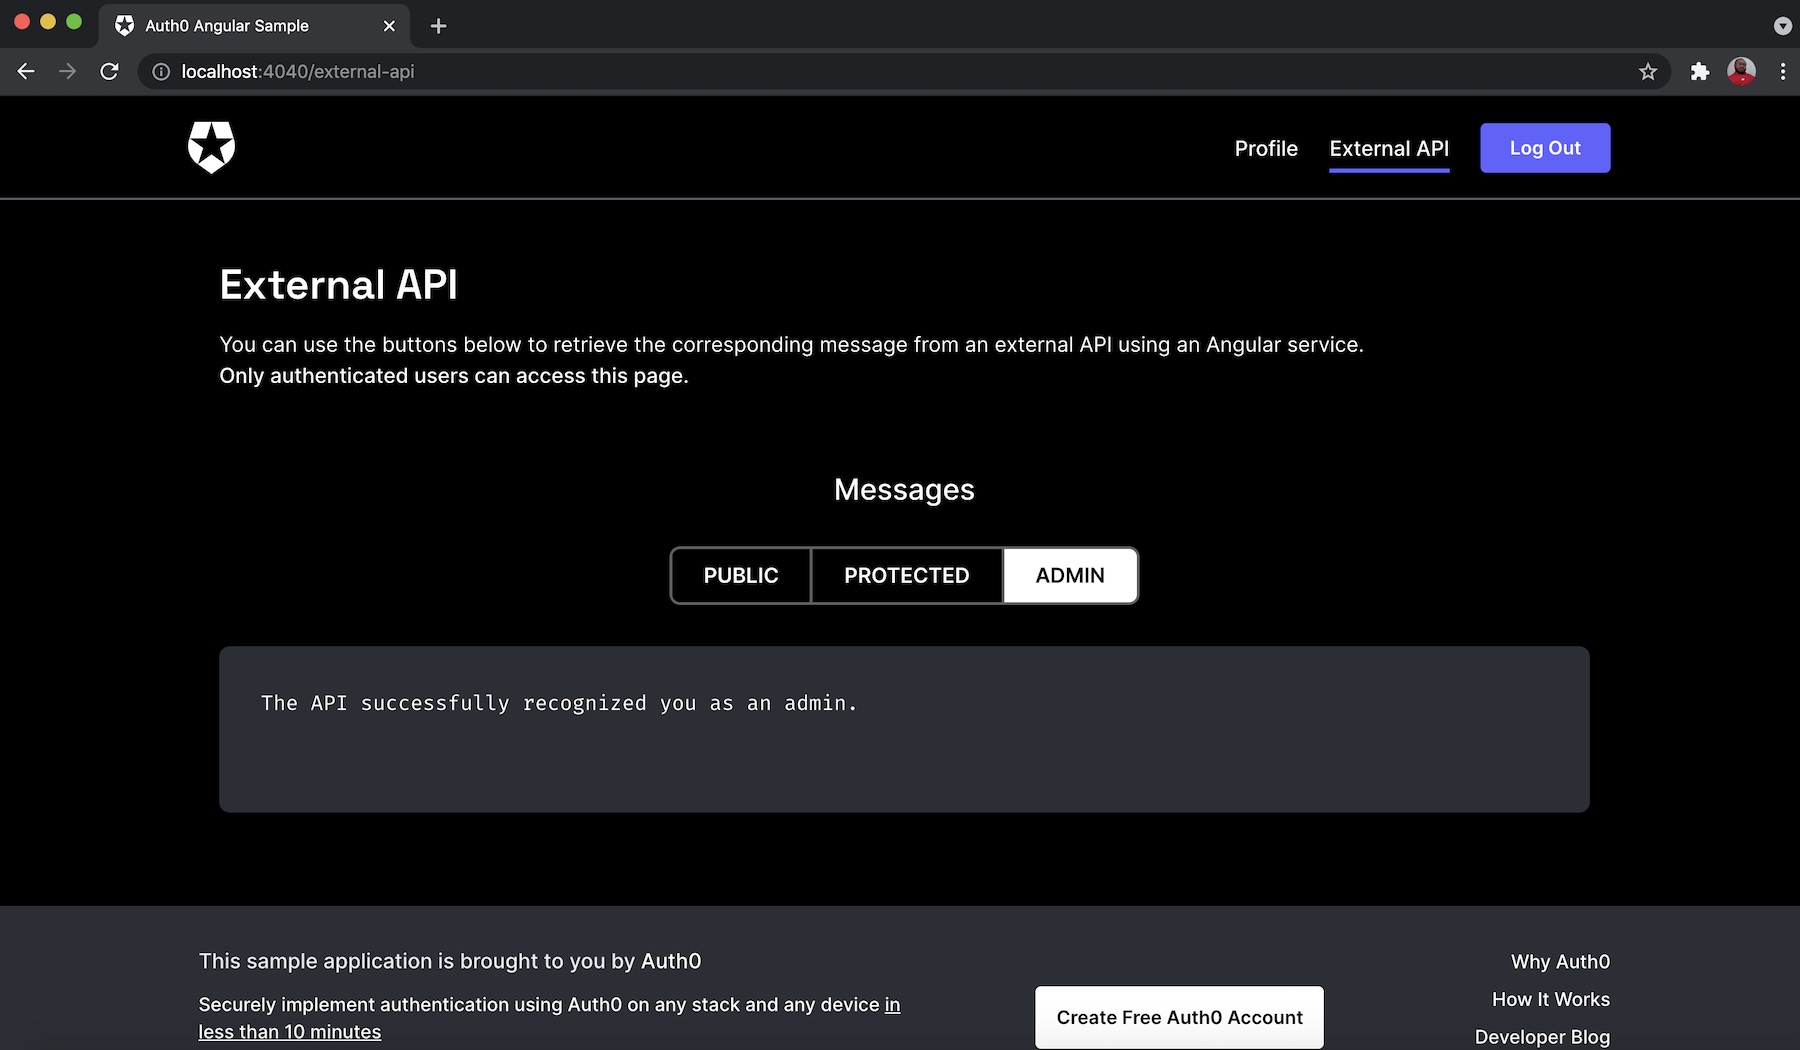
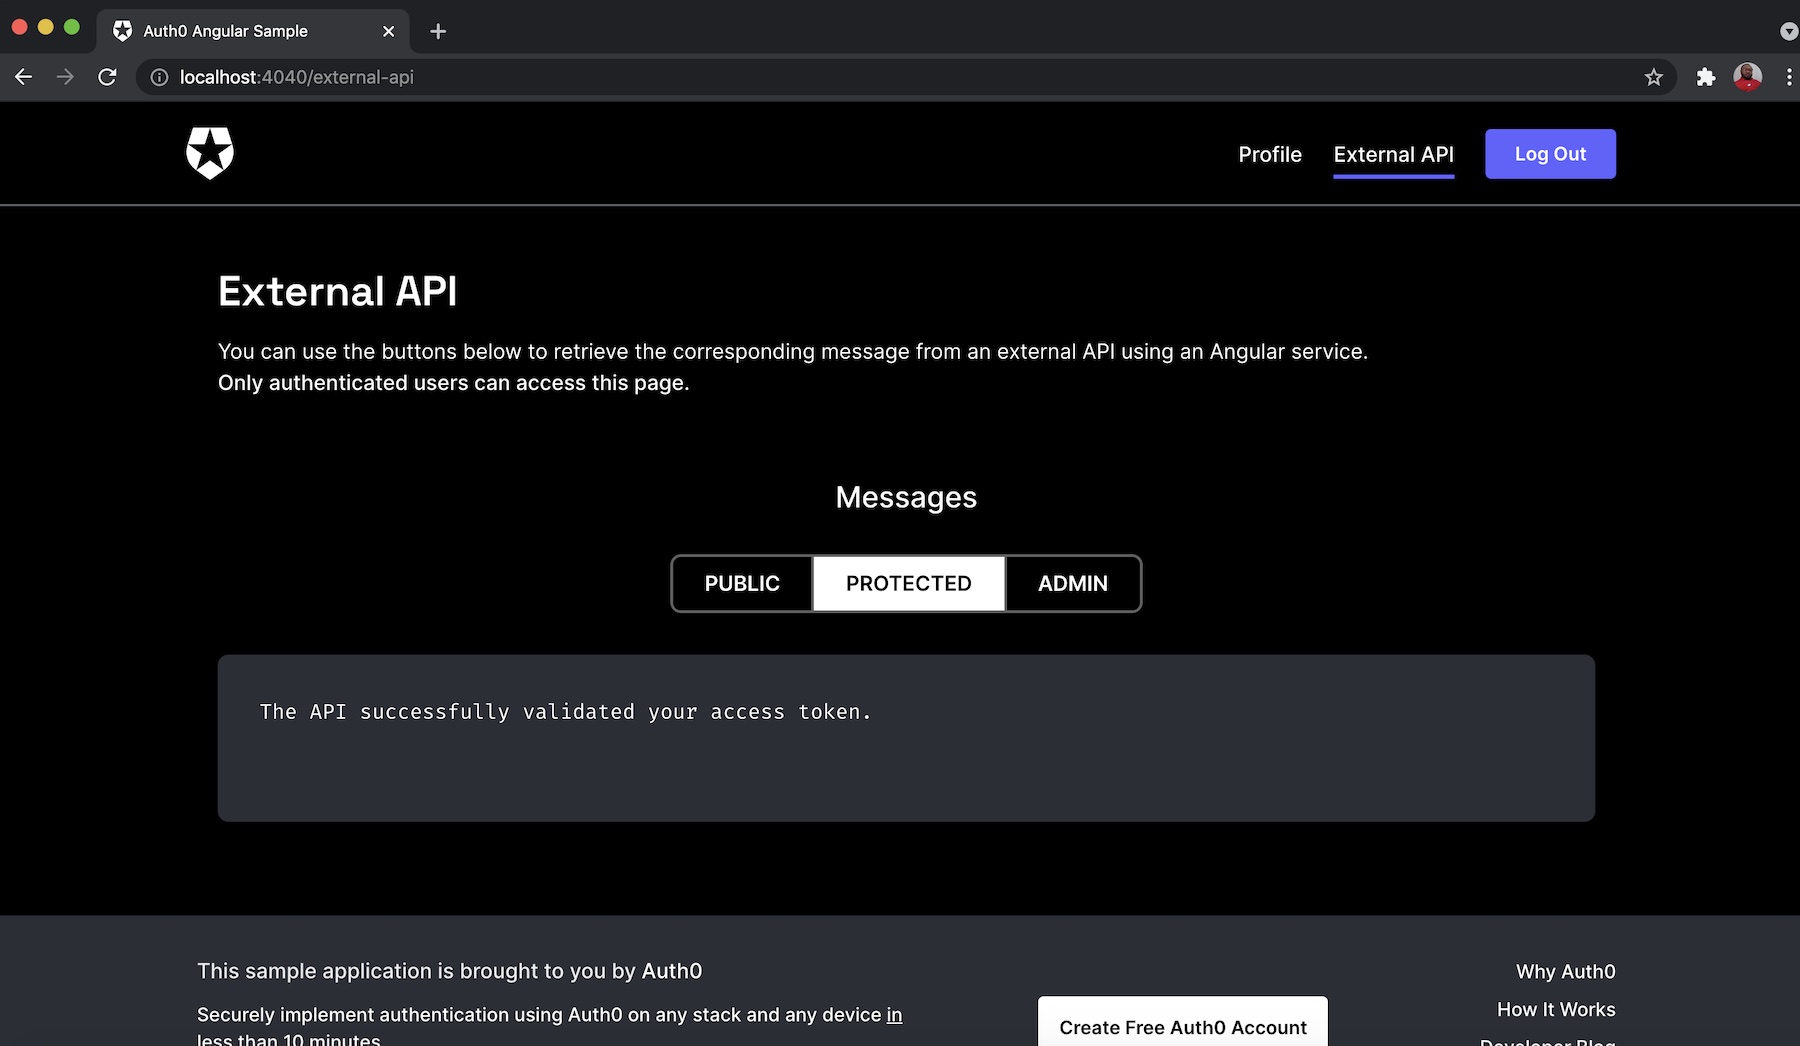
In the client application, click on the External API button and provide your credentials.
Ensure that you log in with the details of the user with the Admin role as specified on the Auth0 Dashboard.
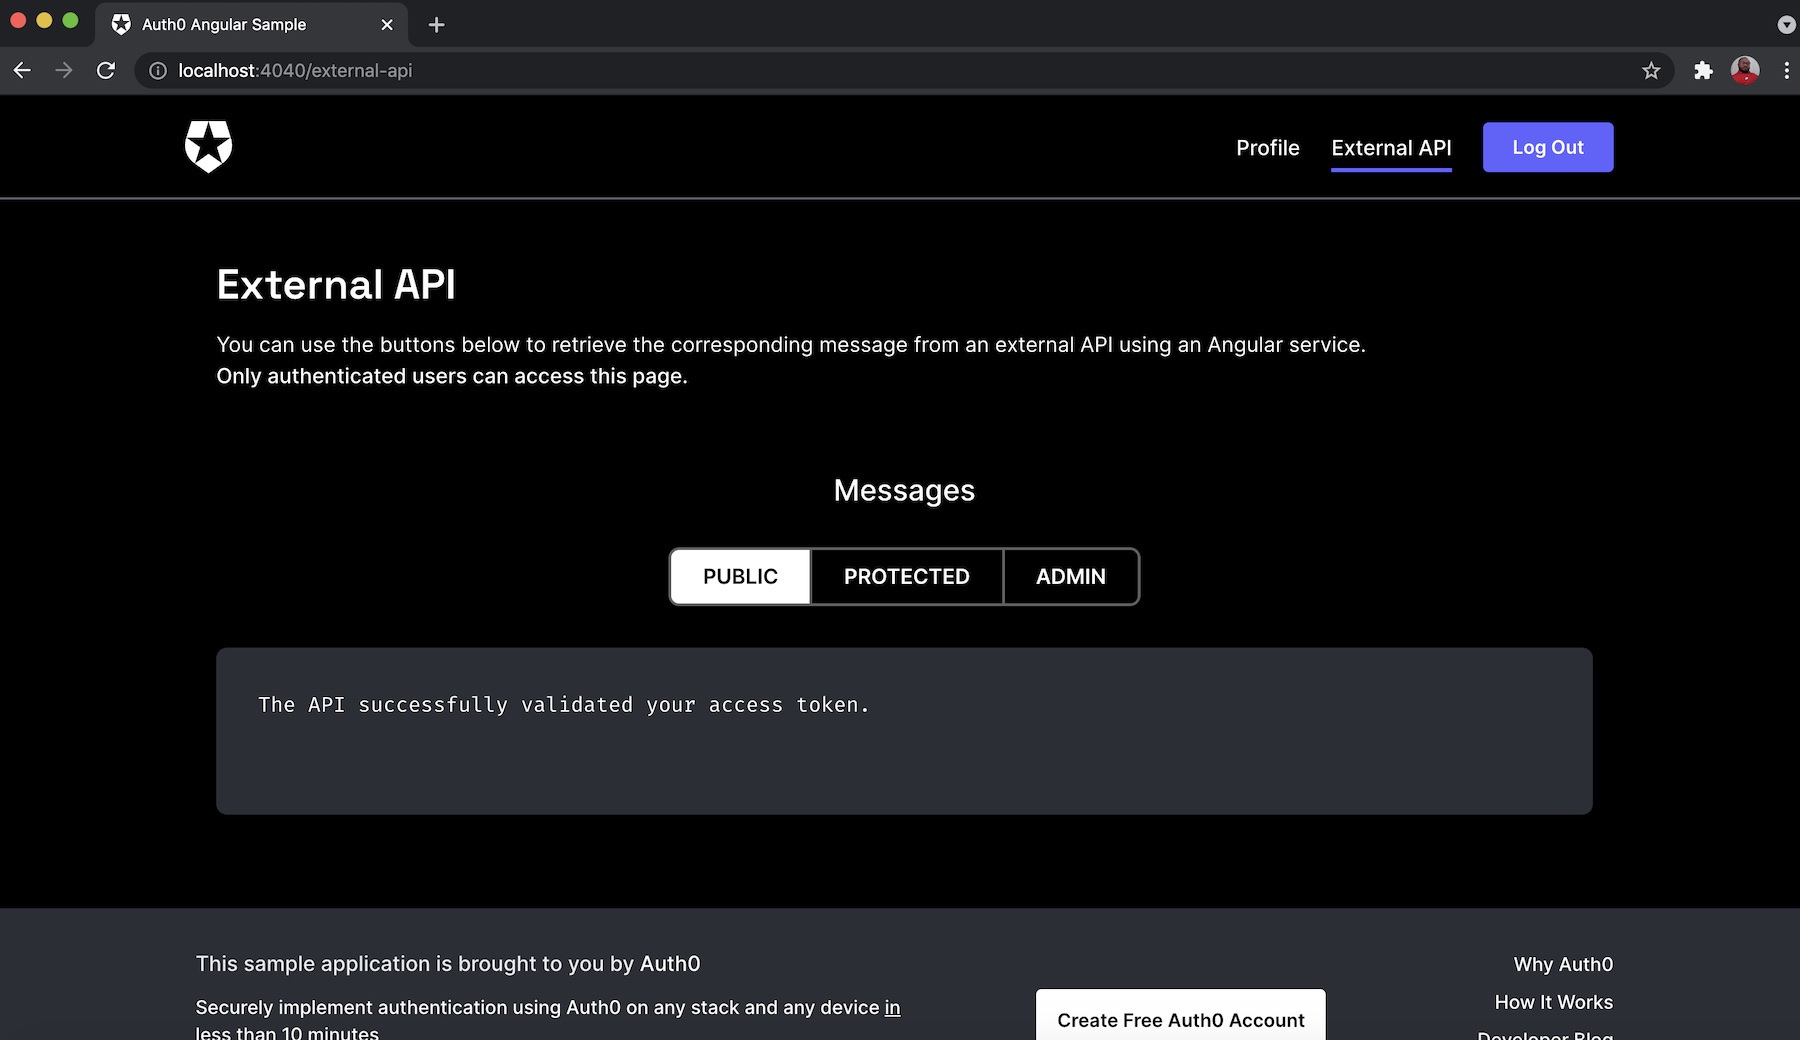
You can also check the other endpoints by clicking on the PUBLIC button for api/messages/public endpoint or the PROTECTED button for api/messages/protected endpoints as shown, respectively, below:
Conclusion
As shown here in this tutorial, you learned how to easily build a Symfony API server with an endpoint that can be accessed by anyone on the internet without authentication and other endpoints that require the appropriate authorization and role.
You created these endpoints successionally by starting with the public endpoint and going further to create two protected endpoints, namely private and admin. To completely set up and configure authentication and authorization for the protected endpoints, you leveraged Auth0's API to ensure that only HTTP requests that contain the valid access token in their authorization header can retrieve data.
I hope that you found this tutorial helpful. The complete source code for the API server built in this post can be found here on GitHub.
Happy coding, and please feel free to share your thoughts and questions in the comment section below.
About the author

Olususi Oluyemi
Software Engineer / Technical Content Creator