
This is the second in a series of articles in which you’ll create a “wishlist” mobile application using the Flutter SDK. The wishlist contains items that the user would like to someday own, storing each item’s name, description, and URL. The mobile app provides the user interface and communicates with a back-end application, which stores the list and provides an API to perform CRUD operations on it. Initially, the app will communicate with a public API that anyone can access; later, you’ll modify the app so that the user signs in using Auth0 to access their list via a secured API.
Note: This article builds on material and code from the previous article in this series, Build a Flutter Wishlist App, Part 1: Introducing Flutter and Building a Basic Wishlist App.
The App So Far
Here’s what you’ve done so far:
- You created your own copy of the wishlist server application. You did this using Glitch, a web application hosting service that allows you to create your own “remixes” of an existing project. The mobile app will use this server application as its back end.
- You created a new Flutter app. By default, Flutter creates a simple single-screen “starter” app, which you promptly discarded.
- You created the app’s domain models. This is a simple application, so it has only two models: one for items in the list and one for the list itself.
- You created a service to manage the wishlist. This service is a class containing methods to call the wishlist server API’s endpoints, which provide the functionality to get the list of items, add an item to the list, edit an item in the list, and delete an item from the list.
- And finally, you created the landing page. This is the app’s opening screen. It greets the user and presents them with a button that they will eventually tap in order to sign in:
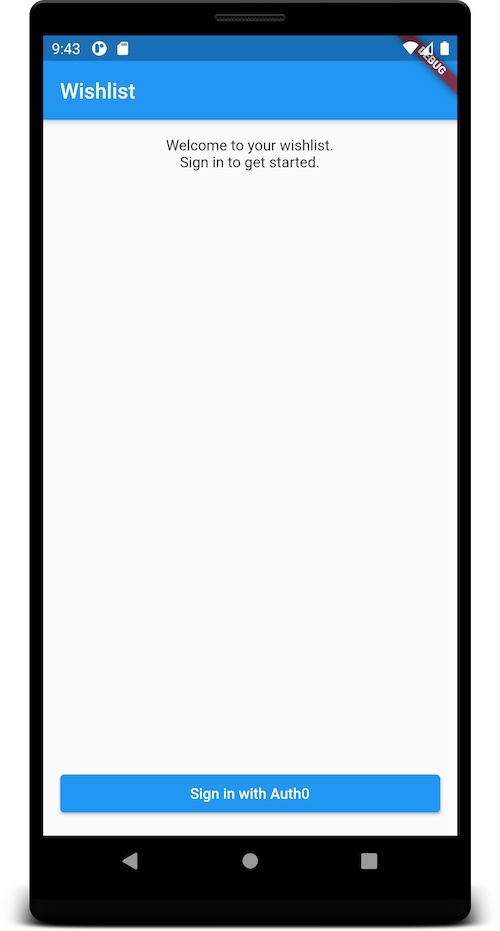
At the end of the previous article, running the app presented the user with the landing page, but the app does little more than that. If you were to tap the Sign in with Auth0 button, you would be presented with a spinning progress indicator. After three seconds, the progress indicator would disappear.
The app doesn’t do much — yet — but we’re going to fix that! In this article, you’ll give the app full CRUD functionality. The user will be able to view their wishlist, as well as add, edit, and delete items.
Let’s continue building the app!
The Wishlist Page
It’s now time to work on the wishlist page. This is the page that will display all the items in the list.
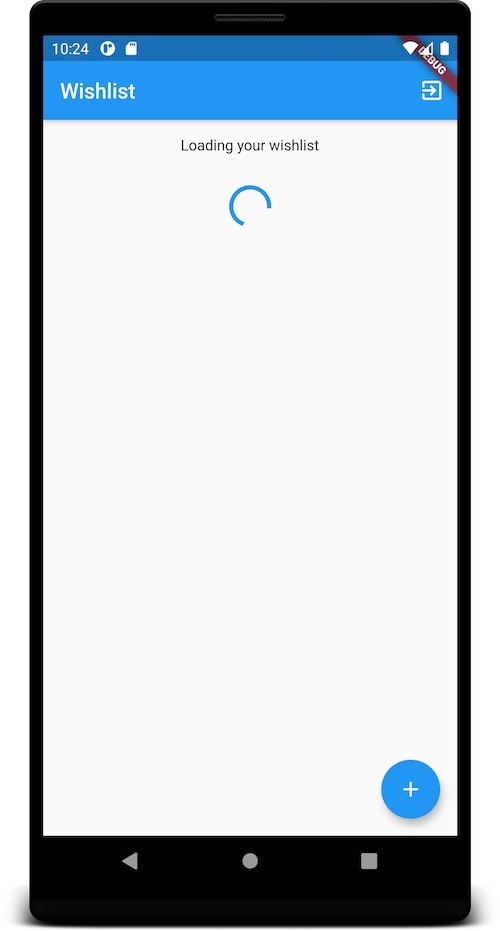
What the wishlist page looks like
When the user navigates to this page, the app retrieves the list from the back end. While this happens, the page informs the user that it’s loading the list using text and a spinning progress indicator:
If the loading process completes successfully, the page displays the list if it contains at least one item:

If the list is empty, the user sees this instead:

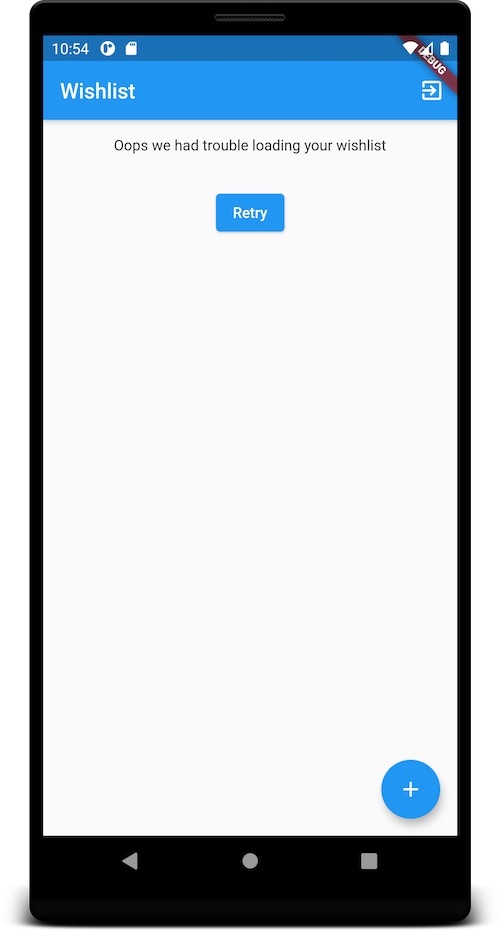
And finally, if an error occurred in the process of retrieving the wishlist from the back end, the user is presented with the following:
The page has an action button in the application bar that the user can press to sign out. At the bottom right corner of the page is a floating action button that the user presses to add an item to the wishlist.
The wishlist page view model
The first step in creating the wishlist page is defining the view model. To do this, create the lib/pages/wishlist directory, and then create a file named wishlist_view_model.dart inside that directory.
Enter the following code into wishlist_view_model.dart:
import 'package:flutter/foundation.dart';
import '../../models/item.dart';
import '../../models/wishlist.dart';
import '../../services/wishlist_service.dart';

class WishlistViewModel extends ChangeNotifier {
  final WishlistService wishlistService;
  Future<Wishlist> _wishlistFuture;
  Future<Wishlist> get wishlistFuture => _wishlistFuture;
  WishlistViewModel(this.wishlistService);
  Future<void> loadInitialWishlist() =>
      _wishlistFuture = wishlistService.getWishList();
  Future<void> refreshWishlist() async {
    _wishlistFuture = wishlistService.getWishList();
    notifyListeners();
    await _wishlistFuture;
  }

  Future<void> deleteItem(Item item) async {
    await wishlistService.deleteItem(item);
    await refreshWishlist();
  }

  Future<void> signOut() {
    // TODO: handle signing out
    return Future.value(null);
  }
}
The WishlistViewModel class exposes a getter named wishlistFuture. wishlistFuture refers to an instance of the Future class, which is used to create objects that represent a computation that takes place after a delay. In this case, that computation is the asynchronous operation that retrieves the user’s wishlist from the back end.
The Future instance referenced by wishlistFuture has four public methods:
loadInitialWishlist(), which loads the wishlist when the wishlist page is displayed when the app is launched.refreshWishlist(), which updates the user’s wishlist, which needs to be done after a change is made to the list, such as adding or deleting an item.deleteItem(), which deletes an item from the user’s wishlist. It callsrefreshWishlist()after doing so.signOut(), which is called when the user signs out of the application.
The wishlist page view
Now that the view model has been implemented, it’s time to make the view. Create a new file, wishlist_page.dart, in the lib/pages/wishlist directory — the same directory as the view model you just coded. Fill it with this code:
import 'package:flutter/material.dart';
import 'package:url_launcher/url_launcher.dart';
import '../../models/item.dart';
import '../../models/wishlist.dart';
import '../add_item/add_item_page.dart';
import '../edit_item/edit_item_page.dart';
import '../landing/landing_page.dart';
import 'wishlist_view_model.dart';

class WishlistPage extends StatefulWidget {
  static const String route = 'wishlist';
  final WishlistViewModel viewModel;
  const WishlistPage(
    this.viewModel, {
    Key key,
  }) : super(key: key);
  @override
  _WishlistPageState createState() => _WishlistPageState();
}

class _WishlistPageState extends State<WishlistPage> {
  @override
  void initState() {
    super.initState();
    widget.viewModel.loadInitialWishlist();
  }

  @override
  Widget build(BuildContext context) {
    return Scaffold(
      appBar: AppBar(
        title: const Text('Wishlist'),
        actions: <Widget>[
          IconButton(
              icon: const Icon(Icons.exit_to_app),
              onPressed: () async {
                await _signOut(context);
              })
        ],
      ),
      body: FutureBuilder<Wishlist>(
        future: widget.viewModel.wishlistFuture,
        builder: (_, AsyncSnapshot<Wishlist> snapshot) {
          switch (snapshot.connectionState) {
            case ConnectionState.done:
              if (snapshot.hasError) {
                return Padding(
                  padding: const EdgeInsets.all(16),
                  child: Center(
                    child: Column(
                      children: <Widget>[
                        const Text('Oops we had trouble loading your wishlist'),
                        const SizedBox(height: 32),
                        ElevatedButton(
                          onPressed: () async {
                            await widget.viewModel.refreshWishlist();
                          },
                          child: const Text('Retry'),
                        ),
                      ],
                    ),
                  ),
                );
              }
              final List<Item> items = snapshot.data?.items ?? <Item>[];
              if (items.isEmpty) {
                return const Center(
                  child: Text('Your wishlist is empty. Why not add some items'),
                );
              }
              return ListView.builder(
                itemCount: items.length,
                itemBuilder: (_, int index) {
                  final Item item = items[index];
                  return Card(
                    child: Padding(
                      padding: const EdgeInsets.all(8),
                      child: Row(
                        children: <Widget>[
                          Expanded(
                            child: Column(
                              crossAxisAlignment: CrossAxisAlignment.start,
                              children: <Widget>[
                                Text(item.name),
                                Text(item.description),
                                GestureDetector(
                                  onTap: () => launch(item.url),
                                  child: Text(
                                    item.url,
                                    style: TextStyle(
                                        decoration: TextDecoration.underline),
                                  ),
                                ),
                              ],
                            ),
                          ),
                          IconButton(
                            onPressed: () async {
                              await _editItem(item);
                            },
                            icon: const Icon(Icons.edit),
                          ),
                          IconButton(
                            onPressed: () async {
                              await _deleteItem(item);
                            },
                            icon: const Icon(Icons.delete),
                          )
                        ],
                      ),
                    ),
                  );
                },
              );
            default:
              return Padding(
                padding: const EdgeInsets.all(16),
                child: Center(
                  child: Column(
                    children: const <Widget>[
                      Text('Loading your wishlist'),
                      SizedBox(height: 32),
                      CircularProgressIndicator(),
                    ],
                  ),
                ),
              );
          }
        },
      ),
      floatingActionButton: FloatingActionButton(
        onPressed: () async {
          await _addItem(context);
        },
        child: const Icon(Icons.add),
      ),
    );
  }

  Future<void> _deleteItem(Item item) async {
    try {
      await widget.viewModel.deleteItem(item);
    } on Exception {
      await showDialog(
        context: context,
        builder: (_) => AlertDialog(
          content: const Text('Failed to delete the item'),
          actions: <Widget>[
            TextButton(
              onPressed: () {
                Navigator.of(context).pop();
              },
              child: const Text('OK'),
            )
          ],
        ),
      );
    }
  }

  Future<void> _signOut(BuildContext context) async {
    await widget.viewModel.signOut();
    await Navigator.of(context)
        .pushNamedAndRemoveUntil(LandingPage.route, (_) => false);
  }

  Future<void> _addItem(BuildContext context) async {
    final Object addedItem =
        await Navigator.of(context).pushNamed(AddItemPage.route);
    if ((addedItem as bool) ?? false) {
      await widget.viewModel.refreshWishlist();
    }
  }

  Future<void> _editItem(Item item) async {
    final Object addedItem = await Navigator.of(context)
        .pushNamed(EditItemPage.route, arguments: item);
    if ((addedItem as bool) ?? false) {
      await widget.viewModel.refreshWishlist();
    }
  }
}
When the page is shown for the first time, initState() is called. It calls the loadInitialWishlist() method defined in the WishlistViewModel class. Notice that loadInitialWishlist() does not call the notifyListeners() method; it isn’t necessary since initState() is called before the page is rendered. In fact, telling the UI at this point that it needs to re-render the page due to a change in state would cause an error.
The main part of the page is contained within the FutureBuilder widget. It listens to wishlistFuture, which you may recall is a getter for the newly-created WishlistViewModel. Once again, wishlistFuture is a Future instance that represents the state of the asynchronous operation that retrieves the wishlist.
The builder property of the FutureBuilder widget determines what it should display. It contains a switch statement that reacts to the different states of the asynchronous operation.
Remember that this page can be in one of four possible states:
- Loading the user’s wishlist and displaying a “Loading” message and a progress indicator while doing so.
If the list was successfully loaded and contains at least one item, displaying the list of items with the help of the
ListView.builderconstructor.Each item in the list is displayed with a
Cardwidget. This widget will display the item’s name, description, and URL. The URL can be opened in a web browser by calling thelaunch()method provided by theurl_launcherplugin. Options to edit and delete the item are also provided.- If the list was successfully loaded but is empty, displaying an “empty list” message.
- If the list failed to load, displaying a “list could not be loaded message” and presenting the user with a button to try loading the list again. At the moment, the application isn’t using a protected endpoint to access the wishlist, which means that the error was probably a connection issue. This is why it presents an option to retry.
The “Add Item” Page
With the wishlist view model and view implemented, the user can now view the complete list of items on their wishlist. The next feature you’ll build is the ability to add items to the list, which the user does use the “Add Item” page.
What the “Add Item” page looks like
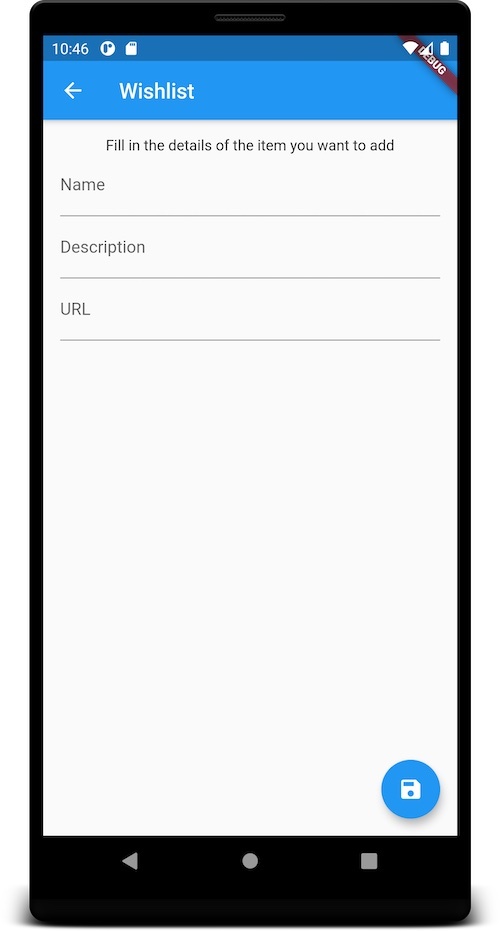
The “Add Item” page is pretty straightforward. It presents the user with the following:
- A “back” button in the application bar returns the user to the wishlist page.
- Fields for entering the name, description, and URL for the wishlist item. All three fields are mandatory.
- At the floating action button at the bottom right corner of the page that functions as a “Save” button.
The “Add Item” page view model
Just as we did with the wishlist page, let’s start with the “Add Item” page by defining its directory. Create a subdirectory of lib/pages named add_item.
In the newly-created lib/pages/add_item directory, create the “Add Item” view model file, add_item_view_model.dart. Add the following code to the file:
import 'package:flutter/foundation.dart';
import '../../models/item.dart';
import '../../services/wishlist_service.dart';

class AddItemViewModel extends ChangeNotifier {
  final WishlistService wishlistService;
  bool _addingItem = false;
  bool get addingItem => _addingItem;
  AddItemViewModel(
    this.wishlistService,
  );
  Future<void> addItem(Item item) async {
    try {
      _addingItem = true;
      notifyListeners();
      await wishlistService.addItem(item);
    } finally {
      _addingItem = false;
      notifyListeners();
    }
  }
}
The AddItemViewModel class depends on the WishlistService to forward the request to add an item to the user’s wishlist. The page uses the addingItem getter to let users know when the application is busy processing the request.
The “Add Item” page view
To create the view, add a new file, add_item_page.dart, to the lib/pages/add_item directory. It should contain the following code:
import 'package:flutter/material.dart';
import '../../models/item.dart';
import 'add_item_view_model.dart';

class AddItemPage extends StatefulWidget {
  static const String route = 'addItem';
  final AddItemViewModel viewModel;
  const AddItemPage(
    this.viewModel, {
    Key key,
  }) : super(key: key);
  @override
  _AddItemPageState createState() => _AddItemPageState();
}

class _AddItemPageState extends State<AddItemPage> {
  final GlobalKey<FormState> _formKey = GlobalKey<FormState>();
  TextEditingController _nameController;
  TextEditingController _descriptionController;
  TextEditingController _urlController;
  FocusNode _descriptionFocusNode;
  FocusNode _urlFocusNode;
  @override
  void initState() {
    super.initState();
    _nameController = TextEditingController();
    _descriptionController = TextEditingController();
    _urlController = TextEditingController();
    _descriptionFocusNode = FocusNode();
    _urlFocusNode = FocusNode();
  }

  @override
  void dispose() {
    _nameController.dispose();
    _descriptionController.dispose();
    _urlController.dispose();
    _descriptionFocusNode.dispose();
    _urlFocusNode.dispose();
    super.dispose();
  }

  @override
  Widget build(BuildContext context) {
    return Scaffold(
      appBar: AppBar(
        title: const Text('Wishlist'),
      ),
      body: Padding(
        padding: const EdgeInsets.all(16),
        child: Form(
          key: _formKey,
          autovalidateMode: AutovalidateMode.onUserInteraction,
          child: Column(
            children: <Widget>[
              const Text('Fill in the details of the item you want to add'),
              TextFormField(
                controller: _nameController,
                decoration: const InputDecoration(labelText: 'Name'),
                onFieldSubmitted: (_) {
                  _descriptionFocusNode.requestFocus();
                },
                validator: _mandatoryValidator,
              ),
              TextFormField(
                controller: _descriptionController,
                decoration: const InputDecoration(labelText: 'Description'),
                onFieldSubmitted: (_) {
                  _urlFocusNode.requestFocus();
                },
                validator: _mandatoryValidator,
              ),
              TextFormField(
                controller: _urlController,
                decoration: const InputDecoration(labelText: 'URL'),
                validator: _mandatoryValidator,
              ),
              if (widget.viewModel.addingItem) ...const <Widget>[
                SizedBox(height: 32),
                CircularProgressIndicator(),
              ]
            ],
          ),
        ),
      ),
      floatingActionButton: FloatingActionButton(
        onPressed: widget.viewModel.addingItem
            ? null
            : () async {
                await _addItem(context);
              },
        child: const Icon(Icons.save),
      ),
    );
  }

  String _mandatoryValidator(String text) {
    return (text?.isEmpty ?? true) ? 'Required' : null;
  }

  Future<void> _addItem(BuildContext context) async {
    try {
      if (_formKey.currentState.validate()) {
        final Item item = Item(
            name: _nameController.text,
            description: _descriptionController.text,
            url: _urlController.text);
        await widget.viewModel.addItem(item);
        Navigator.of(context).pop(true);
      }
    } on Exception {
      await showDialog(
        context: context,
        builder: (_) => AlertDialog(
          content: const Text('Failed to add the item'),
          actions: <Widget>[
            TextButton(
              onPressed: () {
                Navigator.of(context).pop();
              },
              child: const Text('OK'),
            )
          ],
        ),
      );
    }
  }
}
The page has a form (represented by the Form widget) with three text fields (represented by the TextFormField widgets) where the user can enter the name, description, and URL of the item, respectively. Supplying a TextEditingController to each TextFormField widget allows the values entered in the text fields to be retrieved as seen in the _addItem() method, which is called when the “Save” button is pressed.
The _mandatoryValidator() method contains the validation logic for each text field. As mentioned earlier, they are all mandatory fields. By setting the autovalidateMode property of the Form widget to AutovalidateMode.onUserInteraction, the form will automatically validate the entire form as soon as the user makes a change to any form field.
The Name and Description TextFormField widgets are also associated with a FocusNode. FocusNode objects are used to improve the UX by creating an order that determines the next UI object gets the focus next. For example, if the user is currently on the Name field, hitting the Enter key would trigger the onFieldSubmitted callback. Within the callback, the application will programmatically request that the next item in the focus order, the Description field receives the focus.
The floating action button is shown as a way for the user to add the item to their wishlist. When pressed, it will trigger a check to make sure the entire form is valid. If the form is valid, it calls the addItem() method in the AddItemViewModel so that the request to add the item can be passed to the appropriate API.
While the request is happening (i.e., the addingItem getter of the AddItemViewModel is true), a progress indicator is shown, and the “Save” button is disabled to prevent duplicate “add item” requests. Should a problem occur with trying to add an item, the user is presented with an error dialog box. If the new item is successfully added, the navigator will pop the current route so that the user is taken back to the wishlist page, which will be refreshed to show the newly added item.
“Edit Item” page
Since users might make a mistake when adding an item or need to update an item’s details, the app provides an “Edit Item” page. The logic behind this page is nearly identical to the “Add Item” page you just built.
What the “Edit Item” page looks like
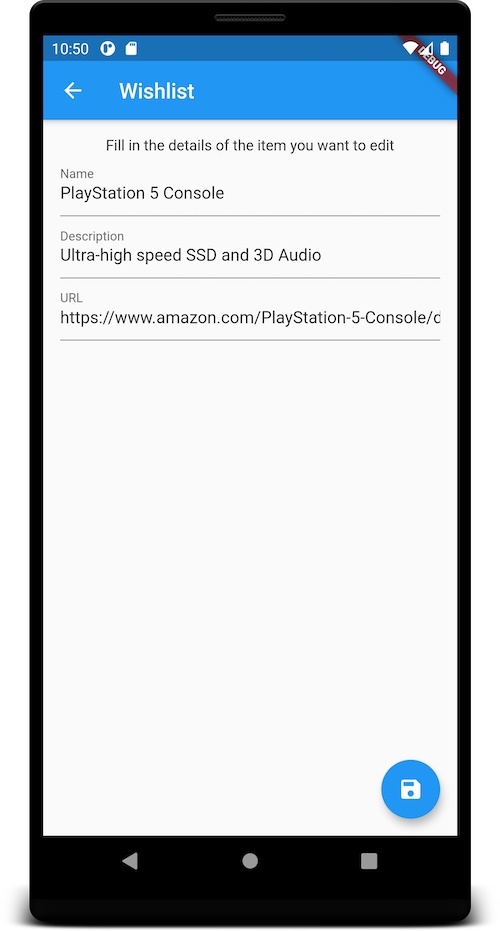
The “Edit Item” page appears identical to the “Add Item” page, with the following controls:
- A “back” button in the application bar returns the user to the wishlist page.
- Fields for entering the name, description, and URL for the wishlist item. All three fields are mandatory.
- At the floating action button at the bottom right corner of the page that functions as a “Save” button.
The “Edit Item” page view model
Create the “Edit Item” page’s view model by creating the lib/pages/edit_item directory, and then adding the edit_item_view_model.dart file to that directory. Add this code to the file:
import 'package:flutter/foundation.dart';
import '../../models/item.dart';
import '../../services/wishlist_service.dart';

class EditItemViewModel extends ChangeNotifier {
  final WishlistService wishlistService;
  bool _editingItem = false;
  bool get editingItem => _editingItem;
  EditItemViewModel(
    this.wishlistService,
  );
  Future<void> editItem(Item item) async {
    try {
      _editingItem = true;
      notifyListeners();
      await wishlistService.editItem(item);
    } finally {
      _editingItem = false;
      notifyListeners();
    }
  }
}
The “Edit Item” page view
The page itself will reside in an edit_item_page.dart file in the lib/pages/edit_item directory with the following code:
import 'package:flutter/material.dart';
import '../../models/item.dart';
import 'edit_item_view_model.dart';

class EditItemPage extends StatefulWidget {
  static const String route = 'editItem';
  final Item item;
  final EditItemViewModel viewModel;
  const EditItemPage(
    this.item,
    this.viewModel, {
    Key key,
  }) : super(key: key);
  @override
  _EditItemPageState createState() => _EditItemPageState();
}

class _EditItemPageState extends State<EditItemPage> {
  final GlobalKey<FormState> _formKey = GlobalKey<FormState>();
  TextEditingController _nameController;
  TextEditingController _descriptionController;
  TextEditingController _urlController;
  FocusNode _descriptionFocusNode;
  FocusNode _urlFocusNode;
  @override
  void initState() {
    super.initState();
    final Item item = widget.item;
    _nameController = TextEditingController(text: item.name);
    _descriptionController = TextEditingController(text: item.description);
    _urlController = TextEditingController(text: item.url);
    _descriptionFocusNode = FocusNode();
    _urlFocusNode = FocusNode();
  }

  @override
  void dispose() {
    _nameController.dispose();
    _descriptionController.dispose();
    _urlController.dispose();
    _descriptionFocusNode.dispose();
    _urlFocusNode.dispose();
    super.dispose();
  }

  @override
  Widget build(BuildContext context) {
    return Scaffold(
      appBar: AppBar(
        title: const Text('Wishlist'),
      ),
      body: Padding(
        padding: const EdgeInsets.all(16),
        child: Form(
          key: _formKey,
          autovalidateMode: AutovalidateMode.onUserInteraction,
          child: Column(
            children: <Widget>[
              const Text('Fill in the details of the item you want to edit'),
              TextFormField(
                controller: _nameController,
                decoration: const InputDecoration(labelText: 'Name'),
                onFieldSubmitted: (_) {
                  _descriptionFocusNode.requestFocus();
                },
                validator: _mandatoryValidator,
              ),
              TextFormField(
                controller: _descriptionController,
                decoration: const InputDecoration(labelText: 'Description'),
                onFieldSubmitted: (_) {
                  _urlFocusNode.requestFocus();
                },
                validator: _mandatoryValidator,
              ),
              TextFormField(
                controller: _urlController,
                decoration: const InputDecoration(labelText: 'URL'),
                validator: _mandatoryValidator,
              ),
              if (widget.viewModel.editingItem) ...const <Widget>[
                SizedBox(height: 32),
                CircularProgressIndicator(),
              ]
            ],
          ),
        ),
      ),
      floatingActionButton: FloatingActionButton(
        onPressed: widget.viewModel.editingItem
            ? null
            : () async {
                await _editItem(context);
              },
        child: const Icon(Icons.save),
      ),
    );
  }

  String _mandatoryValidator(String text) {
    return (text?.isEmpty ?? true) ? 'Required' : null;
  }

  Future<void> _editItem(BuildContext context) async {
    try {
      if (_formKey.currentState.validate()) {
        final Item item = Item(
            id: widget.item.id,
            name: _nameController.text,
            description: _descriptionController.text,
            url: _urlController.text);
        await widget.viewModel.editItem(item);
        Navigator.of(context).pop(true);
      }
    } on Exception {
      await showDialog(
        context: context,
        builder: (_) => AlertDialog(
          content: const Text('Failed to edit the item'),
          actions: <Widget>[
            TextButton(
              onPressed: () {
                Navigator.of(context).pop();
              },
              child: const Text('OK'),
            )
          ],
        ),
      );
    }
  }
}
The EditItemViewModel and EditItemPage classes are nearly identical to the AddItemViewModel and AddItemPage classes you created earlier. The main difference is that the “Add Item” and “Edit Item” classes call different endpoints. This is reflected in how the view model calls the editItem() method of the WishlistService. Everything around form validation, changing which field gets the focus, and so on, is the same.
Here’s some good news — you’ve built all the pages for the app!
Enable the “Add Item” and “Edit Item” Pages
Even though you have created new pages, only the landing page is enabled. Right now, there’s no way for the user to navigate to the “Add Item” and “Edit Item” pages.
In order to enable the “Add Item” and “Edit Item” pages, you need to create a way to get to them. This is achieved via the use of named routes. Just as a URL is a way to navigate to a web page, a named route is a way to navigate to a page in an app.
Update the code in the lib/main.dart file to the following:
import 'package:flutter/material.dart';
import 'package:provider/provider.dart';
import 'package:provider/single_child_widget.dart';
import 'models/item.dart';
import 'pages/add_item/add_item_page.dart';
import 'pages/add_item/add_item_view_model.dart';
import 'pages/edit_item/edit_item_page.dart';
import 'pages/edit_item/edit_item_view_model.dart';
import 'pages/landing/landing_page.dart';
import 'pages/landing/landing_view_model.dart';
import 'pages/wishlist/wishlist_page.dart';
import 'pages/wishlist/wishlist_view_model.dart';
import 'services/wishlist_service.dart';

Future<void> main() async {
  WidgetsFlutterBinding.ensureInitialized();
  // TODO: determine initial route based on if user signed in before
  final String initialRoute = LandingPage.route;
  runApp(
    MultiProvider(
      providers: <SingleChildWidget>[
        Provider<WishlistService>(
          create: (_) => WishlistService(),
        ),
        ChangeNotifierProvider<LandingViewModel>(
          create: (BuildContext context) => LandingViewModel(),
        ),
        ChangeNotifierProvider<WishlistViewModel>(
          create: (BuildContext context) {
            return WishlistViewModel(
                Provider.of<WishlistService>(context, listen: false));
          },
        ),
        ChangeNotifierProvider<AddItemViewModel>(
          create: (BuildContext context) {
            return AddItemViewModel(
                Provider.of<WishlistService>(context, listen: false));
          },
        ),
        ChangeNotifierProvider<EditItemViewModel>(
          create: (BuildContext context) {
            return EditItemViewModel(
                Provider.of<WishlistService>(context, listen: false));
          },
        ),
      ],
      child: MyApp(initialRoute),
    ),
  );
}

class MyApp extends StatelessWidget {
  final String initialRoute;
  const MyApp(
    this.initialRoute, {
    Key key,
  }) : super(key: key);
  @override
  Widget build(BuildContext context) {
    return MaterialApp(
      title: 'Wishlist',
      theme: ThemeData(
        primarySwatch: Colors.blue,
        visualDensity: VisualDensity.adaptivePlatformDensity,
      ),
      initialRoute: initialRoute,
      onGenerateRoute: (RouteSettings settings) {
        switch (settings.name) {
          case LandingPage.route:
            return MaterialPageRoute(
              builder: (_) => Consumer<LandingViewModel>(
                builder: (_, LandingViewModel viewModel, __) =>
                    LandingPage(viewModel),
              ),
            );
          case WishlistPage.route:
            return MaterialPageRoute(
              builder: (_) => Consumer<WishlistViewModel>(
                builder: (_, WishlistViewModel viewModel, __) =>
                    WishlistPage(viewModel),
              ),
            );
          case AddItemPage.route:
            return MaterialPageRoute(
              builder: (_) => Consumer<AddItemViewModel>(
                builder: (_, AddItemViewModel viewModel, __) =>
                    AddItemPage(viewModel),
              ),
            );
          case EditItemPage.route:
            final Item item = settings.arguments;
            return MaterialPageRoute(
              builder: (_) => Consumer<EditItemViewModel>(
                builder: (_, EditItemViewModel viewModel, __) =>
                    EditItemPage(item, viewModel),
              ),
            );
        }
        return null;
      },
    );
  }
}
As part of this change, the WishlistService has been registered as a dependency that can be passed to the view models. Each view model has also been registered with the provider package.
Each page requires its associated view model, and this is where the Consumer widget comes in. Each page “consumes” an instance of its view model.
The code to handle each route is almost identical, but one to note is the route for editing an item. That route contains additional code since it takes the details of the item to be edited as a navigation parameter. This has been done to simplify the logic for the application for this article. A production application would take the MVVM approach, where the navigation parameter would be a unique identifier for the item that would then be fetched and then stored in the view model. This is an exercise that you can do after going through the entire article.
With the routes for each page defined, you can now go back to the landing page at lib/pages/landing/landing_page.dart and update the signIn() method to navigate to the wishlist page upon signing in successfully. The code for the entire page will look like
import 'package:flutter/material.dart';
import '../wishlist/wishlist_page.dart';
import 'landing_view_model.dart';

class LandingPage extends StatelessWidget {
  static const String route = '/';
  final LandingViewModel viewModel;

  const LandingPage(
    this.viewModel, {
    Key key,
  }) : super(key: key);

  @override
  Widget build(BuildContext context) {
    return Scaffold(
      appBar: AppBar(
        title: const Text('Wishlist'),
      ),
      body: Padding(
        padding: const EdgeInsets.all(16),
        child: Column(
          crossAxisAlignment: CrossAxisAlignment.stretch,
          children: <Widget>[
            const Text(
              'Welcome to your wishlist.',
              textAlign: TextAlign.center,
            ),
            const Text(
              'Sign in to get started.',
              textAlign: TextAlign.center,
            ),
            if (viewModel.signingIn) ...const <Widget>[
              SizedBox(
                height: 32,
              ),
              Center(child: CircularProgressIndicator()),
            ],
            const Expanded(
              child: SizedBox(
                height: 32,
              ),
            ),
            ElevatedButton(
              onPressed: viewModel.signingIn
                  ? null
                  : () async {
                      await signIn(context);
                    },
              child: const Text('Sign in with Auth0'),
            ),
          ],
        ),
      ),
    );
  }

  Future<void> signIn(BuildContext context) async {
    await viewModel.signIn();
    await Navigator.of(context)
        .pushNamedAndRemoveUntil(WishlistPage.route, (_) => false);
  }
}
If the user successfully signs in, the wishlist page will be shown. The pushNamedAndRemoveUntil() method is called with a predicate that always returns false. This is done so that all of the previous routes are removed. This improves the user experience by not allowing the user to go back to the landing page and force the user to sign in again after they had intentionally signed in.
Summary
Now that you’ve completed the “Edit Item” page, congratulations are in order — you now have a working wishlist app!
Run the app
Run the app. You should be able to press the Sign in with Auth0 button to go to the wishlist page. Once there, you should see the initial list of items in the wishlist, as well as add, edit or delete items.
You may notice a delay in loading the wishlist when you first run the app. This is a back-end issue. Projects hosted on free Glitch accounts are put into “sleep mode” after a period of inactivity and take a few seconds to “wake up” when called. Once the first API call is made, the back end will move out of “sleep mode” and become more responsive.
What’s next
While it might appear that you have a complete app, there’s still more to do.
Right now, while the app presents the user with a Sign in with Auth0 button when launched, pressing it doesn’t actually authenticate the user. It simply takes the user to the wishlist page, completely bypassing the step where the user enters their credentials.
There’s also the issue of the API. The app currently communicates with one that’s open to the world, which means that anyone with a browser and the correct URL will be able to see your wishlist. If they also know how to make HTTP POST, PUT, and DELETE calls, they’ll be able to alter your list.
In articles that follow this one, you’ll expand the wishlist app by adding authentication and communicating with a secured API.
Worth reading
- The previous article. The code in this article builds on code from Part 1 in this series. Make sure you’ve read this article first!
- Install Flutter. This page on the official Flutter site will walk you through the process of installing the Flutter SDK on Windows macOS, Linux, and Chrome OS.
- Write your first Flutter app, part 1. Here’s the Flutter team’s tutorial on writing basic Flutter apps. It covers some topics that go beyond what this series covers, including stateful widgets and building infinite, lazily loaded lists.
- A tour of the Dart language. A quick overview of the programming language that Flutter uses.
- Get Started with Flutter Authentication. Another Flutter article on this blog. This one shows how to add user authentication to Flutter apps using OAuth 2.0 and OpenID Connect.
About the author

Michael Bui
Sofware Developer
I'm a software developer with a background in consulting and experience in technical leadership roles. The majority of my career has been with using .NET to build applications across the full-stack and for mobile, desktop, and web. My main area of interest is in agile software development and building cross-platform applications using technologies like Flutter and Xamarin.Forms.
These days I do more work using Flutter. Besides using it professionally to build applications, I've done a talk at a meetup, maintain a blog where I post about Flutter in DexterX and contribute to and maintain various open-source projects.