
React Hooks have become very popular over the past few months, and for good reason. In one of my previous articles, I demonstrated how you can build an entire group chat application using React Hooks in just 100 lines of code!
React Hooks can be a powerful addition to your application, however, implementing authentication and authorization on your own can still be tricky. Thanks to Auth0, you can implement it mostly out-of-the-box with just a little effort from your side! Auth0 is a managed authentication platform that provides connections to all of the major social media logins such as Twitter, Google, and Facebook.
This article demonstrates the power that React Hooks and Auth0 add to your application. In the course of this article, you will see how both React Hooks and Auth0 can help you build a fully functional Wikipedia-like application. If you'd like to skip ahead, you can view the final code in this GitHub repository.
This post is built upon this very well-written article by Bruno Krebs. It is recommended that you read that first before moving further.
What Are We Building?
You will be building a Wikipedia-lite application using React Hooks and Auth0 for authorization and authentication.
The app will have the following features:
- View existing articles posted by other users
- Require user to be logged in to write a new article
- Require user to be logged in to edit an existing article
The tech stack used is:
- NodeJS as a server
- NextJS as a React framework
- Bootstrap as a frontend framework
- PassportJS to handle authentication routes
- Mongoose to handle MongoDB connectivity
- Auth0 for authentication and authorization
You can take a look at a demonstration of the completed app in the video below:
You can also view the live app here.
“Learn how to build a Wikipedia app using React hooks, MongoDB, Next.js, and Auth0!”
Tweet This
Setting Up the Wiki App
First, you need to get the database set up. You're going to use MongoDB Atlas to do this.
Setting up MongoDB Atlas
Here's what you need to do to get set up with MongoDB Atlas:
Create an account on MongoDB Atlas: https://www.mongodb.com/download-center.
After your account is created, you'll be redirected to a new page. Click on "Starter Clusters".
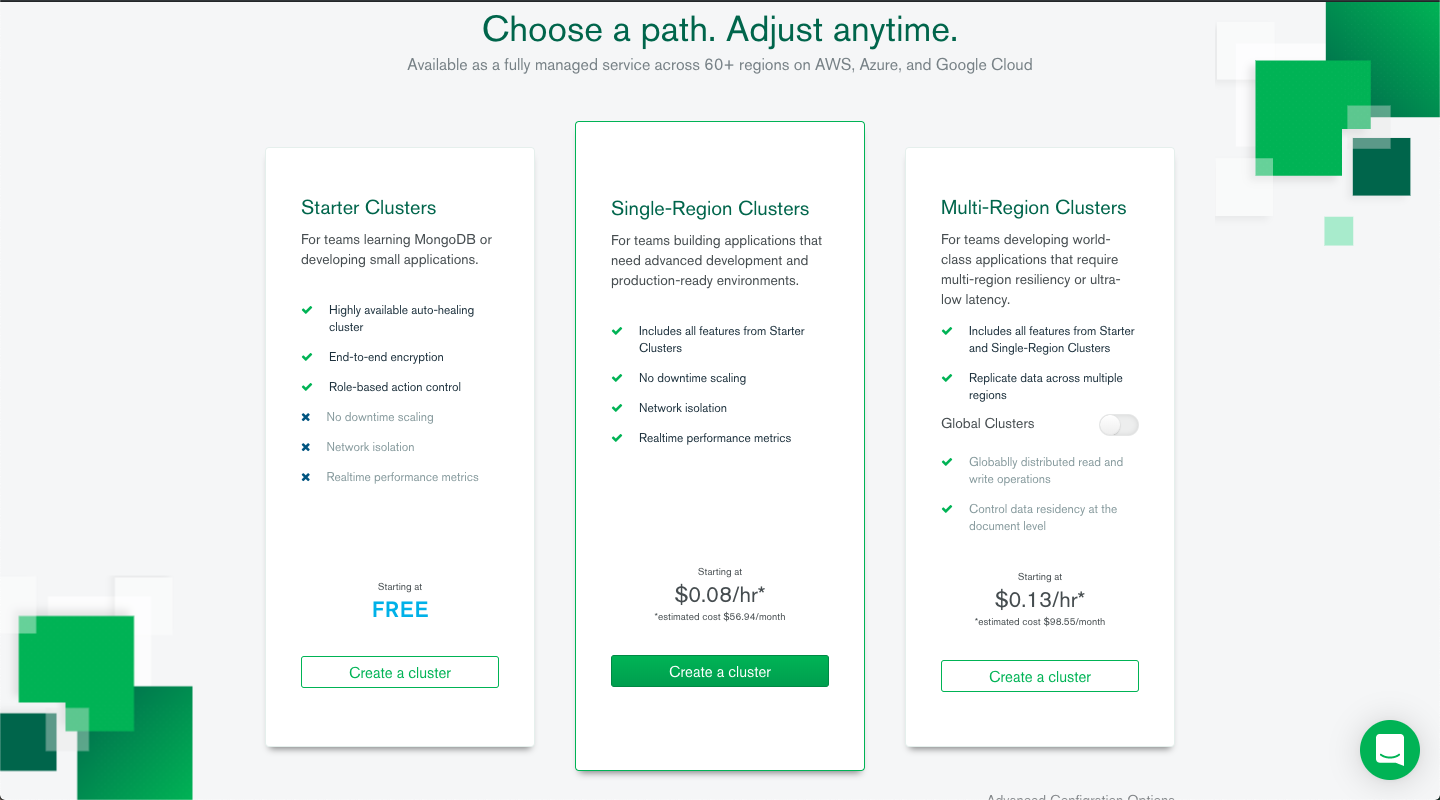
- Enter a name for your cluster and click on "Continue".

- On the next page, you can let the default selections be and then click on "Create Cluster".

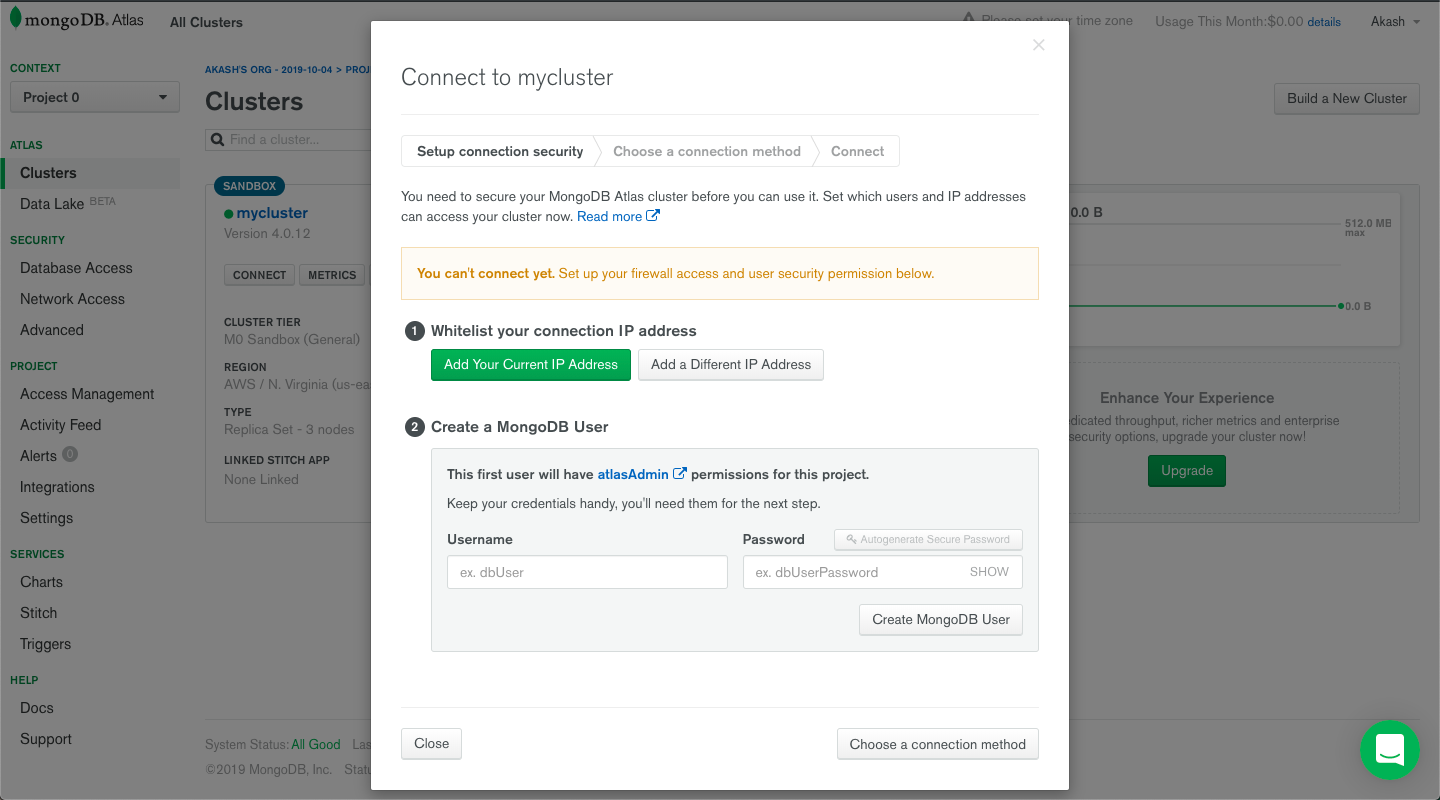
- After you enter the main page, click on "Connect" and create a MongoDB user on the "Connect to {clustername}" screen. Press "Create MongoDB User" and then click "Choose a connection method".
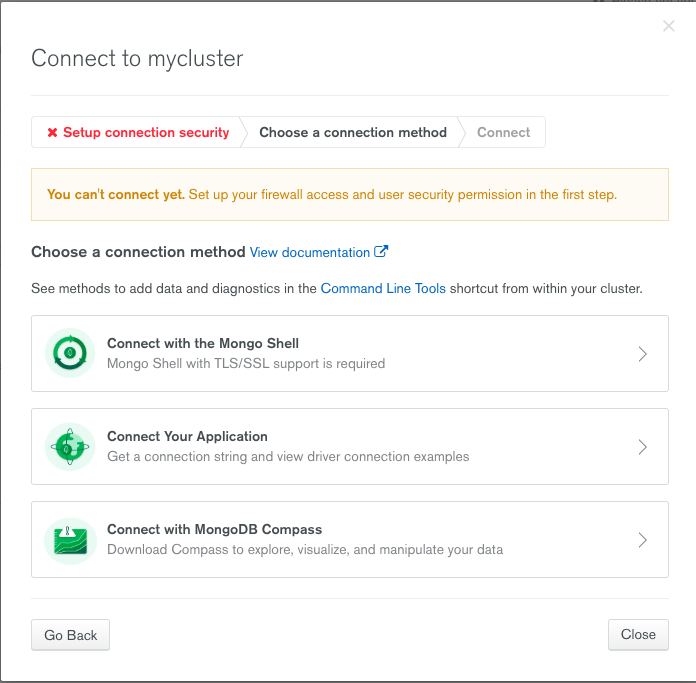
- On the next screen, choose "Connect Your Application", and store the database URI that it gives you. You will need this when you set up your backend.
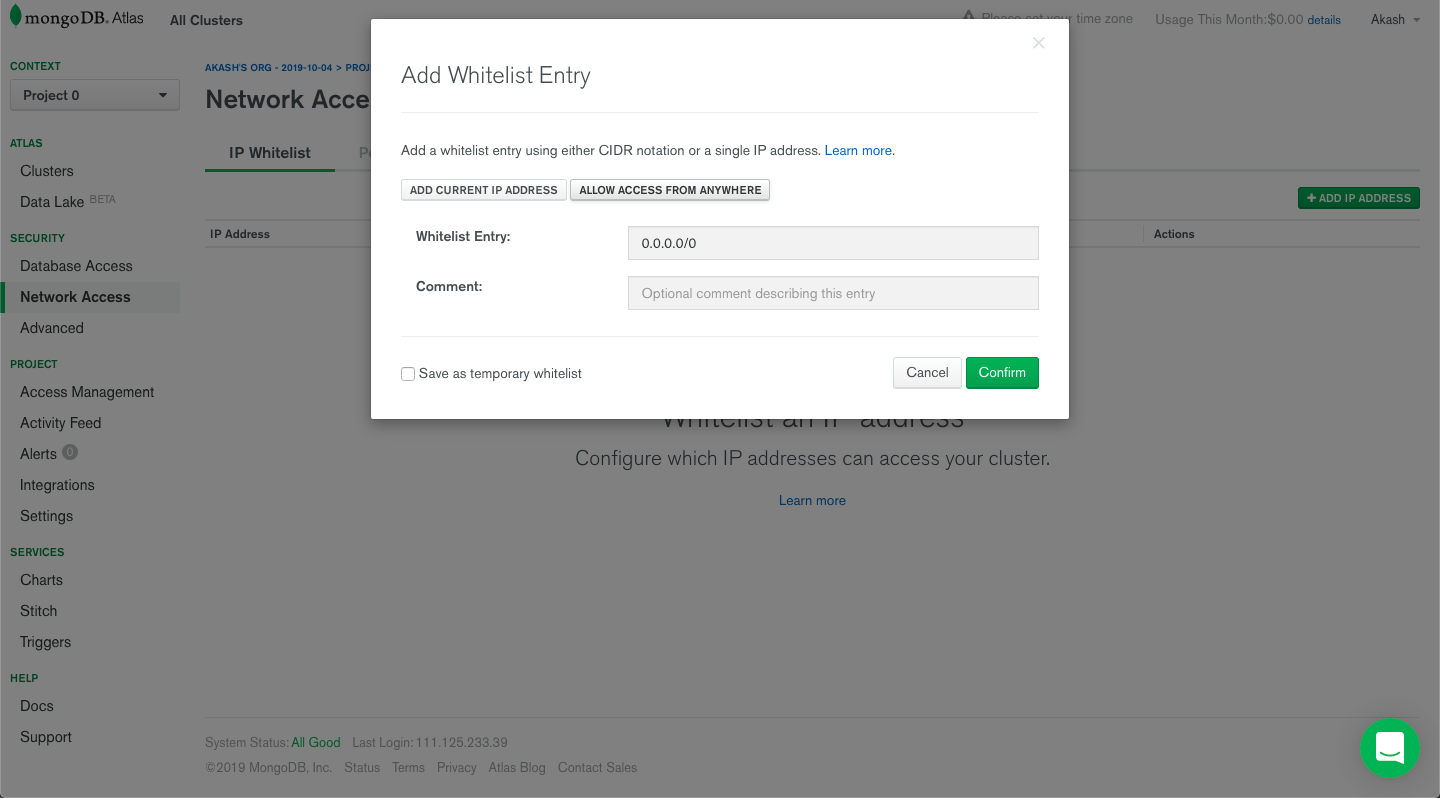
- To allow database access from any IP, after closing the previous screen, click on "Network Access" on the left menu. On this page, click on "+ Add IP Address". Then choose "Allow access from anywhere" on the popup and click on "Confirm". Now you're good to go!
Setting up the server template
You'll be modifying an existing application template for the server code. Be sure to clone this repository, which you will use as a starting point.
You can install the dependencies by running npm i and run the server by running npm run dev. Any changes to the code will be directly reflected in the browser.
Getting Started with Auth0
Next, you need to create an Auth0 account so that you can integrate authentication into your application. If you haven't created an Auth0 account, you can sign up for a free one now.
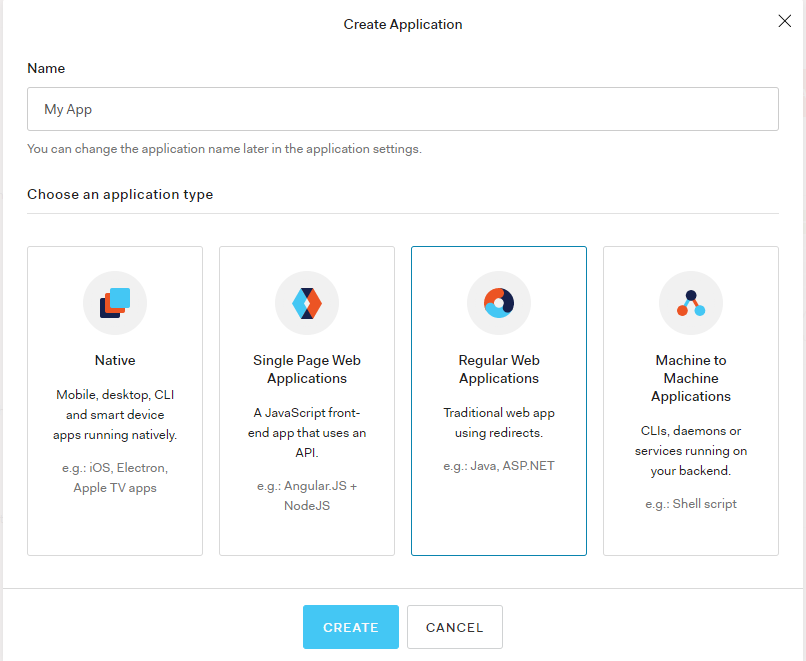
Once you're in the dashboard, click on "+ Create Application".
Enter the name of your application here, for example, "My App" and then select "Regular Web Applications" as the application type.
First, install dotenv to handle the secrets and next to install NextJS.
npm i dotenv next
Add this to the top of server.js to access your secrets:
require("dotenv").config();
Create a .env file in the root of your code directory and paste the content below into it:
AUTH0_DOMAIN=http://your-auth0-domain.com
AUTH0_CLIENT_ID=Client_Id_From_Auth0
AUTH0_CLIENT_SECRET=Client_Secret_From_Auth0
AUTH0_CALLBACK_URL=http://localhost:8081/callback
BASE_URL=http://localhost:8081
MONGO_URI=mongodb+srv://your-mongo-server
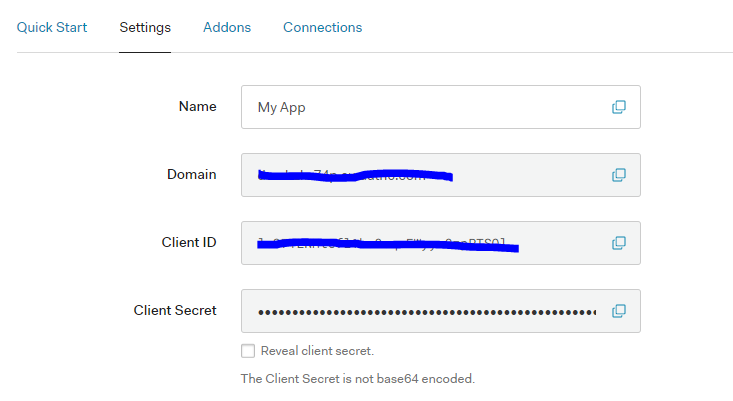
Now back in the Auth0 dashboard, click on your application and then click "Settings". You're going to fill in your .env file using these values.
In the .env file, replace the placeholders with the actual values from your Auth0 dashboard. If your Auth0 domain is https://my-auth0.com, then your AUTH0_DOMAIN value would look like this:
AUTH0_DOMAIN=https://my-auth0.com
Do this for all of the values in the .env file.
- CALLBACK_URL —
http://localhost:8081/callback. If you're using a different port number, make sure this matches it. - BASE_URL —
http://localhost:8081 - MONGO_URI — the database URI that you saved earlier during the MongoDB setup.
Note: Make sure you replace
<password>in this URI with your user password you created in the Mongo dashboard.
Now you need to do one last thing in the Auth0 dashboard.
Set the Callback URL and Logout URL to the following:
Callback URL: — http://localhost:8081/callback
Logout URL: — http://localhost:8081/
Be sure to set the port numbers to match yours if you've set it to a different port number in your application.
Integrating Auth0 into the Application
Now switch back to the terminal and install Passport and its Auth0 implementation into your app by running:
npm i passport passport-auth0
Add express-session to handle sessions via middleware and uid-safe to generate safe UIDs for URLs and cookies:
npm i express-session uid-safe
Add these lines of code to the top of your server.js file to import the dependencies:
const http = require("http");
const session = require("express-session");
const passport = require("passport");
const Auth0Strategy = require("passport-auth0");
const uid = require("uid-safe");
Now it's time to get started with Next.js. In server.js, replace the code below the imports (starting at const port = parseInt(...)... with:
// 1 - boilerplate to get started with Next
const dev = process.env.NODE_ENV !== "production";
const app = next({ dev });
const handle = app.getRequestHandler();

app.prepare().then(() => {
  const server = express();

  // 2 - add session management to Express
  const sessionConfig = {
    secret: uid.sync(18),
    cookie: {
      maxAge: 86400 * 1000 // 24 hours in milliseconds
    },
    resave: false,
    saveUninitialized: true
  };
  server.use(session(sessionConfig));
  server.use(bodyparser.json());

  // 3 - configuring Auth0Strategy
  const auth0Strategy = new Auth0Strategy(
    {
      domain: process.env.AUTH0_DOMAIN,
      clientID: process.env.AUTH0_CLIENT_ID,
      clientSecret: process.env.AUTH0_CLIENT_SECRET,
      callbackURL: process.env.AUTH0_CALLBACK_URL
    },
    function(accessToken, refreshToken, extraParams, profile, done) {
      return done(null, profile);
    }
  );

  // 4 - configuring Passport
  passport.use(auth0Strategy);
  passport.serializeUser((user, done) => done(null, user));
  passport.deserializeUser((user, done) => done(null, user));

  // 5 - adding Passport and authentication routes
  server.use(passport.initialize());
  server.use(passport.session());

  // 6 - function to restrict access to routes
  const restrictAccess = (req, res, next) => {
    if (!req.isAuthenticated()) return res.redirect("/login");
    next();
  };

  // 7 - restricting access to some pages & files that you're going to make next
  server.use("/write", restrictAccess);
  server.use("/edit", restrictAccess);
  server.use("/api/*", restrictAccess);

  // 8 - handling routes with Next.js
  server.get("*", handle);

  // 9 - creating a port variable and listening on it
  const port = process.env.PORT || 8081;

  http.createServer(server).listen(port, () => {
    console.log(`listening on port ${port}`);
  });
});
This file sets up the Auth0 strategy for authentication, which uses the Auth0 values you filled in earlier in the .env file. You then configure Passport.js and use it to create a middleware that will restrict access to a specified route by redirecting an unauthenticated user to the login page. Next, you use that middleware on the routes you want to protect: /write, /edit, and api.
“Auth0 makes it easy to protect your API routes!”
Tweet This
Next, create a folder called api in the root of the app directory to hold your API routes.
Inside the api folder, create another folder auth-routes and then inside that make a new file called index.js to host your API. Include them in the server.js file as:
// At top with other imports
const authRoutes = require("./api/auth-routes");
// ...
// 5 - adding Passport and authentication routes
server.use(passport.initialize());
server.use(passport.session());
server.use(authRoutes);
// ...
Inside /api/auth-routes/index.js, paste the following:
const express = require("express");
const passport = require("passport");

// 1. Create an Express Router
const router = express.Router();

// 2. Create a login route, which authenticates via Auth0, then redirects to callback
router.get("/login", passport.authenticate("auth0", {
  scope: "openid email profile"
}), (req, res) => res.redirect("/"));

// 3. Create a callback route, which decides where user is redirected after being logged in
router.get("/callback", (req, res, next) => {
  passport.authenticate("auth0",  (err, user) => {
    if (err) return next(err);
    if (!user) return res.redirect("/login");
    req.logIn(user, (err) => {
      if (err) return next(err);
      res.redirect("/");
    });
  })(req, res, next);
});

// 4. Create route which logs user out from Auth0, then redirects them to BASE_URL
router.get("/logout", (req, res) => {
  req.logout();

  const {AUTH0_DOMAIN, AUTH0_CLIENT_ID, BASE_URL} = process.env;
  res.redirect(`https://${AUTH0_DOMAIN}/logout?client_id=${AUTH0_CLIENT_ID}&returnTo=${BASE_URL}`);
});

module.exports = router;
Here, you are setting up the Express router and then using it to create a login route. This route sends the user to the Auth0 login page where they can sign in. Next, you're creating a callback route, callback, that decides where the user is redirected after they successfully sign in.
By this point, your server.js should look like this.
You can build your Next.js files and start the server locally by running the command below:
npm run build
npm start
You can view it in the browser at http://localhost:8081 or whatever port you set your app to listen on. Although, at this point, the majority of the application hasn't been built out yet, so there isn't much to see.
Go ahead and stop your server now and you'll come back to it once you have more of the app finished.
Building the Backend
Add a folder called articles to the api folder and inside of that, create a file called index.js. It will host all of your backend API endpoints.
These are the endpoints that you'll need for your API:
- Get all the articles
- Create a new article
- Update existing articles
- Get data for a single article
- Get edit history for an article
Initial setup for the backend
First, add Mongoose to the app with:
npm i mongoose
Make sure the MONGO_URI is present in your .env file and then import Mongoose into server.js:
const mongoose = require("mongoose");

mongoose.connect(
  process.env.MONGO_URI,
  { useNewUrlParser: true }
);
This mongoose variable will be passed to your routes. This will help to model your application data.
Import the articles route into server.js as follows:
// In the top section of the server code below library imports
const articlesAPI = require("./api/articles");
// ...
// 5 - adding Passport and authentication routes
server.use(passport.initialize());
server.use(passport.session());
server.use(authRoutes);
articlesAPI(server, mongoose);
// ...
The structure of api/articles/index.js will look like this:
module.exports = (app, mongoose) => {
};
You'll use app to handle routes and mongoose to handle the database. You can test all the API endpoints that use GET by going to the URL in your browser. Because you won't have a way to input data initially, POST requests will have to be tested using Postman or through the completed app.
Get all articles
An article will consist of a title, description, and the article text.
The editing history table will have the title of the article, the user that did the editing, the date when it occurred, and the type of event (creation or editing).
Import Schema from mongoose and create a schema for the article data in api/articles/index.js.
// api/articles/index.js
module.exports = (app, mongoose) => {
  const { Schema } = mongoose;

  const articleSchema = new Schema({
    title: String,
    description: String,
    text: String
  });

  const editSchema = new Schema({
    title: String,
    user: String,
    date: { type: Date, default: Date.now },
    event: String
  });
}
From this schema, you will create a mongoose model named Article to get all the articles from the database:
// api/articles/index.js
// paste this below editSchema

app.get("/api/articles", (req, res) => {
  const Article = mongoose.model("Articles", articleSchema);
  Article.find({}, (err, articles) => {
    res.send(articles);
    console.log(err);
  });
});
Create an article
Next, you need to set up an endpoint to create new articles. This endpoint will accept title, description, text, and the writer's name through a POST request.
You also need to check if an article with the same title already exists. If it does, you return an error. Otherwise, you will add the article, return success, and push a creation event to the edit table.
// api/articles/index.js -> below previous code

app.post("/api/create-article", (req, res) => {
  // 1 - Create model for Article & Edit
  const Article = mongoose.model("Articles", articleSchema);
  const Edit = mongoose.model("Edit", editSchema);

  // 2 - Get article info from POST request body
  const { title, description, text, user } = req.body;
  console.log(req.body);

  // 3 - Search whether article with title is already in db
  Article.find({ title }, (err, article) => {
    if (err) {
      return console.log(err);
    } else {
      console.log(article);
      if (article.length === 0) {
        console.log("Adding");

        // 4a - If not, generate article & edit objects
        const newArticle = new Article({
          title,
          description,
          text
        });

        const edit = new Edit({
          title,
          user: user.displayName,
          event: "Creation"
        });

        // 5 - Perform save operation on db
        newArticle.save(err => {
          if (err) return console.log(err);
          res.send("Added");
        });
        edit.save(err => {
          if (err) return console.log(err);
        });
      } else {

        // 4b - If yes, send a 403
        res.sendStatus(403);
      }
    }
  });
});
Updating an article
Next, create an endpoint that updates an existing article. This will be a POST request that will contain the article's id, title, description, text, and username.
It will use the findOneAndUpdate query and also add an edit event to the Edit Table for the article id.
// api/articles/index.js -> below previous code

app.post("/api/update-article", (req, res) => {

  // 1 - Create model for Article & Edit
  const Article = mongoose.model("Articles", articleSchema);
  const Edit = mongoose.model("Edit", editSchema);

  // 2 - Get article info from POST request body
  const { id, title, description, text, user } = req.body;
  console.log(req.body);

  // 3 - Update the article by searching by its existing id
  Article.findOneAndUpdate({ _id: id }, { title, description, text }, (err, article) => {
    if (err) {
      console.log(err);
      res.sendStatus(500);
    } else {

      // 4 - Create an Edit Object & save it
      const edit = new Edit({
        title,
        user: user.displayName,
        event: "Edited"
      });
      edit.save(err => {
        if (err) return console.log(err);
      });
      res.send("Added");
    }
  });
});
Getting an article
You also need an endpoint to get the article from the database to display on the frontend. You will use the Article model to fetch the data from the Mongo database.
// api/articles/index.js -> below previous code

app.get("/api/article-data", (req, res) => {
  // 1 - Create article model
  const Article = mongoose.model("Articles", articleSchema);

  // 2 - Get article id from query string
  const { id } = req.query;

  // 3 - Find & send article
  Article.find({ _id: id }, (err, article) => {
    if (err) return res.send({ success: false });
    res.send({
      success: true,
      ...article
    });
  });
});
Getting edit history for an article
Finally, you will need an endpoint to get the edit history of the page from the backend database. This will use the Edit model to fetch the history using the id as a unique identifier.
// api/articles/index.js -> below previous code

app.get("/api/edit-history", (req, res) => {

  // 1 - Create Edit model using schema
  const Edit = mongoose.model("Edit", editSchema);

  // 2 - Get article id from query string
  const { id } = req.query;

  // 3 - Find & send history
  Edit.find({ title: id }, (err, article) => {
    if (err) return res.send('');
    res.send(article);
  });
});
At this point, you can start your server again. You can do that by running the following command:
npm run build
npm run dev
Now you can go to http://localhost:8081/api/articles and you'll see your first GET request that returns a test article!
Just leave this running as you start to build out the frontend in the next section.
Building the Frontend
As mentioned earlier, you will be using Bootstrap for styling. Install Bootstrap by entering the following into your terminal:
npm i bootstrap react-bootstrap
Building components
First, you need to make a few changes to pages/_app.jsx to make the frontend work with Passport.
Here's what you need to do:
- Add a top-level
Usersprop - Import Container and Jumbotron from
react-bootstrapand use them in the application - Integrate Passport into the app
Open up pages/_app.jsx and replace it with:
// pages/_app.jsx
import React from "react";
import App, { Container as NextContainer } from "next/app";
import Head from "next/head";
// Import boostrap components
import Container from "react-bootstrap/Container";
import Jumbotron from "react-bootstrap/Jumbotron";
// Import a Navbar component, which we will create in the next step
import Navbar from "../components/Navbar";
class MyApp extends App {
  // This ensures that user details are passed to each page
  static async getInitialProps({ Component, ctx }) {
    let pageProps = {};
    if (Component.getInitialProps) {
      pageProps = await Component.getInitialProps(ctx);
    }
    if (ctx.req && ctx.req.session.passport) {
      pageProps.user = ctx.req.session.passport.user;
    }
    return { pageProps };
  }
  constructor(props) {
    super(props);
    this.state = {
      user: props.pageProps.user
    };
  }
  render() {
    const { Component, pageProps } = this.props;
    const props = {
      ...pageProps,
      user: this.state.user
    };
    return (
      <NextContainer>
        <Head>
          <title>Auth0 Wiki</title>
        </Head>
        <Navbar user={this.state.user} />
        <Container>
          <Jumbotron>
            <Component {...props} />
          </Jumbotron>
        </Container>
      </NextContainer>
    );
  }
}
export default MyApp;
The navbar will be a top-level component present on every page.
Next, modify the _document.jsx file to have:
- A meta tag to add responsiveness
- A Bootstrap dark theme
- Link to
sweetalertscript
Replace everything in _document.jsx with:
import Document, { Head, Html, Main, NextScript } from "next/document";
export default class MyDocument extends Document {
  render() {
    return (
      <Html>
        <Head>
          <meta name="viewport" content="width=device-width, initial-scale=1.0" />
          <link rel="stylesheet" href="https://bootswatch.com/4/darkly/bootstrap.min.css" />
          <script src="https://unpkg.com/sweetalert/dist/sweetalert.min.js" />
        </Head>
        <body>
          <Main />
          <NextScript />
        </body>
      </Html>
    );
  }
}
In the root directory of your app, create a folder called components and then inside of it, add Navbar.js. Inside of Navbar.js, paste:
import Link from "next/link";
import Container from "react-bootstrap/Container";
import Navbar from "react-bootstrap/Navbar";
import Nav from "react-bootstrap/Nav";
export default function AppNavbar({ user }) {
  return (
    <Navbar bg="light" expand="lg" style={{ marginBottom: "25px" }}>
      <Container>
        <Navbar.Brand>
          <Link href="/">
            <a>Thoughts!</a>
          </Link>
        </Navbar.Brand>
        <Navbar.Toggle aria-controls="basic-navbar-nav" />
        <Navbar.Collapse id="basic-navbar-nav">
          <Nav className="mr-auto">
            <Link href="/">
              <a className="nav-link">Home</a>
            </Link>
            {user && (
              <>
                <Link href="/write">
                  <a className="nav-link">New Article</a>
                </Link>
                <Link href="/logout">
                  <a className="nav-link">Log Out</a>
                </Link>
              </>
            )}
            {!user && (
              <Link href="/login">
                <a className="nav-link">Log In to Write</a>
              </Link>
            )}
          </Nav>
        </Navbar.Collapse>
      </Container>
    </Navbar>
  );
}
Next, create an Articles component in components/Articles.js that you will use in the index page. It will display all the articles written so far sorted by date of creation.
import Col from "react-bootstrap/Col";
import Row from "react-bootstrap/Row";
import Article from "./Article";
export default function Articles(props) {
  return (
    <Row>
      <Col xs={12}>
        <h2>Latest Articles</h2>
      </Col>
      {/* Show all loaded articles linearly by mapping them */}
      {props.articles &&
        props.articles.map(article => (
          <Col key={article._id} xs={12} sm={6} md={4} lg={3}>
            <Article article={article} />
          </Col>
        ))}
      {/* Show loading if no articles passed */}
      {!props.articles && <Col xs={12}>Loading...</Col>}
    </Row>
  );
}
Article cards are generated based on the props passed to them by the Articles component. Go ahead and create the component at components/Article.js as shown below:
import Card from "react-bootstrap/Card";
export default function Article({ article }) {
  return (
    <Card bg="secondary" text="white" style={{ marginTop: "15px" }}>
      <Card.Body>
        <Card.Title>
          <a href={'/article?id=' + article._id}>{article.title}</a>
        </Card.Title>
        <Card.Text>{article.description}</Card.Text>
      </Card.Body>
    </Card>
  );
}
Building the pages
In NextJS, the code for React pages is written in the pages folder at the root of your project.
There are two main hooks that you are going to use while building the frontend: the State hook and the Effect hook. The State Hook is responsible for maintaining the state in your app while the Effect Hook performs effects based on state changes.
For a detailed introduction, you can read this article on React Hooks.
You're going to use the axios library to handle HTTP requests. Add it to your project by running:
npm i axios
The first page you're going to build is the index page at pages/index.jsx. Create the index.jsx file and paste in the following:
import Container from "react-bootstrap/Container";
import { useEffect, useState } from "react";
const axios = require("axios");
import Articles from "../components/Articles";
function Index() {
  // Use the state hook to handle all articles
  const [articles, setArticles] = useState("");
  // Use effect hook to call our articles api and set articles
  useEffect(() => {
    axios.get("/api/articles").then(res => setArticles(res.data));
  }, []);
  return (
    <Container>
      <Articles articles={articles} />
    </Container>
  );
}
export default Index;
Next, you need to create a page that people can use to post new articles that will appear on the homepage. Create a .jsx file at pages/write.jsx as follows:
// pages/write.jsx
import { useState } from "react";
import axios from "axios";
export default function Write({ user }) {
  // We create a title, description & text state to handle form state
  const [title, setTitle] = useState("");
  const [description, setDescription] = useState("");
  const [text, setText] = useState("");
  // A handleSubmit function is created to handle form submits
  const handleSubmit = e => {
    e.preventDefault();
    // Get all form data directly from state hooks
    const reqData = {
      title,
      description,
      text: text.replace(/\n/g, "<br />"),
      user
    };
    // Making a POST request to our API
    axios
      .post("/api/create-article", reqData)
      .then(res => {
        swal("Article Submitted", "", "success");
        location.href = "/";
      })
      .catch(err => {
        // If an article name already existed in the database, give an error to
        // the user that it already exists
        return swal("Sorry, " + "Article name not unique, " + "error");
      });
  };
  return (
    <form onSubmit={e => handleSubmit(e)}>
      <label htmlFor="title">
        <h5>Title</h5>
      </label>
      <input
        className="browser-default"
        style={{
          height: "100%",
          width: "100%",
          padding: "10px",
          border: "2px #eee solid",
          borderRadius: "8px"
        }}
        required
        id="title"
        type="text"
        placeholder="Give a suitable title ..."
        onChange={e => setTitle(e.target.value.trim())}
      />
      <label style={{ marginTop: "1em" }} htmlFor="description">
        <h5>Description</h5>
      </label>
      <input
        className="browser-default"
        style={{
          height: "100%",
          width: "100%",
          padding: "10px",
          border: "2px #eee solid",
          borderRadius: "8px"
        }}
        required
        id="description"
        type="text"
        placeholder="Write a suitable description in one or two sentences ..."
        onChange={e => setDescription(e.target.value.trim())}
      />
      <label style={{ marginTop: "1em" }} htmlFor="article">
        <h5>Article</h5>
      </label>
      <textarea
        rows="10"
        className="browser-default"
        style={{
          height: "100%",
          width: "100%",
          padding: "10px",
          border: "2px #eee solid",
          borderRadius: "8px"
        }}
        required
        id="article"
        placeholder="Write the Article Body ..."
        onChange={e => setText(e.target.value.trim())}
      />
      <button style={{ marginTop: "1em", borderRadius: "8px" }} type="submit">
        Submit
      </button>
    </form>
  );
}
Whenever you click on an article on the index page, it should show you the article's content. Create a new file called pages/article.jsx to handle that.
// pages/article.jsx
import { useEffect, useState } from "react";
import Axios from "axios";
import { withRouter } from "next/router";
// Use withRouter to get query params
const Article = withRouter(props => {
  const [article, setArticle] = useState("");
  const [failure, setFailure] = useState("");
  useEffect(() => {
    // Get id from query and perform request to our API
    const id = props.router.query.id;
    if (id) {
      Axios.get('/api/article-data?id=' + props.router.query.id).then(res => {
        const data = res.data;
        console.log(data[0]);
        // Display Article or Failure State depending on response
        if (data[0]) {
          return setArticle(data[0]);
        } else {
          setFailure("No article Found with that id");
        }
      });
    } else {
      location.href = "/";
    }
  }, []);
  return (
    <div>
      {!article && !failure && <div>Loading Article ...</div>}
      {article && (
        <div
          className="valign-wrapper"
          style={{
            display: "flex",
            flexWrap: "wrap",
            marginTop: "-1em",
            justifyContent: "space-between"
          }}
        >
          <h1>{article.title}</h1>
          <div>
            <a href={'/edit?id=' + article._id} style={{ marginTop: "1em", marginRight: "0.5em" }}>
              Edit This Article
            </a>
            <a href={'/edithistory?title=' + article.title} style={{ marginTop: "1em" }}>
              Edit History
            </a>
          </div>
        </div>
      )}
      {article && (
        <div style={{ marginTop: "1em" }}>
          {article.text.split("<br />").map(text => (
            <p>{text}</p>
          ))}
        </div>
      )}
      {failure}
    </div>
  );
});
export default Article;
You also need to create a page to handle the event when a user wants to edit a page.
Create a file at pages/edit.jsx. This page combines code from the write and article page to display existing values to users directly.
// pages/edit.jsx
import { useEffect, useState } from "react";
import Axios from "axios";
import { withRouter } from "next/router";
const Article = withRouter(props => {
  const [failure, setFailure] = useState("");
  const [id, setId] = useState("");
  const [title, setTitle] = useState("");
  const [description, setDescription] = useState("");
  const [text, setText] = useState("");
  useEffect(() => {
    // Get id from query and perform request to our API
    const id = props.router.query.id;
    if (id) {
      Axios.get('/api/article-data?id=' + props.router.query.id).then(res => {
        const data = res.data;
        console.log(data[0]);
        // Submit data to be replaced at backend or display error
        if (data[0]) {
          setTimeout(()=>{
            document.querySelector("#article").value = data[0].text
            .replace(/<br />/g,'\n');
          }, 500);
          setId(data[0]._id);
          setTitle(data[0].title);
          setDescription(data[0].description);
          setText(data[0].text);
        } else {
          setFailure("No article Found with that id");
        }
      });
    } else {
      location.href = "/";
    }
  }, []);
  const handleSubmit = e => {
    e.preventDefault();
    const confirmation = confirm("Are you sure you want to edit this article ?");
    if (confirmation) {
      const reqData = {
        id,
        title,
        description,
        user: props.user,
        text: text.replace(/\n/g, "<br />")
      };
      Axios.post("/api/update-article", reqData)
        .then(res => {
          swal("Article Edit", "", "success");
          location.href="/";
        })
        .catch(err => {
          return swal("Sorry ", "Article Editing Failed", "error");
        });
    } else return;
  };
  return (
    <div>
      {!id && !failure && <div>Loading Article ...</div>}
      {id && (
        <form onSubmit={e => handleSubmit(e)}>
          <label htmlFor="title">
            <h5>Title</h5>
          </label>
          <input
            className="browser-default"
            style={{
              height: "100%",
              width: "100%",
              padding: "10px",
              border: "2px #eee solid",
              borderRadius: "8px"
            }}
            required
            id="title"
            type="text"
            defaultValue={title}
            placeholder="Give a suitable title ..."
            onChange={e=>setTitle(e.target.value.trim())}
          />
          <label style={{ marginTop: "1em" }} htmlFor="description">
            <h5>Description</h5>
          </label>
          <input
            className="browser-default"
            style={{
              height: "100%",
              width: "100%",
              padding: "10px",
              border: "2px #eee solid",
              borderRadius: "8px"
            }}
            required
            defaultValue={description}
            id="description"
            type="text"
            placeholder="Write a suitable description in one or two sentences ..."
            onChange={e=>setDescription(e.target.value.trim())}
          />
          <label style={{ marginTop: "1em" }} htmlFor="article">
            <h5>Article</h5>
          </label>
          <textarea
            rows="10"
            className="browser-default"
            style={{
              height: "100%",
              width: "100%",
              padding: "10px",
              border: "2px #eee solid",
              borderRadius: "8px"
            }}
            required
            id="article"
            placeholder="Write the Article Body ..."
            onChange={e=>setText(e.target.value.trim())}
          />
          <button style={{ marginTop: "1em", borderRadius: "8px" }} type="submit">
            Submit
          </button>
        </form>
      )}
      {failure}
    </div>
  );
});
export default Article;
Finally, you will create an edit-history page at pages/edithistory.jsx as shown below:
// pages/edithistory.jsx
import { useEffect, useState } from "react";
import Axios from "axios";
import { withRouter } from "next/router";
const Article = withRouter(props => {
  const [editData, setData] = useState("");
  const [failure, setFailure] = useState("");
  useEffect(() => {
    // Get title from query parameter
    const title = props.router.query.title;
    if (title) {
      // Set edit history if gotten, otherwise set failure message
      Axios.get('/api/edit-history?id=' + title).then(res => {
        const data = res.data;
        if (data) {
          console.log(data);
          return setData(data);
        } else {
          setFailure("No article Found with that id");
        }
      });
    } else {
      location.href = "/";
    }
  }, []);
  return (
    <div style={{ overflow: "scroll" }}>
      {!editData && !failure && <div>Loading Edit History ...</div>}
      {editData && (
        <>
          <h2>{props.router.query.title} edit history</h2>
          <table>
            <thead>
              <tr>
                <th style={{ minWidth: "150px" }}>Name</th>
                <th style={{ minWidth: "150px" }}>Event</th>
                <th style={{ minWidth: "150px" }}>Date</th>
              </tr>
            </thead>
            <tbody>
              {editData.map(atom => (
                <tr key={atom.date}>
                  <td style={{ minWidth: "150px" }}>{atom.user}</td>
                  <td style={{ minWidth: "150px" }}>{atom.event}</td>
                  <td style={{ minWidth: "150px" }}>{atom.date}</td>
                </tr>
              ))}
            </tbody>
          </table>
        </>
      )}
      {failure}
    </div>
  );
});
export default Article;
That's it! You now have a fully functional Wikipedia app built using React Hooks and Auth0. You can find the complete code for the app in this GitHub repo. Check it out in the browser at http://localhost:8081 to test it out. You will be redirected to the login page if you try to create or edit an article.
What's Next?
App Ideas
It's never too late to add secure authentication like Auth0 to any of your existing applications. Using Auth0 will save a lot of development time so that instead of implementing features that already exist in Auth0, you can focus on building the rest of your app. You can use this tutorial as an example to secure your applications or as inspiration to create your own application.
Some applications which require auth are:
- Social Media Platforms
- Personal Tracking Platforms (Notes apps, Task Apps, etc.)
- Apps Having Subscription Models (News, Software Services, etc.)
Leave a comment below if you have any questions and thanks for reading!
About the author

Akash Joshi
Guest Author