
TL;DR: In this tutorial, we will see how easy it is to build a web application with Symfony and add authentication to it without banging your head on a wall! First, we'll create a custom authentication using Symfony Guard. Then, we'll look at how to build the same thing, but even more robust, using Auth0. Check out the repo to get the code.
The Symfony Framework is one of the leading PHP frameworks, built with reusable PHP components. Tools like WordPress, Drupal, phpBB, and Laravel depend on these Symfony Framework components. Well-known PHP projects such as Silex, Twig, and Swiftmailer also originated from Symfony projects. One notable Symfony community is Sensiolabs Connect, which is an extensive professional network for Symfony developers.
Getting Started
We will be building a simple tech company listing app using the latest version of Symfony. Symfony has come a long way since its first official release. Here we will work with Symfony 5. This latest version comes with a lot of benefits that we will see later in the tutorial. Our app will simply list Top tech companies in the world. Once we add authentication to the app, all logged-in users will have the privilege of knowing these top tech companies and their market value. This list was extracted from this article.
Symfony utilizes Composer to manage its dependencies. So, before using Symfony, make sure you have Composer installed on your machine. We can install Symfony Framework by issuing the composer create-project command in our terminal or using the symfony installer.
To create our application for this tutorial, run the following command to create a new web application named top-tech-companies:
composer create-project symfony/website-skeleton top-tech-companies
The preceding command will create a new folder named top-tech-companies in the root folder where you ran the command from. It will also install all of the required dependencies, which include but not limited to:
- symfony/maker-bundle: This bundle helps you create empty commands, controllers, form classes, tests, and more so you can forget about writing boilerplate code.
- symfony/security-bundle: This bundle integrates the complete security system for our Symfony web application and provides ways to authorize authenticated users based on their roles.
- symfony/flex: This is a tool that makes adding new features seamless through the use of a simple command.
We will make use of the symfony/maker-bundle a lot in this tutorial.
Another way to install Symfony is via Symfony installer. You simply need to run the following command:
symfony new top-tech-companies
Check out the Symfony docs to learn how to set up the Symfony installer.
Explore Directory Structure
Symfony Framework automatically ships with a default directory structure like the one below:
your-project/
├─ bin/
│  ├─ console
│  └─ phpunit
├─ config/
│  └─ packages/
│  └─ routes/
├─ public/
│  └─ index.php
├─ src/
│  └─ Controller/
│  └─ Entity/
│  └─ Form/
│  └─ Migrations/
│  └─ Repository/
│  └─ Security/
│  └─ Kernel.php
├─ templates/
├─ translations/
├─ var/
├─ vendor
   └─ ...
The recommended purpose for each of these directories can be found below:
bin: Contains the executable filesconfig: Contains all the configuration defined for any environmentpublic: This is the document root. It holds all publicly accessible files, such asindex.php, stylesheets, JavaScript files, and images. Theindex.phpfile is also called “front controller”.src: Contains all the Symfony-specific code (controllers and forms), your domain code (e.g., Doctrine classes) and all your business logictemplates: Contains all the template files for the applicationtests: This houses the files for functional or unit testtranslations: Contains translation files for internationalization and localizationvar: Contains all the cache and log files generated by the applicationvendor: Contains all application dependencies installed by Composer
Running the Application
Move into the newly created project and install a web server:
// Change directory
cd top-tech-companies

// install web server
composer require symfony/web-server-bundle --dev ^4.4.2
Then run the application with:
php bin/console server:run
If you installed and configured the Symfony installer, you can also use the following command to run the application:
symfony serve
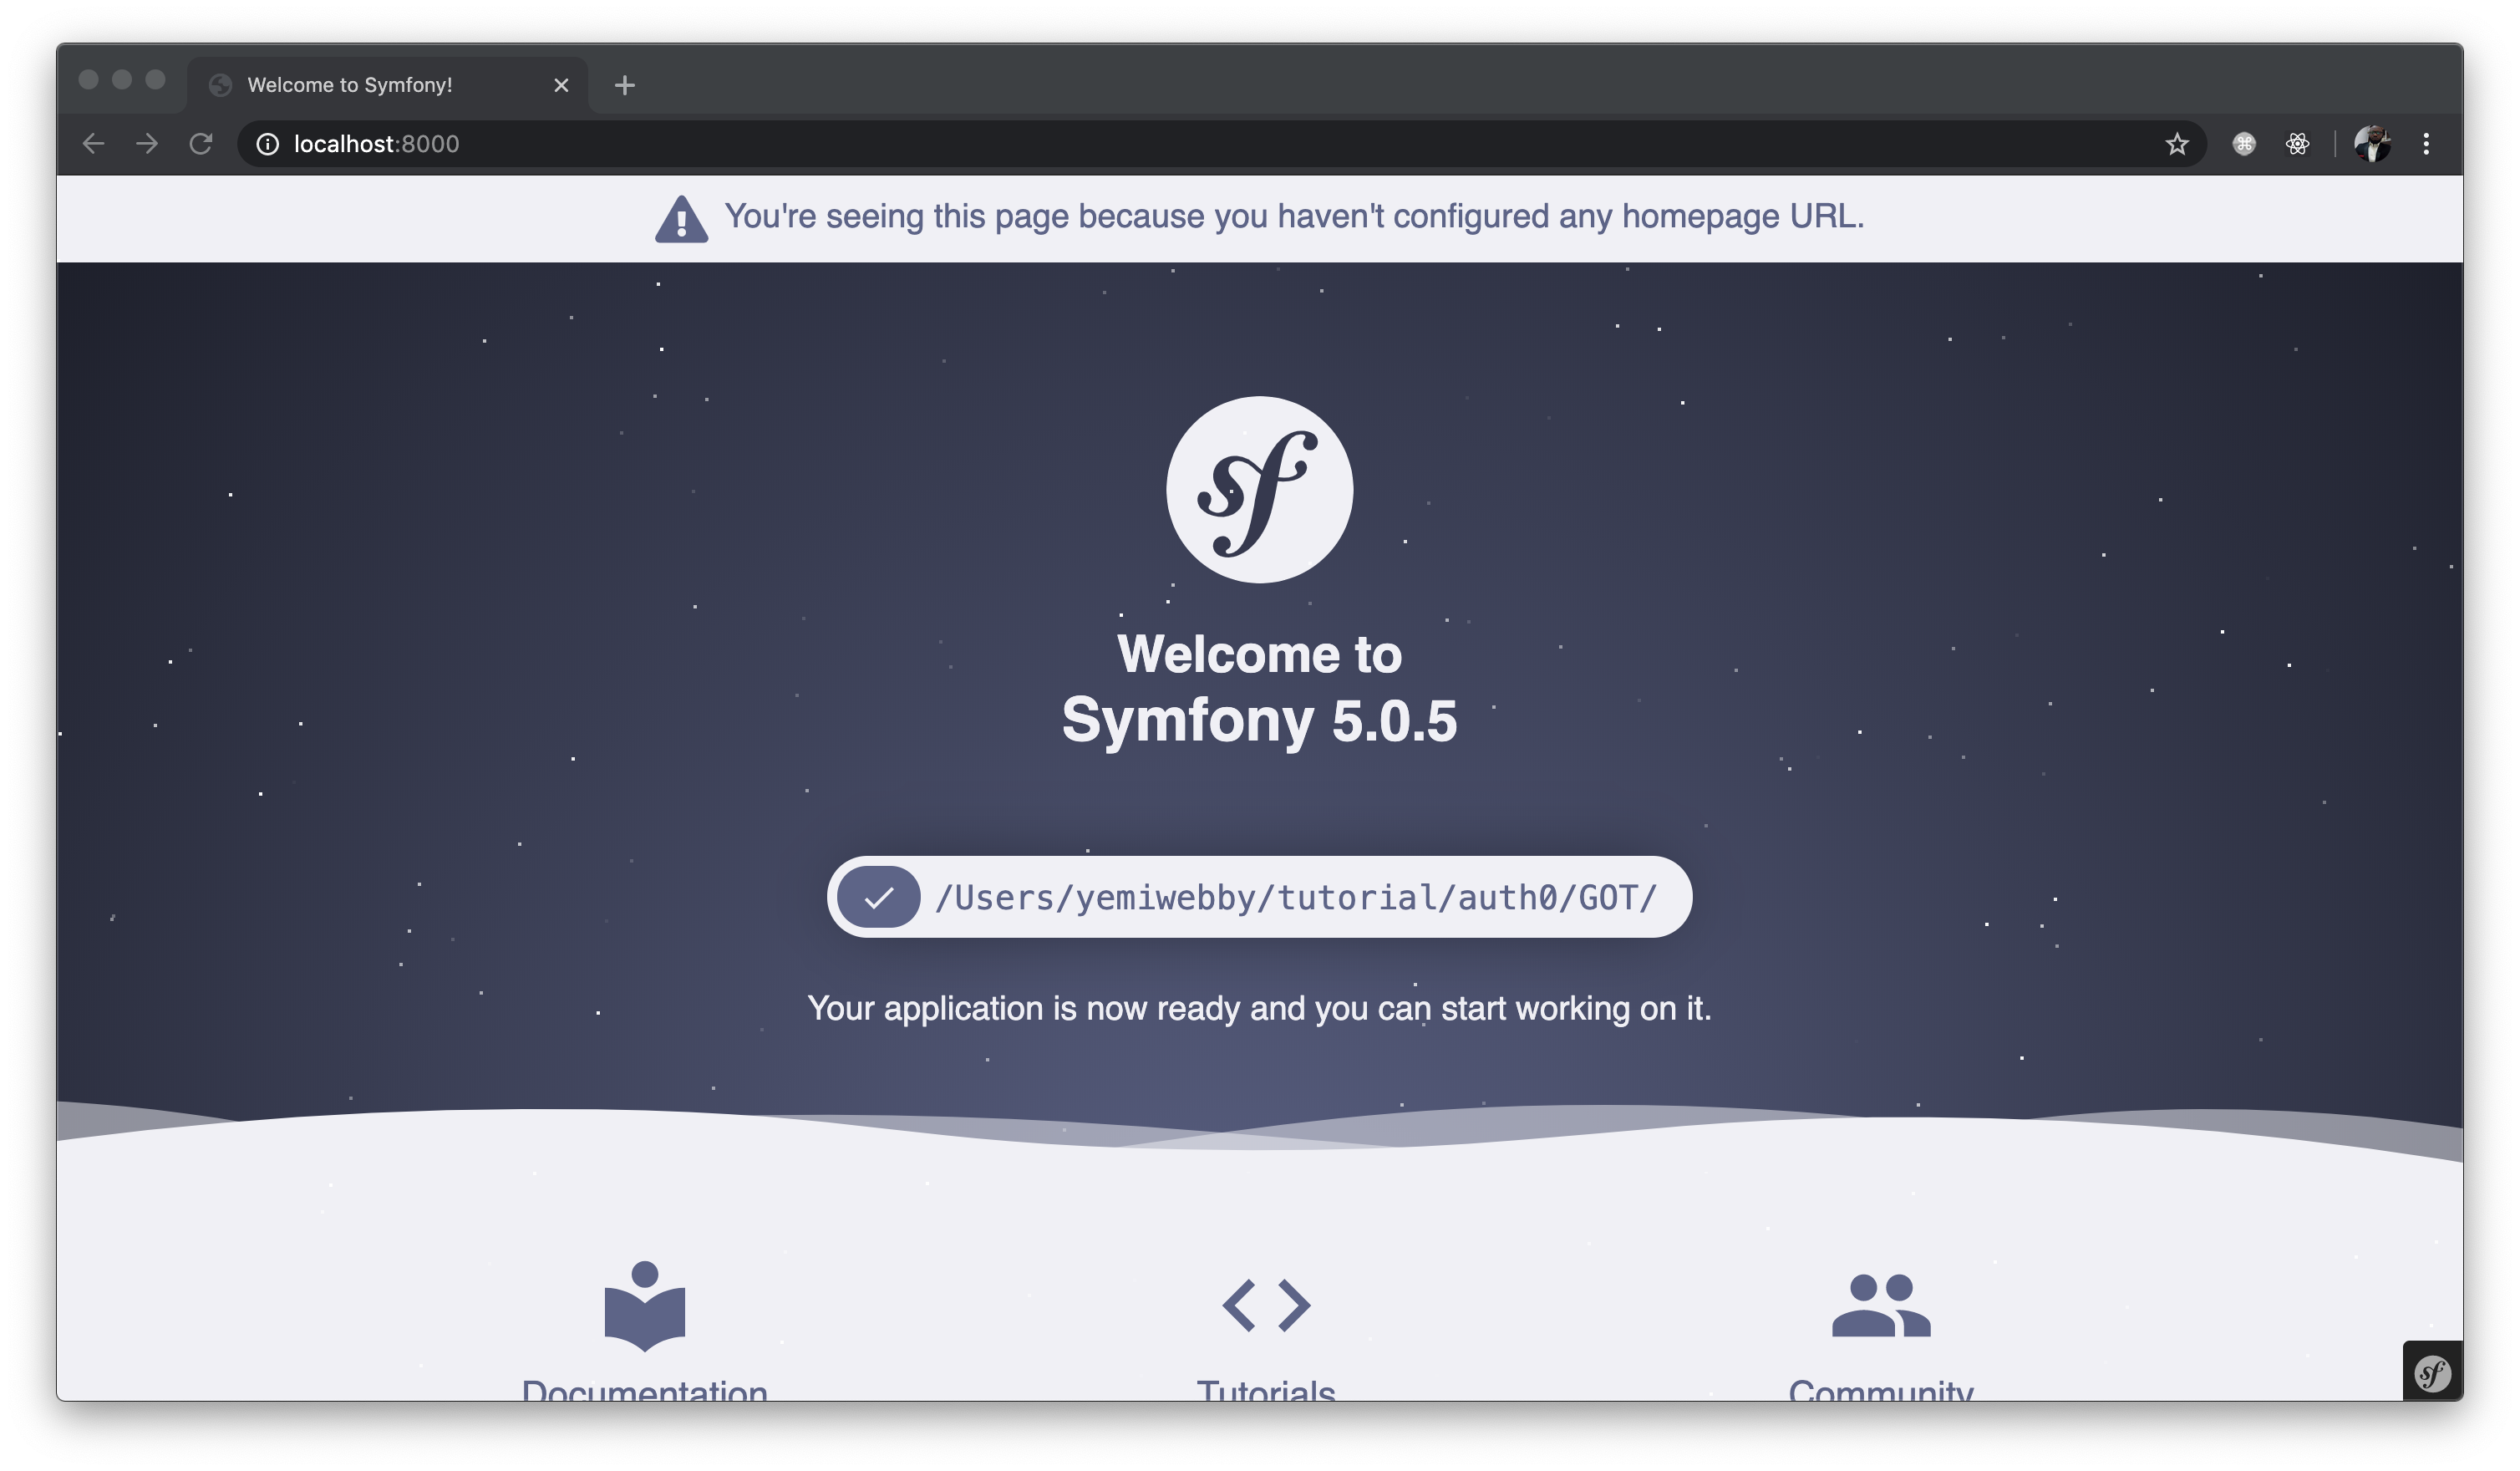
You can view it on http://localhost:8000.
Creating a User Class
Before we can register or authenticate a user within our application, we need to create a User class or an entity. Let’s use the symfony/maker bundle to generate it. Stop the development server from running using CTRL + C, and run the following command afterward:
php bin/console make:user
The command above will ask you several questions so that the appropriate files can be automatically generated for you. Follow the prompt and respond accordingly, as shown here:
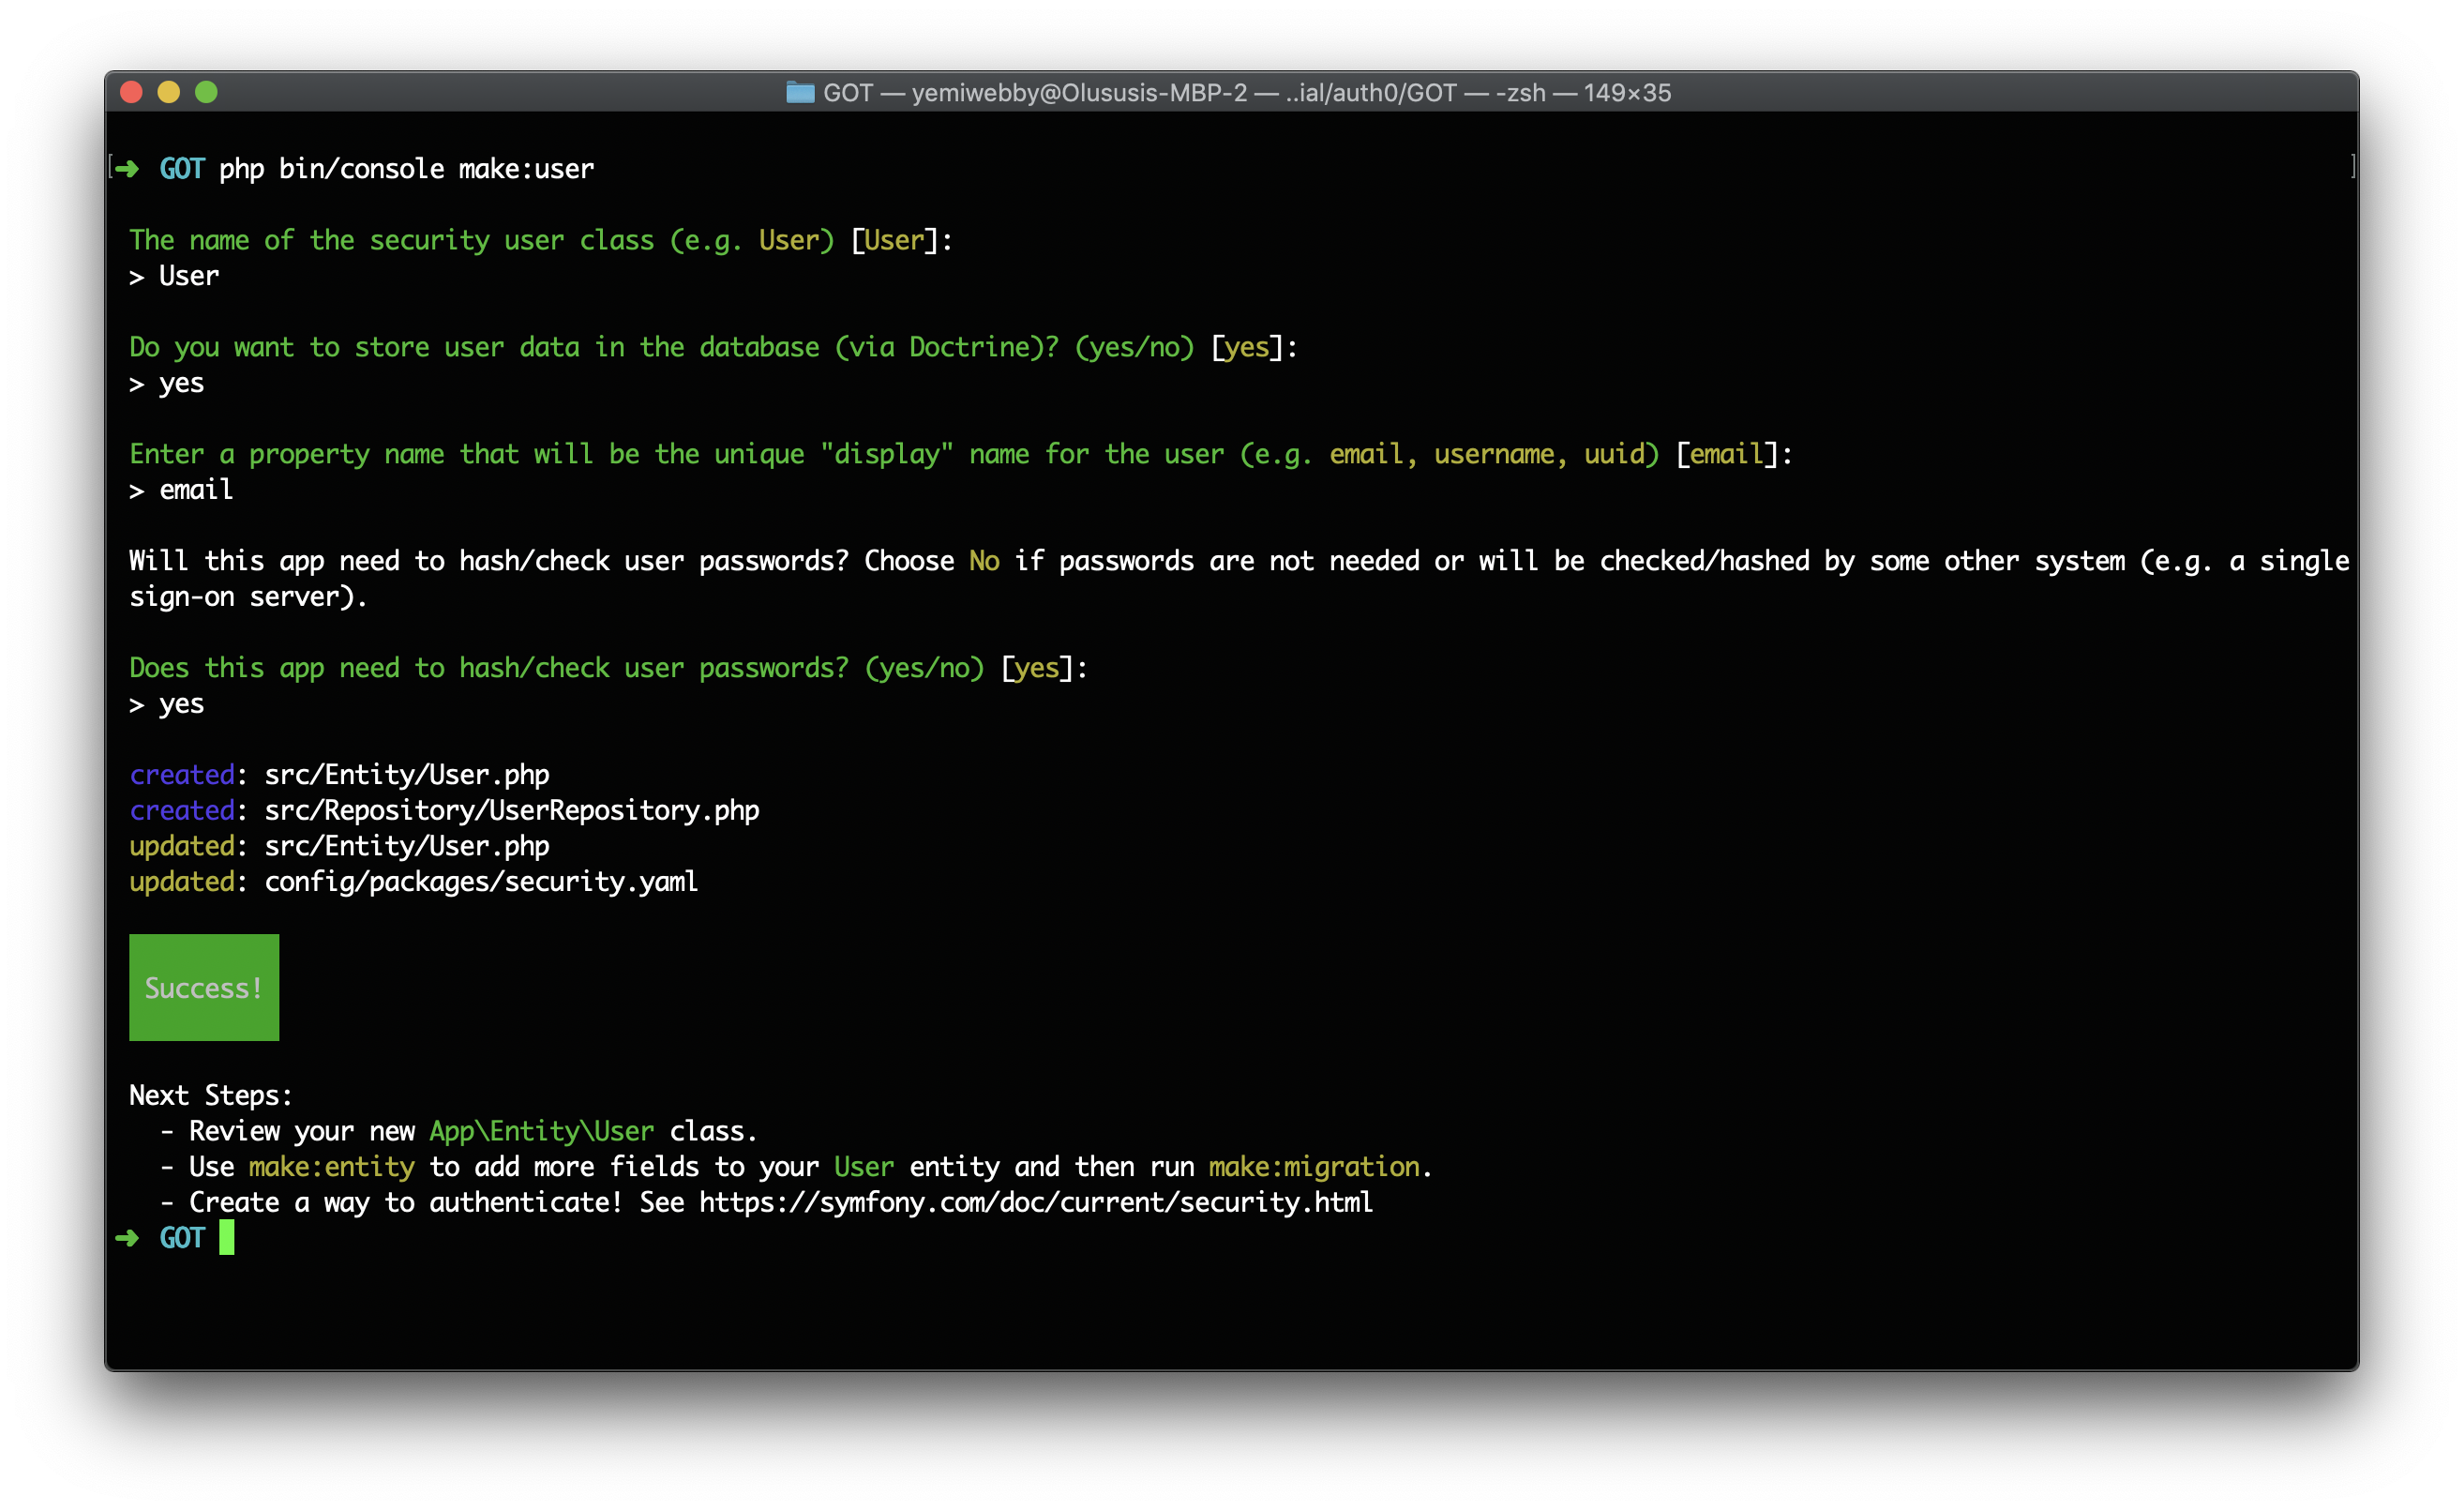
This will create two new files named src/Entity/User.php and src/Repository/UserRepository.php and also update the config/packages/security.yaml file. More about that later in the tutorial.
Before we wrap up this section, we need to add one more field to the User class. Open the src/Entity/User.php file and update its content, as shown below:
// src/Entity/User.php
<?php

namespace App\Entity;
use Doctrine\ORM\Mapping as ORM;
use Symfony\Component\Security\Core\User\UserInterface;
/**
 * @ORM\Entity(repositoryClass="App\Repository\UserRepository")
 */
class User implements UserInterface
{
    /**
     * @ORM\Id()
     * @ORM\GeneratedValue()
     * @ORM\Column(type="integer")
     */
    private $id;

    /**
     * @ORM\Column(type="string", length=180, unique=true)
     */
    private $email;

    /**
     * @ORM\Column(type="json")
     */
    private $roles = [];

    /**
     * @var string The hashed password
     * @ORM\Column(type="string")
     */
    private $password;

    /**
     * @ORM\Column(type="string", length=255)
     */
    private $name;

    public function getId(): ?int
    {
        return $this->id;
    }

    public function getEmail(): ?string
    {
        return $this->email;
    }

    public function setEmail(string $email): self
    {
        $this->email = $email;
        return $this;
    }

    /**
     * A visual identifier that represents this user.
     *
     * @see UserInterface
     */
    public function getUsername(): string
    {
        return (string) $this->email;
    }

    /**
     * @see UserInterface
     */
    public function getRoles(): array
    {
        $roles = $this->roles;
        // guarantee every user at least has ROLE_USER
        $roles[] = 'ROLE_USER';
        return array_unique($roles);
    }

    public function setRoles(array $roles): self
    {
        $this->roles = $roles;
        return $this;
    }

    /**
     * @see UserInterface
     */
    public function getPassword(): string
    {
        return (string) $this->password;
    }

    public function setPassword(string $password): self
    {
        $this->password = $password;
        return $this;
    }

    /**
     * @see UserInterface
     */
    public function getSalt()
    {
        // not needed when using the "bcrypt" algorithm in security.yaml
    }

    /**
     * @see UserInterface
     */
    public function eraseCredentials()
    {
        // If you store any temporary, sensitive data on the user, clear it here
        // $this->plainPassword = null;
    }

    public function getName(): ?string
    {
        return $this->name;
    }

    public function setName(string $name): self
    {
        $this->name = $name;
        return $this;
    }
}
In addition to the properties automatically created by the Symfony MakerBundle, we included a name property and also created both getter and setter method for it. All the properties defined here will represent each field for the user table within the database.
Setting up the Controllers
Now that we have a Symfony project installed, we need to generate a new controller to handle content rendering and any HTTP requests sent to our application. We will start by creating a controller that will handle render the list of tech companies, as stated earlier. Use the following command to generate the ListController:
php bin/console make:controller ListController
This will create two new files for you: a controller located in src/Controller/ListController.php and a view page in templates/list/index.html.twig. Open the ListController.php file and replace its content with:
// ./src/Controller/ListController
<?php

namespace App\Controller;

use Symfony\Bundle\FrameworkBundle\Controller\AbstractController;
use Symfony\Component\HttpFoundation\Request;
use Symfony\Component\Routing\Annotation\Route;

class ListController extends AbstractController
{
    /**
     * @Route("/list", name="list")
     */
    public function index(Request $request)
    {
        $companies = [
            'Apple' => '$1.16 trillion USD',
            'Samsung' => '$298.68 billion USD',
            'Microsoft' => '$1.10 trillion USD',
            'Alphabet' => '$878.48 billion USD',
            'Intel Corporation' => '$245.82 billion USD',
            'IBM' => '$120.03 billion USD',
            'Facebook' => '$552.39 billion USD',
            'Hon Hai Precision' => '$38.72 billion USD',
            'Tencent' => '$3.02 trillion USD',
            'Oracle' => '$180.54 billion USD',
        ];

        return $this->render('list/index.html.twig', [
            'companies' => $companies,
        ]);
    }
}
To keep things simple, we created and hardcoded the list of companies, as obtained from this article and passed it to a view named index.html.twig within the list directory. If your application is in production, you should retrieve the items within this array from the data in your database.
Next, generate a new controller to handle user registration with:
php bin/console make:controller RegistrationController
This will create two new files for you: a controller located in src/Controller/RegistrationController.php and a view page in templates/registration/index.html.twig. Open the RegistrationController.php file and replace its content with:
// ./src/Controller/RegistrationController
<?php

namespace App\Controller;

use App\Entity\User;
use App\Form\UserType;
use Symfony\Bundle\FrameworkBundle\Controller\AbstractController;
use Symfony\Component\HttpFoundation\Request;
use Symfony\Component\Routing\Annotation\Route;
use Symfony\Component\Security\Core\Encoder\UserPasswordEncoderInterface;

class RegistrationController extends AbstractController
{
    private $passwordEncoder;

    public function __construct(UserPasswordEncoderInterface $passwordEncoder)
    {
        $this->passwordEncoder = $passwordEncoder;
    }

    /**
     * @Route("/registration", name="registration")
     */
    public function index(Request $request)
    {
        $user = new User();

        $form = $this->createForm(UserType::class, $user);

        $form->handleRequest($request);

        if ($form->isSubmitted() && $form->isValid()) {
            // Encode the new users password
            $user->setPassword($this->passwordEncoder->encodePassword($user, $user->getPassword()));

            // Set their role
            $user->setRoles(['ROLE_USER']);

            // Save
            $em = $this->getDoctrine()->getManager();
            $em->persist($user);
            $em->flush();

            return $this->redirectToRoute('app_login');
        }

        return $this->render('registration/index.html.twig', [
            'form' => $form->createView(),
        ]);
    }
}
Here, we mapped this controller to the registration route. Therefore, all HTTP requests sent to the /registration endpoint to register users within the application will be processed by the index() method defined above. This method will process the registration form and persist user data to the database. If the form has not been submitted yet, a user registration form will be rendered instead.
Lastly, generate a new controller that will handle the login process for a user:
php bin/console make:controller SecurityController
After running the command above, a new controller named SecurityController.php will be created within the src/controller directory. We will update this file in a bit.
Understanding Symfony Routes
Now that we are done creating all of the required controllers for this application, we can now proceed to create the registration and login form. But before that, you will notice that all the controllers created so far come with a PHP annotation of @Route("/routename", name="routename"). This is used by Symfony to define the route that will receive a particular request and render a view where and when necessary.
Symfony Framework allows several configuration options for setting up routes. Such as YAML, XML, PHP, or using annotations. It supports annotations and the option of explicitly stating it in config/routes/annotations.yaml file. The goal of the Symfony routing system is to parse any URL and determine which controller should be executed. All formats provide the same features and performance, so choose your favorite. Symfony recommends annotations because it's convenient to put the route and controller in the same place. In this tutorial, we will make use of annotations within our Controllers.
Creating User Type
Earlier, we referenced a form within the RegistrationController.php. We will create the form in this section. To begin, we will use the Maker bundle to create a form to register users. This removes the stress involved in creating and rendering form fields, handling validation, and so on, as it is done for you.
Run the following command and follow the prompts to generate the registration form:
php bin/console make:form
Start by entering UserType as the name of the form class. Next, enter the name of the User class created earlier:
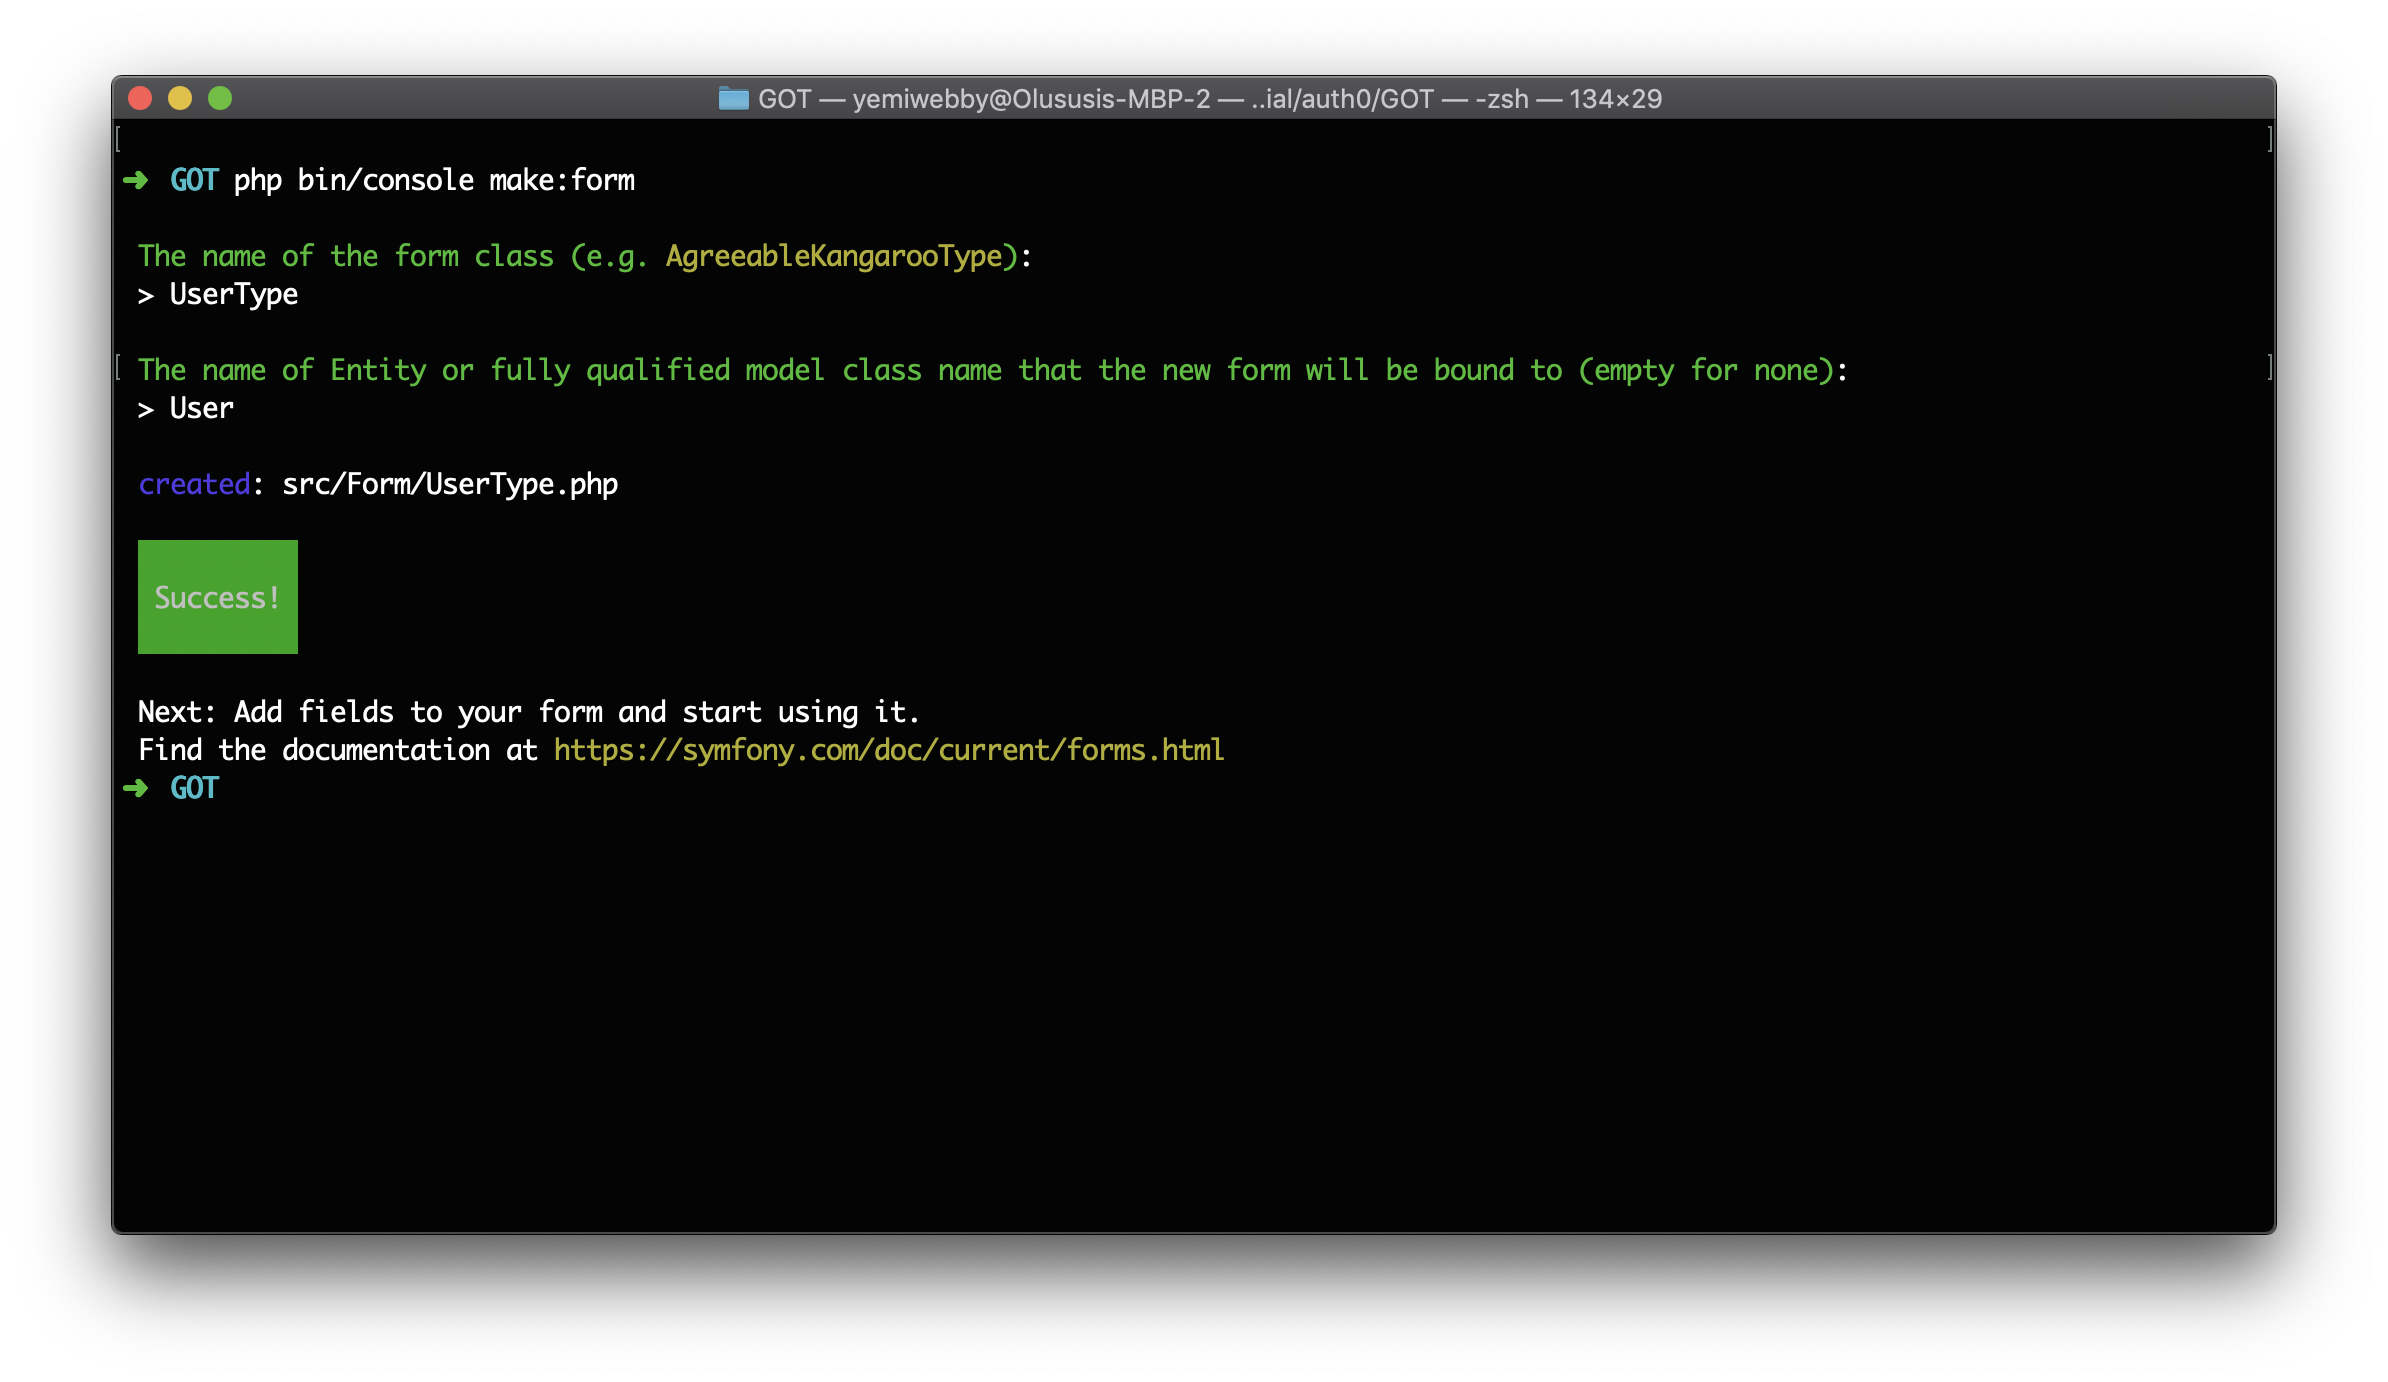
Now, open the src/Form/UserType.php file and use the following content for it:
// src/Form/UserType.php
<?php

namespace App\Form;

use App\Entity\User;
use Symfony\Component\Form\AbstractType;
use Symfony\Component\Form\Extension\Core\Type\EmailType;
use Symfony\Component\Form\Extension\Core\Type\PasswordType;
use Symfony\Component\Form\Extension\Core\Type\RepeatedType;
use Symfony\Component\Form\Extension\Core\Type\TextType;
use Symfony\Component\Form\FormBuilderInterface;
use Symfony\Component\OptionsResolver\OptionsResolver;

class UserType extends AbstractType
{
    public function buildForm(FormBuilderInterface $builder, array $options)
    {
        $builder
            ->add('email', EmailType::class)
            ->add('name', TextType::class)
            ->add('password', RepeatedType::class, [
                'type' => PasswordType::class,
                'first_options' => ['label' => 'Password'],
                'second_options' => ['label' => 'Confirm Password']
            ])
        ;
    }

    public function configureOptions(OptionsResolver $resolver)
    {
        $resolver->setDefaults([
            'data_class' => User::class,
        ]);
    }
}
First, we modified the content generated for this file by including the Type for each of the form fields and also included a password confirm field. These form fields will be displayed on the registration form.
Generating the Login Form
Creating a powerful login form for Symfony website is quite simple. The Makerbundle can be used to easily bootstrap a new Login form without hassle. Depending on your setup, you may be asked different questions, and your generated code may be slightly different. To create the Login form, run the following command:
php bin/console make:auth
As a response from the preceding command, you will be prompted to provide answers to a couple of questions.
Respond as follows:
What style of authentication do you want? [Empty authenticator]:

[0] Empty authenticator
[1] Login form authenticator

> 1

The class name of the authenticator to create (e.g., AppCustomAuthenticator):

> LoginFormAuthenticator

Choose a name for the controller class (e.g. SecurityController) [SecurityController]:

> SecurityController

Do you want to generate a '/logout' URL? (yes/no) [yes]:
> yes
Once the process is completed, two new files will automatically be created for you in src/Security/LoginFormAuthenticator.php and templates/security/login.html.twig. It will also update both config/packages/security.yaml and src/Controller/SecurityController.php.
Open the src/Controller/SecurityController.php and update it as shown here:
// src/Controller/SecurityController.php
<?php

namespace App\Controller;

use Symfony\Bundle\FrameworkBundle\Controller\AbstractController;
use Symfony\Component\HttpFoundation\Response;
use Symfony\Component\Routing\Annotation\Route;
use Symfony\Component\Security\Http\Authentication\AuthenticationUtils;

class SecurityController extends AbstractController
{
    /**
     * @Route("/", name="app_login")
     */
    public function login(AuthenticationUtils $authenticationUtils): Response
    {
        // get the login error if there is one
        $error = $authenticationUtils->getLastAuthenticationError();
        // last username entered by the user
        $lastUsername = $authenticationUtils->getLastUsername();

        return $this->render('security/login.html.twig', ['last_username' => $lastUsername, 'error' => $error]);
    }

    /**
     * @Route("/logout", name="app_logout")
     */
    public function logout()
    {
        throw new \Exception('This method can be blank - it will be intercepted by the logout key on your firewall');
    }
}
Here, we edited the @Route() annotation on the login() method to render the login form on the homepage of our application.
Configuring the Database
Here, let us configure our database connection. The default driver Symfony ships with is MySQL. Open the .env file within the root directory of the application and find the DATABASE_URL environment variable.
DATABASE_URL=mysql://db_user:db_password@127.0.0.1:3306/db_name?serverVersion=5.7
Update this line with your own credentials and the name you want to use for the database, for example, techcompanies. If you don't have MySQL installed and set up on your system, follow this guide to get started.
- dbuser: Replace with your database username_
- dbpassword: Replace with your database password_
- dbname: Replace with your database name. You don't have to create the database yet, as we'll do that in the next step._
Note: This is a good time to double-check that .env is listed in your .gitignore file. You should NEVER commit sensitive data to your repository.
Next, run the following command to create a database with the value of your database name:
php bin/console doctrine:database:create
At the moment, the database still has no tables. Run the following command that will instruct Doctrine to create the tables based on the User entity that we have created earlier:
php bin/console doctrine:schema:update --force
Setting up Authentication
If you'd like to use Auth0 with Symfony, skip the the Auth0 integration section.
Use Auth0 with SymfonySymfony ships with an awesome security component called Guard that simplifies the authentication process. Let's take advantage of it in our app. The first step is to configure the Symfony security settings.
Open up config/packages/security.yaml file and configure it like so:
security:
  encoders:
    App\Entity\User:
      algorithm: auto
  # https://symfony.com/doc/current/security.html#where-do-users-come-from-user-providers
  providers:
    # used to reload user from session & other features (e.g. switch_user)
    app_user_provider:
      entity:
        class: App\Entity\User
        property: email
  firewalls:
    dev:
      pattern: ^/(_(profiler|wdt)|css|images|js)/
      security: false
    main:
      anonymous: lazy
      provider: app_user_provider
      guard:
        authenticators:
          - App\Security\LoginFormAuthenticator
      logout:
        path: app_logout
        target: /
Most sections within the preceding file have been pre-configured by the MakerBundle. It handles the following as indicated by each section:
encoders: This is used to configure how passwords created within the application will be hashed. Leaving the value for thealgorithmto beautowill auto-selects the best possible hashing algorithm for it.providers: This points to the PHP class that will be use to load a user object from the session.firewalls: This is used to define how users of our application will be authenticated.
Lastly, to redirect a user back to the homepage after a successful logout process, we edited the logout section by changing the target path to \;
Setting up Views
Symfony Framework ships with a powerful templating engine called Twig. Twig allows you to write concise, readable templates that are more friendly to web designers and, in several ways, more powerful than PHP templates.
The views needed for authentication in this app are in the templates/security directory. The base layout for our application has also been configured in the templates/base.html.twig file. All of these views use the Bootstrap CSS framework, but you are free to customize them however you wish.
Open up your templates/list/index.html.twig and configure it like so:
{# templates/list/index.html.twig #} {% extends 'base.html.twig' %} {% block
body %}
<div class="container">
  <div class="row">
    <div class="col-md-12">
      <div class="card bg-light mb-3 mt-3">
        <div class="card-body">
          <div class="card-header">List of top technology companies</div>
          <AmpContent>
          <table class="table">
            <tr>
              <th>Company Name</th>
              <th>Market Value</th>
            </tr>
            {% for key, item in companies %}
            <tr>
              <td>{{ key }}</td>
              <td>{{ item }}</td>
            </tr>
            {% endfor %}
          </table>

</NonAmpContent>
        </div>
      </div>
      <AmpContent>
      <a href="{{ path('app_login') }}" class="btn btn-info">
        You need to login to see the list 😜😜 >></a
      >

</NonAmpContent>
    </div>
  </div>
</div>
{% endblock %}
Here, we are looping through the $companies array data passed from the ListController for appropriate rendering in the index.html.twig view.
app.user == null— Let's you check if a user is authenticated or not. It returnstrueif a user is logged-in andnullif a user is not.
Open templates/security/login.html.twig and templates/registration/index.html.twig templates. Configure them respectively:
{# templates/security/login.html.twig #} {% extends 'base.html.twig' %} {% block
title %}Log in!{% endblock %} {% block body %}
<div class="container">
  <div class="row">
    <div class="col-md-10 ml-md-auto">
      <div class="">
        <div class="card bg-light mb-3 mt-5" style="width: 800px;">
          <div class="card-body">
            <form class="form-horizontal" role="form" method="post">
              <AmpContent>
              <div class="alert alert-danger">
                {{ error.messageKey|trans(error.messageData, 'security') }}
              </div>

</NonAmpContent> <AmpContent>
              <div class="mb-3">
                You are logged in as {{ app.user.username }},
                <a href="{{ path('app_logout') }}">Logout</a>
              </div>

</NonAmpContent>
              <div class="card-header mb-3">Please sign in</div>
              <div class="form-group">
                <label for="email" class="col-md-4 control-label"
                  >E-Mail Address</label
                >
                <div class="col-md-12">
                  <input
                    id="inputEmail"
                    type="email"
                    class="form-control"
                    name="email"
                    value="{{ last_username }}"
                    required
                    autofocus
                  />
                </div>
              </div>
              <div class="form-group">
                <label for="password" class="col-md-4 control-label"
                  >Password</label
                >
                <div class="col-md-12">
                  <input
                    id="inputPassword"
                    type="password"
                    class="form-control"
                    name="password"
                    required
                  />
                </div>
              </div>
              <input
                type="hidden"
                name="_csrf_token"
                value="{{ csrf_token('authenticate') }}"
              />
              <div class="form-group">
                <div class="col-md-12">
                  <button type="submit" class="btn btn-primary">
                    <i class="fa fa-btn fa-sign-in"></i> Login
                  </button>
                </div>
              </div>
            </form>
          </div>
        </div>
      </div>
    </div>
  </div>
</div>
{% endblock %}
And for templates/registration/index.html.twig, paste in:
{# templates/registration/index.html.twig #} {% extends 'base.html.twig' %} {%
block body %}
<div class="container">
  <div class="row">
    <div class="col-md-10 ml-md-auto">
      <div class="card bg-light mb-3 mt-5" style="width: 800px">
        <div class="card-body">
          <div class="card-header mb-3">Registration Form</div>
          {{ form_start(form) }}
          <div class="form_group">
            <div class="col-md-12 mb-3">
              {{ form_row(form.name, {'attr': {'class': 'form-control'}}) }}
            </div>
          </div>
          <div class="form_group">
            <div class="col-md-12 mb-3">
              {{ form_row(form.email, {'attr': {'class': 'form-control'}}) }}
            </div>
          </div>
          <div class="form_group">
            <div class="col-md-12 mb-3">
              {{ form_row(form.password.first, {'attr': {'class':
              'form-control'}}) }}
            </div>
          </div>
          <div class="form_group">
            <div class="col-md-12 mb-3">
              {{ form_row(form.password.second, {'attr': {'class':
              'form-control'}}) }}
            </div>
          </div>
          <div class="form-group">
            <div class="col-md-8 col-md-offset-4" style="margin-top:5px;">
              <button type="submit" class="btn btn-primary">
                <i class="fa fa-btn fa-user"></i> Register
              </button>
            </div>
          </div>
          {{ form_end(form) }}
        </div>
      </div>
    </div>
  </div>
</div>
{% endblock %}
We are making use of the Symfony built-in form methods in this template.
Update the Base Template
Update the base template with:
{# templates/base.html.twig #}
<!DOCTYPE html>
<html>
  <head>
    <meta charset="UTF-8" />
    <title>{% block title %}Welcome!{% endblock %}</title>
    <link
      rel="stylesheet"
      href="https://maxcdn.bootstrapcdn.com/bootstrap/4.0.0/css/bootstrap.min.css"
    />
    {% block stylesheets %}{% endblock %}
  </head>
  <body>
    <nav
      class="navbar navbar-expand-lg navbar-light bg-light"
      style="height: 70px;"
    >
      <a class="navbar-brand" href="#">Symfony</a>
      <div class="collapse navbar-collapse" id="navbarSupportedContent"></div>
      <ul class="nav navbar-nav navbar-right">
        <AmpContent>
        <li><a class="nav-link" href="{{ path('list') }}">View List</a></li>
        <li><a class="nav-link" href="{{ path('app_logout') }}">Logout</a></li>

</AmpContent>

<NonAmpContent>

        <li><a class="nav-link" href="{{ path('app_login') }}">Login</a></li>
        <li>
          <a class="nav-link" href="{{ path('registration') }}">Register</a>
        </li>

</NonAmpContent>
      </ul>
    </nav>
    {% block body %}{% endblock %} {% block javascripts %}{% endblock %}
  </body>
</html>
This file contains the main layout for our application. Included here is the CDN file for Boostrap CSS and a navigation bar that contains the links to different pages within this application as indicated by the route.
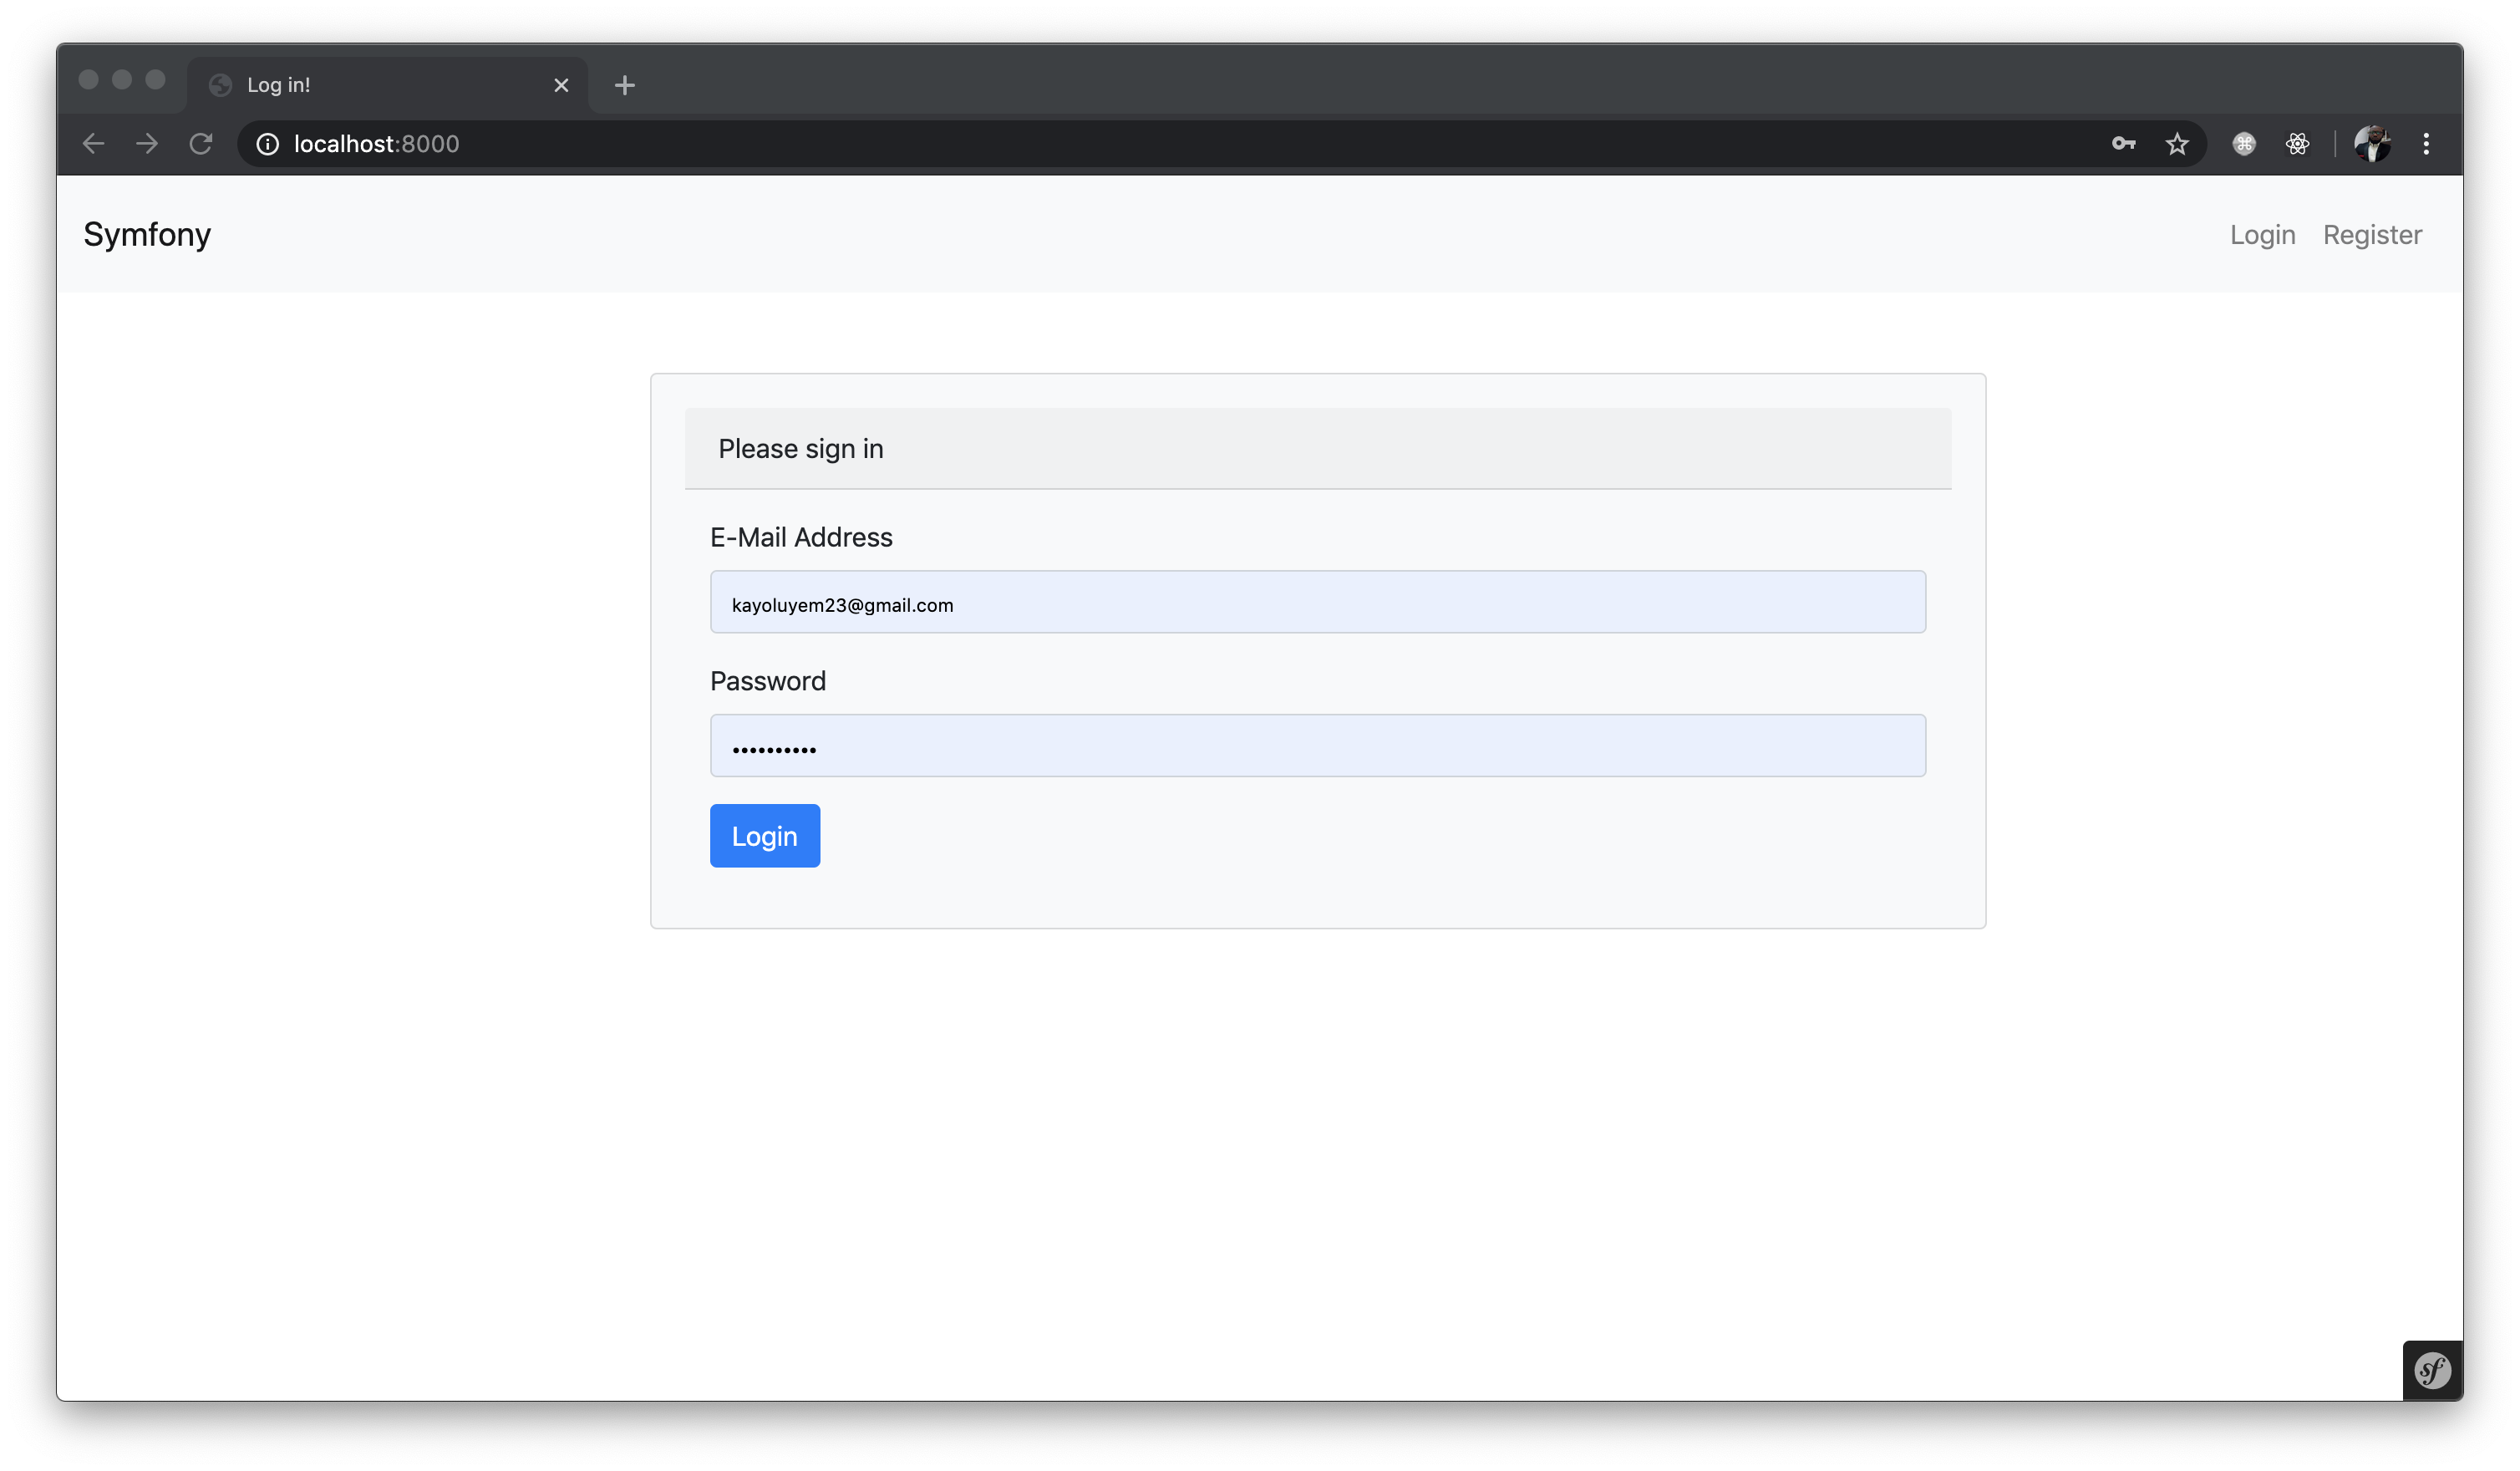
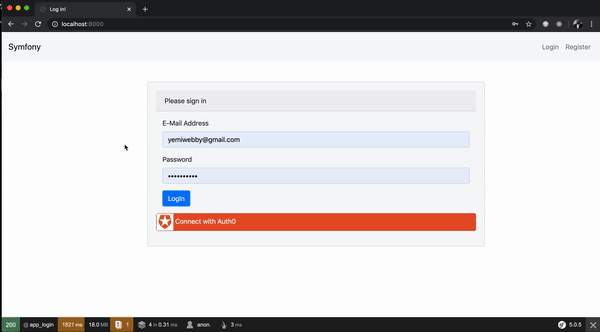
With all the routes and views fully set up, you can now go ahead and run the application using php bin/console server:run. View it on http://localhost:8000. You will see the following:
Login Page
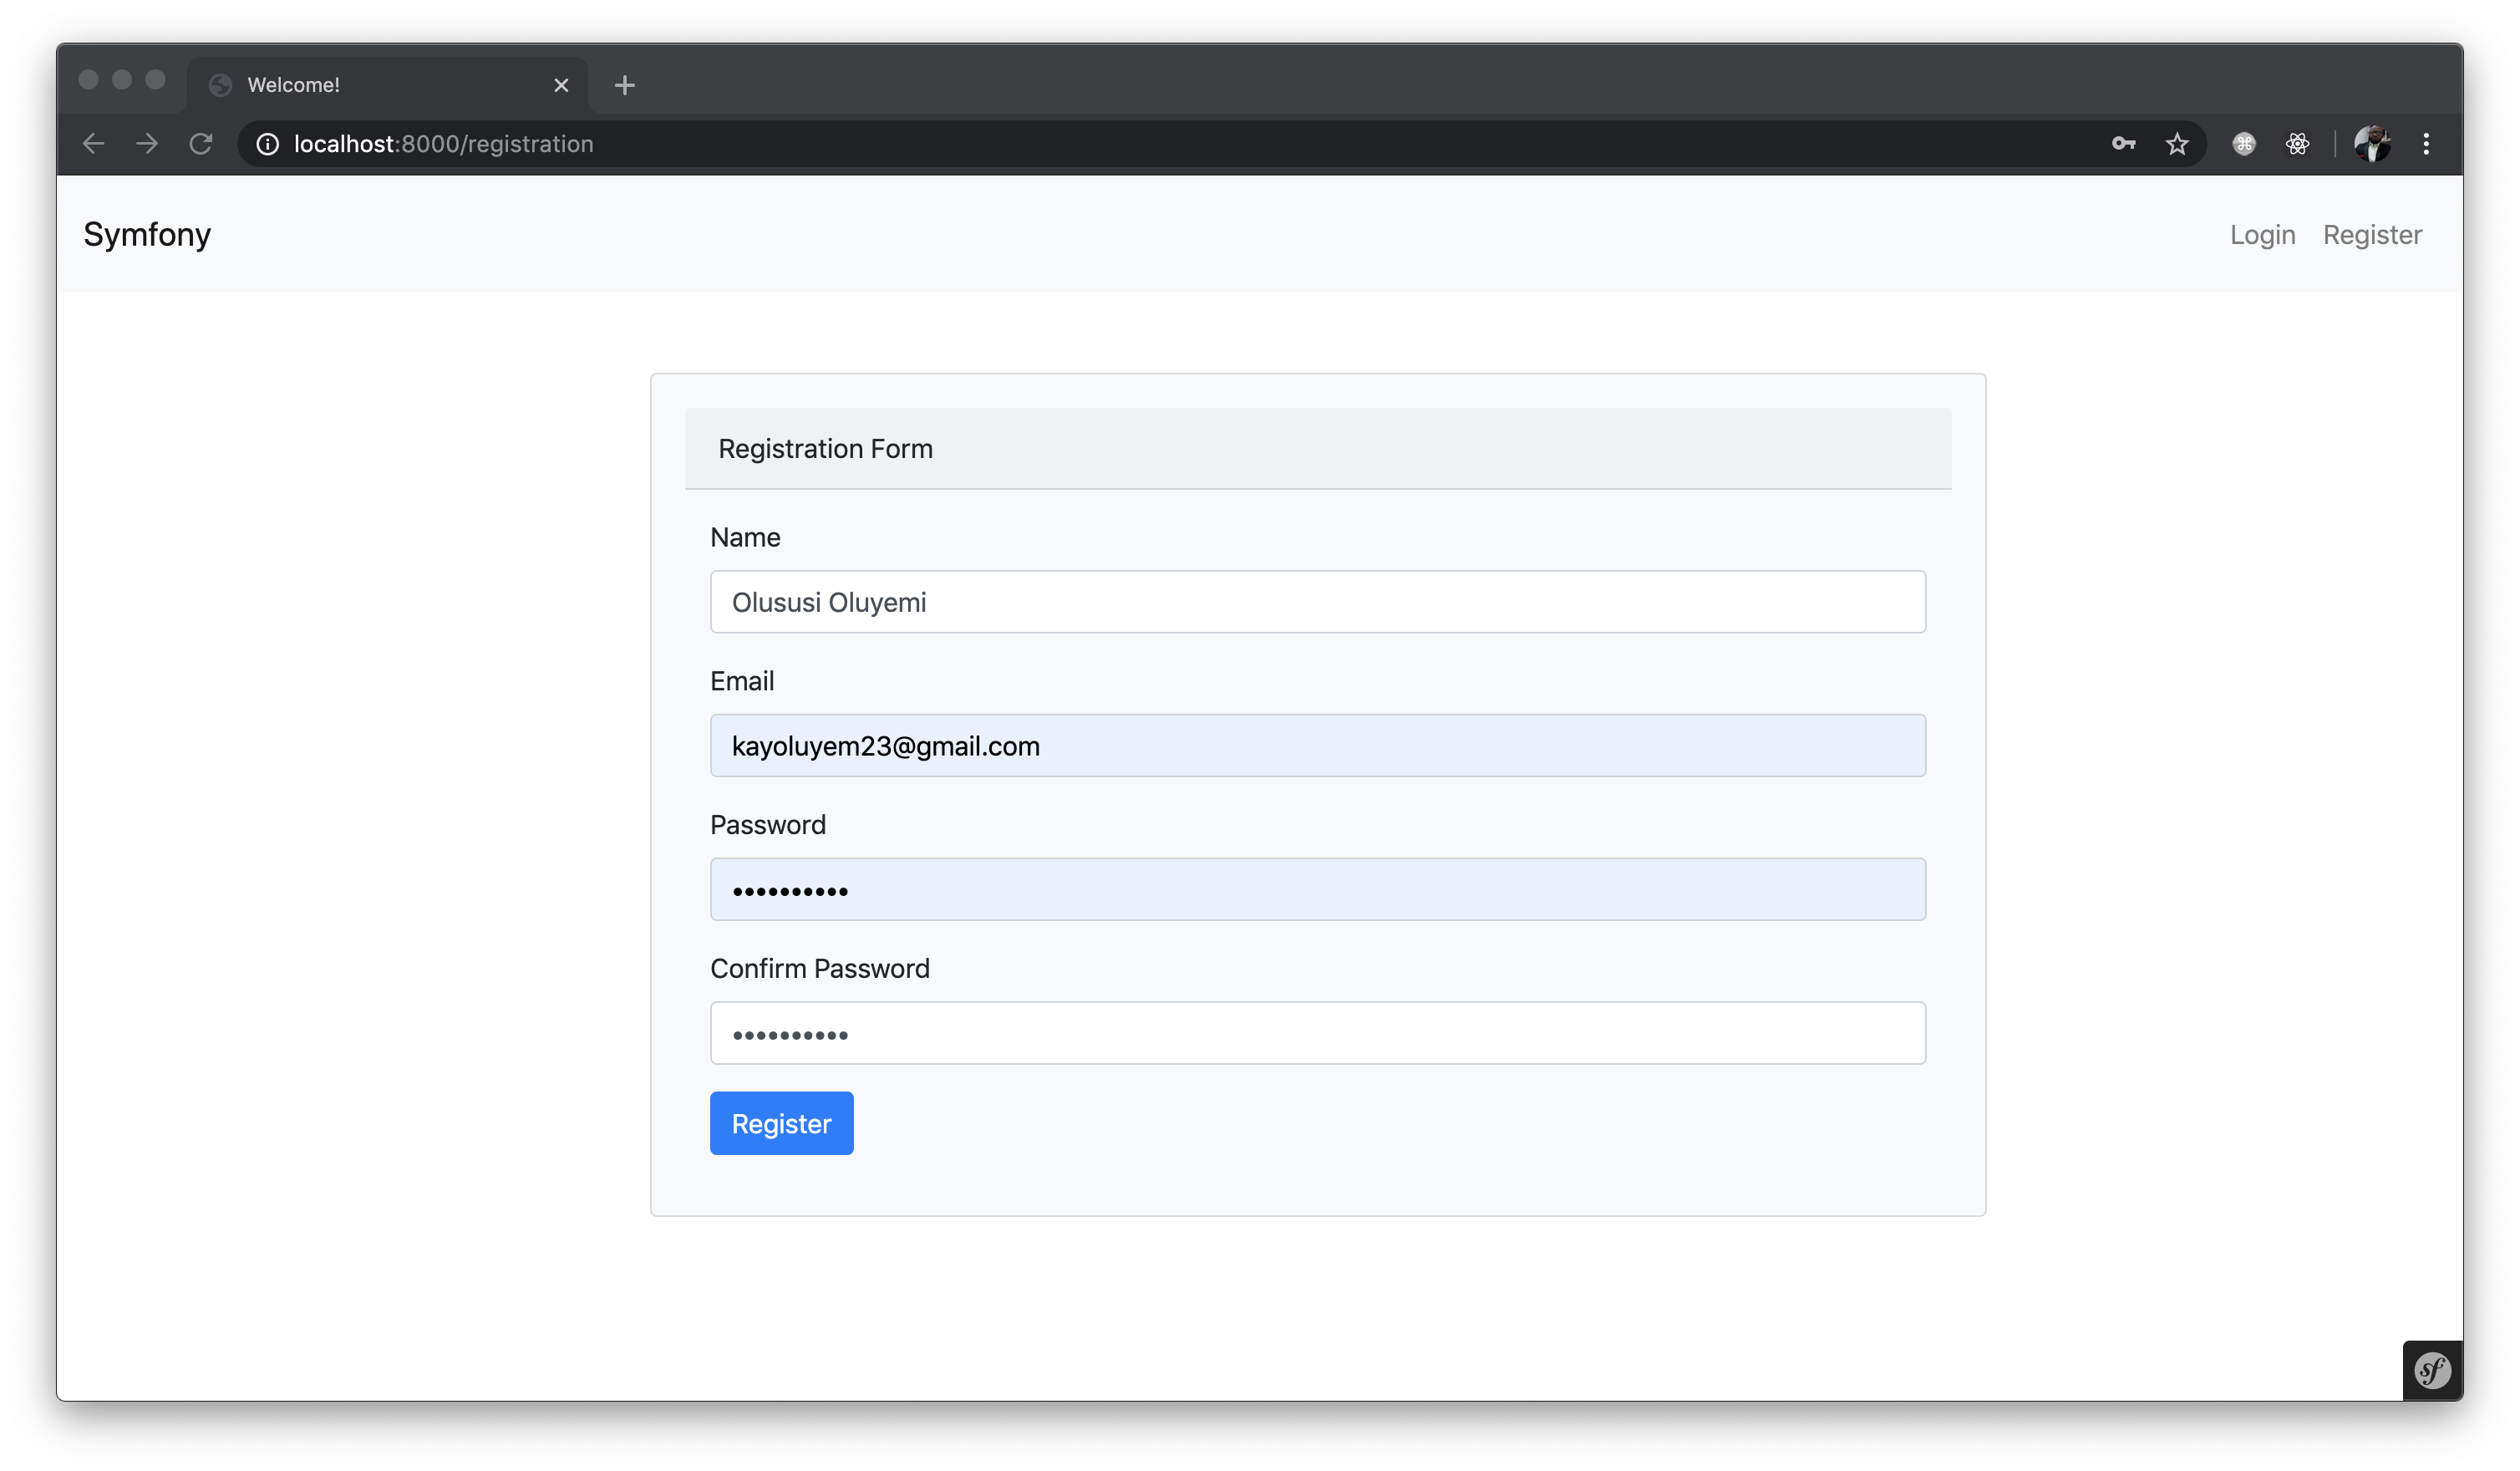
Register Page
Landing Page

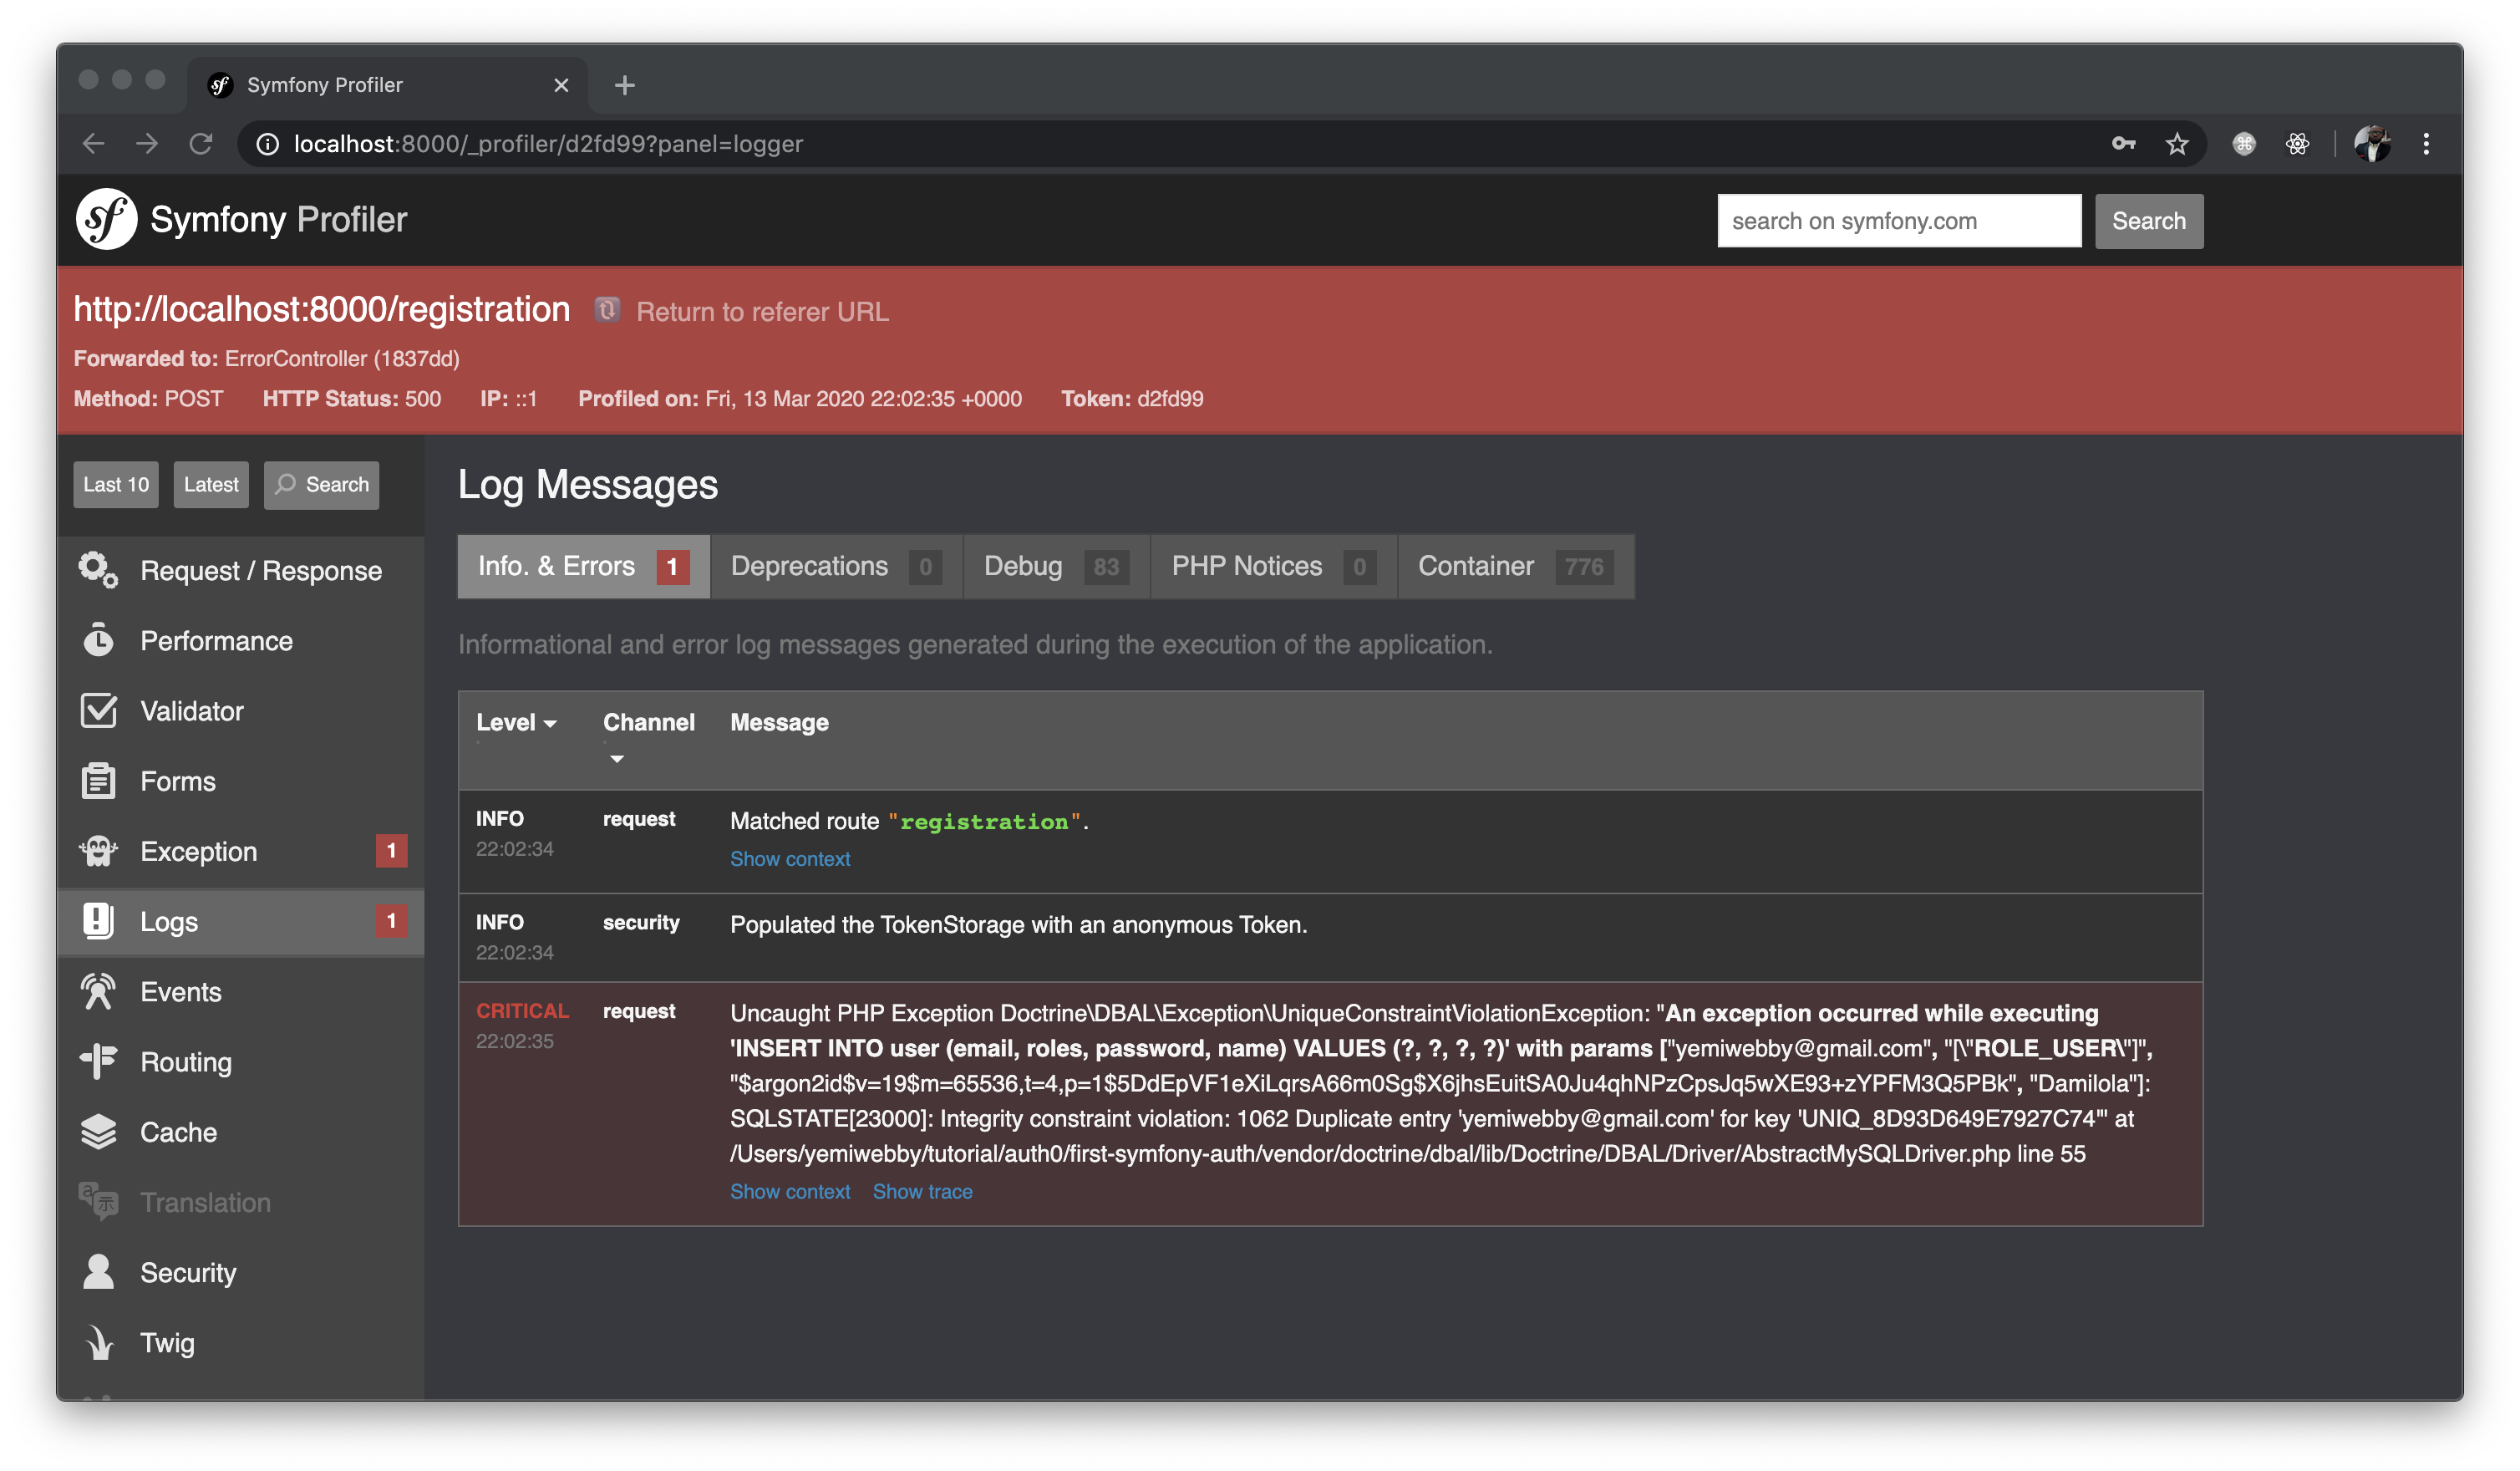
Try registering a user on the application. Then proceed to log in. You will see this:
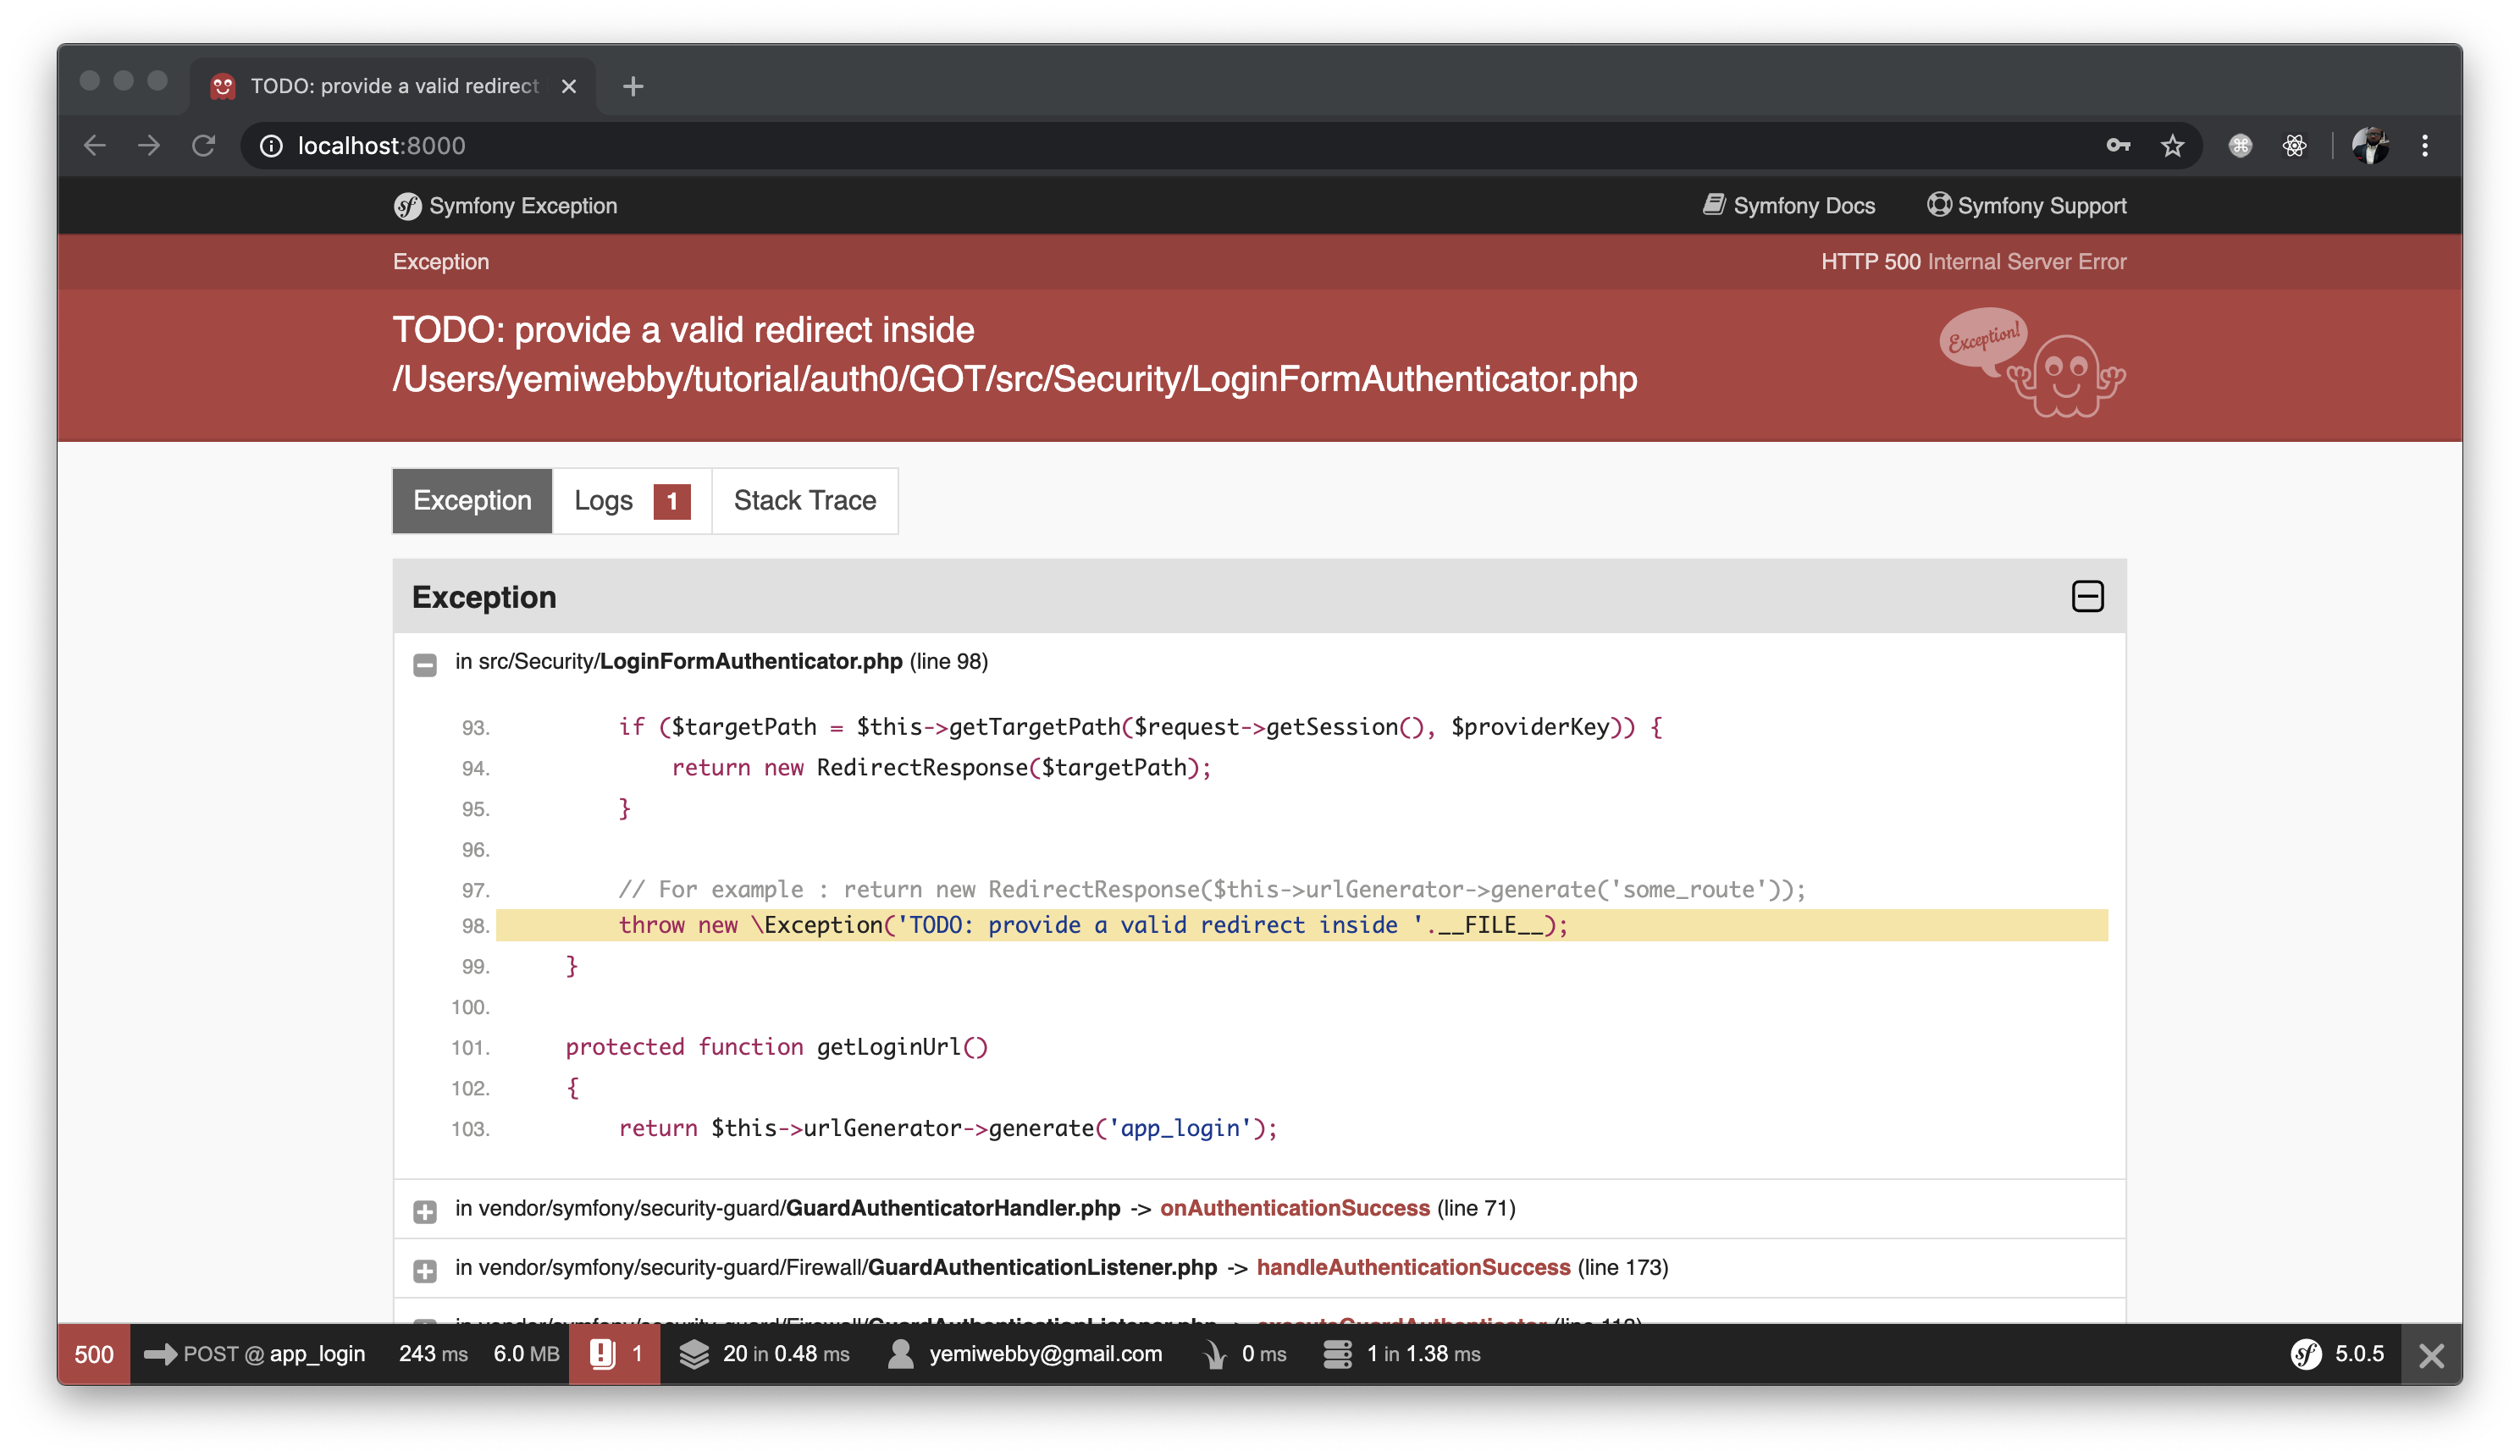
Oops! Don’t sweat it. This error occurred because a valid redirect route once authenticated has not been provided yet. To fix this, open the LoginFormAuthenticator.php file within src/Security directory and update the onAuthenticationSuccess() method as shown below:
// src/Security/LoginFormAuthenticator
public function onAuthenticationSuccess(Request $request, TokenInterface $token, $providerKey)
{
    if ($targetPath = $this->getTargetPath($request->getSession(), $providerKey)) {
        return new RedirectResponse($targetPath);
    }

    return new RedirectResponse($this->urlGenerator->generate('list'));
}
What we have done here is to redirect the users to the list route immediately after being authenticated. You can now login and see the application functioning properly as described earlier:
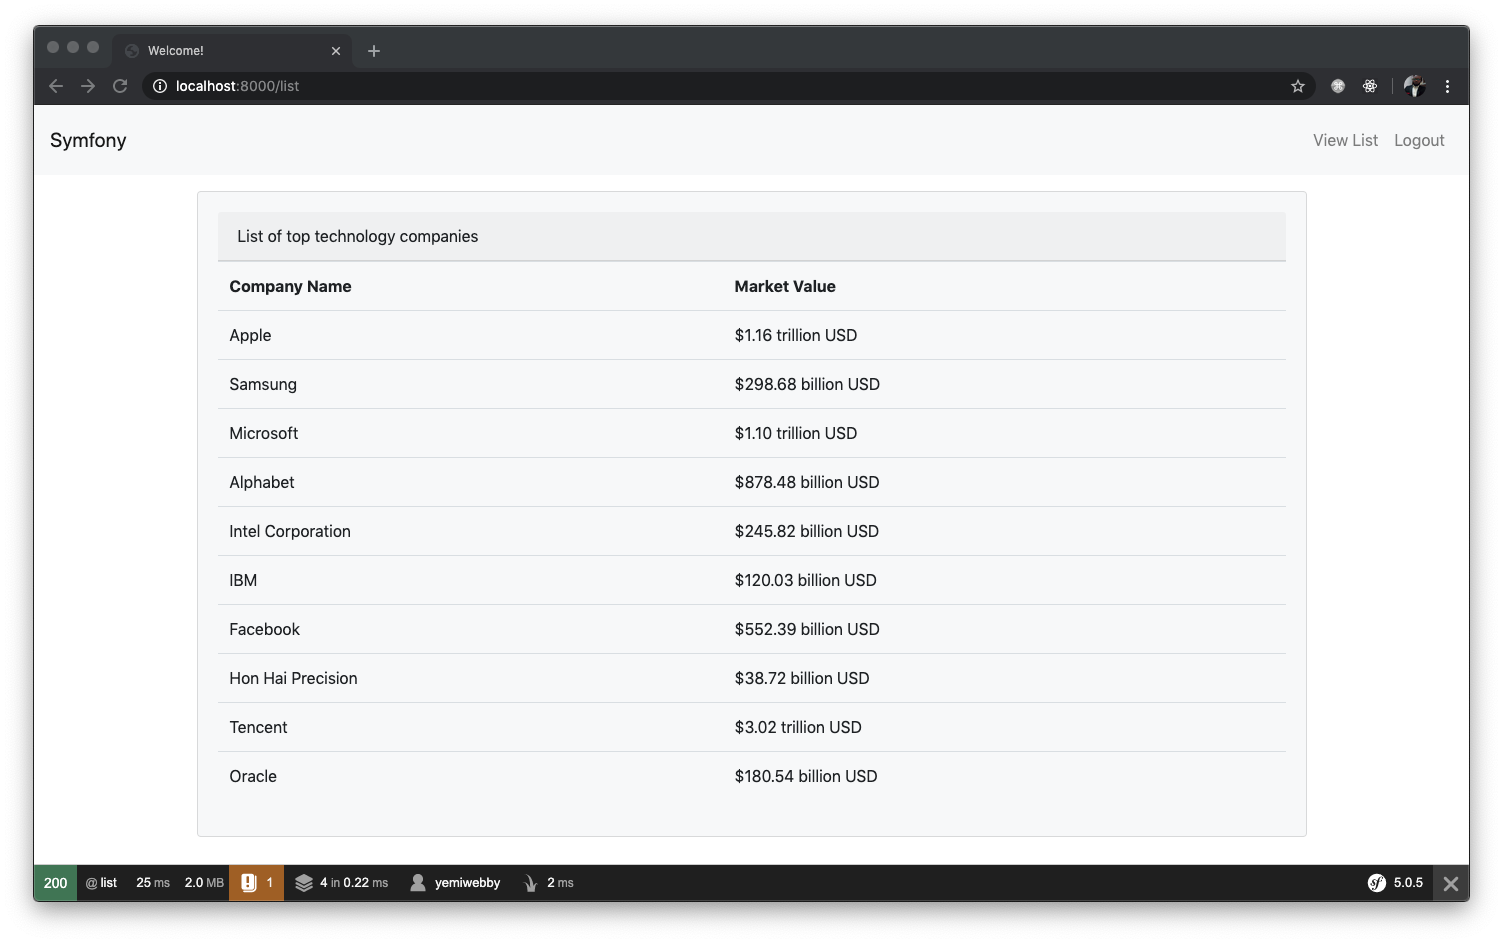
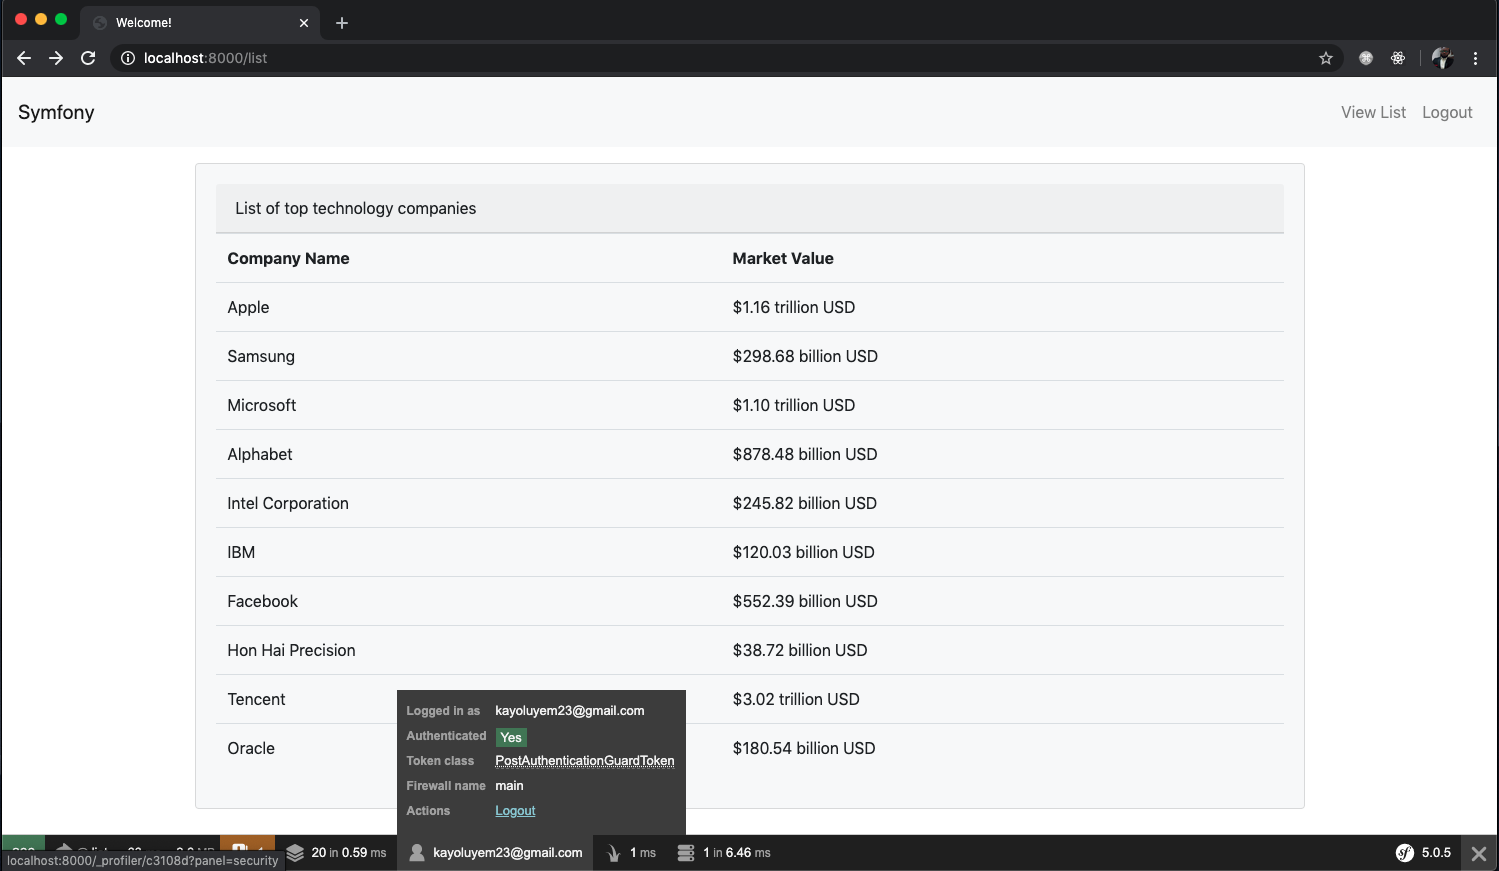
The profile debug Toolbar
Symfony ships with an awesome web debug toolbar. It is one of the most recognizable elements of Symfony applications. It provides all sorts of information about sessions, cookies, variables, load time, service providers, request-response time cycle, app size, and also an extensive error log. This toolbar increases the productivity of Symfony developers because it makes debugging super easy!

You can disable the toolbar by setting the value of toolbar to false in config/packages/dev/web_profiler.yaml file like so:
# config/packages/dev/web_profiler.yaml
web_profiler:
  toolbar: false
  intercept_redirects: false
Symfony vs other PHP frameworks
Right now, Laravel is the most trending PHP framework in the world. Laravel thrives on excellent and straightforward documentation. It's also easier to learn. Symfony, on the other hand, is a very stable and mature framework. It is great for very large web projects. Symfony has been around for so long that several PHP projects and frameworks like Laravel depend on many of its components. Symfony forces you as a developer to learn Solid OOP. Many open-source projects build on Symfony components, thus allowing a developer who is well-versed in Symfony to easily work on other PHP projects. CakePHP has an awesome inbuilt ORM that makes building queries and relationships a piece of cake. If you want an excellent comparison of Symfony and other PHP frameworks, check here.
Aside: Using Auth0 with Symfony
Auth0 issues JSON Web Tokens on every login for your users. This means that you can have a solid identity infrastructure, including single sign-on, user management, support for social identity providers (Facebook, GitHub, Twitter, etc.), enterprise identity providers (Active Directory, LDAP, SAML, etc.) and your database of users with just a few lines of code.
We can easily set up authentication in our Symfony apps with Auth0's Centralized Login Page. If you do not have an Auth0 account, sign up for one now.
Navigate to the Auth0 management dashboard and let's set up our application. This will serve as the connection between your Symfony app and Auth0.
Click on the Create Application button and then select Regular Web Application. Name your application anything you'd like. Once your application has been created, click on the Settings tab. Leave this page open, as we'll need to pull some of those values into our Symfony app soon.
Let's set things up on the Symfony side.
Step 1: Install and Configure Auth0 plugin
Auth0 library is considered as a third-party service. Symfony recommends the use of the HWIOAuthBundle community bundle to authenticate users via any third-party service. To begin, install the bundle and other depedencies using composer:
composer require hwi/oauth-bundle:dev-master#b042ddd php-http/guzzle6-adapter php-http/httplug-bundle
You might get this question from the terminal:
“Do you want to execute this recipe?”
Just ignore this and select the No option as shown here:
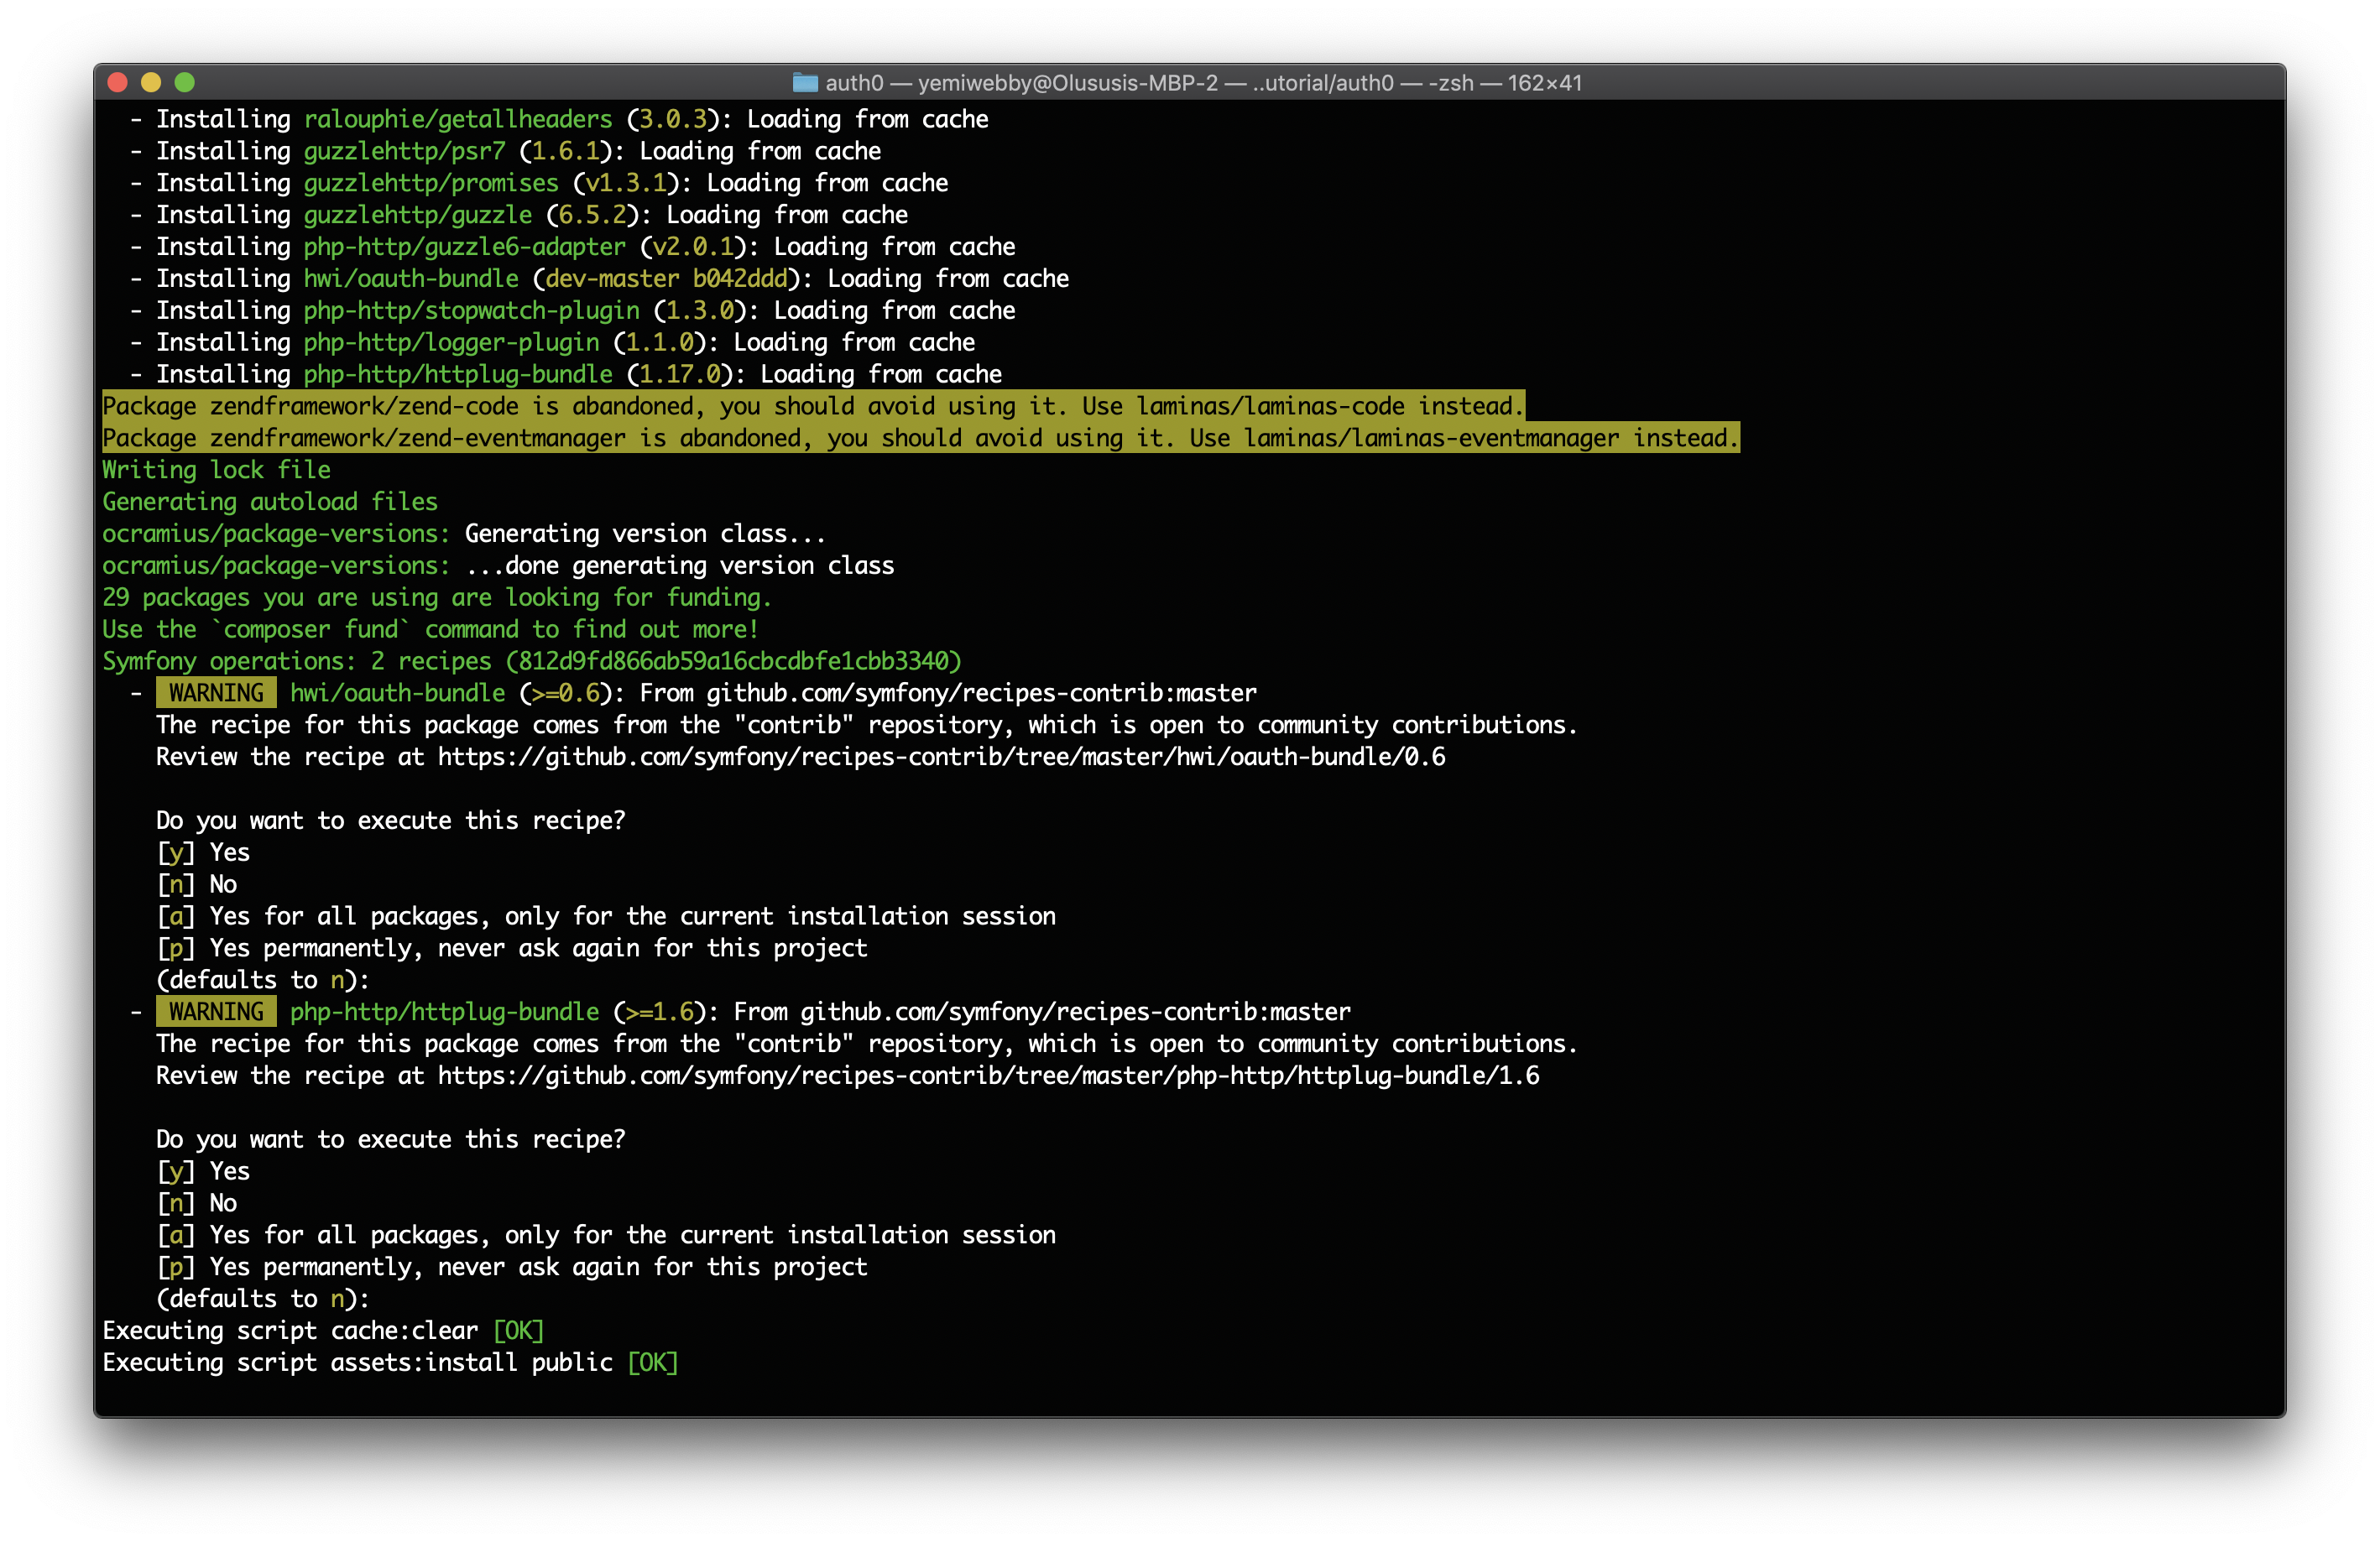
This is a known issue on GitHub, and it's because HWIOAuthBundle has not been fully configured to support Symfony 5 yet. Executing its recipe will create a blank config file and expects it to be properly configured. This will fail and reverts composer.json to its original state. A workaround is to select no option and manually add the bundle to config/bundles.php as shown here:
// config/bundles.php
<?php

return [
    Symfony\Bundle\FrameworkBundle\FrameworkBundle::class => ['all' => true],
    Symfony\Bundle\TwigBundle\TwigBundle::class => ['all' => true],
    Twig\Extra\TwigExtraBundle\TwigExtraBundle::class => ['all' => true],
    Symfony\Bundle\WebProfilerBundle\WebProfilerBundle::class => ['dev' => true, 'test' => true],
    Symfony\Bundle\MonologBundle\MonologBundle::class => ['all' => true],
    Symfony\Bundle\DebugBundle\DebugBundle::class => ['dev' => true, 'test' => true],
    Sensio\Bundle\FrameworkExtraBundle\SensioFrameworkExtraBundle::class => ['all' => true],
    Doctrine\Bundle\DoctrineBundle\DoctrineBundle::class => ['all' => true],
    Doctrine\Bundle\MigrationsBundle\DoctrineMigrationsBundle::class => ['all' => true],
    Symfony\Bundle\SecurityBundle\SecurityBundle::class => ['all' => true],
    Symfony\Bundle\MakerBundle\MakerBundle::class => ['dev' => true],
    Symfony\Bundle\WebServerBundle\WebServerBundle::class => ['dev' => true],
    Http\HttplugBundle\HttplugBundle::class => ['all' => true], // add this
    HWI\Bundle\OAuthBundle\HWIOAuthBundle::class => ['all' => true],// add this
];
To import the redirect.xml and login.xml routing files in your own routing file, open config/routes.yaml and update its content as shown here:
# config/routes.yaml

hwi_oauth_redirect:
  resource: "@HWIOAuthBundle/Resources/config/routing/redirect.xml"
  prefix: /connect

hwi_oauth_connect:
  resource: "@HWIOAuthBundle/Resources/config/routing/connect.xml"
  prefix: /connect

hwi_oauth_login:
  resource: "@HWIOAuthBundle/Resources/config/routing/login.xml"
  prefix: /login

auth0_login:
  path: /auth0/callback

auth0_logout:
  path: /auth0/logout
Next, create a new file named hwi_oauth.yaml within config/packages and use the following content to configure the resource owners you want to use in your application:
hwi_oauth:
  firewall_names: [main]
  # https://github.com/hwi/HWIOAuthBundle/blob/master/Resources/doc/2-configuring_resource_owners.md
  resource_owners:
    auth0:
      type: oauth2
      class: 'App\Auth0ResourceOwner'
      client_id: "%env(AUTH0_CLIENT_ID)%"
      client_secret: "%env(AUTH0_CLIENT_SECRET)%"
      base_url: "https://%env(AUTH0_DOMAIN)%"
      scope: "openid profile email"
Here, we set the name of the firewall in which the HWI0AuthBundle will be active as main. We then created a resource owner and referenced an Auth0ResourceOwner. To set up this class, create a new file within the src directory and call it Auth0ResourceOwner.php. Then paste the following code in it:
<?php

namespace App;

use HWI\Bundle\OAuthBundle\OAuth\ResourceOwner\GenericOAuth2ResourceOwner;
use Symfony\Component\OptionsResolver\Options;
use Symfony\Component\OptionsResolver\OptionsResolver;

class Auth0ResourceOwner extends GenericOAuth2ResourceOwner
{
    protected $paths = array(
        'identifier' => 'user_id',
        'nickname' => 'nickname',
        'realname' => 'name',
        'email' => 'email',
        'profilepicture' => 'picture',
    );

    public function getAuthorizationUrl($redirectUri, array $extraParameters = array())
    {
        return parent::getAuthorizationUrl($redirectUri, array_merge(array(
            'audience' => $this->options['audience'],
        ), $extraParameters));
    }

    protected function configureOptions(OptionsResolver $resolver)
    {
        parent::configureOptions($resolver);

        $resolver->setDefaults(array(
            'authorization_url' => '{base_url}/authorize',
            'access_token_url' => '{base_url}/oauth/token',
            'infos_url' => '{base_url}/userinfo',
            'audience' => '{base_url}/userinfo',
        ));

        $resolver->setRequired(array(
            'base_url',
        ));

        $normalizer = function (Options $options, $value) {
            return str_replace('{base_url}', $options['base_url'], $value);
        };

        $resolver->setNormalizer('authorization_url', $normalizer);
        $resolver->setNormalizer('access_token_url', $normalizer);
        $resolver->setNormalizer('infos_url', $normalizer);
        $resolver->setNormalizer('audience', $normalizer);
    }
}
Finally in this section, open the .env and include your Auth0 credentials as shown here:
AUTH0_CLIENT_ID=AUTH0_CLIENT_ID
AUTH0_CLIENT_SECRET=AUTH0_CLIENT_SECRET
AUTH0_DOMAIN=AUTH0_DOMAIN
Ensure that you replace AUTH0_CLIENT_ID, AUTH0_CLIENT_SECRET, and AUTH0_DOMAIN placeholders with the appropriate values from your Auth0 management dashboard. You'll find them under the Application you previously created.
Step 2: Register the Callback
Head over to your Auth0 dashboard and register Allowed Callback URLs as http://localhost:8000/auth0/callback and Allowed Logout URLs as http://localhost:8000/auth0/logout respectively.
Step 3: Include Auth0's Centralized Login Page
Next, open templates/security/login.html.twig and add the Auth0 login immediately after the <form></form> element as shown here:
<a
  href="{{ path('hwi_oauth_service_redirect', {'service': 'auth0'}) }}"
  style="color: #fff;"
>
  <div class="card mb-3" style="background-color: #e8542e">
    <div class="card-body" style="padding: 0;">
      <img src="https://images.ctfassets.net/23aumh6u8s0i/WtIL3D91xLCC14B7qN5y5/eb2995f1c305061449cc5115822dfade/02VeCz0" height="40" />
      Connect with Auth0
    </div>
  </div>
</a>
Step 4: Update the security layer
Update the config/security.yaml file as shown here:
security:
  encoders:
    App\Entity\User:
      algorithm: auto
  # https://symfony.com/doc/current/security.html#where-do-users-come-from-user-providers
  providers:
    # used to reload user from session & other features (e.g. switch_user)
    app_user_provider:
      entity:
        class: App\Entity\User
        property: email
    oauth_hwi:
      id: hwi_oauth.user.provider
  firewalls:
    dev:
      pattern: ^/(_(profiler|wdt)|css|images|js)/
      security: false
    main:
      anonymous: ~
      provider: oauth_hwi
      oauth:
        resource_owners:
          auth0: "/auth0/callback"
        login_path: /
        failure_path: /
        default_target_path: /list
        oauth_user_provider:
          service: hwi_oauth.user.provider
      guard:
        authenticators:
          - App\Security\LoginFormAuthenticator
      logout:
        path: app_logout
        target: /
  access_control:
    - { path: ^/login$, roles: IS_AUTHENTICATED_ANONYMOUSLY }
Run the application again. When the login button is clicked, users are redirected to Auth0's Centralized Login Page:
Step 5: Enjoy!
Once a user registers, it stores the user information in your Auth0 dashboard. We can retrieve this info using the HWI\Bundle\OAuthBundle\Security\Core\User\OAuthUserProvider class methods.
With Auth0, you can have all your users' information stored without having to run your own database. Auth0 provides powerful analytics about the users signing up on your platform, such as the browser the user logged in with, the location, device, number of logins, and more, out of the box!
Wrapping Up
You have just built your first app with Symfony 5. We just barely scratched the surface in this tutorial, which was designed to help you get started in building your own apps with Symfony framework. You can leverage the knowledge gained here to build bigger and better apps. Symfony teaches you a lot about how to develop good, transparent, well-tested, and well-coded applications with PHP. When compared with other PHP frameworks, Symfony is very stable. Several PHP frameworks depend on Symfony components. It is one of the few frameworks out there bundled with good documentation and certifications for developers. Would you prefer Laravel over Symfony or vice versa? Let me know your thoughts in the comment section.
About the author

Olususi Oluyemi
Software Engineer / Technical Content Creator