
In the previous section, you started an Android project that uses Auth0 for user login, logout, and reading and updating user metadata. You set up the project on both the Auth0 and app sides. In this section, you’ll complete the project and update it to ensure that it works in both portrait and landscape orientations.
Write the code
Everything you’ve done so far in this exercise is just a preamble. It’s now time to write the actual code! This is the biggest task in the exercise, so let’s do it in small steps.
🛠 Move to the app/java/com.example.login folder and open the main activity’s file, MainActivity.kt. Its contents should look like this:
package com.example.myapplication

import androidx.appcompat.app.AppCompatActivity
import android.os.Bundle

class MainActivity : AppCompatActivity() {
    override fun onCreate(savedInstanceState: Bundle?) {
        super.onCreate(savedInstanceState)
        setContentView(R.layout.activity_main)
    }
}
Import the necessary libraries
🛠 Add the following import statements to the ones already in the file:
import androidx.core.view.isVisible
import com.auth0.android.Auth0
import com.auth0.android.authentication.AuthenticationAPIClient
import com.auth0.android.authentication.AuthenticationException
import com.auth0.android.callback.Callback
import com.auth0.android.management.ManagementException
import com.auth0.android.management.UsersAPIClient
import com.auth0.android.provider.WebAuthProvider
import com.auth0.android.result.Credentials
import com.auth0.android.result.UserProfile
import com.google.android.material.snackbar.Snackbar
Most of these import statements import classes from Auth0’s libraries. Here’s what those classes do:
AuthenticationAPIClient: Accesses the Auth0 Authentication API. The app uses this to retrieve the user’s profile information.AuthenticationException: Defines errors and exceptions that may arise during authentication.Callback: Defines an object containing “success” and “failure” callback functions that Auth0 should call after completing an API function.ManagementException: Defines errors and exceptions thatCallbackobjects may have to handle.UsersAPIClient: Manages user information. The app uses this to retrieve the user’s profile information.WebAuthProvider: Provides Auth0’s web page-based login to the app. The app uses this to log the user in via a login page in a web browser and log the user out.Credentials: Stores the user’s credentials, including ID, access, and refresh tokens.UserProfile: Stores the user’s profile information, including their user ID, names, email address, and metadata.
🛠 You’ll also need to import the Activity ’s auto-generated view binding library, which will make it possible for your code to reference views in the layout (or, to put it more simply: access the onscreen widgets). Do this by adding the following import statement, replacing {YOUR_PACKAGE_NAME_HERE} with the name of your app’s package, which you’ll find on the first line of the file:
import {YOUR_PACKAGE_NAME_HERE}.databinding.ActivityMainBinding
The package name for my app is com.example.login, so my import statement looks like this:
import com.example.login.databinding.ActivityMainBinding
Add class properties
🛠 Add the following properties to MainActivity so that the start of the class looks like this:
class MainActivity : AppCompatActivity() {

    private lateinit var binding: ActivityMainBinding

    // Login/logout-related properties
    private lateinit var account: Auth0
    private var cachedCredentials: Credentials? = null
    private var cachedUserProfile: UserProfile? = null


    override fun onCreate(savedInstanceState: Bundle?) {

    ...
You’ll use the first property, binding, to access the widgets on the screen. The other three properties are related to logging in and out and are described in more detail below:
account: represents the app’s Auth0 account and is instantiated using the app’s client ID and the domain for the app’s Auth0 tenant. Let me make this clear: this isn’t the account of the user trying to log in, but the account of the developer or organization who is delegating the login/logout process to Auth0. In the case of this example, it’s your Auth0 developer account.account’s value is set inonCreate()when the activity is instantiated.cachedCredentials: contains the user’s credentials that are returned from Auth0 after a successful login. Its value should benullwhen the user is not logged in. When the user is logged in, it should reference an instance ofCredentials. ACredentialsinstance has the following properties:idToken: The ID token, which contains user information that the app can use to customize the user’s experience.accessToken: The access token, which is a credential that allows the app to access the Auth0 API.refreshToken: The refresh token, which can be used to request a new access token when the original access token expires, without requiring the user to re-authenticate.type: The type of the received access token.expiresAt: The date/time when the received access token expires.scope: The scopes granted to the access token. I’ll explain what scopes are in the next section, The login method.
cachedUserProfile: holds the user’s profile information. Its value should benullwhen the user is not logged in. When the user is logged in, it should reference an instance ofUserProfile. AUserProfileinstance has the following properties:email: The email address corresponding to the user account.isEmailVerified:trueif the user responded to the verification email sent by Auth0 after they registered themselves as a user.name: The user’s full name.givenName: The user’s given name, often referred to as their “first name” or “forename”.familyName: The user’s family name, often referred to as their “last name” or “surname”.nickname: The user’s nickname, sometimes referred to as thier “familiar name” or “moniker”.PictureURL: The URL where the user’s picture can be retrieved.createdAt: The creation date and time of the user’s account.
Update the onCreate() method
First, let’s fill out the onCreate() method that was automatically generated for the project and use it to initialize everything in the activity.
🛠 Update the onCreate() method so that it looks like this:
override fun onCreate(savedInstanceState: Bundle?) {
    super.onCreate(savedInstanceState)

    account = Auth0(
        getString(R.string.com_auth0_client_id),
        getString(R.string.com_auth0_domain)
    )

    binding = ActivityMainBinding.inflate(layoutInflater)
    setContentView(binding.root)

    binding.buttonLogin.setOnClickListener { login() }
    binding.buttonLogout.setOnClickListener { logout() }
    binding.buttonGet.setOnClickListener { getUserMetadata() }
    binding.buttonSet.setOnClickListener { setUserMetadata() }
}
This method:
- Defines the account object, which contains the necessary credentials to connect to your Auth0 account.
- Creates a view binding object, which you’ll use to access the onscreen widgets.
- Connects the Log in, Log out, Get, and Set buttons to the methods they should call when tapped.
Add the login() method
The next step is to implement the method that gets called when the user taps the Log In button.
🛠 Add this to the class after onCreate():
private fun login() {
    WebAuthProvider
        .login(account)
        .withScheme(getString(R.string.com_auth0_scheme))
        .withScope(getString(R.string.login_scopes))
        .withAudience(getString(R.string.login_audience, getString(R.string.com_auth0_domain)))
        .start(this, object : Callback<Credentials, AuthenticationException> {

            override fun onFailure(exception: AuthenticationException) {
                showSnackBar(getString(R.string.login_failure_message, exception.getCode()))
            }

            override fun onSuccess(credentials: Credentials) {
                cachedCredentials = credentials
                showSnackBar(getString(R.string.login_success_message, credentials.accessToken))
                updateUI()
                showUserProfile()
            }
        })
}
login() uses the Auth0 SDK’s WebAuthProvider class, which gives the app the ability to use Auth0’s authentication service. The WebAuthProvider methods that you’ll use most often are its login() and logout() methods.
Although this method is formatted to span several lines, it’s just a single line of code. The single line is made of a call to a chain of WebAuthProvider ’s methods starting with login(). If you ignore all the comments and parameters, the method chain looks like this:
WebAuthProvider
    .login()
    .withScheme()
    .withScope()
    .withAudience()
    .start()
This is the Builder design pattern in action. From login() to withAudience(), each method in the chain takes an argument that provides additional information about the login, using that information to creates a WebAuthProvider object that it passes to the next method in the chain. The final method in the chain, start(), takes the resulting WebAuthProvider object as its argument and uses it to display the login page and define what should happen when the login succeeds and when it fails.
Let’s take a look at what each of the methods in the chain does.
login() initiates the login process and specifies the Auth0 account used by the application.
withScheme() specifies the scheme to use for the URL that Auth0 redirects to after a successful login. For web apps, the scheme is http or https. This value is arbitrary for native mobile apps, so we use app to make it clear to other developers and other people who may use the Auth0 settings for this app that the redirect is not to a web page.
withScope() specifies which sets of user data the app is authorized to use if the user logs in successfully. The OpenID Connect and OAuth frameworks, on which Auth0’s authentication and authorization are based, use the term scope to represent the authorization to access user’s data and resources. The method takes a space-delimited string as its argument, where each “word” in the string specifies a different scope. The string used in this app contains these scopes:
openid: Indicates that application that uses OpenID Connect for authentication. This is the only required scope; all other scopes are optional.profile: Authorizes the application to access basic user profile information, including first name, surname, nickname, their photo or avatar, and so on.email: Authorizes the application to access the user’s email address.read:current_user: Authorizes the application with read-only access to thecurrent_userclaim.update:current_user_metadata: Authorizes the application with read and write access to thecurrent_user_metadataclaim. This scope allows us to get and set thecountryvalue in the user’s metadata.
withAudience() specifies the URL that the app will use to connect to Auth0’s login service. This URL is constructed using the domain of the Auth0 tenant used by the app and the endpoint for the Auth0 authentication API.
start() takes the WebAuthProvider object constructed by all the previous methods in the chain and opens the browser window to display the login page. It takes two parameters: a context (a reference to the Activity that’s initiating the browser window) and an anonymous object with two callback methods:
onFailure(): Defines what should happen if the user returns from the browser login screen without successfully logging in. This typically happens when the user closes the browser login screen or taps the “back” button while on that screen. The app displays aSnackBarthat notifies the user that login failed, followed by an error code.onSuccess(): Defines what should happen if the user returns from the browser login screen after successfully logging in. The app processes the successful response, displays aSnackBarnotifying the user that login was successful, and updates the UI to its “logged in” state.
Add the logout() method
You’ve probably guessed that if there’s a login() method that’s called when the user presses the Log In button, there must also be a logout() method that’s called when the user presses the Log Out button.
🛠 Add this method to the class after login():
private fun logout() {
    WebAuthProvider
        .logout(account)
        .withScheme(getString(R.string.com_auth0_scheme))
        .start(this, object : Callback<Void?, AuthenticationException> {

            override fun onFailure(exception: AuthenticationException) {
                updateUI()
                showSnackBar(getString(R.string.general_failure_with_exception_code,
                    exception.getCode()))
            }

            override fun onSuccess(payload: Void?) {
                cachedCredentials = null
                cachedUserProfile = null
                updateUI()
            }

        })
}
As with login(), logout() also uses the Auth0 SDK’s WebAuthProvider class and is a one-liner that uses the Builder pattern. This time, that one line calls a shorter chain of WebAuthProvider ’s methods starting with logout(). If you ignore all the parameters, the method chain looks like this:
WebAuthProvider
    .logout()
    .withScheme()
    .start()
logout() initiates the logout process and specifies the Auth0 account used by the application, which should be the same account as the one used to log in.
withScheme() specifies the scheme to use for the URL that Auth0 redirects to after successful logout. This should be the same scheme as the one used to log in.
start() takes the WebAuthProvider object constructed by all the previous methods in the chain to log the user out. It takes two parameters: a context (a reference to the Activity that’s initiating the logout process) and an anonymous object with two callback methods:
onFailure(): Defines what should happen when the logout process fails. This rarely happens and usually indicates a network or server issue. In this example, the app updates the UI (which remains in the “logged in” state) and displays aSnackBarthat notifies the user that logout failed, followed by an error code.onSuccess(): Defines what should happen when the logout process succeeds. In this example, the app destroys its local copies of the user’s credentials and profile and updates the UI to its “logged out” state.
Add the showUserProfile() method
Every Auth0 user has a user profile associated with their account. The user profile contains the following basic information about the user:
- Names: The user’s full name, given name, surname, and nickname
- Email info: The user’s email address, and whether it was verified
- Picture: The location of an image that identifies the user
- Creation date: The date and time when the user’s account was created
When the user successfully logs in, the app should display their name and email onscreen. It does so by calling showUserProfile() immediately after a successful login.
🛠 Add this method to the class after logout():
private fun showUserProfile() {
    // Guard against showing the profile when no user is logged in
    if (cachedCredentials == null) {
        return
    }

    val client = AuthenticationAPIClient(account)
    client
        .userInfo(cachedCredentials!!.accessToken!!)
        .start(object : Callback<UserProfile, AuthenticationException> {

            override fun onFailure(exception: AuthenticationException) {
                showSnackBar(getString(R.string.general_failure_with_exception_code,
                    exception.getCode()))
            }

            override fun onSuccess(profile: UserProfile) {
                cachedUserProfile = profile
                updateUI()
            }

        })
}
This method is the final task performed by the onSuccess() callback method in loginWithBrowser(). It initializes the cachedUserProfile property, which contains the user’s profile information.
As a precaution, it returns immediately if the cachedCredentials property is null, which implies that no user is logged in, and therefore there isn’t any user profile to show.
In order to get this information, it does the following:
- It creates an instance of
AuthenticationAPIClient, which retrieves Auth0 account information. Like the login and logout methods, this also uses the Builder pattern. - It uses
AuthenticationAPIClient’suserInfo()method to specify that we want to retrieve user profile information from Auth0. This method requires a valid access token, which it extracts from thecachedCredentialsproperty. - Finally, it defines callback methods for the cases where it failed and succeeded in retrieving the user profile information from Auth0. If the retrieval was successful, the profile information is stored in
cachedUserProfile, and the UI is updated to display the user’s name and email address.
Add the getUserMetadata() and setUserMetadata() methods
The user profile contains information that generally applies to every user account regardless of the type of application it’s being used for — name, email, photo, and date/time created. While this is necessary information, it’s probably not all the user information that you want to store in their profile.
That what the user metadata is for. Think of it as a key-value store where you can place additional user information that isn’t covered by the user profile. In this app, the user metadata will store just one additional piece of user information — their country — and it will allow the user to retrieve and update this information.
🛠 Add the following to the class after showUserProfile():
private fun getUserMetadata() {
    // Guard against getting the metadata when no user is logged in
    if (cachedCredentials == null) {
        return
    }

    val usersClient = UsersAPIClient(account, cachedCredentials!!.accessToken!!)

    usersClient
        .getProfile(cachedUserProfile!!.getId()!!)
        .start(object : Callback<UserProfile, ManagementException> {

            override fun onFailure(exception: ManagementException) {
                showSnackBar(getString(R.string.general_failure_with_exception_code,
                    exception.getCode()))
            }

            override fun onSuccess(userProfile: UserProfile) {
                cachedUserProfile = userProfile
                updateUI()

                val country = userProfile.getUserMetadata()["country"] as String?
                binding.edittextCountry.setText(country)
            }

        })
}

private fun setUserMetadata() {
    // Guard against getting the metadata when no user is logged in
    if (cachedCredentials == null) {
        return
    }

    val usersClient = UsersAPIClient(account, cachedCredentials!!.accessToken!!)
    val metadata = mapOf("country" to binding.edittextCountry.text.toString())

    usersClient
        .updateMetadata(cachedUserProfile!!.getId()!!, metadata)
        .start(object : Callback<UserProfile, ManagementException> {

            override fun onFailure(exception: ManagementException) {
                showSnackBar(getString(R.string.general_failure_with_exception_code,
                    exception.getCode()))
            }

            override fun onSuccess(profile: UserProfile) {
                cachedUserProfile = profile
                updateUI()

                showSnackBar(getString(R.string.general_success_message))
            }

        })
}
While showUserProfile() uses an instance of AuthenticationAPIClient to get the user profile information, getUserMetadata() and setUserMetadata() use a different object type: UsersAPIClient.
Unlike AuthenticationAPIClient, which needs only an Auth0 account object to be instantiated, you need both an Auth0 account object and an access token to instantiate a UsersAPIClient object.
getUserMetadata() specifies the user profile using UsersAPIClient ’s getProfile() method and the ID of the user, followed by the start() method to attempt to get the user profile and define callback methods for failure and success.
getUserMetadata()’s onSuccess() callback is almost the same as showUserProfile()’s — it just has these two additional lines that extract the country value from the user’s metadata and display it onscreen:
val country = userProfile.getUserMetadata()["country"] as String?
binding.edittextCountry.setText(country)
setUserMetadata() defines a Map with a single key-value pair, where the key is the string country and the corresponding value is the contents of the EditText where the user enters the name of their country. It then passes that Map along with the user’s ID to UsersAPIClient ’s updateMetadata() method to specify the change to be made, followed by the start() method to initiate the update and define callback methods for failure and success.
setUserMetadata()’s onSuccess() callback is almost the same as getUserMetadata()’s — but instead of updating the EditText where the user enters the name of their country, it simply displays a SnackBar notifying the user that it was successful in updating the metadata.
Add the UI methods
The final step is to add the methods that present information to the user.
🛠 Add the following to the class after getUserMetadata() and setUserMetadata():
private fun updateUI() {
    val isLoggedIn = cachedCredentials != null

    binding.textviewTitle.text = if (isLoggedIn) {
        getString(R.string.logged_in_title)
    } else {
        getString(R.string.logged_out_title)
    }
    binding.buttonLogin.isEnabled = !isLoggedIn
    binding.buttonLogout.isEnabled = isLoggedIn
    binding.linearlayoutMetadata.isVisible = isLoggedIn

    binding.textviewUserProfile.isVisible = isLoggedIn

    val userName = cachedUserProfile?.name ?: ""
    val userEmail = cachedUserProfile?.email ?: ""
    binding.textviewUserProfile.text = getString(R.string.user_profile, userName, userEmail)

    if (!isLoggedIn) {
        binding.edittextCountry.setText("")
    }
}

private fun showSnackBar(text: String) {
    Snackbar
        .make(
        binding.root,
        text,
        Snackbar.LENGTH_LONG
    ).show()
}
If you’ve made it this far, I have great news for you: you’ve written all the code for the app!
See the App in Action
Run the app. You’ll see this:
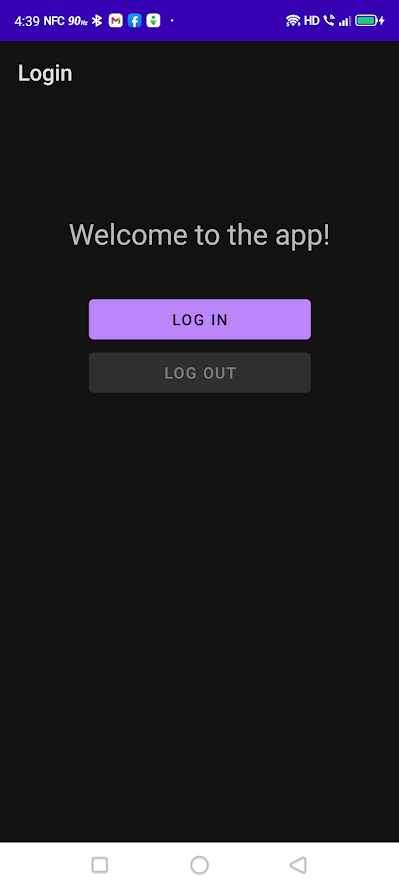
Tap the Log in button. The app will open a browser window that will display the login web page:
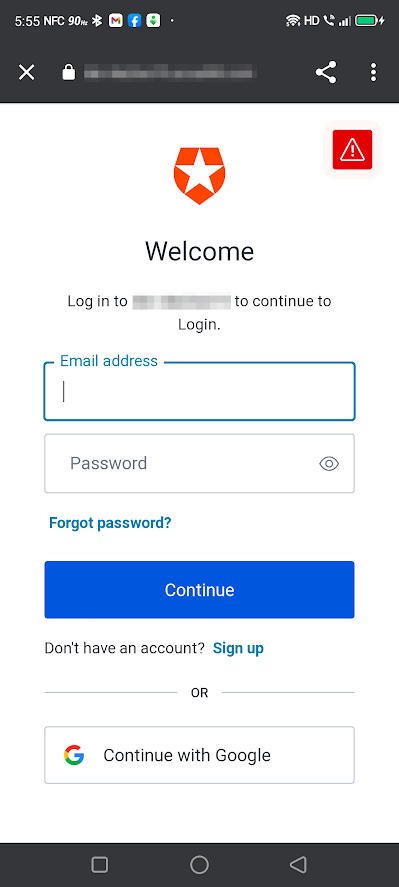
Log in using the email address and password of the user account you created earlier. Since this is the first time the account has logged into the app, the Authorize App page will appear in the browser window:
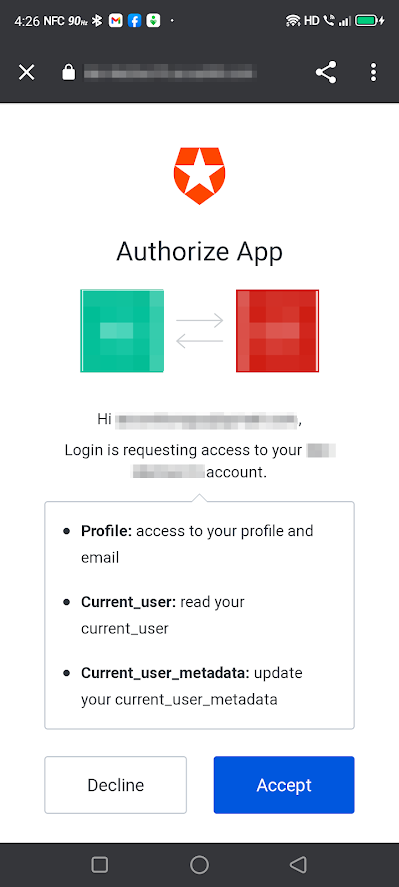
This page is asking you to authorize the app to access the following information in your user account:
- Profile: access to your profile and email
- Current_user: read your current_user
- Current_user_metadata: update your current_user_metadata
If these items sound familiar, it’s because you’ve seen them recently. They’re the names of the scopes in the login_scopes string in the strings.xml resource...
<string name="login_scopes">
    openid profile email read:current_user update:current_user_metadata
</string>
...which the call to withScope() in the login() method uses to specify which sets of user data the app is authorized to use. This additional step informs the user of this use of their data and gives them a choice to approve or decline.
Tap the Approve button. The browser will disappear, and you will return to the app, which will now look like this:

Tap the Get button. If you’ve never edited the value of the country field in the user’s metadata, the metadata text box will display the hint text “Enter country”.
Enter a country’s name (or any other text if you like) into the text box and tap the Set button. You’ll see this:
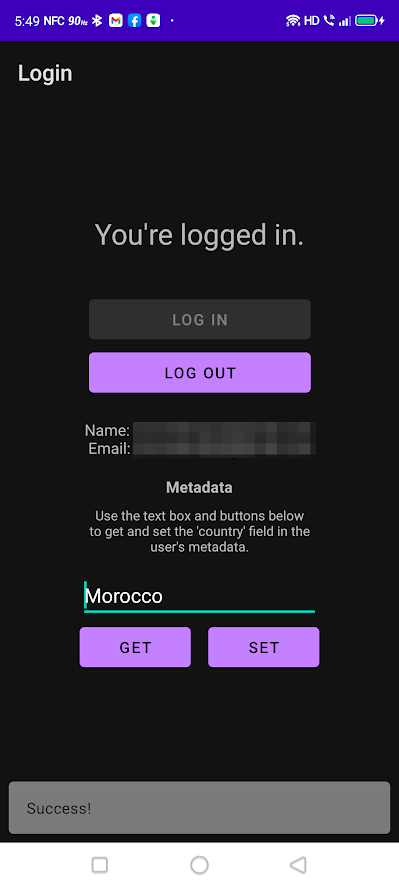
Two things just happened:
- If the user’s metadata already had a
countryfield, its value changed to whatever text you entered. If the user’s metadata didn’t have acountryfield, acountryfield was added to the metadata, and its value was set to whatever text you entered. - An Android pop-up message called a
Snackbarappeared at the bottom of the screen with the message “Success!”
Log out of the app, then log in again. Tap the Get button. The app should fill the metadata text box with the value of the country metadata field.
Let’s look at the updated user metadata from the Auth0 side. In the Auth0 dashboard, go to the list of users. Do this by clicking User Management in the menu on the left side of the page, followed by clicking on Users. Select the user that is currently logged in on the app. You’ll be taken to that user’s Details page:
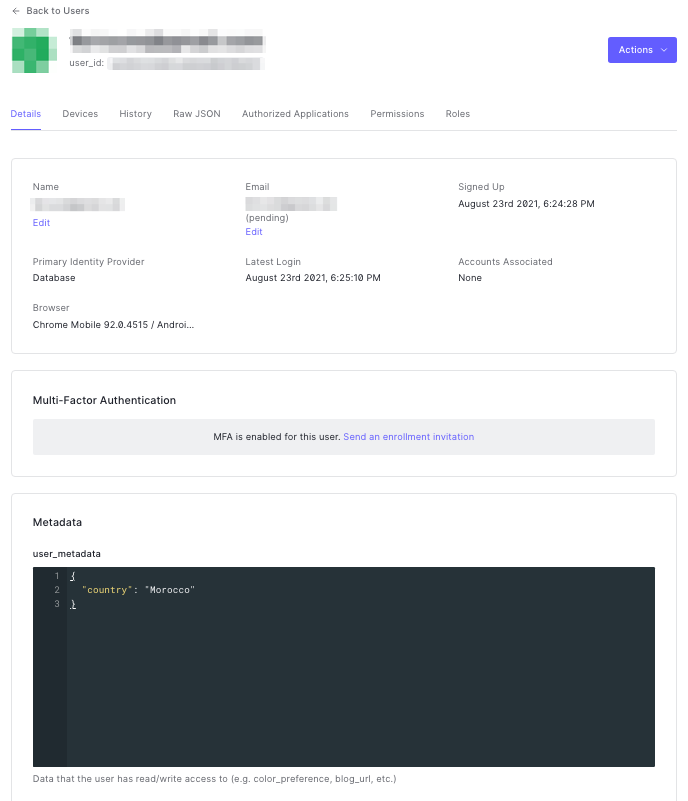
Scroll down to the Metadata section of the page. You’ll see an area labeled user_metadata. If you filled out the EditText in the app, you’ll see it in the JSON object there:
{
    "country": {WHATEVER_TEXT_YOU_ENTERED}
}
Each Auth0 user account can store two kinds of metadata:
- User metadata, which is meant for data intentionally provided by and controlled by the user. It’s typically used for storing information that the user wants to share with the app, such as their address, contact information, preferences, and similar data. Only data that the user can read and edit should be stored here.
- App metadata, which is meant for data provided by and controlled by the app. It’s typically used for storing information about the user that is primarily for the app’s use, such as the user’s roles, permissions, status, and similar data. There may be cases where the user can read this data, but you should not use app metadata to store data provided directly by the user.
While a detailed look at the user account pages is beyond the scope of this article, you should explore them to see the kinds of data and functionality that are associated with user accounts.
When Things Go Sideways
The expression “to go sideways” means “to go wrong” or “to not go according to plan.” In this section, I’ll show you what can go wrong when you’re writing an Android app and fail to account for what happens when the user turns their phone on its side.
Inducing app amnesia
Run the app and log in. You should see this:
Rotate your device to landscape orientation:
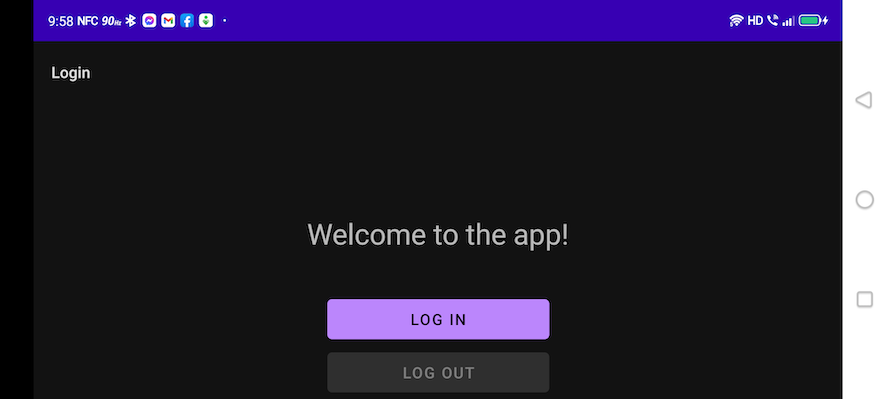
Notice what happened:
- The greeting text changed from “You’re logged in.” to “Welcome to the app!”, which is its state when the app is launched.
- The buttons have also been returned to their initial state: Log in is enabled, and Log out is disabled.
It appears as if turning your device on its side has given your app amnesia and returned it to its initial state. What happened?
Configuration changes and reloading
To use a developer cliché: this isn’t a bug, but a feature.
Whenever it detects a configuration change, Android’s default response is to reload the current activity. There are many configuration changes, such as language, keyboard availability, or the change you made just now: screen orientation. Reloading an activity when a configuration change happens makes it run its initialization methods again and reload resources, allowing it to set itself up for the new configuration.
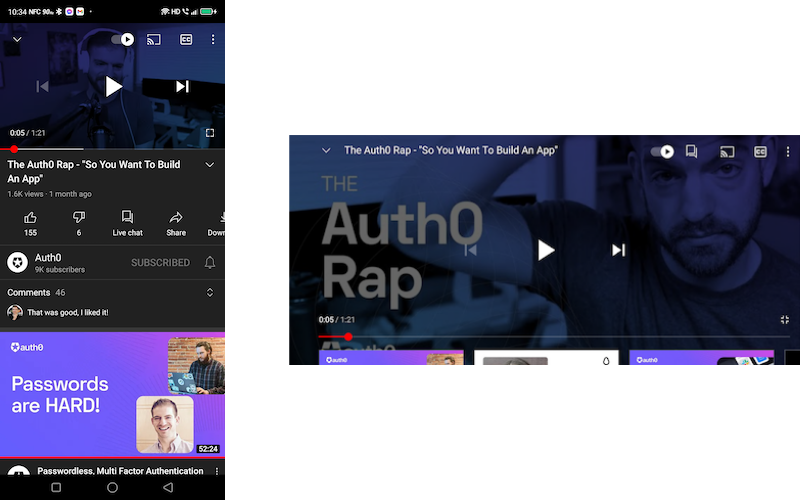
This behavior was designed for applications that present different interfaces in different orientations. YouTube is an example of such an app, which has different portrait and landscape UI setups:
Changing the screen orientation reloaded the activity and restored the app to its initial state, but it did not change your “logged in” status. The logout() method was not called when you turned your device on its side. You’re still logged in!
You can confirm your “logged in” status by tapping the Log in button. Note that there wasn’t an intermediate step where you had to enter your email address and password — you were taken straight to the app:

Note that that app never presented the login page. That’s because there wasn’t any need — you were still logged in. Let’s solve this problem.
Curing your app’s amnesia
You can instruct Android not to reload Activities in the event of specified configuration changes in the app’s manifest.
🛠 Open AndroidManifest.xml and change the <activity> tag to the following:
<activity
    android:name=".MainActivity"
    android:exported="true"
    android:configChanges="orientation|screenSize" >
This change adds the attribute android:configChanges= “orientation|screenSize” to MainActivity, which tells Android that the activity should not reload if the device orientation or screen size changes. Instead of reloading the activity, Android uses a callback method to notify the app of the change. The assumption is that you’ll handle those configuration changes yourself. Since we’ll ignore this callback, the configuration change has no effect.
Run the app and log in. Change the screen orientation, going from portrait to landscape and back. It no longer causes the activity to reload.
Conclusion
You’ve just built a simple app that features basic username/password authentication — the ability to identify a known user. In addition to log a user in and out, you can also retrieve the information in their profile, and read and update their metadata.
You can find the code for the complete project for this article in this repository on the Auth0 Blog Samples GitHub account. The only change that you’ll need to make in order to run it is to enter your app’s client ID and tenant’s domain in the auth0.xml resource file.
This is the first in a new series of articles on Android development with Auth0. Future articles will cover new developments in Android 12 and Android Studio, as well as deeper dives into authentication and authorization with Android and Auth0 and alternatives to the standard username-and-password approach. Watch this space!
Next Step: Read the preview part hereI ran into an issueAbout the author

Joey deVilla
Senior Developer Advocate (Auth0 Alumni)