
When you secure your .NET MAUI applications with Auth0, you have to deal with ID and access tokens to get data about the user and call a protected API. While these tokens are internal technical artifacts, their management can impact the user experience. In this article, we will explore how token management can affect the user experience and suggest a way to fix it while keeping security in mind.
The Authentication User Experience
If you have built a native application with .NET MAUI and used Auth0 to manage authentication and authorization, you already know what the user experience looks like: the user authenticates, goes through the functionality of your app, sees their personal details on the screen, and triggers calls to protected APIs.
At some point, when they want to quit your application, they have two options:
- Log out and close the app.
- Close the app without logging out.
While the first option is fairly straightforward, the second can create a user experience problem: the next time the user accesses your app, they need to re-authenticate, no matter how long it has been since their last access. In fact, without any specific management, the ID and access tokens used by your MAUI app will be lost when it is closed.
This behavior may be intentional, and so you are fine with it. However, from the user's perspective, authenticating every time they launch the app can be frustrating. This is especially true since many web and native apps have accustomed users to long-lived sessions, which balance security and user experience.
Let's say you want to give your users this experience, so they don't have to re-authenticate every time they access your app. How do you achieve this?
The basic principle is pretty simple: once the user authenticates, you need to store the ID and access tokens (and anything else that is important to your user's session) somewhere and then restore them the next time your app runs.
Well, actually, you don't have to put those tokens in just any place. You need a secure place. And you need to make sure that the user experience is not adversely affected in any way by this new approach to dealing with tokens. Let's work together to figure out how to do that using security best practices.
If you want to learn more about ID tokens and access tokens, read the article "ID Token and Access Token: What's the Difference?"
The Sample Project
To learn how to handle tokens securely while providing the best user experience, you'll use a sample project that implements a basic .NET MAUI application secured by Auth0. Details on the implementation of this starter application can be found in these two articles:
Prerequisites
Make sure that you have everything you need to run the sample project that accompanies this article on your machine. Specifically, you need the latest .NET 8.0 SDK and any additional components that depend on your development and target platforms. Please, refer to this document to learn more and to set up your development environment.
You can use the .NET CLI to build and run your projects, as we will do in this article, but feel free to use the IDE and tool that you prefer.
Get the project
You can download the starter project by running the following command in your terminal window:
git clone --branch starting-point --single-branch https://github.com/auth0-blog/dotnet-maui-token-management.git
This command lets you download the starting-point branch, which contains the code you will work on.
Once you download the project, you will find a dotnet-maui-token-management folder containing two subfolders:
api_aspnet-core_csharp_hello-world. This is an ASP.NET Core Web API protected with Auth0.dotnet-maui-auth0-app. This is the .NET MAUI app using Auth0 for user authentication and calling the protected API implemented in the other folder.
Run the project
Before you start implementing token management, you need to configure the sample project and make sure it works as expected. To do this, you will need an Auth0 account. If you don't have one, you can sign up for a free account.
Then follow the instructions in this README document to configure and run the ASP.NET Core Web API and follow the instructions in this README document to configure and run the .NET MAUI application.
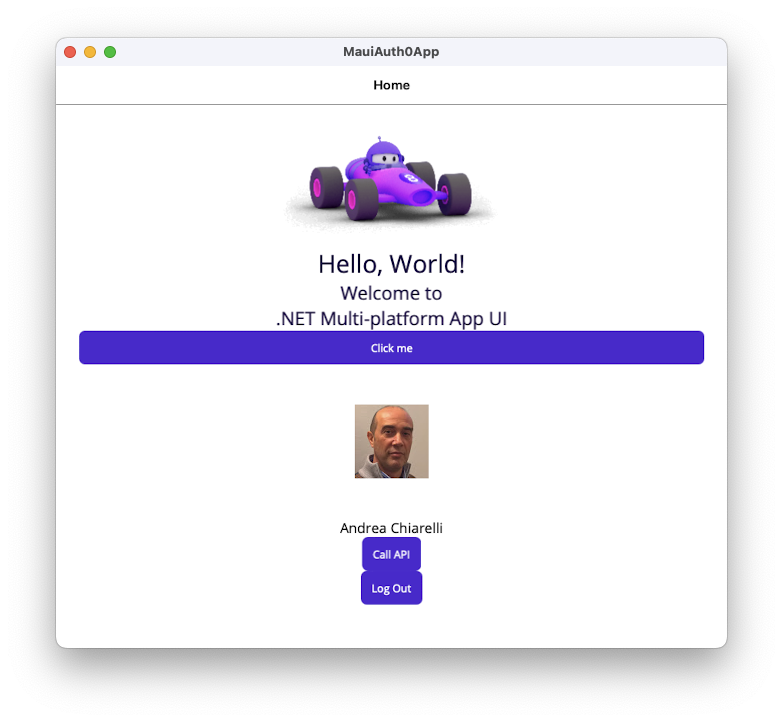
After you run the MAUI app and authenticate, you should see a screen similar to the following:
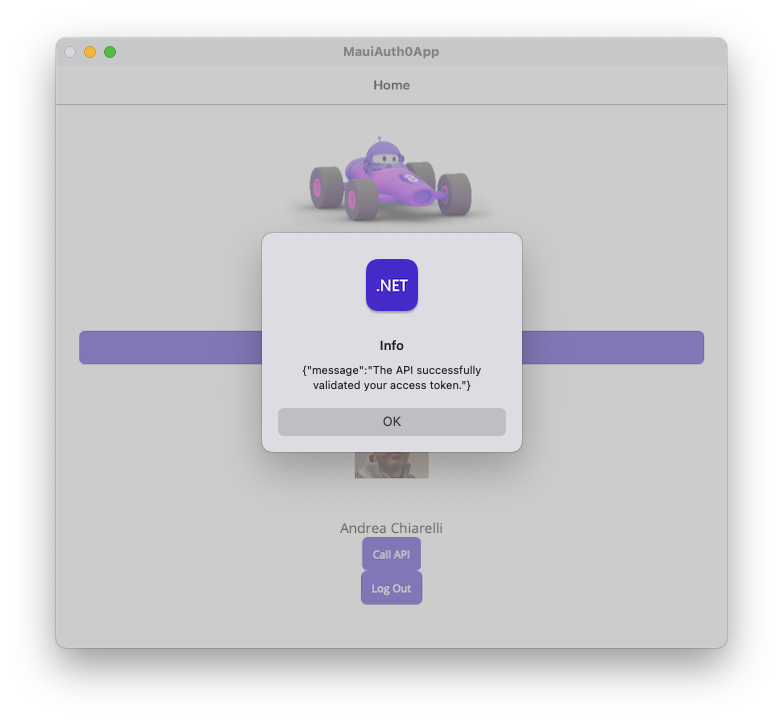
When you click the "Call API" button, you should get a successful message, as shown in the following picture:
If everything works as expected, you are ready to work on this project.
Use the Secure Storage
The first step is to determine where to store the tokens. The MAUI framework gives you a few options, such as the file storage or the application preferences storage. However, for storing sensitive data, your choice must be the Secure Storage. This option allows you to store data in key and value pairs using the operating system's encryption mechanism.
The .NET MAUI framework provides you with an ISecureStorage interface and a default implementation available through the SecureStorage.Default property. You can easily manage the tokens through a few methods, as you will soon learn.
⚠️ IMPORTANT! ⚠️ For operating systems other than Windows, additional settings are required to enable the Secure Storage. Please, check out this document to learn more.
Write the tokens
The current MAUI app implementation doesn't store the ID and access tokens. It uses the ID token on the fly to display the user profile data on the screen as soon as it receives it from Auth0. It keeps the access token in the AccessToken property of the TokenHolder static class. This class is implemented in the TokenHolder.cs file in the dotnet-maui-auth0-app folder. The implementation you are about to start will eventually get rid of the TokenHolder class.
Let's start by changing the way the application currently stores the access token. Open the MainPage.xaml.cs file in the dotnet-maui-auth0-app folder and modify the code of the OnLoginClicked() method as shown below:
// dotnet-maui-auth0-app/MainPage.xaml.cs

//...using statements...

namespace MauiAuth0App;

public partial class MainPage : ContentPage
{
  //...existing code...

  private async void OnLoginClicked(object sender, EventArgs e)
  {
    var loginResult = await auth0Client.LoginAsync(new { audience = "https://myapi.com"});

    if (!loginResult.IsError)
    {
      UsernameLbl.Text = loginResult.User.Identity.Name;
      UserPictureImg.Source = loginResult.User
        .Claims.FirstOrDefault(c => c.Type == "picture")?.Value;

      LoginView.IsVisible = false;
      HomeView.IsVisible = true;

      // TokenHolder.AccessToken = loginResult.AccessToken; 👈 old code
      //👇 new code
      try
      {
        await SecureStorage.Default.SetAsync("access_token", loginResult.AccessToken);
        await SecureStorage.Default.SetAsync("id_token", loginResult.IdentityToken);
      } catch (Exception ex)
      {
        await DisplayAlert("Error", ex.Message, "Ok");
      }
      //👆 new code
    }
    else
    {
      await DisplayAlert("Error", loginResult.ErrorDescription, "OK");
    }
  }

  //...existing code...
}
This code replaces the existing assignment to the TokenHolder.AccessToken property with the statements that store the ID and access tokens in the Secure Storage. As you can see, the method to store a value is SetAsync(), and it requires that you provide a key to identify that value.
Remove the tokens
While you want the tokens to survive when the application closes, when the user logs out, you need to delete these tokens from the Secure Storage. You implement this by adding a line to the OnLogoutClicked() method, as shown in the following snippet:
// dotnet-maui-auth0-app/MainPage.xaml.cs

//...using statements...

namespace MauiAuth0App;

public partial class MainPage : ContentPage
{

  //...existing code...

  private async void OnLogoutClicked(object sender, EventArgs e)
  {
    var logoutResult = await auth0Client.LogoutAsync();

    //👇 new code
    SecureStorage.Default.RemoveAll();
    //👆 new code

    HomeView.IsVisible = false;
    LoginView.IsVisible = true;
  }
}
You have used the RemoveAll() method to remove all keys previously stored in the Secure Storage. If you need to remove a single value, you can do so by using the Remove() method with the key associated with the value. See here for an example.
Fix the User Experience
Now your application stores the ID and access tokens in a safe place when it receives them from Auth0. It only removes them when the user logs out. It's time to take advantage of this token persistence to avoid the hassle of user authentication when the user hasn't previously logged out.
In short, at startup, your app will check if an ID token is stored in the Secure Storage. If this is not the case, the app will proceed with the usual authentication. On the other hand, if the app finds a still valid ID token stored in the Secure Storage, no authentication is required, but the existing ID token is used to display the user profile.
The previously stored access token is also used to call the protected API.
Check the ID token
Let's start the implementation of this flow by installing the package that allows you to validate your ID token and get the user profile. Run the following command in the folder of your .NET MAUI application project:
dotnet add package IdentityModel.OidcClient.IdentityTokenValidator
Now create a new file named UserManager.cs in the dotnet-maui-auth0-app folder with the following content:
// dotnet-maui-auth0-app/UserManager.cs

using IdentityModel.Client;
using IdentityModel.OidcClient;
using System.Security.Claims;

namespace MauiAuth0App;

public class UserManager
{
  private string _domain = "";
  private string _clientId = "";

  public UserManager(string domain, string clientId)
  {
    _domain = domain;
    _clientId = clientId;
  }

  public async Task<ClaimsPrincipal> GetAuthenticatedUser()
  {
    ClaimsPrincipal user = null;
    var idToken = await SecureStorage.Default.GetAsync("id_token");

    if (idToken != null)
    {
      var doc = await new HttpClient().GetDiscoveryDocumentAsync($"https://{_domain}");
      var validator = new JwtHandlerIdentityTokenValidator();
      var options = new OidcClientOptions
      {
        ClientId = _clientId,
        ProviderInformation = new ProviderInformation
        {
          IssuerName = doc.Issuer,
          KeySet = doc.KeySet
        }
      };

      var validationResult = await validator.ValidateAsync(idToken, options);

      if (!validationResult.IsError) user = validationResult.User;
    }

    return user;
  }
}
You added the needed references to the namespaces that enable your code to use the ClaimsPrincipal class and other objects and methods to validate an ID token. The ClaimsPrincipal class represents your user. The GetAuthenticatedUser() method retrieves the ID token stored in the Secure Storage and creates a new user object from it. Notice that this method also validates the ID token by following the best practices. This is particularly important to mitigate attacks that can potentially inject or overwrite your ID token, especially when you don't fetch the token directly from the server and use it immediately, as in this case.
If an ID token doesn't exist in the storage or the validation fails, the GetAuthenticatedUser() method returns null.
Now, open the MauiProgram.cs file and edit its content as shown below:
// dotnet-maui-auth0-app/MauiProgram.cs

//...using statements...

namespace MauiAuth0App;

public static class MauiProgram
{
  public static MauiApp CreateMauiApp()
  {
    //...existing code...

    builder.Services.AddSingleton<MainPage>();

    //👇 updated code
    const string domain = "<YOUR_AUTH0_DOMAIN>";
      const string clientId = "<YOUR_CLIENT_ID>";

    builder.Services.AddSingleton(new Auth0Client(new()
    {
        Domain = domain,
        ClientId = clientId,
        RedirectUri = "myapp://callback/",
        PostLogoutRedirectUri = "myapp://callback/",
        Scope = "openid profile email"
    }));

    builder.Services.AddSingleton(new UserManager(domain, clientId));
    //👆 updated code

    builder.Services.AddSingleton<TokenHandler>();
    builder.Services.AddHttpClient("DemoAPI",
        client => client.BaseAddress = new Uri("https://localhost:6061")
      ).AddHttpMessageHandler<TokenHandler>();
        builder.Services.AddTransient(
        sp => sp.GetRequiredService<IHttpClientFactory>().CreateClient("DemoAPI")
    );

    return builder.Build();
  }
}
You replaced the existing code that registers the Auth0Client instance with a little more elaborated snippet of code. First, you defined two constants that hold the Auth0 domain and client ID values. Then, you register two singleton services:
- The first service is the
Auth0Clientinstance as before, but now it uses the constant values. - The second service is a
UserManagerinstance based on the same constant values used to register the Auth0 client.
Adapt the UI
To avoid user authentication at startup, you need to invoke the GetAuthenticatedUser() method when the initial view is loaded. In the MainPage.xaml.cs file, let's inject the UserManager instance as shown below:
// dotnet-maui-auth0-app/MainPage.xaml.cs

using Auth0.OidcClient;

namespace MauiAuth0App;

public partial class MainPage : ContentPage
{
  int count = 0;
  private readonly Auth0Client auth0Client;
  private HttpClient _httpClient;
  private UserManager _userManager;    //👈 new code

  //👇 changed code
  public MainPage(Auth0Client client, HttpClient httpClient, UserManager userManager)
  {
      InitializeComponent();
    auth0Client = client;
    _httpClient = httpClient;
    _userManager = userManager;
  }
  //👆 changed code

  //...existing code...

}
You defined the private _userManager variable to hold the instance. Then, you changed the class constructor signature to include the UserManager instance. Finally, you assigned the instance received from the dependency injection system to the _userManager variable.
It's time to use the UserManager instance. In the same MainPage.xaml.cs file, add the OnLoaded() private method to the MainPage class as shown in the following:
// dotnet-maui-auth0-app/MainPage.xaml.cs

using Auth0.OidcClient;

namespace MauiAuth0App;

public partial class MainPage : ContentPage
{
  //...existing code...

  //👇 new code
  private async void OnLoaded(object sender, EventArgs e)
  {
    var user = await _userManager.GetAuthenticatedUser();

    if (user != null)
    {
      UsernameLbl.Text = user.Identity.Name;
      UserPictureImg.Source = user.Claims.FirstOrDefault(c => c.Type == "picture")?.Value;

      LoginView.IsVisible = false;
      HomeView.IsVisible = true;
    }
  }
  //👆 new code
}
The OnLoaded() method calls the GetAuthenticatedUser() method. If a user object is returned, its name and picture are used to be displayed on the page, and everything looks like the authentication has happened. Otherwise, the login button is shown as usual.
Let's attach the OnLoaded() method to the view definition. Open the MainPage.xaml file and apply the change highlighted here:
<!-- dotnet-maui-auth0-app/MainPage.xaml -->

<?xml version="1.0" encoding="utf-8" ?>
<ContentPage xmlns="http://schemas.microsoft.com/dotnet/2021/maui"
             xmlns:x="http://schemas.microsoft.com/winfx/2009/xaml"
             x:Class="MauiAuth0App.MainPage"
             Loaded="OnLoaded"> <!-- //👈 new attribute -->

<!-- existing markup -->

</ContentPage>
You're done!
To test these changes, run the modified MAUI application, log in, and then close the app without logging out. Then, restart the app. This time you land directly on the main page, which shows the user's data without authentication.
Deal with the Access Token Expiration
The user doesn't need to re-authenticate if they didn't log out. So, you might think that your job is done. Actually, this is not the case.
What happens if the ID token is still valid but the access token has expired? With the current implementation, the user accesses your app as if they were authenticated, but all of your API requests will fail. This is not good at all. The user needs to log in again to get a new access token.
You can think of a few options to recover from this situation.
Option 1: Re-authentication. You could redirect the user to the login screen when the API request fails. Unfortunately, this doesn't seem like the best approach for the user experience. Imagine that the user accesses your app without having to authenticate, and when they perform an action that requires calling an API, they are prompted to authenticate. That might seem pretty weird.
Option 2: Increase lifetime. Alternatively, you could consider increasing the access token's lifetime through the Auth0 dashboard. This would reduce the probability of an access token expiring and, consequently, that the API requests fail. However, this approach doesn't eliminate the problem. In addition, increasing the access token's lifetime is not recommended from a security perspective.
Option 3: Check the expiration date. Why don't you check the access token's expiration date? You already do this for the ID token. You should also add the access token check at startup, and everything will run smoothly. That's also a very bad idea! You must not try to inspect access tokens! Access tokens are an agreement between the authorization server (e.g., Auth0) and the resource server (the API). The client should treat it as a meaningless string. Even if the client knows the format of the access token, it is not authorized to inspect it. The format and content of the access token may change without notice to the client, resulting in runtime errors.
Enter Refresh Tokens
You may think that your situation is hopeless. In reality, there is a solution that involves refresh tokens. These are special tokens that allow an application to obtain new access and ID tokens without having to ask the user to log in again. Here's how they work at a high level:
- When the user authenticates, your application requests a refresh token along with the ID and access tokens.
- When your application finds that the access token has expired, it requests a new ID and access tokens from Auth0 by sending the refresh token.
- Auth0 sends your application new access and ID tokens. A new refresh token will also be sent if refresh token rotation is enabled.
- Your application uses the new access token to call the API and uses the new refresh token to renew the tokens when they expire. Providing a new refresh token helps mitigate the risk of replay attacks.
Let's see how to use refresh tokens in your .NET MAUI application.
To learn more about refresh tokens and how they work, check out this article.
Enable refresh token support
Before changing your application code, you need to enable your API to take advantage of refresh tokens. This doesn't require any changes to the API's code. Let's see how to do it.
Enable refresh token support for your API
Go to the API section of the Auth0 dashboard and select your API. Then click the Settings tab and scroll down to the Access Settings section. Here, enable the Allow Offline Access switch as shown below:
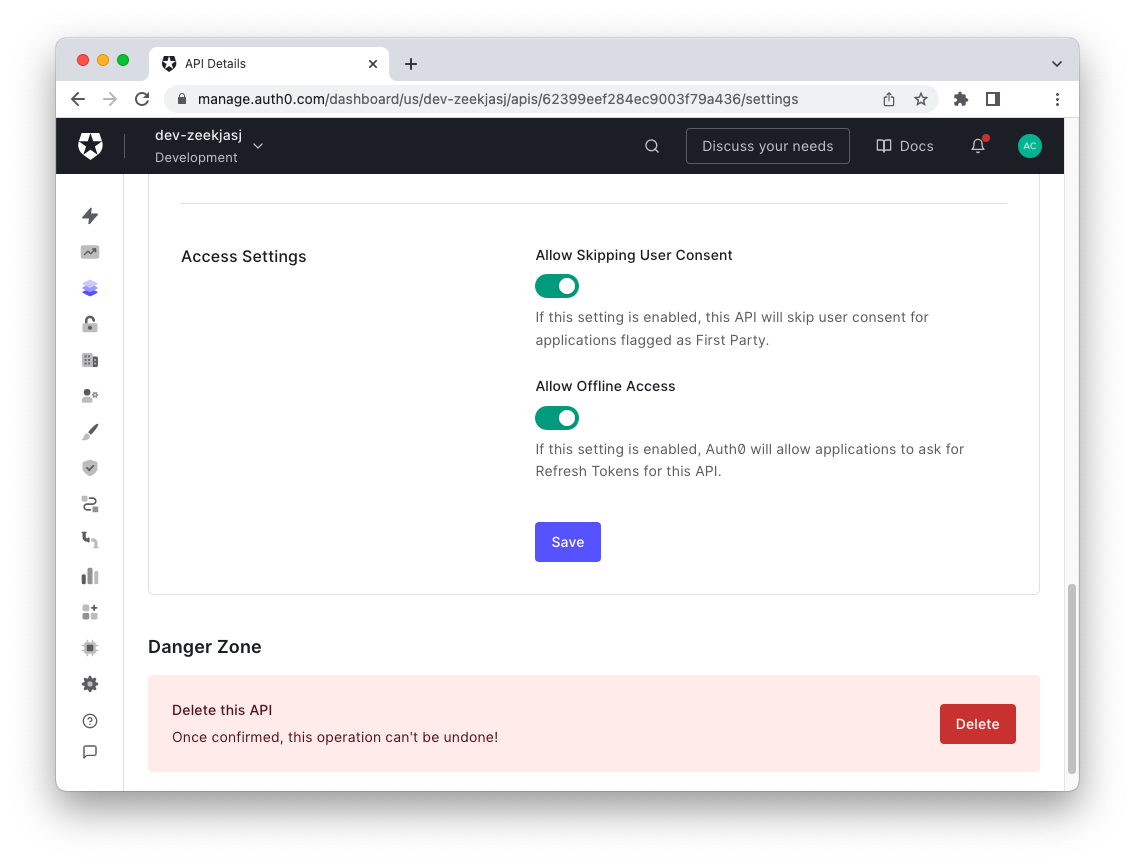
Don't forget to click the Save button.
Enable refresh token rotation for your app
Enabling support for refresh tokens rotation is optional but recommended. It enhances the refresh tokens' security. Go to the Applications section of the Auth0 dashboard and select your MAUI app. Then click the Settings tab and scroll down to the Refresh Token Rotation section. Toggle the Rotation switch to enable refresh token rotation as shown below:
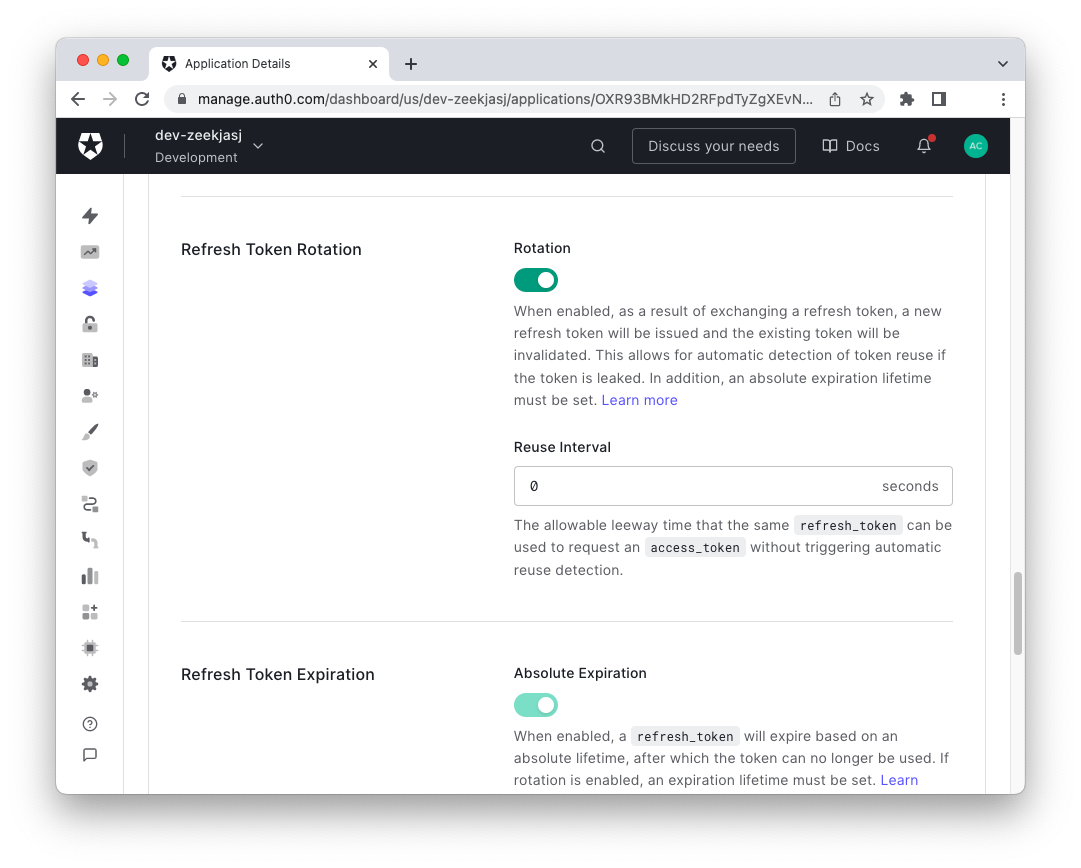
Scroll down and click the Save Changes button.
Request a refresh token
Once you enable refresh tokens, your application can request them. It's as easy as adding a new offline_access scope to the existing scopes. Open the MauiProgram.cs file and add this new scope as shown in the following code snippet:
// dotnet-maui-auth0-app/MauiProgram.cs

//...using statements...

namespace MauiAuth0App;

public static class MauiProgram
{
    public static MauiApp CreateMauiApp()
    {
    //...existing code...

    builder.Services.AddSingleton(new Auth0Client(new()
    {
      Domain = domain,
      ClientId = clientId,
      RedirectUri = "myapp://callback/",
      PostLogoutRedirectUri = "myapp://callback/",
      Scope = "openid profile email offline_access"  //👈 changed code
    }));

    //...existing code...
    }
}
That's all. Next time your application runs, it will request a refresh token in addition to the ID and access tokens.
Store the refresh token
Your application needs to store the refresh token as well. This guarantees that it can request a new access token when it expires. Let's modify the OnLoginClicked() method of the MainPage class as highlighted here:
// dotnet-maui-auth0-app/MainPage.xaml.cs

using Auth0.OidcClient;

namespace MauiAuth0App;

public partial class MainPage : ContentPage
{
  //...existing code...

private async void OnLoginClicked(object sender, EventArgs e)
  {
    var loginResult = await auth0Client.LoginAsync(new { audience = "https://myapi.com"});

    if (!loginResult.IsError)
    {
      //...existing code...

      try
      {
        await SecureStorage.Default.SetAsync("access_token", loginResult.AccessToken);
        await SecureStorage.Default.SetAsync("id_token", loginResult.IdentityToken);
        //👇 new code
        if (loginResult.RefreshToken != null)
        {
          await SecureStorage.Default.SetAsync("refresh_token", loginResult.RefreshToken);
        }
        //👆 new code

      } catch (Exception ex)
      {
        await DisplayAlert("Error", ex.Message, "Ok");
      }
    }
    else
    {
      await DisplayAlert("Error", loginResult.ErrorDescription, "OK");
    }
  }

  //...existing code...
}
If you get a refresh token, you store it in the Secure Storage as it happens with the other tokens.
Use Refresh Tokens
Now, you are ready to use refresh tokens whenever your access token is no longer valid to call the protected API. Let's implement this in two steps: refreshing the tokens and using the refreshed access token.
Refresh the tokens
In this step, you'll implement a RefreshTokensAsync() method for the TokenHandler class. This method requests new ID, access, and refresh tokens to Auth0 and is implemented as follows:
// dotnet-maui-auth0-app/TokenHandler.cs

//...using statements...

namespace MauiAuth0App;

public class TokenHandler : DelegatingHandler
{
  //...existing code...

  //👇 new code
  private async Task<RefreshTokenResult> RefreshTokensAsync(string refreshToken)
  {
    var refreshResult = await auth0Client.RefreshTokenAsync(refreshToken);

    if (!refreshResult.IsError)
    {
      await SecureStorage.Default.SetAsync("access_token", refreshResult.AccessToken);
      await SecureStorage.Default.SetAsync("id_token", refreshResult.IdentityToken);

      if (refreshResult.RefreshToken != null)
      {
        await SecureStorage.Default.SetAsync("refresh_token", refreshResult.RefreshToken);
      }
    }

    return refreshResult;
  }
  //👆 new code
}
It uses the RefreshTokenAsync() method of the auth0Client object and stores the received tokens in the Secure Storage. It also returns the renewed tokens.
Remember that if you don't enable refresh token rotation, you will not receive a new refresh token. So the old refresh token will continue to be valid.
Use the refreshed access token
With the current implementation, you can now rearrange the code of the TokenHandler class in order to leverage the refresh token. So, replace the content of the TokenHandler.cs file in the dotnet-maui-auth0-app folder with the following:
// dotnet-maui-auth0-app/TokenHandler.cs

using System.Net.Http.Headers;

namespace MauiAuth0App;

public class TokenHandler : DelegatingHandler
{
  private readonly Auth0Client auth0Client;

  public TokenHandler(Auth0Client _auth0Client)
  {
    auth0Client= _auth0Client;
  }

  protected override async Task<HttpResponseMessage> SendAsync(HttpRequestMessage request, CancellationToken cancellationToken)
  {
    var accessToken = await SecureStorage.Default.GetAsync("access_token");
    var refreshToken = await SecureStorage.Default.GetAsync("refresh_token");

    request.Headers.Authorization =
        new AuthenticationHeaderValue("Bearer", accessToken);

    var responseMessage = await base.SendAsync(request, cancellationToken);

    if (responseMessage.StatusCode == System.Net.HttpStatusCode.Unauthorized
        && refreshToken != null)
    {
      var refreshResult = await RefreshTokensAsync(refreshToken);

      if (!refreshResult.IsError)
      {
        request.Headers.Authorization =
                new AuthenticationHeaderValue("Bearer", refreshResult.AccessToken);

        responseMessage = await base.SendAsync(request, cancellationToken);
      }
    }

    return responseMessage;
  }

  private async Task<RefreshTokenResult> RefreshTokensAsync(string refreshToken)
  {
    //...existing code...
  }
}
Compared to the previous version, you may notice that the TokenHandler class now gets an instance of Auth0Client from the dependency system.
Also, the SendAsync() method starts by retrieving the access and refresh tokens from the Secure Storage. Then it makes the API call by setting the bearer token as before. If it gets an Unauthorized response from the API, it assumes that the access token has expired. In this case, it invokes the RefreshTokensAsync() method to refresh the tokens and uses the new access token to resubmit its request to the API. This completes your work!
Now you can delete the TokenHolder.cs file in the Auth0 folder and test your app!
Notice that the full refresh token process happens without the user realizing it, so their experience is not disrupted.
Leverage Auth0's authentication and authorization services in your .NET applications.
DOWNLOAD THE FREE EBOOK
Let’s Recap
I think you have learned a lot throughout this article. You started by noticing an annoying user experience problem: having to re-authenticate each time your MAUI app restarts.
You discovered that you can use the Secure Storage to securely store ID and access tokens and reuse them the next time the app restarts. This apparently solves the re-authentication problem, but there is still a problem with the access token: when it expires, your API calls fail even though the user thinks they are authenticated.
You have explored and discarded some bad options that might come to mind to solve the problem. You learned that the correct solution is to use refresh tokens. You enabled refresh token support through the Auth0 dashboard and implemented token renewal in your MAUI app when your API call fails.
Now your .NET MAUI app provides a better user experience for your users while keeping security a priority.
You can download the full source code of the project built in this article from this GitHub repository.
About the author

Andrea Chiarelli
Principal Developer Advocate
I have over 20 years of experience as a software engineer and technical author. Throughout my career, I've used several programming languages and technologies for the projects I was involved in, ranging from C# to JavaScript, ASP.NET to Node.js, Angular to React, SOAP to REST APIs, etc.
In the last few years, I've been focusing on simplifying the developer experience with Identity and related topics, especially in the .NET ecosystem.