Authorization is one of the fundamental pieces of putting together a line of business applications, and it is necessary whether you are planning to build a web application, a mobile application, or just expose an API for your customers to use. Yet, the task of understanding whether an actor has permission to execute an action on a resource tends to be complicated.
In this article, we are going to explore how authorization is often thought of and how the concept of permission has been entangled with other concerns. Then, we will try to tear it apart and put it back together in a way that can be put to work independently, and explore how OpenFGA is a great tool that can help during this journey.
When we talk about authorization on an implementation level, the first thought is usually OAuth2. The ubiquitous specification and the multitude of implementations on the market (including Auth0's) made it the primary choice for a lot of applications.
The issue, just like with other technologies, lies when developers jump on the train without a proper understanding of the protocol (often without even reading the specification), including its use cases and limitations. This leads to confusion in the implementation and wrong assumptions.
In this article, though, we will be focusing on one specific misconception: the role of the scopes in the protocol, the permissions, and how to use them correctly for an application.
Introducing the System Context
Let's start with a system that keeps track of the employees in the company, whose definition is relatively straightforward. For this example, we are going to be using Node.js and writing the code in TypeScript, but neither the language nor the runtime environment really matters. You can use OpenFGA with any development framework.
The following is an example of the model we are going to use to represent an employee:
export type Employee = {
    name: string;
    surname: string;
    employmentInfo: {
        salary: number;
        startDate: Date;
        status: 'onboarding' | 'employed' | 'terminated';
    };
    groupName: string;
};
We want to expose this resource through our internal API — but we also want to make sure that the information is properly protected. In particular:
- Only authenticated users are allowed to list the users in the system.
- In order to view the
employmentInfoinformation, you need to be either explicitly allowed or part of the HR group. - In order to change the employment status, you need to be in the admin group.
Before even starting to think about the authorization model, let's make sure that our web application is prepared to serve the content and refuse unauthorized requests, that is, in this example, requests that do not have a valid access token:
import { employees } from './models';
import express from 'express';
import { auth, claimIncludes, scopeIncludesAny } from 'express-oauth2-jwt-bearer';

const server = express();

server.use(
    auth({
        issuerBaseURL: 'https://<YOUR_AUTH0_DOMAIN>',
        audience: '<YOUR_API_AUDIENCE>',
    }),
);

server.get('/employees', (request, reply) => reply.send(employees));
The express-oauth2-jwt-bearer package is doing most of the work for us. At run time, the plugin will download the JWKS configuration from the well-known URL, and then, whenever a request is coming in:
- It will check that there is an
Authorizationheader and check that it uses theBearerscheme. - It will extract and decode the access token.
- It will verify the signature with the public key downloaded from the JWKS configuration.
If any of these steps fail, the request will be rejected with a 401 status code.
Note: Even though the method is called
auth- there is NOT any user authentication happening here. This is nothing else than a verification process. In particular, it verifies that the token is actually issued by the same entity whose public key is stored in the well-known configuration.
The current code is always returning all the employees' data — which we now have to fix. That is where developers usually start to use scopes. To model this specific part, one might think of creating three scopes:
employee:read: Represents the ability to read the employee data.employee:read-sensitive: Represents the ability to read employee info data.employee:write: Represents the ability to change the employment status.
Then, we can assign these permissions to the users we decide need access to the HR data. Auth0's UI has a convenient page where to assign permissions to users. We can then find these in the permission key of the decoded JWT:
{
    "iss": "https://vncz.us.auth0.com/",
    "sub": "auth0|640fb2d026f817f043e0f6f0",
    "aud": "/dev/null",
    "iat": 1679090796,
    "exp": 1679177196,
    "azp": "r5OFP9jZ3LOyP8bPWmAXkf0Nyei6Bxcx",
    "permissions": ["employee:read", "employee:read-sensitive", "employee:write"],
    "scope": "employee:read"
}
In the example above, the auth0 prefix in the value of the sub claim indicates that Auth0 is the source of the user who just logged in. In the case of another provider, the type might vary. For Google, for instance, it would be google-oauth2.
With this data in the token, we can now modify our source code to verify that the scopes that are required are in place before continuing with the operation:
server.get('/employees', scopeIncludesAny("employee:read"), claimIncludes("permissions", "employee:read"), (request, reply) => {
    if (request.user.permissions.includes('employee:read-sensitive')) return reply.send(employees);
    return reply.send(employees.map(u => omit(u, 'employmentInfo')));
});

server.patch('/employees/:id', scopeIncludesAny("employee:write"), claimIncludes("permissions", "employee:write"),, (_, reply) => {
    // ...
});
You can see an additional check in the body of the GET /employees function. In case the employee:read-sensitive scope is not there, we trim the returned body.
All good! The application is now secure, and we can move on with our lives.
Discovering the Limits
Months pass by, and new regulations now require the application to be more stringent with regard to how the data is being returned. In particular, we are now required to have an additional check to return the salary property: the user needs to be in the HR subgroup for your division. So, if Bob is in the engineering group, only people in the hr:engineering group shall be able to read the salary property.
Accommodating this change seems trivial, but breaking it apart will reveal a set of questions:
- How many groups do we have in our organization? How many will we have? In the majority of cases, this is dynamic information; sharing it ahead of time with the authorization system is not something that is doable.
- How many parts of a resource exposed (and its subsequent manipulation) would need specific scopes? For instance, in the future, modifying
groupNamecould require a more specific scope. - How many resources is our system exposing? For each one of these, the two issues above will multiply.
The two problems above are commonly known as granularity explosion and role explosion, where the developer at first tries to transfer the entire hierarchy through scopes, only to give up and transfer role memberships through scopes.
On top of these, there start to be also technical problems:
- The JWT size is limited to the transportation medium we are using. HTTP headers might have a size limit that is dependent on the HTTP server we are using. For instance, Apache and nginx have a default size of 8k, but these values can be modified by the server administrator, if necessary.
- The token is valid for as long as it is specified in its
expclaim. If during that time there is a change — for instance, the user gets moved to another group — the token will still be valid and yet carry information that is inaccurate.
Some solutions, such as Auth0, have developed tools to alleviate some of these problems. For instance, Auth0 Core Authorization can automatically collect all the permissions that are associated with a user, handle overlapping role assignments, and put the results in the permissions. Auth0 Actions allow developers to hook into the authorization process and run some custom code, where additional decisions can be made.
Some other solutions, on the other hand, conflict the scope claim with user permissions and melt them together, interleaving application delegation concerns with user permissions.
The real problem, indeed, lies in the fact that this is not an adequate use of scopes — and they were never intended to be used in such a way. Vittorio Bertocci has a great article on the matter, and I encourage everybody to take some time to read it.
However, for the purposes of this article, we can summarize here some of the takeaways:
- OAuth2 scopes are not meant to represent what the user can do in the system but rather limit what the application that has the token can do on behalf of the user. In other words, they describe the delegated capabilities, not the user's permission context.
- OAuth2 scopes do not tell the full authorization context that the current user has in a system. For instance, in our sample application above, having
employee:readdoes NOT imply that the user cannot access sensitive data. It only specifies that access to sensitive data has not been delegated to this application. - Even if using the
permissionsclaim, saying that user Bob has theemployee:readpermission does not offer a full picture. Can the user read any employee? Or maybe just some of them?
The natural way to move forward would be to perform additional checks at runtime based on what group the user belongs to. In our User model, we do have groupName that keeps track of such information.
While for trivial use cases it might do the job, it quickly goes out of hands where more complicated relationships have to be handled, such as parent-child groups, sibling groups, as well as exceptions, and so on.
Entering OpenFGA
OpenFGA is an open-source authorization solution inspired by Google Zanzibar. It uses relationships between objects to reach authorization decisions on whether a user is allowed to perform an action on an object.
Once the authorization model describing how objects can be related to one another has been defined, data representing the known relationships in the system can be written. Expect to be updating this data as users interact with your application.
Finally, whenever a user tries to access a resource, the application will perform a runtime check by asking the OpenFGA server whether a user is allowed to perform an action on an object and act accordingly by granting or denying them access.
Minimal viable example
For instance, let's assume to have user and group entities and want to delegate to the OpenFGA server whether a user belongs or not to a group. We can write the following model in the Auth0 FGA Configuration Language:
model
  schema 1.1
type user
type group
  relations
    define member: [user] or member from subgroup
    define subgroup: [group]
The model above:
- Defines two types,
userandgroup. - Defines a
memberrelation — meaning that a user is part of the group either by direct assignment or by indirect assignment (by being a member of the subgroup). - Defines a
subgrouprelation — meaning that a group can be a subgroup of another group.
Given the model, we can now feed it with some data. OpenFGA works with relationship tuples, consisting of user, relation, object.
Let's review an example:
[
    {
        "user": "group:frontend",
        "relation": "subgroup",
        "object": "group:engineering"
    },
    {
        "user": "user:clark",
        "relation": "member",
        "object": "group:frontend"
    },
    {
        "user": "user:lex",
        "relation": "member",
        "object": "group:engineering"
    }
]
These three tuples are saying:
- The
frontendgroup is a subgroup of theengineeringgroup. clarkis a member of thefrontendgroup.lexis a member of theengineeringgroup.
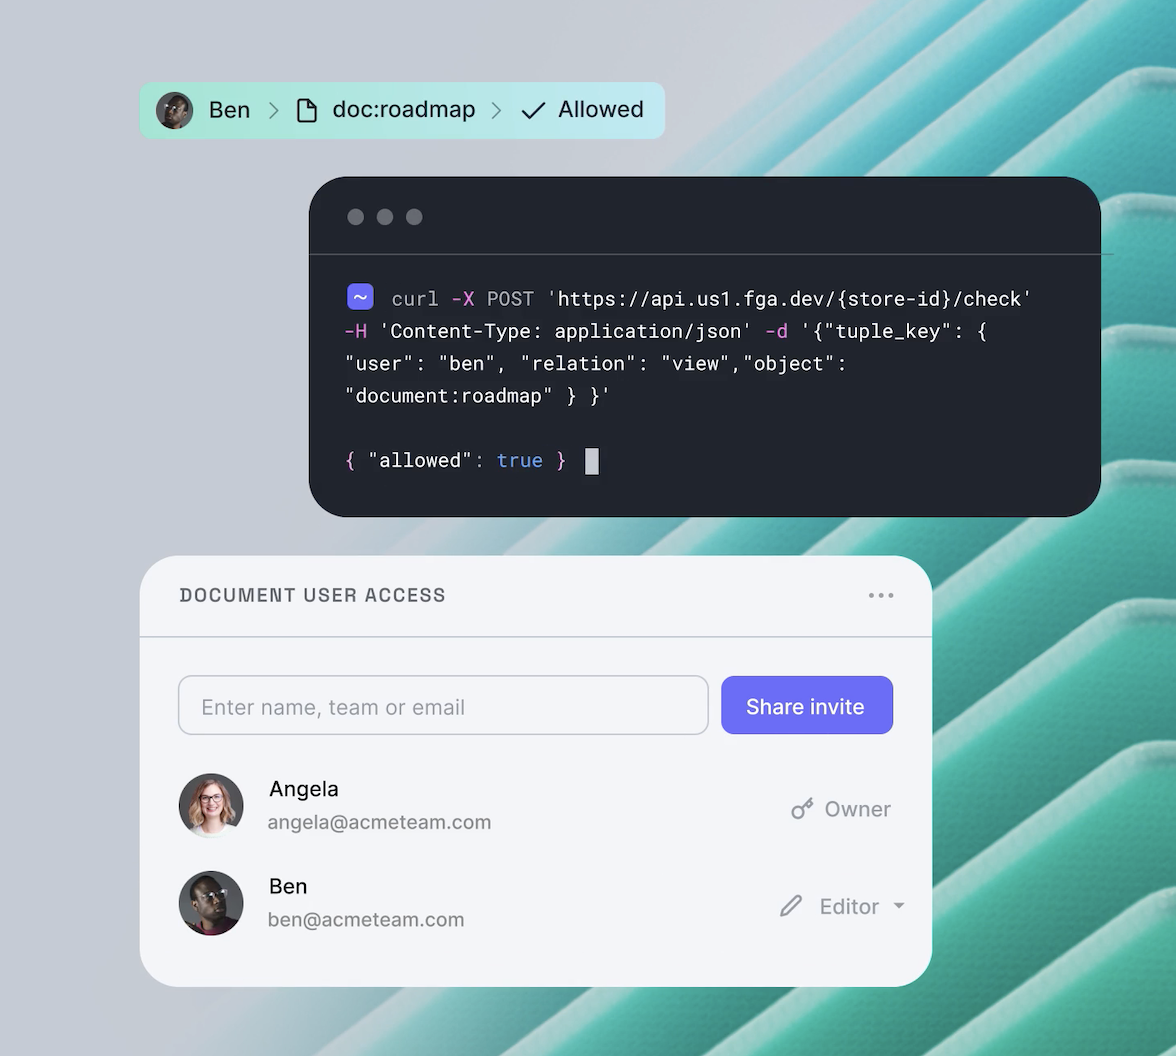
Now we ask the server whether a certain relationship is present:
const { allowed } = await openFgaApi.check({
    tuple_key: {
        object: 'group:engineering',
        relation: 'member',
        user: 'user:clark',
    },
});

// allowed = true, indicating that user:clark is a member of the engineering group
You can see how the OpenFGA server has been able to find that a user in the frontend group is implicitly also a member of the engineering group.
Setting up the OpenFGA server and modeling the various use cases are outside the scope of this article. Check out Setup OpenFGA and Getting Started with Modeling from the OpenFGA docs to learn more.
Migrating to FGA
OpenFGA is open source and can be hosted in your own infrastructure. On the other hand, Auth0 provides a playground as well as a hosted solution Auth0 FGA for OpenFGA. While it currently lacks deep integration (as in importing data from our Auth0 tenant, for instance), we can still use it to put our authorization system and perform checks.
For our example in this article, we are going to keep track of the group and employee types. Additionally speaking, we are interested in tracking the following relations:
- An employee is part of a group. That is to say,
ckentis part ofengineering. - A group has a sibling relation. That is to say that
hr-engineeringis a group "in support" ofengineering. - Group members that can view/set the employment information.
The result of these requirements is the following model:
model
  schema 1.1
type group
  relations
    define member: [employee]
    define sibling: [group]
    define sibling_member: member from sibling
type employee
  relations
    define group: [group]
    define set_employmentInfo_status: member from group or sibling_member from group
    define view_employmentInfo: member from group or sibling_member from group or view_employmentInfo_salary
    define view_employmentInfo_salary: member from group
Now we can feed the OpenFGA server with the tuples that represent our use case:
[
    {
        // The HR Engineering group is the group of this employee
        "object": "employee:auth0|640fb2d026f817f043e0f6f0",
        "relation": "group",
        "user": "group:hr-engineering"
    },
    {
        // The HR Engineering group is the group of ckent
        "object": "employee:ckent",
        "relation": "group",
        "user": "group:engineering"
    },
    {
        // The HR Engineering group is the group of lluthor
        "object": "employee:lluthor",
        "relation": "group",
        "user": "group:hr-engineering"
    },
    {
        // The employee ckent is member of the engineering group
        "object": "group:engineering",
        "relation": "member",
        "user": "employee:ckent"
    },
    {
        // The Engineering group is sibling of the HR engineering group
        "object": "group:engineering",
        "relation": "sibling",
        "user": "group:hr-engineering"
    },
    {
        // Employee auth0|640fb2d026f817f043e0f6f0 is member of the HR group
        "object": "group:hr",
        "relation": "member",
        "user": "employee:auth0|641cc484a95e85204548e2a4"
    },
    {
        // Employee auth0|640fb2d026f817f043e0f6f0 is member of the HR Engineering group
        "object": "group:hr-engineering",
        "relation": "member",
        "user": "employee:auth0|640fb2d026f817f043e0f6f0"
    },
    {
        // Employee lluthor is member of the HR Engineering group
        "object": "group:hr-engineering",
        "relation": "member",
        "user": "employee:lluthor"
    },
    {
        // The HR Engineering group is sibling of the engineering group
        "object": "group:hr-engineering",
        "relation": "sibling",
        "user": "group:engineering"
    }
]
At this point, we can modify our code to connect to OpenFGA and query the store to understand whether an operation is allowed or not.
Let's start by creating an instance of the OpenFGA client that uses our store configuration:
const openFgaApi = new OpenFgaApi({
    storeId: process.env.OPENFGA_STORE_ID,
    apiScheme: process.env.OPENFGA_API_SCHEME || 'http',
    apiHost: process.env.OPENFGA_API_HOST || 'localhost:8080',
});
Now, we can use the check() method of the OpenFGA instance to make our authorization decisions:
server.get('/employees', scopeIncludesAny("employee:read"), (request, reply) =>
  Promise.all(
    employees.map(user =>
      Promise.all(
        ['view_employmentInfo', 'view_employmentInfo_salary'].map(relation =>
          openFgaApi.check({
            tuple_key: {
              object: `employee:${user.uniqueName}`,
              relation,
              user: `employee:${request.user.sub}`,
            },
          }),
        ),
      ).then(([{ allowed: viewEmploymentInfo }, { allowed: viewSalary }]) => {
        if (!viewEmploymentInfo) return omit(user, 'employmentInfo');
        if (!viewSalary) return omit(user, 'employmentInfo.salary');
        return user;
      }),
    ),
  ).then(result => reply.send(result));
);
The new piece of code now makes two API calls to the OpenFGA server for each user and asks whether the necessary relations are in place. According to the result, we omit the parts of the resource that are not supposed to be seen.
Additionally speaking, now that we have offloaded this authorization check to OpenFGA, the groupName property becomes redundant and can be removed from the User model.
Generalize and reuse
Removing pieces of information based on the current permission is a very common use case scenario and can indeed be generalized if we are willing to put some conventions in our OpenFGA model.
Suppose that all the relations that are about returning pieces of data are prefixed with view, and what follows is the path of the data, yielding to relations such as view_employmentInfo or view_employmentInfo_salary.
In such case, we could write something like this:
function omitFromRelations(
    tuple: { user: string, object: string },
    data: Record<string, unknown>,
    relations: string[],
) {
    return Promise.all(
        relations.map(relation =>
            openFgaApi.check({
                tuple_key: {
                    ...tuple,
                    relation,
                },
            }),
        ),
    ).then(fgaResults =>
        chain(relations)
            .zip(fgaResults)
            .filter(([_, k]) => !k?.allowed)
            .map(([k]) =>
                chain(k || '')
                    .split('_')
                    .drop()
                    .join('.')
                    .value(),
            )
            .reduce((data, invalidRelation) => omit(data, invalidRelation), data)
            .value(),
    );
}
So that we can generalize our code as follows:
server.get('/employees', claimIncludes('permissions', 'employee:read'), (request, reply) => {
    Promise.all(
        employees.flatMap(user =>
            omitFromRelations(
                {
                    object: `employee:${user.uniqueName}`,
                    user: `employee:${request.user.sub}`,
                },
                user,
                ['view_employmentInfo', 'view_employmentInfo_salary'],
            ),
        ),
    ).then(result => reply.send(result));
});
The same mechanism can also be used to filter our properties that the user is not supposed to have writing access:
server.patch('/employees/:id', claimIncludes('permissions', 'employee:write'), (request, reply) => {
    omitFromRelations(
        {
            object: `employee:${user.uniqueName}`,
            user: `employee:${request.user.sub}`,
        },
        request.body,
        ['set_employmentInfo', 'set_employmentInfo_salary'],
    ).then(result => updateUserById(request.params.id, result));
});
Conclusions
By the end of this article, you should now have a clearer idea of the scope claim in a JWT, its original intention as well as the unfortunate misuse we find around.
We have seen how the permission claim that Auth0's tokens provide better, user-specific information to convey permission-related information, but, unfortunately, it is not granular as some use case scenarios require.
Finally, you should have learned how OpenFGA can help solve the granularity problem and offload authorization checks instead of writing your own system. Give it a try!
About the author

Vincenzo Chianese
API Architect