
After authenticating your Android app’s users (which you can learn in this tutorial), you’ll probably want to know more about them and even store information about them as well.
Your app might need to know the email addresses associated with the user’s account or the user’s various names (given name, family name, or perhaps a nickname). You will probably store the settings and preferences that the user provides. You may also want to keep track of values that affect the app’s functionality. In a game, these could be things like the current level or high score; in a productivity app, these might be information such as if the user has performed a specific action or where the user is in a given workflow.
You might not be aware that Auth0’s user accounts store different kinds of information about each user. In this article, you’ll learn about the information in Auth0 user accounts by adding the functionality to access this information to an existing app.
Look for the 🛠 emoji if you’d like to skim through the content while focusing on the build and execution steps.
What You’ll Build
You’ll start with a pre-built simple, single-screen Android app that will allow the user to log in and log out using Auth0. You’ll write some additional code that will give the app the ability to access these three different kinds of information about the user:
- Their user profile
- Their user metadata
- Their app metadata
I’ll explain what these are as I take you on a tour of the app.
The purpose of this app is to demonstrate how you access the three different kinds of user information stored in each user account. Let’s look at them in detail.
The user profile
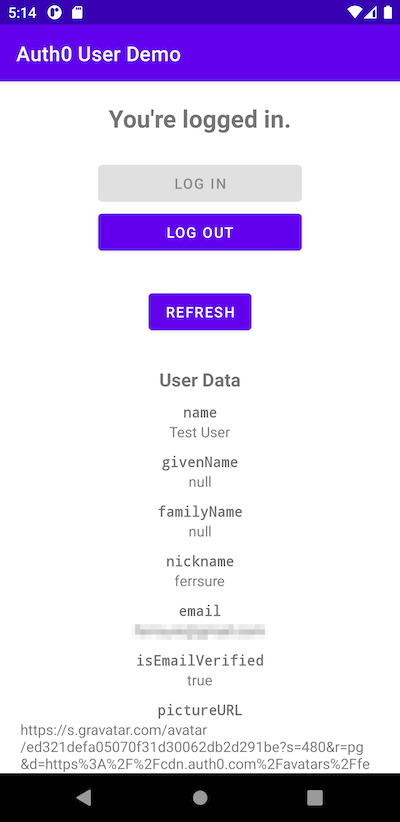
When the user runs the app and logs in successfully, the first set of user information they’ll see is the user profile. It takes up most of the app’s screen, and you’ll need to scroll to see it all. Here’s the first part...
...and here’s the rest:
The user profile is a small set of essential user data that can be found in most user accounts, regardless of identity provider. The Auth0 Android library provides access to this information as properties of a UserProfile object. These properties are:
name: The user’s full name, typically their first and last names, as a single string.givenName: The user’s given name, or what we would call the user’s “first name” in the western world.familyName: The user’s family name.nickname: The user’s nickname. This is often the name used to log in.email: The email address associated with this user account.isEMailVerified: A boolean whose value istrueif the user verified that the value inemailis their email address.pictureURL: The URL for an image of the user or some representation of the user.createdAt: The date and time when the user account was created.extraInfo: Extra information associated with the user account, stored as a JSON dictionary converted into aMap<String, Any>instance. The kind of information stored in this value depends on the identity provider.
User metadata
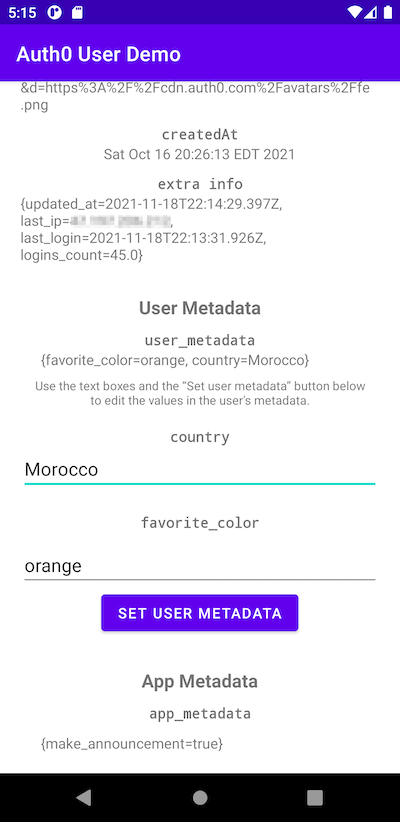
You’ll find the user metadata when you scroll to the bottom of the app’s screen:
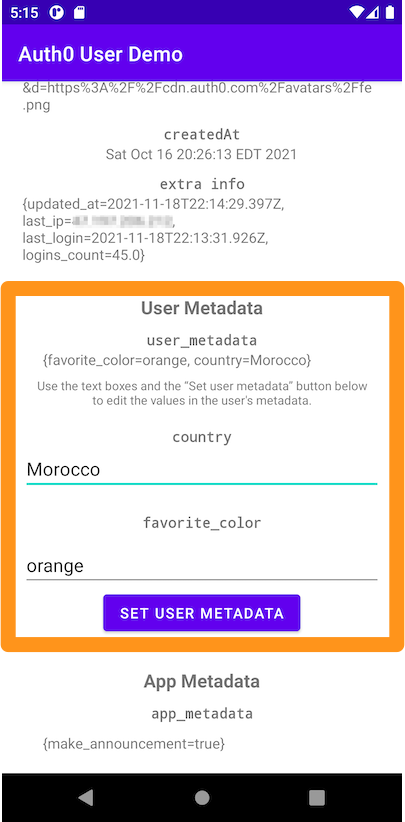
The user metadata is a set of attributes about the user that don’t affect the app’s core functionality. The user should be able to view and modify this information, and as such, it’s typically used to store user preferences and settings.
The Auth0 tenant sends user metadata as a JSON dictionary, which the Android library converts into a Map<String, Any> object.
The app displays the user metadata object and lets the user enter or edit two values stored within it: their country and favorite color.
App metadata
Below the user metadata, you’ll find the app metadata:
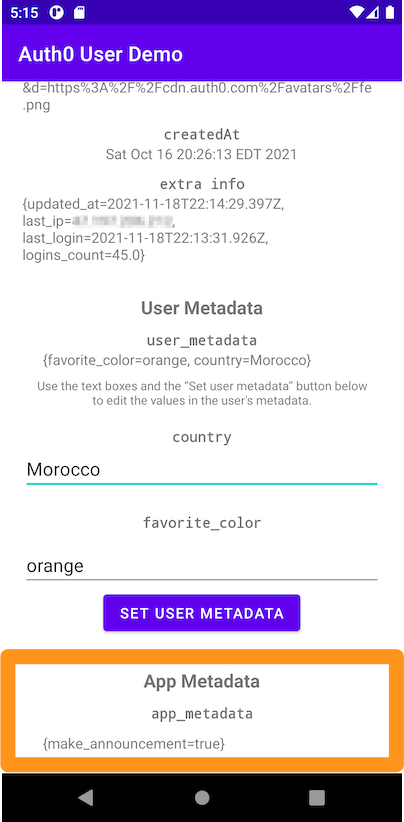
Unlike the user metadata, the app metadata is a set of attributes about the user that do affect the app’s core functionality. This includes information such as:
- The user’s status (e.g., if the user is using the app on a trial basis or is a paying customer)
- The user’s state. In a workplace app, this might be a flag representing whether the user completed a mandatory step. In a game app, this could be the user’s score and the level they reached in their last session.
- Other information determining what features or activities should be available to the user.
The Auth0 tenant sends app metadata as a JSON dictionary, which the Android library converts into a Map<String, Any> object.
Prerequisites
You’ll need the following for this coding exercise:
What you’ll need
- An Android development setup. Make sure you have the following, in the order given below:
- Java SE Developer Kit (JDK), version 11 or later. You can find out which version is on your computer by opening a command-line interface and entering java --version.
- Android Studio, version 3.6 (February 2020) or later. I used the current stable version of Android Studio when writing this article: version 2020.3.1, also known as “Arctic Fox”.
- At least one Android SDK (Software Development Kit) platform. You can confirm that you have one (and install one if you don’t) in Android Studio. Open Tools → SDK Manager. You’ll see a list of Android SDK platforms. Make sure that the current SDK (Android 11.0 (R) at the time of writing) is checked; if it isn’t, check it, click the Apply button, and click the OK button in the confirmation dialog that appears. Wait for the SDK platform to install and click the Finish button when installation is complete.
- An Android device, real or virtual:
- Using a real device: Connect the device to your computer with a USB cable. Make sure that your device has Developer Options and USB debugging enabled.
- Using a virtual device: Using Android Studio, you can build a virtual device (emulator) that runs on your computer. Here’s my recipe for a virtual device that simulates a current-model inexpensive Android phone:
- Open Tools → AVD Manager (AVD is short for “Android Virtual Device”). The Your Virtual Devices window will appear. Click the Create Virtual Device... button.
- The Select Hardware window will appear. In the Phone category, select Pixel 3a and click the Next button.
- The System Image window will appear, and you’ll see a list of Android versions. Select R (API 30, also known as Android 11.0). If you see a Download link beside R, click it, wait for the OS to download, then click the Finish button. Then click the Next button.
- The Android Virtual Device (AVD) window will appear. The AVD Name field should contain Pixel 3a API 30, the two rows below it should have the titles Pixel 3a and R, and in the Startup orientation section, Portrait should be selected. Click the Finish button.
- You will be back at the Your Virtual Devices window. The list will now contain Pixel 3a API 30, and that device will be available to you when you run the app.
- An Auth0 account. If you don’t have one, sign up for a free one now — you’ll need it in the next step.
Download, Configure and Run the Starter Project
Download the starter project
I wanted to keep the focus of this tutorial on the user profile, user metadata, and app metadata in this tutorial. To do this, I’ve provided a starter project that incorporates authentication and provides a functioning user interface. By starting with this pre-made project, you’ll be able to focus your attention on accessing user information.
The starter project is in the starter branch, and you can download its .zip file here.
🛠 Download the .zipped starter project and unzip it or clone it from the starter branch of this tutorial’s GitHub repository.
Configure the starter project
Since the app delegates authentication to Auth0, you need to do some configuration in the Auth0 dashboard and within the app. Let’s do this now.
Configure the project on the Auth0 dashboard
In this configuration step, you’ll register the Android app with Auth0, get two key pieces of information you’ll need to enter into the app and specify how Auth0 should notify your app when a user has logged in and logged out.
🛠 Log into your Auth0 account and create a new Native application for this project with the name Android User Demo.
🛠 Go to the Settings tab for your newly-created application and find the Domain and Client ID fields. Make of note of their values; you’ll use them shortly.
🛠 Scroll down to the Application URIs section. This is where you provide two pieces of information that Auth0 needs to know about your app, which are:
- One or more Allowed Callback URLs: the URLs that Auth0 will redirect to after the user successfully logs in.
- One or more Allowed Logout URLs: the URL that Auth0 will redirect to after the user logs out.
Auth0 uses these values even though Android apps don’t use web pages and URLs, but activities and intents instead.
In the case of native applications, the callback and logout URLs are the same string, and Auth0 sends that string to your app to inform it that a user has logged in or logged out. For Android native apps, the string follows this format:
{SCHEME}://{YOUR_DOMAIN}/android/{YOUR_APP_PACKAGE_NAME}/callback
🛠 Construct the string that goes into the Allowed Callback URLs and Allowed Logout URLs by doing the following:
- Replace
{SCHEME}with app.{SCHEME}is the URL’s protocol. If you were writing a web app, this value would behttp, or better,https. Since this is an Android native app, you can pick any string for this value. I like to useapp. - Replace
{YOUR_DOMAIN}with your tenant’s domain, which was in the Domain field that you saw earlier on this page. - Replace
{YOUR_APP_PACKAGE_NAME}withcom.example.auth0userdemo, which is the package name of the Android starter project app.
🛠 Save your changes by clicking the Save Changes button at the bottom of the page.
🛠 If there are no users in your tenant, create one now — you’ll need one to log into the app. Do this by clicking on User Management in the dashboard’s left side menu and then clicking on Users in the submenu that appears. Click the Create User button and create a new user by providing a name and password and selecting Username-Password-Authentication for that user’s Connection.
Configure the project within the app
In this configuration step, you’ll provide the app with the two key pieces of information that you got from the Auth0 dashboard in the previous step.
🛠 Open the auth0.xml file in the app project. If you set Android Studio’s Project pane menu to Android, you’ll find it in the app/res/values folder:
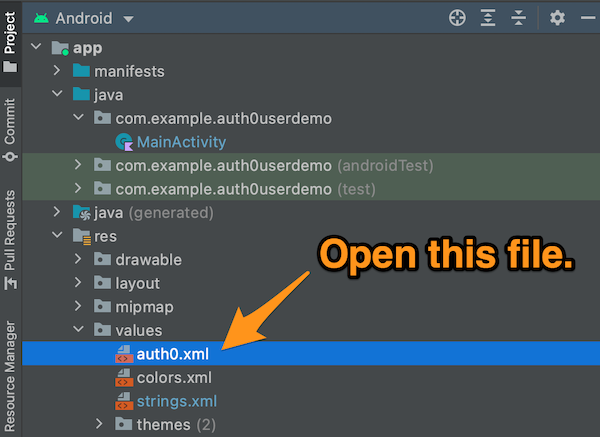
When you open the file, you’ll see this:
<?xml version="1.0" encoding="utf-8"?>
<resources>

    <!--
    Auth0 identifiers
    ===========================
    Your tenant’s domain and your app client ID grant access to your Auth0 tenant.
    Don’t check this file into public version control without sanitizing its values first!
    -->

    <string name="com_auth0_domain">Insert your Auth0 tenant’s domain here.</string>
    <string name="com_auth0_client_id">Insert your app’s Auth0 client ID here.</string>

</resources>
🛠 Replace Insert your Auth0 tenant’s domain here. with your tenant’s domain and Insert your app’s Auth0 client ID here. with your app’s client ID.
Run the starter project
Now that you’ve configured the project, it’s time to confirm that the app works.
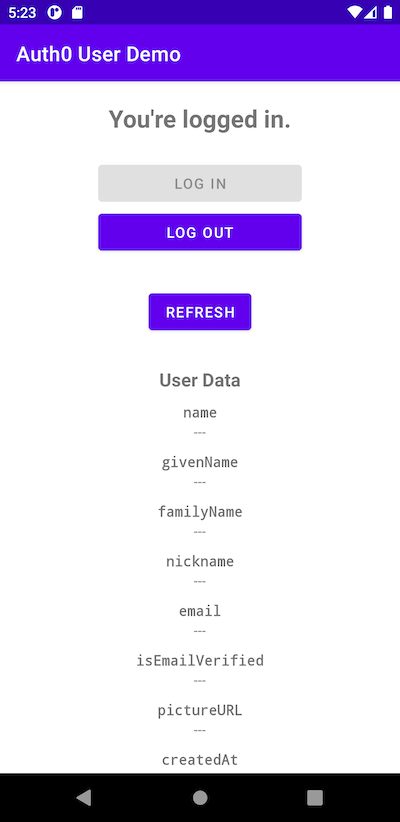
🛠 Select an emulator or device, run the app, and log in using any of the users registered with your tenant. The app should look like this:
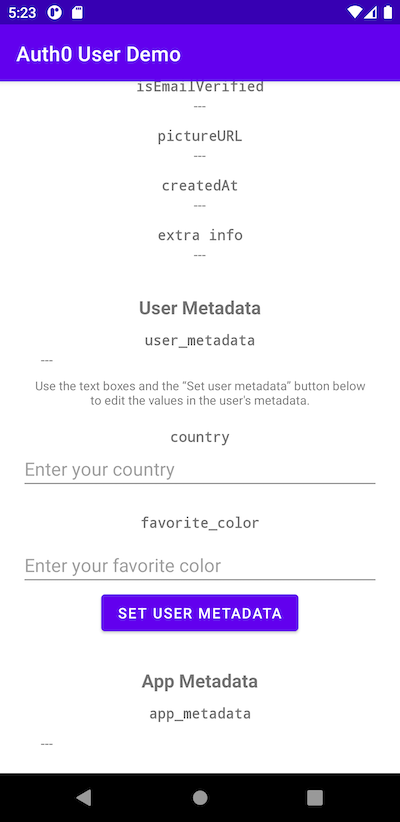
If you scroll to the bottom of the screen, you’ll see this:
The authentication part of the app works. It’s performed by the login() method, shown below with additional numbered comments:
private fun login() {
  WebAuthProvider  // 1
    .login(account) // 2
    .withScheme(getString(R.string.com_auth0_scheme)) // 3
    .withScope(getString(R.string.login_scopes))  // 4
    .withAudience(getString(R.string.login_audience,  getString(R.string.com_auth0_domain))) // 5
    .start(this, object : Callback<Credentials, AuthenticationException> { // 6

      override fun onFailure(exception: AuthenticationException) {
        showSnackBar(getString(R.string.login_failure_message, exception.getCode()))
      }

      override fun onSuccess(credentials: Credentials) {
        cachedCredentials = credentials
        showSnackBar(getString(R.string.login_success_message, credentials.accessToken))

        // TODO: Get the user’s profile information

        updateUI()
      }
    })
}
Here’s a quick overview of what’s happening in login(). The list item numbers correspond to the numbered comments in the code above:
WebAuthProvideris a class in the Auth0 Android library. It provides Auth0’s web page-based login to the app. The app uses this to log the user in via a login page in a web browser and log the user out.login()initiates the login process and specifies the Auth0 account used by the application.withScheme()specifies the scheme to use for the URL that Auth0 redirects to after a successful login. For web apps, the scheme ishttporhttps. This value is arbitrary for native mobile apps, so we useappto make it clear to other developers and other people who may use the Auth0 settings for this app that the redirect is not to a web page.withScope()specifies which sets of user data the app is authorized to use if the user logs in successfully. The OpenID Connect and OAuth frameworks, on which Auth0’s authentication and authorization are based, use the term scope to represent the authorization to access user’s data and resources. The method takes a space-delimited string as its argument, where each “word” in the string specifies a different scope. The string used in this app contains these scopes:openid: Indicates that application that uses OpenID Connect for authentication. This is the only required scope; all other scopes are optional.profile: Authorizes the application to access basic user profile information, including first name, surname, nickname, their photo or avatar, and so on.email: Authorizes the application to access the user’s email address.read:current_user: Authorizes the application with read-only access to the current_user claim.update:current_user_metadata: Authorizes the application with read and write access to thecurrent_user_metadataclaim. This scope allows us to get and set values in the user’s metadata.
withAudience()specifies the URL that the app will use to connect to Auth0’s login service. This URL is constructed using the domain of the Auth0 tenant used by the app and the endpoint for the Auth0 authentication API.start()takes theWebAuthProviderobject constructed by all the previous methods in the chain and opens the browser window to display the login page. It takes two parameters: a context (a reference to theActivitythat’s initiating the browser window) and an anonymous object with two callback methods:onFailure(): Defines what should happen if the user returns from the browser login screen without successfully logging in. This typically happens when the user closes the browser login screen or taps the “back” button while on that screen. The app displays aSnackBarthat notifies the user that login failed, followed by an error code.onSuccess(): Defines what should happen if the user returns from the browser login screen after successfully logging in. The app processes the successful response, displays aSnackBarnotifying the user that login was successful, and updates the UI to its “logged in” state.
🛠 Note that onSuccess() contains the following comment:
// TODO: Get the user’s profile information
🛠 Replace that comment with the following:
getUserProfile()
If you look just below login(), you’ll see three empty methods:
private fun getUserProfile() {
  // TODO: Implement this method!
}

private fun getUserMetadata() {
  // TODO: Implement this method!
}

private fun setUserMetadata() {
  // TODO: Implement this method!
}
In this tutorial, you’ll fill these empty methods, starting with getUserProfile(), which will retrieve the user’s profile, including their basic user profile information.
Get the User Profile Information and Display It
Let’s add code to getUserProfile() a little bit at a time. I’ll explain what each bit of code does after you enter it.
🛠 Update the getUserProfile() method to the following:
private fun getUserProfile() {
  // Guard against showing the profile the user isn’t logged in
  if (cachedCredentials == null) {
    return
  }

}
This tests to see if the cachedCredentials property contains a Credentials instance. We need that instance to retrieve the user profile. If it’s not there, it’s better to exit this method immediately.
🛠 Add the following code to getUserProfile():
val client = AuthenticationAPIClient(account)
The line above creates an instance of AuthenticationAPIClient, an object for contacting the Auth0 API for account information. This object will be used to request the user’s profile information.
🛠 Add the following code to complete getUserProfile():
client
  .userInfo(cachedCredentials!!.accessToken!!)
  .start(object : Callback<UserProfile, AuthenticationException> {

      override fun onFailure(exception: AuthenticationException) {
      showSnackBar(getString(R.string.general_failure_with_exception_code,
        exception.getCode()))
    }

    override fun onSuccess(userProfile: UserProfile) {
      cachedUserProfile = userProfile
      getUserMetadata()
      updateUI()
    }

  })
This is the code that makes the request for the user’s profile information.
It calls AuthenticationAPIClient ’s userInfo() method to create a request for the user’s profile information. This method requires a valid access token, which it extracts from the cachedCredentials property. It returns a Request object.
The Request object’s start() method transmits the user profile request to Auth0. In using it, you need to provide two callback methods:
onFailure(), which is called if the request for user profile information did not succeed. When this happens, the app displays aSnackBarthat tells the user that an exception occurred and displays a little debugging information.onSuccess(), which is called if the request for user profile information succeeds. When this happens, the app receives aUserProfileobject and copies it into thecachedUserProfileproperty. The app then callsgetUserMetadata()(which currently does nothing) and then updates the UI to display the newly-received information.
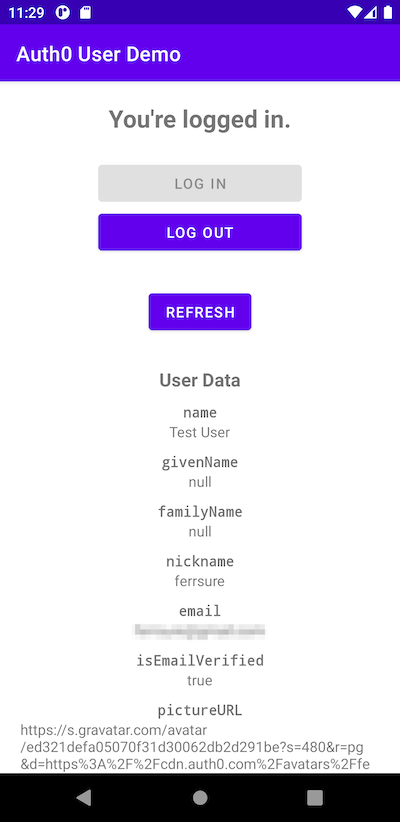
🛠 Run the app and log in. This time, you’ll see that most of the fields in the User Data section are now filled in:
Here’s what the lower part of the screen looks like:
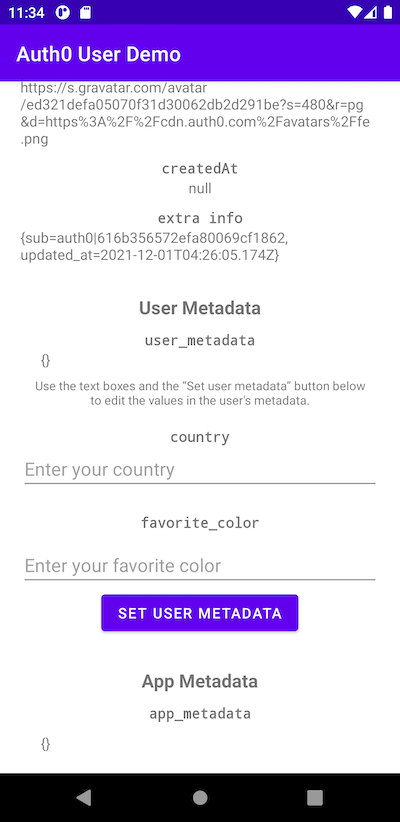
If you look at the updateUI() method, you’ll see that that it calls the updateUserInfoUI() method. updateUserInfoUI() accesses the user profile-related properties of cachedUserProfile and displays them onscreen.
Note that the createdAt property is null. That’s because this information hasn’t been retrieved yet. That happens in the next step when we retrieve the metadata.
Get the Metadata and Display It
Implement getUserMetadata()
Let’s add code to getUserMetadata() a little bit at a time. It’s similar to the code in getUserProfile(). I’ll explain what each bit of code does after you enter it.
🛠 Update the getUserMetadata() method to the following:
private fun getUserMetadata() {
  // Guard against getting the metadata when no user is logged in
  if (cachedCredentials == null || cachedUserProfile == null) {
    return
  }

}
This tests to see if the cachedCredentials property contains a Credentials instance and the cachedUserProfile property contains a UserProfile instance. We need both instances to retrieve the metadata. If both aren’t there, it’s better to exit this method immediately.
🛠 Add the following code to getUserMetadata():
val usersClient = UsersAPIClient(account, cachedCredentials!!.accessToken!!)
The line above creates an instance of UsersAPIClient, an object for contacting the Auth0 API for additional account information. Creating this instance requires a valid access token, which it extracts from the cachedCredentials property.
🛠 Add the following code to complete getUserMetadata():
usersClient
  .getProfile(cachedUserProfile!!.getId()!!)
  .start(object : Callback<UserProfile, ManagementException> {

    override fun onFailure(exception: ManagementException) {
      showSnackBar(getString(R.string.general_failure_with_exception_code,
        exception.getCode()))
    }

    override fun onSuccess(userProfile: UserProfile) {
      cachedUserProfile = userProfile
      updateUI()
    }

  })
This is the code that makes the request for the metadata associated with the user.
It calls UsersAPIClient ’s getProfile() method to create a request for additional user information information. This method requires the user’s unique identifier, which it extracts from the cachedUserProfile property. It returns a Request object.
The Request object’s start() method transmits the additional information request to Auth0. In using it, you need to provide two callback methods:
onFailure(), which is called if the request for additional information did not succeed. When this happens, the app displays aSnackBarthat tells the user that an exception occurred and displays a little debugging information.onSuccess(), which is called if the request for additional information succeeds. When this happens, the app receives aUserProfileobject containing both the user profile information and the additional metadata. This object is copied into thecachedUserProfileproperty. The app then updates the UI to display the newly-received information.
Provide some metadata for the app to display
The app can now display the user metadata and the app metadata associated with the user’s account, but there’s a problem: there’s no metadata to show! One way to solve this problem is to edit that metadata manually in the Auth0 dashboard.
🛠 Open the user page for the user you intend to use when logging into the app. Do this by clicking on User Management in the dashboard’s left side menu, then Users in the submenu that appears, and finally the user.
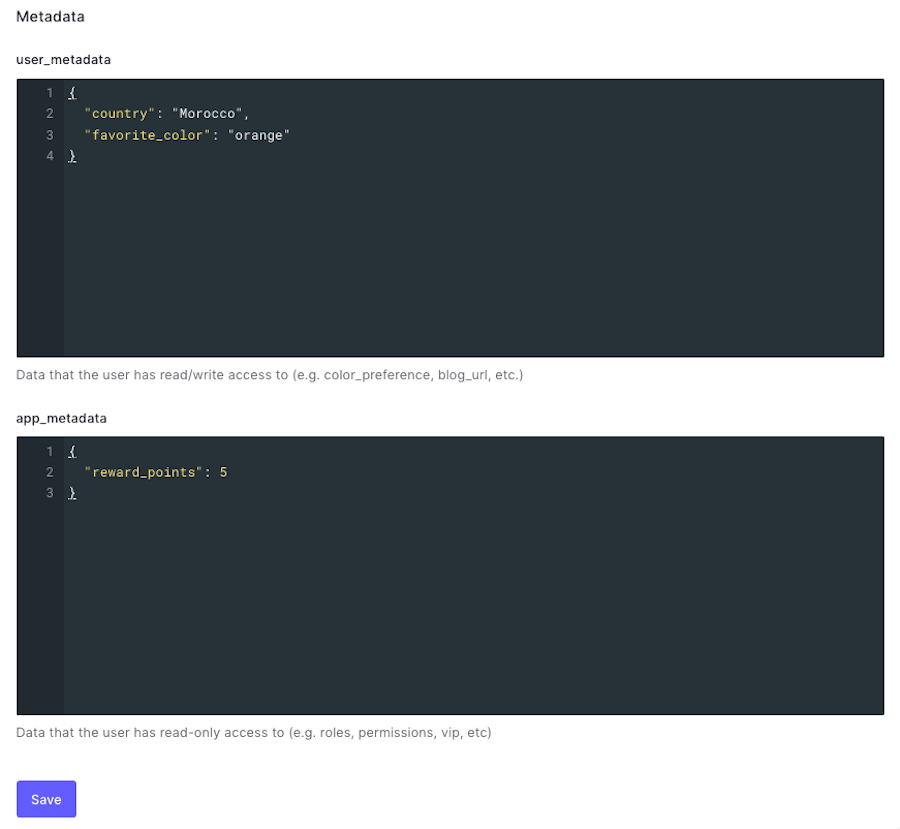
Scroll halfway down the page until you see the Metadata section. It should look like the screenshot below:
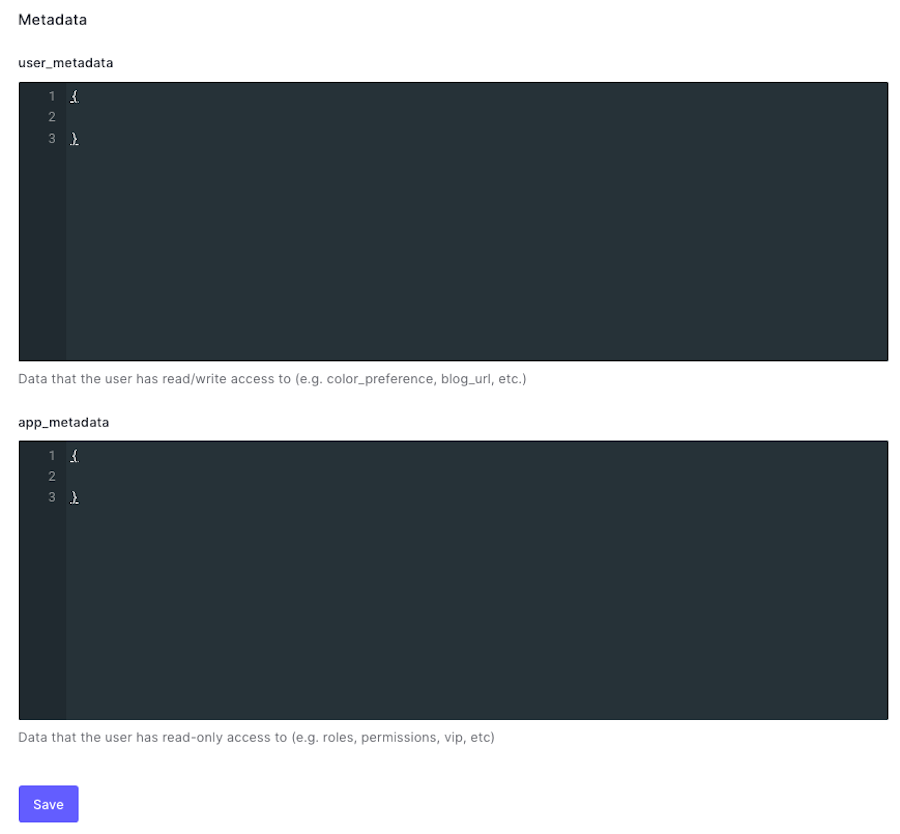
Unless you’ve already played around with the user’s metadata, both the User_metadata and app_metadata fields should be empty.
🛠 Update the contents of the user_metadata field to the following:
{
  "country": "New Zealand",
  "favorite_color": "blue"
}
🛠 Update the contents of the app_metadata field to the following:
{
  "reward_points": 5.0
}
🛠 Click the Save button just below app_metadata field.
Now that there’s metadata associated with the user let’s see what it looks like in the app!
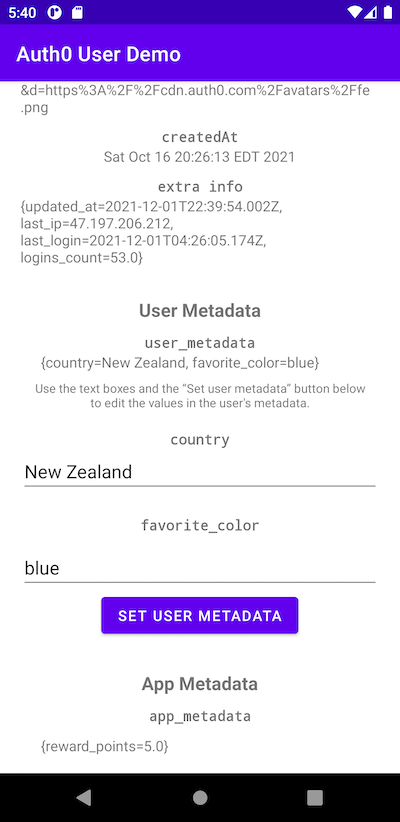
🛠 Run the app, log in, and scroll to the bottom of the screen. This time, you’ll see that all the fields in the User Data, User Metadata, and App Metadata sections are filled in:
A few things worth noting
Some differences in the user profile information
You may have noticed some changes in the last two fields in the User Data section:
- The createdAt field no longer displays
nullbut instead shows the date and time when the user’s Auth0 account was created. - The extra info field displays more information now that the app is retrieving both user profile information and metadata:
last_ip: The IP address from which the user last logged in.last_login: The date and time when the user last logged in.logins_count: The number of times the user logged in.
Your app can access the extra info information by calling on cachedUserProfile ’s getExtraInfo() method, which returns these values as a Map<String, Any> object.
cachedUserProfile
You may also have noticed that the cachedUserProfile property gets set twice:
cachedUserProfileis set first in thegetUserProfile()method when the app provides Auth0 with an access token and gets aUserProfileobject in response. ThisUserProfileobject contains only the user profile information and none of the metadata. If this method succeeds in getting the user profile information, it calls thegetUserMetadata()method.cachedUserProfileis set again immediately after in thegetUserMetadata()method, when the app provides Auth0 with the user’s ID (which it gets from the cachedUserProfileobject) and gets anotherUserProfileobject in response. WhengetUserMetadata()completes successfully,cachedUserProfilecontains both the user profile information and the metadata.
Simply put, you need to fetch the user’s profile information twice in order to get all the information associated with the user. This is because you need the user’s ID in order to retrieve their metadata, and the user’s ID comes from the user’s profile!
Let the User Edit Their User Metadata
There’s one last bit of functionality that you need to code: the ability for the user to edit their user metadata. Remember that anything stored in the user metadata should be both user-readable and user-editable.
Let’s add code to setUserMetadata(), which is called when the user presses the Set User Metadata button. It’s similar to the code in getUserMetadata(). We’ll enter the code a little bit at a time; I’ll explain what each bit of code does after you enter it.
🛠 Update the setUserMetadata() method to the following:
private fun setUserMetadata() {
  // Guard against getting the metadata when no user is logged in
  if (cachedCredentials == null) {
    return
  }

}
Once again, this is a test to confirm that cachedCredentials contains a Credentials object, which has access token. We need the access token to make changes to the user metadata.
🛠 Add the following code to setUserMetadata():
val usersClient = UsersAPIClient(account, cachedCredentials!!.accessToken!!)
val metadata = mapOf(
  "country" to binding.countryEdittext.text.toString().trim(),
  "favorite_color" to binding.favoriteColorEdittext.text.toString().trim()
)
The code above starts the process of updating the user metadata.
Just as we did with setUserMetadata(), we’re creating an instance of UsersAPIClient to contacting the Auth0 API about account information. This process requires a valid access token, which comes from the cachedCredentials property.
The code then creates a Map with two key-value pairs:
- The
countrykey and its corresponding value, the contents of the countryEditTextfield. - The
favorite_colorkey and its corresponding value, the contents of the favorite_colorEditTextfield.
- The
🛠 Add the following code to complete setUserMetadata():
usersClient
  .updateMetadata(cachedUserProfile!!.getId()!!, metadata)
  .start(object : Callback<UserProfile, ManagementException> {

    override fun onFailure(exception: ManagementException) {
      showSnackBar(getString(
      R.string.general_failure_with_exception_code, exception.getCode()))
    }

    override fun onSuccess(profile: UserProfile) {
      cachedUserProfile = profile
      updateUI()
      showSnackBar(getString(R.string.general_success_message))
    }

  })
This is the code that makes the request to update the user’s user metadata.
It calls UsersAPIClient ’s updateMetadata() method, whose name is also its job. This method requires the user’s unique identifier, which it extracts from the cachedUserProfile property. It returns a Request object.
The Request object’s start() method transmits the update request to Auth0. In using it, you need to provide two callback methods:
onFailure(), which is called if the request to update the user metadata did not succeed. When this happens, the app displays aSnackBarthat tells the user that an exception occurred and displays a little debugging information.onSuccess(), which is called if the request to update the user metadata succeeded. When this happens, the app receives aUserProfileobject containing both the user profile information and the updated metadata. This object is copied into thecachedUserProfileproperty. The app then updates the UI to display the updated information.
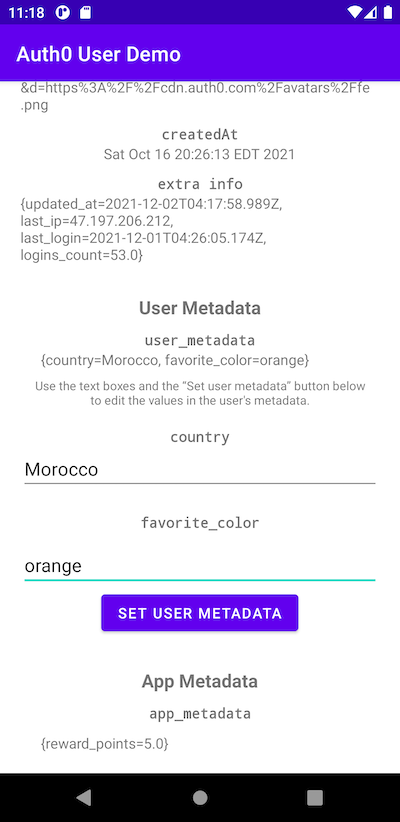
🛠 Run the app, log in, and scroll to the bottom of the screen. Change the values of both the country and favorite_color text fields and press the Set User Metadata button.
Check the user_metadata field. You’ll see that its values have been updated:
You can also see the updated values in the Metadata section of the user’s page in the Auth0 dashboard:
Other Ways to Change User Information
The Android library limits the changes that an app can make to a user’s information to the user metadata. It doesn’t provide a way for apps to make changes to a user’s profile information or app metadata — at least not directly.
However, there are cases when an app might need to change the information in the user’s profile, such as when they want to change their name or email address. There’s also the fact that while the user shouldn’t be able to change their app metadata, the app or its back end will need to do it.
For these cases, you can use the Auth0 Management API, which gives applications the ability to do anything you can do in the Auth0 dashboard, and even a little more. It’s one way to make changes to the user’s profile information or their metadata, and you can find out more on the Auth0 documentation page titled Manage Metadata Using the Management API.
You can also make changes to the user’s metadata using Actions, which are a small bit of Node.js code that execute during certain events of the Auth0 workflow, such as when the user logs in, changes their password, registers for a user account, and more.
Conclusion
You now have an app that demonstrates how to access the various kinds of information associated with each user account:
User profile: Very basic user identity data found in most user accounts, regardless of identity provider. It stores information such as the user’s various names, email address, and the URL for their picture. User metadata: Information about the user which the user can view and modify. The data should not affect the app’s core functionality. It’s most often used for storing preferences and settings. App metadata: Information about the user that does affect the app’s core functionality and is usually “behind the scenes” and not directly shown to the user. It’s most often to store the user’s state.
Try experimenting and see how handy it can be to be able to access information about the user information directly from their Auth0 user account!
You can find this tutorial’s project on GitHub. The starter project is in the starter branch, and you can download its .zip file here. The finished project is in the main branch and you can download its .zip file here.
About the author

Joey deVilla
Senior Developer Advocate (Auth0 Alumni)