Introduction
Users vs. The Nightmare Form
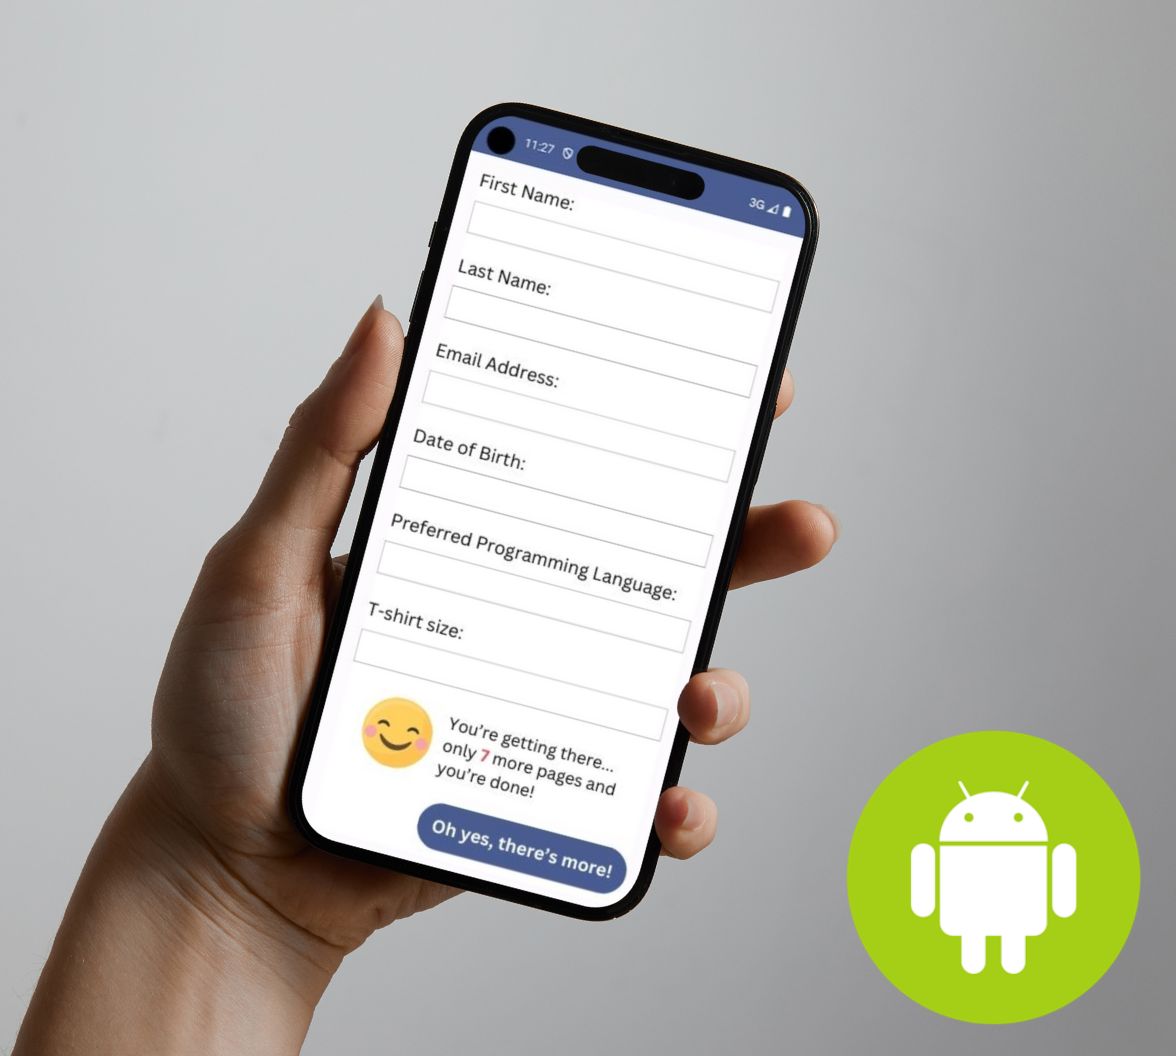
Here’s the moment I dread after signing up for a new service or installing a new app:
I call this the nightmare form. You’ve probably encountered one of these — a form where the application or site wants to provide it with all sorts of information about you, right now. When faced with one of these, I’ve walked away from my computer, put down my phone, or switched to another app or site and never finished filling it out.
If an app is free and users must fill out the nightmare form before using it, many will abandon it and never return. After all, it costs them nothing to leave; in fact, it saves them time!
Progressive Profiling

Users generally don’t mind providing an app or service with information about themselves, especially if doing so leads to something they find useful or helpful. What they do mind is having to do it all at once, especially if it happens just after signing up or subscribing.
The solution is to collect this information a bit at a time like drips from a faucet instead of a blast from a firehose. Instead of hammering the user with a barrage of questions and form fields, you ask them to provide one piece of information now and again. This can happen over consecutive logins or, if your app or service is something users sign into often, once every three or four logins. The idea is to minimize annoyance and make submitting information as painless as possible.
Collecting user information in this manner, and limiting the amount of information you collect each time, makes providing information feel less like a chore. The formal name that's typically used for this pattern is progressive profiling, and you can read more about the general support Auth0 provides here.
What you’ll build
You’ll start with a ready-built single-screen Jetpack Compose-based Android app that uses Auth0 for authentication. It’s quite similar to the app from my earlier article, Get Started with Jetpack Compose Authentication.
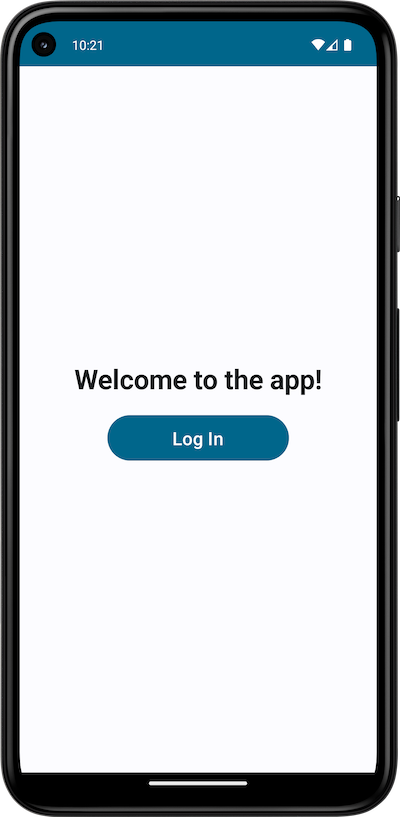
When launched, the starter app presents the “Welcome to the app!” screen, which features a Log in button:
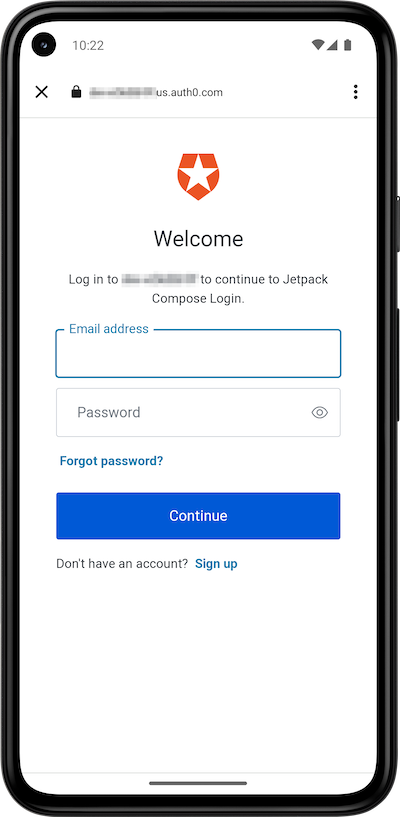
Pressing the Log in button takes you to Auth0’s Universal Login screen:
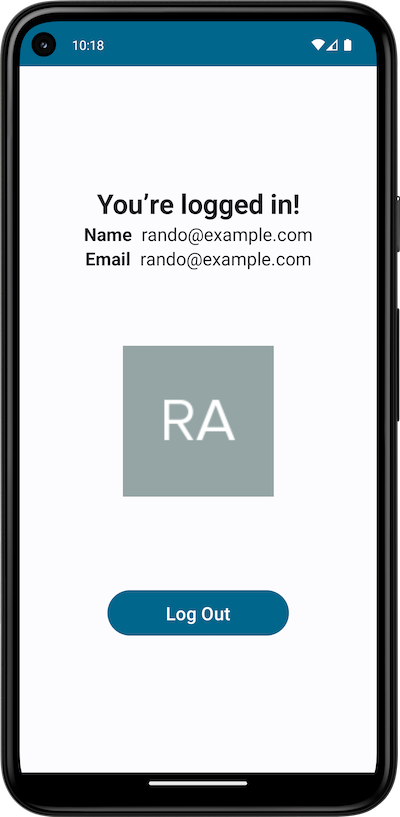
After logging in, the app will present its main screen, which displays your name, email, and photo, along with a Log out button:
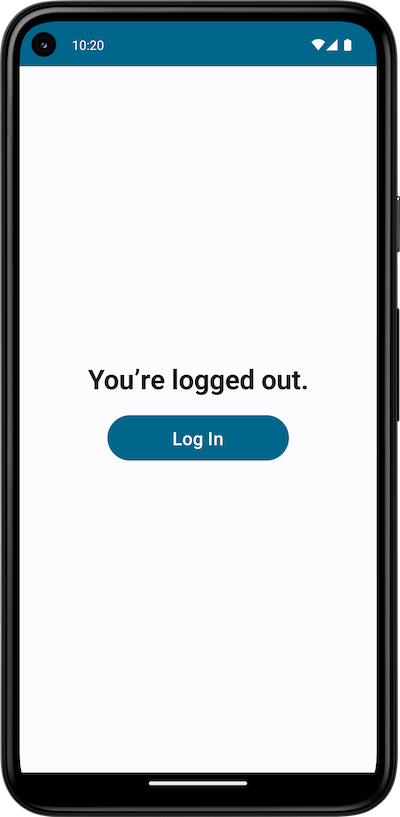
Pressing the Log out button takes you to the “You’re logged out.” screen:
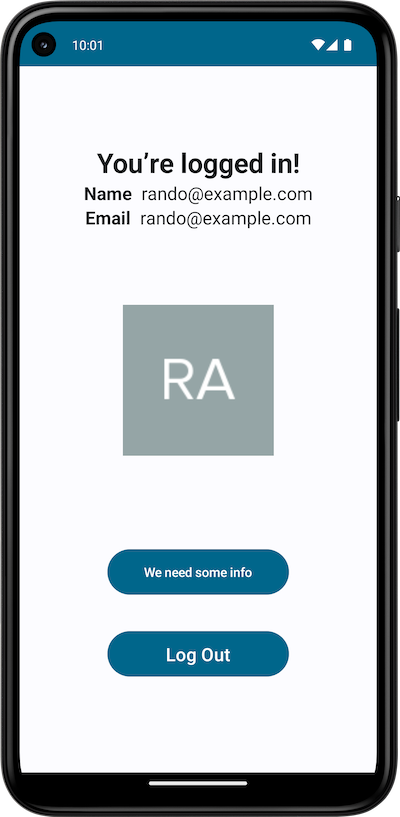
In the exercise associated with this article, you’ll add a feature that will prompt the user for additional information to add to their profile. When it’s time to perform progressive profiling, the app will show an additional button on the “You’re logged in!” screen — a We need some info button:
Pressing the We need some info button takes you to a new screen: the “question and answer” screen…
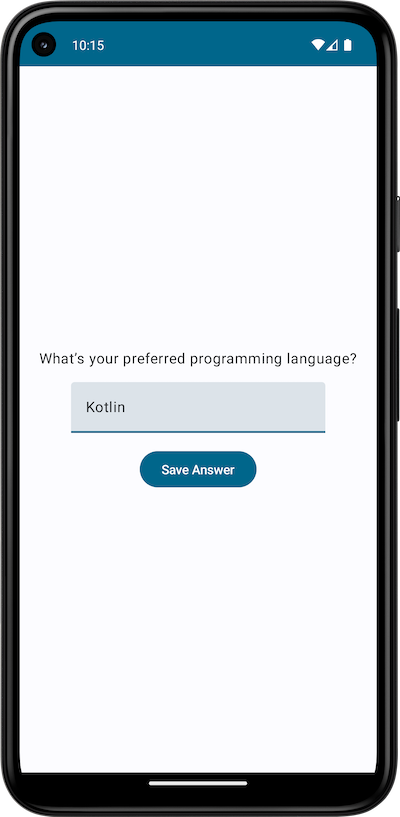
This screen presents the user with a question, a text field for entering the answer, and a Save Answer button. When the user enters an answer and presses Save Answer, the app takes them back to the “You’re logged in!” screen, which no longer displays the We need some info button:
This brings up a few questions:
- How does the app know when to perform progressive profiling (i.e., display the We need some info button)?
- Where does the app get the question to display on the “question and answer” screen?
- Where does the app store the user’s answer to progressive profiling questions?
The answer is in the user profile’s app metadata and user metadata.
Metadata makes it work
The information Auth0 stores about each user — the user profile — is purposely designed to store only basic information about each user, including:
- contact details, such as email address,
- the various names the user goes by,
- additional identifying information such as the user’s picture (or, more accurately, that picture’s URL),
- and administrative data, such as the user’s unique identifier, when they last logged in, what IP they were using, and so on.
Because this information can be useful during the login process, it’s included in the user profile. But it might not be enough.
There are a number of scenarios where it would be helpful to have information about the user that isn’t included in the user’s profile fields, such as:
- The user’s status: Is the user using the app on a trial basis, or are they a paying customer? Does the user have access to the app’s basic features, or did they purchase the deluxe package with all the features?
- Additional information related to the user’s identity: Does the application require a mailing address for the user, or perhaps a separate billing address? Does the user have usernames on other platforms that the app needs to know about?
- Flags that track user actions: Has the user accepted the app’s terms and conditions? Have they completed the tutorial?
- Other information about the user’s account: Is it time to show the user an alert, announcement, or notice? Is there an available upgrade for the app?
To store the kinds of information listed above, Auth0 user profiles include fields for app metadata and user metadata.
App metadata is information about the user to be used by the app. It’s for storing flags, permissions, external IDs, user levels (e.g., the user’s account type — basic, deluxe, or premium?), and other user information affecting the application’s core functionality. The app should not present this information to the user. The Auth0 SDK lets apps read a user profile’s app metadata field but does not allow apps to write to it.
User metadata is information about the user meant for use by the user. It’s for storing preferences, settings, additional contact information, and other data the user directly provides to the app. Unlike app metadata, user metadata does not affect the app’s core functionality. The user should be allowed not only to see their user metadata but to edit it as well.
App metadata and user metadata are stored in their own fields within the user profile as JSON strings.
You should limit your use of app metadata and user metadata to storing and retrieving information about the user’s identity. They’re best used for small bits of information that you might need to access during Auth0 workflows (for example, Auth0 Actions can access app metadata and user metadata). For more details, see the Auth0 Docs section titled Understand How Metadata Works in User Profiles.
The app you’ll build uses both app metadata and user metadata to perform progressive profiling. It examines the contents of the user profile’s app metadata field, looking for a JSON object with the key progressive_profiling. Here’s an example of app metadata that has such an object:
{
  "user_account_type": "deluxe",
  "user_account_expires": "2023-11-05",
  "user_country": "CA"

  "progressive_profiling": {
    "question": "What’s your preferred programming language?",
    "answer_field": "preferred_programming_language"
  }
}
For the purposes of this exercise, we’ll assume that the question value is a plain string without any formatting information.
The presence of an object whose key progressive_profiling tells the app that it might have to display the We need some info button on the app’s “logged in” screen.
The progressive-profiling object has two properties:
question: The question the app should display on the “question and answer” screen.answer_field: The key for the user’s answer, which the app will store in the user metadata.
If the app finds a progressive_profiling object in the app metadata, it will check to see if the answer_field value exists as a key in the user metadata. If it doesn’t find this value, the user has not yet provided an answer. The app then displays the We need some info button on the “logged in” screen, and hopefully, the user will press it and answer the question.
The app stores the answer in the user metadata when the user answers the question, using answer_field’s value as the key and the user’s answer as the corresponding value. In this example, if the user answers with “Kotlin,” the app will add the following to the user metadata:
"preferred_programming_language": “Kotlin”
We’ll assume that the preferred_programming_language value is a plain string without any formatting information.
The next time the app checks the app metadata for the presence of a progressive_profiling object, it will find the value of progressive_profiling’s answer_field property in the user metadata’s keys, which means that the user has already answered the question and the app will not perform progressive profiling.
Now that all that preamble’s out of the way let’s start building this app!
Look for the 🛠 emoji if you’d like to skim through the content while focusing on the build and execution steps.
What You’ll Need
You’ll need the following to build the app:
1. An Auth0 account
The app uses Auth0’s authentication and metadata features to log users in and perform progressive profiling. As you may have already deduced, you’ll need an Auth0 account to build and use the app.
Fortunately, you can sign up for an Auth0 account free of charge. You can do a lot with a free account, as it lets you add unlimited login/logout to up to 10 applications and 7,000 users, which should be more than enough for prototyping, development, and testing.
2. An Android development setup
To develop applications for Android, make sure you have the following, in the order given below:
- Any computer from 2013 or later running the most recent version of Linux, macOS, or Windows that it will support. It should have at least 8 GB RAM, and it would be better if it had more.
- Android Studio,. Jetpack Compose is a recent development, so you should use the most recent stable version of Android Studio. At the time of writing (June 2023), this version was “Flamingo,” also known as 2022.2.1 Patch 2, from May 2023.
- At least one Android SDK (Software Development Kit) platform. You can confirm that you have one (and install one if you don’t) in Android Studio. Open Tools → SDK Manager. You’ll see a list of Android SDK platforms. Select the current SDK (Android 13.0 (Tiramisu) at the time of writing), click the Apply button, and click the OK button in the confirmation dialog that appears. Wait for the SDK platform to install and click the Finish button when installation is complete.
- An Android device, real or virtual.
- Using a real device: Connect the device to your computer with a USB cable. Make sure that your device has Developer Options and USB debugging enabled.
- Using a virtual device: Using Android Studio, you can build a virtual device (emulator) that runs on your computer. Here’s my recipe for a virtual device that simulates a current-model inexpensive Android phone:
- Open Tools → AVD Manager (AVD is short for “Android Virtual Device”). The Device Manager panel will appear. Make sure the Virtual device tab is selected and click the Create device button.
- The Select Hardware window will appear. Ensure the Phone category is selected, then select Pixel 5 from the list of phones and click the Next button. The Google Pixel 5 was released in 2020, three years prior to the time of writing, and is a reasonable “representative” phone.
- The System Image window will appear, and you’ll see a list of Android versions. Select the latest version of Android, Tiramisu (API 33, also known as Android 13.0). If the Next button is disabled and you see a Download link beside Tiramisu, click that download link to download the OS. Once Tiramisu no longer has a download icon beside it and is available for selection, select it and click the Next button.
- The Android Virtual Device (AVD) window will appear. The AVD Name field should contain Pixel 5 API 33, the two rows below it should have the titles Pixel 5 and Tiramisu. Select Portrait in the Startup orientation section, then click the Finish button.
- You will return to the Device Manager panel. The device list will now contain Pixel 5 API 33, and it will be available when you run the app.
3. The starter project
Rather than make you build the entire app "from scratch", I’m providing you with a starter project that you’ll enhance by adding progressive profiling. This is a slightly modified version of the finished app from the Get Started with Jetpack Compose Authentication article. It has a single screen and does the following:
- It lets the user log in using Auth0’s Universal Login.
- When logged in, it displays the user’s name, email address, and photo.
- It lets the user log out.
🛠 Download the project files, which you can find at on Github. You can either clone the repository or download the repository as a .zip file.
The repository contains two directories:
starter, which contains the starter project.complete, which contains the project as it should be at the end of the exercise. You can use this for comparison if, for some reason, your app doesn’t work after following all the steps in this article.
Set Up and Run the Starter Project
Before you start coding, you’ll need to register the app in the Auth0 dashboard and configure the app.
You need an Auth0 account to proceed. Remember, you can sign up for an account for free!
Register the app in Auth0
🛠 Follow these steps:
- Log into the Auth0 dashboard, select Applications → Applications from the menu on the left side of the page, and create a new Native application.
- Once you have created the app, copy these values from the app’s Settings page in the Auth0 dashboard:
- Domain
- Client ID
- If your Auth0 tenant doesn’t have any users, create one. You can do this by selecting User Management → Users from the menu on the left side of the page and clicking the Create User button.
- If you haven’t done so already, launch Android Studio. In the project (either the starter or complete one), open the auth0.xml resource file and...
- Replace
Enter your Auth0 tenant’s domain here.with the domain you copied from the Auth0 dashboard. - Replace
Enter your app’s client ID here.with the domain you copied from the Auth0 dashboard.
- Replace
- Go back to the Auth0 dashboard, and in the application’s page, scroll down to the Application URIs section and paste the following into both the Allowed Callback URLs and Allowed Logout URLs:
app://{Your tenant domain}/android/com.auth0.composeprogressiveprofiling/callback
Make sure to replace {Your tenant domain} with your tenant’s domain. Once you’ve pasted this value into both Allowed Callback URLs and Allowed Logout URLs, then click the Save button at the bottom of the page to save your changes.
🛠 Run the app. You should be able to log in, see your user’s name, email address, and picture, and log out.
You’re now ready to start the exercise and give the app the power of progressive profiling.
Adding Navigation and a New Screen
While the starter app appears to have two screens — a “logged in” and a “logged out” screen — it actually has only one. This main screen, which the MainScreen() composable in the MainScreen.kt file renders, achieves the illusion of two screens by hiding certain UI elements when the user and altering the contents of the heading and button based on the user’s logged-in/logged-out status.
The “question and answer” screen is different enough to be its own screen. With two screens, the project will need a mechanism for navigating between screens. We’ll add Jetpack Compose’s Jetpack Compose’s navigation component to the project to help us with this task.
🛠️ Add the following to the end of the dependencies block of the app-level build.gradle file:
// 📄 build.gradle (Module :app)

// Jetpack Compose navigation library
implementation "androidx.navigation:navigation-compose:+"
Adding a NavController and NavHost
Now that the navigation component is available to the project, it’s time to make use of it.
🛠️ Switch to MainActivity.kt and add the following to its import statements:
// 📄 MainActivity.kt

import androidx.navigation.compose.NavHost
import androidx.navigation.compose.composable
import androidx.navigation.compose.rememberNavController
🛠️ Scroll to the end of MainActivity.kt and replace the current version of the App composable with the following:
// 📄 MainActivity.kt

@Composable
fun App(
    viewModel: MainViewModel
) {
    val navController = rememberNavController()

    NavHost(
        navController = navController,
        startDestination = "MainScreen"
    ) {
        composable("MainScreen") {
            MainScreen(
                navigation = navController,
                viewModel = viewModel
            )
        }
        composable("QuestionAnswerScreen") {
            QuestionAnswerScreen(
                navigation = navController,
                viewModel = viewModel
            )
        }
    }
}
Consider the first line of the composable body:
val navController = rememberNavController()
The rememberNavController() function creates an instance of NavController, which is the central API for Jetpack Compose’s navigation component. It’s a stateful object that remembers which composable is currently displaying the app’s current screen. It also keeps track of the composables the user visited before the current one, making it possible to navigate to previous screens.
A NavController is an object that navigations from composable to composable. It needs to be associated with a Navhost, which is the graph of all the composables the NavController can navigate to.
Let’s take a closer look at the newly-added NavHost:
NavHost(
    navController = navController,
    startDestination = "MainScreen"
) {
    composable("MainScreen") {
        MainScreen(
            navigation = navController,
            viewModel = viewModel
        )
    }
    composable("QuestionAnswerScreen") {
        QuestionAnswerScreen(
            navigation = navController,
            viewModel = viewModel
        )
    }
}
NavHost()’s first two parameters are:
navController, which specifies theNavControllerinstance to be associated with theNavHost.startDestination, which determines which composable theNavControllernavigates to at the start.
NavHost()’s final parameter is this lambda:
composable("MainScreen") {
    MainScreen(
        navigation = navController,
        viewModel = viewModel
    )
}
composable("QuestionAnswerScreen") {
    QuestionAnswerScreen(
        navigation = navController,
        viewModel = viewModel
    )
The composable() function adds a composable to NavHost’s graph. It takes two parameters:
route: A string that assigns a name to the composable, which will be used for navigation. For example, to navigate to theMainScreencomposable, you would usenavController.navigate("MainScreen")since"MainScreen"is the value assigned asMainScreen’sroute. You also used"MainScreen "to specify thatMainScreenis the initial composable the app will display.- A lambda that instantiates the composable to be added to
NavHost’s graph.
You may have noticed that MainScreen and QuestionAnswerScreen share a ViewModel. I often take this approach when two or more screens share data and functionality. In this case, both screens need to know about the app metadata and user metadata.
Android Studio’s syntax highlighter and the Problems tab at the bottom of the screen will point out that MainScreen doesn’t have a navigation parameter and that there’s QuestionAnswerScreen composable doesn’t exist. You’ll fix these issues next.
Updating the main screen
Let’s work on MainScreen first.
🛠️ Open MainScreen.kt and add the missing navigation parameter to MainScreen() so that it looks like this:
// 📄 MainScreen.kt

@Composable
fun MainScreen(
    navigation: NavController, // 👈🏽 New code
    viewModel: MainViewModel
) {

// ...The rest of the function goes here...
🛠️ Click NavController in the code you just added and use alt-Enter or option-Enter key combination to import androidx.navigation.NavController.
The newly-added navigation parameter allows MainScreen to access the NavController you set up in the App composable in MainActivity.kt. This makes it possible to navigate from this composable to any other composable in the NavHost associated with the NavController.
Now that it’s possible to navigate to other composables let’s add a button to do that.
🛠️ Scroll down to the section MainScreen() marked by the User info comment and update it as shown below:
// 📄 MainScreen.kt

        // User info
        // ---------
        if (viewModel.userIsAuthenticated) {
            UserInfoRow(
                label = stringResource(R.string.name_label),
                value = viewModel.user.name,
            )
            UserInfoRow(
                label = stringResource(R.string.email_label),
                value = viewModel.user.email,
            )
            UserPicture(
                url = viewModel.user.picture,
                description = viewModel.user.name,
            )

            // 👇🏽 New code
            // Progressive profiling button
            // ----------------------------
            viewModel.getMetadata()
            if (viewModel.showProgressiveProfilingButton) {
                ProfilingButton(
                    text = "We need some info",
                    onClick = {
                        navigation.navigate("QuestionAnswerScreen")
                    }
                )
            }
            // 👆🏽 New code
        }
The ViewModel retrieves the user’s metadata in this new code, determining if the ProfilingButton should appear. As for the ProfilingButton, take a closer look at the value passed to its onClick parameter:
onClick = {
    navigation.navigate("QuestionAnswerScreen")
}
With the help of the NavController reference that MainScreen receives from MainActivity, clicking the ProfilingButton takes the user to the QuestionaAnswerScreen composable, whose route was defined in the NavHost as ”QuestionAnswerScreen”.
Android Studio’s syntax highlighting should be complaining that the ViewModel doesn’t have a getMetadata() method or a showProgressiveProfilingButton property. It will also point out that there’s no such thing as a ProfilingButton.
You’ll add the missing ViewModel members later. In the meantime, let’s define ProfilingButton.
🛠️ Add this composable to the end of MainScreen.kt:
// 📄 MainScreen.kt

@Composable
fun ProfilingButton(
    text: String,
    onClick: () -> Unit,
) {
    Column(
        modifier = Modifier
            .fillMaxWidth()
            .padding(20.dp),
        horizontalAlignment = Alignment.CenterHorizontally,
    ) {
        Button(
            onClick = { onClick() },
            modifier = Modifier
                .width(200.dp)
                .height(50.dp),
        ) {
            Text(
                text = text,
                fontSize = 14.sp,
            )
        }
    }
}
The changes to MainScreen are complete. It’s time to add QuestionAnswerScreen to the app.
Adding a “question and answer” screen
🛠️ Add a new Kotlin file named QuestionAnswerScreen to the app. Do this by right-clicking on the com.example.composeprogressiveprofiling group in the Project explorer on the left side of Android Studio and selecting New → Kotlin Class/File.
🛠️ Add the following to the newly created QuestionAnswerScreen.kt file:
// 📄 QuestionAnswerScreen.kt

@Composable
fun QuestionAnswerScreen(
    navigation: NavController,
    viewModel: MainViewModel
) {
    Column(
        modifier = Modifier
            .fillMaxWidth()
            .fillMaxHeight(),
        verticalArrangement = Arrangement.Center,
        horizontalAlignment = Alignment.CenterHorizontally
    ) {
        Text(viewModel.progressiveProfilingQuestion)
        AnswerTextField(viewModel = viewModel)
        Button(onClick = {
            viewModel.saveProgressiveProfilingAnswer()
            viewModel.getMetadata()
            navigation.popBackStack()
        }) {
            Text(text = "Save Answer")
        }
    }
}

@Composable
fun AnswerTextField(viewModel: MainViewModel) {
    Column(Modifier.padding(16.dp)) {
        TextField(
            value = viewModel.progressiveProfilingAnswer,
            onValueChange = { viewModel.progressiveProfilingAnswer = it }
        )
    }
}
🛠️ Click on the following in the code you just added and use alt-Enter or option-Enter to import them:
Text(androidx.compose.material3.Text)Button(androidx.compose.material3.Button)TextField(androidx.compose.material3.TextField)
TextField after importing it, expand this section to find out how to fix this problem.At the time of writing (June 2023), some of the user interface components provided by the Compose Material 3 library are still experimental. TextField is one of these components, and Android Studio’s syntax highlighting will mark it as an error.
If you encounter this situation, simply hover the cursor over the TextField keyword until this pop-up appears:
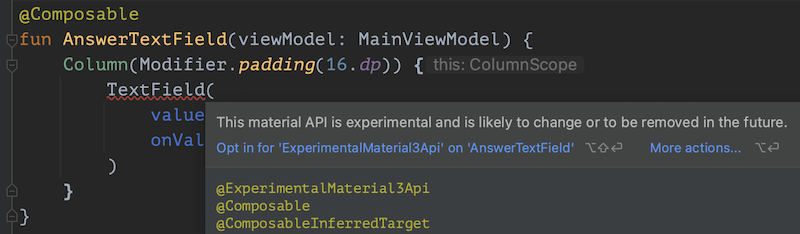
Click the Opt in for 'ExperimentalMaterial3Api' on 'AnswerTextField' link. It will add an @OptIn annotation to the AnswerTextField() composable and an addition import, androidx.compose.material3.ExperimentalMaterial3Api, to the file.
Once you’ve added those three import statements, the only errors in QuestionAnswerScreen.kt will be related to ViewModel members that you haven’t implemented yet.
There are two things worth examining in the newly-added code. The first is the Button defined in the QuestionAnswerScreen() composable:
Button(onClick = {
    viewModel.saveProgressiveProfilingAnswer()
    viewModel.getMetadata()
    navigation.popBackStack()
}) {
    Text(text = "Save Answer")
}
Clicking the button will save the user’s answer, update the ViewModel with the latest user metadata, and then call the NavController’s popBackStack() method, which will take the user to the previously visited composable — MainScreen.
Clicking the button will save the user’s answer, update the ViewModel with the latest user metadata, and then call the NavController’s popBackStack() method, which will take the user to the previously visited composable — MainScreen.
The other thing worth examining is the AnswerTextField composable:
@Composable
fun AnswerTextField(viewModel: MainViewModel) {
    Column(Modifier.padding(16.dp)) {
        TextField(
            value = viewModel.progressiveProfilingAnswer,
            onValueChange = { viewModel.progressiveProfilingAnswer = it }
        )
    }
}
Of particular note are the two parameters for the TextField composable contained within it:
value: Specifies what holds the contents of theTextField, which in this case is the ViewModel’sprogressiveProfilingAnswerproperty. It doesn’t exist yet, but you’ll add it shortly.onValueChange: Defines what should happen when the contents of theTextFieldchange. In this case, the ViewModel’sprogressiveProfilingAnswerproperty should be updated with this new value.
And now, let’s update the heart of the app: the ViewModel.
Updating the ViewModel
MainViewModel needs some extra properties, so let’s add them.
Add new properties
🛠️ Update the variable declaration section of the MainViewModel class as shown below:
// 📄 MainViewModel

    var appJustLaunched by mutableStateOf(true)
    var userIsAuthenticated by mutableStateOf(false)
    var user by mutableStateOf(User())

    // 👇🏽 New code
    var showProgressiveProfilingButton by mutableStateOf(false)
    var progressiveProfilingQuestion by mutableStateOf("")
    var progressiveProfilingQuestionField = ""
    var progressiveProfilingAnswer by mutableStateOf("")

    var credentials: Credentials? = null
    var appMetadata = mapOf<String, Any>()
    var userMetadata = mapOf<String, Any>()
    // 👆🏽 New code

    private lateinit var account: Auth0
    private lateinit var context: Context
Here’s what each of the new properties does:
showProgressiveProfilingButton: The progressive profiling button onMainScreenmonitors this value. If set totrue, the button shows itself.progressiveProfilingQuestion: TheTextcomposable onQuestionAnswerScreenmonitors this value to determine what text it should display.progressiveProfilingQuestionField: The name of the key in the user’s user metadata that will store the user’s answer to the question.progressiveProfilingAnswer: TheTextFieldcomposable onQuestionAnswerScreenmonitors this value to determine what text it should contain.credentials: The user’s credentials, retrieved from the Auth0 tenant.appMetadata: The user’s app metadata, retrieved from the Auth0 tenant.userMetadata: The user’s user metadata, retrieved from the Auth0 tenant.
Some of these properties are declared with by mutableStateOf({initial valiue}). The by keyword declares a delegated property — think of by as meaning “provided by.” The mutableStateOf() function returns an instance of MutableState, which holds a value that Jetpack Compose will observe. Any MainViewModel property that affects a composable, whether it’s a Text object, a Button, or a whole screen, is declared using by mutableStateOf().
Update login()
MainViewModel’s properties are now updated. It’s time to update its methods. The first method to update: login().
🛠️ Update login() so that end result looks like this:
// 📄 MainViewModel

    fun login() {
        WebAuthProvider
            .login(account)
            .withScheme(context.getString(R.string.com_auth0_scheme))
        // 👇🏽 New code 1
            .withAudience("https://${context.getString(R.string.com_auth0_domain)}/api/v2/")
            .withScope("openid profile email read:current_user update:current_user_metadata")
            // 👆🏽 New code 1
            .start(context, object : Callback<Credentials, AuthenticationException> {

                override fun onFailure(error: AuthenticationException) {
                    // The user either pressed the “Cancel” button
                    // on the Universal Login screen or something
                    // unusual happened.
                    Log.e(TAG, "Error occurred in login(): $error")
                }

                override fun onSuccess(result: Credentials) {
                    // The user successfully logged in.
                    user = User(result.idToken)
                    userIsAuthenticated = true
                    appJustLaunched = false
                    // 👇🏽 New code 2
                    credentials = result
                    getMetadata()
                    // 👆🏽 New code 2
                }

            })
    }
You made two additions to login(). The first, marked with the “New code 1” comments, add a couple of actions to the login process:
withAudience(): Defines the audience, which is OAuth’s terminology for the intended recipient of a token. In this case, the token is an access token, and the audience is the user management API hosted on your tenant, located athttps://{your tenant’s domain}/api/v2. The app uses this API to get the user’s app and user metadata.withScope(): Defines the scopes granted to the access token. If this method is not included in the login method chain, the access token is granted a default set of scopes consisting ofopenid,profile, andemail. In order to read the user’s app and user metadata and write to the user’s user metadata, we need additional scopes beyond the default set — namely,read:current_userandupdate:current_user_metadata— so we need to include this method and the extra scopes.
The “New code 2” additions are a little more straightforward. When the user successfully logs in, the app should store the user’s credentials, then retrieve the app and user metadata associated with the user’s account.
Update logout()
🛠️ The logout() method needs a minor update. Add a line to set the credentials property to null at the end of the onSuccess() function, as shown below:
// 📄 MainViewModel

    fun logout() {
        WebAuthProvider
            .logout(account)
            .withScheme(context.getString(R.string.com_auth0_scheme))
            .start(context, object : Callback<Void?, AuthenticationException> {

                override fun onFailure(error: AuthenticationException) {
                    // For some reason, logout failed.
                    Log.e(TAG, "Error occurred in logout(): $error")
                }

                override fun onSuccess(result: Void?) {
                    // The user successfully logged out.
                    user = User()
                    userIsAuthenticated = false
                    credentials = null // 👈🏽 New code
                }

            })
    }
Add the metadata methods
login() and logout() have been updated, so the next step in the exercise is to add the methods that retrieve the user’s metadata.
Retrieve the user’s user and app metadata
🛠️ The first method you’ll add is getMetadata(), which retrieves the user’s app metadata and user metadata. Add the code below to the end of the MainViewModel class, just after the logout() method:
// 📄 MainViewModel

    fun getMetadata() {
        var accessToken = ""
        credentials?.let {
            accessToken = it.accessToken
        } ?: run {
            return
        }

        val usersClient = UsersAPIClient(account, accessToken)
        usersClient
            .getProfile(user.id)
            .start(object : Callback<UserProfile, ManagementException> {

                override fun onFailure(error: ManagementException) {
                    Log.e(TAG, "Error occurred in getMetadata(): $error")
                }

                override fun onSuccess(result: UserProfile) {
                    // Get user metadata
                    userMetadata = result.getUserMetadata()
                    appMetadata = result.getAppMetadata()
                    setProgressiveProfilingStatus()
                    setProgressiveProfilingQuestion()
                }

            })

    }
You may have noticed this code at the start of getMetadata():
credentials?.let {
    accessToken = it.accessToken
} ?: run {
    return
}
This is a Kotlin idiom for doing something if a given value isn’t null and doing something else otherwise. This code checks MainViewModel’s credentials property contains a value (that is, it is not null). The goal is to get the access token if the ViewModel has the user’s credentials and exit the method if it doesn’t.
The language features that make this work are:
?.: This is the “safe call” operator. If{object}isnull, then{object}?.{method()}or{object}?.{property}returnsnullwithout executing the method or accessing the property. In this case, ifcredentialsisnull,credentials?.let()results innull.let(): Takes the object it’s invoked upon as its parameter and returns the result of the lambda expression. In the code above,let()takescredentialsand assigns the value in itsaccessTokenproperty to the local variableaccessToken.?:: The “Elvis operator,” which takes its name from the fact that when viewed on its side, it looks a pair of eyes beneath Elvis Presley’s hairstyle. It returns the left-side value if it’s notnull; otherwise, it returns the right-side one.run(): This creates a block of code that can be treated as a value, allowing us to use it as an operand for the Elvis operator.
There’s a lot more to
let()andrun(), which are two of Kotlin’s scope functions, which are covered in more detail in the documentation.
If the method was able to get the user’s access token from credentials, it proceeds to the next step, where it creates a UsersAPIClient instance to retrieve the user’s UserProfile:
val usersClient = UsersAPIClient(account, accessToken)
usersClient
    .getProfile(user.id)
    .start(object : Callback<UserProfile, ManagementException> {

// ...The rest of the function goes here...
If it successfully retrieves the UserProfile, it then uses that profile to retrieve the user’s app and user metadata, storing each in its designated property. The method then uses the metadata to determine if it should do some progressive profiling and, if so, what question it should present to the user:
override fun onSuccess(result: UserProfile) {
    // Get user metadata
    userMetadata = result.getUserMetadata()
    appMetadata = result.getAppMetadata()
    setProgressiveProfilingStatus()
    setProgressiveProfilingQuestion()
}
You’ll implement the setProgressiveProfilingStatus() and setProgressiveProfilingQuestion() methods shortly.
Extract the progressive profiling info from the app metadata
🛠️ The next method to implement is getProgressiveProfilingMapObjectOrNull(). Add it to MainViewModel immediately after getMetadata():
// 📄 MainViewModel

    fun getProgressiveProfilingMapObjectOrNull(): Map<String, Any>? {
        return appMetadata.getOrDefault(
            key = "progressive_profiling",
            defaultValue = null
        ) as Map<String, Any>?
    }
This utility function returns the progressive_profiling map object from the user’s app metadata if it exists or null if it doesn’t.
The next two methods use getProgressiveProfilingMapObjectOrNull().
Determine if the app should perform progressive profiling
🛠️ Add the method below to MainViewModel immediately after getProgressiveProfilingMapObjectOrNull():
// 📄 MainViewModel

    fun setProgressiveProfilingStatus() {
        val progressiveProfilingMap = getProgressiveProfilingMapObjectOrNull()
        progressiveProfilingMap?.let {
            progressiveProfilingQuestionField = progressiveProfilingMap.getOrDefault(
                key = "answer_field",
                defaultValue = ""
            ) as String
            val answer = userMetadata.getOrDefault(
                key = progressiveProfilingQuestionField,
                defaultValue = ""
            )
            showProgressiveProfilingButton = (answer == "")
        } ?: run {
            showProgressiveProfilingButton = false
        }
    }
setProgressiveProfilingStatus() is the method that sets the value of MainView’s showProgressiveProfilingButton property, which is a boolean. The if statement that contains ProfilingButton on MainScreen uses the showProgressiveProfilingButton as its conditional to determine if ProfilingButton should be displayed.
The method first checks the contents of the user’s app metadata for a progressive_profiling map object. Here’s an example of what this object should look like:
"progressive_profiling": {
  "question": "What's your preferred programming language?",
  "answer_field": "preferred_programming_language"
}
If it finds a progressive_profiling map object, it checks the value of its answer_field property. If this value exists and isn’t an empty string, it checks the user’s user metadata for a key that matches the value. For example, this user metadata contains a key that matches the progressive_profiling object shown above:
{
   "some_value": 3.50,
   "preferred_programming_language": "Kotlin",
   "some_other_value": "pizza"
}
If the method finds a progressive_profiling object like the one above in the user’s app metadata and the user metadata is like the example above, it will set the showProgressiveProfilingButton property to false because the question has already been answered; the answer is Kotlin.
On the other hand, if the user’s user metadata looks like this...
{
   "some_value": 3.50,
   "some_other_value": "pizza"
}
...the method will set the showProgressiveProfilingButton property to true because preferred_programming_language doesn’t appear as a key in the user’s user metadata. This implies that the user hasn’t answered the question about their favorite programming language.
Display the question
🛠️ Implement the setProgressiveProfilingQuestion() method. Add it to MainViewModel immediately after setProgressiveProfilingStatus():
// 📄 MainViewModel

    fun setProgressiveProfilingQuestion() {
        val progressiveProfilingMap = getProgressiveProfilingMapObjectOrNull()
        progressiveProfilingMap?.let {
            progressiveProfilingQuestion = progressiveProfilingMap.getOrDefault(
                key = "question",
                defaultValue = ""
            ) as String
        } ?: run {
            progressiveProfilingQuestion = ""
        }
    }
This method sets the content of the Text composable in QuestionAnswerScreen. It does this by retrieving the question property of the progressive_profiling object in the user’s app metadata.
Save the user’s answer
🛠️ There’s one last method to implement: saveProgressiveProfilingAnswer(). Add the code below to MainViewModel immediately after setProgressiveProfilingQuestion():
// 📄 MainViewModel

    fun saveProgressiveProfilingAnswer() {
        var accessToken = ""
        credentials?.let {
            accessToken = it.accessToken
        } ?: run {
            return
        }

        val usersClient = UsersAPIClient(account, accessToken)
        usersClient
            .updateMetadata(
                user.id,
                mapOf(progressiveProfilingQuestionField to progressiveProfilingAnswer))
            .start(object : Callback<UserProfile, ManagementException> {

                override fun onFailure(error: ManagementException) {
                    Log.e(TAG, "Error occurred in saveProgressiveProfilingAnswer(): $error")
                }

                override fun onSuccess(result: UserProfile) {
                    getMetadata()
                }

            })
    }
This method writes a key-value pair to the user’s app metadata, where the key is value of the answer_field property of the progressive_profiling object, and the value is the contents of MainViewModel’s progressiveProfilingAnswer field, which reflects the contents of the TextField in QuestionAnswerScreen.
Try Out Your New Progressive Profiling Screen
Before you can test the app, you’ll need to make a couple of changes to the user you’ll use to log in.
🛠️ Open the Auth0 dashboard, select User Management → Users from the menu on the left side of the page, and select a user.
🛠️ Scroll down to the Metadata section of the page and make sure that the user_metadata field is empty:
{}
🛠️ Set the contents of the app_metadata field to the following:
{
  "progressive_profiling": {
    "question": "What’s your preferred programming language?",
    "answer_field": "preferred_programming_language"
  }
}
🛠️ Save the updates (there’s a Save button just below the app_metadata field) and run the app. Log in; you should see the We need some info button on the “logged in” screen:
🛠️ Press the We need some info button and answer the question. You don’t have to enter “Kotlin,” but this is a Kotlin exercise, so why enter anything else?
🛠️ Save your answer. You should return to the “logged in” page, and it should no longer show the We need some info button:
🛠️ Go back to the user page in the Auth0 dashboard and look at the user_metadata field. It should now contain this:
{
  "preferred_programming_language": "Kotlin"
}
Congratulations! You’ve added progressive profiling to an app that uses Auth0 authentication.
How Do I Set the Progressive Profiling Question in Users’ App Metadata?
By now, you might be wondering how you’ll set up progressive profiling questions. You could manually enter the question in each user’s app metadata using the Auth0 dashboard. This will work if you have no more than a handful of users, but this is impractical for real-world purposes.
Fortunately, there is a way to programmatically edit the app metadata of a tenant’s users: the Management API. This API isn’t available in the Auth0.Android SDK, but it is available to back-end servers or trusted parties performing administrative tasks, as well as Auth0 Actions - which are Node.js functions that execute when triggered by specific events (such as a login) during Auth0 workflows.
Conclusion
I’ll keep this brief, as you’ve covered a lot of ground in this exercise. Not only have you learned about app metadata, user metadata, and how to harness them, but you’ve also been exposed to Jetpack Compose navigation, sharing a ViewModel between composables, and some idiomatic Kotlin. I hope you find this material helpful in your future Android projects!
About the author

Joey deVilla
Senior Developer Advocate (Auth0 Alumni)