
TL;DR: You can check out a React Flux app with authentication implemented in this Github repository
Let’s face it. React is the new cool kid on the block. Everybody is working on creating React components because it entails understanding just 2 basic concepts:
- A component is just a function
- Single-direction data flow
However, once you start creating a bigger app, you realize that just using React isn’t enough. So you start looking at Flux, which is the architecture Facebook uses to create React apps.
As we learned in a previous blog post, learning how to conduct authentication in a Single Page App can get super complex. We had to learn about tokens, JWTs and how to integrate them with SPAs. Learning how to do it with Flux is even harder! That’s why in this blogpost we’ll learn how to add authentication to a React Flux app.
“Learning how to conduct authentication in a Single Page App can get super complex”
Tweet This

Before we start
We’ll be coding our React app using ES6 thanks to Browserify and Babelify, and we’ll be using npm for build tools and installing dependencies. If you want to start a project with the same architecture, just clone this seed project.
Coding ReactJS Authentication!
Login page
The Login component
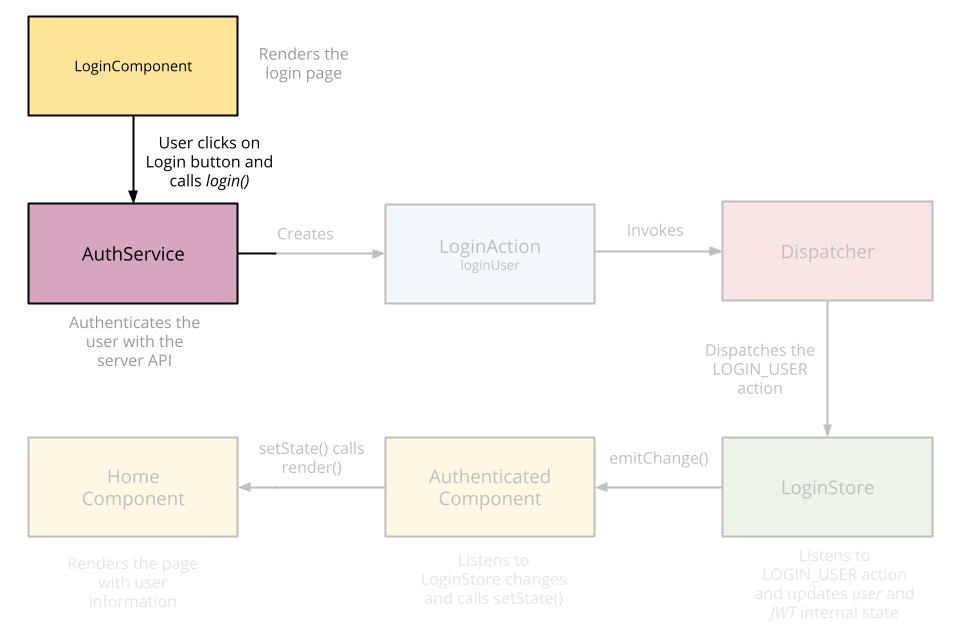
First, let’s create our Login component. Its main function is rendering an input for the username and password and calling the AuthService when the user clicks on the login button.
// ... imports
export default class Login extends React.Component {

  constructor() {
    this.state = {
      user: ‘’,
      password: ‘’
    };
  }

  // This will be called when the user clicks on the login button
  login(e) {
    e.preventDefault();
    // Here, we call an external AuthService. We’ll create it in the next step
    Auth.login(this.state.user, this.state.password)
      .catch(function(err) {
        console.log(“Error logging in”, err);
      });
  }

  render() {
    return (
        <form role=“form”>
        <div className=“form-group”>
          <input type=“text” valueLink={this.linkState(‘user’)}placeholder=“Username” />
          <input type=“password” valueLink={this.linkState(‘password’)} placeholder=“Password” />
        </div>
        <button type=“submit” onClick={this.login.bind(this)}>Submit</button>
      </form>
    </div>
    );
  }
}

// We’re using the mixin `LinkStateMixin` to have two-way databinding between our component and the HTML.
reactMixin(Login.prototype, React.addons.LinkedStateMixin);
The AuthService & the LoginAction

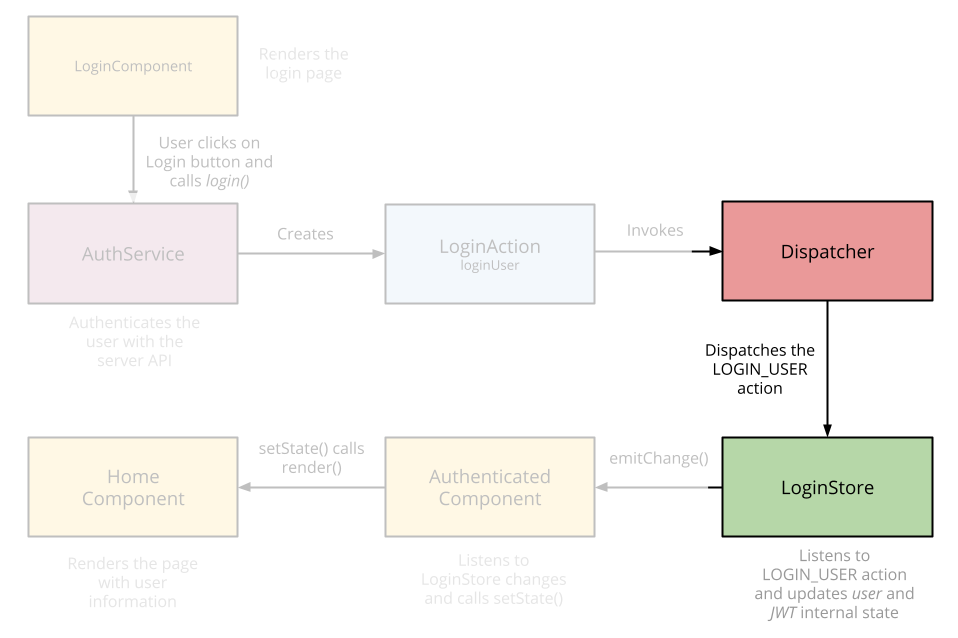
Our AuthService is in charge of calling our login API. The server will validate the username and password and return a token (JWT) back to our app. Once we get it, we’ll create a LoginAction and send it to all the Stores using the Dispatcher from Flux.
// AuthService.js
// ... imports
class AuthService {

  login(username, password) {
    // We call the server to log the user in.
    return when(request({
      url: ‘http://localhost:3001/sessions/create',
      method: ‘POST’,
      crossOrigin: true,
      type: ‘json’,
      data: {
        username, password
      }
    }))
    .then(function(response) {
        // We get a JWT back.
        let jwt = response.id_token;
        // We trigger the LoginAction with that JWT.
        LoginActions.loginUser(jwt);
        return true;
    });
  }
}

export default new AuthService()
// LoginAction.js
// ... imports
export default {
  loginUser: (jwt) => {
    // Go to the Home page once the user is logged in
    RouterContainer.get().transitionTo(‘/‘);
    // We save the JWT in localStorage to keep the user authenticated. We’ll learn more about this later.
    localStorage.setItem(‘jwt’, jwt);
    // Send the action to all stores through the Dispatcher
    AppDispatcher.dispatch({
      actionType: LOGIN_USER,
      jwt: jwt
    });
  }
}
You can take a look at the router configuration on Github, but it’s important to note that once the LoginAction is triggered, the user is successfully authenticated. Therefore, we need to redirect him or her from the Login page to the Home. That’s why we’re adding the URL transition in here.
The LoginStore
The LoginStore, like any other store, has 2 functions:
- It holds the data it gets from the actions. In our case, that data will be used by all components that need to display the user information.
- It inherits from
EventEmmiter. It’ll emit a change event every time its data changes so that Components can be rendered again.
// ... imports
class LoginStore extends BaseStore {

  constructor() {
    // First we register to the Dispatcher to listen for actions.
    this.dispatchToken = AppDispatcher.register(this._registerToActions.bind(this));
    this._user = null;
    this._jwt = null;
  }

  _registerToActions(action) {
    switch(action.actionType) {
      case USER_LOGGED_IN:
        // We get the JWT from the action and save it locally.
        this._jwt = action.jwt;
        // Then we decode it to get the user information.
        this._user = jwt_decode(this._jwt);
        // And we emit a change to all components that are listening.
        // This method is implemented in the `BaseStore`.
        this.emitChange();
        break;
      default:
        break;
    };
  }

  // Just getters for the properties it got from the action.
  get user() {
    return this._user;
  }

  get jwt() {
    return this._jwt;
  }

  isLoggedIn() {
    return !!this._user;
  }
}
export default new LoginStore();
You can take a look at the
BaseStorein Github. It includes some utility methods that all stores will have.
Displaying the user information
Creating an Authenticated component
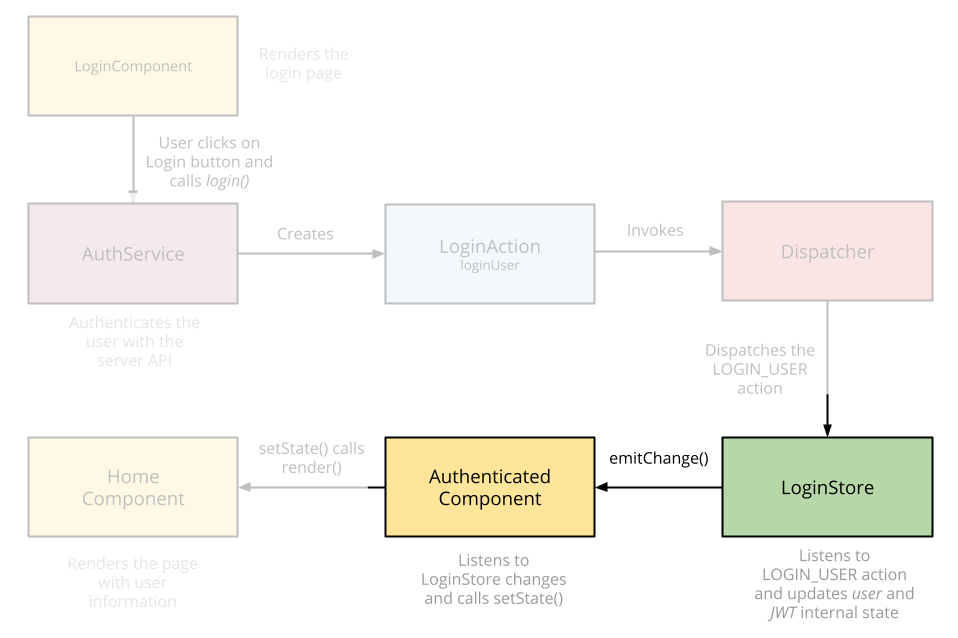
Now, we can start creating components that require authentication. For that, we’ll create a wrapper (or decorator) component called AuthenticatedComponent. It’ll make sure the user is authenticated before displaying its content. If the user isn’t authenticated, it’ll redirect him or her to the Login page. Otherwise, it’ll send the user information to the component it’s wrapping:
// ... imports
export default (ComposedComponent) => {
  return class AuthenticatedComponent extends React.Component {

    static willTransitionTo(transition) {
      // This method is called before transitioning to this component. If the user is not logged in, we’ll send him or her to the Login page.
      if (!LoginStore.isLoggedIn()) {
        transition.redirect(‘/login’);
      }
    }

    constructor() {
      this.state = this._getLoginState();
    }

    _getLoginState() {
      return {
        userLoggedIn: LoginStore.isLoggedIn(),
        user: LoginStore.user,
        jwt: LoginStore.jwt
      };
    }

    // Here, we’re subscribing to changes in the LoginStore we created before. Remember that the LoginStore is an EventEmmiter.
    componentDidMount() {
      LoginStore.addChangeListener(this._onChange.bind(this));
    }

    // After any change, we update the component’s state so that it’s rendered again.
    _onChange() {
      this.setState(this._getLoginState());
    }

    componentWillUnmount() {
        LoginStore.removeChangeListener(this._onChange.bind(this));
    }

    render() {
      return (
      <ComposedComponent
        {...this.props}
        user={this.state.user}
        jwt={this.state.jwt}
        userLoggedIn={this.state.userLoggedIn} />
      );
    }
  }
};
An interesting pattern is used here.
First, take a look at what we’re exporting. We’re exporting a function that receives a Component as a parameter and then returns a new Component that wraps the one that was sent as an argument.
Next, take a look at the render method. There, we’re rendering the Component we received as a parameter. Besides the props it should receive, we’re also sending it all the user information so it can use those properties.
Now, let’s create the Home component which will be wrapped by the AuthenticatedComponent we’ve just created.
Home Page
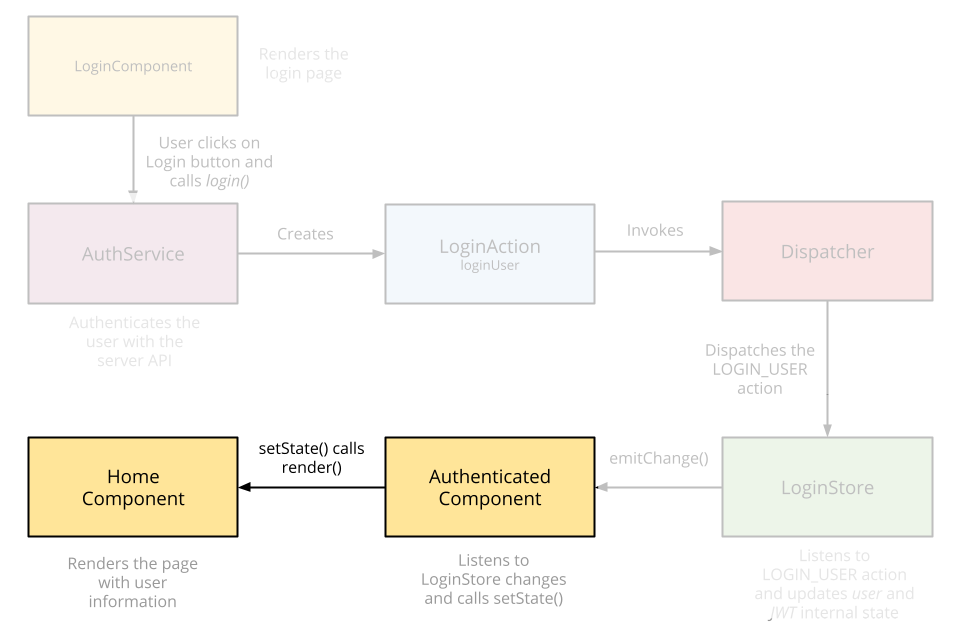
The Home will display user information. As it’s wrapped by the AuthenticatedComponent, we can be sure of 2 things:
- Once the
rendermethod is called on theHomecomponent, we know the user is authenticated. Otherwise, the app would have redirected him to theLoginpage. - We know we’ll have the user information under
propsbecause we’ve received them from theAuthenticatedComponent
// ... imports
// We’re wrapping the home with the AuthenticatedComponent
export default AuthenticatedComponent(class Home extends React.Component {
  render() {
     // Here, we display the user information
    return (<h1>Hello {this.props.user.username}</h1>);
  }
});
Let’s call an API!
Now, you should be able to call an API. In order to call an API that requires authentication, you must send the JWT we received on Login in the Authorization header. Any AuthenticatedComponent has access to this JWT so you can do something as follows:
// Home.jsx
// It must be on an AuthenticatedComponent
callApi() {
  fetch(‘http://example.com/my-cool-url', {
    method: ‘GET’,
    headers: {
      Authorization: ‘Bearer ‘ + this.props.jwt
    }
  }
Keeping the user authenticated
Now that the user is authenticated, we want to keep him or her authenticated instead of showing the login page every time he refreshes the website.
Due to the fact we’re saving the JWT on localStorage after a successful authentication, we can manually trigger the LoginAction and everything will work. That’s the beauty of using Flux.
// app.jsx ==> Bootstrap file
let jwt = localStorage.getItem(‘jwt’);
if (jwt) {
  LoginActions.loginUser(jwt);
}
Aside: Securing React Apps with Auth0
As you will learn in this section, you can easily secure your React applications with Auth0, a global leader in Identity-as-a-Service (IDaaS) that provides thousands of enterprise customers with modern identity solutions. Alongside with the classic username and password authentication process, Auth0 allows you to add features like Social Login, Multifactor Authentication, Passwordless Login, and much more with just a few clicks.
To follow along the instruction describe here, you will need an Auth0 account. If you don't have one yet, now is a good time to sign up for a free Auth0 account.
Also, if you want to follow this section in a clean environment, you can easily create a new React application with just one command:
npx create-react-app react-auth0
Then, you can move into your new React app (which was created inside a new directory called react-auth0 by the create-react-app tool), and start working as explained in the following subsections.
Setting Up an Auth0 Application
To represent your React application in your Auth0 account, you will need to create an Auth0 Application. So, head to the Applications section on your Auth0 dashboard and proceed as follows:
- click on the Create Application button;
- then define a Name to your new application (e.g., "React Demo");
- then select Single Page Web Applications as its type.
- and hit the Create button to end the process.
After creating your application, Auth0 will redirect you to its Quick Start tab. From there, you will have to click on the Settings tab to whitelist some URLs that Auth0 can call after the authentication process. This is a security measure implemented by Auth0 to avoid the leaking of sensitive data (like ID Tokens).
So, when you arrive at the Settings tab, search for the Allowed Callback URLs field and add http://localhost:3000/callback into it. For this tutorial, this single URL will suffice.
That's it! From the Auth0 perspective, you are good to go and can start securing your React application.
Dependencies and Setup
To secure your React application with Auth0, there are only three dependencies that you will need to install:
auth0.js: This is the default library to integrate web applications with Auth0.react-router: This is the de-facto library when it comes to routing management in React.react-router-dom: This is the extension to the previous library to web applications.
To install these dependencies, move into your project root and issue the following command:
npm install --save auth0-js react-router react-router-dom
Note: As you want the best security available, you are going to rely on the Auth0 login page. This method consists of redirecting users to a login page hosted by Auth0 that is easily customizable right from your Auth0 dashboard. If you want to learn why this is the best approach, check the Universal vs. Embedded Login article.
After installing all three libraries, you can create a service to handle the authentication process. You can call this service Auth and create it in the src/Auth/ directory with the following code:
// src/Auth/Auth.js
import auth0 from 'auth0-js';

export default class Auth {
  constructor() {
    this.auth0 = new auth0.WebAuth({
      // the following three lines MUST be updated
      domain: '<AUTH0_DOMAIN>',
      audience: 'https://<AUTH0_DOMAIN>/userinfo',
      clientID: '<AUTH0_CLIENT_ID>',
      redirectUri: 'http://localhost:3000/callback',
      responseType: 'token id_token',
      scope: 'openid profile',
    });

    this.getProfile = this.getProfile.bind(this);
    this.handleAuthentication = this.handleAuthentication.bind(this);
    this.isAuthenticated = this.isAuthenticated.bind(this);
    this.login = this.login.bind(this);
    this.logout = this.logout.bind(this);
    this.setSession = this.setSession.bind(this);
  }

  getProfile() {
    return this.profile;
  }

  handleAuthentication() {
    return new Promise((resolve, reject) => {
      this.auth0.parseHash((err, authResult) => {
        if (err) return reject(err);
        console.log(authResult);
        if (!authResult || !authResult.idToken) {
          return reject(err);
        }
        this.setSession(authResult);
        resolve();
      });
    });
  }

  isAuthenticated() {
    return new Date().getTime() < this.expiresAt;
  }

  login() {
    this.auth0.authorize();
  }

  logout() {
    // clear id token and expiration
    this.idToken = null;
    this.expiresAt = null;
  }

  setSession(authResult) {
    this.idToken = authResult.idToken;
    this.profile = authResult.idTokenPayload;
    // set the time that the id token will expire at
    this.expiresAt = authResult.expiresIn * 1000 + new Date().getTime();
  }
}
The Auth service that you just created contains functions to deal with different steps of the sign in/sign up process. The following list briefly summarizes these functions and what they do:
getProfile: This function returns the profile of the logged-in user.handleAuthentication: This function looks for the result of the authentication process in the URL hash. Then, the function processes the result with theparseHashmethod fromauth0-js.isAuthenticated: This function checks whether the expiry time for the user's ID token has passed.login: This function initiates the login process, redirecting users to the login page.logout: This function removes the user's tokens and expiry time.setSession: This function sets the user's ID token, profile, and expiry time.
Besides these functions, the class contains a field called auth0 that is initialized with values extracted from your Auth0 application. It is important to keep in mind that you have to replace the <AUTH0_DOMAIN> and <AUTH0_CLIENT_ID> placeholders that you are passing to the auth0 field.
Note: For the
<AUTH0_DOMAIN>placeholders, you will have to replace them with something similar toyour-subdomain.auth0.com, whereyour-subdomainis the subdomain you chose while creating your Auth0 account (or your Auth0 tenant). For the<AUTH0_CLIENT_ID>, you will have to replace it with the random string copied from the Client ID field of the Auth0 Application you created previously.
Since you are using the Auth0 login page, your users are taken away from the application. However, after they authenticate, users automatically return to the callback URL that you set up previously (i.e., http://localhost:3000/callback). This means that you need to create a component responsible for this route.
So, create a new file called Callback.js inside src/Callback (i.e., you will need to create the Callback directory) and insert the following code into it:
// src/Callback/Callback.js
import React from 'react';
import { withRouter } from 'react-router';

function Callback(props) {
  props.auth.handleAuthentication().then(() => {
    props.history.push('/');
  });

  return <div>Loading user profile.</div>;
}

export default withRouter(Callback);
This component, as you can see, is responsible for triggering the handleAuthentication process and, when the process ends, for pushing users to your home page. While this component processes the authentication result, it simply shows a message saying that it is loading the user profile.
After creating the Auth service and the Callback component, you can refactor your App component to integrate everything together:
// src/App.js

import React from 'react';
import { withRouter } from 'react-router';
import { Route } from 'react-router-dom';
import Callback from './Callback/Callback';
import './App.css';

function HomePage(props) {
  const { authenticated } = props;

  const logout = () => {
    props.auth.logout();
    props.history.push('/');
  };

  if (authenticated) {
    const { name } = props.auth.getProfile();
    return (
      <div>
        <h1>Howdy! Glad to see you back, {name}.</h1>
        <button onClick={logout}>Log out</button>
      </div>
    );
  }

  return (
    <div>
      <h1>I don't know you. Please, log in.</h1>
      <button onClick={props.auth.login}>Log in</button>
    </div>
  );
}

function App(props) {
  const authenticated = props.auth.isAuthenticated();

  return (
    <div className="App">
      <Route
        exact
        path="/callback"
        render={() => <Callback auth={props.auth} />}
      />
      <Route
        exact
        path="/"
        render={() => (
          <HomePage
            authenticated={authenticated}
            auth={props.auth}
            history={props.history}
          />
        )}
      />
    </div>
  );
}

export default withRouter(App);
In this case, you are actually defining two components inside the same file (just for the sake of simplicity). You are defining a HomePage component that shows a message with the name of the logged-in user (that is, when the user is logged in, of course), and a message telling unauthenticated users to log in.
Also, this file is making the App component responsible for deciding what component it must render. If the user is requesting the home page (i.e., the / route), the HomePage component is shown. If the user is requesting the callback page (i.e., /callback), then the Callback component is shown.
Note that you are using the Auth service in all your components (App, HomePage, and Callback) and also inside the Auth service. As such, you need to have a global instance for this service, and you have to include it in your App component.
So, to create this global Auth instance and to wrap things up, you will need to update your index.js file as shown here:
// src/index.js

import React from 'react';
import ReactDOM from 'react-dom';
import { BrowserRouter } from 'react-router-dom';
import Auth from './Auth/Auth';
import './index.css';
import App from './App';
import registerServiceWorker from './registerServiceWorker';

const auth = new Auth();

ReactDOM.render(
  <BrowserRouter>
    <App auth={auth} />
  </BrowserRouter>,
  document.getElementById('root'),
);
registerServiceWorker();
After that, you are done! You just finished securing your React application with Auth0. If you take your app for a spin now (npm start), you will be able to authenticate yourself with the help of Auth0, and you will be able to see your React app show your name (that is, if your identity provider does provide a name).
If you are interested in learning more, please, refer to the official React Quick Start guide to see, step by step, how to properly secure a React application. Besides the steps shown in this section, the guide also shows:
Closing remarks
We’ve finished implementing the Login for a React Flux app. If you want to know how to implement a signup or if you want to see the full example at work, you can grab the code from Github.
Happy Hacking! :).
About the author

Martin Gontovnikas
Former SVP of Marketing and Growth at Auth0 (Auth0 Alumni)
Gonto’s analytical thinking is a huge driver of his data-driven approach to marketing strategy and experimental design. He is based in the Bay area, and in his spare time, can be found eating gourmet food at the best new restaurants, visiting every local brewery he can find, or traveling the globe in search of new experiences.View profile