
This is the third and final article in a series that guides you through the process of creating a “wishlist” mobile application using the Flutter SDK. The wishlist contains items that the user would like to someday own, storing each item’s name, description, and URL. The mobile app provides the user interface and communicates with a back-end application, which stores the list and provides an API to perform CRUD operations on it. The initial version of the app simply provides a functioning wishlist, while the final version incorporates Auth0 authentication to allow only authorized users to use the app as well as to use a secure API.
Note: This article builds on material and code from the two previous articles in this series, Build a Flutter Wishlist App, Part 1: Introducing Flutter and Building a Basic Wishlist App and Build a Flutter Wishlist App, Part 2: Adding CRUD Functionality to Your App.
The Current State of the App
At this point, you have a fully functional wishlist app. It stores and displays the items on your wishlist. It also allows you to add items to the list, edit items in the list, and delete items from the list.

The problem is that the app isn’t secure. It doesn’t require the user to log in, and its API is openly accessible. It’s all too easy for an unauthorized party to see, alter, or erase the contents of the wishlist.
In this article, you will address these security issues in a couple of ways:
- You’ll change the app so that it makes use of a secure API that requires authentication. It will have the exact same endpoints that the original API has, but it won’t allow unauthorized access to its functionality.
- You’ll also change the way that it grants access to the user. Right now, anyone can use the app without logging in. You’ll update the app so that users will be required to log in in order to use the app.
To work on this article, you’ll need to have entered the code from the first two articles in this series.
You’ll also need an Auth0 account, since you’ll use it to add authentication to the app. If you don't have one yet, sign up for a free Auth0 account.
Setting Up the New, Secure API
In the first article in this series, you created a server for an unsecured wishlist API. You did this by using the Glitch service, which allows you to create a copy of an existing server project and host that instance on their service. You’ll do this again, but this time, you’ll create an instance of a server project for an API secured with Auth0.
Create a new server with a secure API
Open this Glitch project in a new browser window or tab. Note that this project’s URL is different than the one you opened in Part 1. You’ll see this page:
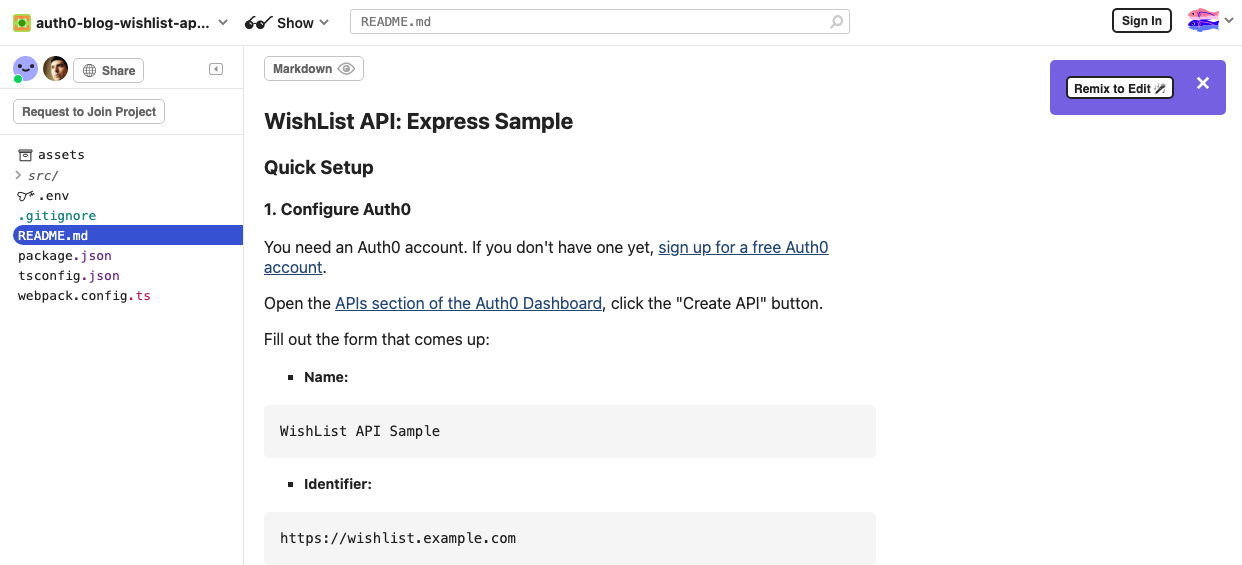
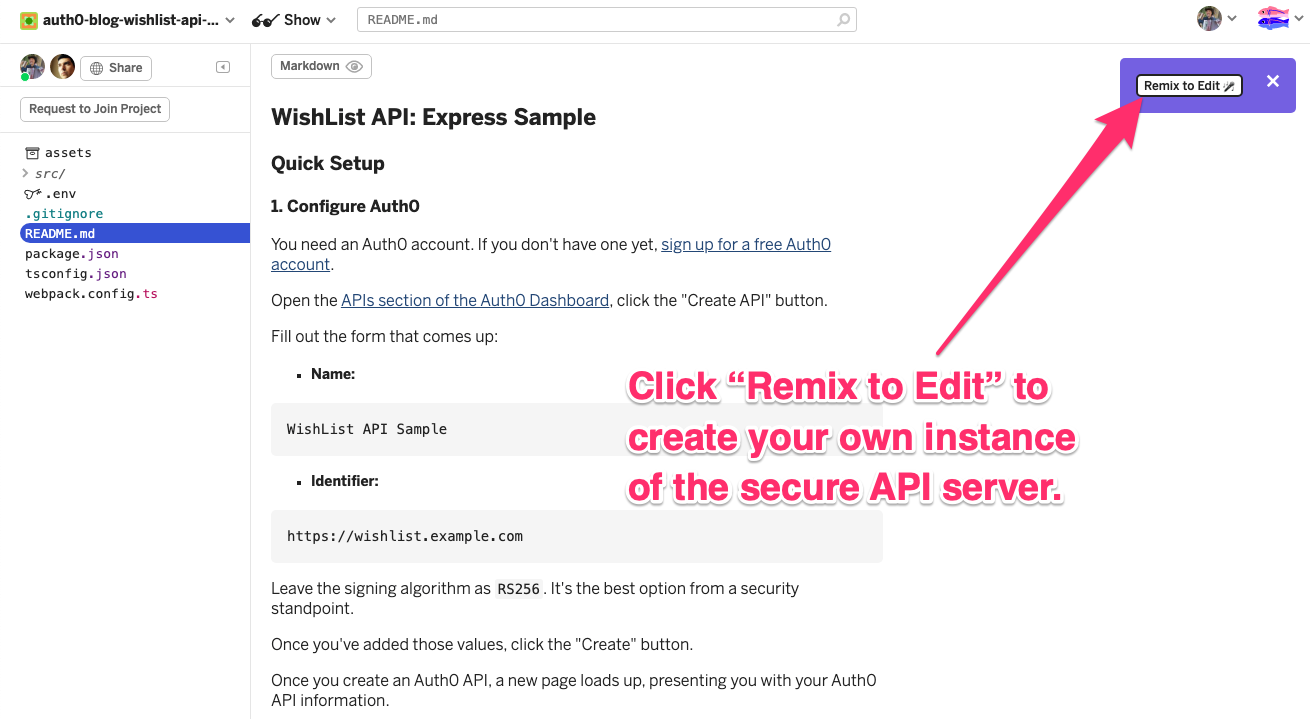
Just as you did with the original project, you’ll want to create your own instance of this API server. Do this by clicking on the Remix to Edit button in the top-right corner:
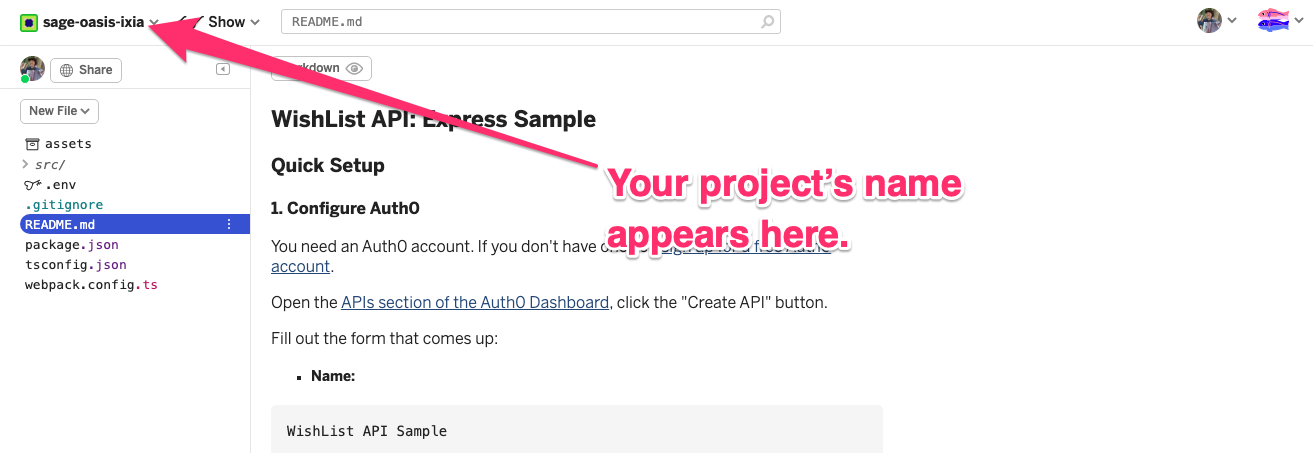
This will create your own instance of the server project and take you to its README.md file. Once again, Glitch will assign the project with a name made of three random words separated by hyphens (e.g., nostalgic-overjoyed-heron), which will appear in the top left corner of the page:
Register the API with your Auth0 tenant
The API provided by the server you just created will require authentication, which in turn will require registering its API with your Auth0 tenant.
To register the API with your Auth0 tenant, you'll need an Auth0 account. You can sign up for a free one here.. Once you’ve created your Auth0 account, set up a new tenant.
Open the Auth0 Dashboard and go to the APIs page, which you can do by clicking on Applications in the left column menu and then clicking on the APIs item that appears in the sub-menu:
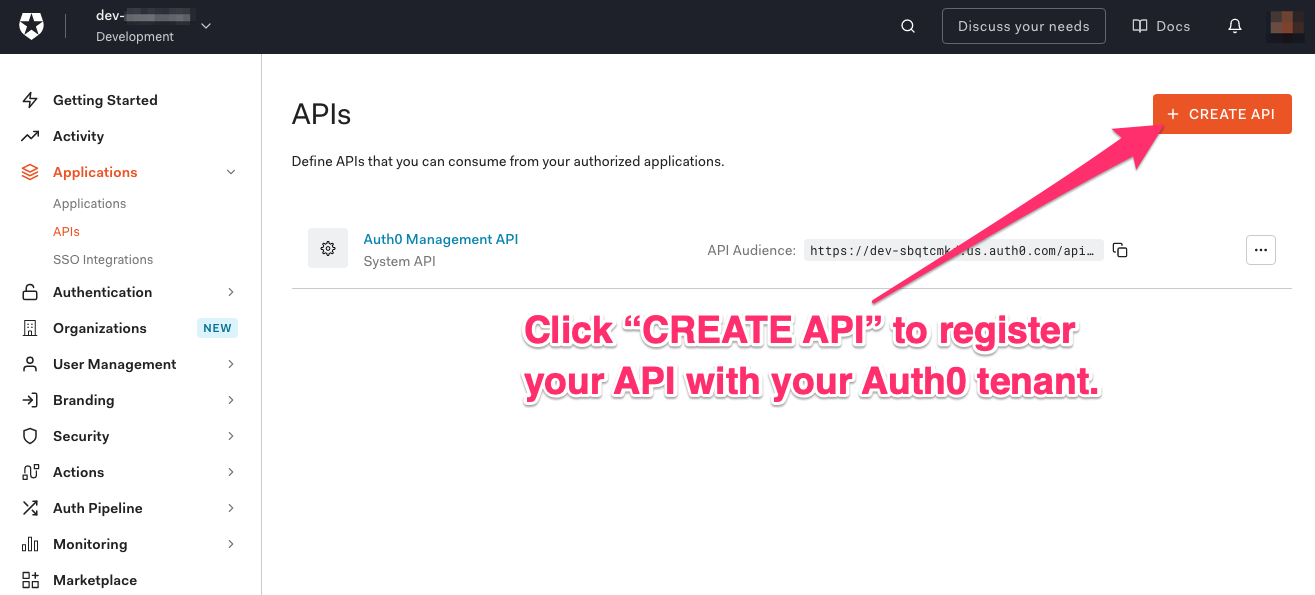
Once you’re on the APIs page, click the CREATE API button. You’ll be presented with a pop-up form. Fill out its fields with these values:
- Name:
Wishlist Secure API - Identifier:
https://wishlist.example.com
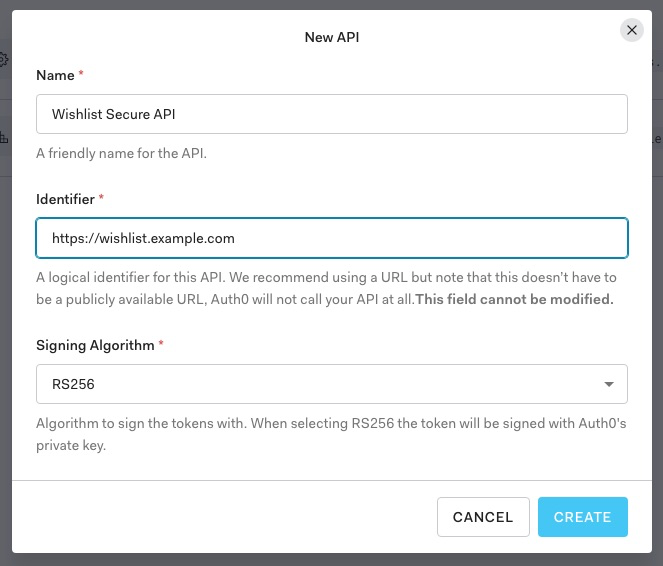
Leave the selection in the Signing Algorithm drop-down menu as RS256. It's the best option from a security standpoint. Once you've filled out the form, click the CREATE button.
A new page will load, presenting you with information about the newly-created API:

Keep the page open! You’ll need it in the next step.
Connect the server to Auth0
In your Glitch project, select the .env file in the list on the left side of the page. You’ll see the list of the project’s environment variables:
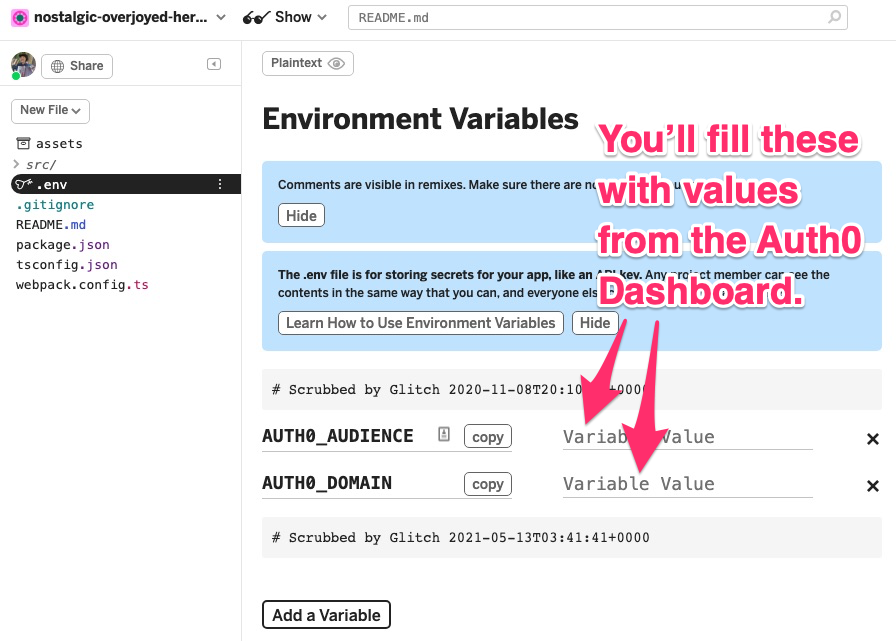
You'll need to add the values for the AUTH0_AUDIENCE and AUTH0_DOMAIN environment variables. You’ll get these from your Auth0 API configuration.
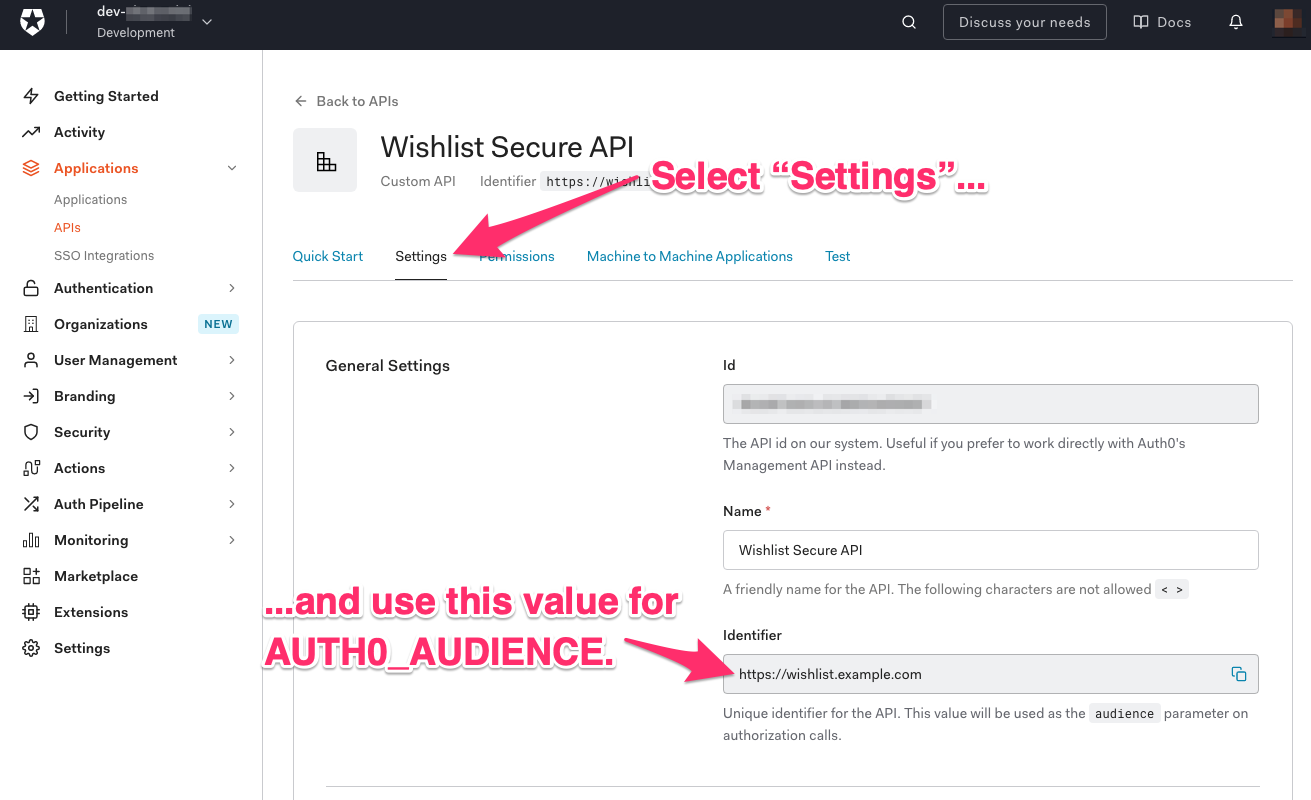
Head back to the browser window or tab with your Auth0 API page and follow these steps to get the value for AUTH0_AUDIENCE:
- Click on the Settings tab.
- Locate the Identifier field and copy its value.
- Go back to your Glitch project’s
.envfile. Paste the Identifier value that you copied in the previous step into the Variable Value field forAUTH0_AUDIENCE.
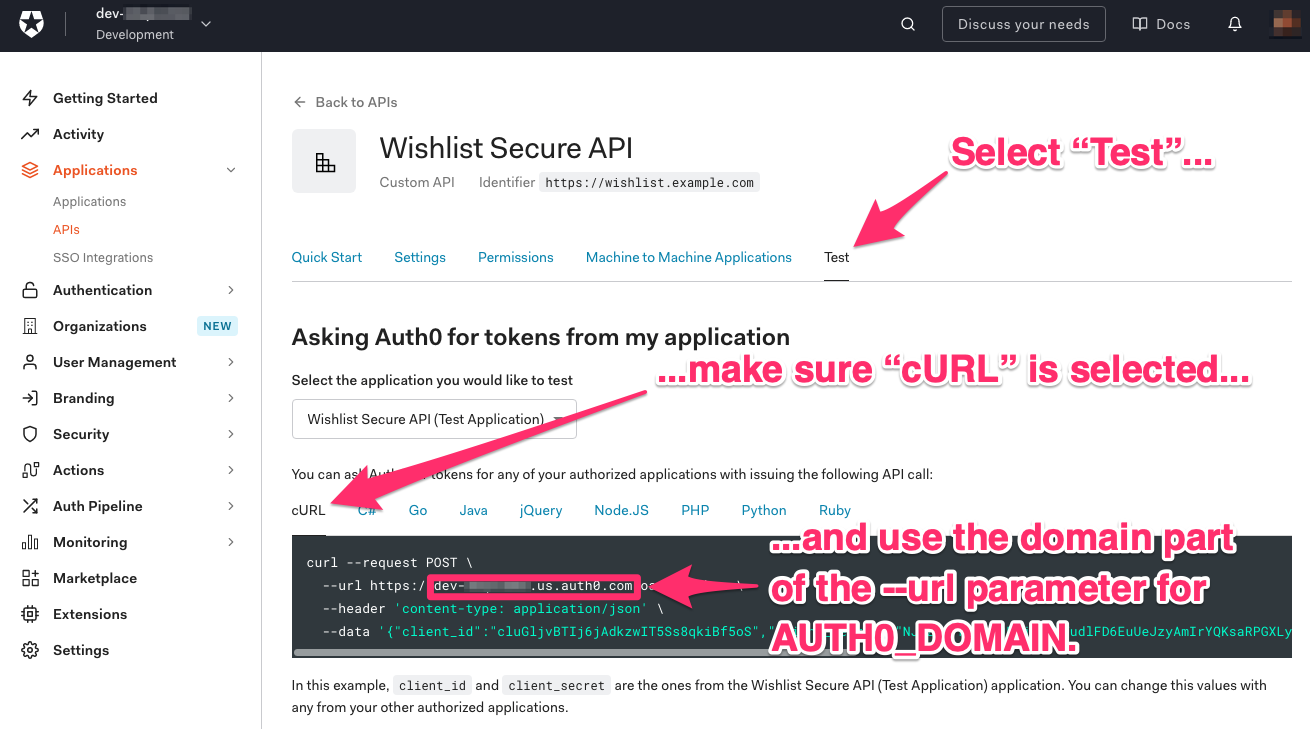
Return to the browser window or tab with your Auth0 API page and follow these steps to get the value for AUTH0_DOMAIN:
- Click on the Test tab.
- Locate the section called "Asking Auth0 for tokens from my application".
- Make sure that cURL tab is selected. Just below it, you should see a cURL command.
- Copy your Auth0 domain, which is the domain part of
--urlparameter value of the cURL command. Copy the--urlparameter value that immediately followshttps://and up to (but not including) rge/oauth/token \part. - Go back to your Glitch project’s
.envfile. Paste the Auth0 domain that you copied in the previous step into the Variable Value field forAUTH0_DOMAIN.
Refresh the Glitch project page. This will reload the project, which will now use the environment variable values that you just provided.
Test the secure API
You’ve created your own copy of the server and registered its API with your Auth0 tenant. Let’s test it.
To test the secure API, you’ll need a URL to call. That URL will be of the form shown below...
https://{GLITCH_PROJECT_NAME}.glitch.me/api/wishlist/items
...where {GLITCH_PROJECT_NAME} is the three-word name that Glitch assigned to your project when it was first created. Once again, you can find this name at the top left corner of any page in your Glitch project.
Try an HTTP GET call to the URL without doing any authentication first. Open a command-line interface (Terminal on macOS and Linux, Command Prompt on Windows) and enter the following command:
curl --request GET \
    --url https://{GLITCH_PROJECT_NAME}.glitch.me/api/wishlist/items
Since you didn’t authenticate first, you’ll see this response:
No authorization token was found
As disappointing as the response may be, this is exactly what you want to happen without authentication. You don’t want just anyone accessing the list.
Try the call again, but this time, with authentication. Follow these steps:
- Go to the browser tab or window with your Auth0 API and make sure that the Test tab is still selected.
- Scroll down to the section titled Sending the token to the API.
- Make sure that cURL tab is selected. Just below it, you should see a cURL command. It should have the following form...
curl --request GET \
  --url http://path_to_your_api/ \
  --header 'authorization: Bearer
{TOKEN_STRING}'
...where {TOKEN_STRING} is the authentication token for the API, a really long string that’s hundreds of characters in length.
Copy this command, paste it into your command-line interface and change the --url parameter value from this...
http://path_to_your_api/
...to this:
https://{GLITCH_PROJECT_NAME}.glitch.me/api/wishlist/items
(Make sure that you replace {GLITCH_PROJECT_NAME} with the name of your Glitch project.)
This time, when you issue the command, you should receive a JSON response detailing the wishlist, which should contain the three default wishlist items.
You have just set up the secure API and registered it with Auth0. The rest of this exercise will be about setting up the app so that:
- The user will be able to sign into the application in order to use it.
- The application will be able to access the server’s protected endpoints and allow the user to view and manage their wishlist.
Registering the Flutter App with Your Auth0 Tenant
Register the app
Just as you had to register the API with your Auth0 tenant, you need to register the app as well. Follow these steps:
- Go to the Applications section of the Auth0 Dashboard.
- Click on the CREATE APPLICATION button.
- Enter a name for your application, such as
Flutter Wishlist Application. - The Flutter app is a native app, so in the Choose an application type section, ensure that the selected application type is Native (it should be selected by default) and click on the CREATE button.
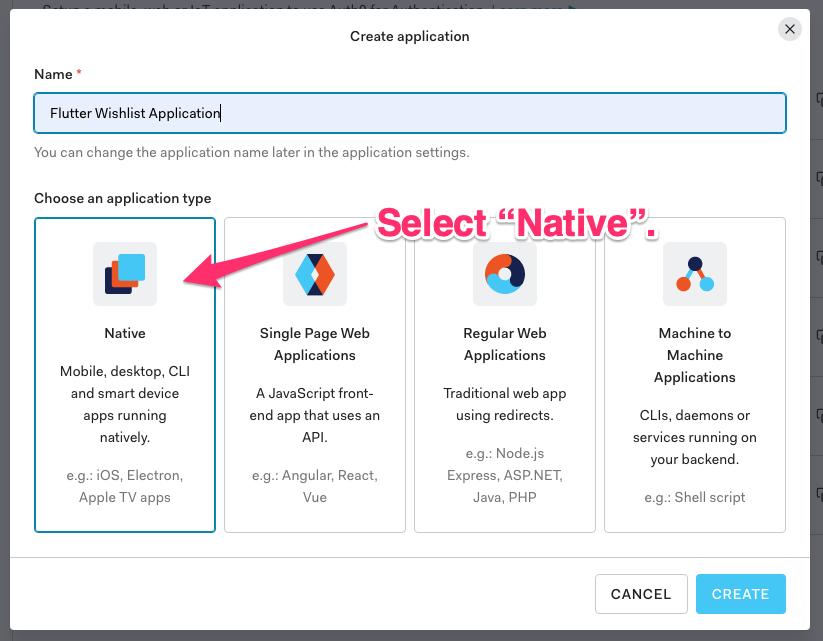
You’ll be taken to a screen where you can configure your application:
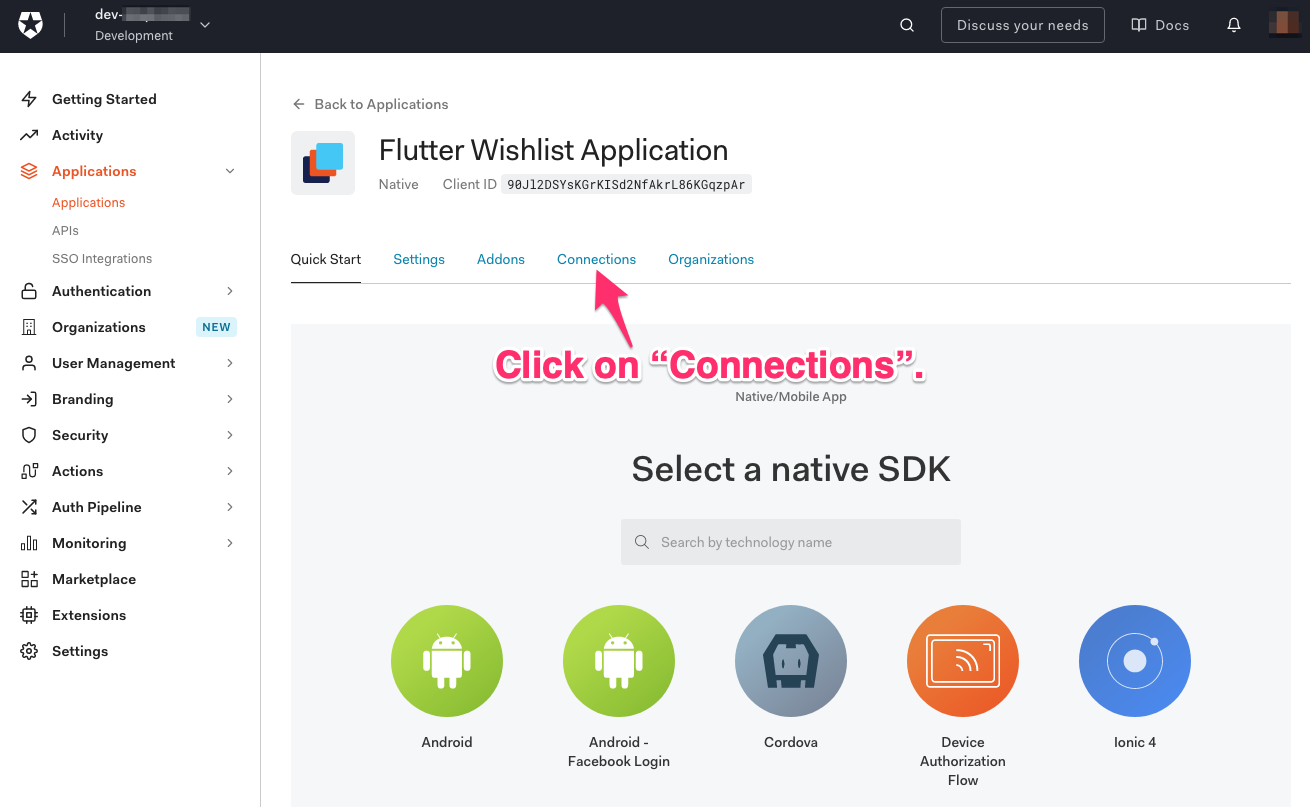
Click on the Connections tab and make sure that at least one connection type is enabled. The screenshot below shows one possible case, which allows for two kinds of sign-in:
- Users who credentials are stored in a your tenant’s database, and
- Users who use their Google account to sign in.

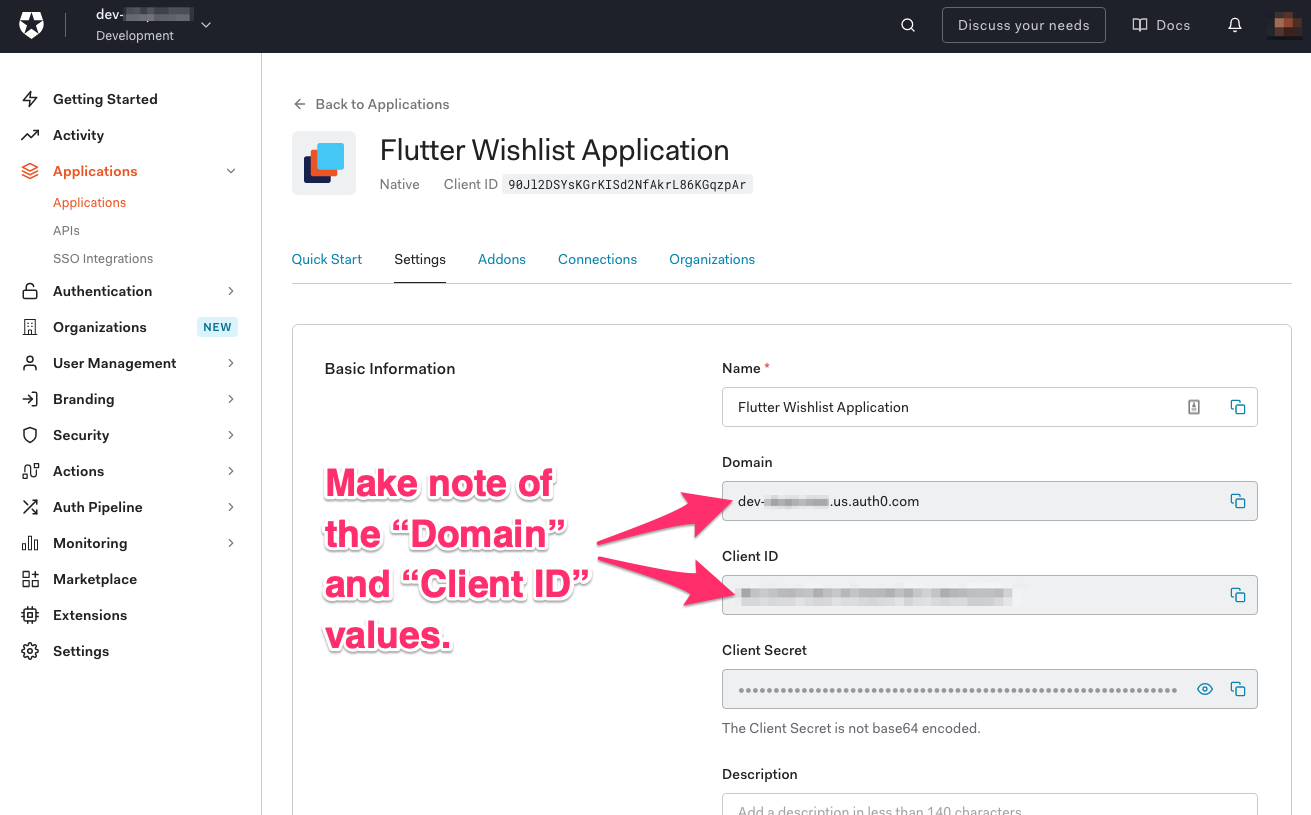
Click on the Settings tab. Take note of the Domain and Client ID values. You'll need them later on:
The next step is to specify the callback URL, which your Auth0 tenant will call once the user has signed in. In this case, this URL isn’t a location on the web, but a location inside your app.
Scroll down the page to the Application URIs section. Find the Allowed Callback URLs field and enter this value:
com.auth0.flutter-wishlist-app://login-callback
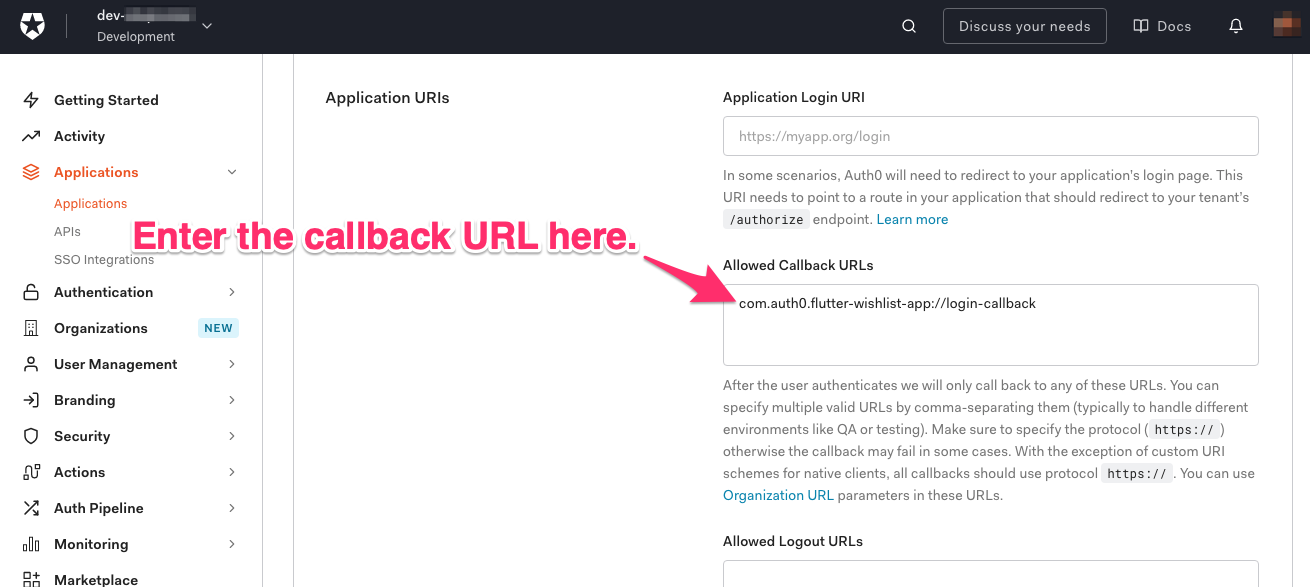
Make sure the callback doesn't contain a trailing slash (
/) as this can cause redirection to fail.
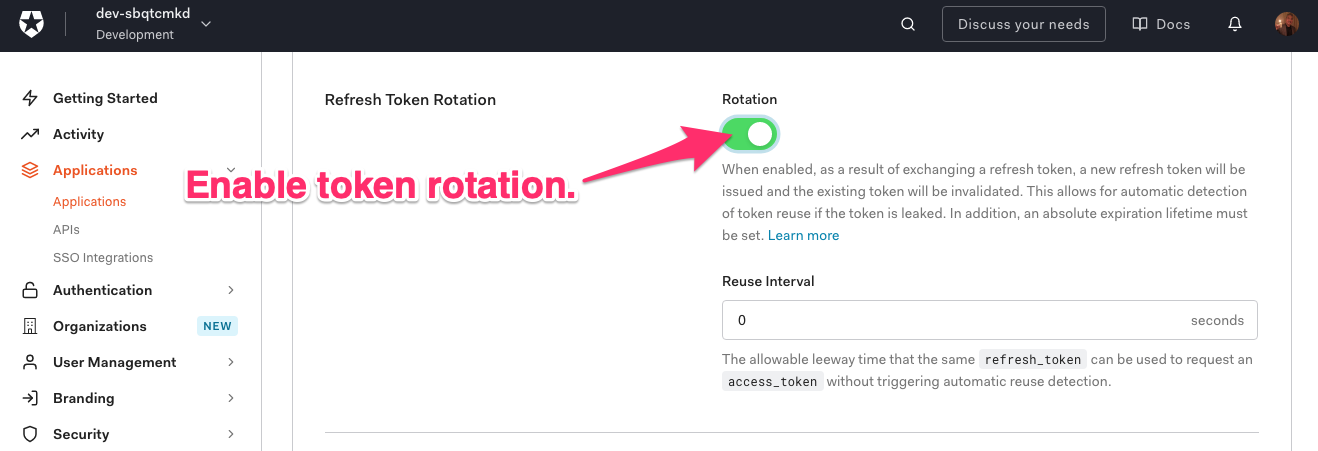
You’ll also need to enable refresh token rotation. By doing this, when the user refreshes their access token, another refresh token is returned as part of the response.
After enabling this feature, the Refresh Token Rotation section of the application’s Settings page should look like this:
Scroll to the bottom of the page and click on the SAVE CHANGES. You’ll see a confirmation message letting you know that the changes have been saved.
Create a user
If you’re working with a new Auth0 tenant, you may not have created a user yet. Follow these instructions to create a user:
- In the left column menu of the Auth0 dashboard, select User Management and then Users. This will take you to the Users page, which displays a list of all the users registered for the tenant.
- Click the CREATE USER button. Enter the user’s email address and a strong password (passwords that are too weak will be rejected), and use the default value for Connection: Username-Password Authentication.
- Click the CREATE button to create the user. You can now use this user to log into the app once it’s complete.
Server-side setup is complete!
At this point, you’ve completed all the server-side tasks:
- You’ve set up the server for the secure wishlist API,
- Registered the secure wishlist API with your Auth0 tenant, and
- Registered the app with your Auth0 tenant.
For the rest of the exercise, you’ll work on the Flutter app — namely, the user and API authentication parts of the app.
Setting Up the App
Before you can start writing code to authenticate the user and make calls to the secure API, you’ll need to perform a couple of tasks.
Install the dependencies
The first tasks is into install a couple of dependencies in the form of plugins whose features you’ll use.
Go back to the pubspec.yaml file in your application’s root directory and add the following dependencies:
flutter_appauth: A plugin that provides a wrapper around the AppAuth native Android and iOS SDKs that are commonly used to enable users to sign in via various identity providers.flutter_secure_storage: A plugin that allows data to be stored securely.
The dependencies section of the pubspec.yaml file should look as follows:
dependencies:
  flutter:
    sdk: flutter
  flutter_appauth: ^0.9.2+6
  flutter_secure_storage: ^3.3.5
  http: ^0.12.2
  json_annotation: ^3.1.1
  provider: ^4.3.2+3
  url_launcher: ^5.7.10
Save the changes and make sure the dependencies are installed. If your IDE doesn’t automatically install these plugins when you save pubspec.yaml, run the flutter pub get command on the command line.
Register the custom URI scheme with flutter_appauth
In order for the application to redirect users back to the application after signing in, flutter_appauth needs to “know” custom URI scheme for the callback URL (i.e. com.auth0.flutter-wishlist-app://login-callback), which you specified in the Aith0 dashboard earlier. This scheme is com.auth0.flutter-wishlist-app, and it’s specified in different files for Android and iOS devices.
First, specify this scheme for Android devices. Update the android/app/build.gradle file so that its defaultConfig section looks like this:
defaultConfig {
    // TODO: Specify your own unique Application ID (https://developer.android.com/studio/build/application-id.html).
    applicationId "com.auth0.flutter_wishlist_app"
    minSdkVersion 18
    targetSdkVersion 29
    versionCode flutterVersionCode.toInteger()
    versionName flutterVersionName
    manifestPlaceholders = [
        'appAuthRedirectScheme': 'com.auth0.flutter-wishlist-app'
    ]
}
In addition to specifying the scheme, the text above also updates rge value for minSdkVersion from 16 to 18. This is needed for the flutter_secure_storage plugin to work.
Now specify the scheme for iOS devices. Update the ios/Runner/Info.plist file so that it looks like this:
<?xml version="1.0" encoding="UTF-8"?>
<!DOCTYPE plist PUBLIC "-//Apple//DTD PLIST 1.0//EN" "http://www.apple.com/DTDs/PropertyList-1.0.dtd">
<plist version="1.0">
    <dict>
        <key>CFBundleDevelopmentRegion</key>
        <string>$(DEVELOPMENT_LANGUAGE)</string>
        <key>CFBundleExecutable</key>
        <string>$(EXECUTABLE_NAME)</string>
        <key>CFBundleIdentifier</key>
        <string>$(PRODUCT_BUNDLE_IDENTIFIER)</string>
        <key>CFBundleInfoDictionaryVersion</key>
        <string>6.0</string>
        <key>CFBundleName</key>
        <string>flutter_wishlist_app</string>
        <key>CFBundlePackageType</key>
        <string>APPL</string>
        <key>CFBundleShortVersionString</key>
        <string>$(FLUTTER_BUILD_NAME)</string>
        <key>CFBundleSignature</key>
        <string>????</string>
        <key>CFBundleVersion</key>
        <string>$(FLUTTER_BUILD_NUMBER)</string>
        <key>LSRequiresIPhoneOS</key>
        <true/>
        <key>UILaunchStoryboardName</key>
        <string>LaunchScreen</string>
        <key>UIMainStoryboardFile</key>
        <string>Main</string>
        <key>UISupportedInterfaceOrientations</key>
        <array>
            <string>UIInterfaceOrientationPortrait</string>
            <string>UIInterfaceOrientationLandscapeLeft</string>
            <string>UIInterfaceOrientationLandscapeRight</string>
        </array>
        <key>UISupportedInterfaceOrientations~ipad</key>
        <array>
            <string>UIInterfaceOrientationPortrait</string>
            <string>UIInterfaceOrientationPortraitUpsideDown</string>
            <string>UIInterfaceOrientationLandscapeLeft</string>
            <string>UIInterfaceOrientationLandscapeRight</string>
        </array>
        <key>UIViewControllerBasedStatusBarAppearance</key>
        <false/>
        <key>CFBundleURLTypes</key>
        <array>
            <dict>
                <key>CFBundleTypeRole</key>
                <string>Editor</string>
                <key>CFBundleURLSchemes</key>
                <array>
                    <string>com.auth0.flutter-wishlist-demo</string>
                </array>
            </dict>
        </array>
    </dict>
</plist>
Creating Additional Services
Now that you’ve set up the app to allow sign-in to work, you can start adding code. The first bits of code you’ll write are for two new services:
SecureStorageService, which manages the secure storage of data by accessing the functionality provided by theflutter_secure_storageplugin.AuthorizationService, which manages authentication and authorization by accessing the functionality provided by theflutter_appauthplugin.
Both these services are classes that wrap plugins. They’re written in a manner similar to the way you wrote the WishlistService class in the previous article’s exercise.
By wrapping the plugins in these services classes, you’re future-proofing your code. If a plugin changes in such a way that it breaks code that calls it, the breakage is limited to a single point. Another benefit of this approach is that you can change the underlying implementation while keeping the interface the same.
Create SecureStorageService
In the lib/services directory, create a file named secure_storage_service.dart with the following code:
import 'package:flutter_secure_storage/flutter_secure_storage.dart';
class SecureStorageService {
  static const String accessTokenKey = 'access_token';
  static const String accessTokenExpirationDateTimeKey =
      'access_token_expiration_datetime';
  static const String refreshTokenKey = 'refresh_token';
  final FlutterSecureStorage flutterSecureStorage;
  SecureStorageService(this.flutterSecureStorage);
  Future<String> getAccessToken() {
    return flutterSecureStorage.read(key: accessTokenKey);
  }
  Future<void> saveAccessToken(String accessToken) {
    return flutterSecureStorage.write(key: accessTokenKey, value: accessToken);
  }
  Future<DateTime> getAccessTokenExpirationDateTime() async {
    final String iso8601ExpirationDate =
        await flutterSecureStorage.read(key: accessTokenExpirationDateTimeKey);
    if (iso8601ExpirationDate == null) {
      return null;
    }
    return DateTime.parse(iso8601ExpirationDate);
  }
  Future<void> saveAccessTokenExpiresIn(
      DateTime accessTokenExpirationDateTime) {
    return flutterSecureStorage.write(
        key: accessTokenExpirationDateTimeKey,
        value: accessTokenExpirationDateTime.toIso8601String());
  }
  Future<String> getRefreshToken() {
    return flutterSecureStorage.read(key: refreshTokenKey);
  }
  Future<void> saveRefreshToken(String refreshToken) {
    return flutterSecureStorage.write(
        key: refreshTokenKey, value: refreshToken);
  }
  Future<void> deleteAll() {
    return flutterSecureStorage.deleteAll();
  }
}
SecureStorageService’s dependency on the FlutterSecureStorage class provided by the flutter_secure_storage plugin is made explicit via its constructor. The FlutterSecureStorage class allows us to store and retrieve the following information:
- The access token sent to web APIs
- When the access token will expire
- The refresh token used to obtain new access tokens
FlutterSecureStorage also provides the deleteAll() method, which is invoked when the user logs out. When this happens, the tokens and all related information are deleted from storage.
Create AuthorizationService
In the lib/services directory, create a file named authorization_service.dart with the following content:
import 'package:flutter_appauth/flutter_appauth.dart';
import 'secure_storage_service.dart';
class AuthorizationService {
  static const String clientId = 'YOUR_CLIENT_ID';
  static const String domain = 'YOUR_DOMAIN';
  static const String issuer = 'https://$domain';
  static const String redirectUrl =
      'com.auth0.flutter-wishlist-app://login-callback';
  final FlutterAppAuth appAuth;
  final SecureStorageService secureStorageService;
  AuthorizationService(
    this.appAuth,
    this.secureStorageService,
  );
  Future<void> authorize() async {
    final AuthorizationTokenResponse response =
        await appAuth.authorizeAndExchangeCode(AuthorizationTokenRequest(
            clientId, redirectUrl,
            issuer: issuer,
            promptValues: <String>[
          'login'
        ],
            scopes: <String>[
          'offline_access',
        ],
            additionalParameters: {
          'audience': 'https://wishlist.example.com',
        }));
    await secureStorageService.saveAccessToken(response.accessToken);
    await secureStorageService
        .saveAccessTokenExpiresIn(response.accessTokenExpirationDateTime);
    await secureStorageService.saveRefreshToken(response.refreshToken);
  }
  Future<String> getValidAccessToken() async {
    final DateTime expirationDate =
        await secureStorageService.getAccessTokenExpirationDateTime();
    if (DateTime.now()
        .isBefore(expirationDate.subtract(const Duration(minutes: 1)))) {
      return secureStorageService.getAccessToken();
    }
    return _refreshAccessToken();
  }
  Future<String> _refreshAccessToken() async {
    final String refreshToken = await secureStorageService.getRefreshToken();
    final TokenResponse response = await appAuth.token(TokenRequest(
        clientId, redirectUrl,
        issuer: issuer, refreshToken: refreshToken));
    await secureStorageService.saveAccessToken(response.accessToken);
    await secureStorageService
        .saveAccessTokenExpiresIn(response.accessTokenExpirationDateTime);
    await secureStorageService.saveRefreshToken(response.refreshToken);
    return response.accessToken;
  }
}
You need to update the values assigned to the clientId and domain fields as shown below:
- Replace
YOUR_CLIENT_IDin the code above with the ID that Auth0 assigned to your secure API. You can find this value by going to the Auth0 dashboard, selecting Applications → APIs in the left column menu, selecting the Settings tab, selecting your wishlist secure API from the list of APIs, and copying the value in the Id field under General Settings. - Replace
YOUR_DOMAINin the code above with domain of your tenant. You can find this value by going to the Auth0 dashboard, selecting Applications → APIs in the left column menu, selecting the Test tab, looking at the value for the--urlfrom the example cURL command and copying the domain portion (the part of the value that doesn’t includehttps://or/oauth/token).
Notice that the value for the redirectUrl property is the same as the callback URL configured with your Auth0 tenant.
As its name implies, the AuthorizationService class is responsible for all things to do with authorization. This includes performing the authorization request itself via the authorize() method and returning a valid access token via the getValidAccessToken() method.
When AuthorizationService makes an authorization request, it requests the offline_access scope, which ensures that a refresh token is returned in addition to an access token.
The authorization request includes an additional parameter, audience, which specifies the API for which the tokens provide access. It should match the identifier of the wishlist API, which you configured in your Auth0 tenant to be https://wishlist.example.com.
To save the results of a successful authorization request, the AuthorizationService makes use of the SecureStorageService class. When the application tries to call AuthorizationService’s getValidAccessToken() method, it returns the access token from secure storage, provided that the token is more than a minute away from expiring.
If the access token is set to expire in less than a minute, it will attempt to exchange a refresh token for a new access token. That logic is captured in the private _refreshAccessToken() method. We code the time period of one minute because the native AppAuth Android and iOS SDKs provide convenience methods performing actions with “fresh” access tokens that use the same expiration period. You can tweak this threshold to suit your context if needed.
Implementing Sign-In
Now that you’ve added the AuthorizationService and SecureStorageService classes, it’s time to make use of them. The first way is to implement sign-in, which was absent in the previous version of the app. This requires making updates to the landing page’s viewmodel and the wishlist service classes.
Update the LandingViewModel class to use AuthorizationService
With the AuthorizationService class in place, you can now change the LandingViewModel class so that it makes use of AuthorizationService’s authorize() method.
Update the code in lib/pages/landing/landing_view_model.dart to the following:
import 'package:flutter/foundation.dart';
import '../../services/authorization_service.dart';

class LandingViewModel extends ChangeNotifier {
  bool _signingIn = false;
  bool get signingIn => _signingIn;
  final AuthorizationService authorizationService;
  LandingViewModel(this.authorizationService);
  Future<void> signIn() async {
    try {
      _signingIn = true;
      notifyListeners();
      await authorizationService.authorize();
    } finally {
      _signingIn = false;
      notifyListeners();
    }
  }
}
Update the WishlistService class to send access tokens to the secure wishlist API
It’s time to make changes to the WishlistService class to so that it includes access tokens when making calls to the secure wishlist API’s endpoints.
Update the code in lib/services/wishlist_service.dart to the following:
import 'dart:convert';
import 'package:http/http.dart' as http;
import '../models/api/add_item_request_dto.dart';
import '../models/api/edit_item_request_dto.dart';
import '../models/api/item_dto.dart';
import '../models/item.dart';
import '../models/wishlist.dart';
import 'authorization_service.dart';
class WishlistService {
  static const String itemsApiUrl = 'YOUR_ITEMS_API_URL';
  final AuthorizationService authorizationService;
  WishlistService(this.authorizationService);
  Future<Wishlist> getWishList() async {
    final String accessToken = await authorizationService.getValidAccessToken();
    final http.Response response = await http.get(
      itemsApiUrl,
      headers: <String, String>{
        'Content-Type': 'application/json',
        'Authorization': 'Bearer $accessToken',
      },
    );
    if (response.statusCode == 200) {
      final List<Object> decodedJsonList = jsonDecode(response.body);
      final List<ItemDTO> items = List<ItemDTO>.from(
          decodedJsonList.map((json) => ItemDTO.fromJson(json)));
      return Wishlist(items
          ?.map((ItemDTO itemDTO) => Item(
              id: itemDTO.id,
              name: itemDTO.name,
              description: itemDTO.description,
              url: itemDTO.url))
          ?.toList());
    }
    throw Exception('Could not get the wishlist');
  }
  Future<String> addItem(Item item) async {
    final AddItemRequestDTO addItemRequest = AddItemRequestDTO(
        name: item.name, description: item.description, url: item.url);
    final String accessToken = await authorizationService.getValidAccessToken();
    final http.Response response = await http.post(itemsApiUrl,
        headers: <String, String>{
          'Content-Type': 'application/json',
          'Authorization': 'Bearer $accessToken',
        },
        body: jsonEncode(addItemRequest.toJson()));
    if (response.statusCode == 201) {
      return response.body;
    }
    throw Exception('Could not add item');
  }
  Future<String> editItem(Item item) async {
    final EditItemRequestDTO editItemRequest = EditItemRequestDTO(
        name: item.name, description: item.description, url: item.url);
    final String accessToken = await authorizationService.getValidAccessToken();
    final http.Response response = await http.put('$itemsApiUrl/${item.id}',
        headers: <String, String>{
          'Content-Type': 'application/json',
          'Authorization': 'Bearer $accessToken',
        },
        body: jsonEncode(editItemRequest.toJson()));
    if (response.statusCode == 200) {
      return response.body;
    }
    throw Exception('Could not add item');
  }
  Future<void> deleteItem(Item item) async {
    final String accessToken = await authorizationService.getValidAccessToken();
    final http.Response response = await http.delete(
      '$itemsApiUrl/${item.id}',
      headers: <String, String>{
        'Content-Type': 'application/json',
        'Authorization': 'Bearer $accessToken',
      },
    );
    if (response.statusCode != 204) {
      throw Exception('Could not delete item');
    }
  }
}
Replace YOUR_ITEMS_API_URL in the code above with the path to your API. Once again, that path should be the following...
https://{GLITCH_PROJECT_NAME}.glitch.me/api/wishlist/items
...where {GLITCH_PROJECT_NAME} is the name that Glitch assigned to your API project.
With the changes you made, WishlistService makes use of AuthorizationService’s getValidAccessToken() method so that it can pass the access token received from your Auth0 tenant as part of the Authorization header. Without this token, the API will not grant access to its endpoints. This is how the application is secured.
Implementing Sign-Out
Just as you implemented sign-in functionality, you also have to write code to sign the user out. This is a little more complex, as there are many more places where th user can sign out.
Update the WishlistViewModel class
Update the code in lib/pages/wishlist/wishlist_view_model.dart to the following:
import 'package:flutter/foundation.dart';
import 'package:flutter_wishlist_app/services/secure_storage_service.dart';
import '../../models/item.dart';
import '../../models/wishlist.dart';
import '../../services/wishlist_service.dart';

class WishlistViewModel extends ChangeNotifier {
  final WishlistService wishlistService;
  final SecureStorageService secureStorageService;
  Future<Wishlist> _wishlistFuture;
  Future<Wishlist> get wishlistFuture => _wishlistFuture;
  WishlistViewModel(
    this.wishlistService,
    this.secureStorageService,
  );
  Future<void> loadInitialWishlist() =>
      _wishlistFuture = wishlistService.getWishList();
  Future<void> refreshWishlist() async {
    _wishlistFuture = wishlistService.getWishList();
    notifyListeners();
    await _wishlistFuture;
  }

  Future<void> deleteItem(Item item) async {
    await wishlistService.deleteItem(item);
    await refreshWishlist();
  }

  Future<void> signOut() {
    return secureStorageService.deleteAll();
  }
}
The class has been updated to take a dependency on the SecureStorageClass and will call its deleteAll() method when the user signs out. Remember, deleteAll() will delete all the tokens in secure storage, which means that the app no longer has a way to access the API — at least until the user signs in again.
Signing out when the user has been away for too long
Here’s another scenario to consider: The user should be signed out when the refresh token expires. This happens when the user hasn’t used an application for a while. For the purposes of this application, the sign-out process is triggered when their session is expired; the user will be notified when this happens.
To do this, you'll be updating each page that results in a call to a protected endpoints where this error can occur. The pages affected are those for adding, editing and deleting items.
Let’s implement this feature in the AddItemViewModel class by giving it a signOut() method. Update the code in lib/pages/add_item/add_item_view_model.dart to the following:
import 'package:flutter/foundation.dart';
import '../../models/item.dart';
import '../../services/secure_storage_service.dart';
import '../../services/wishlist_service.dart';

class AddItemViewModel extends ChangeNotifier {
  final WishlistService wishlistService;
  final SecureStorageService secureStorageService;
  bool _addingItem = false;
  bool get addingItem => _addingItem;
  AddItemViewModel(
    this.wishlistService,
    this.secureStorageService,
  );
  Future<void> addItem(Item item) async {
    try {
      _addingItem = true;
      notifyListeners();
      await wishlistService.addItem(item);
    } finally {
      _addingItem = false;
      notifyListeners();
    }
  }
  Future<void> signOut() {
    return secureStorageService.deleteAll();
  }
}
The AddItemPage class can then be updated to see if the refresh token has expired. If the token has expired, the user will be required to log in again. Update the code in lib/pages/add_item/add_item_page.dart to the following:
import 'package:flutter/material.dart';
import 'package:flutter/services.dart';
import '../../models/item.dart';
import '../landing/landing_page.dart';
import 'add_item_view_model.dart';

class AddItemPage extends StatefulWidget {
  static const String route = 'addItem';
  final AddItemViewModel viewModel;
  const AddItemPage(
    this.viewModel, {
    Key key,
  }) : super(key: key);
  @override
  _AddItemPageState createState() => _AddItemPageState();
}
class _AddItemPageState extends State<AddItemPage> {
  final GlobalKey<FormState> _formKey = GlobalKey<FormState>();
  TextEditingController _nameController;
  TextEditingController _descriptionController;
  TextEditingController _urlController;
  FocusNode _descriptionFocusNode;
  FocusNode _urlFocusNode;
  @override
  void initState() {
    super.initState();
    _nameController = TextEditingController();
    _descriptionController = TextEditingController();
    _urlController = TextEditingController();
    _descriptionFocusNode = FocusNode();
    _urlFocusNode = FocusNode();
  }
  @override
  void dispose() {
    _nameController.dispose();
    _descriptionController.dispose();
    _urlController.dispose();
    _descriptionFocusNode.dispose();
    _urlFocusNode.dispose();
    super.dispose();
  }
  @override
  Widget build(BuildContext context) {
    return Scaffold(
      appBar: AppBar(
        title: const Text('Wishlist'),
      ),
      body: Padding(
        padding: const EdgeInsets.all(16),
        child: Form(
          key: _formKey,
          autovalidateMode: AutovalidateMode.onUserInteraction,
          child: Column(
            children: <Widget>[
              const Text('Fill in the details of the item you want to add'),
              TextFormField(
                controller: _nameController,
                decoration: const InputDecoration(labelText: 'Name'),
                onFieldSubmitted: (_) {
                  _descriptionFocusNode.requestFocus();
                },
                validator: _mandatoryValidator,
              ),
              TextFormField(
                controller: _descriptionController,
                decoration: const InputDecoration(labelText: 'Description'),
                onFieldSubmitted: (_) {
                  _urlFocusNode.requestFocus();
                },
                validator: _mandatoryValidator,
              ),
              TextFormField(
                controller: _urlController,
                decoration: const InputDecoration(labelText: 'URL'),
                validator: _mandatoryValidator,
              ),
              if (widget.viewModel.addingItem) ...const <Widget>[
                SizedBox(height: 32),
                CircularProgressIndicator(),
              ]
            ],
          ),
        ),
      ),
      floatingActionButton: FloatingActionButton(
        onPressed: widget.viewModel.addingItem
            ? null
            : () async {
                await _addItem(context);
              },
        child: const Icon(Icons.save),
      ),
    );
  }
  String _mandatoryValidator(String text) {
    return (text?.isEmpty ?? true) ? 'Required' : null;
  }
  Future<void> _signOut(BuildContext context) async {
    await widget.viewModel.signOut();
    await Navigator.of(context)
        .pushNamedAndRemoveUntil(LandingPage.route, (_) => false);
  }
  Future<void> _addItem(BuildContext context) async {
    try {
      if (_formKey.currentState.validate()) {
        final Item item = Item(
            name: _nameController.text,
            description: _descriptionController.text,
            url: _urlController.text);
        await widget.viewModel.addItem(item);
        Navigator.of(context).pop(true);
      }
    } on Exception catch (e) {
      if (e is PlatformException &&
          e.message.contains('invalid refresh token')) {
        await showDialog(
          context: context,
          builder: (_) => AlertDialog(
            content: const Text(
                'Your session has expired and will need to sign in again.'),
            actions: <Widget>[
              TextButton(
                onPressed: () async {
                  await _signOut(context);
                },
                child: const Text('OK'),
              )
            ],
          ),
        );
      } else {
        await showDialog(
          context: context,
          builder: (_) => AlertDialog(
            content: const Text('Failed to add the item'),
            actions: <Widget>[
              TextButton(
                onPressed: () {
                  Navigator.of(context).pop();
                },
                child: const Text('OK'),
              )
            ],
          ),
        );
      }
    }
  }
}
The main change here is within the catch block of the addItem() method. When the refresh token has expired, the flutter_appauth plugin throws a PlatformException with a message that says that there's an invalid refresh token. This message is part of the error response from Auth0 when this scenario occurs and is documented here. The app presents a dialog that trigger a sign-out, which in turn takes the user back to the landing page.
The EditItemViewModel class is similar to AddItemViewModel, and it requires similar changes. Update the code in lib/pages/edit_item/edit_item_view_model.dart to the following:
import 'package:flutter/foundation.dart';
import 'package:flutter_wishlist_app/services/secure_storage_service.dart';
import '../../models/item.dart';
import '../../services/wishlist_service.dart';

class EditItemViewModel extends ChangeNotifier {
  final WishlistService wishlistService;
  final SecureStorageService secureStorageService;
  bool _editingItem = false;
  bool get editingItem => _editingItem;
  EditItemViewModel(
    this.wishlistService,
    this.secureStorageService,
  );
  Future<void> editItem(Item item) async {
    try {
      _editingItem = true;
      notifyListeners();
      await wishlistService.editItem(item);
    } finally {
      _editingItem = false;
      notifyListeners();
    }
  }

  Future<void> signOut() {
    return secureStorageService.deleteAll();
  }
}
The EditItemPage class needs changes similar to the ones you made in AddItemPage. Update the code in lib/pages/edit_item/edit_item_page.dart to the following:
import 'package:flutter/material.dart';
import 'package:flutter/services.dart';
import '../../models/item.dart';
import '../landing/landing_page.dart';
import 'edit_item_view_model.dart';

class EditItemPage extends StatefulWidget {
  static const String route = 'editItem';
  final Item item;
  final EditItemViewModel viewModel;
  const EditItemPage(
    this.item,
    this.viewModel, {
    Key key,
  }) : super(key: key);
  @override
  _EditItemPageState createState() => _EditItemPageState();
}
class _EditItemPageState extends State<EditItemPage> {
  final GlobalKey<FormState> _formKey = GlobalKey<FormState>();
  TextEditingController _nameController;
  TextEditingController _descriptionController;
  TextEditingController _urlController;
  FocusNode _descriptionFocusNode;
  FocusNode _urlFocusNode;
  @override
  void initState() {
    super.initState();
    final Item item = widget.item;
    _nameController = TextEditingController(text: item.name);
    _descriptionController = TextEditingController(text: item.description);
    _urlController = TextEditingController(text: item.url);
    _descriptionFocusNode = FocusNode();
    _urlFocusNode = FocusNode();
  }
  @override
  void dispose() {
    _nameController.dispose();
    _descriptionController.dispose();
    _urlController.dispose();
    _descriptionFocusNode.dispose();
    _urlFocusNode.dispose();
    super.dispose();
  }
  @override
  Widget build(BuildContext context) {
    return Scaffold(
      appBar: AppBar(
        title: const Text('Wishlist'),
      ),
      body: Padding(
        padding: const EdgeInsets.all(16),
        child: Form(
          key: _formKey,
          autovalidateMode: AutovalidateMode.onUserInteraction,
          child: Column(
            children: <Widget>[
              const Text('Fill in the details of the item you want to edit'),
              TextFormField(
                controller: _nameController,
                decoration: const InputDecoration(labelText: 'Name'),
                onFieldSubmitted: (_) {
                  _descriptionFocusNode.requestFocus();
                },
                validator: _mandatoryValidator,
              ),
              TextFormField(
                controller: _descriptionController,
                decoration: const InputDecoration(labelText: 'Description'),
                onFieldSubmitted: (_) {
                  _urlFocusNode.requestFocus();
                },
                validator: _mandatoryValidator,
              ),
              TextFormField(
                controller: _urlController,
                decoration: const InputDecoration(labelText: 'URL'),
                validator: _mandatoryValidator,
              ),
              if (widget.viewModel.editingItem) ...const <Widget>[
                SizedBox(height: 32),
                CircularProgressIndicator(),
              ]
            ],
          ),
        ),
      ),
      floatingActionButton: FloatingActionButton(
        onPressed: widget.viewModel.editingItem
            ? null
            : () async {
                await _editItem(context);
              },
        child: const Icon(Icons.save),
      ),
    );
  }
  String _mandatoryValidator(String text) {
    return (text?.isEmpty ?? true) ? 'Required' : null;
  }
  Future<void> _signOut(BuildContext context) async {
    await widget.viewModel.signOut();
    await Navigator.of(context)
        .pushNamedAndRemoveUntil(LandingPage.route, (_) => false);
  }
  Future<void> _editItem(BuildContext context) async {
    try {
      if (_formKey.currentState.validate()) {
        final Item item = Item(
            id: widget.item.id,
            name: _nameController.text,
            description: _descriptionController.text,
            url: _urlController.text);
        await widget.viewModel.editItem(item);
        Navigator.of(context).pop(true);
      }
    } on Exception catch (e) {
      if (e is PlatformException &&
          e.message.contains('invalid refresh token')) {
        await showDialog(
          context: context,
          builder: (_) => AlertDialog(
            content: const Text(
                'Your session has expired and will need to sign in again.'),
            actions: <Widget>[
              TextButton(
                onPressed: () async {
                  await _signOut(context);
                },
                child: const Text('OK'),
              )
            ],
          ),
        );
      } else {
        await showDialog(
          context: context,
          builder: (_) => AlertDialog(
            content: const Text('Failed to edit the item'),
            actions: <Widget>[
              TextButton(
                onPressed: () {
                  Navigator.of(context).pop();
                },
                child: const Text('OK'),
              )
            ],
          ),
        );
      }
    }
  }
}
Deleting items occurs on the page that displays the wishlist. Its view model, WishlistViewModel, already has a signOut() method. We only need to update its corresponding view class, WishlistPage — specifically in the area where its _deleteItem() method is defined.
Update the code in lib/pages/wishlist/wishlist_page.dart to the following:
import 'package:flutter/material.dart';
import 'package:flutter/services.dart';
import 'package:url_launcher/url_launcher.dart';
import '../../models/item.dart';
import '../../models/wishlist.dart';
import '../add_item/add_item_page.dart';
import '../edit_item/edit_item_page.dart';
import '../landing/landing_page.dart';
import 'wishlist_view_model.dart';

class WishlistPage extends StatefulWidget {
  static const String route = 'wishlist';
  final WishlistViewModel viewModel;
  const WishlistPage(
    this.viewModel, {
    Key key,
  }) : super(key: key);
  @override
  _WishlistPageState createState() => _WishlistPageState();
}
class _WishlistPageState extends State<WishlistPage> {
  @override
  void initState() {
    super.initState();
    widget.viewModel.loadInitialWishlist();
  }
  @override
  Widget build(BuildContext context) {
    return Scaffold(
      appBar: AppBar(
        title: const Text('Wishlist'),
        actions: <Widget>[
          IconButton(
              icon: const Icon(Icons.exit_to_app),
              onPressed: () async {
                await _signOut(context);
              })
        ],
      ),
      body: FutureBuilder<Wishlist>(
        future: widget.viewModel.wishlistFuture,
        builder: (_, AsyncSnapshot<Wishlist> snapshot) {
          switch (snapshot.connectionState) {
            case ConnectionState.done:
              if (snapshot.hasError) {
                return Padding(
                  padding: const EdgeInsets.all(16),
                  child: Center(
                    child: Column(
                      children: <Widget>[
                        const Text('Oops we had trouble loading your wishlist'),
                        const SizedBox(height: 32),
                        ElevatedButton(
                          onPressed: () async {
                            await widget.viewModel.refreshWishlist();
                          },
                          child: const Text('Retry'),
                        ),
                      ],
                    ),
                  ),
                );
              }
              final List<Item> items = snapshot.data?.items ?? <Item>[];
              if (items.isEmpty) {
                return const Center(
                  child: Text('Your wishlist is empty. Why not add some items'),
                );
              }
              return ListView.builder(
                itemCount: items.length,
                itemBuilder: (_, int index) {
                  final Item item = items[index];
                  return Card(
                    child: Padding(
                      padding: const EdgeInsets.all(8),
                      child: Row(
                        children: <Widget>[
                          Expanded(
                            child: Column(
                              crossAxisAlignment: CrossAxisAlignment.start,
                              children: <Widget>[
                                Text(item.name),
                                Text(item.description),
                                GestureDetector(
                                  onTap: () => launch(item.url),
                                  child: Text(
                                    item.url,
                                    style: TextStyle(
                                        decoration: TextDecoration.underline),
                                  ),
                                ),
                              ],
                            ),
                          ),
                          IconButton(
                            onPressed: () async {
                              await _editItem(item);
                            },
                            icon: const Icon(Icons.edit),
                          ),
                          IconButton(
                            onPressed: () async {
                              await _deleteItem(item);
                            },
                            icon: const Icon(Icons.delete),
                          )
                        ],
                      ),
                    ),
                  );
                },
              );
            default:
              return Padding(
                padding: const EdgeInsets.all(16),
                child: Center(
                  child: Column(
                    children: const <Widget>[
                      Text('Loading your wishlist'),
                      SizedBox(height: 32),
                      CircularProgressIndicator(),
                    ],
                  ),
                ),
              );
          }
        },
      ),
      floatingActionButton: FloatingActionButton(
        onPressed: () async {
          await _addItem(context);
        },
        child: const Icon(Icons.add),
      ),
    );
  }
  Future<void> _deleteItem(Item item) async {
    try {
      await widget.viewModel.deleteItem(item);
    } on Exception catch (e) {
      if (e is PlatformException &&
          e.message.contains('invalid refresh token')) {
        await showDialog(
          context: context,
          builder: (_) => AlertDialog(
            content: const Text(
                'Your session has expired and will need to sign in again.'),
            actions: <Widget>[
              TextButton(
                onPressed: () async {
                  await _signOut(context);
                },
                child: const Text('OK'),
              )
            ],
          ),
        );
      } else {
        await showDialog(
          context: context,
          builder: (_) => AlertDialog(
            content: const Text('Failed to delete the item'),
            actions: <Widget>[
              TextButton(
                onPressed: () {
                  Navigator.of(context).pop();
                },
                child: const Text('OK'),
              )
            ],
          ),
        );
      }
    }
  }
  Future<void> _signOut(BuildContext context) async {
    await widget.viewModel.signOut();
    await Navigator.of(context)
        .pushNamedAndRemoveUntil(WishlistPage.route, (_) => false);
  }
  Future<void> _addItem(BuildContext context) async {
    final Object addedItem =
        await Navigator.of(context).pushNamed(AddItemPage.route);
    if ((addedItem as bool) ?? false) {
      await widget.viewModel.refreshWishlist();
    }
  }
  Future<void> _editItem(Item item) async {
    final Object addedItem = await Navigator.of(context)
        .pushNamed(EditItemPage.route, arguments: item);
    if ((addedItem as bool) ?? false) {
      await widget.viewModel.refreshWishlist();
    }
  }
}
Putting It All Together
By implementing the sign-in and sign-out functionality, you have added new services to the app. A number of classes also have additional dependencies.
You now need to update the lib/main.dart file to account for these changes. Open it and replace its content with the following:
import 'package:flutter/material.dart';
import 'package:flutter_appauth/flutter_appauth.dart';
import 'package:flutter_secure_storage/flutter_secure_storage.dart';
import 'package:provider/provider.dart';
import 'package:provider/single_child_widget.dart';
import 'models/item.dart';
import 'pages/add_item/add_item_page.dart';
import 'pages/add_item/add_item_view_model.dart';
import 'pages/edit_item/edit_item_page.dart';
import 'pages/edit_item/edit_item_view_model.dart';
import 'pages/landing/landing_page.dart';
import 'pages/landing/landing_view_model.dart';
import 'pages/wishlist/wishlist_page.dart';
import 'pages/wishlist/wishlist_view_model.dart';
import 'services/authorization_service.dart';
import 'services/secure_storage_service.dart';
import 'services/wishlist_service.dart';

Future<void> main() async {
  WidgetsFlutterBinding.ensureInitialized();
  const FlutterSecureStorage secureStorage = FlutterSecureStorage();
  final SecureStorageService secureStorageService =
      SecureStorageService(secureStorage);
  final String refreshToken = await secureStorageService.getRefreshToken();
  final String initialRoute =
      refreshToken == null ? LandingPage.route : WishlistPage.route;
  runApp(
    MultiProvider(
      providers: <SingleChildWidget>[
        Provider<FlutterAppAuth>(
          create: (_) => FlutterAppAuth(),
        ),
        ProxyProvider<FlutterAppAuth, AuthorizationService>(
          update: (_, FlutterAppAuth appAuth, __) =>
              AuthorizationService(appAuth, secureStorageService),
        ),
        ProxyProvider<AuthorizationService, WishlistService>(
          update: (_, AuthorizationService authorizationService, __) =>
              WishlistService(authorizationService),
        ),
        ChangeNotifierProvider<LandingViewModel>(
          create: (BuildContext context) => LandingViewModel(
            Provider.of<AuthorizationService>(context, listen: false),
          ),
        ),
        ChangeNotifierProvider<WishlistViewModel>(
          create: (BuildContext context) {
            return WishlistViewModel(
                Provider.of<WishlistService>(context, listen: false),
                secureStorageService);
          },
        ),
        ChangeNotifierProvider<AddItemViewModel>(
          create: (BuildContext context) {
            return AddItemViewModel(
                Provider.of<WishlistService>(context, listen: false),
                secureStorageService);
          },
        ),
        ChangeNotifierProvider<EditItemViewModel>(
          create: (BuildContext context) {
            return EditItemViewModel(
                Provider.of<WishlistService>(context, listen: false),
                secureStorageService);
          },
        ),
      ],
      child: MyApp(initialRoute),
    ),
  );
}
class MyApp extends StatelessWidget {
  final String initialRoute;
  const MyApp(
    this.initialRoute, {
    Key key,
  }) : super(key: key);
  @override
  Widget build(BuildContext context) {
    return MaterialApp(
      title: 'Wishlist',
      theme: ThemeData(
        primarySwatch: Colors.blue,
        visualDensity: VisualDensity.adaptivePlatformDensity,
      ),
      initialRoute: initialRoute,
      onGenerateRoute: (RouteSettings settings) {
        switch (settings.name) {
          case LandingPage.route:
            return MaterialPageRoute(
              builder: (_) => Consumer<LandingViewModel>(
                builder: (_, LandingViewModel viewModel, __) =>
                    LandingPage(viewModel),
              ),
            );
          case WishlistPage.route:
            return MaterialPageRoute(
              builder: (_) => Consumer<WishlistViewModel>(
                builder: (_, WishlistViewModel viewModel, __) =>
                    WishlistPage(viewModel),
              ),
            );
          case AddItemPage.route:
            return MaterialPageRoute(
              builder: (_) => Consumer<AddItemViewModel>(
                builder: (_, AddItemViewModel viewModel, __) =>
                    AddItemPage(viewModel),
              ),
            );
          case EditItemPage.route:
            final Item item = settings.arguments;
            return MaterialPageRoute(
              builder: (_) => Consumer<EditItemViewModel>(
                builder: (_, EditItemViewModel viewModel, __) =>
                    EditItemPage(item, viewModel),
              ),
            );
        }
        return null;
      },
    );
  }
}
The main differences to call out here are:
- The value of
initialRoutewill depend on if a refresh token had been saved. You can change this so that its value is determined by looking for the access token instead or checking for the existence of both access and refresh tokens. I decided to check for the refresh token since it’s needed if the access token has expired. If the refresh token exists, theninitialRouteleads to the wishlist page; if there’s no refresh token, the app presents the landing page. - A number of
ProxyProvider<T1, T2>s have been registered withprovider. This is used when an instance of T2 is needed but it in turn depends on an object of type T1. In this scenario, by registering aProxyProvider<FlutterAppAuth, AuthorizationService>widget, when theAuthorizationServiceobject is requested, the code specified by theupdateproperty is invoked. An instance of theFlutterAppAuthwould be obtained that could used to instantiate and return the requestedAuthorizationService. - The code to create the view models has been updated to match the changes to their constructors.
Conclusion
Congratulations! You now have a working, secure wishlist app! Confirm this flutter run on the command line in your project directory, and try signing in and then viewing, adding, editing, and deleting wishlist items.
You’ve done a lot in this exercise:
- You set up a new secure API
- You registered the API with your Auth0 tenant
- You registered a native mobile app with your Auth0 tenant
- You changed an existing Flutter app to incorporate user authentication and secure API access with Auth0
The application integrates with Auth0 to obtain the appropriate tokens that need to be passed to the web APIs that were built in the previous article. Along the way you learned how to implement an application that follows the MVVM architectural model. Since access tokens are short-lived for security reasons, the app uses a mechanism that ensures that it only uses current access tokens when sending requests to web APIs. You should use this app as a reference for techniques that you can use to build more complex applications.
About the author

Michael Bui
Sofware Developer
I'm a software developer with a background in consulting and experience in technical leadership roles. The majority of my career has been with using .NET to build applications across the full-stack and for mobile, desktop, and web. My main area of interest is in agile software development and building cross-platform applications using technologies like Flutter and Xamarin.Forms.
These days I do more work using Flutter. Besides using it professionally to build applications, I've done a talk at a meetup, maintain a blog where I post about Flutter in DexterX and contribute to and maintain various open-source projects.