
TL;DR: In this article, you will learn how to develop an audio player app using Angular and RxJS. You will handle audio operations and application state using RxJS. To secure your application, you will use Auth0. If needed, you can find the final code in this GitHub repository.
Introduction
Creating an audio player is always an intimidating task, especially if you think about managing the media's state, reacting to media events, and reflecting these changes correctly on the UI (User Interface). So, in this article, you will use Angular and Angular Material (with some other libraries) to easily tackle these challenges.
To handle media playback in a reactive way, you will wrap JavaScript's Audio object with an RxJS Observable and you will also use RxJS to manage the state of your audio player.
To provide a secure user experience through your application, you'll add user authentication through Auth0.
Prerequisites
Since you are going to use Angular, you will need to install Node.js in your development machine. So, if you haven't done so yet, go to the download page of Node.js and follow the instructions there.
After Installing it, you will need to install Angular CLI via npm:
npm install -g @angular/cli
If you are using npm v5.2+, you can use
npxto use@angular/cliwithout installing it by runningnpx @angular/cli [options that follow the ng global command]
Scaffolding the app
After installing all the environment dependencies, you can focus on scaffolding your Angular app. To do this, issue the following command on a terminal:
ng new angular-audio
You can use also use npx to scaffold the app:
npx @angular/cli new angular-audio
This command will ask you three questions:
- Would you like to add Angular routing? (y/N): You can input
y(yes) as you are going to use Angular Routing in the app. - Which stylesheet format would you like to use? (Use arrow keys): Select
SCSSfrom the options given. - Would you like to share anonymous usage data with the Angular Team at Google under Google’s Privacy Policy at https://policies.google.com/privacy For more details and how to change this setting, see http://angular.io/analytics. (y/N): If you want to share data with Google press
yelse pressN.
Running the application
Before continuing, make sure you can start your application in the browser. Make angular-audio your current working directly:
cd angular-audio
Once there, you can simply run:
npm start
In your browser, visit http://localhost:4200/ to open the app.
Installing project dependencies
Having confirmed that you can run the basic app in the browser, you can start building this app by installing the dependencies. To build your audio player, you will use the Angular Material Library. You can install it using the ng add command:
ng add @angular/material
This command will ask you three questions:
- Choose a pre-built theme name, or "custom" for a custom theme: Choose
Indigo/Pink - Set up HammerJS for gesture recognition?: You can input
y(yes) since you need gesture recognition. - Set up browser animations for Angular Material? (Y/n): you can input
y(yes) again because you will need animation.
You are also going to use moment.js to manipulate dates and times. Install it via npm:
npm install --save moment
Note: RxJS comes bundled with Angular
Developing the Audio Player UI Using Angular Material
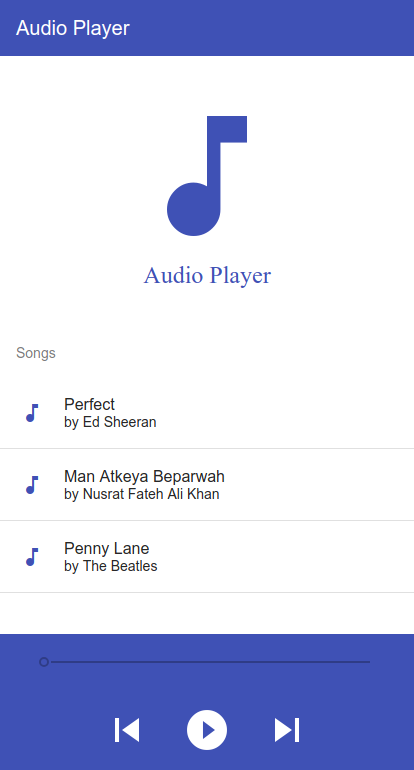
In this section, you will design the UI of the application. In the end, your application will look like this:
Since your app will use Angular Material Components, you'll need to import them inside your root NgModule.
To do so, create a material module using the ng generate command:
ng generate module material --module=app --flat
The
ng generate modulecommand creates the module with the given name; in your case, the name ismaterial. The--module=appoption allows you to specify in which module to import the new one, and--flatcreates the module into the root directory without creating an extra folder.
The previous command will generate material.module in the /src/app directory. Replace the content of that file with the following code:
// src/app/material.module.ts
import { NgModule } from "@angular/core";
import {
  MatButtonModule,
  MatListModule,
  MatSliderModule,
  MatIconModule,
  MatToolbarModule,
  MatCardModule
} from "@angular/material";

const modules = [
  MatButtonModule,
  MatListModule,
  MatSliderModule,
  MatIconModule,
  MatToolbarModule,
  MatCardModule
];

@NgModule({
  imports: modules,
  exports: modules
})
export class MaterialModule {}
Then, you are going to create the app-player component using the @angular/cli:
ng generate component pages/player --module app
It will generate a player.component.ts file and other required files within the src/app/pages/player/ directory.
Audio player HTML
Inside the ./src/pages/player directory, you will find the player.component.html file. In this file, you will add some HTML to define your player structure. As you will see, the top-level element is a div with the container class. On the top, you will have a navigation bar which contains the name of the application inside <mat-toolbar>.
Below the header, you will have a div element with class content which will have your app's logo and a <mat-list> with the list of media files.
Finally, the footer div element with class .media-footer will have two <mat-toolbar> elements.
In the first <mat-toolbar>, you will have a <mat-slider>. This will allow the user to change the current time of the audio track.
In the second <mat-toolbar>, you will have rest of the playback controls.
Replace the content of src/app/pages/player/player.component.html with the following code:
<!-- src/app/pages/player/player.component.html -->
<div class="container">
    <mat-toolbar color="primary" class="main-toolbar">
      <span>Audio Player</span>
    </mat-toolbar>
    <div class="content">
        <div class="logo">
          <mat-icon>music_note</mat-icon>
          <div>Audio Player</div>
      </div>
      <mat-list color="primary">
        <h3 mat-subheader>Songs</h3>
        <mat-list-item *ngFor="let file of files; let i = index" (click)="openFile(file, i)">
          <mat-icon color="primary" mat-list-icon>music_note</mat-icon>
          <h4 mat-line>{{ file.name }}</h4>
          <h5 mat-line>by {{ file.artist }}</h5>
          <mat-icon color="primary" *ngIf="currentFile.index === i && !state?.error">volume_up</mat-icon>
          <h6 *ngIf="currentFile.index === i && state?.error">ERROR</h6>
          <mat-divider></mat-divider>
        </mat-list-item>
      </mat-list>
    </div>
    <div class="media-footer">
      <mat-toolbar color="primary">
        <mat-toolbar-row>
           {{ state?.readableCurrentTime }}
           <mat-slider class="time-slider" min="0" [max]="state?.duration" step="1" [value]="state?.currentTime" (input)="onSliderChangeEnd($event)" [disabled]="state?.error || currentFile.index === undefined"></mat-slider>
           {{ state?.readableDuration }}
        </mat-toolbar-row>
        <mat-toolbar-row class="media-action-bar">
          <button mat-button [disabled]="isFirstPlaying()" (click)="previous()">
            <mat-icon mat-list-icon>skip_previous</mat-icon>
          </button>
          <button mat-button (click)="play()" [disabled]="state?.error" *ngIf="!state?.playing">
            <mat-icon mat-list-icon>play_circle_filled</mat-icon>
          </button>
          <button mat-button (click)="pause()" *ngIf="state?.playing">
            <mat-icon mat-list-icon>pause</mat-icon>
          </button>
          <button  mat-button [disabled]="isLastPlaying()" (click)="next()">
            <mat-icon mat-list-icon>skip_next</mat-icon>
          </button>
        </mat-toolbar-row>
      </mat-toolbar>
    </div>
</div>
Styling the audio player
Just to improve the look and feel of your app, you will do some minor styling in the player.component.scss file (you can find it under ./src/pages/player/), as shown below:
// src/app/pages/player/player.component.scss
.container {
  .main-toolbar {
    .spacer {
      flex: 1 1 auto;
    }
    .toolbar-btn {
      font-size: 16px;
      margin-right: 5px;
      cursor: pointer;
    }
  }

  .content {
    .logo {
      margin: 2.5rem;
      text-align: center;
      font-size: 24px;
      color: #3f51b5;
      .mat-icon {
        height: 160px !important;
        width: 160px !important;
        font-size: 160px !important;
      }
    }
  }

  .media-footer {
    position: absolute;
    bottom: 0;
    width: 100%;
    .time-slider {
      width: 100% !important;
      margin-left: 20px;
      margin-right: 20px;
    }
    .media-action-bar {
      width: 100%;
      padding: 2.5rem;
      justify-content: center;
      .mat-icon {
        height: 48px !important;
        width: 48px !important;
        font-size: 48px !important;
      }
    }
  }
}
To ensure that your application compiles, open player.component.ts and update it with the following content which includes mock data:
// src/app/pages/player/player.component.ts
// ... import statements and @Component declaration ...
export class PlayerComponent {
  files: Array<any> = [
    { name: "First Song", artist: "Inder" },
    { name: "Second Song", artist: "You" }
  ];
  state;
  currentFile: any = {};

  isFirstPlaying() {
    return false;
  }
  isLastPlaying() {
    return true;
  }
}
Updating the router
In order to see the UI, you need to configure the router inside the app-routing.module.ts file to use PlayerComponent as a route like so:
// src/app/app-routing.module.ts
import { NgModule } from "@angular/core";
import { RouterModule, Routes } from "@angular/router";
import { PlayerComponent } from "./pages/player/player.component";

const routes: Routes = [
  { path: "", component: PlayerComponent },
  { path: "**", redirectTo: "" }
];

@NgModule({
  imports: [RouterModule.forRoot(routes)],
  exports: [RouterModule]
})
export class AppRoutingModule {}
You also have to replace the content of app.component.html with <router-outlet></router-outlet> as following:
<router-outlet></router-outlet>
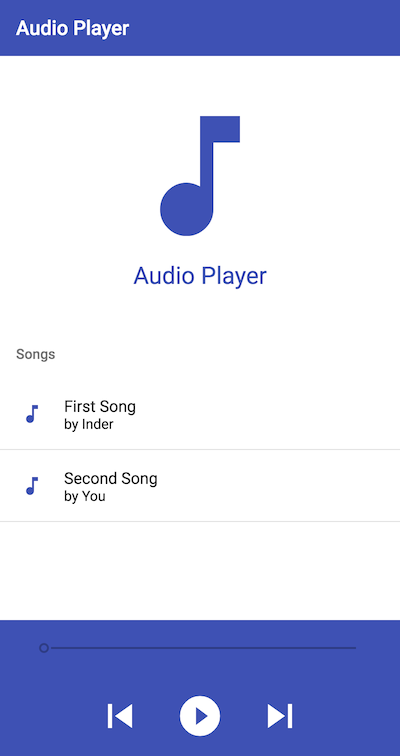
At this point, you can actually see how the app looks like. Go ahead and spin up the development server with npm start and open the browser at localhost:4200. You should see this:
However, you will observe that none of our buttons are working. Let's start adding functionality to our application.
Creating a Service to Manage the Audio Playback
After creating the audio player UI, you can start working on the playback feature.
Creating playback Observable
The Observable that you are going to create is the central piece of your application. RxJS comes with an Observable constructor to help you create custom observables. It takes a subscribe function as an input and returns an Observable.
new Observable(subscribe): Observable<T>;
This subscribe function takes an observer object and returns an unsubscribe function. Observer objects provide three methods: next, error, and complete.
- To emit a value, you can call the
observer.nextmethod with the desired value. - In case of an error, you can use the
observer.errorfunction to throw the error and make the observable stop. - If you no longer need the observer and there are no more values to emit, you can call the
observer.completemethod.
Don't be confused with
new Observable(subscribe)andObservable.subscribe(). Thesubscribemethod that you pass into theObservableconstructor is like a blueprint of an Observable and you can execute it by invokingObservable.subscribe()method.
To know more about Observables, take a look at Reverse Engineering Observable.
In your audio player app, you are going to create an observable to get notifications about media events like playing, pause, timeupdate, and so on. So, basically, you will listen to the media events of Audio inside the observable and then notify the rest of the app via the observer.next method.
Now that you understand why you need an observable, you can start by creating a service using it in your Angular app:
ng generate service services/audio
This will generate service in a file called audio.service.ts under ./src/services/audio/. Replace the contents of the audio.service.ts file with:
// src/app/services/audio.service.ts
import { Injectable } from "@angular/core";
import { Observable, BehaviorSubject, Subject } from "rxjs";
import { takeUntil } from "rxjs/operators";
import * as moment from "moment";

@Injectable({
  providedIn: "root"
})
export class AudioService {
  private stop$ = new Subject();
  private audioObj = new Audio();
  audioEvents = [
    "ended",
    "error",
    "play",
    "playing",
    "pause",
    "timeupdate",
    "canplay",
    "loadedmetadata",
    "loadstart"
  ];

  private streamObservable(url) {
    new Observable(observer => {
      // Play audio
      this.audioObj.src = url;
      this.audioObj.load();
      this.audioObj.play();

      const handler = (event: Event) => {
        observer.next(event);
      };

      this.addEvents(this.audioObj, this.audioEvents, handler);
      return () => {
        // Stop Playing
        this.audioObj.pause();
        this.audioObj.currentTime = 0;
        // remove event listeners
        this.removeEvents(this.audioObj, this.audioEvents, handler);
      };
    });
  }

  private addEvents(obj, events, handler) {
    events.forEach(event => {
      obj.addEventListener(event, handler);
    });
  }

  private removeEvents(obj, events, handler) {
    events.forEach(event => {
      obj.removeEventListener(event, handler);
    });
  }
}
Now, whenever you want to play a new audio file, you will create this observable and listen to all these media events. You will do this via a new method called playStream() that you are going to add to the AudioService class:
// src/app/services/audio.service.ts
// ... import statements ...

export class AudioService {
  // ... constructors and other methods ...

  playStream(url) {
    return this.streamObservable(url).pipe(takeUntil(this.stop$));
  }
}
“Learn about the power of RxJS observables by building an audio player with Angular and Material Design.”
Tweet This
Adding the playback methods
Now that you have the basis of the AudioService, you can develop the rest of its methods: play, pause, stop, seekTo, and formatTime. As their implementation is self-explanatory, you can simply add these five methods to the AudioService service as shown below:
// src/app/services/audio.service.ts
// ... import statements ...

export class AudioService {
  // ... constructors and other methods ...
  play() {
    this.audioObj.play();
  }

  pause() {
    this.audioObj.pause();
  }

  stop() {
    this.stop$.next();
  }

  seekTo(seconds) {
    this.audioObj.currentTime = seconds;
  }

  formatTime(time: number, format: string = "HH:mm:ss") {
    const momentTime = time * 1000;
    return moment.utc(momentTime).format(format);
  }
}
Managing Playback State Using RxJS
In a typical Angular application, you might use some state management library like NgRx. But in this application, you are going to use BehaviorSubject to manage the state of the application.
You are going to update AudioService to manage the state since the state is dependent on audio playback.
Creating StreamState interface
In order to take more advantage of TypeScript's type checking; first, you are going to create an interface for state management.
ng g interface interfaces/streamState
This will generate an interface in a file called stream-state.ts under ./src/interfaces/. Replace the content of the file with the following:
// src/app/interfaces/stream-state.ts
export interface StreamState {
  playing: boolean;
  readableCurrentTime: string;
  readableDuration: string;
  duration: number | undefined;
  currentTime: number | undefined;
  canplay: boolean;
  error: boolean;
}
This list explains what these values mean:
playing: a boolean which indicates if there is any audio playingreadableCurrentTime: a string which gives you the current time of playing audio in a human-readable formreadableDuration: the human-readable duration of the current audioduration: the duration of current audio in millisecondscurrentTime: the current time of audio in millisecondscanplay: boolean to indicate if you can play the selected audio or noterror: a boolean to indicate if an error occurred while playing audio or not
Creating a default state
Now you are going to import the StreamState interface and create a state object with the initial state as following:
// src/app/services/audio.service.ts
import { StreamState } from '../interfaces/stream-state';

export class AudioService {
  ...
  private state: StreamState = {
    playing: false,
    readableCurrentTime: '',
    readableDuration: '',
    duration: undefined,
    currentTime: undefined,
    canplay: false,
    error: false,
  };
}
Emitting the state changes
You will also need a way to emit state changes. So you are going to use BehaviorSubject named stateChange. You will also provide and emit the default value of state as shown below. Also, the state is dependent on Audio Events like playing, pause and so on. You are going to update state by reacting to those events using the updateStateEvents method. The updateStateEvent method takes an audio event and set this.state. In the end, you are going to emit the latest state via stateChange subject as shown:
// src/app/services/audio.service.ts
export class AudioService {
  private stateChange: BehaviorSubject<StreamState> = new BehaviorSubject(
    this.state
  );

  private updateStateEvents(event: Event): void {
    switch (event.type) {
      case "canplay":
        this.state.duration = this.audioObj.duration;
        this.state.readableDuration = this.formatTime(this.state.duration);
        this.state.canplay = true;
        break;
      case "playing":
        this.state.playing = true;
        break;
      case "pause":
        this.state.playing = false;
        break;
      case "timeupdate":
        this.state.currentTime = this.audioObj.currentTime;
        this.state.readableCurrentTime = this.formatTime(
          this.state.currentTime
        );
        break;
      case "error":
        this.resetState();
        this.state.error = true;
        break;
    }
    this.stateChange.next(this.state);
  }
}
Resetting the state
When you need to reset the state. You can do it using resetState method as following:
// src/app/services/audio.service.ts
private resetState() {
  this.state = {
    playing: false,
    readableCurrentTime: '',
    readableDuration: '',
    duration: undefined,
    currentTime: undefined,
    canplay: false,
    error: false
  };
}
Reading the state
You are going to need a method to share the stateChange BehaviorSubject to the rest of the application. However, providing access to Subject outside the service can be dangerous. So you will use asObservable method of BehaviorSubject to only return Observable part as follows:
// src/app/services/audio.service.ts
export class AudioService {
  getState(): Observable<StreamState> {
    return this.stateChange.asObservable();
  }
}
Updating streamObservable
Finally, you need to adapt the streamObservable method by firing updateStateEvent method inside it and also resetting the state during unsubscription. The updated streamObservable looks like this:
// src/app/services/audio.service.ts
private streamObservable(url) {
  return new Observable(observer => {
    // Play audio
    this.audioObj.src = url;
    this.audioObj.load();
    this.audioObj.play();

    const handler = (event: Event) => {
      this.updateStateEvents(event);
      observer.next(event);
    };

    this.addEvents(this.audioObj, this.audioEvents, handler);
    return () => {
      // Stop Playing
      this.audioObj.pause();
      this.audioObj.currentTime = 0;
      // remove event listeners
      this.removeEvents(this.audioObj, this.audioEvents, handler);
      // reset state
      this.resetState();
    };
  });
}
You can check the final version of AudioService here.
Reading the Music Files
After managing the state of the application, you will need to create a service to get a list of files. To do so, you can create a cloud service using Angular:
ng generate service services/cloud
This command will generate service in a file called cloud.service.ts under ./src/services. Now, replace the contents of this file with:
// src/app/services/cloud.service.ts
import { Injectable } from "@angular/core";
import { of } from "rxjs";

@Injectable({
  providedIn: "root"
})
export class CloudService {
  files: any = [
    // tslint:disable-next-line: max-line-length
    {
      url:
        "https://ia801504.us.archive.org/3/items/EdSheeranPerfectOfficialMusicVideoListenVid.com/Ed_Sheeran_-_Perfect_Official_Music_Video%5BListenVid.com%5D.mp3",
      name: "Perfect",
      artist: " Ed Sheeran"
    },
    {
      // tslint:disable-next-line: max-line-length
      url:
        "https://ia801609.us.archive.org/16/items/nusratcollection_20170414_0953/Man%20Atkiya%20Beparwah%20De%20Naal%20Nusrat%20Fateh%20Ali%20Khan.mp3",
      name: "Man Atkeya Beparwah",
      artist: "Nusrat Fateh Ali Khan"
    },
    {
      url:
        "https://ia801503.us.archive.org/15/items/TheBeatlesPennyLane_201805/The%20Beatles%20-%20Penny%20Lane.mp3",
      name: "Penny Lane",
      artist: "The Beatles"
    }
  ];

  getFiles() {
    return of(this.files);
  }
}
The getFiles method above basically mocks an HTTP request by returning an Observable with a hardcoded files object.
Stitching All Together
So far you have written code for services and created the UI of the application. Now you will stitch both of them together by implementing PlayerComponent.
The audio player UI controller
To help you control your audio player user interface, you will implement a controller responsible for the following things:
- fetching all the media files
- adding the playback feature in the app
You will implement the following methods:
constructor: creates an instance of Player Component, then it will grab all the media files from the cloud service and finally it will start listening to state updates fromAudioServiceviagetStatemethodplayStream: it will subscribe to AudioService.playStream to start playing an audio file for the first timeplay: it will restart the audio playbackpause: it will pause the audio playbackstop: it will stop the audio playbackopenFile: it will grab the audio file, set it as the current file and then play it using theplayStreammethodnext: it will play the next track from the audio playlistprevious: it will play the previous track from the audio playlistisFirstPlaying: it will check if the first track is playing or notisLastPlaying: it will check if the last track is playing or notonSliderChangeEnd: it will fire when the user uses the slider andseekTothat part of the music
First, you will need to import required files and create files, state, and currentFile properties as shown:
// src/app/pages/player/player.component.ts
import { Component } from "@angular/core";
import { AudioService } from "../../services/audio.service";
import { CloudService } from "../../services/cloud.service";
import { StreamState } from "../../interfaces/stream-state";

// ... @Component declaration ...

export class PlayerComponent {
  files: Array<any> = [];
  state: StreamState;
  currentFile: any = {};
}
constructor
The constructor will create an instance of PlayerComponent and fetch the media files and then assign them to this.files property. It will also subscribe to state changes and assign it to this.state property.
// src/app/pages/player/player.component.ts
// ... import statements and @Component declaration ...
export class PlayerComponent {
  constructor(
    public audioService: AudioService,
    public cloudService: CloudService
  ) {
    // get media files
    cloudService.getFiles().subscribe(files => {
      this.files = files;
    });

    // listen to stream state
    this.audioService.getState().subscribe(state => {
      this.state = state;
    });
  }
}
playStream Method
Then, the playstream method can fire the playStream method of your AudioService. This method on the service returns an observable that you will use to subscribe and start listening to media events like canplay, playing, etc. However, you don't really need those values or events because you can read them using the stateChange subject. This method is used to start observable and audio playback.
// src/app/pages/player/player.component.ts
// ... import statements and @Component declaration ...
export class PlayerComponent {
  // ...constructor and other methods ...\
  playStream(url) {
    this.audioService.playStream(url).subscribe(events => {
      // listening for fun here
    });
  }
}
openFile Method
Whenever the user clicks on a media file, the openFile method will be fired. Then, this method will fire the playStream method with the URL of the file chosen.
// src/app/pages/player/player.component.ts
// ... import statements and @Component declaration ...
export class PlayerComponent {
  // ...constructor and other methods ...
  openFile(file, index) {
    this.currentFile = { index, file };
    this.audioService.stop();
    this.playStream(file.url);
  }
}
pause Method
Once the playStream method is fired, the media playback is initiated. As such, your users might want to pause the playback. For that, you will implement the pause method as follows:
// src/app/pages/player/player.component.ts
// ... import statements and @Component declaration ...
export class PlayerComponent {
  // ...constructor and other methods ...
  pause() {
    this.audioService.pause();
  }
}
play Method
It's also true that users might want to start playing the media again. For that, you will add the following:
// src/app/pages/player/player.component.ts
// ... import statements and @Component declaration ...
export class PlayerComponent {
  // ...constructor and other methods ...
  play() {
    this.audioService.play();
  }
}
stop Method
Then, to stop the media, you will add the following method:
// src/app/pages/player/player.component.ts
// ... import statements and @Component declaration ...
export class PlayerComponent {
  // ...constructor and other methods ...
  stop() {
    this.audioService.stop();
  }
}
The next Method
Also, to let your users move to the next music, you will define the following method:
// src/app/pages/player/player.component.ts
// ... import statements and @Component declaration ...
export class PlayerComponent {
  // ...constructor and other methods ...
  next() {
    const index = this.currentFile.index + 1;
    const file = this.files[index];
    this.openFile(file, index);
  }
}
The previous Method
Similarly, you will need to provide a method to play the previous track:
// src/app/pages/player/player.component.ts
// ... import statements and @Component declaration ...
export class PlayerComponent {
  // ...constructor and other methods ...
  previous() {
    const index = this.currentFile.index - 1;
    const file = this.files[index];
    this.openFile(file, index);
  }
}
The isFirstPlaying and isLastPlaying Methods
Then, you will need two helper methods to check if the music being played is the first or the last track from the playlist. You use these methods to disable and enable the UI buttons:
// src/app/pages/player/player.component.ts
// ... import statements and @Component declaration ...
export class PlayerComponent {
  // ...constructor and other methods ...
  isFirstPlaying() {
    return this.currentFile.index === 0;
  }

  isLastPlaying() {
    return this.currentFile.index === this.files.length - 1;
  }
}
The onSliderChangeEnd Methods
Also, you will want to enable your users to do seek operations. So, when the seek operation ends, Angular will fire the onSliderChangeEnd method and, in it, you can fetch the time selected by the user and seekTo that time:
// src/app/pages/player/player.component.ts
// ... import statements and @Component declaration ...
export class PlayerComponent {
  // ...constructor and other methods ...
  onSliderChangeEnd(change) {
    this.audioService.seekTo(change.value);
  }
}
Building and running the audio player
After implementing the application, you can run it via @angular/cli:
npm start
The above command will spin up a web server at http://localhost:4200/.
Authentication with Auth0
To develop a secure app, you are going to rely on Auth0 to handle the authentication of your users. As such, you can sign up for a free Auth0 account here. Then, you will need to set up an Auth0 Application to represent your mobile app.
Installing dependencies
To secure your Angular app with Auth0, you will have to install auth0-js via npm:
npm install --save auth0-js
Set up an Auth0 application
- Go to your Auth0 Dashboard and click the "create a new application" button.
- Name your new app (e.g. "Angular Audio Player"), select "Single Page Application" as its type, and click the "Create" button.
- In the Settings tab of your new Auth0 app, add
http://localhost:4200in the Allowed Callback URLs. - Add
http://localhost:4200to both the Allowed Web Origins and Allowed Logout URLs. - Click the "Save Changes" button.
Configuring Auth0
Now you are going to add Auth0 Configuration to the environment.ts file under src/environment directory:
// src/environment/environment.ts
export const environment = {
  production: false,
  auth0: {
    clientID: "[YOUR_AUTH0_CLIENT_ID]",
    domain: "[YOUR_AUTH0_DOMAIN]",
    redirectUri: "http://localhost:4200",
    logoutUrl: "http://localhost:4200"
  }
};
This list explains what these values mean:
clientID: the Client Id property available in your Auth0 Application.domain: your Auth0 Domain (e.g.your-domain.auth0.comredirectUri: the URL where the user will be redirected after login. You can use the same URL as your callback URL herelogoutUrl: the URL that you want your user to direct when he/she log out.
Auth service
After creating your Auth0 account and defining the Auth0 config in the environment file, you will need to define an authentication service in your Angular app. To do so, you will use @angular/cli:
ng generate service services/auth
This command will generate service in a file called auth.service.ts under ./src/services. Now, replace the contents of this file with:
// src/app/services/auth.service.ts
import { Injectable } from "@angular/core";
import * as auth0 from "auth0-js";
import { environment } from "../../environments/environment";
import { Observable, BehaviorSubject, bindNodeCallback, of } from "rxjs";
import { Router } from "@angular/router";

@Injectable({
  providedIn: "root"
})
export class AuthService {
  auth0 = new auth0.WebAuth({
    clientID: environment.auth0.clientID,
    domain: environment.auth0.domain,
    responseType: "token id_token",
    redirectUri: environment.auth0.redirectUri,
    scope: "openid profile email"
  });

  // Track whether or not to renew token
  private _authFlag = "isLoggedIn";
  private _userProfileFlag = "userProfile";

  // Store authentication data
  // Create stream for token
  token$: Observable<string>;
  // Create stream for user profile data
  userProfile$ = new BehaviorSubject<any>(null);

  // Authentication Navigation
  onAuthSuccessUrl = "/";
  onAuthFailureUrl = "/";
  logoutUrl = environment.auth0.logoutUrl;

  // Create observable of Auth0 parseHash method to gather auth results
  parseHash$ = bindNodeCallback(this.auth0.parseHash.bind(this.auth0));
  // Create observable of Auth0 checkSession method to
  // verify authorization server session and renew tokens
  checkSession$ = bindNodeCallback(this.auth0.checkSession.bind(this.auth0));

  constructor(private router: Router) {
    const userProfile = localStorage.getItem(this._userProfileFlag);
    if (userProfile) {
      this.userProfile$.next(JSON.parse(userProfile));
    }
  }

  login = () => this.auth0.authorize();

  handleLoginCallback = () => {
    if (window.location.hash && !this.authenticated) {
      this.parseHash$().subscribe({
        next: authResult => {
          this._setAuth(authResult);
          window.location.hash = "";
          this.router.navigate([this.onAuthSuccessUrl]);
        },
        error: err => this._handleError(err)
      });
    }
  };

  private _setAuth = authResult => {
    // Save authentication data and update login status subject
    // Observable of token
    this.token$ = of(authResult.accessToken);

    const userProfile = authResult.idTokenPayload;
    // Emit value for user data subject
    this.userProfile$.next(userProfile);
    // save userProfile in localStorage
    localStorage.setItem(this._userProfileFlag, JSON.stringify(userProfile));

    // Set flag in local storage stating this app is logged in
    localStorage.setItem(this._authFlag, JSON.stringify(true));
  };

  get authenticated(): boolean {
    return JSON.parse(localStorage.getItem(this._authFlag));
  }

  renewAuth() {
    if (this.authenticated) {
      this.checkSession$({}).subscribe({
        next: authResult => this._setAuth(authResult),
        error: err => {
          localStorage.removeItem(this._authFlag);
          localStorage.removeItem(this._userProfileFlag);
          this.router.navigate([this.onAuthFailureUrl]);
        }
      });
    }
  }

  logout = () => {
    // Set authentication status flag in local storage to false
    localStorage.setItem(this._authFlag, JSON.stringify(false));
    // remove the userProfile data
    localStorage.removeItem(this._userProfileFlag);

    // This does a refresh and redirects back to the homepage
    // Make sure you have the logout URL in your Auth0
    // Dashboard Application settings in Allowed Logout URLs
    this.auth0.logout({
      returnTo: this.logoutUrl,
      clientID: environment.auth0.clientID
    });
  };

  // Utility functions

  private _handleError = err => {
    if (err.error_description) {
      console.error(`Error: ${err.error_description}`);
    } else {
      console.error(`Error: ${JSON.stringify(err)}`);
    }
  };
}
To better understand how the code above works, take a look into the following explanation:
auth0: is an instance ofauth0-WebAuth, which you will use for the authentication_authFlag && _userProfileFlag: are thelocalStoragekeys for storing authentication and user profile datatoken$: anObservablewhich emits access tokenuserProfile$: thisBehaviorSubjectcreates a stream for the profile dataonAuthSuccessUrl && onAuthFailureUrl: the URLs which Auth0 will redirect to after success and failure of authentication respectivelylogoutUrl: the URL where the user is redirected after log outparseHash$: anObservablewhich parse the hash and gives you back the auth resultcheckSession$: anObservableuse to check the session and then renew the token if it is required
Now, take a look at the methods of the service above:
constructor: In the constructor, you are going to check if there is any user information stored inlocalStorage. If yes, then you will emit it viauserProfile$BehaviorSubjectlogin(): In the login method, you authorize the userhandleLoginCallback(): After authentication, this method is going to be fired. It usesparseHash$Observable to parse the auth result and then it sets the authentication state usingthis._setAuthmethod and finally redirect toonAuthSuccessUrl_setAuth(): takesauthResultfrom parsed Auth data and initializestoken$. sets the Auth State inlocalStoragealong withuserProfiledataauthenticated(): is used to check if the user is authenticated or not usinglocalStorageflagrenewAuth(): checks if the user is authenticated or not and then check session if it's valid or not and set's auth state respectivelylogout(): it logs out the user by removing auth state and user data fromlocalStorage. It also calls theauth0.logoutmethod which redirects the user to givenlogoutUrl
Auth guard
Now that you have created AuthService. You can create AuthGuard, which allows you to secure routes of the application. Use Angular Cli to generate the guard as follows:
ng generate guard guards/auth
This command will generate the auth.guard.ts file under /src/app/guards directory. Update the content of the file with the following:
// src/app/guards/auth.guard.ts
import { Injectable } from "@angular/core";
import {
  CanActivate,
  ActivatedRouteSnapshot,
  RouterStateSnapshot
} from "@angular/router";
import { Observable } from "rxjs";
import { AuthService } from "../services/auth.service";
import { Router } from "@angular/router";

@Injectable({
  providedIn: "root"
})
export class AuthGuard implements CanActivate {
  constructor(private authService: AuthService, private router: Router) {}

  canActivate(
    next: ActivatedRouteSnapshot,
    state: RouterStateSnapshot
  ): Observable<boolean> | Promise<boolean> | boolean {
    if (this.authService.authenticated) {
      return true;
    } else {
      this.router.navigate(["/"]);
      return false;
    }
  }
}
It basically checks if the user is logged in or not. If the user is logged in, it allows the user to access the given route otherwise redirect the user to / route.
Updating the UI
Now that you have created the AuthService and AuthGuard, you can use them to add authentication to the player.
Profile page
First, you are going to create an extra page for the player. You are going to add user profile information on that page. You will use @angular/cli:
ng g component pages/profile --module app
Open the profile.component.ts file in pages/profile directory and add the following content:
// src/app/pages/profile/profile.component.ts
import { Component, OnInit } from "@angular/core";
import { AuthService } from "src/app/services/auth.service";

@Component({
  selector: "app-profile",
  templateUrl: "./profile.component.html",
  styleUrls: ["./profile.component.scss"]
})
export class ProfileComponent implements OnInit {
  userProfile;
  constructor(authService: AuthService) {
    authService.userProfile$.subscribe(profile => {
      this.userProfile = profile;
    });
  }

  ngOnInit() {}
}
Now open the profile.component.html add the following content:
<!-- src/app/pages/profile/profile.component.html -->
<div class="container">
    <mat-toolbar color="primary" class="main-toolbar">
      <mat-icon class="back-btn" routerLink="/">arrow_back</mat-icon>
      <span>Audio Player - Profile</span>
      <span class="spacer"></span>
    </mat-toolbar>
    <mat-card class="profile-card">
        <img mat-card-image [src]="userProfile?.picture"/>
        <mat-card-content>
            <mat-card-title>{{ userProfile?.name }}</mat-card-title>
        </mat-card-content>
      </mat-card>
</div>
Finally, open the profile.component.scss and add the following content:
// src/app/pages/profile/profile.component.scss
.back-btn {
  margin-right: 5px;
  cursor: pointer;
}

.profile-card {
  margin: 20px;
  max-width: 400px;
}
User can access this component at /profile URL.
You have to add this route to router config in the app-routing.module.ts file as follows:
// src/app/app-routing.module.ts
// ... imports statements
const routes: Routes = [
  { path: "", component: PlayerComponent },
  { path: "profile", component: ProfileComponent },
  { path: "**", redirectTo: "" }
];

// ... AppRoutingModule class
Updating player component
You also have to update the player component by adding the Authentication UI and also link to the Profile page. You are going to update player.component.html by adding the <mat-toolbar> in the header as follows:
<!-- src/app/pages/player/player.component.html -->
<mat-toolbar color="primary" class="main-toolbar">
  <span>Audio Player</span>
  <span class="spacer"></span>
  <span class="toolbar-btn" *ngIf="!auth.authenticated" (click)="auth.login()">LOGIN </span>
  <span class="toolbar-btn" *ngIf="auth.authenticated" (click)="auth.logout()">LOGOUT</span>
  <span class="toolbar-btn" *ngIf="auth.authenticated" routerLink="/profile">PROFILE</span>
</mat-toolbar>
Along with Toolbar, you have to hide the playlist if user is not logged in. You can simply add *ngIf="auth.authenticated" to the playlist as follows:
<!-- src/app/pages/player/player.component.html -->
<mat-list color="primary" *ngIf="auth.authenticated">
  <h3 mat-subheader>Songs</h3>
  <mat-list-item *ngFor="let file of files; let i = index" (click)="openFile(file, i)">
    <mat-icon color="primary" mat-list-icon>music_note</mat-icon>
    <h4 mat-line>{{ file.name }}</h4>
    <h5 mat-line>by {{ file.artist }}</h5>
    <mat-icon color="primary" *ngIf="currentFile.index === i && !state?.error">volume_up</mat-icon>
    <h6 *ngIf="currentFile.index === i && state?.error">ERROR</h6>
    <mat-divider></mat-divider>
  </mat-list-item>
</mat-list>
Also, you have to inject the AuthService inside PlayerComponent as follows:
// src/app/pages/player/player.component.ts
// ... import statements and @Component Decorator
constructor(public audioService: AudioService,
  public cloudService: CloudService,
  public auth: AuthService) {
 // ... constructor code
}

// ... rest of the methods
Updating AppComponent
Finally, you have to update the app.component.ts file to handle authentication as follows:
// src/app/app.component.ts
import { Component } from "@angular/core";
import { AuthService } from "./services/auth.service";

@Component({
  selector: "app-root",
  templateUrl: "./app.component.html",
  styleUrls: ["./app.component.scss"]
})
export class AppComponent {
  constructor(public auth: AuthService) {
    auth.renewAuth();
    auth.handleLoginCallback();
  }
}
Running
You can run the application using @angular/cli:
npm start
“Adding authentication to an Angular app is simple and secure using Auth0 with RxJS!”
Tweet This
Conclusion
In this article, you created an audio player app with Angular. You used RxJS to develop audio playback features and handle state management. Beyond that, you also used Auth0 to handle user authentication in your app. With this, you have finished developing the application with static audio content.
I hope you enjoyed this article. Again, you can find the final code in this GitHub repository. See you next time!
About the author

Indermohan Singh
Mobile Developer