
Modern applications are increasingly data driven, which leads to a lot of time spent fetching, filtering, and aggregating data. When implemented with the Apollo platform, GraphQL reduces the complexity associated with data fetching and enables developers to take advantage of incredible tooling for crafting flexible APIs. In this tutorial, we'll explore how to build a production-ready application with GraphQL, React and Apollo. Finally, we'll wrap it up by learning how to add authentication with Auth0. The completed code is available on GitHub.
Secure your GraphQL API with Auth0
Auth0 allows us to easily add authentication to applications. Let's get started with securing our GraphQL API. Open your GraphQL API terminal and install the following libraries:
npm install jsonwebtoken jwks-rsa --save
- jsonwebtoken: JsonWebToken implementation for Node.js
- jwks-rsa: A library to retrieve RSA public keys from a JWKS (JSON Web Key Set) endpoint.
Open up src/server.js and import them:
const { ApolloServer, gql, AuthenticationError } = require('apollo-server');
const jwt = require('jsonwebtoken');
const jwksClient = require('jwks-rsa');
...
...
Now, let's add the code to verify a token:
const { ApolloServer, gql, AuthenticationError } = require('apollo-server');
const jwt = require('jsonwebtoken');
const jwksClient = require('jwks-rsa');
import { Author, Book } from './store';


const client = jwksClient({
  jwksUri: `https://<YOUR_AUTH0_DOMAIN>/.well-known/jwks.json`
});

function getKey(header, cb){
  client.getSigningKey(header.kid, function(err, key) {
    var signingKey = key.publicKey || key.rsaPublicKey;
    cb(null, signingKey);
  });
}

const options = {
  audience: '<YOUR_AUTH0_CLIENT_ID>',
  issuer: `https://<YOUR_AUTH0_DOMAIN>/`,
  algorithms: ['RS256']
};

...
Replace <YOUR_AUTH0_DOMAIN> with the value in the Domain field of your Auth0 application (e.g. kabiyesi.auth0.com). Also, replace the <YOUR_AUTH0_CLIENT_ID> placeholder with the value presented in the Client ID field of your Auth0 Application.
In GraphQL, there's no set standard on how to perform authentication and authorization for APIs. However, Apollo has an excellent guide for access control in GraphQL.
One of the ways of adding authentication to GraphQL APIs according to the guide is putting user information on the context. Let's go ahead and do that right away!
src/server.js
...
...
const server = new ApolloServer({
  typeDefs,
  resolvers,
  context: ({ req }) => {
    // simple auth check on every request
    const token = req.headers.authorization;
    const user = new Promise((resolve, reject) => {
      jwt.verify(token, getKey, options, (err, decoded) => {
        if(err) {
          return reject(err);
        }
        resolve(decoded.email);
      });
    });

    return {
      user
    };
  },
});

...
In the Apollo Server constructor above, we pass a function to build our context object. The context object is one that gets passed to every single resolver at every level, so we can access it anywhere in our schema code. It’s where we can store things like data fetchers, database connections, and information about the user making the request.
Since the context is generated again with every new request, we don’t have to worry about cleaning up user data at the end of execution.
The context function here looks at the request headers, pulls off the header named authorization, and stores it to a token variable. It then calls the jwt.verify method to validate the token by using the getKey callback. A promise is resolved with the user's email if the token is valid and a promise is rejected with an error if the token is not a valid one. After that, it returns a context object containing the (potential) user, for all of our resolvers to use.
Now, let's get the user from the context object in our Mutation resolver!
const { ApolloServer, gql, AuthenticationError } = require('apollo-server');

...
...
...
const resolvers = {
  ...

  Mutation: {
    addBook: async (_, {title, cover_image_url, average_rating, authorId }, { user }) => {
       try {
        const email = await user; // catching the reject from the user promise.
        const book = await Book.create({
          title: title,
          cover_image_url: cover_image_url,
          average_rating: average_rating,
          authorId: authorId
        });

        return book;
       } catch(e) {
           throw new AuthenticationError('You must be logged in to do this');
       }
    }
  }
};
The third argument in a resolver is the context object. In the code above, we retrieved { user } passed from the context in Apollo Server constructor in the addBook resolver.
const email = await user;
This line of code above waits for the user promise to resolve and stores the email of the user in an email variable. If there's an error, the catch block gets the error and throws an AuthenticationError. Wait a minute? Where's the AuthenticationError coming from? We imported it from Apollo Server.
Apollo Server 2.0 provides a couple of predefined errors, including AuthenticationError, ForbiddenError, UserInputError and a generic ApolloError. These errors are designed to enhance errors thrown before and during GraphQL execution. The provided errors focus on debugging an Apollo server as well as enabling the client to take specific action based on an error.
When an error occurs in Apollo server both inside and outside of resolvers, each error inside of the errors array will contain an object at extensions that contains the information added by Apollo server.
Now, run your server and try to perform a mutation with a fake token!

Secure your React App
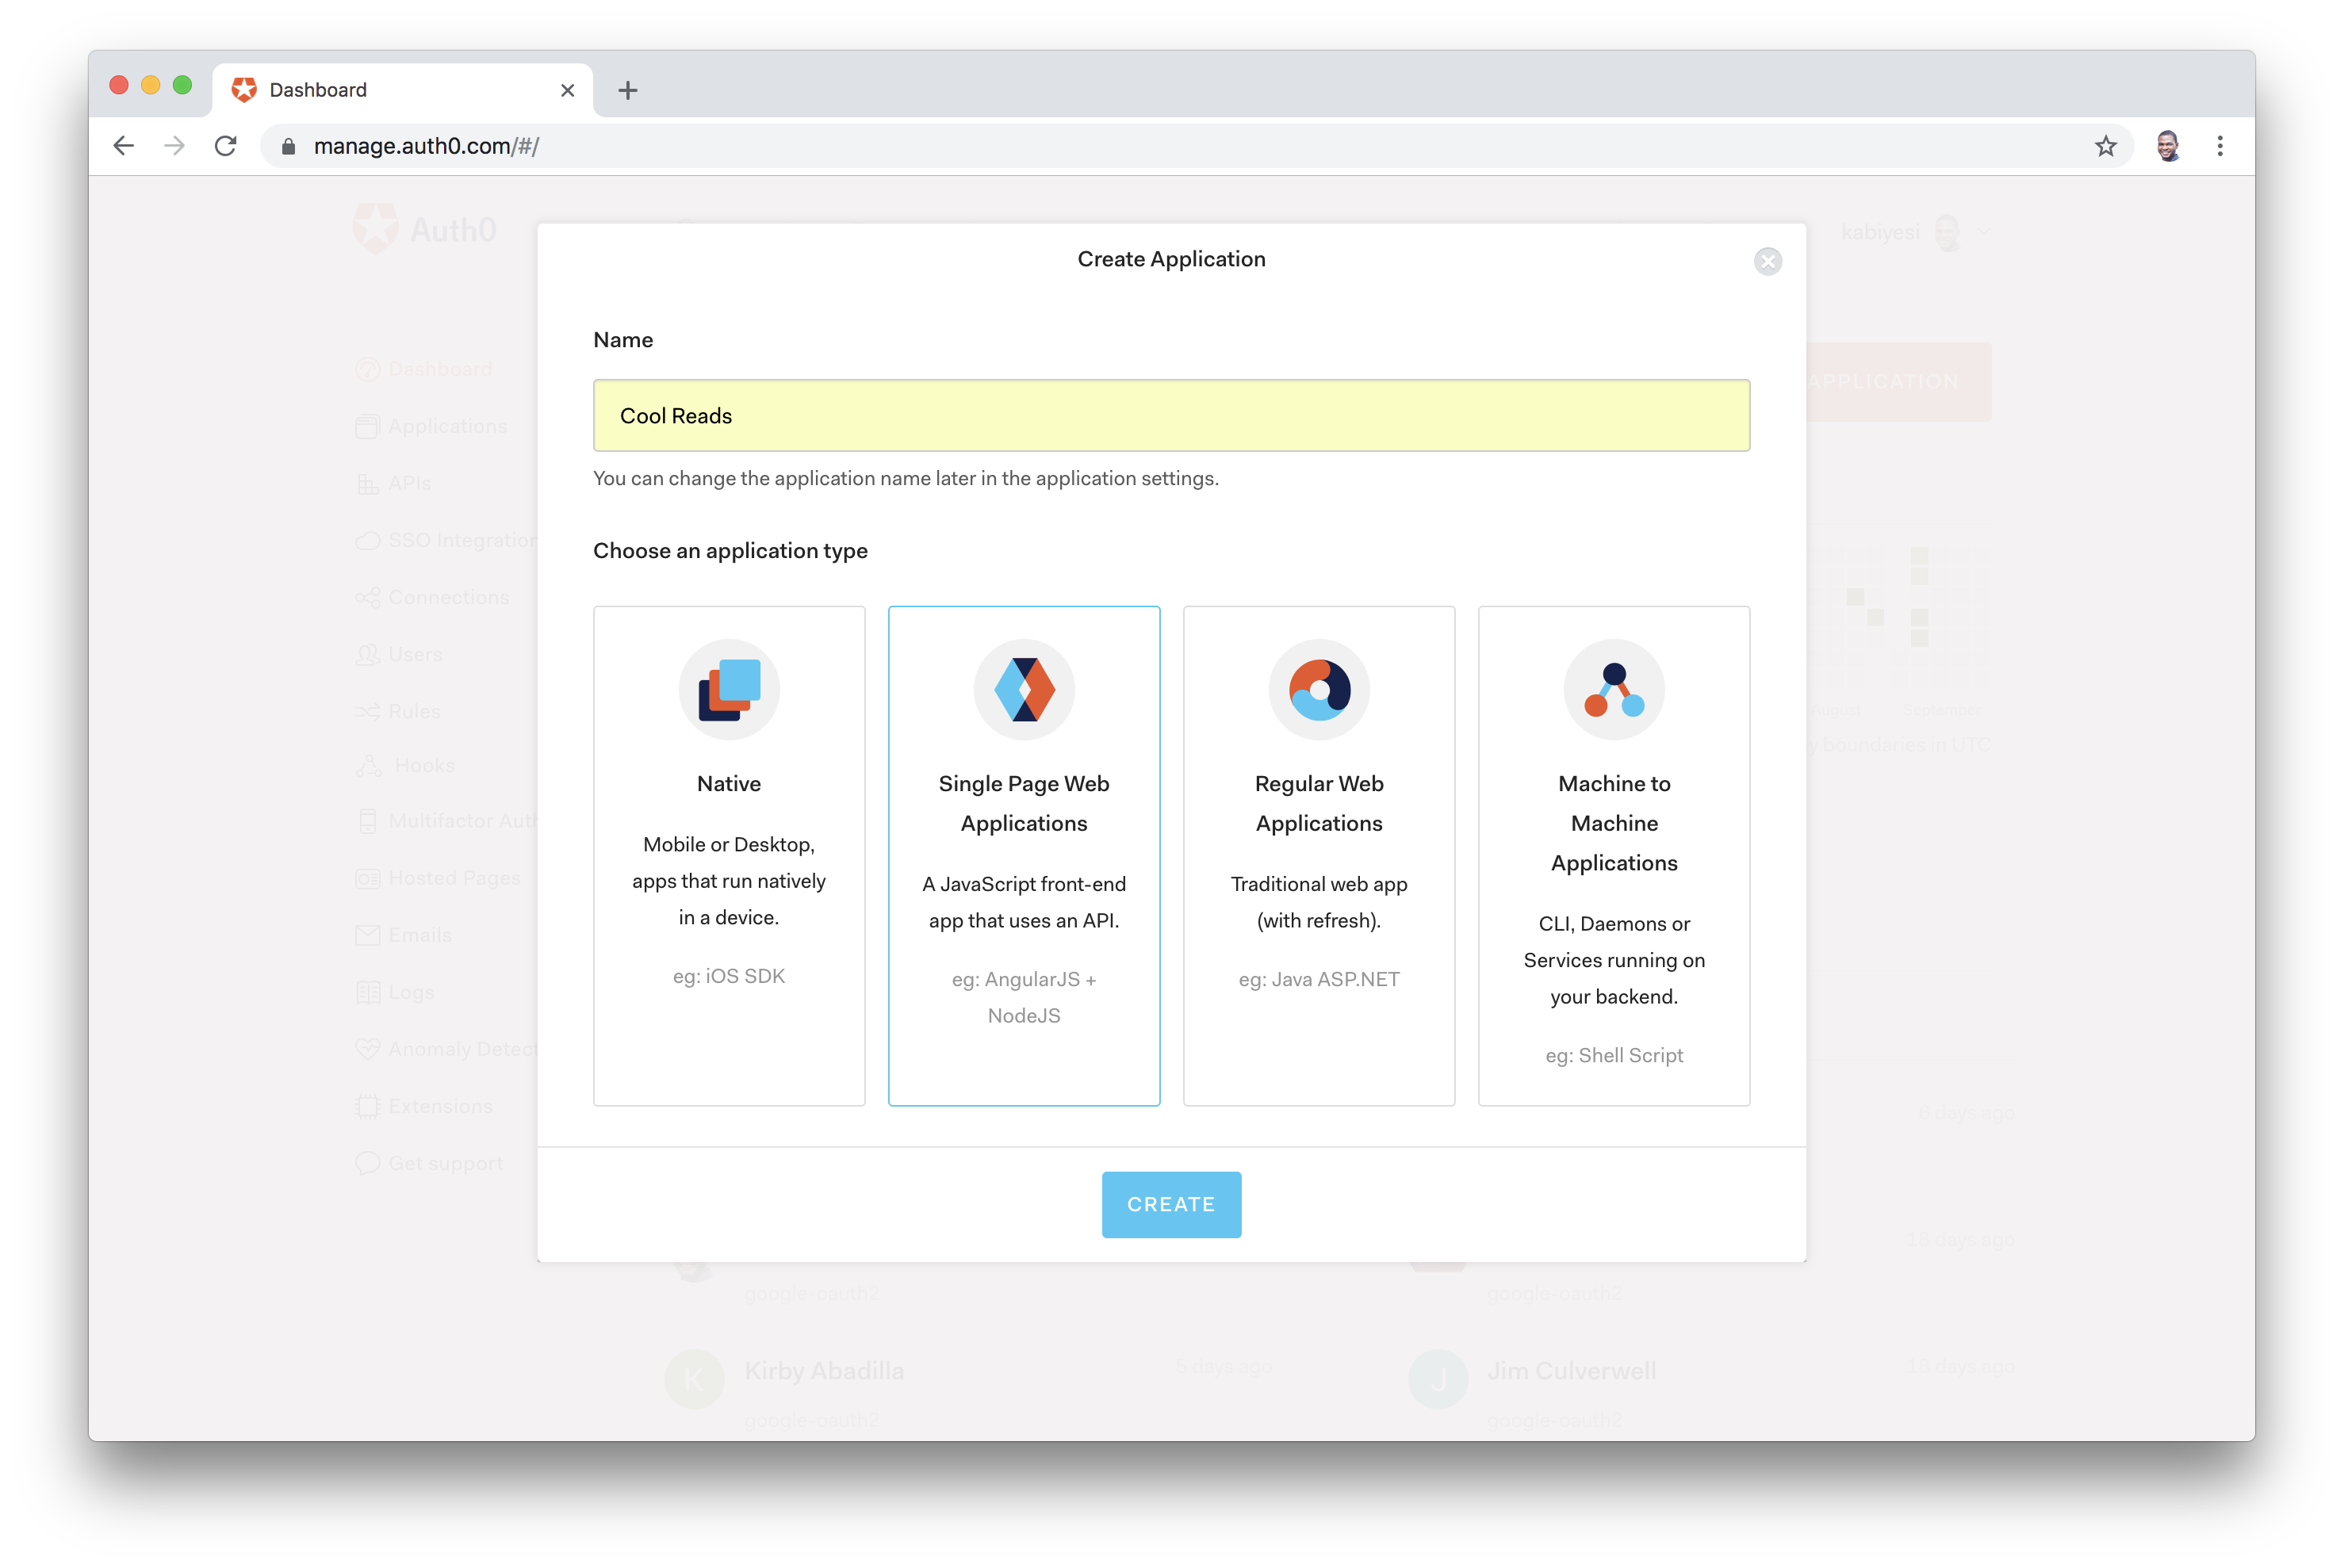
Auth0 allows us to easily add authentication to applications. Login to your Auth0 management dashboard and create a new application. In the dialog shown, enter the name and select Single Page Application as its type:

In the Settings tab, add http://localhost:3000/callback in the Allowed Callback URLs and http://localhost:3000 to the Allowed Origins (CORS). Also add http://localhost:3000 into the Allowed Logout URLs field.
Ensure you also replace the value of <AUTH0_DOMAIN> in const AUDIENCE = 'https://<AUTH0_DOMAIN>/userinfo'; to your auth0 domain.
Create the Auth Service
We'll create an authentication service to handle everything about authentication in our app. Go ahead and create an Auth.js file in the src directory.
Before we add code, you need to install auth0-js package like so:
npm install auth0-js --save
src/Auth.js
Open up the Auth.js file and add code to it like so:
import auth0 from 'auth0-js';

class Auth {
  constructor() {
    this.auth0 = new auth0.WebAuth({
      domain: '<YOUR_AUTH0_DOMAIN>',
      clientID: '<YOUR_AUTH0_CLIENT_ID>',
      redirectUri: 'http://localhost:3000/callback',
      audience: 'https://<YOUR_AUTH0_DOMAIN>/userinfo',
      responseType: 'token id_token',
      scope: 'openid email'
    });

    this.login = this.login.bind(this);
    this.logout = this.logout.bind(this);
    this.handleAuthentication = this.handleAuthentication.bind(this);
    this.isAuthenticated = this.isAuthenticated.bind(this);
  }

  login() {
    this.auth0.authorize();
  }

  getIdToken() {
    return this.idToken;
  }

  handleAuthentication() {
    return new Promise((resolve, reject) => {
      this.auth0.parseHash((err, authResult) => {
        if (err) return reject(err);
        if (!authResult || !authResult.idToken) {
          return reject(err);
        }
        this.setSession(authResult);
        resolve();
      });
    })
  }

  setSession(authResult) {
    this.idToken = authResult.idToken;
    console.log(this.idToken);
    // set the time that the id token will expire at
    this.expiresAt = authResult.expiresIn * 1000 + new Date().getTime();
  }

  logout() {
    this.auth0.logout({
      returnTo: 'http://localhost:3000',
      clientID: '<YOUR_AUTH0_CLIENT_ID>',
    });
  }

  silentAuth() {
    return new Promise((resolve, reject) => {
      this.auth0.checkSession({}, (err, authResult) => {
        if (err) return reject(err);
        this.setSession(authResult);
        resolve();
      });
    });
  }

  isAuthenticated() {
    // Check whether the current time is past the token's expiry time
    return new Date().getTime() < this.expiresAt;
  }
}

const auth = new Auth();

export default auth;
Note: Replace the <YOUR_AUTH0_CLIENT_ID> and <YOUR_AUTH0_DOMAIN> with the values from your Auth0 application.
Let's analyze what's going on in the authentication code above:
- constructor: An instance of
auth0.WebAuthis created and initialized with your Auth0 values and define some other important configurations. For example, you are defining that Auth0 will redirect users (redirectUri) to thehttp://localhost:3000/callbackURL (the same one you inserted in the Allowed Callback URLs field previously). - getIdToken: This method returns the
idTokengenerated by Auth0 for the current user. - handleAuthentication: This is the method that your app will call right after the user is redirected from Auth0. This method simply reads the hash segment of the URL to fetch the user details and the id token.
- isAuthenticated: This method returns whether there is an authenticated user or not.
- login: This method initializes the authentication process. This method sends your users to the Auth0 login page.
- logout: This method signs a user out.
Let's go update the Nav component to hide/show the login and logout buttons based on the user's authentication status.
Now, your Nav component should be refactored to look like this:
import React, { Component } from 'react';
import { Link, withRouter } from 'react-router-dom';
import auth from '../Auth';
import '../App.css';

class Nav extends Component {

  constructor(props){
    super(props);
  }

  logout = () => {
    auth.logout();
    this.props.history.replace('/');
  };

  render() {
    return (
      <nav className="navbar navbar-default">
        <div className="navbar-header">
          <Link className="navbar-brand" to="/">COOL READS</Link>
        </div>
        <ul className="nav navbar-nav">
          <li>
            <Link to="/">All Book Ratings</Link>
          </li>
          <li>
            {
              ( auth.isAuthenticated() ) ? <Link to="/create">Upload a Rated Book</Link> :  ''
            }
          </li>
        </ul>
        <ul className="nav navbar-nav navbar-right">
          <li>
            {
             (auth.isAuthenticated()) ? (<button className="btn btn-danger log" onClick={() => this.logout()}>Log out </button>) : (<button className="btn btn-info log" onClick={() => auth.login()}>Log In</button>)
            }
          </li>
        </ul>
      </nav>
    );
  }
}

export default withRouter(Nav);
Add A Callback Component
We will create a new component in the src/components directory and call it Callback.js. This component will be activated when the localhost:3000/callback route is called and it will process the redirect from Auth0 and ensure we received the right data back after a successful authentication.
Callback.js
import React, { Component } from 'react';
import {withRouter} from 'react-router-dom';
import loading from '../loading.svg';
import auth from '../Auth';

class Callback extends Component {

  async componentDidMount() {
    await auth.handleAuthentication();
    this.props.history.replace('/');
  }

  render() {
    const style = {
      position: 'absolute',
      display: 'flex',
      justifyContent: 'center',
      height: '100vh',
      width: '100vw',
      top: 0,
      bottom: 0,
      left: 0,
      right: 0,
      backgroundColor: 'white',
    }

    return (
      <div style={style}>
        <img src={loading} alt="loading"/>
      </div>
    );
  }
}

export default withRouter(Callback);
Once a user is authenticated, Auth0 will redirect back to our application and call the /callback route. Auth0 will also append the id_token to this request, and our Callback component will make sure to properly process and store the token in the in-app memory. Then, the app will be redirected back to the / page and will be in a logged-in state.
Go ahead and invoke the command below to copy the loading.svg into the appropriate directory:
curl -o src/loading.svg -O https://raw.githubusercontent.com/auth0-blog/book-app/master/client/src/loading.svg
Now, go ahead and add the /callback route in App.js.
...
import Callback from './components/Callback';
...

class App extends Component {

  render() {
    return (
      <div>
        <Nav />
        <Route exact path='/' component={ListBook} />
        <Route exact path='/create' component={CreateBook} />
        <Route exact path='/callback' component={Callback} />
      </div>
    );
  }
}

export default withRouter(App);
Send Token Via Headers From Apollo Client
Open index.js and modify it to be this:
...
import auth from './Auth';
...
const client = new ApolloClient({
  uri: "http://localhost:4000/graphql",
  request: operation => {
    operation.setContext(context => ({
      headers: {
        ...context.headers,
        authorization: auth.getIdToken(),
      },
    }));
  },
});
...
In the code above, we're setting the authorization header to the value of the id_token and sending it to the GraphQL API endpoint. Now try, to add a reviewed book again!
Keeping Users Signed In
Right now, once you reload the application, the users automatically get logged out because the user's credentials are stored in the app's memory. Let's keep the users logged in!
We'll use the Silent Authentication provided by Auth0. Whenever your application is loaded, it will send a silent request to Auth0 to check if the current user (actually the browser) has a valid session. If they do, Auth0 will send back to you an idToken and an idTokenPayload, just like it does on the authentication callback.
Head over to the Applications section of your Auth0 dashboard and update the following:
- Allowed Web Origins: Add
http://localhost:3000to the field. Without this value there, Auth0 would deny any AJAX request coming from your app. - Social Connections: Auth0 auto-configure all new accounts to use development keys registered at Google for the social login. We expect developers to replace these keys with theirs once they start using Auth0 in more capacity. Furthermore, every time an app tries to perform a silent authentication, and that app is still using the development keys, Auth0 returns that there is no session active (even though this is not true). Head over to the Social connections on your dashboard, and update the Client ID and Client Secret fields with the new keys gotten from Connect your app to Google documentation provided by Auth0..
Note: If you don't want to use your Google keys, you can deactivate this social connection and rely only on users that sign up to your app through Auth0's Username and Password Authentication.
Check out the silentAuth function in the Auth.js file:
...
silentAuth() {
  return new Promise((resolve, reject) => {
    this.auth0.checkSession({}, (err, authResult) => {
      if (err) return reject(err);
      this.setSession(authResult);
      resolve();
    });
  });
}
...
This method is responsible for performing the Silent Authentication. It makes a request to AuthO's checkSession function and sets a new session.
Let's refactor the src/Auth.js file to ensure the new authentication works properly.
import auth0 from 'auth0-js';

class Auth {
  constructor() {
    ...
    this.authFlag = 'isLoggedIn';
    ...
  }

  ...
  isAuthenticated() {
    return JSON.parse(localStorage.getItem(this.authFlag));
  }

  setSession(authResult) {
    this.idToken = authResult.idToken;
    localStorage.setItem(this.authFlag, JSON.stringify(true));
  }

  signIn() {
    this.auth0.authorize();
  }

  signOut() {
    localStorage.setItem(this.authFlag, JSON.stringify(false));
    this.auth0.logout({
      returnTo: 'http://localhost:3000',
      clientID: 'LUft9iOEONnQilP8mFDdmiBHdNljGJ2u',
    });
  }

  silentAuth() {
    if(this.isAuthenticated()) {
      return new Promise((resolve, reject) => {
        this.auth0.checkSession({}, (err, authResult) => {
          if (err) {
            localStorage.removeItem(this.authFlag);
            return reject(err);
          }
          this.setSession(authResult);
          resolve();
        });
      });
    }
  }
}

const auth = new Auth();

export default auth;
Let's analyze the change above. The authFlag constant is a flag that we store in local storage to indicate whether a user is logged in or not. It is also an indicator for renewing tokens with the Auth0 server after a full-page refresh.
Once the user is authenticated and redirected back to the app from the Auth0 server, the authFlag is set to true and stored in local storage so that if the user returns to the app later, we can check whether to ask the authorization server for a fresh token. The silentAuth method checks if the user is indeed authorized via the Auth0 checkSession method if the authFlag is true. If the user is authorized, new authentication data is returned and the setSession method is called. If the user is not authorized, the authFlag is deleted from local storage and logged out.
One more thing. Head over to App.js and update it like so:
import React, { Component } from 'react';
import {Route, withRouter} from 'react-router-dom';
import Nav from './components/Nav';
import Callback from './components/Callback';
import ListBook from './components/ListBook';
import CreateBook from './components/CreateBook';
import './App.css';
import auth from './Auth';

class App extends Component {

  async componentDidMount() {
    if (this.props.location.pathname === '/callback') return;
    try {
      await auth.silentAuth();
      this.forceUpdate();
    } catch (err) {
      if (err.error === 'login_required') return;
      console.log(err.error);
    }
  }

  render() {
    return (
      <div>
        <Nav />
        <Route exact path='/' component={ListBook} />
        <Route exact path='/create' component={CreateBook} />
        <Route exact path='/callback' component={Callback} />
      </div>
    );
  }
}

export default withRouter(App);
If the requested route is /callback, the app does nothing. This is the correct behavior because, when users are requesting for the /callback route, they do so because they are getting redirected by Auth0 after the authentication process. In this case, you can leave the Callback component to handle the process.
If the requested route is anything else, the app wants to try a silentAuth. Then, if no error occurs, the app calls forceUpdate so the user can see its name and that they are signed in.
If there is an error on the silentAuth, the app checks if the error is login_required. If this is the case, the app does nothing because it means the user is not signed in (or that you are using development keys, which you shouldn't).
If there is an error that is not login_required, the error is simply logged to the console. Actually, in this case, it would be better to notify someone about the error so they could check what is happening.
Try to authenticate your app. Then, refresh your browser and you'll discover that you won't have to lose your session again. Perfect!
Secure the Create Route
You want to make sure users can't access the /create route without being authenticated first on the client side. Go ahead and create a GuardedRoute.js file in the src/components directory. Now add code to the GuardedRoute.js file:
import React from 'react';
import {Route} from 'react-router-dom';
import auth from '../Auth';

function GuardedRoute(props) {
  const { component: Component, path} = props;
  return (
    <Route exact path={path} render={(props) => {
     if (!auth.isAuthenticated()) return auth.login();
      return <Component {...props} />
    }} />
  );
}

export default GuardedRoute;
In the code above, we created a functional component that checks if a user is authenticated before rendering a component. Let's apply this recently created functionality to the /create route.
Open up App.js. Make sure the GuardedRoute is imported at the top of the file like so:
...
import GuardedRoute from './components/GuardedRoute';
...
Now, pass the CreateBook component to the GuardedRoute like so:
...
import GuardedRoute from './GuardedRoute/GuardedRoute';
...

class App extends Component {

  ...

  render() {
    return (
      <div>
        <Nav />
        ...
        <GuardedRoute exact path='/create' component={CreateBook} />
      </div>
    );
  }
}

export default withRouter(App);
Once you try to access the /create route, you'll be redirected to the login page.
Conclusion
In this tutorial, we covered how easy it is to build a product with GraphQL using great tools like Apollo Client, Apollo Server, React and Auth0. What a time to be alive!
The next step after this is to learn how to monitor your app's performance with Apollo Engine. Apollo Engine is a cloud service that provides deep insights into your GraphQL layer, so you can run in production with confidence. Check out this excellent guide on GraphQL performance and monitoring.
If you want to learn more about using GraphQL, check out the excellent Apollo guides.
Let me know if you have any questions about GraphQL in the comments section!
About the author

Prosper Otemuyiwa
Former Auth0 Employee (Auth0 Alumni)