
If you have built a web application, you most likely had to implement user registration, login, and logout and have restricted access to resources depending on the user. This is what authentication and authorization deal with. There are many ways to implement this in Ruby, and they all have pros and cons. In this post, you'll learn about five different gems you can use to implement authentication and authorization in your Ruby application.
Authentication vs. Authorization
Before you jump into the gems, you must understand the difference between authentication and authorization because they are commonly confused.
Authentication is proving if someone or something is who they say they are, while authorization checks if something or someone has access to a particular resource and is allowed to perform a specific action.
One of the reasons these two concepts get misused is because, usually, authentication has to happen first for authorization to occur. You could need to verify a user's identity to determine whether or not they have access to a particular resource.
With these concepts in your mind now, let's head up to the gems.
Authentication Gems
Devise
Devise is an authentication gem for Rails based on Warden, a Rack authentication framework that is based on the modularity concept of only using what you need. Devise is an MVC solution based on Rails engines; it allows you to have authentication on multiple models, meaning you could, for example, have a User model and an Admin model, and they will have different controllers and routes to login, logout, etc.
Because Devise is so heavily based on Rails, it is recommended you have some Rails knowledge before jumping in and using it.
To get it to work in your app, you need to add it to your Gemfile and follow the installation steps from their documentation. Finally, you can create a new model; let's say you want to call it User, for you'll need to run:
rails generate devise User
The above command will create the model, and the migration, which, when you run rails db:migrate looks as follows:
== 20221020152252 DeviseCreateUsers: migrating ================================
-- create_table(:users)
   -> 0.0009s
-- add_index(:users, :email, {:unique=>true})
   -> 0.0003s
-- add_index(:users, :reset_password_token, {:unique=>true})
   -> 0.0002s
== 20221020152252 DeviseCreateUsers: migrated (0.0015s) =======================
The migration creates a new User table and adds a few indexes to the table, such as a unique index for the email and the reset_password_token without you having to do much else.
It will also generate all the necessary routes for you to handle sign-up, login, logout, and even password-set flows:
➜  five-gems git:(main) ✗ rails routes
                  Prefix Verb   URI Pattern                    Controller#Action
        new_user_session GET    /users/sign_in(.:format)       devise/sessions#new
            user_session POST   /users/sign_in(.:format)       devise/sessions#create
    destroy_user_session DELETE /users/sign_out(.:format)      devise/sessions#destroy
       new_user_password GET    /users/password/new(.:format)  devise/passwords#new
      edit_user_password GET    /users/password/edit(.:format) devise/passwords#edit
           user_password PATCH  /users/password(.:format)      devise/passwords#update
                         PUT    /users/password(.:format)      devise/passwords#update
                         POST   /users/password(.:format)      devise/passwords#create
cancel_user_registration GET    /users/cancel(.:format)        devise/registrations#cancel
   new_user_registration GET    /users/sign_up(.:format)       devise/registrations#new
  edit_user_registration GET    /users/edit(.:format)          devise/registrations#edit
       user_registration PATCH  /users(.:format)               devise/registrations#update
                         PUT    /users(.:format)               devise/registrations#update
                         DELETE /users(.:format)               devise/registrations#destroy
                         POST   /users(.:format)               devise/registrations#create
Because of its modularity concept, Devise allows you to include different modules to your models to add the functionality you need for your app. For example, the database_authenticable module allows you to hash the password and validate the authenticity of a user while signing in. The recoverable module enables the password reset functionality, and so on.
Also, on the controller level, Devise provides you with some helpers and filters like the authenticate_user! helper function, which denies controller access to unauthenticated users.
So yeah, Devise sets up many things for you, but once you have added it to your project, you need to maintain your user's table and all the information related to the user's identity.
OmniAuth
OmniAuth is a library that allows you to implement multi-provider authentication for web applications. For example, if you wanted to authenticate your users using their Google or Facebook accounts, you could use the OmniAuth gem to delegate the authentication to those providers.
OmniAuth introduces the concept of strategies. A strategy is a provider who will perform the authentication. In the example above, it'll be the Google and Facebook strategies.
Auth0 has implemented an OmniAuth strategy called omniauth-auth0. You might know it as the Ruby on Rails SDK, which you can use to implement authentication in a Rails web application.
Let's use the Auth0 strategy to understand how OmniAuth works. OmniAuth assumes that there are two parts to the process of authentication. The request phase and the callback phase which is illustrated in the following diagram:
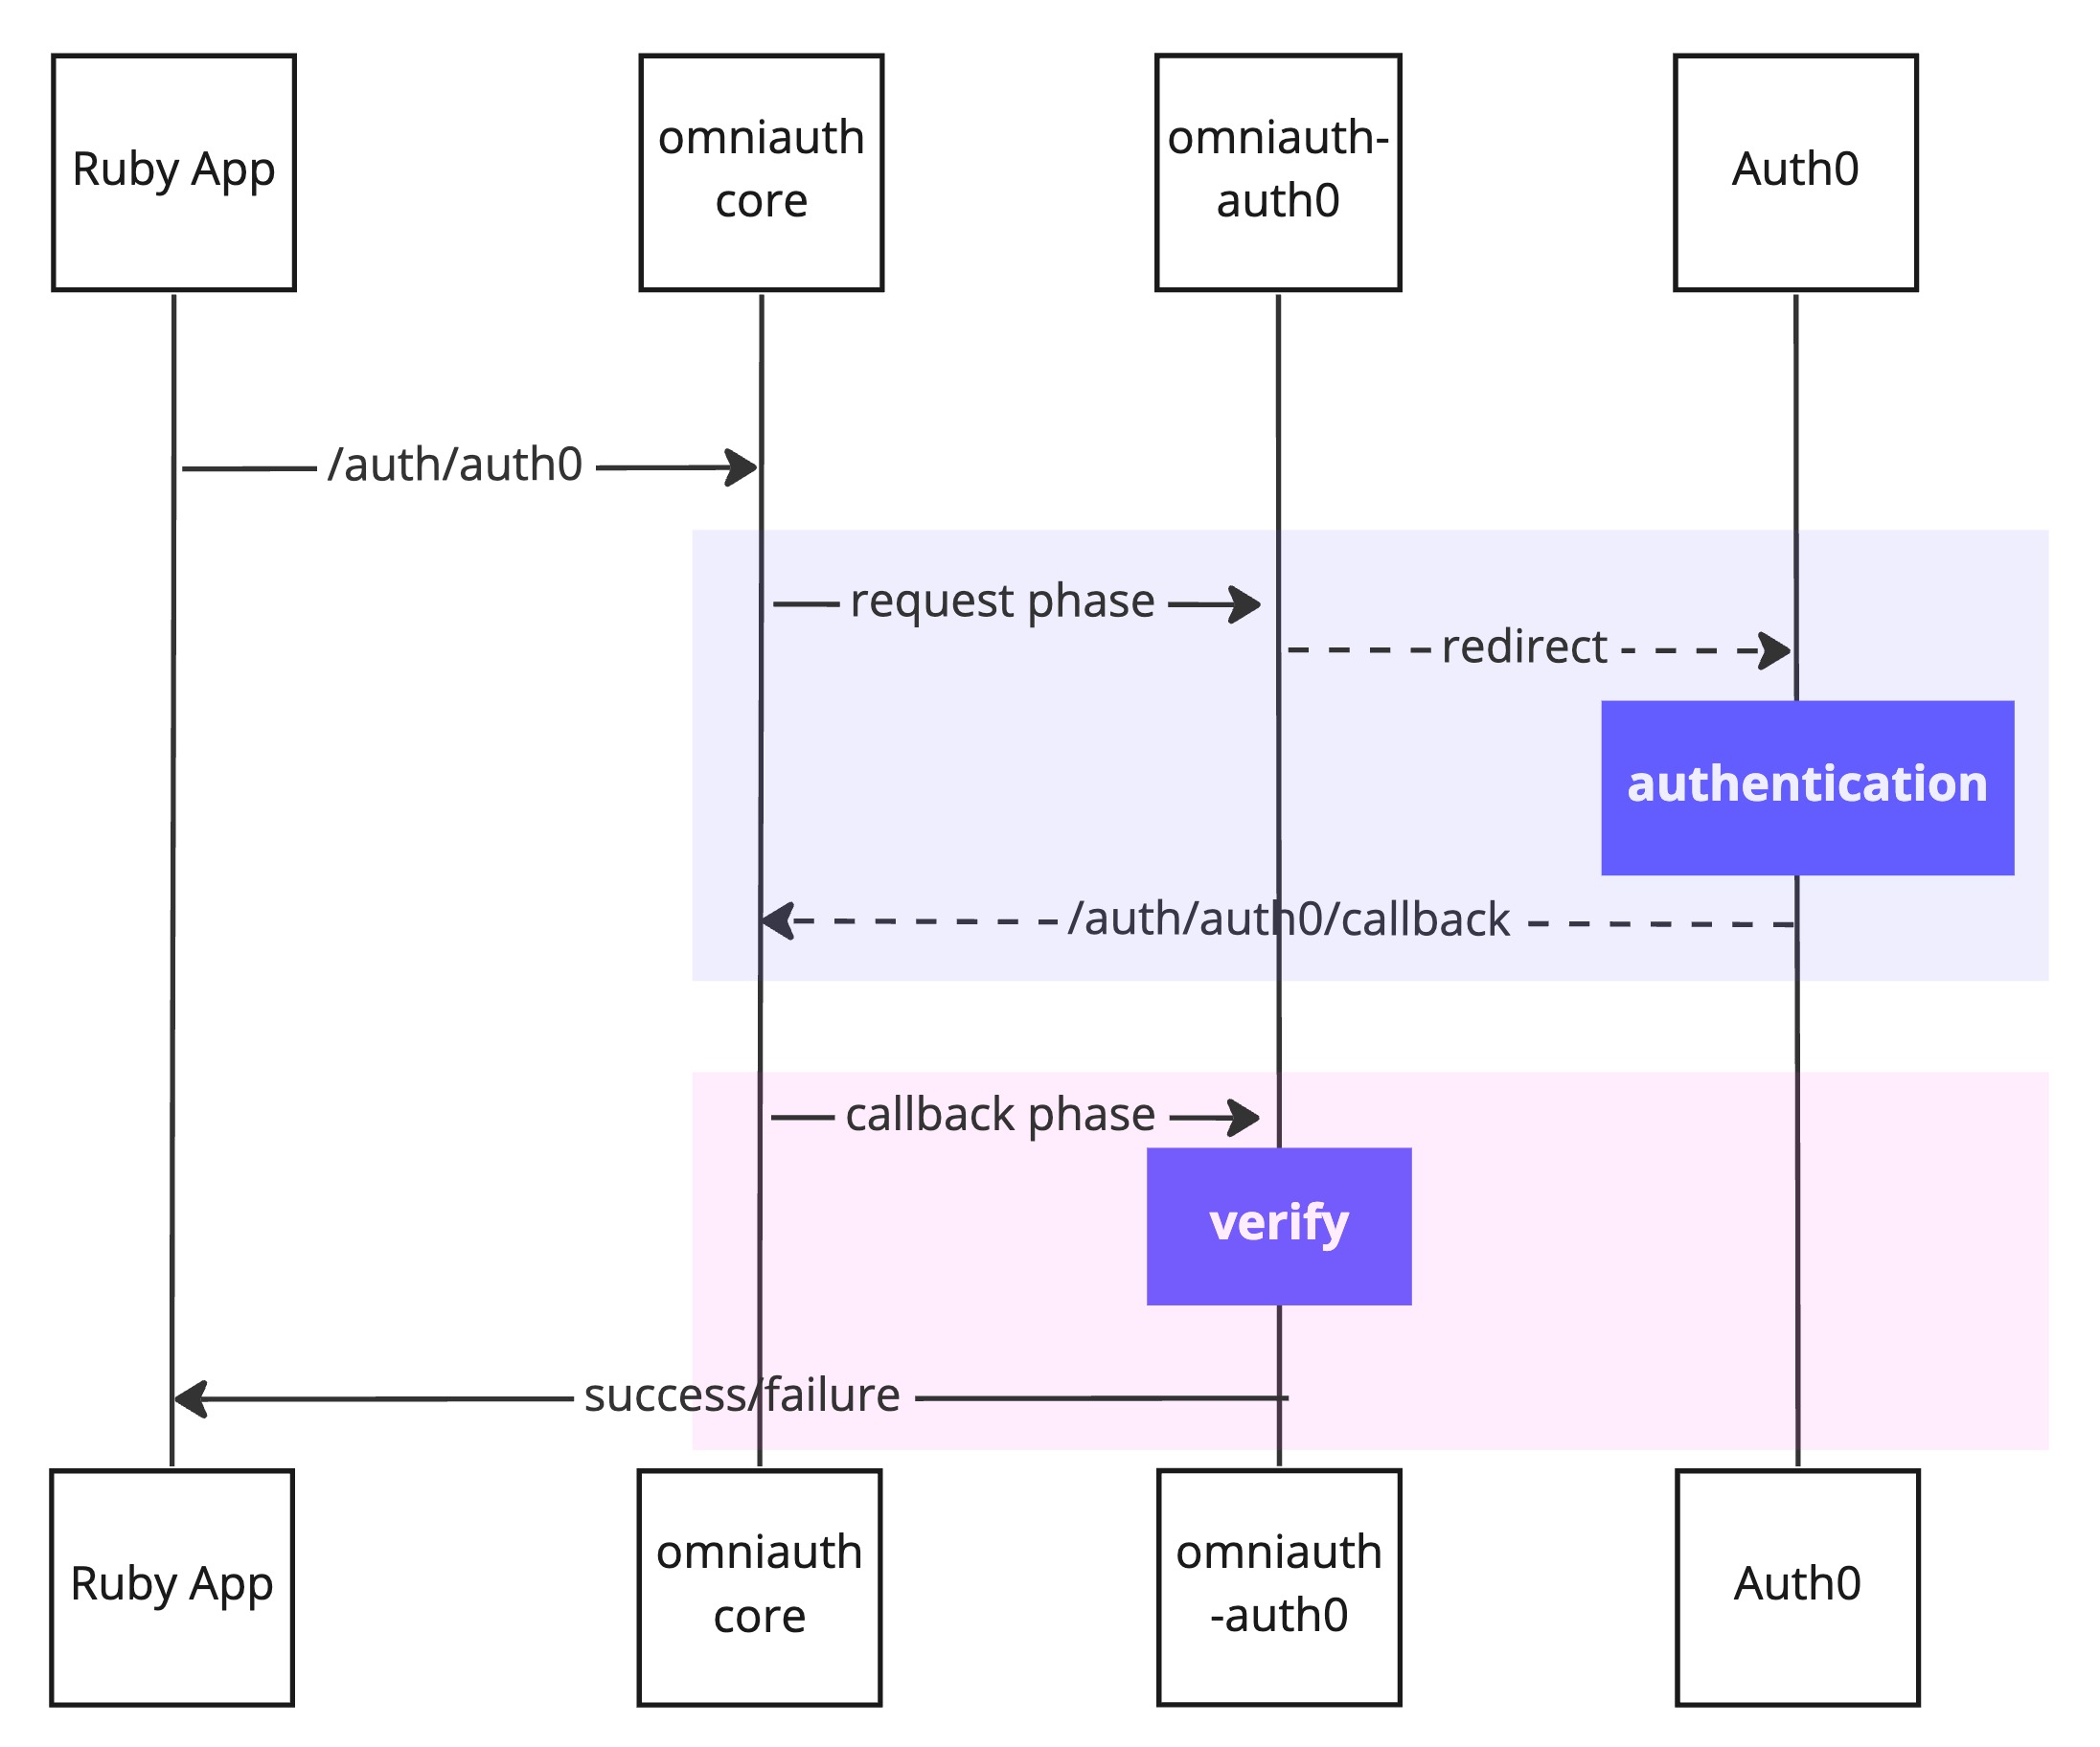
The request phase is typically a redirect to the provider's website, in this case, Auth0. Then Auth0 will authenticate the user and (optionally) ask permission to share information about them with the application. Finally, Auth0 redirects to your application, sending along data about the user, such as an ID Token and an Access Token, as well as other information the user permitted to share. You can then catch that information by implementing a callback action in your authentication controller. This action will be automatically called once the user authentication process has finished.
Your authentication controller would then look similar to this:
# ./app/controllers/auth0_controller.rb
class Auth0Controller < ApplicationController
  def callback
    # OmniAuth stores the information returned from Auth0 and the IdP in request.env['omniauth.auth'].
    # In this code, you will pull the raw_info supplied from the id_token and assign it to the session.
    # Refer to https://github.com/auth0/omniauth-auth0#authentication-hash for complete information on 'omniauth.auth' contents.
    auth_info = request.env['omniauth.auth']
    session[:credentials] = {}
    session[:credentials][:id_token] = auth_info['credentials']['id_token']
    session[:credentials][:access_token] = auth_info['credentials']['token']

    # Redirect to the URL you want after successful auth
    redirect_to '/dashboard'
  end

  def failure
    # Handles failed authentication -- Show a failure page (you can also handle with a redirect)
    @error_msg = request.params['message']
  end

  def logout
    # you will finish this in a later step
  end
end
To learn more about how to integrate the ominiauth-auth0 gem into your app, you can install the SDK and follow the Ruby on Rails Quickstart.
This approach allows you to delegate all the authentication functionality to a third party like Auth0, meaning that you don't have to store anything related to the user's identity other than the Access Token to make authorized requests in the future.
Try out Auth0 authentication for free.
Get started →When to use Devise or OmniAuth?
As usual in software engineering, it depends on your use case. You should use Devise if you want to be the maintainer of the infrastructure that manages your users' identity. If you want to allow your users to use your application by authenticating with other providers, you should use OmniAuth.
There is an option to combine Devise with OmniAuth thanks to Devise's implementation, which allows you to get the best of both worlds.
Authorization Gems
Pundit
Pundit is an authorization gem that allows you to restrict certain parts of your Rails application to authorized users. Pundit provides a set of helpers which guide you in leveraging regular Ruby classes and object-oriented design patterns to build a simple, robust, and scalable authorization system.
Pundit is focused on the notion of policy classes, and a policy is nothing more than a list of methods where you specify who can do what. For example, imagine you have the typical Post model; then you'd have a PostPolicy such as:
class PostPolicy
    attr_reader :user, :post

    def initialize(user, post)
        @user = user
        @post = post
    end

    def update?
        user.admin? || !post.published?
    end
end
And then your controller could look like this:
def update
  @post = Post.find(params[:id])
  authorize @post
  if @post.update(post_params)
    redirect_to @post
  else
    render :edit
  end
end
The authorize! method automatically infers that Post will have a matching PostPolicy class and instantiates this class, handing in the current user and the given record. It then infers from the action name that it should call update? on this instance of the policy. You'd usually put all the policy classes under app/policies, and each domain object should have its respective policy class.
CanCanCan
CanCanCan is the successor of CanCan, the official authorization library for Rails back in the day. CanCanCan is an authorization library for Ruby and Ruby on Rails which restricts what resources a given user is allowed to access.
The gem consists of two main parts:
- Authorizations library: allows you to define the rules to access different objects and provides helpers to check for those permissions.
- Rails helpers: simplify the code in Rails controllers by automatically loading and checking the permissions of models and reducing duplicated code.
Similarly to Pundit, CanCanCan provides a new concept called ability. An ability is a class where you manage all authorizations. If you think about the Post example from above, in CanCanCan, you will define an ability such as:
# abilities.rb

class Ability
include CanCan::Ability

    def initialize(user)
        can :read, Post, public: true

        return unless user.present?
        can :read, Post, user: user

        return unless user.admin?
        can :read, Post
    end
end
In this case, three rules are defined when it comes to reading a Post. Each ability can have the form can actions, subjects, conditions. You could then create your PostsController such as:
class PostsController < ApplicationController
    def show
        @post = Post.find(params[:id])
        authorize! :read, @post
    end
end
In this example, if a post is public, when calling the authorize! helper in your controller, even non-authenticated users will be authorized to read it. In the second case defined in the ability file, you need a user to be authenticated, and in the last, the user must have the admin role.
CanCanCan also offers the possibility to define abilities with "cannot" instead of "can", in case that makes more sense for the readability of your permission.
When to use Pundit or CanCanCan?
As you saw, both gems introduce similar concepts like policies and abilities. CanCanCan is easy to use and very straightforward, especially if you have a small number of domain objects; because you have a single ability class, it can get messy.
Pundit allows you to have one class per domain object, making it cleaner, but it's a bit more complicated when you start using it. Using Pundit might be a good option for its modularity if you have many domain objects.
A Special Guest: The JWT Gem
As you may know, JWT stands for JSON Web Token, a standard that defines a compact and self-contained way for securely transmitting information between parties as a JSON object.
JWT tokens are usually used for authentication and authorization. For example, if you have a Web API that needs to have secured endpoints, a good option would be to use token-based authorization with JWTs.
The JWT gem is a ruby gem to handle JSON Web Tokens, and it is pretty straightforward; its primary function is to encode and decode JWTs.
For example, let's assume you want to encode a payload using a RSA signature.
rsa_private = OpenSSL::PKey::RSA.generate 2048
rsa_public = rsa_private.public_key

payload = { some: :cool_payload }

token = JWT.encode payload, rsa_private, 'RS256'
The value of token will be:
"eyJhbGciOiJSUzI1NiJ9.eyJzb21lIjoiY29vbF9wYXlsb2FkIn0.Ku0-CNRgp_wViDIhj0SJgsrsyPNKc3rqCW-2P7KMVgvfInlaqoMKPTGfOUfXLeGX33H2ZX0_9PBNfi0Gh6sg5XbJ3wOPSZ4f4kDMCF32hlmPpvmfPkOgQuOnjTtPayPlLs98mZdH1QzQ_j-Ru1BKnVhlOXLcwaYFUiHpMOs6TjAHW5Fcp3yXBezYvrFi2Q4eSTSd3SgamFTmD4UUL4sQvQEFn2eu58SPojoKkZd6qqY6n-aaqncNcOpYNzInULIrSoza0B1FknSfu09dWLin7I0zCG18iUw8qemVKKHjaIpjx5tFAbOu_vjQUrKwiwPMAUL9fjzdjUW7ZbKgeXyQag"
You can then use the JWT.decode function to decode it, and it will return:
3.1.2 :007 > decoded_token = JWT.decode token, rsa_public, true, { algorithm: 'RS256' }
 => [{"some"=>"cool_payload"}, {"alg"=>"RS256"}]
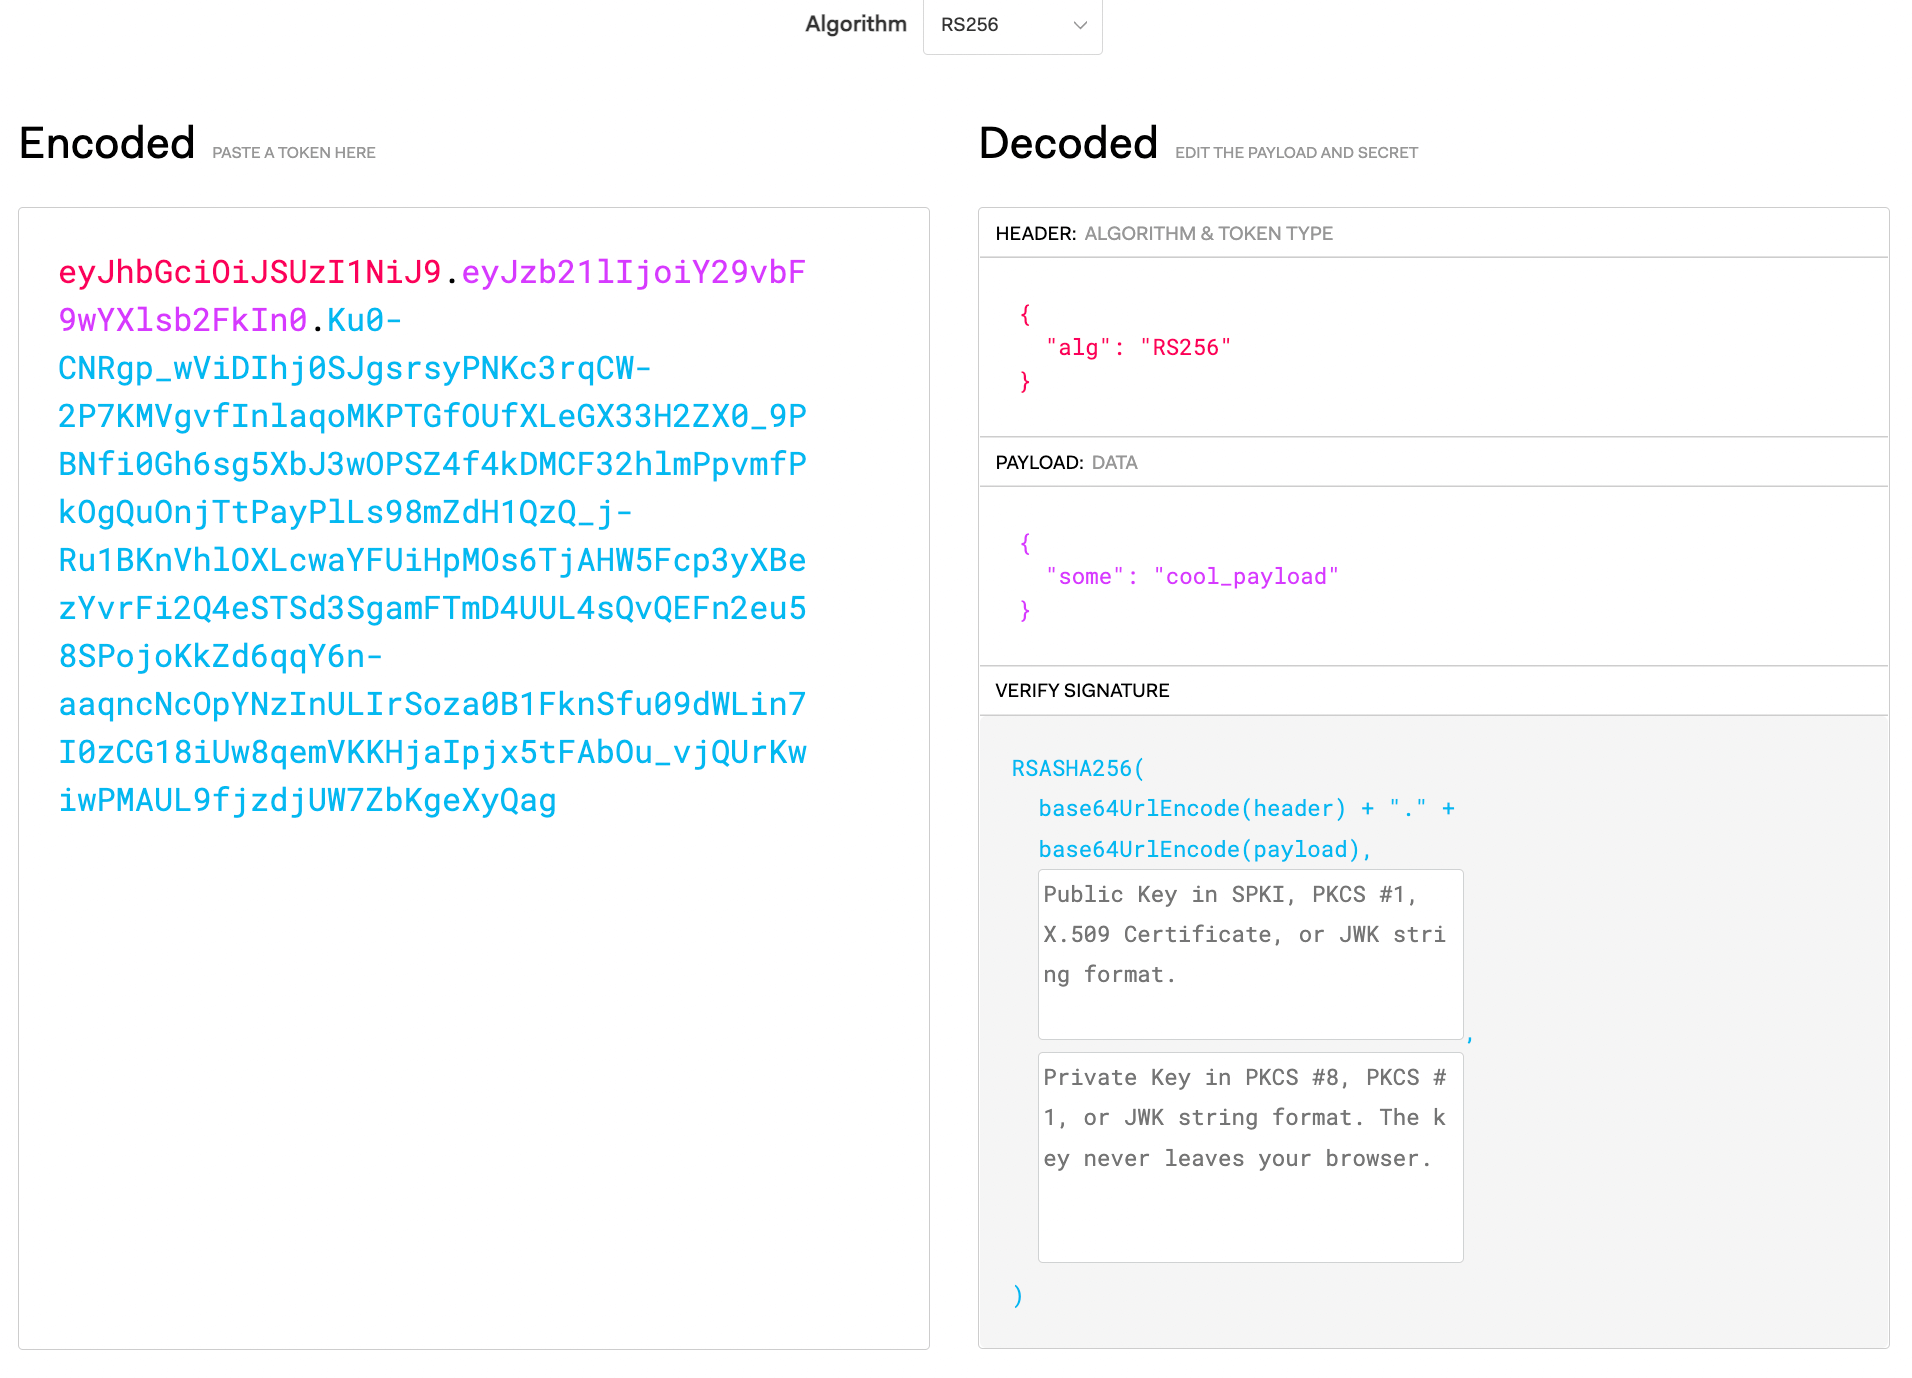
An excellent way to also decode tokens and inspect them is going to jwt.io and pasting the token you just got from this blog post to see it decoded:
Summary
In this post, you learned about five different Ruby gems used for authentication and authorization and when to use them.
For authentication, you can handle the process using a database with Devise, delegate the authentication to a third-party using OmniAuth, or merge them and get the best of both worlds:
Devise
- As a Rails-centric gem, it requires Rails knowledge before getting started.
- Uses Rails engines to take care of a lot of the authentication.
- Requires you to maintain the infrastructure that manages your users' identity.
OmniAuth
- Offers multi-provider authentication
- Works with multiple Ruby frameworks
- It's supported by multiple providers like Auth0
For authorization, Pundit and CanCanCan offer similar concepts but depending on the number of domain objects you have, and you might want to use one over the other:
Pundit
- Offers better modularization when having many domain objects.
- Introduces the concept of policies to handle what a user can do.
- It can be a little complicated to get started.
CanCanCan
- Introduces the concept of abilities to handle what a user can do.
- Recommended if you have a small number of domain objects.
Is easy to set up and use.
Finally, you learned about the JWT gem, which you can use to encode and decode JWT tokens.
What other gems do you use for authentication and authorization?
Let me know in the comments!
Thanks for reading!
About the author

Carla Urrea Stabile
Staff Developer Advocate
I've been working as a software engineer since 2014, particularly as a backend engineer and doing system design. I consider myself a language-agnostic developer but if I had to choose, I like to work with Ruby and Python.
After realizing how fun it was to create content and share experiences with the developer community I made the switch to Developer Advocacy. I like to learn and work with new technologies.
When I'm not coding or creating content you could probably find me going on a bike ride, hiking, or just hanging out with my dog, Dasha.