

TL;DR: In this article, we are going to discuss how Oracle CX Commerce and Auth0 can now be connected! We will walk through that process to see just how we can accomplish that!
Auth0 + Oracle CX Commerce
Auth0 and Oracle have partnered together to find a great opportunity that brings added value to our users. Oracle and Auth0 now empower customers to leverage the Auth0 platform to add identity and access management capabilities to commerce storefronts that are built and hosted on CX Commerce.
Oracle CX Commerce
Okay, but what is Oracle CX Commerce? CX Commerce is a leading enterprise SaaS commerce solution -- scalable, flexible, cloud-native, and built to support both B2B and B2C. Want to build an enterprise, highly customizable, feature-rich digital commerce business? CX Commerce’s solution provides for all of that!
"Auth0 and Oracle have partnered together to find a great opportunity that brings added value to our users."
Tweet This

Why Use Auth0 and Oracle CX Commerce Together
Auth0 brings a level of identity and authentication that can benefit many Oracle CX Commerce customers, including social sign-on! Auth0 has a large list of social networks to choose from that can easily be plugged into an online store. Merchants can choose from Facebook to LinkedIn, whichever social network makes sense for the audience of the website! Whether B2B or B2C, the integration is easy to use for shoppers and business partners.
Auth0 can add:
- Registering for a new account
- Single Sign-On (SSO) for Oracle CX Commerce-powered apps
- Social Sign-On
By adding in Auth0, we can also configure a CX Commerce app and set up SSO for both Social and Enterprise connections!
How will this help improve customer satisfaction? This is a very customizable and global solution that many customers have been waiting for. For example, there are merchants in APAC that want this solution because the current registration requires an email. Many APAC countries have people registering for sites using their mobile phone number. If the shopper wants to use their Facebook or Twitter account to log into the website, this is now possible!
And wherever your shoppers are in the world, being able to log into a storefront via Facebook, Amazon, Google, or other accounts increases conversions. It improves the overall experience by eliminating an additional barrier to browsing or placing an order.
This partnership between Oracle CX Commerce and Auth0 is destined to deliver innovative solutions that help improve business and shopper experience.
"By adding in Auth0, we can also configure a CX Commerce app and set up SSO for both Social and Enterprise connections!"
Tweet This
How to Connect Oracle CX Commerce and Auth0
In this next section, let's go over how to connect Oracle CX Commerce and Auth0.
Configure Oracle CX Commerce SSO
Enable Single Sign-On on the Oracle CX Commerce instance
The first thing we need to do is enable SSO on our Oracle CX Commerce instance. We can use a PUT request on the /ccadmin/v1/merchant/samlSettings endpoint to enable it with some options.
We will want to configure all the security features, such as assertion encryption as well as request and response signatures.
PUT https://ccadmin-{{env}}.oracleoutsourcing.com/ccadmin/v1/merchant/samlSettings
  {
    "enabled": true,
    "nameIdPolicyFormat": "urn:oasis:names:tc:SAML:2.0:nameid-format:persistent",
    "requireEncryptedAssertions": true,
    "requireSignedResponse": true,
    "signAuthnRequest": true,
    "nameIdPolicyAllowCreate": true
  }
Configure Cross-Origin Resource Sharing (CORS) to allow access to resources from Auth0 servers
The following PUT request on the /ccadmin/v1/sites/siteUS (use your Site ID) will allow access to resources from outside the domain. This will return two URLs: the Auth0 URL and a URL for Facebook Social Login.
PUT https://ccadmin-{{env}}.oracleoutsourcing.com/ccadmin/v1/sites/siteUS
  {
    "properties": {
    "allowedOriginMethods": {
      "https://login.eu.auth0.com" : "POST",
      "https://dev-e3psebdq.eu.auth0.com": "POST"
    }
  }
}
Retrieve Service Request Entity Descriptor for the Storefront instance
We can retrieve the whole Service Request Entity Descriptor for our Storefront instance using a GET request on the /ccstore/v1/merchant/samlSettings endpoint.
The Entity Descriptor is returned in the spEntityDescriptor field.
GET https://ccstore-{{env}}.oracleoutsourcing.com/ccstore/v1/merchant/samlSettings
  {
    "spEntityDescriptor": "<?xml version=\"1.0\" encoding=\"UTF-8\"standalone=\"no\"?>
        <md:EntityDescriptor xmlns:md=\"urn:oasis:names:tc:SAML:2.0:metadata\"
            entityID=\"https://ccstore-z7ta.oracleoutsourcing.com[…Binding=\"urn:oasis:names:tc:SAML:2.0:bindings:HTTP-POST\"
            Location=\"https://ccstore-z7ta.oracleoutsourcing.com/SAMLpost\"
            index=\"1\" isDefault=\"true\"/>
            </md:SPSSODescriptor>
        </md:EntityDescriptor>",
  "links": [
    {
      "rel": "self",
      "href": "https://ccstore-z7ta.oracleoutsourcing.com/ccstore/v1/merchant/samlSettings"
    }
  ]
}
Above is a formatted version of the spEntityDescriptor field. We will find the application SAML callback URL in the Location attribute of the md:AssertionConsumerService tag.
<?xml version="1.0" encoding="UTF-8"?>
<md:EntityDescriptor xmlns:md="urn:oasis:names:tc:SAML:2.0:metadata" entityID="https://ccstore-
z7ta.oracleoutsourcing.com">
<md:SPSSODescriptor protocolSupportEnumeration="urn:oasis:names:tc:SAML:2.0:protocol">
<md:KeyDescriptor xmlns="urn:oasis:names:tc:SAML:2.0:metadata" use="encryption">
<dsig:KeyInfo xmlns:dsig="http://www.w3.org/2000/09/xmldsig#">
<dsig:X509Data>
<dsig:X509Certificate>MIIDUjCCAjqgAwIBAgIEFV[…]xFQQXQ\nWt8ObeT8vQdOLn9t4ZnXevMY3MV EsjMbFQUu99mngLR1h9mG7C4=\n</dsig:X509Certificate>
<dsig:X509IssuerSerial>
<dsig:X509IssuerName>CN=ops</dsig:X509IssuerName>
<dsig:X509SerialNumber>358591734</dsig:X509SerialNumber>
</dsig:X509IssuerSerial>
<dsig:X509SubjectName>C=US, ST=California, L=Redwood City, O=Oracle Corporation, OU=tz7ta0c0, CN=tenant_tz7ta0c0</dsig:X509SubjectName>
<dsig:X509SKI>wwGRZXxfpezbTIFzTqCB+gFO+hU=\n</dsig:X509SKI>
</dsig:X509Data>
</dsig:KeyInfo>
</md:KeyDescriptor>
<md:KeyDescriptor xmlns="urn:oasis:names:tc:SAML:2.0:metadata" use="signing">
<dsig:KeyInfo xmlns:dsig="http://www.w3.org/2000/09/xmldsig#">
<dsig:X509Data>
<dsig:X509Certificate>
MIIDUjCCAjqgAwIBAgIEFV[…]xFQQXQ\nWt8ObeT8vQdOLn9t4ZnXevMY3MVEsjMbFQUu99mngLR1h9mG7C4=\n
</dsig:X509Certificate>
<dsig:X509IssuerSerial>
<dsig:X509IssuerName>CN=ops</dsig:X509IssuerName>
<dsig:X509SerialNumber>358591734</dsig:X509SerialNumber>
</dsig:X509IssuerSerial>
<dsig:X509SubjectName>C=US, ST=California, L=Redwood City, O=Oracle Corporation,OU=tz7ta0c0, CN=tenant_tz7ta0c0
</dsig:X509SubjectName>
<dsig:X509SKI>wwGRZXxfpezbTIFzTqCB+gFO+hU=\n</dsig:X509SKI>
</dsig:X509Data>
</dsig:KeyInfo>
</md:KeyDescriptor>
<md:NameIDFormat xmlns="urn:oasis:names:tc:SAML:2.0:metadata">urn:oasis:names:tc:SAML:2.0:nameid-
format:persistent</md:NameIDFormat>
<md:AssertionConsumerService xmlns="urn:oasis:names:tc:SAML:2.0:metadata" Binding="urn:oasis:names:tc:SAML:2.0:bindings:HTTP-POST" Location="https://ccstore-z7ta.oracleoutsourcing.com/SAML/post" index="1" isDefault="true" />
</md:SPSSODescriptor>
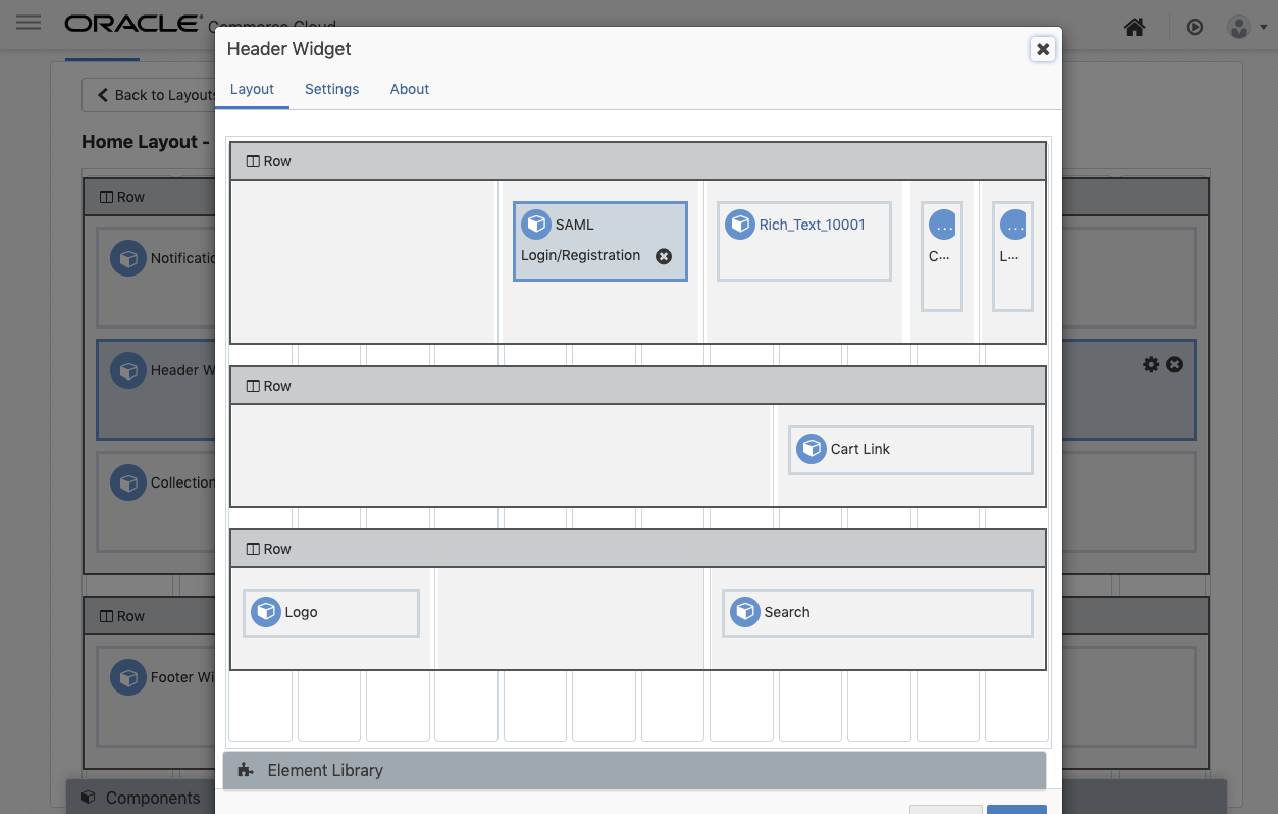
</md:EntityDescriptor>Add the SAML Login/Registration Widget to the Header Widget
Now that CX Commerce is configured, we can replace the standard Login/Registration Widget. We can find that in the Header Widget along with the SAML Login/Registration Widget. This will redirect users to our Auth0 login screen when they click the Login link.
Configure Auth0 Application and SAML2 Add-On
Create and configure an application in Auth0
If we visit Auth0.com, we can start the application process. If we do not already have an account, we can sign up for a free Auth0 account here.
- Go to our Auth0 Dashboard and click the "Create Application" button.
- Name our new app (Oracle CX Commerce), select "Single Page Web Applications", and click the "Create" button.
- In the Settings for our new Auth0 app, add
https://ccstore-xxx.oracleoutsourcing.com/SAML/postto the Allowed Callback URLs. - Add
http://localhost:[PORT]to the Allowed Logout URLs. This will be the link we want the user directed to when they hit log out. - Click the "Save Changes" button.
Configure the SAML 2 Web App add-on in Auth0
Once the application is configured, we can enable the SAML 2 add-on. If we were to click on "Addons", right next to the "Settings" tab for our application, we will see the option for "SAML 2 Web App". Click on the button that toggles, and a modal will appear.
Within that modal, we will want to add in our "Allowed Callback URL" into the spot for "Application Callback URL": https://ccstore-xxx.oracleoutsourcing.com/SAML/post
We can then configure additional security features in the settings, such as signing responses and importing CX Commerce certificates for handling signed requests.
The certificate is the one found in the storefront entity descriptor extracted earlier.
{
  "signatureAlgorithm": "rsa-sha1",
  "digestAlgorithm": "sha1",
  "signResponse": true,
  "signingCert": "-----BEGIN CERTIFICATE-----\nMIIDUjCCAjqgAwIBAgIEFV[…]xFQQXQ\nWt8ObeT8vQdOLn9t4ZnXevMY3MVEsjMbFQUu99mngLR1h9mG7C4=\n-----END CERTIFICATE-----\n"
}
Next, click on "Usage" at the top of the modal and we will find all the information we need to finalize the configuration in Oracle CX Commerce.
Here we can download the "Identity Provider Metadata" that will be uploaded to CX Commerce.
Our Auth0 Entity Descriptor will look like:
<EntityDescriptor entityID="urn:dev-e3psebdq.eu.auth0.com"
    xmlns="urn:oasis:names:tc:SAML:2.0:metadata">
    <IDPSSODescriptor protocolSupportEnumeration="urn:oasis:names:tc:SAML:2.0:protocol">
        <KeyDescriptor use="signing">
            <KeyInfo xmlns="http://www.w3.org/2000/09/xmldsig#">
                <X509Data>
                    <X509Certificate> MIIDDTCCAfWgAwIBAgIJGkJ2[…]8hn9WIe2Uj6rqrINzyhHclXVdRzy1F8EQ5q/+Z1ECF9Bc1I8sqFQk=
                    </X509Certificate>
                </X509Data>
            </KeyInfo>
        </KeyDescriptor>
        <SingleLogoutService Binding="urn:oasis:names:tc:SAML:2.0:bindings:HTTP-Redirect" Location="https://dev-e3psebdq.eu.auth0.com/samlp/8kVhBa7Sn84ejet98w634wAGlNi9N5AW/logout" />
        <SingleLogoutService Binding="urn:oasis:names:tc:SAML:2.0:bindings:HTTP-POST" Location="https://dev-e3psebdq.eu.auth0.com/samlp/8kVhBa7Sn84ejet98w634wAGlNi9N5AW/logout"/>
        <NameIDFormat>urn:oasis:names:tc:SAML:1.1:nameid-format:emailAddress</NameIDFormat>
        <NameIDFormat>urn:oasis:names:tc:SAML:2.0:nameid-format:persistent</NameIDFormat>
        <NameIDFormat>urn:oasis:names:tc:SAML:2.0:nameid-format:transient</NameIDFormat>
        <SingleSignOnService Binding="urn:oasis:names:tc:SAML:2.0:bindings:HTTP-Redirect" Location="https://dev-e3psebdq.eu.auth0.com/samlp/8kVhBa7Sn84ejet98w634wAGlNi9N5AW"/>
        <SingleSignOnService Binding="urn:oasis:names:tc:SAML:2.0:bindings:HTTP-POST" Location="https://dev-e3psebdq.eu.auth0.com/samlp/8kVhBa7Sn84ejet98w634wAGlNi9N5AW"/>
        <Attribute Name="http://schemas.xmlsoap.org/ws/2005/05/identity/claims/emailaddress" NameFormat="urn:oasis:names:tc:SAML:2.0:attrname-format:uri" FriendlyName="E-Mail Address"
        xmlns="urn:oasis:names:tc:SAML:2.0:assertion"/>
        <Attribute Name="http://schemas.xmlsoap.org/ws/2005/05/identity/claims/givenname" NameFormat="urn:oasis:names:tc:SAML:2.0:attrname-format:uri" FriendlyName="Given Name"
        xmlns="urn:oasis:names:tc:SAML:2.0:assertion"/>
        <Attribute Name="http://schemas.xmlsoap.org/ws/2005/05/identity/claims/name" NameFormat="urn:oasis:names:tc:SAML:2.0:attrname-format:uri" FriendlyName="Name"
        xmlns="urn:oasis:names:tc:SAML:2.0:assertion"/>
        <Attribute Name="http://schemas.xmlsoap.org/ws/2005/05/identity/claims/surname" NameFormat="urn:oasis:names:tc:SAML:2.0:attrname-format:uri" FriendlyName="Surname"
        xmlns="urn:oasis:names:tc:SAML:2.0:assertion"/>
        <Attribute Name="http://schemas.xmlsoap.org/ws/2005/05/identity/claims/nameidentifier" NameFormat="urn:oasis:names:tc:SAML:2.0:attrname-format:uri" FriendlyName="Name ID"
        xmlns="urn:oasis:names:tc:SAML:2.0:assertion"/>
    </IDPSSODescriptor>
</EntityDescriptor>
Configure SAML Mapping Rule in Auth0
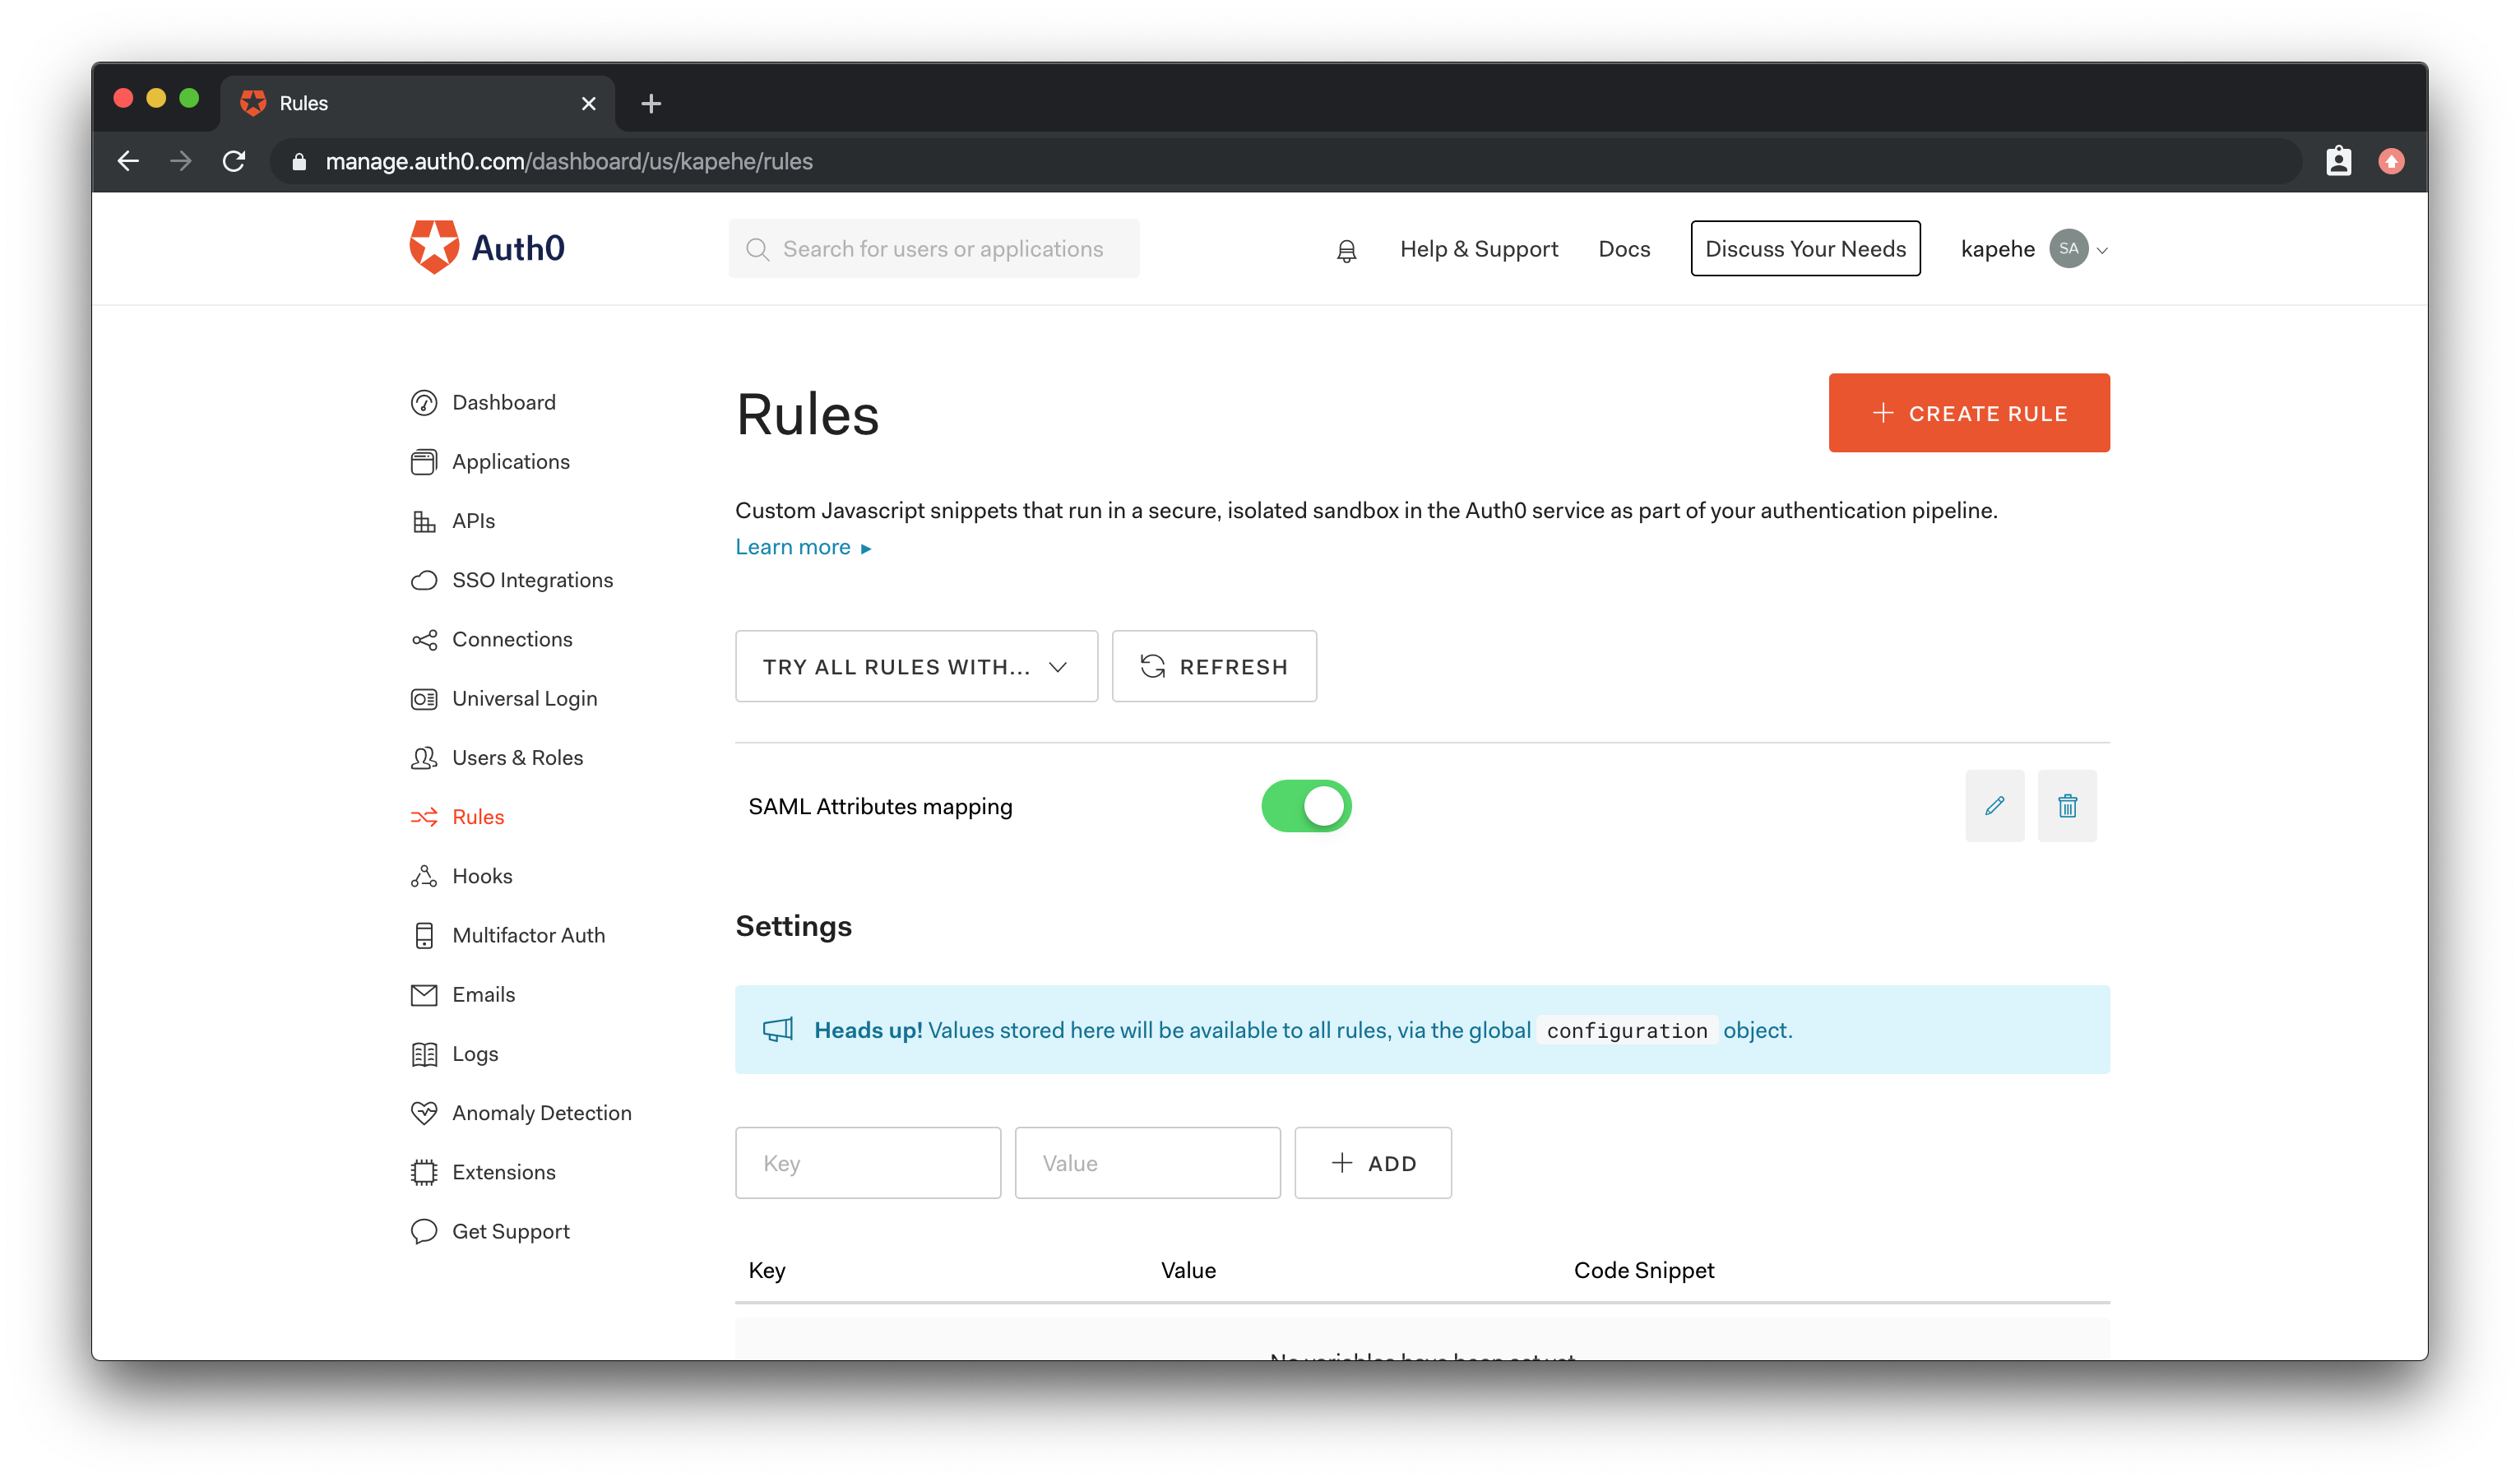
To be able to match the existing user in Oracle CX Commerce, we need to change the SAML mapping to map the "nameidentifier" field with the email address. We can do this by creating a rule in Auth0.
If we click on "Rules" in the menu on the left in the Dashboard, we will then see a "+Create Rule" button. Hit that button. We will then see a list of rules we can use.
Scroll down to find the rule titled: SAML Attributes mapping
Here is the code for the final rule:
function (user, context, callback) {
  context.samlConfiguration.mappings = {
    "http://schemas.xmlsoap.org/ws/2005/05/identity/claims/nameidentifier": "email",
    "http://schemas.xmlsoap.org/ws/2005/05/identity/claims/emailaddress": "email",
    "http://schemas.xmlsoap.org/ws/2005/05/identity/claims/name": "name",
    "http://schemas.xmlsoap.org/ws/2005/05/identity/claims/food": "user_metadata.favorite_food",
    "http://schemas.xmlsoap.org/ws/2005/05/identity/claims/address":
    "app_metadata.shipping_address"
  };

  callback(null, user, context);
}
Hit "Save Changes" when done.
Force Email Verification in Auth0
We may want to add in email verification to our application. That's also an Auth0 Rule!
If we return to our Rules Dashboard, we can add another rule by clicking the "+Create Rule" button again. Find the "Force email verification" and click on it.
Here is the code for the final rule in Auth0:
function (user, context, callback) {
  if (!user.email_verified) {
    return callback(new UnauthorizedError('Please verify your email before logging in.'));
  } else {
    return callback(null, user, context);
  }
}
So now, when the user registers to Auth0 using a username/password method instead of the social media route, they will receive an email that will allow them to verify their email address via a link.
Configure Social Connections in Auth0
Enable a new social connection in Auth0
Now that we have SAML 2 configured in Auth0 let's add in Social Connections!
If we were to click on "Connections" and then "Social", we would be at the Social Connections page within our Auth0 Dashboard.
Here, we can turn on Facebook social connections for one or many of our Auth0 apps. We will be directed to a modal that will show us our list of applications. Be sure to turn it on for this application!
We will need to add in our App ID and App Secret. To learn more about this, please visit this document.
Conclusion
With Oracle CX Commerce and Auth0 connected, developers and customers can see huge benefits. Having Social Login capabilities makes shopping easier for customers and improves conversion rates for merchants. Auth0 helps enable social sign-on, plus other rules and benefits, to be added easily to Oracle CX Commerce digital experiences.
About Auth0
Auth0 by Okta takes a modern approach to customer identity and enables organizations to provide secure access to any application, for any user. Auth0 is a highly customizable platform that is as simple as development teams want, and as flexible as they need. Safeguarding billions of login transactions each month, Auth0 delivers convenience, privacy, and security so customers can focus on innovation. For more information, visit https://auth0.com.


