
TL;DR: Streamlit is an open-source app framework for Machine Learning and Data Science teams. You can create beautiful data apps in hours. All in pure Python. Streamlit was released in October 2019 and was recently acquired by Snowflake. There's huge excitement about it in the Data Science community. It's not just for Data Science, though. With its component extensibility architecture, you can build and integrate most kinds of web frontends into Streamlit apps. My experience with Streamlit can be verified on the official page of Streamlit Creators.
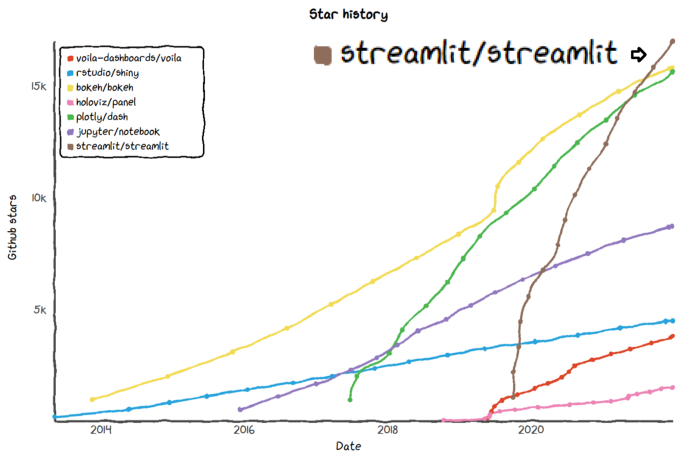
Don't take my word for it that Streamlit is extremely popular and worth taking a serious look at. Here's a chart I found showing the extremely rapid adoption rate of Streamlit compared to other similar tools.
Why is that so?
Streamlit focuses on simplicity
"How can we make a machine learning script and convert it into an app as simple as possible, so that it basically feels like a scripting exercise?", Inventor of Streamlit, Adrien Treuille (Ph.D.)
Streamlit is a single Python package that you install through pip, that gives you a set of functions which:
- Can be interleaved into an existing ML code script
- Essentially making the ML code parameterizable
- Does a little bit of layout, and
- Magically turns your ML code into a beautiful app
Inspiration is drawn from Jupyter, ipywidgets, R-Shiny, Voila, React, etc., but more as a guiding light than a software architecture. There are significant technical differences in the implementation of Streamlit, which is based on a declarative data flow model, not wiring callbacks.
Python frameworks such as scikit-learn, spaCy, Pandas, and various visualization frameworks such as Altair, Plotly and Matplotlib all work seamlessly with Streamlit.
Streamlit supports many uses
- Every single data analysis team needs to create apps. They're a focal point - like the bonfire of the team. It's where team members get together and communicate.
- Apps are a crucial part of the ML (data analysis) workflow, especially in a non-trivial project.
- This applies not only to internal apps. Machine learning researchers and data scientists need to build apps for external consumption too. Other teams need to consume models in various different ways, and it ought to be much easier to build the required but different application layers to do that.
I'm a big fan of Streamlit and use it extensively for serious work and play. In a previous job, I had developed several in-house apps that I needed to share externally with clients and colleagues, so adding security and authentication features was imperative. As you'll see in this article, Streamlit's embedded components, extensibility architecture, and native session state management will help realize this security objective.
Here is the GitHub repository for this article.
Getting Started with Streamlit
The core Streamlit documentation, discussion forum, and examples gallery are very good. This article will by no means replace them but will serve as an alternative place you can start learning about Streamlit with the specific aim of integrating with Auth0. To get a broader appreciation of Streamlit check out these links: API Docs | Gallery | GitHub | Discussion Forum | Discord Server.
Quick installation
To use
Streamlit, you'll need Python 3.5 or above. I use the Anaconda Python distribution (conda) and Visual Studio Code IDE with Python extensions, which works well with conda environments.
- Open a
conda consolewindow - If necessary, run
conda activatefor the env in which you want to install package requirements. See managing conda environments. - Run one of these commands in the console window:
$ pip install --upgrade streamlit
# and
$ pip install -r requirements.txt
The latter command ensures that all necessary packages for this article are in your Python environment. The requirements file is in the GitHub repository for this article.
Note: Linux and Mac users, please remove the
windows-cursespackage from the requirements file. The curses package comes with the Python standard library. In Linux and Mac, the curses dependencies should already be installed, so there are no extra steps needed. On Windows, you need to install one special Python package,windows-curses, available on PyPI to add curses support.
Running a Streamlit app
- Create a Python script file
<your app>.py(typically, this is namedapp.py) - Enter this code, then save the file:
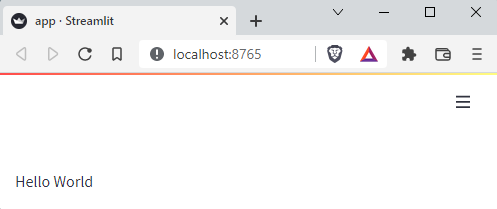
import streamlit as st
st.write('Hello World')
In the conda console, from <your app> directory, type:
streamlit run [--server.port <port number>] <your app>.py
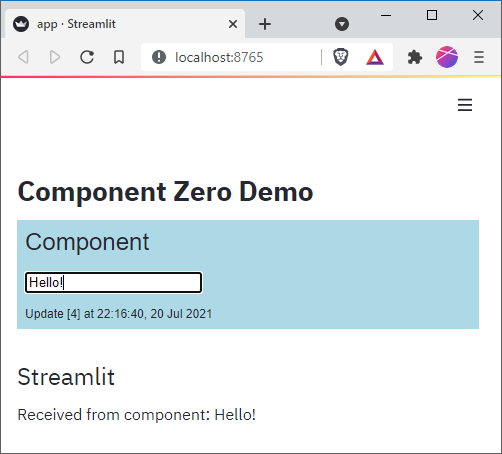
If you don't specify a server port, <your app> will open a browser window on the default port (8501). On my machine, app.py opens on port 8765 at http://localhost:8765/, as shown below:
Yes... it's as simple as that!
If you're interested, you can change the port by putting the following entry in your ~/.streamlit/config.toml file. This is my setting:
[server]
port=8765
You can see the full set of config options by running streamlit config show from the command line.
Let's Create a Streamlit App from Scratch
We'll start with a plain Python program (script) that performs an action based selection choice:
simple_script.py
actions = {'A': print, 'B': print, 'C': print}
choice = None
while not choice in actions.keys():
    choice = input('Choose one of [A, B, C] > ').upper()
result = actions[choice](f'You chose {choice}')
You execute this script from the command line by typing python simple_script.py, and it will prompt you to choose one of the options and echo it back to you.
$ python simple_script.py
Choose one of [A, B, C] > A
You chose A
So, what would this script look like written as an interactive Streamlit web application? As hinted earlier, you should be able to transform the script simply by adding some "magical Python commands". Here it is:
simple_script_streamlit.py
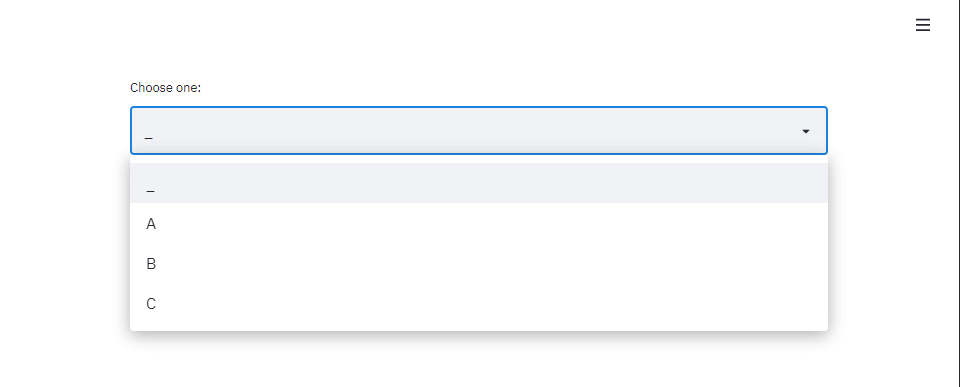
import streamlit as st
actions = {'A': st.write, 'B': st.write, 'C': st.write}
choice = st.selectbox('Choose one:', ['_', 'A', 'B', 'C'])
if choice != '_':
    result = actions[choice](f'You chose {choice}')
All I did was:
- Import the
streamlitpackage (asstby convention) - Replace the
printaction functions with Streamlit's magicst.writefunction - Replace the read input loop with a Streamlit's selection box widget,
st.selectbox.
Everything else is much the same. You can execute this program from the command line by typing streamlit run simple_script_streamlit.py. This will start a Streamlit server on the default port and render the web app in a new browser window. You should see something like this:
The power of adding some magic dust to an existing Python script isn't so obvious in such a trivial example. Let's look at something more convincing that has data and charting capabilities in the console, run from the command line.
simple_script_plot.py
import sys
import matplotlib
import matplotlib.pyplot as plt
import numpy as np

try:
  matplotlib.use('module://drawilleplot')
except:
  print('Please install `drawilleplot` and `windows-curses` (the latter isn't required for Unix flavors):')
  print('\tpip install drawilleplot')
  print('\tpip install windows-curses')
  sys.exit(0)

def f1(t):
    return np.exp(-t) * np.cos(2*np.pi*t)
def f2(t):
    return np.cos(2*np.pi*t)
t = np.arange(0.0, 5.0, 0.1)

def table():
    print([x for x in zip(t,f1(t))])
    print([x for x in zip(t,f2(t))])

def plot():
    plt.figure()
    plt.subplot(2, 1, 1) # nrows, ncols, index
    plt.plot(t, f1(t), 'bo', t, f1(t), 'k')

    plt.subplot(212)
    plt.plot(t, f2(t), 'r--')
    plt.show()

    plt.close()

actions = {'T': table, 'P': plot}
choice = None
while not choice in actions.keys():
    choice = input('Choose one of [T (tabulate), P (plot)] > ').upper()
result = actions[choice]()
(Note: Linux and Mac users, please remove the windows-curses package from the requirements file.)
You execute this program from the command line by typing python simple_script_plot.py and, as before, it will prompt you to choose one of the options and performs the appropriate action.
Option 'T' displays coordinates of a couple of data series in a poorly formatted printout:
$ python simple_script_plot.py
Choose one of [T (tabulate), P (plot)] > t
[(0.0, 1.0), (0.1, 0.7320288483374399), (0.2, 0.2530017165184952), ..., (4.9, 0.006024412254402584)]
[(0.0, 1.0), (0.1, 0.8090169943749475), (0.2, 0.30901699437494745), ..., (4.9, 0.8090169943749488)]
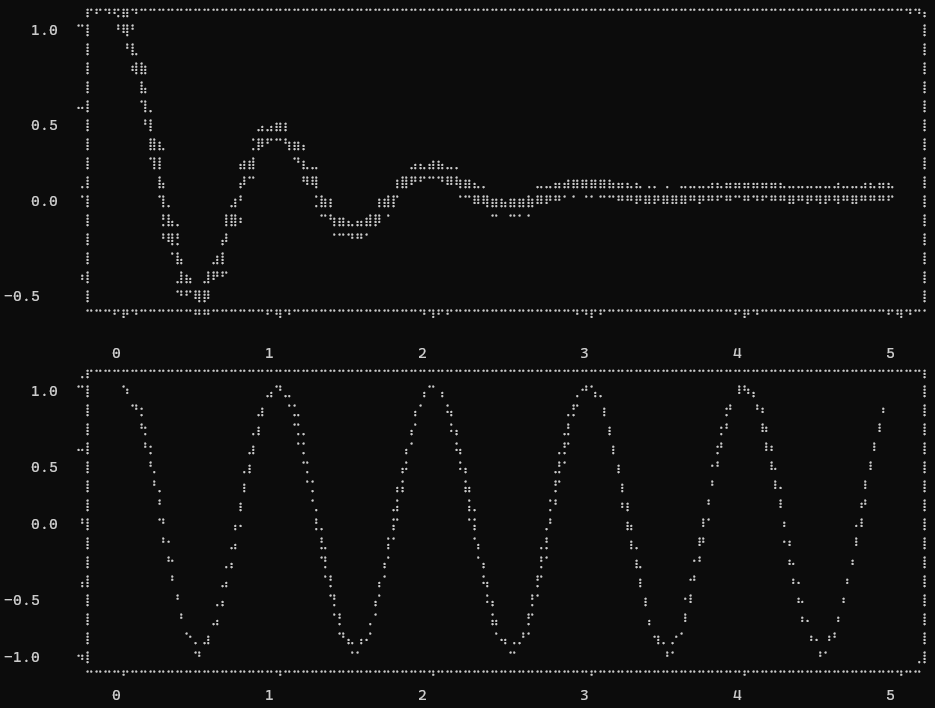
Option 'P' displays ASCII charts of these data series:
$ python simple_script_plot.py
Choose one of [T (tabulate), P (plot)] > P
Now, let's convert this console plotting script into a beautiful interactive Streamlit web application. It's much simpler than you may imagine:
simple_script_plot_streamlit_plus.py
import streamlit as st
import matplotlib.pyplot as plt
import numpy as np
import pandas as pd
def f1(t):
    return np.exp(-t) * np.cos(2*np.pi*t)
def f2(t):
    return np.cos(2*np.pi*t)
t = np.arange(0.0, 5.0, 0.1)
def table():
    st.header('Tables')
    c1, c2 = st.columns(2)
    c1.write(pd.DataFrame([x for x in zip(t,f1(t))]))
    c2.write(pd.DataFrame([x for x in zip(t,f2(t))]))
def plot():
    plt.figure()
    plt.subplot(2, 1, 1) # nrows, ncols, index
    plt.plot(t, f1(t), 'bo', t, f1(t), 'k')
    plt.subplot(212)
    plt.plot(t, f2(t), 'r--')
    st.header('Charts')
    st.pyplot(plt)

st.title('Data Explorer')
st.sidebar.header('Settings')

actions = {'Tabulate': table, 'Plot': plot}
choices = st.sidebar.multiselect('Choose task:', ['Tabulate', 'Plot'])
for choice in choices:
    result = actions[choice]()
The Streamlit function I used to draw a Matplotlib chart is st.pyplot. I also used st.multiselect, st.title, st.header, st.columns. The functions beginning with st.sidebar.* cause Streamlit to render widgets in a collapsible sidebar. Then I added a title and headings. The sidebar is used for multi-option selection, and the data tables are displayed neatly over two columns, taking advantage of Streamlit's intimate understanding of how to nicely render Pandas DataFrame objects.
As you can see, the Streamlit-enabled script is still uncluttered and functionally similar in an obvious way to the earlier plain Python script. There is no distracting procedural UI code, and the code is written entirely in Python. As a proper web app, it can be deployed on a server and shared with others.
Execute this program from the command line by typing streamlit run simple_script_plot_streamlit_plus.py, and you should see something like this:

Hopefully, you'll agree this is a big improvement in user experience over the original Python command-line script.
You can terminate the Streamlit server by typing Ctrl+C / Option+C in your console window, and if you're curious, go ahead and run the command streamlit hello to see some more cool Streamlit features.
Now that you know how to turn a plain Python script into a Streamlit app, let's focus our attention on Streamlit extensibility using Streamlit Components.
Streamlit Components
Now's a good time to download the GitHub repository for this article. The code snippets that will be shown in the following sections have been abbreviated a little and will not run on their own.
Whilst the core functionality of Streamlit is rich and has high utility out-of-the-box, there are always cases where custom extensibility is desired. Streamlit Components lets you expand the functionality provided in the base Streamlit package by enabling you to write JavaScript and HTML components that can be rendered in Streamlit apps. Streamlit Components can receive data from Streamlit Python scripts and send data to them when initially loaded. Streamlit Components have two parts:
- A frontend which is implemented in any web technology you prefer (JavaScript, React, Vue, etc.) and gets rendered in Streamlit apps via an
iframetag. - A Python API which Streamlit client apps use to instantiate the frontend and communicate with it.
You can also use Streamlit's native
iframeandhtmlcomponent APIs to host isolated (sandboxed) web content. These have limitations, so please see Streamlit component docs for more details.
Components can be packaged and published to PyPI just like any Python package, making distribution very easy.
In this section, we'll create two components using different design approaches. I'll refer to these components as Component Zero and Component Hero:
- Component Zero: is a basic component design implementation that uses static HTML and JavaScript (without any special frontend framework) but has just enough structure and bi-directional (component-to-Streamlit) communication to make it useful.
- Component Hero: is a more sophisticated component design that uses Next.js web framework, opening the door to more advanced user experiences, server-side rendering of static web pages, hosted APIs, and more. Component Hero wraps the core Streamlit components API adding support for eventing between the frontend and Streamlit.
For each of these designs, I'll show some code and diagrams of the system capabilities and system architecture so that you will have enough detail to replicate and make changes to each design implementation yourself.
Component Zero: A Basic Component Implementation
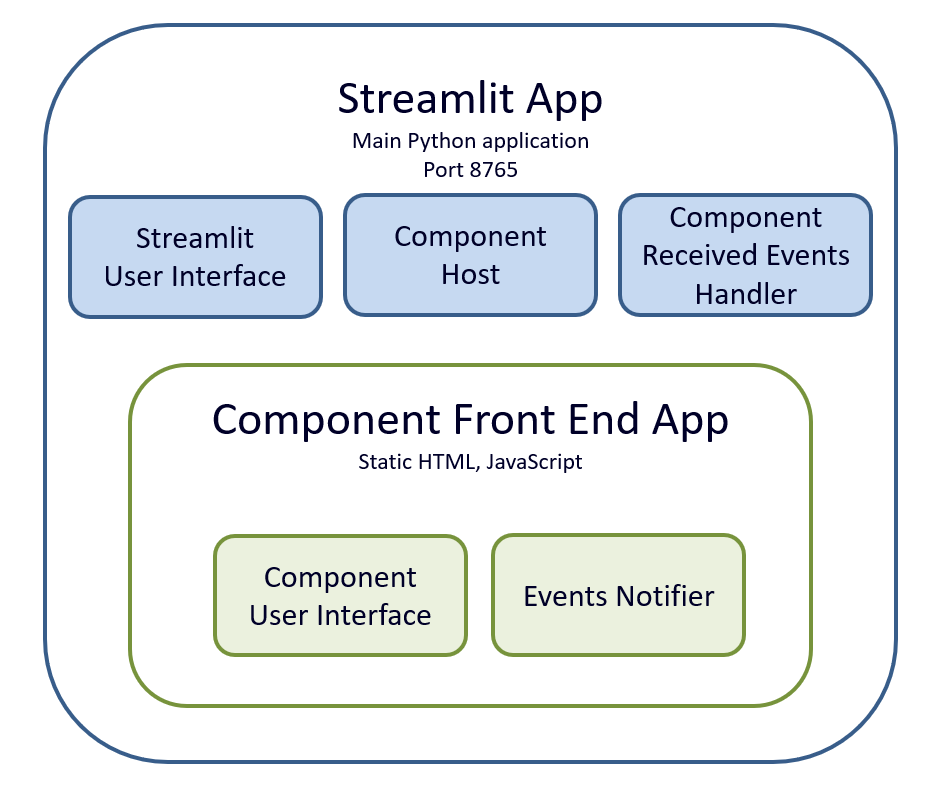
The Component Zero application is like a "hello world" app for Streamlit components. The component takes a text input and sends it to the Streamlit application to display it.
I find it's helpful to see things stripped down to their essentials to understand them. So, here I will implement a simple component in a single HTML/JavaScript file and include just enough structure to make it generally useful. I won't use a frontend framework like React, Next.js, Babel, Webpack, etc. Minimal bi-directional communication will be supported between the component and Streamlit.
Capabilities
The diagram below depicts what will be implemented. The main takeaway is that the Streamlit app server is the only server required, unlike advanced Streamlit components that require a separate web server to serve their frontends. Component Zero is just a plain HTML/JavaScript file, loaded and executed by the Streamlit server itself.
Architecture
The architecture view captures the relationships between the capabilities, shedding light on how the application works.
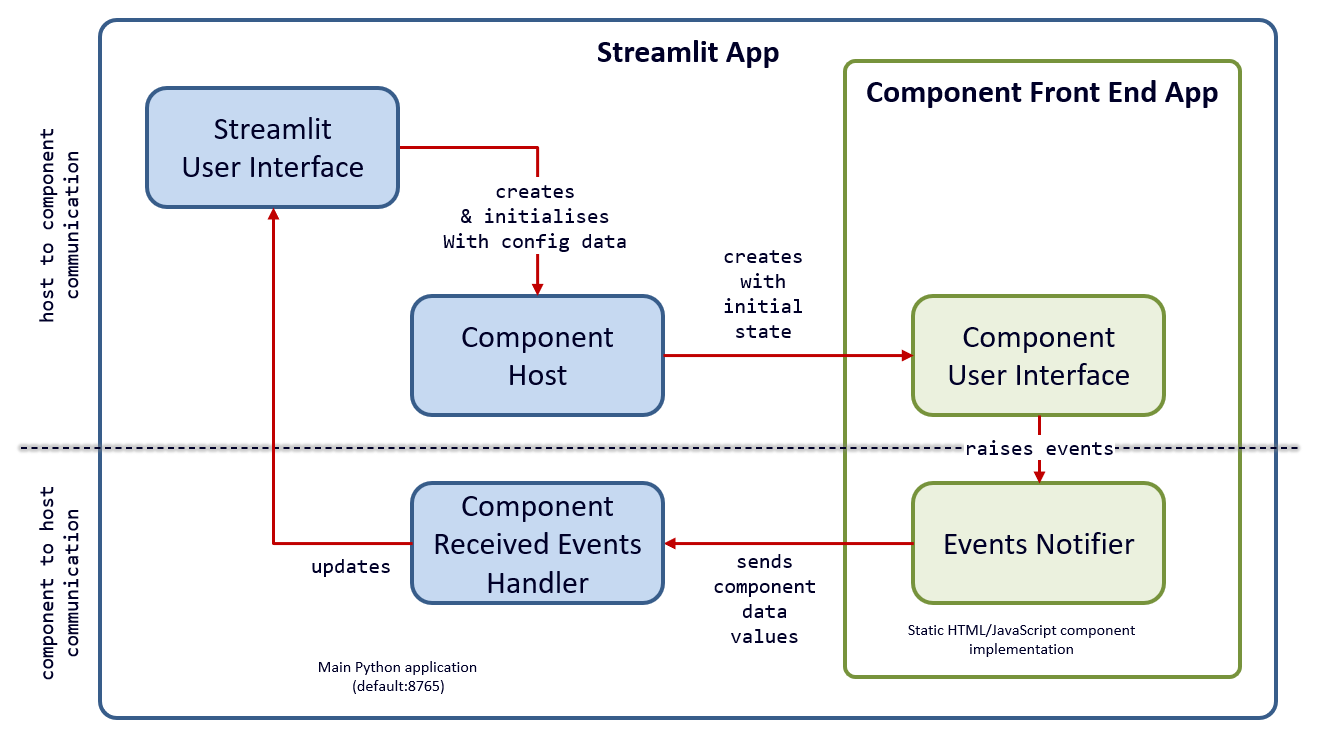
Component Zero implementation details
Let's look at Component Zero's frontend implementation in the ./frontend folder. There are two files here, __init__.py and index.html. It'll help if you refer to the capabilities and architecture diagrams above.
./frontend/__init__.py
This Python module simply declares the component using Streamlit's components.declare_component API and exports a handle to it. This handle is component_zero. You can see the path to the component is in the same folder. When Streamlit loads the component, it will serve the default index.html file from this location.
import streamlit.components.v1 as components
component_zero = components.declare_component(
    name='component_zero',
    path='./frontend'
)
./frontend/index.html
This self-contained file does the following:
- Draws a simple HTML user interface
- Loads JavaScript which implements the minimum set of features needed for the Streamlit component life cycle, namely the ability to:
- Inform the Streamlit client app that the component is ready, using
streamlit:componentReadymessage type. - Calculate or get its own visible screen height, and inform the Streamlit client using the
streamlit:setFrameHeightmessage type. - Handle inbound
messageevents from the Streamlit client app, withstreamlit:renderevent type being one of the most important ones. - Send values (i.e., objects) to the Streamlit client app, using
streamlit:setComponentValuemessage type.
- Inform the Streamlit client app that the component is ready, using
In this basic component, notice _sendMessage() function uses window.parent.postMessage(), which is as fundamental as it gets. The outbound value objects you send to the Streamlit client application must be any JSON serializable object. Conceptually these value objects can be viewed as data or events carrying a data payload. Inbound message values received on streamlit:render events are automatically de-serialized to JavaScript objects.
To illustrate basic extensibility in the static component, I implemented a simple pipeline of inbound message handlers and an actions dispatcher. I show this pipeline being used to initialize the component's data, update the user interface, and log output to the console. See the *_Handler() and initialize(pipeline) functions.
<style>
    <!-- removed for brevity (see GitHub repo) -->
</style>
<html>
<body>
  <!-- Set up your HTML here -->
  <h1>Component</h1>
  <div>
    <input id="text_input" value="" placeholder="Enter some text"/>
  </div>
  <div id="message_div">
    <br/><span id="message_label">__</span>
  </div>
  <script>
    // ----------------------------------------------------
    // Use these functions as is to perform required Streamlit
    // component lifecycle actions:
    //
    // 1. Signal Streamlit client that component is ready
    // 2. Signal Streamlit client to set visible height of the component
    //    (this is optional, in case Streamlit doesn't correctly auto-set it)
    // 3. Pass values from component to Streamlit client
    //

    // Helper function to send type and data messages to Streamlit client

    const SET_COMPONENT_VALUE = "streamlit:setComponentValue"
    const RENDER = "streamlit:render"
    const COMPONENT_READY = "streamlit:componentReady"
    const SET_FRAME_HEIGHT = "streamlit:setFrameHeight"

    function _sendMessage(type, data) {
      // copy data into object
      var outData = Object.assign({
        isStreamlitMessage: true,
        type: type,
      }, data)

      if (type == SET_COMPONENT_VALUE) {
        console.log("_sendMessage data: " + JSON.stringify(data))
        console.log("_sendMessage outData: " + JSON.stringify(outData))
      }

      window.parent.postMessage(outData, "*")
    }

    function initialize(pipeline) {

      // Hook Streamlit's message events into a simple dispatcher of pipeline handlers
      window.addEventListener("message", (event) => {
        if (event.data.type == RENDER) {
          // The event.data.args dict holds any JSON-serializable value
          // sent from the Streamlit client. It is already deserialized.
          pipeline.forEach(handler => {
            handler(event.data.args)
          })
        }
      })

      _sendMessage(COMPONENT_READY, {apiVersion: 1});

      // Component should be mounted by Streamlit in an iframe, so try to autoset the iframe height.
      window.addEventListener("load", () => {
        window.setTimeout(function() {
          setFrameHeight(document.documentElement.clientHeight)
        }, 0)
      })

      // Optionally, if auto-height computation fails, you can manually set it
      // (uncomment below)
      //setFrameHeight(200)
    }

    function setFrameHeight(height) {
      _sendMessage(SET_FRAME_HEIGHT, {height: height})
    }

    // The `data` argument can be any JSON-serializable value.
    function sendData(data) {
      _sendMessage(SET_COMPONENT_VALUE, data)
    }
    // ----------------------------------------------------
    // Now implement the the custom functionality of the component:
    let textInput = document.getElementById("text_input")
    textInput.addEventListener("change", () => {
      sendData({
        value: textInput.value,
        dataType: "json",
      })
    })

    let msgLabel = document.getElementById("message_label")

    // ----------------------------------------------------
    // Define a pipeline of inbound property handlers

    // Set initial value sent from Streamlit!
    function initializeProps_Handler(props) {
      if (textInput.value == "") {
        textInput.value = props.initial_state.message
      }
    }
    // Access values sent from Streamlit!
    function dataUpdate_Handler(props) {
        msgLabel.innerText = `Update [${props.counter}] at ${props.datetime}`
    }
    // Simply log received data dictionary
    function log_Handler(props) {
      console.log("Received from Streamlit: " + JSON.stringify(props))
    }

    let pipeline = [initializeProps_Handler, dataUpdate_Handler, log_Handler]
    // ----------------------------------------------------
    // Finally, initialize component passing in the pipeline
    initialize(pipeline)
  </script>
</body>
</html>
The counterpart to the frontend is the Streamlit application. Its entry point is in app.py. The frontend module is imported, and the component handle, component_zero, is used to create an instance of the component. Interactions in the frontend raise value notifications (events) which will be transmitted to the Streamlit client. When received, these events can be acted upon as needed.
I've provided simple function abstractions to make running a component and handling its notification events more explicit in the design. They are run_component() and handle_event() respectively. This abstraction separates concerns and makes the implementation cleaner. It'll be easier to understand the implementation of Component Hero, which we will discuss in the next section.
app.py
import streamlit as st
from datetime import datetime

from frontend import component_zero

if 'counter' not in st.session_state:
    st.session_state.counter = 0

def main():
    def run_component(props):
        value = component_zero(key='zero', **props)
        return value
    def handle_event(value):
        st.header('Streamlit')
        st.write('Received from component: ', value)

    st.title('Component Zero Demo')
    st.session_state.counter = st.session_state.counter + 1
    props = {
        'initial_state': {'message': 'Hello! Enter some text' },
        'counter': st.session_state.counter,
        'datetime': str(datetime.now().strftime("%H:%M:%S, %d %b %Y"))
    }
    handle_event(run_component(props))

if __name__ == '__main__':
    main()
Running Component Zero
Component Zero is run in the same way as any Streamlit app.
- Open a console window and change the directory to the root folder, where
app.pyis. If you've cloned the GitHub repo, then this will be in./components/zero. - Now, run the Streamlit server with this app.
$ streamlit run app.py
You can now view your Streamlit app in your browser.

  Local URL: http://localhost:8765
  Network URL: http://192.168.1.100:8765
- The app should start on the default port and launch a browser window to display the following page:
Component Hero: A More Sophisticated Component
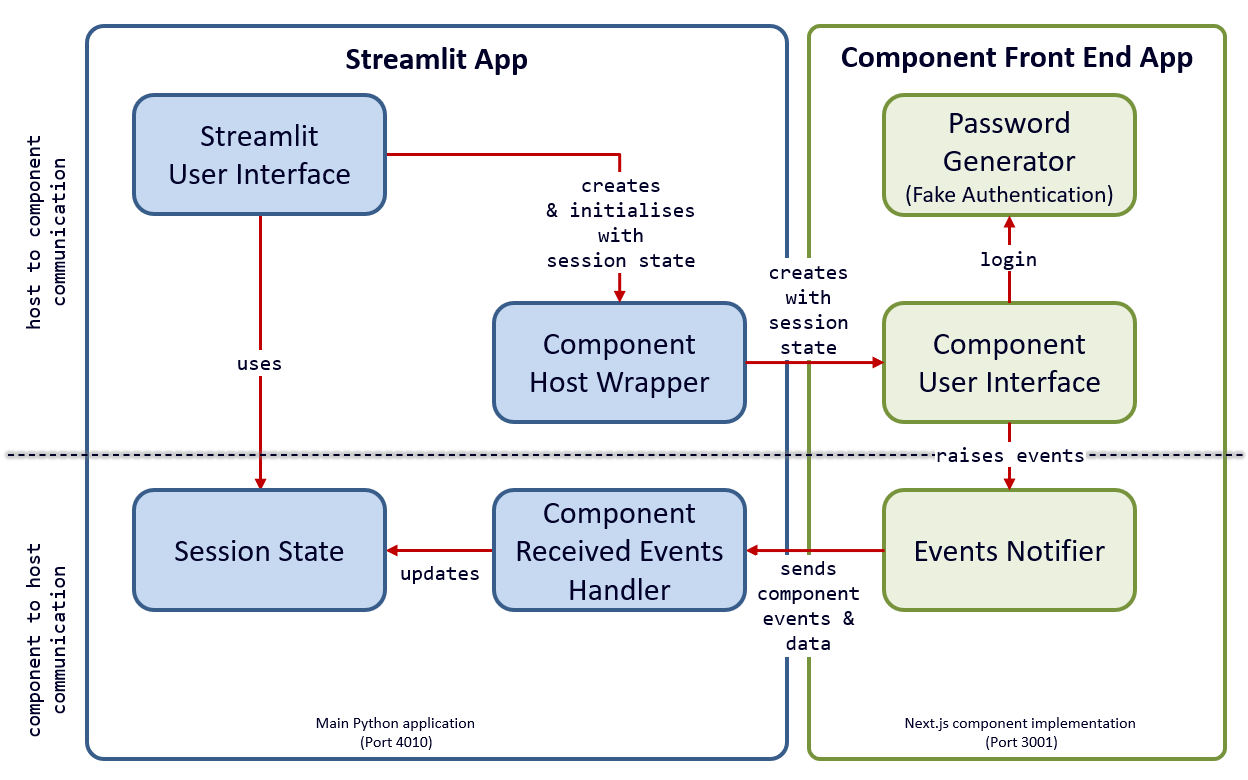
The Component Hero application takes the Zero component's design to the next level. In particular, the frontend is implemented using Next.js web framework. This means the frontend runs in its own Node.js web server stack. Additionally, a Python wrapper for components.declare_component in the Streamlit components API adds support for eventing between the frontend and Streamlit. I will refer to this wrapper as the component host or Streamlit host, which allows me to distinguish between Streamlit code which hosts the component, and Streamlit code for the rest of the application, which I will refer to as the Streamlit client.
Admittedly, Component Hero's design adds a little extra complexity to the overall system, but it opens up numerous additional uses cases combining advanced HTML, JavaScript, and Python for serious Web applications development, such as rich user experiences, server-side rendering of static web pages, self-hosted APIs, and much more. Component Hero can serve as a general component template or component design pattern which you can reuse in other Streamlit apps.
Component Hero demo
Component Hero's use case is a password-protected multi-page Streamlit app. Instead of using Auth0 authentication just yet, I will fake the authentication with a probabilistic password guess generator that has a high chance of generating the correct password after just a few attempts. The Streamlit client implements the multi-page app, and the Streamlit host plus frontend component together implement the (fake) authentication.
In a future article, I will improve Component Hero with very few changes to the architecture and integrate real authentication using Auth0's Next.js SDK. Needless to say, it will be called Component Auth0!
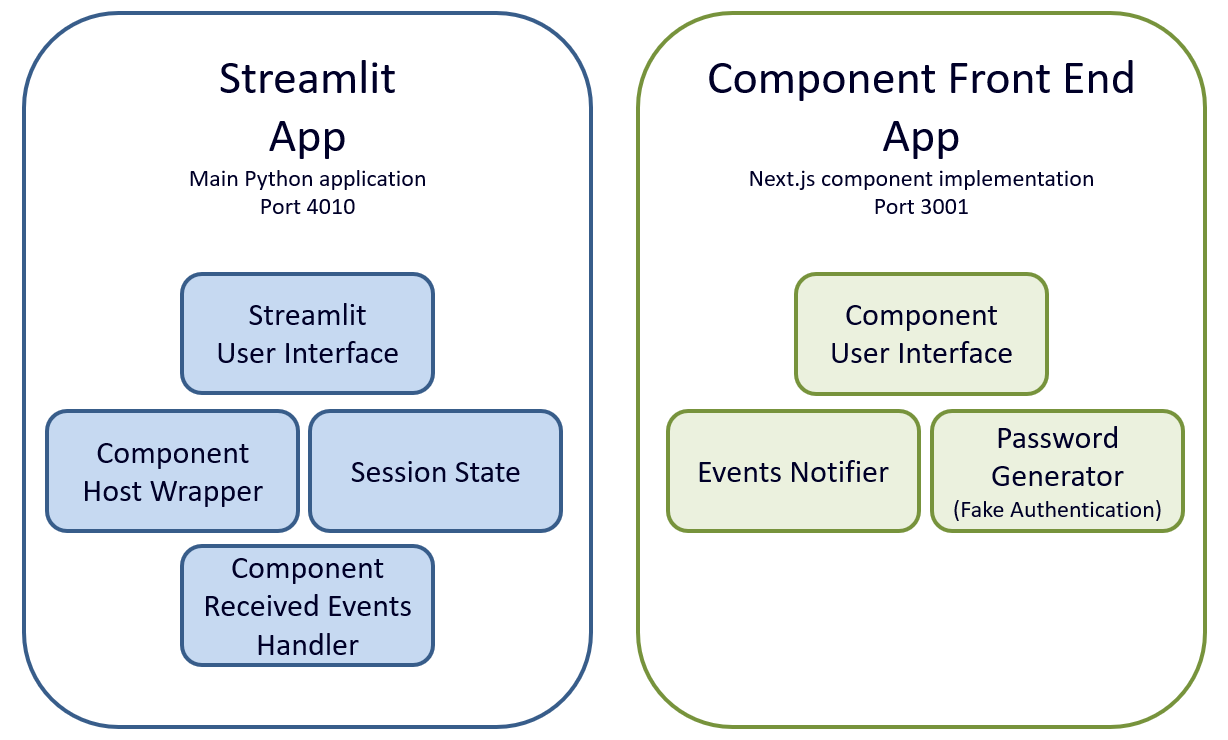
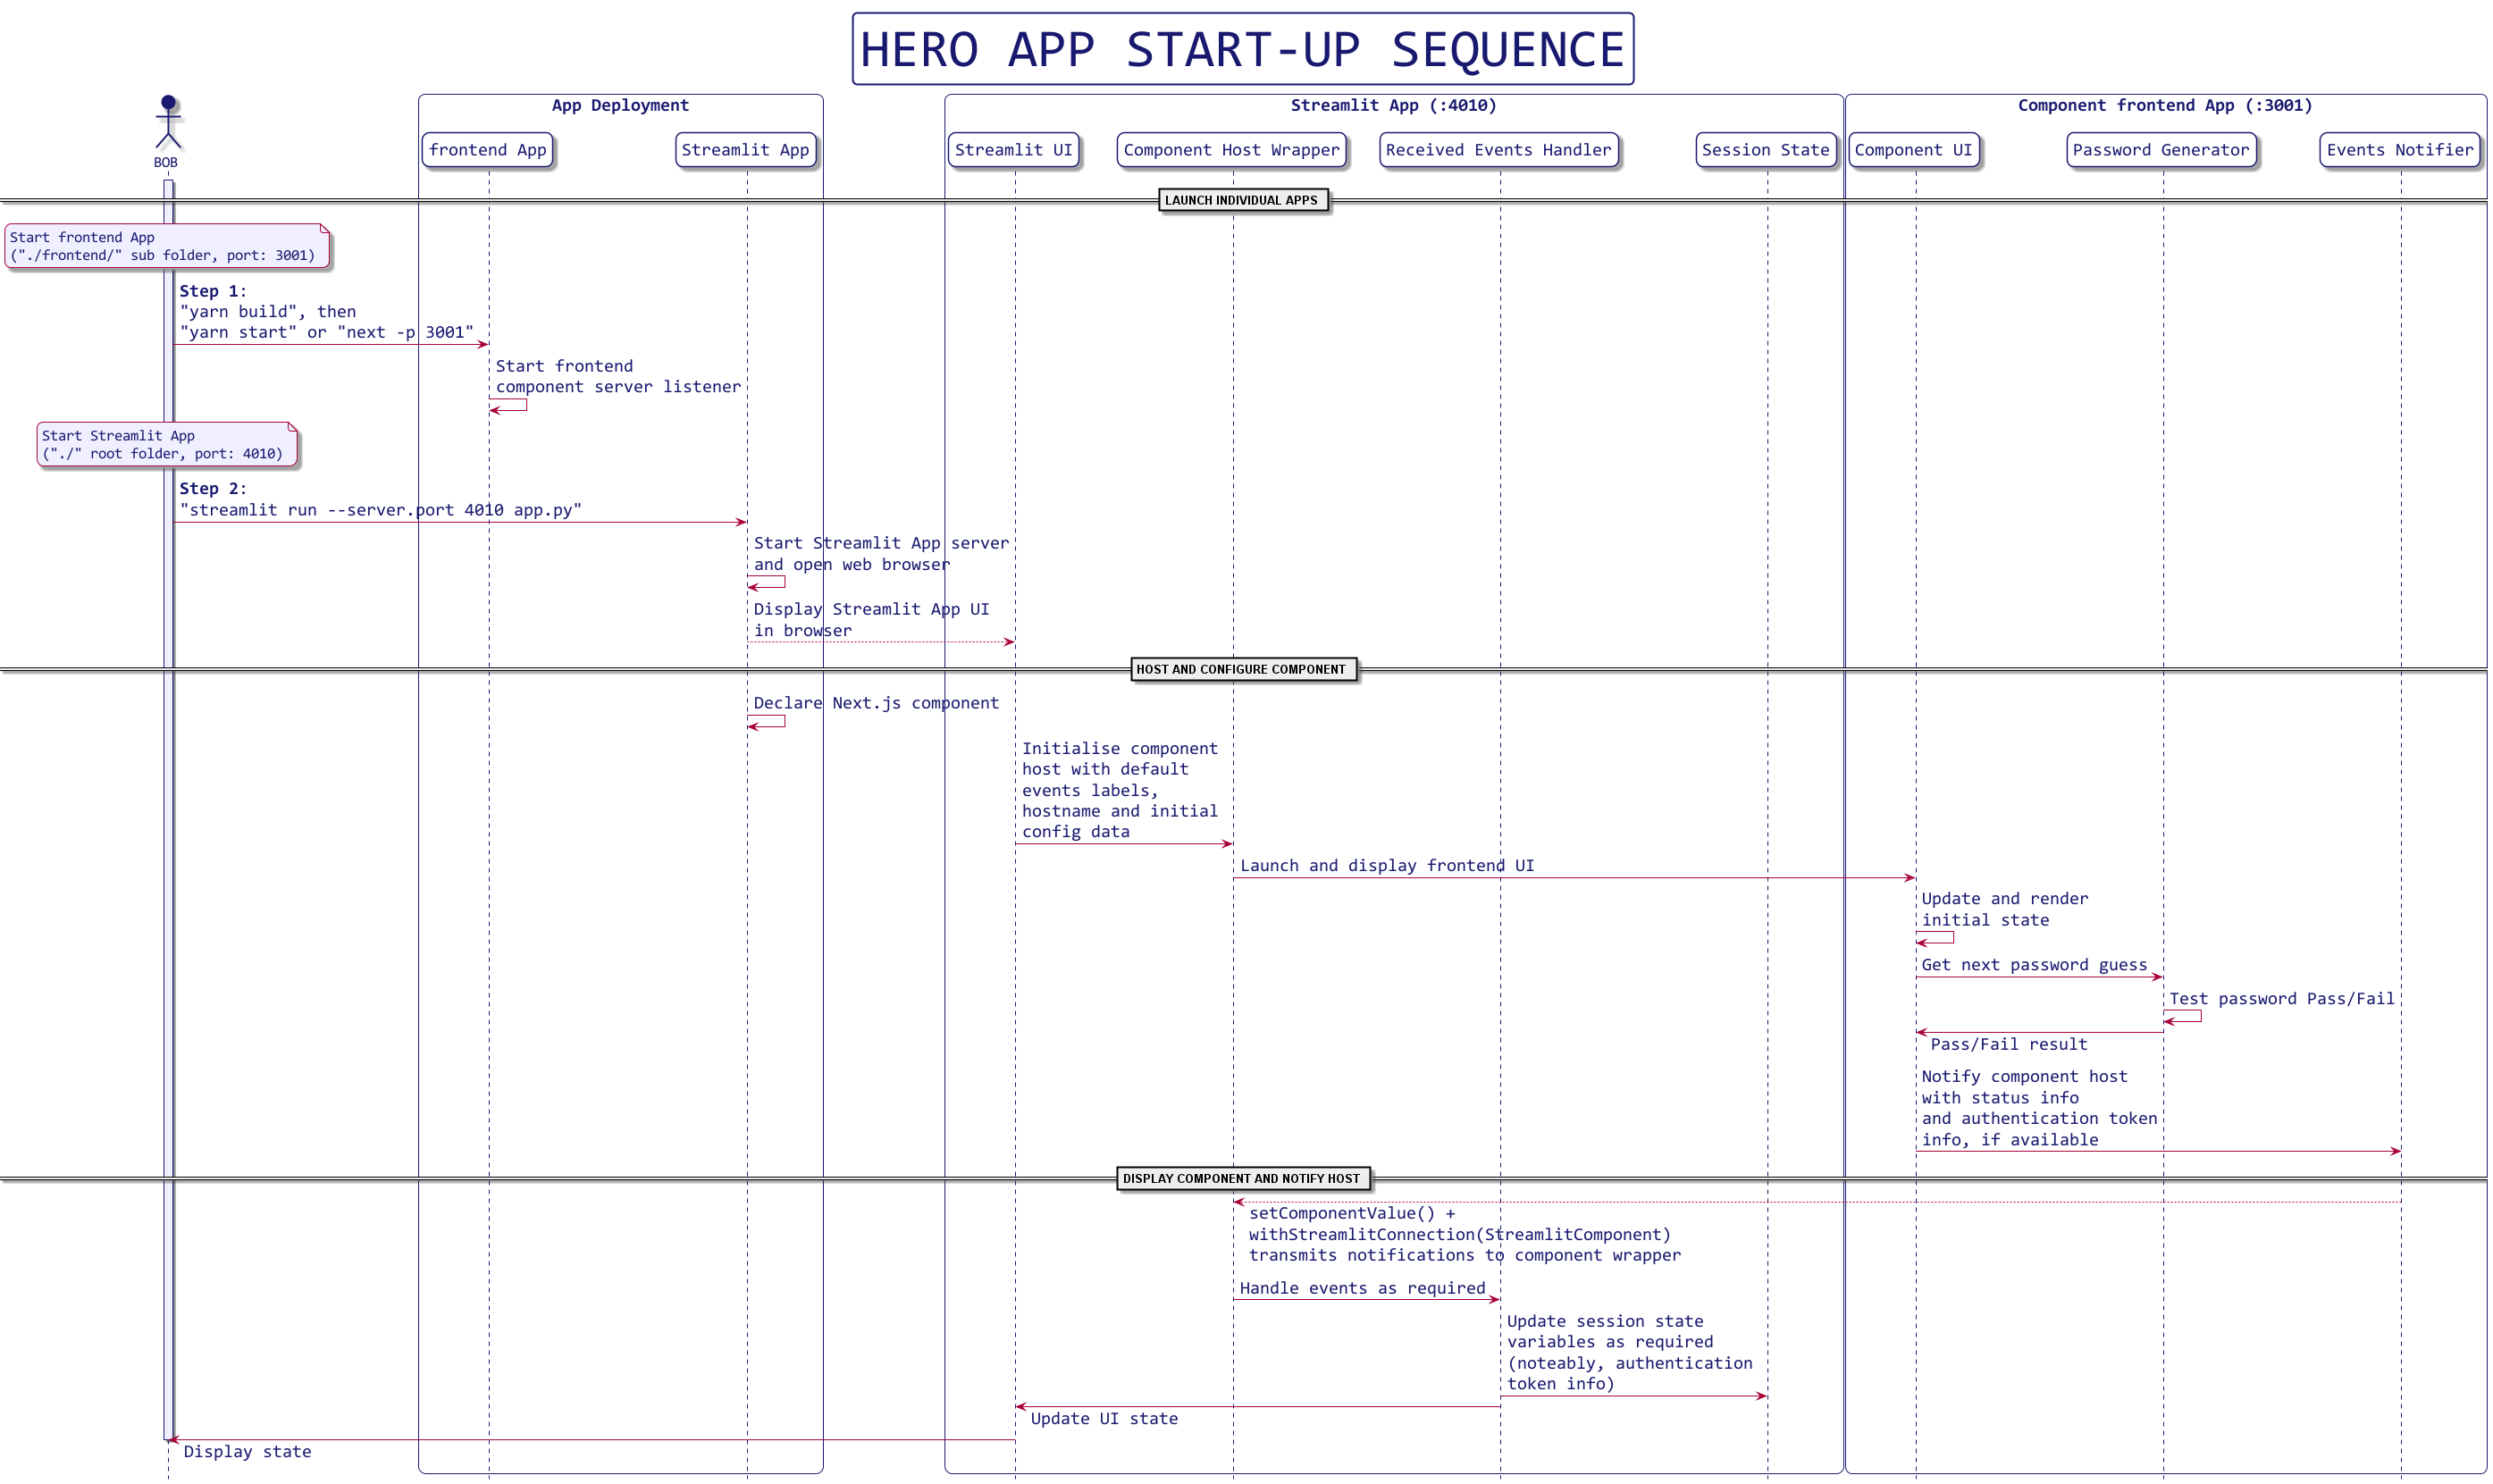
Capabilities
The diagram below shows what will be implemented. The main takeaway is that the Streamlit app server and frontend webserver run as two separate server-based applications. The component implementation cannot be run in Streamlit's server, so it must be executed in its own process and web server. I run Streamlit locally on port 4010 and the frontend locally on port 3001. You can do the same to make it easier to reuse the code and follow the design.
Architecture
The architecture view captures the relationships between the capabilities, shedding light on how the application works.
Application start-up sequence
Since this component is slightly more complicated than the previous one, I have a sequence diagram showing the interactions between capabilities, which will help you better follow the code further below.
Component Hero implementation details
There are three parts to the Component Hero application, which I will explain in some detail:
- The Streamlit component host: a Python wrapper class and an event handler function
- The component: a Next.js (React) web app implementing the component (runs on localhost, port 3001)
- The Streamlit client application (runs on localhost, port 4010)
The component design is like Streamlit-Player.
[1] Streamlit component host wrapper and event handler
I wrapped Streamlit's component Python API (components.declare_component()) to generalize its ability to receive labeled event types from the hosted component, perform data integrity checking and error handling. The wrapper is a Python object I called ComponentHost to follow the Streamlit host vs. client nomenclature I introduced above. ComponentHost 's constructor takes a set of allowed named events and a dict of property values that will be passed to the component frontend when it is first instantiated (mounted). ComponentHost will expect to receive only these named events from the frontend. When it does, they'll be encapsulated in ComponentEvent objects and passed to a user-supplied event handler function. The coordination between ComponentHost, received ComponentEvent(s), and the event handler is mediated by a simple component runner function.
./app/modules/init.py
Declare the component.
# Running from dev server (or different port to Streamlit)
COMPONENT_URL = f'{settings.COMPONENT_BASE_URL}/streamlit'
component_hero = components.declare_component(name='component_hero', url=COMPONENT_URL)
./app/modules/hero_component.py
Hero component wrapper.
DEFAULT_EVENTS = ['onStatusUpdate', 'onActionRequest', 'onError']
class ComponentHost():
    declared_component = None   # low level declared component host
    key = None
    events = []
    props = {}

    class ComponentEvent():
        '''
        Object holding an event name (obj.name), data (obj.data), event source (obj.source).
        name and data can be set to `None`.
        '''
        name = None
        data = None
        source = None
        def __init__(self, host, event):
            e = {}
            if isinstance(event, str):
                e = json.loads(event)
            elif isinstance(event, dict):
                e = event
            event_name = e.get('name', None)
            event_data = e.get('data', None)
            # All events are named
            # Filter by allowed events
            if event_name in host.events:
                self.name = event_name
                self.data = event_data
            else: # report error for unknown and null named events
                self.name = 'onError'
                self.data = {'message': f'Component event {event_name} is not allowed. (Data: {event_data})'}
            self.source = host

    def __init__(self, declared_component, key=None, events=DEFAULT_EVENTS, **props):

        self.declared_component = declared_component
        self.key = key
        self.events = events
        # Allowed props
        self.props = {prop: value for prop, value in props.items() if prop in [
            'hostname', 'initial_state'
        ]}
        # Default prop value
        self.props.setdefault('hostname', 'Default Host')
        self.props.setdefault('initial_state', {'message': 'Default Message', 'action': 'Default Action'})
        self.props.setdefault('events', DEFAULT_EVENTS)
        self.props.setdefault("width", "100%") # built-in prop, height is set in the component itself
        print('### Component Host Ready ###')
        print(f'Event queue: {settings.USE_COMPONENT_EVENT_QUEUE}')
        print(f'Props: {json.dumps(self.props)}')

    def next_event(self):
        # Run declared component
        event = self.declared_component(key=self.key, **(self.props))
        return self.ComponentEvent(host=self, event=event)

    def send_event(self, event):
        '''
        Functionality to send events/data to a component is not supported
        by Streamlit, except when the component is initially mounted :(

        On the other hand, the component can pass events to Streamlit as
        and when it needs to.
        '''
        pass

def run_component(declared_component, events, props, event_handler):
    try:
        run_component_sync(declared_component, events, props, event_handler)
    except Exception as ex:
        print('>> Exception running component <<')
        print(str(ex))

def run_component_sync(declared_component, events, props, event_handler):
    component_host = ComponentHost(declared_component, key='login', events=events, **props)
    event =  component_host.next_event()
    if event:
        try:
            report = event_handler(event)
        except Exception as ex:
            print('>> (run_component_sync) Exception in event handler <<', str(ex))
            report = ['>> (run_component_sync) Exception in event handler <<', str(ex)]
        print_report(report)

def print_report(report):
    print()
    print(f'### [{datetime.now()}] Component event handler report ####')
    print(report)
I'll describe the flow of the code shown above. Starting at run_component_sync(declared_component, events, props, event_handler), this takes the declared component, events, and properties and creates a ComponentHost instance. This causes the component to be displayed in the Streamlit client app.
run_component_sync() uses the next_event() function of ComponentHost to receive ComponentEvent events which are raised by interacting with the running component's user interface. These events are passed to the given event handler, which deals with the event as required. It constructs an array of reporting data as it does its work. This report data array object is passed to a simplistic print_report() function to display the report in the console.
The handle_event() function below can serve as our event handler:
def handle_event(event):
    if not event:
        # return the preserved report
        return st.session_state.report
    name = event.name
    data = event.data
    source = event.source
    report = []
    report.append(name)
    report.append(data)

    props = data.get('props', None)
    action = data.get('action', None)

    if name == 'onStatusUpdate':
      pass # DO SOMETHING
    elif name == 'onActionRequest':
      pass # DO SOMETHING
    elif name == 'onError':
      pass # DO SOMETHING
    st.session_state.report = report
    return report
Now we can get everything going using a component runner init() function. This takes the event handler function and runs the component with its initialization properties and a list of named events. Properties and named events are, of course, application-specific.
./app/component_runner.py
The component runner.
EVENTS  = [ 'onStatusUpdate', 'onActionRequest', 'onError' ]
PROPS   = { 'hostname':'Hero Streamlit App',
            'initial_state': {
                'password': settings.ENCRYPT_PASSWORD,
                'message': 'Default Message',
                'action': 'Default Action'
            },
          }
def init(event_handler):
    run_component(declared_component, EVENTS, PROPS, event_handler)
The Streamlit client application then uses the component as follows:
component_runner.init(handle_event)
The component is finally ready to communicate with the Streamlit application via the component host, using custom-named events that are processed by the event handler.
[2] Next.js (React) component implementation
Please refer Node.js to install the latest version of Node. This article uses Node v16.14.0 LTS. With Node installed, run the command npm install from the ./frontend folder where the package.json file is located. This will install all necessary packages, including Next.js (v12.1.0), React (v17.0.2) and Streamlit's React component library package (v1.4.0).
If you're interested, visit Getting Started to learn more about Next.js. This component was bootstrapped using the with-typescript Next.js example template. The template enables TypeScript's (v4.3.2) features to be used with Next.js, and I also installed the type declarations for React and Node, as explained in the template's documentation.
The component's web page implementation is in /pages/streamlit and is similar to the one described in Streamlit Component-template, with some extra features motivated by the ReactPlayer integration example.
./frontend/pages/streamlit/streamlit.tsx
import React, { useState, useEffect } from 'react'
import {
  withStreamlitConnection,
  ComponentProps,
  Streamlit,
} from 'streamlit-component-lib'
import MyButton from '../../components/MyButton'
const FRAME_HEIGHT = 85
const StreamlitComponent = (props: ComponentProps) => {
  // inbound
  const [hostname, setHostname] = useState('None')
  const [password, setPassword] = useState('None')

  // outbound
  const [message, setMessage] = useState('Generate a password guess to log in.')
  const [passwordGuess, setPasswordGuess] = useState('')
  const [token, setToken] = useState(false)
  const [state, setState] = useState({
    hostname: hostname, passwordGuess: null, token: token, message: message, isError: false, error: null
  })

  // Misc
  const [count, setCount] = useState(0)
  const attempts = [' \ ','--',' / ',' | ']
  const initializeProps = async (props: ComponentProps) => {
    if ('hostname' in props.args && 'initial_state' in props.args) {
      console.log('STC initializeProps')
      setHostname(props.args.hostname)
      setPassword(props.args.initial_state['password'])
      delete props.args.hostname
      delete props.args.initial_state
    }
  }
  const sendEvent = async (name: string, data: any) => {
    if (props.args.events.includes(name)) {
      Streamlit.setComponentValue({ name: name, data: data })
    } else {
      Streamlit.setComponentValue({ name: 'onError', data: data })
    }
  }
  const updateStateAndNotifyHost = async (
    state: { hostname: string, passwordGuess: string, token: boolean, message: string, isError: boolean, error: string } = null
  ) => {
    try {
      setState(state)
      await sendEvent('onStatusUpdate', state)
    } catch (err) {
      console.log(`updateStateAndNotifyHost error: ${err}`)
    }
  }
  useEffect(() => {
    const newState = {
      hostname: hostname,
      passwordGuess: passwordGuess,
      token: token,
      message: message,
      isError: false,
      error: null,
    }
    updateStateAndNotifyHost(newState)
  }, [passwordGuess])
  // One shot initializer for props
  useEffect(() => {
    initializeProps(props)
    Streamlit.setFrameHeight(FRAME_HEIGHT)
  }, [])
  // ----------------------------------------------------
  const generatePasswordGuess = async () => {
    const index = Math.random() * password.length
    const guess = password.substring(0, index) + '_' + password.substring(index + 1)
    // force the guess to be correct "sometimes"
    if (index < password.length / 3) {
      setMessage('Success! Logged in.')
      setPasswordGuess(password)
      setToken(true)
      setCount(0)
    // otherwise make it incorrect
    } else {
      setCount(count+1)
      setMessage('Try again? (' + attempts[3 - count % 4] + ')')
      setPasswordGuess(guess)
      setToken(false)
    }
  }
  const logout = async () => {
    setMessage('Generate a password guess to log in.')
    setPasswordGuess('')
    setToken(false)
    setCount(0)
    return passwordGuess
  }
  // ----------------------------------------------------
  return (
    <header>
      <div className="text-xs text-indigo-700">
        {hostname}{' | '}{message}
      </div>
      <div className="container my-4 ml-1 max-w-xl space-x-4">
        {!token && (<MyButton label='Generate password guess' onClickHandler={generatePasswordGuess} props={props} />)}
        {token && (<MyButton label='Logout' onClickHandler={logout} props={props} />)}
      </div>
    </header>
  )
}

export default withStreamlitConnection(StreamlitComponent)
The component UI is minimal and simply displays the user's authentication status using a password guessing scheme. Its primary job is to send true/false tokens based on correct/incorrect password guesses, respectively. These tokens are sent as OnStatusUpdate events to the Streamlit host application. The Streamlit app (in the event handler) stores the token in the application's session-wide st.session_state. Using this, the app can allow or deny access to authenticated features. The password guess token is passed to the Streamlit component host application using Streamlit.setComponentValue(). This API is provided by Streamlit's React component library streamlit-component-lib.
I use Streamlit.setFrameHeight() to control the height of the component. The streamlit-component-lib library calls this automatically, but you can use it as well to fix your own height. A bit of magic in the last line of the component implementation export default withStreamlitConnection(StreamlitComponent) does some handshaking with Streamlit and sets up the mechanisms for bi-directional data communication.
To get
streamlit-component-libto work in Next.js, I had to use the Next.js transpiler module. Seenext.config.js. If you figure out how to avoid this, please leave a comment.
Important: I know an authentication token should be checked for validity and be generated from user credentials. In a future article, we will see how Auth0 can be integrated with Component Hero to pass jwt authentication tokens to your Streamlit application instead of naive password guesses.
[3] Streamlit client app
Earlier I described the Streamlit component host wrapper and event handler. The remainder of the Python part of the application is the Streamlit client interactive user experience. This part is trivial to implement, given the nice capabilities of Streamlit's built-in UI widgets. The true/false session state token set in the event handler allows or denies access to sub-pages in the client application. Whilst access is denied, the client application prompts the user to log in through the Next.js (React) component.
./app/app.py
This is the main client application.
import streamlit as st
import settings

# Initialize Session State variables used in the client app
# (Must come before imports below)
if 'message' not in st.session_state:
    st.session_state.message = 'None'
if 'token' not in st.session_state:
    st.session_state.token = False
if 'report' not in st.session_state:
    st.session_state.report = []

from common import messageboard, check_token
import dumb_app, dumber_app

# The first widget container in the main page is a 'messageboard'
messageboard = st.empty()

def main():
    with st.expander('Authenticate'):
        import component_runner
        from component_event_handler import handle_event
        component_runner.init(handle_event)
    pages = {
        'DuMMMy aPp 1': [dumb_app.main],      # DUMMY APP 1
        'DUmmmY ApP 2': [dumber_app.main],    # DUMMY APP 2
    }
    def _launch_apps():
        messageboard.empty()
        choice = st.sidebar.radio('What do you want to do?', tuple(pages.keys()))
        pages[choice][0](title=choice, *pages[choice][1:])
    if (check_token(st.session_state.token)):
        _launch_apps()
    else:
        messageboard.info('Please login below...')
    # ABOUT
    st.sidebar.title('Component Hero Demo')
    st.sidebar.markdown('---')
    st.sidebar.info('(c) 2022. CloudOpti Ltd. All rights reserved.')

if __name__ == '__main__':
    st.sidebar.image('./logo.png', output_format='png')
    main()
./app/dumb_app.py
This is the logged-in view.
import streamlit as st
def main(title):
    st.title(title)
    st.write(f'## Welcome to the app that does nothing! :wink:')
frontend settings File
You'll need to add a .env file to the root of the frontend repository and include appropriate environment variables. See env.sample, which is a template for .env.
NEXT_RUN_PORT=3001
NEXT_PUBLIC_CORS_ORIGINS=['http://localhost:3001', 'http://localhost:8888']
# Crypto message exchange details
ENCRYPT_SECRET='This is a top-secret message!!'
ENCRYPT_PASSWORD='YouWillNeverGuessThisSecretPassword'
ENCRYPT_NONCE='nonsensical'
Streamlit (backend) settings File
You'll need to add a .env file to the root of the Streamlit app repository and include appropriate environment variables.
See env.sample, which is a template for .env. The .env file is loaded in ./app/settings.py, which in turn is imported in Python application files that require access to settings values.
# API General
COMPONENT_BASE_URL='http://localhost:3001'
# Crypto message exchange details
ENCRYPT_SECRET='This is a top-secret message!!'
ENCRYPT_PASSWORD='YouWillNeverGuessThisSecretPassword'
ENCRYPT_NONCE='nonsensical'
# Component settings
USE_COMPONENT_EVENT_QUEUE='True'
Whilst the settings files appear to be almost identical, it is not possible to merge them into one shared settings file. The frontend and Streamlit (backend) applications are separate deployments. In a production environment, these deployments are likely to be distributed across two separate machines or VMs.
Running the application
Ensure you have installed the required frontend packages by running npm install from the ./frontend folder. The frontend component app uses Next.js and Tailwind CSS.
The frontend and backend applications are started individually from their root directory folders. Enter the ./frontend folder and in separate terminal windows, run yarn <command>, where <command> is dev in one terminal and start-streamlit in another terminal. Run the commands in this order.
When the Streamlit app starts, the component may not load immediately; it will take until it has been statically compiled. Check the Next.js console and wait till it has finished compiling, then refresh the Streamlit browser window. Recall that
yarn buildwill pre-compile the Next.js app, after which you can runyarn startto start the compiled frontend app (i.e., instead of usingyarn dev, which starts the Next.js server and only compiles the application on-demand).
Below is the scripts section in ./frontend/package.json, which contains the commands that can be run with yarn.
"scripts": {
  "dev": "npx next dev -p 3001",
  "build": "next build --debug",
  "start": "npx next start -p 3001",
  "start-streamlit": "cd ../app && streamlit run --server.port 4010 app.py",
  "start-all": "concurrently "npx next start -p 3001" "cd ../app && streamlit run --server.port 4010 app.py"",
  "typecheck": "tsc"
}
If you install the concurrently package (npm install -g concurrently), you can simultaneously start the frontend and Streamlit application in one command using yarn start-all, or from the command line, you could type:
$ concurrently "yarn start" "yarn start-streamlit"
Conclusion
Streamlit was founded on the idea of building interactive apps easily. There is a new and different workflow to building these kinds of applications. Streamlit is very simple, lightweight, super-easy to understand, and it's slightly difficult to describe. Just try it. In essence, by sprinkling interactive widgets throughout your Python code, Streamlit will magically build a web app for you. The community has responded very positively to this simplicity.
In this article, you hopefully:
- Learned a little bit about how and why Streamlit was conceived by its inventors
- Discovered how to extend Streamlit's functionality using its component API
- Seen how to build both simple and moderately complex custom Streamlit components
- Are ready to take the next steps in a future article integrating Auth0 authentication into your Streamlit applications using components
Resources
- GitHib Repo for this article
- Awesome Streamlit Docs
- Streamlit Discussion Forum
- Components API reference
- Streamlit Component-template GitHub repo
- Awesome Streamlit App Gallery
- integrating ReactPlayer as a component
- Will Streamlit cause the extinction of Flask?
Videos
About the author

Arvindra Sehmi
Startups Strategy Advisor
I work with a few tech start-ups providing technical strategy and product development advice and seed investment. I've rediscovered the joys of hands-on software development and actively engage with various developer communities to learn myself and educate sharing what I know. Previously, I was CIO at Oxford Economics for 10 years bringing 25 years’ prior experience in capital markets and high-technology software industries, enterprise software architecture and solutions development. Before that I spent eight years at Microsoft as a global business manager and award-winning software architect and technical evangelist.
Earlier in my career, I was CTO at a start-up building advanced social media analytics products followed by a couple of years as an executive coach and mentor, and IT change management and strategy consulting to a number of small and medium sized businesses.