
Some applications have a limited lifetime. A website or app for limited-time events such as a conference, convention, or concert will only be useful when the event takes place. Since there’s no point in allowing people to sign up for an account after the event is over, you may want to limit registration to a specific set of dates.
It usually takes a considerable amount of work to limit the dates when new users could register an account. However, if you’re using Auth0 to authenticate your users, this task became a lot easier thanks to Actions!
Actions are a new feature that allows you to extend Auth0 beyond what it can do “out of the box”. They’re Node.js functions that you can add to various flows within Auth0’s processes, including logging in, changing passwords, and signing up for a new account. You write and store these functions in the Auth0 dashboard, where they’re part of your tenant’s settings, and Auth0’s servers execute them.
In this article’s exercise, you’ll learn how to write an Action that limits when users can sign up for an account for a specific application. If a user signs up for an account outside the defined valid registration period, their attempt to sign up will be canceled, and they will see a message explaining why.
Prerequisites
You’ll need the following for this exercise:
- Auth0 account: Actions are an Auth0 feature, which means you need an Auth0 account to use them. You can sign up for free, and the process is pretty painless.
- Any application that uses your Auth0 tenant to provide Universal Login. Any web-based, mobile, or desktop application will do, just as long as it is one of your tenant’s applications. You’ll need it to log in and see how defining Actions changes how login works. If you don’t have any applications that use Auth0 for authentication, you can download one from the Auth0 Quickstarts page.
Create a New Action
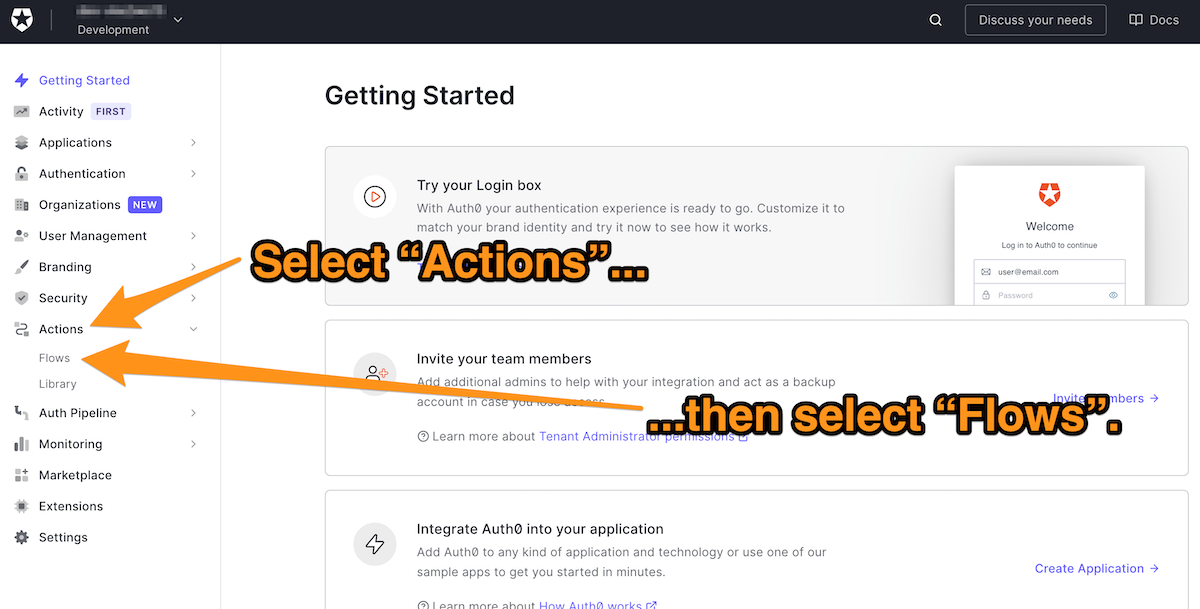
The first step in creating a new Action is navigating to the appropriate authentication flow. Do this by selecting Actions from the left-side menu, then select Flows from the sub-menu that appears:
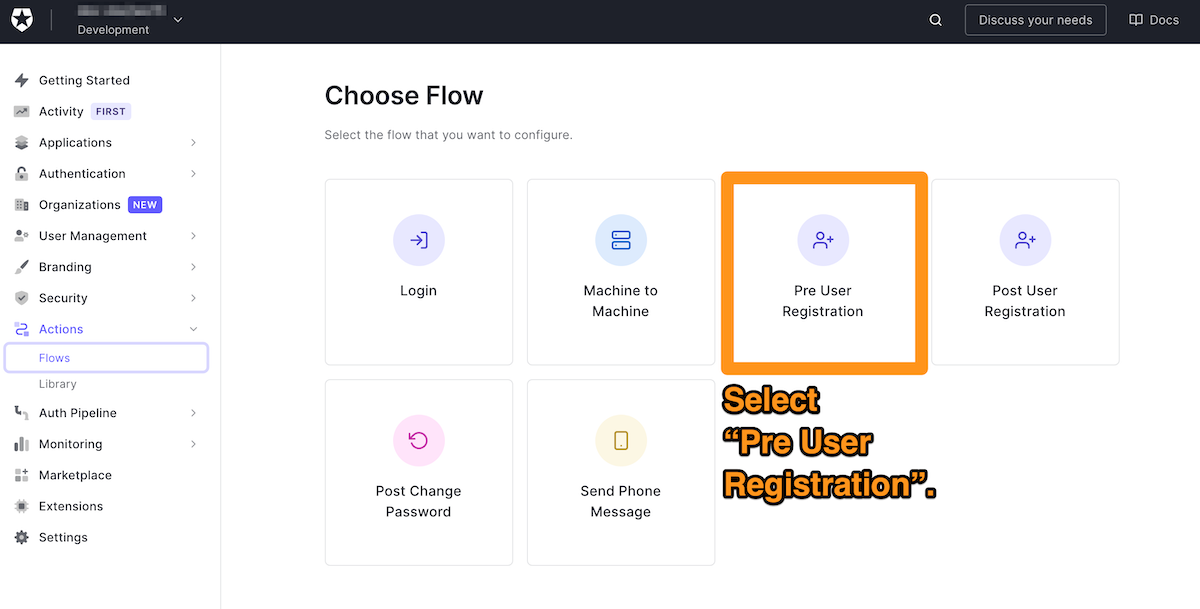
You’ll be at the Choose Flow page, where you can select the flow for your Action. In this case, we want to create an Action that runs immediately after the user submits an email address and password to sign up for an account. Do this by selecting the Pre User Registration flow:
This will take you to the Pre User Registration flow page, which contains a flowchart depicting the pre-user registration flow in the center of the page, and a column labeled Add Action, which lists Actions you can add to the flow.
It’s time to create an Action to add to the flow. Do this by clicking the + button in the Add Action column, then select Build Custom from the menu that appears:

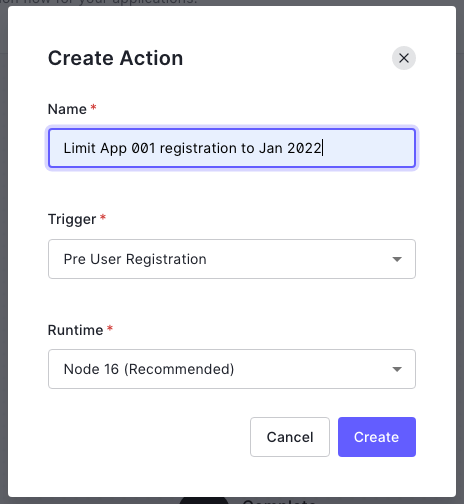
The Create Action dialog box will appear. Give the Action an appropriate name in the Name field. I chose Limit App 001 registration to Jan 2022. Leave the Trigger and Runtime menus at their default settings, and click the Create button:
You’ll be taken to the code editor for your newly created Action:

Write Code for the Action
Let’s write a quick specification for the Action before we code it.
The Action should:
- Only affect sign-ups for a given application. In this exercise, we’ll call it “App 001”. It should not affect sign-ups for any other applications in the tenant.
- Limit registration so that users can sign up for an account only between a given start date and end date. For this exercise, let’s limit registration to January 2022.
- If a user tries to sign up before or after the registration period above, their attempt should fail, and they should be shown a message explaining why.
Here’s the code that implements that specification. It limits registration to the month of January 2022. You should adjust the start and end dates for the registration period as you see fit:
exports.onExecutePreUserRegistration = async (event, api) => {
  if (event.client.client_id === /* CLIENT ID GOES HERE */) {
    // Remember, Date objects are GMT by default!
    const startDate = new Date(/* START DATE/TIME GOES HERE */)
    const endDate = new Date(/* END DATE/TIME GOES HERE */)
    const now = new Date()

    if (now < startDate || now > endDate) {
      const LOG_MESSAGE = "APP 001 registration outside January 2022"
      const USER_MESSAGE = "Registration for this app is limited to January 2022."
      api.access.deny(LOG_MESSAGE, USER_MESSAGE)
    }
  }
}
You’ll need to customize the code above for your situation:
- Replace the
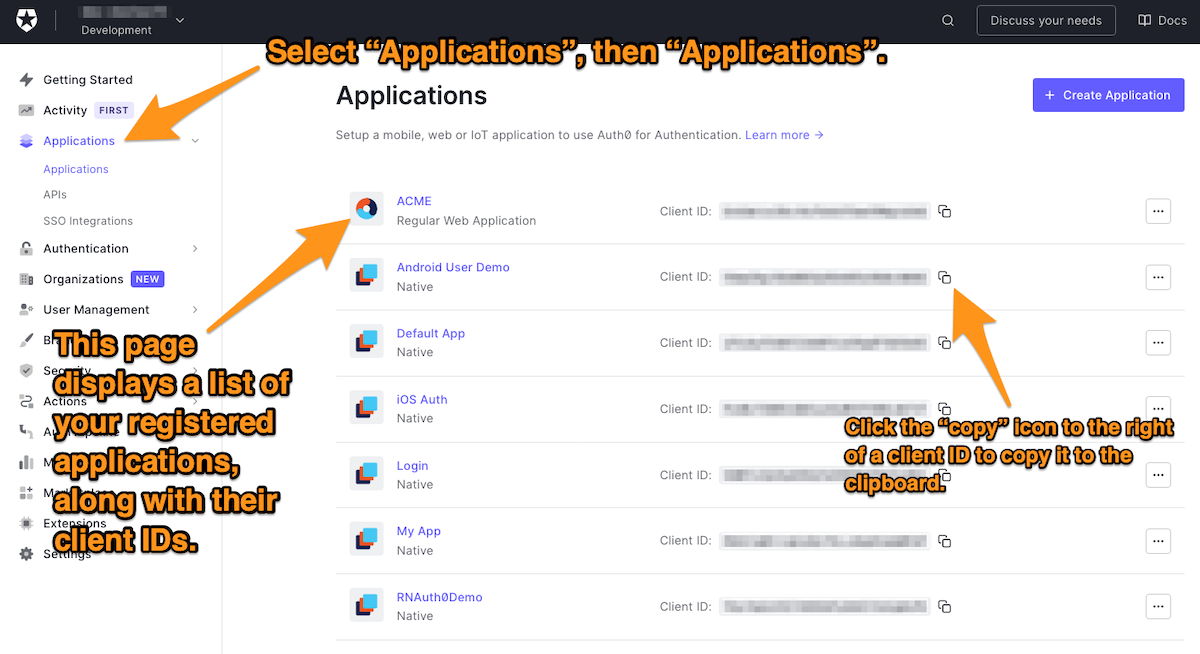
/* CLIENT ID GOES HERE */comment with the application’s client ID that this Action should apply to. The Auth0 dashboard’s Applications list (select Applications → Applications from the menu on the left side of the page) shows the client ID of every application in your tenant.
- Replace the
/* START DATE/TIME GOES HERE */comment with the date and time of the start of the valid registration period. Since we want to limit registration to January 2022, use a start date value of “2021-01-01T00:00:00”. - Replace the
/* END DATE/TIME GOES HERE */comment with the date and time of the start of the valid registration period. For this exercise, use an end date value of “2021-01-31T23:59:59”.
Auth0 calls the onExecutePreUserRegistration() function just after the user has provided an email address and password to sign up for an account but before the account is created. Any code entered into this function can examine the credentials provided by the user or use any other information to decide if the registration should take place or be canceled.
onExecutePreUserRegistration() takes two parameters, whose properties you can use to perform tasks prior to the user being registered:
event: An object that contains details about the request to register a new user. The Action usesevent’sclient.client_idproperty to identify the application that triggered it. Remember, the limited registration period should apply only to App 001.api: An object with methods that you can use to change the behavior of the Pre User Registration flow. The Action usesapi’saccess.deny()method to cancel registration.access.deny()has two parameters:reason: A string containing an internal-facing reason why registration is being canceled. This value will appear in your tenant’s logs.userMessage: A string containing an external-facing reason why registration is being canceled. This value will be displayed to the user to explain why they can’t sign up for a new account.
With the code entered, click the Deploy button to save it.
Add the Action to the Flow
Now that you now have a working Action, it’s time to incorporate it into the flow.
Go back to the Pre User Registration page. There are a couple of ways to do this:
- Select Actions → Flows from the menu on the left side of the page, then click on Pre User Registration.
- If it’s onscreen, click on the Back to Flow link. It will be near the upper left corner of the code editor).
Once you’re on the Pre User Registration page, you should see the Action you just created in the Add Action column:
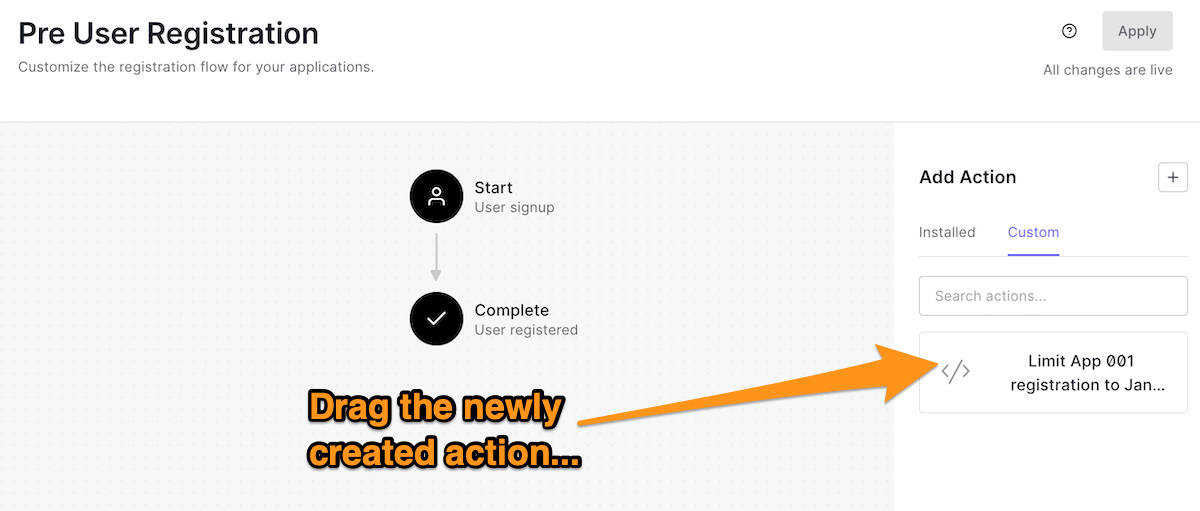
Drag the Action into the flow, as shown in the screenshots above and below.
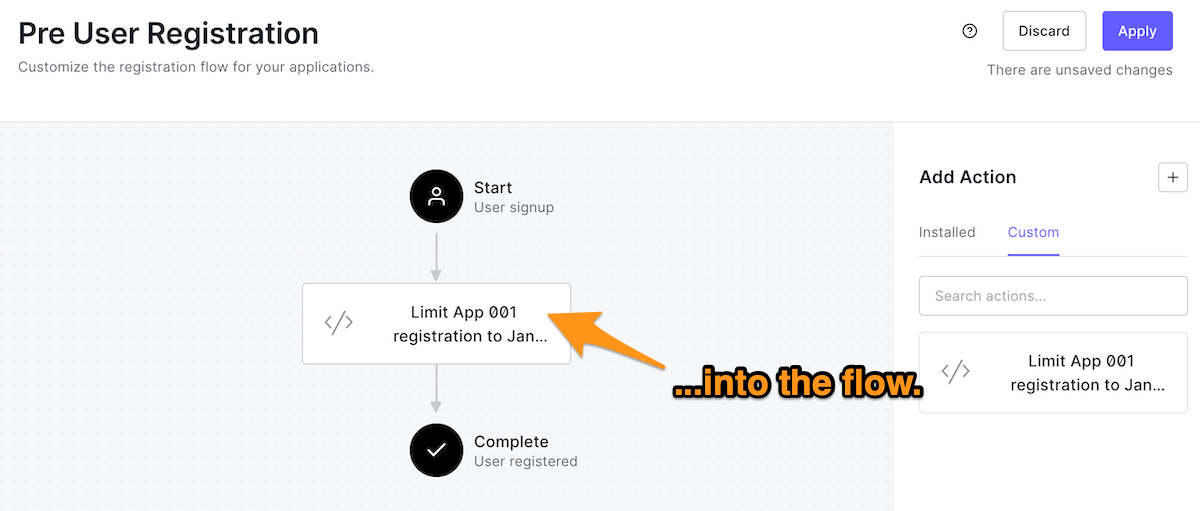
Click the Apply button near the upper right corner of the page. The change you just made to the flow will not take effect until you do so.
Try to Sign Up for an Account
At this point, your Action is now part of the Pre User Registration flow. Whenever a user submits their email address and password to sign up for a new account, your Action will be triggered and execute its code.
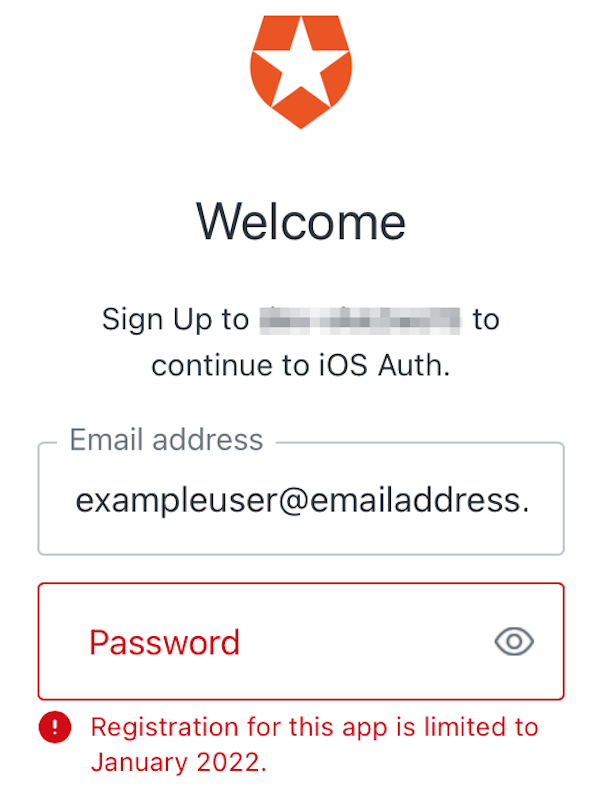
Run the app that you wrote the Action for. Sign up for a new account instead of logging in when you reach the login screen. As long as the current date is outside your Action’s start date and end date, you should be able to enter any valid email address and password because the registration will never happen. You should see the following instead:
Experiment!
Now that you know the basics of restricting new registrations, you might want to try some different test conditions, such as:
- Limiting sign-ups to users in specific countries. There may be legal, business, or security reasons for letting only users in specific countries sign up for an account. The
eventobject provides a lot of information about the request to create a new user account, including the user’s geographical location based on their IP address, which you can access usingevent.request.geoip.countryName. Check out our article, Country-Based Access with Auth0 Actions, to see how you can apply this technique to logins. - Disallowing sign-ups from certain IP addresses. If you see a lot of malicious activity from certain IP addresses, you can block their sign-up requests. This is another use case where the
eventobject comes in handy. Useevent.request.ipto determine the address of the user attempting to register and deny their registration if it appears in a list of known malicious addresses. - Limiting sign-ups to weekdays. You can use JavaScript’s
getDay()function to see if the current date/time falls is a weekend day. Keep in mind that while Saturday (for whichgetDay()returns6) and Sunday (for whichgetDay()returns0) constitute the weekend in most places, some regions have different weekend days. Once again, you may also have to account for time zone differences.
About the author

Joey deVilla
Senior Developer Advocate (Auth0 Alumni)