Pulumi is a fantastic solution for IaC (Infrastructure as Code). It allows you to manage your cloud services with high-level SDKs for popular programming languages like TypeScript, C#, GoLang, and Python. The familiarity and characteristics of those programming languages make it easier to set up, maintain and write code for your cloud services, including your friendly authentication provider Auth0.
This blog post will show you how to provision Auth0 resources using TypeScript and Pulumi. We will use the Pulumi tool to create and manage our infrastructure as code which is a great way to keep your infrastructure in a safe, version-controlled repository.
Let's get started!
What Is Pulumi
![]()
Managing your cloud infrastructure can be a daunting task. When even automated, you need to learn a new programming language (or multiple languages) to write code for your cloud services.
Pulumi is a tool that enables developers to write code for their cloud services using familiar programming languages like TypeScript, C#, GoLang, and Python. This makes it easier than ever to get started with Infrastructure as Code.
Pulumi also abstracts away the cloud provider-specific resources and provides a unified view of all your resources in one place. This makes it easy to see what changes need to be made when you want to migrate to a different cloud provider.
What Is Auth0 and the Auth0 Marketplace
Auth0 is a cloud-based identity and authentication management platform. It provides a platform for developers to add user authentication to their applications and supports a variety of authentication methods, including social login, username and password, and SSO.
The Auth0 marketplace is where developers can find and use pre-built integrations for their applications. These integrations provide user authentication, management, and security features. The Auth0 marketplace offers a variety of integrations, including social login, enterprise federation, and developer tools.
Setting Up Pulumi with Auth0
For this tutorial, you don't need to have prior knowledge of either Pulumi or Auth0, and we will guide you through the process of signing up, installing, setting up, and seeing your cloud resources created.
Installing Pulumi
The first step before we start working on our project is to install Pulumi.
Pulumi is easy to install but slightly different on each operating system.
On a Mac, open your terminal, and enter.
brew install pulumi/tap/pulumi
On Linux, similarly, open your terminal, and enter:
curl -fsSL https://get.pulumi.com | sh
On Windows, it does require downloading an installer, so visit their official installation guide for more information.
Once installed on any OS, you can verify that it is properly installed by running the following command on your terminal:
pulumi version
If everything is fine, it will output the current Pulumi version at the time of writing v3.40.1.
Signing up for Pulumi
Pulumi is an open-source project and completely free to use; it requires having the Pulumi CLI installed and a backend system where the state and other configurations are installed.
You can set up and run a self-managed backend instance or use Pulumi's cloud service, which is free for individuals and offers several prices for teams and enterprises.
Since we want to get started quickly, we will sign up for a FREE account using any authentication provider.
After you log in to pulumi.com, go to your terminal and run the following command:
pulumi login
You will see an output like
Manage your Pulumi stacks by logging in.
Run `pulumi login --help` for alternative login options.
Enter your access token from https://app.pulumi.com/account/tokens
    or hit <ENTER> to log in using your browser                   :
Hit <Enter> to log in through your browser, and it's done. Alternatively, you can manually login into https://app.pulumi.com/account/tokens to generate a token and enter it into the CLI.
Create an Auth0 application for the Pulumi service
Pulumi can manage a lot of the resources of your Auth0 account, but it can't create one for you. Fortunately, that's easy to do. Go ahead and sign up for a free Auth0 account now.
While on the Auth0 dashboard, navigate to the "Applications" section on the left-side menu.
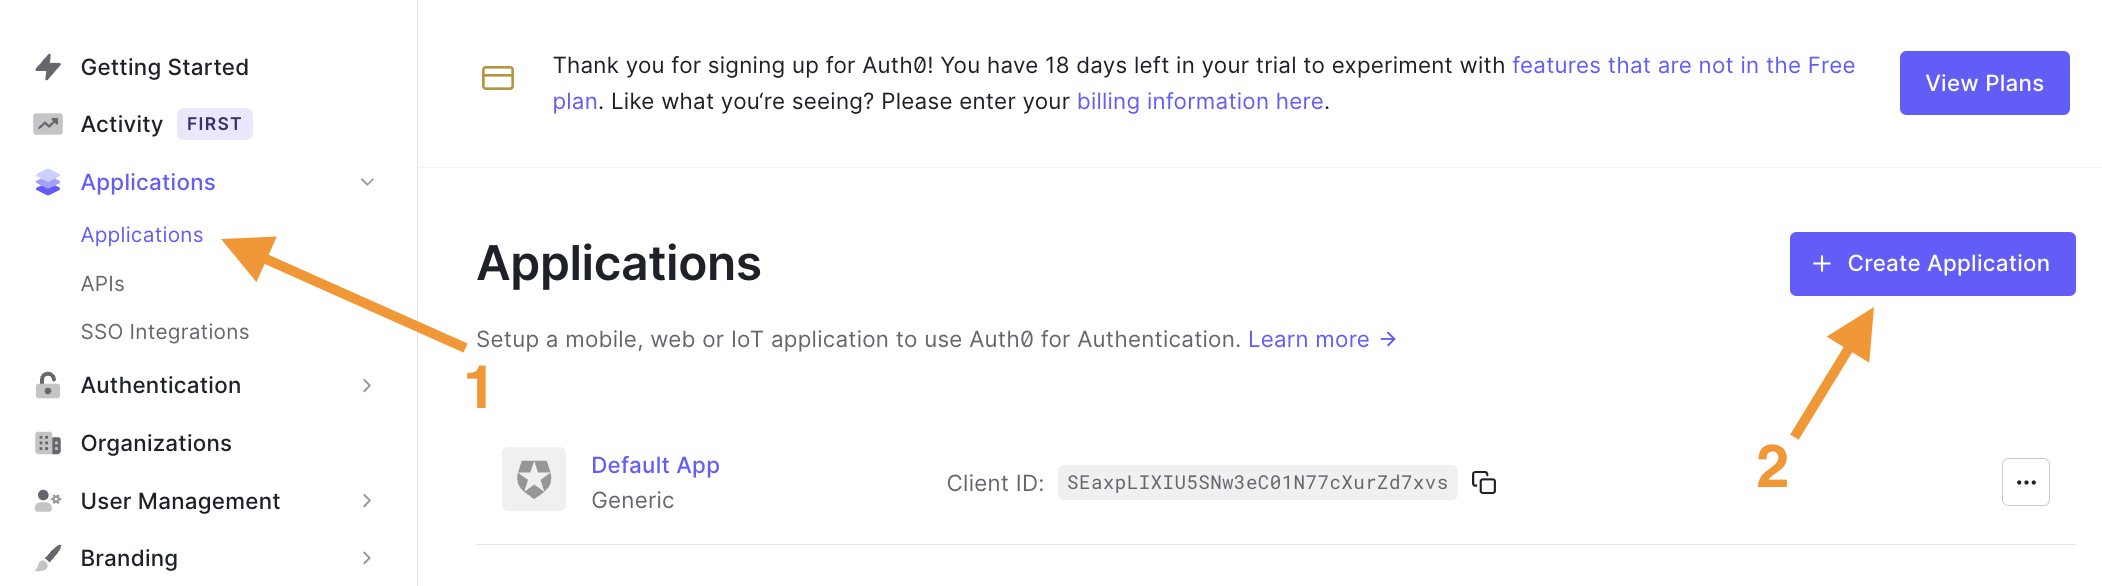
Next, the new application dialog appears; enter an application name, e.g., "Pulumi App", and select the "Machine to Machine Applications" type.
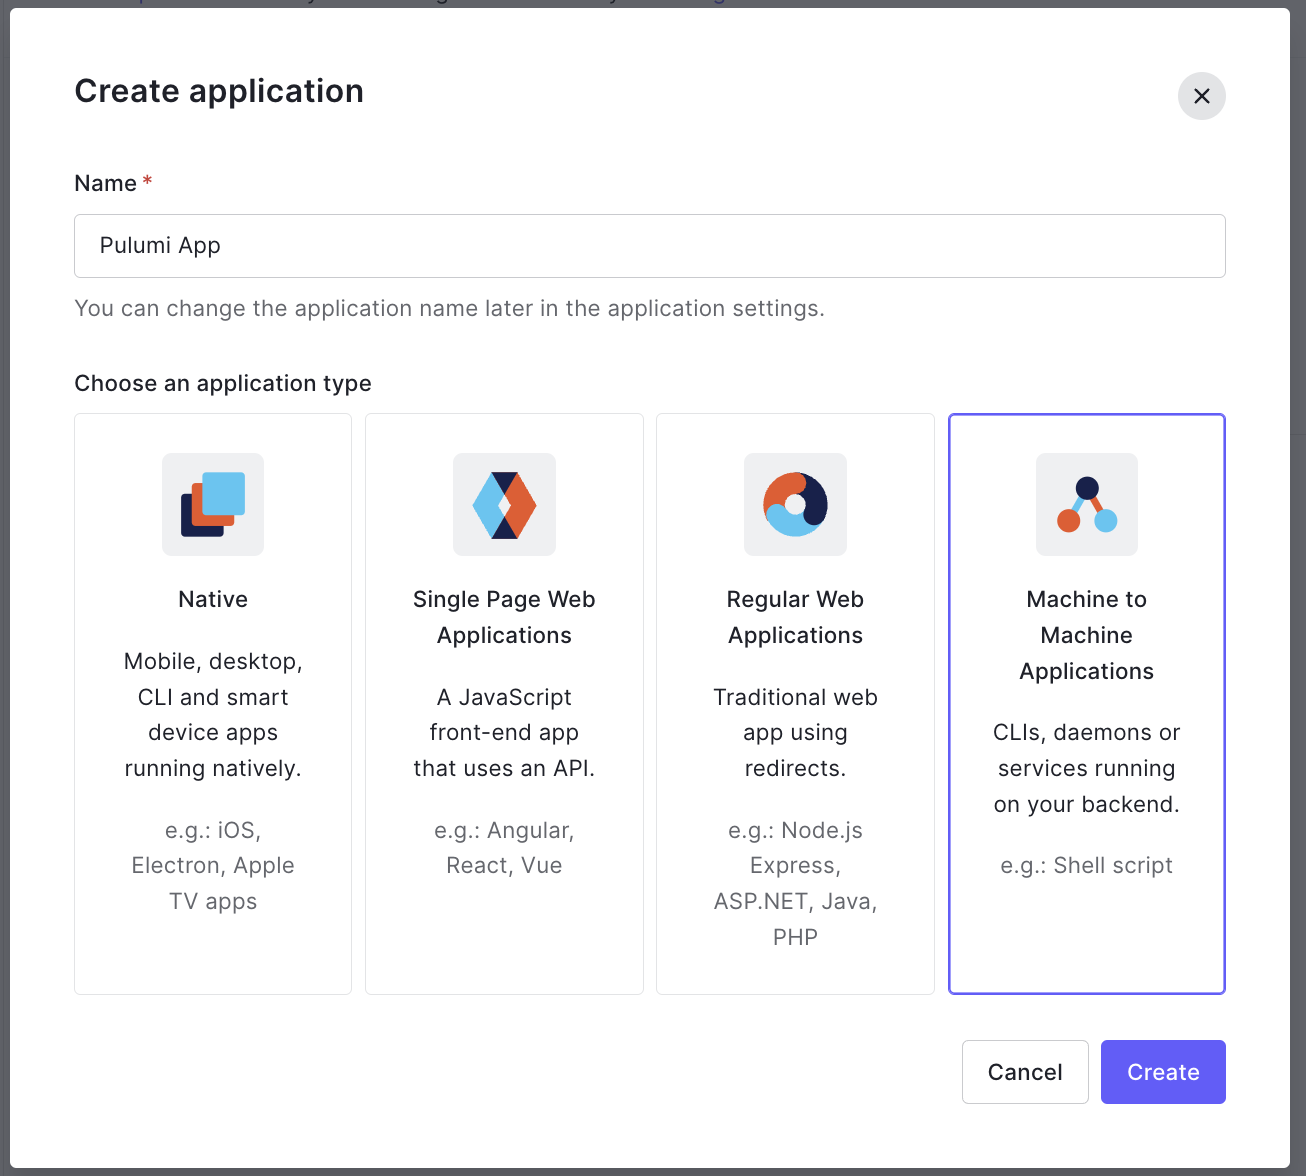
Since we selected the "Machine to Machine" type, we won't need a user for Pulumi; instead, we will use client credentials. But first, we need to authorize the app to access an API, and in our case, we will select the Auth0 Management API, which is available by default with your tenant.
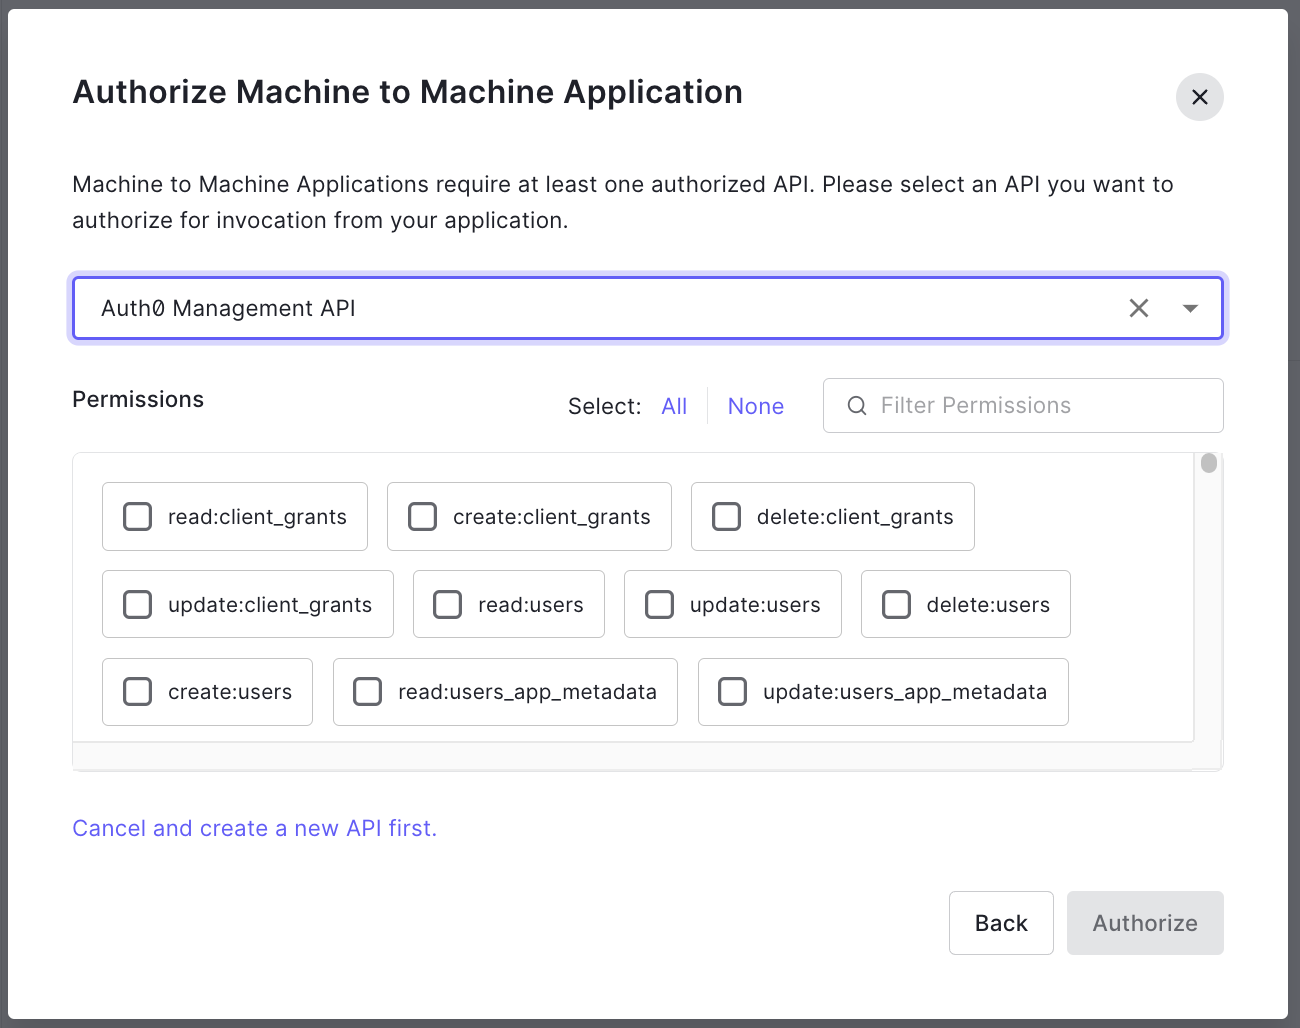
After selecting the API, the dialog will expand, listing all the permissions available for that API. We recommended that you follow the principle of least-privilege and choose the authorizations carefully based on your project requirements, and no more.
With that said, and only because this is a sandbox account, we'll select all to continue, so you are not limited while following this tutorial and dealing with unauthorized access due to missing grants.
Create a new Pulumi project
We are done with all the platform sign-ups and configurations, and we are ready to start coding.
When working with Pulumi, or any other IaC tool, you'll have to decide if you want to include your Pulumi code alongside your application code or on a separate repository. The steps won't differ, though you may want to name and place directories differently.
To start, let's create a new working directory where we'll place all our Pulumi code:
mkdir pulumi-auth0-quickstart && cd pulumi-auth0-quickstart
Next, we will generate a new project using the Auth0 template:
pulumi new auth0-typescript
Note that we specified the template name
auth0-typescript, but there are other languages available. You can read more about Auth0 and Pulumi in the Auth0 Marketplace and the Pulumi registry docs.
Once you run the command above, the terminal window will prompt you for a few values:
- Project name: A unique project name.
- Project description: A short description of your project.
- Stack name: typically referred to as the environment or the organization plus the environment, e.g., "dev" or "auth0/dev".
- auth0:clientId: The Auth0 client id for the Pulumi App; we'll go into details on how to get this information next.
- auth0:clientSecret: The Auth0 client secret for the Pulumi App.
- auth0:domain: The Auth0 domain where your Pulumi App is running.
How to capture the Auth0 values from my Auth0 account
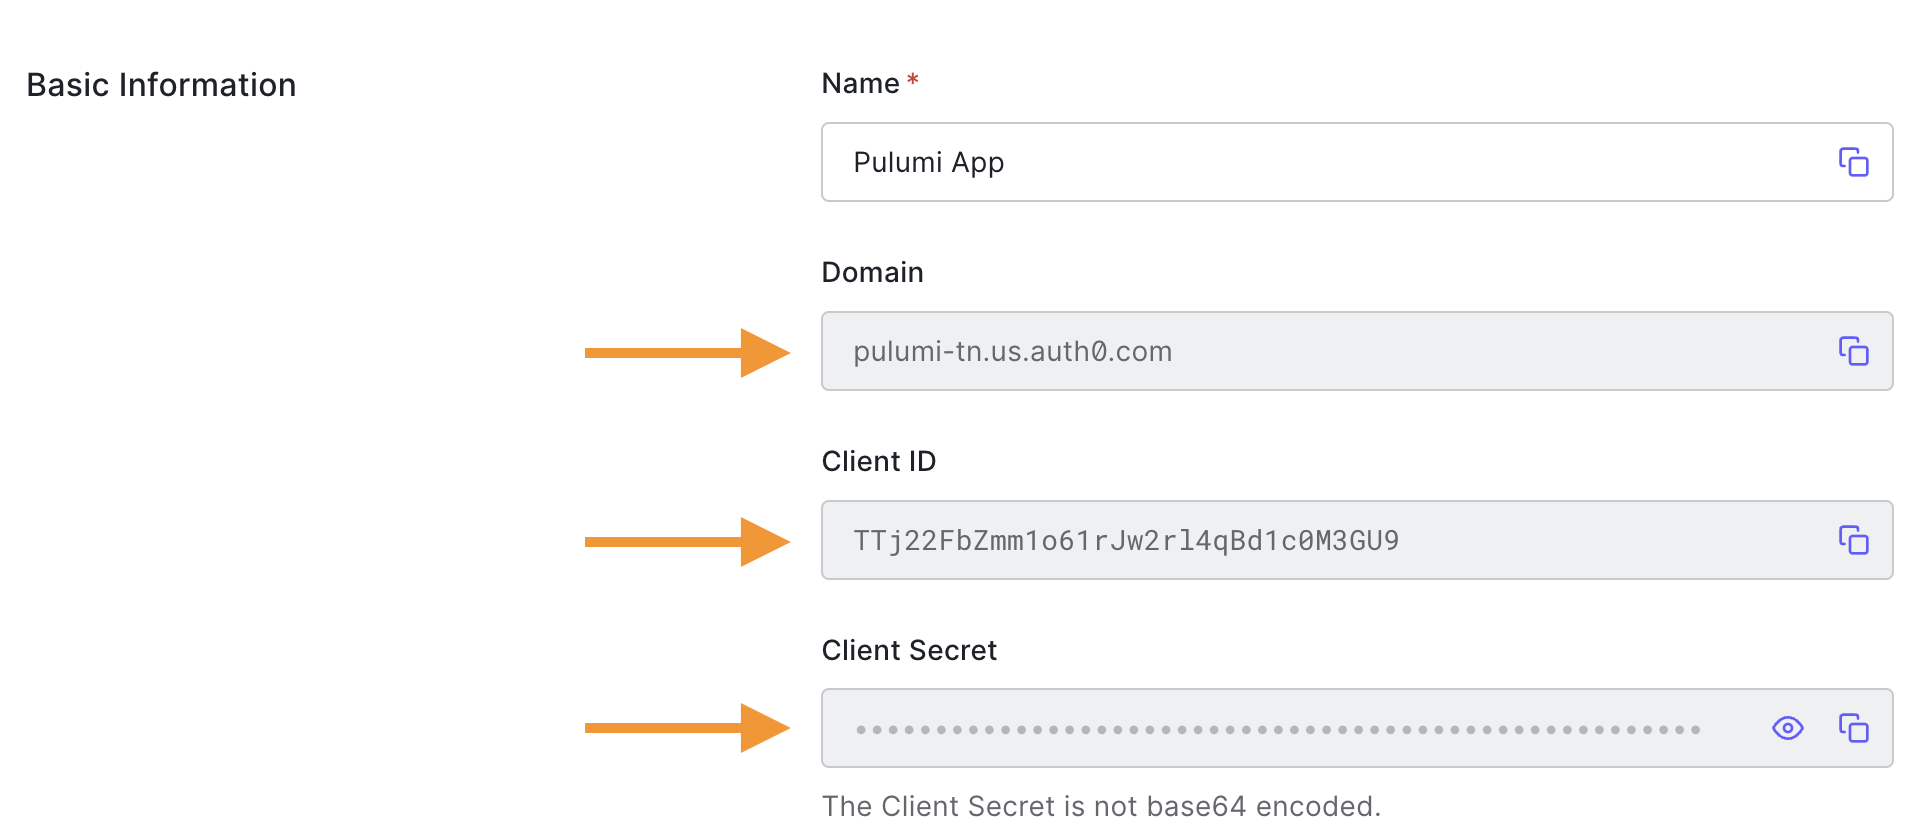
Heading back to the Auth0 dashboard and into the recently created application "Pulumi App", you'll see the app overview, then click the Settings tab to access the information we need.
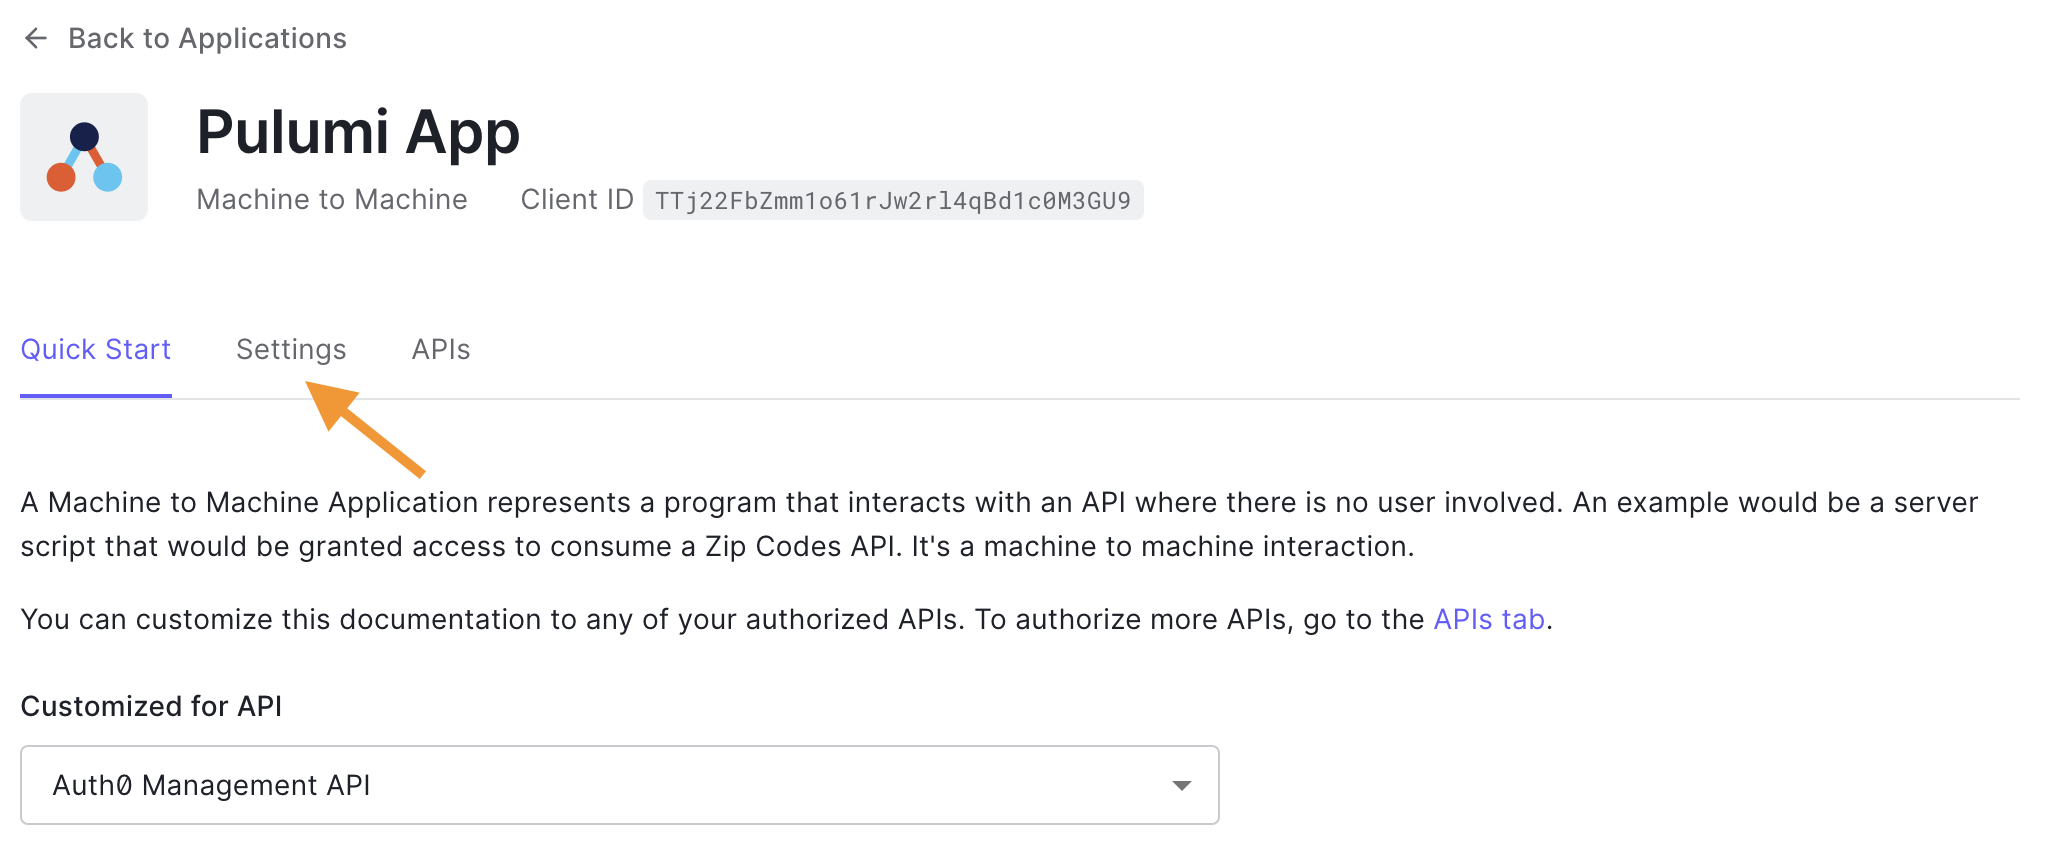
Once on the settings page, the three values we need, clientId, client secret, and domain, are readily available to copy on your screen.
Finally, enter those values in the terminal and way for the project to generate. It may take a minute or two, depending on the programming language.
And don't worry about adding your client secret here, it will be only stored encrypted, and you can decide the level of control and encryption provider of your choice if necessary.
Pulumi and Auth0 quick start project structure
After your project completes, Pulumi will have generated an npm project with three essential files:
index.tsPulumi.[env].yaml: Configuration file where all your Auth0 values are stored.Pulumi: Project related metadata
Let's next take a look at the generated index.ts file;
import * as pulumi from "@pulumi/pulumi";
import * as auth0 from "@pulumi/auth0";

const client = new auth0.Client("client", {
    allowedLogoutUrls: ["https://www.example.com/logout"],
    allowedOrigins: ["https://www.example.com"],
    callbacks: ["https://example.com/auth/callback"],
    appType: "regular_web",
    jwtConfiguration: {
        alg: "RS256"
    },

})

export const clientId = client.clientId
export const clientSecret = client.clientSecret
It is a simple file that will create a new Auth0 Client (or Auth0 application), and will set configurations like the application type, logout URLs, callbacks, and allowed origins, all the typical settings you'll need to set up a regular web application.
Set up the auth0 provider into an existing Pulumi project
If you already have an existing Pulumi project and would like to provision Auth0's resources, you'll first have to install the Auth0 provider for your programming language.
If using typescript, from your terminal, on the root of your Pulumi project, run:
npm i @pulumi/auth0
If you are using other programming languages, check out their official documentation on how to install the Auth0 provider
After installing the provider, you'll have to configure the Auth0 clientId, client secret, and domain from your "Pulumi App".
To capture the value, check the previous section How to capture the Auth0 values from my Auth0 Account and, on your terminal, enter the following command with the updated values:
pulumi config set auth0:domain XXXXXXXXXXXXXX
pulumi config set auth0:client_id YYYYYYYYYYYYYY --secret
pulumi config set auth0:client_secret ZZZZZZZZZZZZZZ --secret
Don't forget to use --secret for clientid and clientsecret as that will tell Pulumi to encrypt the values.
Running Pulumi and Provisioning the Auth0 Resources
Now we are ready to use Pulumi to provision our Auth0 resources.
On your terminal, run:
pulumi up
Pulumi will first compare the current state (generated by the written code) versus the previously saved state (empty since it is our first execution) and will prepare a plan based on the results.
Here is what it looks like on the terminal:
Previewing update (dev)

View Live: https://app.pulumi.com/bajcmartinez/pulumi-auth0-quickstart/dev/previews/e93bebef-eecf-49ec-a58f-86d0b7ea11db

     Type                   Name                         Plan
 +   pulumi:pulumi:Stack    pulumi-auth0-quickstart-dev  create
 +   └─ auth0:index:Client  client                       create

Outputs:
    clientId    : output<string>
    clientSecret: output<string>

Resources:
    + 2 to create

Do you want to perform this update? [Use arrows to move, enter to select, type to filter]
  yes
> no
  details
Since it is the first time we run Pulumi for this project, it will create a new Pulumi stack on the backend and will provision the Auth0 application as we defined it in the index.ts.
Since we agree with the plan, we proceed to execute by selecting the option yes on the screen.
Now Pulumi is creating all the resources and will print the results on the terminal when it finishes.
Updating (dev)

View Live: https://app.pulumi.com/bajcmartinez/pulumi-auth0-quickstart/dev/updates/1

     Type                   Name                         Status
 +   pulumi:pulumi:Stack    pulumi-auth0-quickstart-dev  created
 +   └─ auth0:index:Client  client                       created

Outputs:
    clientId    : "ltiZx0e53LJoqr5IpIJrmZHAuwhsj2WZ"
    clientSecret: [secret]

Resources:
    + 2 created

Duration: 7s
What would happen if I were to run pulumi up again? It should be totally safe, so let's try it and see the results.
Previewing update (dev)

View Live: https://app.pulumi.com/bajcmartinez/pulumi-auth0-quickstart/dev/previews/7fd259e6-cadf-43ab-8b74-3e2329ed818c

     Type                 Name                         Plan
     pulumi:pulumi:Stack  pulumi-auth0-quickstart-dev

Resources:
    2 unchanged

Do you want to perform this update? [Use arrows to move, enter to select, type to filter]
  yes
> no
  details
As expected, Pulumi doesn't detect any changes, the state variable hosted in Pulumi's service and the local configuration given in the code match.
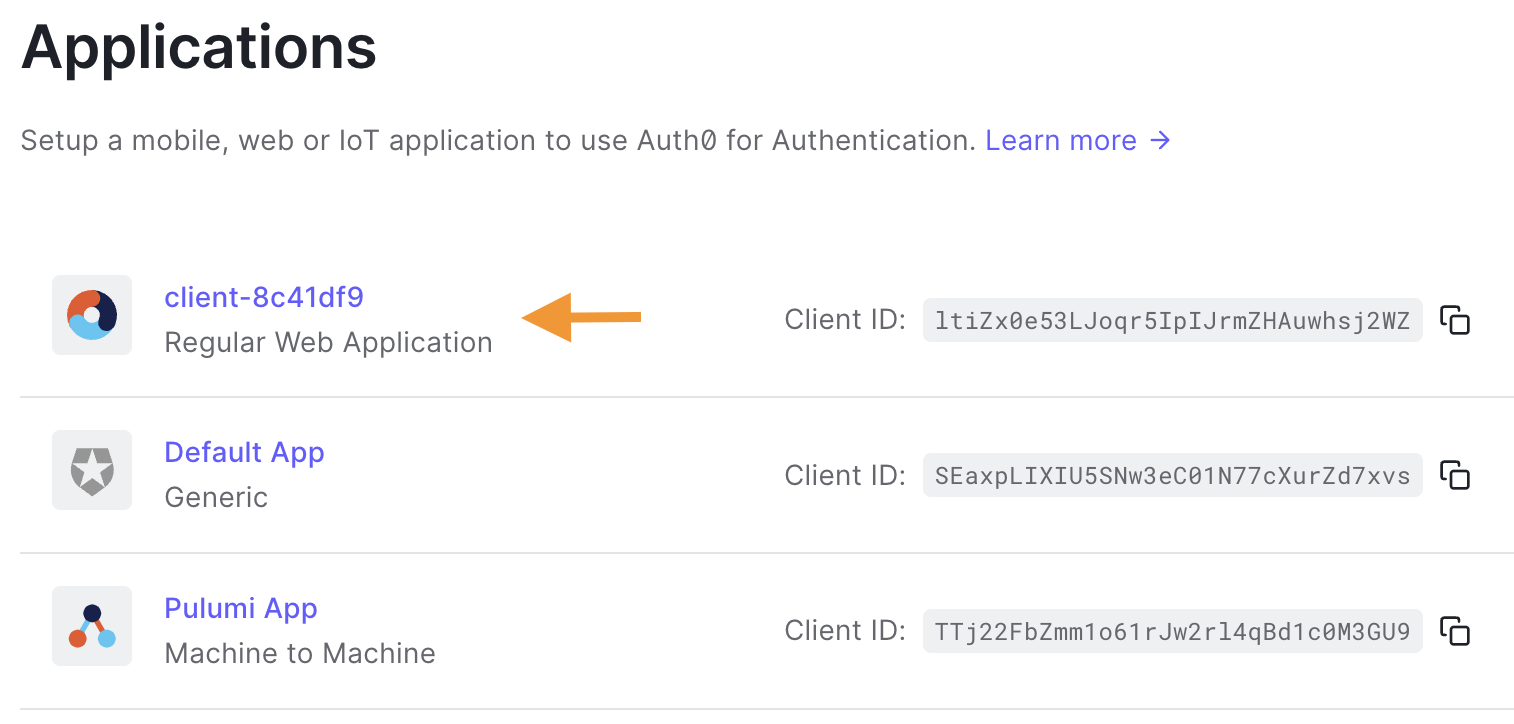
But what exactly happened in our Auth0 account? If we go back to the Auth0 dashboard, a new application will appear with the name client-{unique identifier}, e.g. client-8c41df9. Pulumi, by default, adds that unique identifier at the end of each resource name to prevent name clashing.
Use Case Examples for the Pulumi Auth0 SDK
Let's see next some examples of what can be done with the Pulumi Auth0 SDK.
Provision a new Auth0 application
One of the most common tasks when automating the provisioning of Auth0 resources is to create applications, and as we discussed, we do that by leveraging the Client module.
The official documentation goes into detail on all the parameters and presets for applications, but here is a small sample for a typical scenario for a SPA application (since we already covered web apps):
const client = new auth0.Client("my-spa", {
    allowedLogoutUrls: ["https://www.my-spa.com/logout"],
    allowedOrigins: ["https://www.my-spa.com"],
    callbacks: ["https://my-spa.com/auth/callback"],
    appType: "spa",
});
Provision a new Auth0 user
Another typical use case is to create users. This is commonly done for admins, other super users, or even test users.
Let's see an example of creating an admins role and a user belonging to the group.
const adminGroup = new auth0.Role("admin", {description: "Administrator"});
const jc = new auth0.User("bajcmartinez", {
    connectionName: "Username-Password-Authentication",
    givenName: "Juan Cruz",
    familyName: "Martinez",
    email: "youremail@yourcompany.com",
    password: "very-secure-!nitial-passw0rd",
    emailVerified: true, // We don't want to email the user to confirm its registration
    roles: [adminGroup.id],
});
In the example above, we use the default database connection "Username-Password-Authentication". Optionally you can create and use other connections.
Remember that the user requirements from your connection will apply even when using Pulumi, and if a condition does not match, e.g., "Password is too weak", then the resource will fail to create.
Set your Branding and personalization with Pulumi and Auth0
Another area where Auth0 excels is personalization, allowing you to personalize the experience with your brand, your colors, logo, messages, email addresses, and even email templates.
You can customize everything about your user's experience through the Auth0 dashboard, but if you are using Pulumi, you can change those parameters through code, thanks to the modules like Branding, Email template, Prompts and more.
Here is an example of how to change your brand colors and logo using TypeScript:
const myBrand = new auth0.Branding("my_brand", {
    colors: {
        pageBackground: "#000000",
        primary: "#0059d6",
    },
    logoUrl: "https://mycompany.org/logo.png",
    universalLogin: {
        body: "<!DOCTYPE html><html><head>{%- auth0:head -%}</head><body>{%- auth0:widget -%}</body></html>",
    },
});
What resources are available with the Pulumi Auth0 integration?
With Pulumi, you can set up pretty much everything you can do with the Auth0 dashboard, so no surprise there are quite a few modules available for us to use, like Actions, Client Grants, Attack Protection.
You can read the full list on Pulumi's official docs.
Final Thoughts
More and more companies embrace DevOps and infrastructure as code to provision, manage and maintain the ever-increasing complexity of cloud services.
Pulumi helps individuals and teams to handle their IaC strategy through familiar programming languages, reducing the effort and skills needed.
Thanks to its extensibility with libraries, you can provision your servers, databases, queues, and, for example, Auth0 resources to build and customize the online identity experiences of your apps.
Thanks for learning!
About the author

Juan Cruz Martinez
Staff Developer Advocate