
Cloud computing has seen a shift from traditional Java deployments to application servers like Tomcat to highly dynamic environments such as serverless and container orchestration platforms like Kubernetes.
Many of the benefits of these new cloud platforms rely on their ability to quickly spin application instances up to meet additional demand and restart applications to adapt to infrastructure changes like operating system upgrades or virtual machine provisioning.
Deploying Java to these environments has been a challenge, though, largely due to the amount of time it takes even a basic Java web application to start, called the cold boot time. It is not uncommon to have to wait 30 seconds or more before your application can begin serving traffic, which becomes a problem on platforms that scale down to zero waiting for incoming traffic and expect to quickly launch an application to process a request.
Quarkus is a container native platform that addresses many of these performance issues, and in this blog post, we'll take a look at a simple Quarkus web application exposing a REST endpoint protected by Auth0.
What is Quarkus
Quarkus has been designed to address the needs of serverless and container environments by reducing startup times and memory consumption. Perhaps the most exciting thing about Quarkus is its tight integration with GraalVM to allow applications to be compiled into native binaries.
Quarkus integrates with a huge range of libraries, giving developers access to many familiar platforms and allowing for the migration of existing code bases. These libraries are selected or customized to run seamlessly on Quarkus and to be able to take advantage of native compilation.
Of course, authentication is a central requirement of any modern web application, and Quarkus has out of the box support for OAuth, which in turn can be integrated into Auth0.
The Sample Application Prerequisites
The source code for the sample application can be found on GitHub.
To build the source code, you'll need to have JDK 11, which is available from many sources, including OpenJDK, AdoptOpenJDK, Azul, or Oracle.
The source code includes the Maven wrapper, so calls to mvnw will download Maven for you if it is not already installed.
To compile a native binary, the latest version of GraalVM targeting Java 11 is required. It is important to install the Java 11 version of GraalVM, as opposed to the Java 8 or 16 versions, as this is the only version that will compile a native binary due to this bug.
In addition, the native image component needs to be installed with the command:
gu install native-image
To build and run the Docker image mcasperson/auth0quarkusnative, Docker must be installed.
The docker image can be run with the following command, where AUTH0SECRET is set to the Client Secret, AUTHSERVER is set to the Domain, and CLIENTID is set to the Client ID of your Auth0 application:
docker run \
    --env AUTH0SECRET=xxxx \
    --env AUTHSERVER=https://your.auth0.domain \
    --env CLIENTID=xxxx \
    -p 8080:8080\
    mcasperson/auth0quarkusnative
The Sample Application
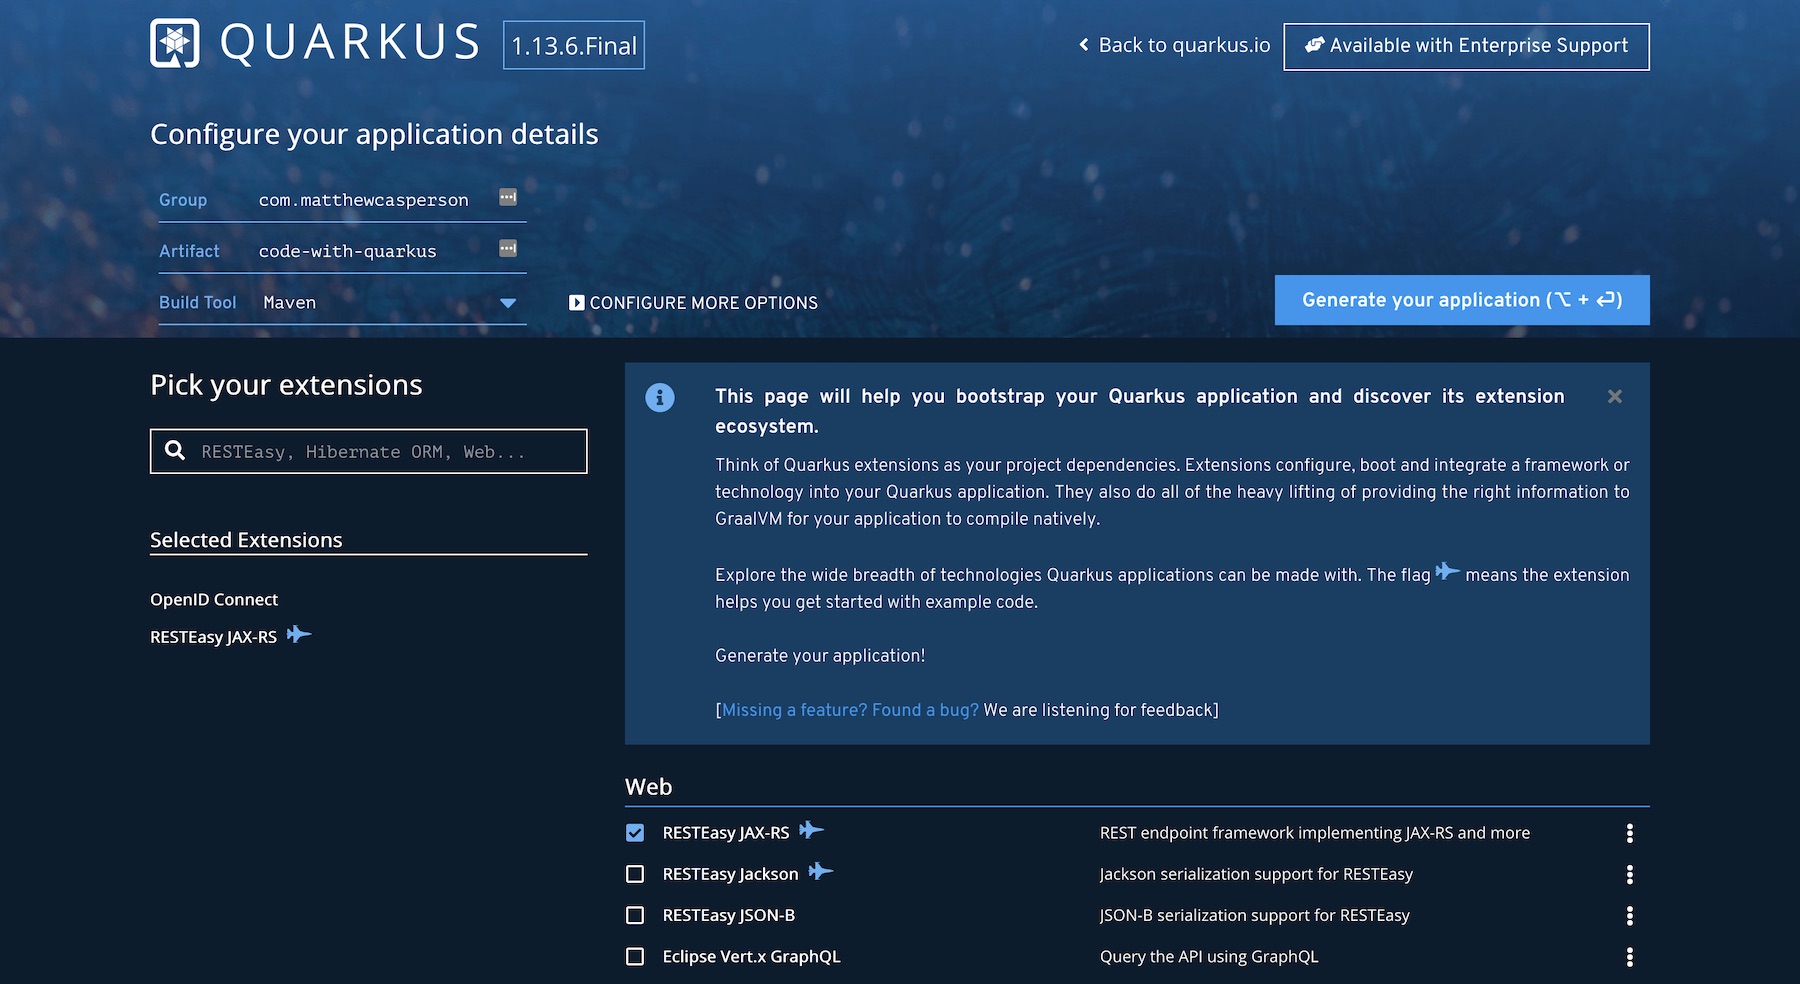
We'll bootstrap our sample application with the online project builder. Our project will make use of the RESTEasy JAX-RS and OpenID Connect extensions to expose HTTP endpoints and integrate with an authentication service.
Populate the Group and Artifact fields, and select RESTEasy JAX-RS and OpenID Connect from the list of extensions. Then click the Generate your application button to download the sample project:
The REST endpoints
We'll start with the GreetingResource class, which we have modified slightly from the supplied template. The complete class is shown below:
package org.matthewcasperson;

import io.quarkus.oidc.IdToken;
import org.eclipse.microprofile.jwt.JsonWebToken;

import javax.inject.Inject;
import javax.ws.rs.GET;
import javax.ws.rs.Path;
import javax.ws.rs.Produces;
import javax.ws.rs.core.MediaType;
import java.util.Optional;

@Path("/")
public class GreetingResource {

    @Inject
    @IdToken
    JsonWebToken idToken;

    @GET
    @Produces(MediaType.TEXT_HTML)
    public String hello() {
        return
                "<html>\n" +
                "    <body>\n" +
                "        <h1>Hello " + idToken.getClaim("email") + "</h1>\n" +
                "    </body>\n"+
                "</html>\n";
    }
}
This class is relatively simple. We annotate the class with the @Path JSX-RS annotation to indicate that it will respond to the root path:
@Path("/")
public class GreetingResource
Inside the class, we use CDI annotations to inject an instance of the OpenID ID token:
    @Inject
    @IdToken
    JsonWebToken idToken;
We then have a method that returns a simple HTML page embedding the email claim contained by the ID token:
    @GET
    @Produces(MediaType.TEXT_HTML)
    public String hello() {
        return
                "<html>\n" +
                "    <body>\n" +
                "        <h1>Hello " + idToken.getClaim("email") + "</h1>\n" +
                "    </body>\n"+
                "</html>\n";
    }
Anyone familiar with Java EE style application development will immediately recognize the JAX-RS and CDI annotations. By incorporating existing libraries, Quarkus applications provide a familiar environment for Java developers.
The unit tests
We have a test in the GreetingResourceTest class. Originally this test verified that accessing the REST endpoint returned an HTTP 200 OK status code. Here we have updated the test to verify that the endpoint returns an HTTP 403 Unauthorized status code, which we expect because this test does not provide any authentication information:
package org.matthewcasperson;

import io.quarkus.test.junit.QuarkusTest;
import org.junit.jupiter.api.Test;

import static io.restassured.RestAssured.given;
import static org.hamcrest.CoreMatchers.is;

@QuarkusTest
public class GreetingResourceTest {

    @Test
    public void testHelloEndpoint() {
        given()
          .when().get("/")
          .then()
             .statusCode(403);
    }
}
The properties file
To enable the population of the ID Token, we need to configure our application to protect our REST endpoints and configure the external authentication service that we trust to verify any users. Quarkus defines these settings in a file called application.properties, located in the src/main/resources directory. The complete file is shown below:
quarkus.http.port=${PORT:8080}
quarkus.oidc.auth-server-url=${AUTHSERVER:https://your.auth0.domain}
quarkus.oidc.client-id=${CLIENTID:xP2E7TJYaKQmh5EyFPYCmtGuIC3Drbez}
quarkus.oidc.credentials.secret=${AUTH0SECRET}
quarkus.oidc.application-type=web_app
quarkus.http.auth.permission.authenticated.paths=/*
quarkus.http.auth.permission.authenticated.policy=authenticated
quarkus.oidc.authentication.scopes=openid,profile,email
Let's break down the settings:
quarkus.http.port=${PORT:8080}defines the HTTP port the application listens on. The value assigned here uses thePORTenvironment variable or a default value of8080.quarkus.oidc.auth-server-url=${AUTHSERVER:https://your.auth0.domain}defines the URL of the authentication server. For convenience, you can assign a default value for the domain (replaceyour.auth0.domainwith your own Auth0 application domain), with the value able to be overridden via theAUTHSERVERenvironment variable.quarkus.oidc.client-id=${CLIENTID:xP2E7TJYaKQmh5EyFPYCmtGuIC3Drbez}defines the client ID, which again has been set with a default Auth0 client ID, with an override able to be defined via theCLIENTIDenvironment variable.quarkus.oidc.credentials.secret=${AUTH0SECRET}defines the client secret from an environment variable. As this value should remain a secret, no default value has been provided.quarkus.oidc.application-type=web_appindicates that this application is a web application.quarkus.http.auth.permission.authenticated.paths=/*defines the paths to be protected, and in our the value matches all paths. Theauthenticatedcomponent of the key can be called whatever you want (for example, this key could have been calledquarkus.http.auth.permission.mygroup.pathsinstead) and is used to match paths to the policy below.quarkus.http.auth.permission.authenticated.policy=authenticatedensures only authenticated users are able to access the protected paths. Theauthenticatedcomponent of the key matches the same name used in thequarkus.http.auth.permission.authenticated.pathskey above.quarkus.oidc.authentication.scopes=openid,profile,emaildefines the scopes requested from the authentication provider. In particular, our web page displays the email address of the authenticated user, so we ensure that scope is defined here.
Packaging the Application
To package the application, which will run the tests by default, we need to define the environment variables referenced by the properties file. Although the test does not contact the Auth0 servers, Quarkus will fail if any properties defined as environment variables with no default value can not be resolved, such as our quarkus.oidc.credentials.secret property.
Expose the environment variables with the following commands, where AUTH0SECRET is set to the Client Secret, AUTHSERVER is set to the Domain, and CLIENTID is set to the Client ID of your Auth0 application:
export AUTH0SECRET=xxxxxxxxxxxx
export AUTHSERVER=https://your.auth0.domain
export CLIENTID=xxxx
From the directory containing the pom.xml file, package the application with the command:
./mvnw package
We can then run the application with the command:
java -jar target/quarkus-app/quarkus-run.jar
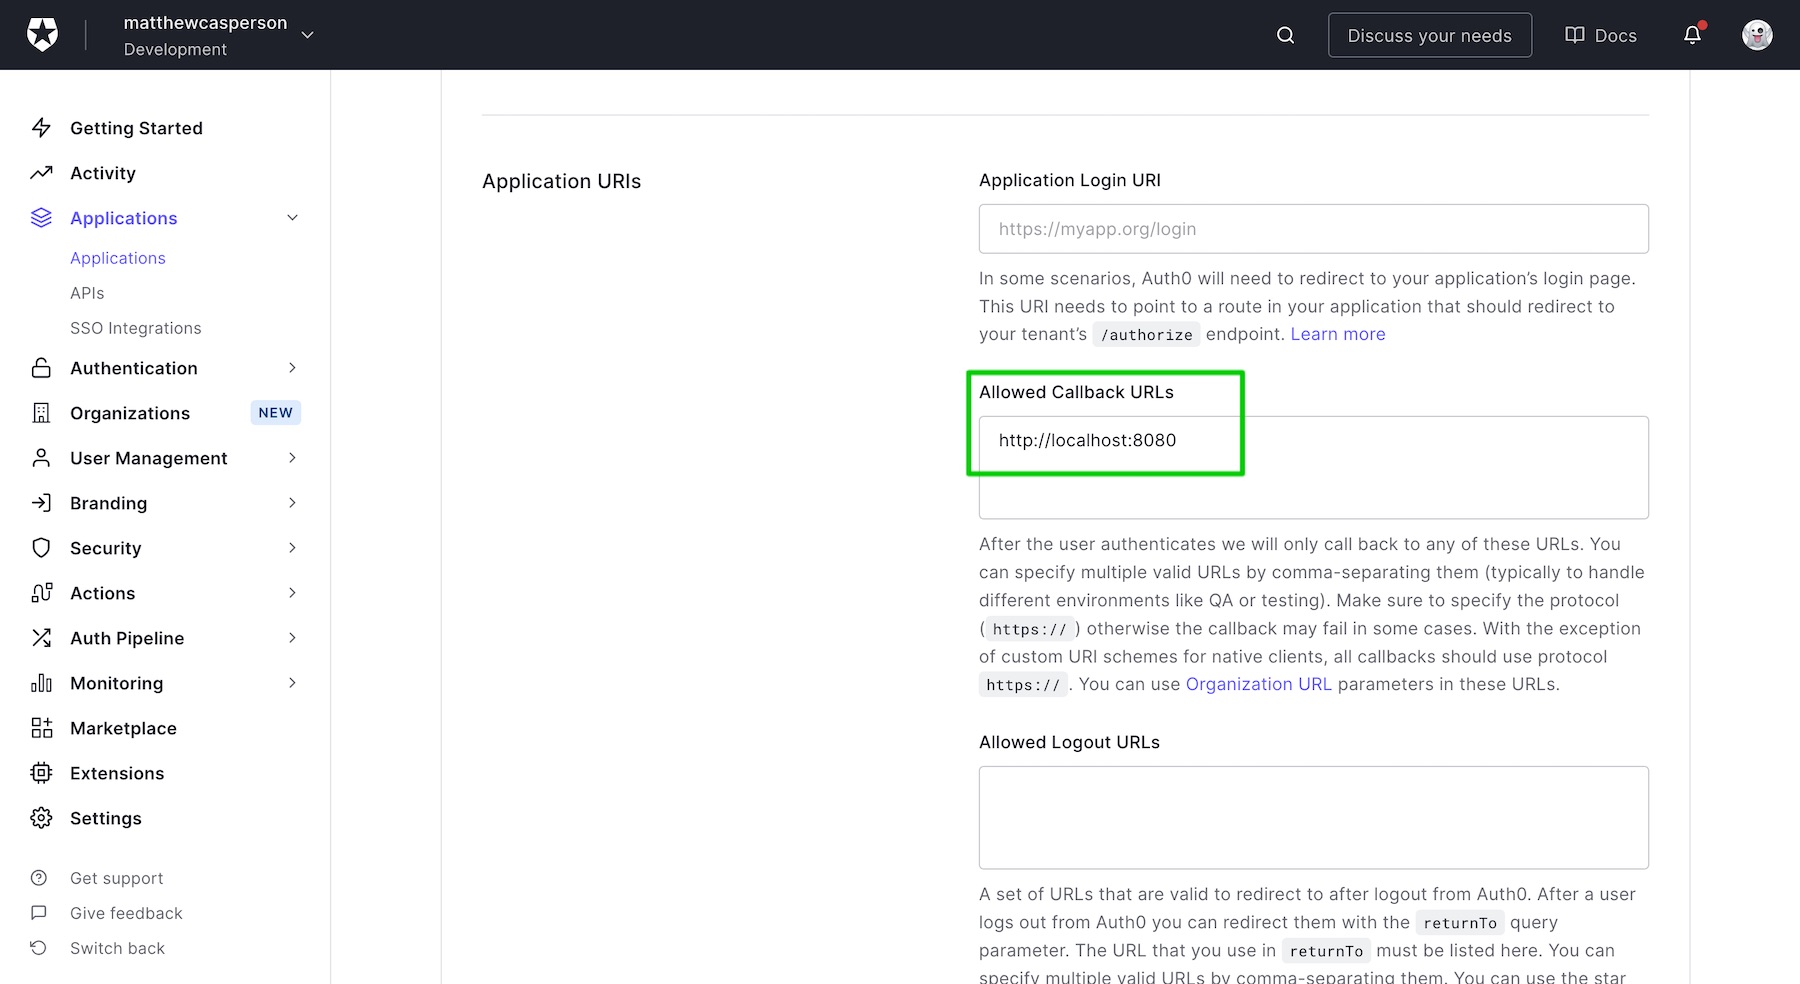
Open http://localhost:8080/ in your web browser. You will be redirected to the Auth0 login page, and once you supply the details of a valid user, you'll be redirected back to the web app where the email address of the authenticated user is displayed:

Note that for the Auth0 application to allow redirection back to applications running locally, the URL http://localhost:8080 must be defined in the Allowed Callback URLs list:
Compiling a Native Binary
On my (admittedly aging) Macbook Pro, the JAR file above booted in around 1.7 seconds. This is quite an achievement, given cold start times of over 30 seconds are not that uncommon with Java web apps.
But even this snappy load time can be improved by compiling our application to a native binary. Thanks to the tight integration between Quarkus and GraalVM, compiling a native binary can be done with the command:
./mvnw package -Pnative
The -Pnative argument builds the application with the native Maven profile, which was defined in the pom.xml file generated for us by the Quarkus project builder website.
Once compiled, our native binary can be run with the command:
./target/auth0quarkusdemo-1.0.0-SNAPSHOT-runner
On my laptop, the first run of the native binary booted in 0.9 seconds, the second run started in 0.5 seconds, and the third run took only 0.2 seconds. This is an amazing improvement, given we did nothing more than pass one argument to the build command.
With these load times, we can realistically load our Java application in a serverless environment and quickly scale from zero to respond to the first request.
More importantly, though, is the fact that native compilation is a core tenant of the Quarkus platform. Each library promoted by Quarkus is expected to support native compilation, and bugs relating to native compilation appear to be given high priority by the Quarkus team. This provides developers with some degree of confidence that they can continue to build natively compiled applications with Quarkus and not run into a roadblock that will break their builds.
Conclusion
Quarkus provides Java developers with a platform to build cloud-native applications they can deploy to environments that Java can struggle in, such as serverless and Kubernetes. With drop-in support for Open ID, Quarkus apps can be easily integrated with an Auth0 application. And native compilation provides lightning fast boot times with little effort from developers.
About the author

Matthew Casperson
Product Manager at Octopus Deploy