The concept of reactive programming has enjoyed a resurgence in the last few years. The post Notes on Reactive Programming calls out that:
the origins of Reactive Programming can probably be traced to the 1970s or even earlier
But it is only relatively recently that Java and its ecosystem provided first-class support for reactive programming, with Java 9 introducing reactive streams, and Spring 5 introducing WebFlux.
In this post, we'll dive into a simple example application implementing a WebFlux server accessed from a web page via RSockets. But before we go into the code, it is worth providing a quick overview of what reactive programming is all about.
An Analogy for Reactive Programming
Imagine you are a reseller and have been given the task of contacting your supplier to find the status of your orders. So you pick up the phone and call your supplier. A customer service representative takes the call and places you on hold while they query their system for the order status. You listen to the hold music for a few minutes, after which the customer service representative picks up again and informs you of the order status.
This interaction was not very efficient. It forces you to sit on hold, during which time you are not all that occupied, but still you are unable to walk away and perform other useful tasks. You have essentially been blocked as you wait for a response to your query.
Let's now imagine another scenario where instead of calling your supplier, you send them an email with your request. Once the email is sent, you can move on to other tasks. When you receive a response, you have the luxury of finishing what you were doing before reading the email reply.
This style of interaction is much more efficient than waiting on the phone, as you are free to perform whatever tasks you need to while waiting for an email response. You have effectively been unblocked and been granted the freedom to perform tasks asynchronously.
Traditional web servers and clients work in a synchronous, blocking fashion. A client will make a request and block execution until a response is provided. The server, in turn, will spawn a thread to process the request, perform any work, and provide the response to the client.
Reactive applications are built around the idea of servers and clients interacting in an asynchronous and non-blocking fashion. This allows for much more efficient use of resources, allowing a server to process more clients.
There is much more to reactive programming than the simple analogy above, but this is enough to understand the sample application we'll explore next.
What is WebFlux?
Reactive programming provides a number of principles describing how systems can interact but does not provide any concrete implementations. Reactive streams go further to define API libraries can implement to take advantage of reactive programming.
The WebFlux documentation describes WebFlux as a:
reactive-stack web framework
that is
fully non-blocking supports Reactive Streams back pressure and runs on such servers as Netty, Undertow, and Servlet 3.1+ containers.
What this means in practice is that developers can use WebFlux to build clients and servers that produce and consume reactive streams resulting in non-blocking, asynchronous applications. WebFlux provides tight integration with the Spring framework, giving developers a familiar solution for many cross-cutting concerns like configuration, security, logging, database access, etc.
Interestingly, despite its name and position alongside traditional frameworks like Spring Web MVC, WebFlux doesn't immediately lend itself to writing browser-based applications. Most of the WebFlux documentation and examples demonstrate Java clients.
That said, we can make use of RSockets to expose a WebFlux server to a browser-based web app. The RSocket website provides this description:
RSocket is a binary protocol for use on byte stream transports.
So our sample application will be a WebFlux server exposed via RSocket to a browser-based web application using rocket-js.
The Sample Application Code
The code for this sample application has been uploaded to GitHub. The resulting application can also be found published as a Docker image tagged as mcasperson/auth0webflux.
To build the source code, you'll need to have JDK 11 or above, which is available from many sources, including OpenJDK, AdoptOpenJDK, Azul, or Oracle.
The Gradle build scripts have been checked in alongside the source code, and when you run gradlew for the first time, Gradle will be downloaded for you.
The frontend application requires Node.js, specifically the Node Package Manager npm.
To build and run the Docker image, Docker must be installed.
The WebFlux Server
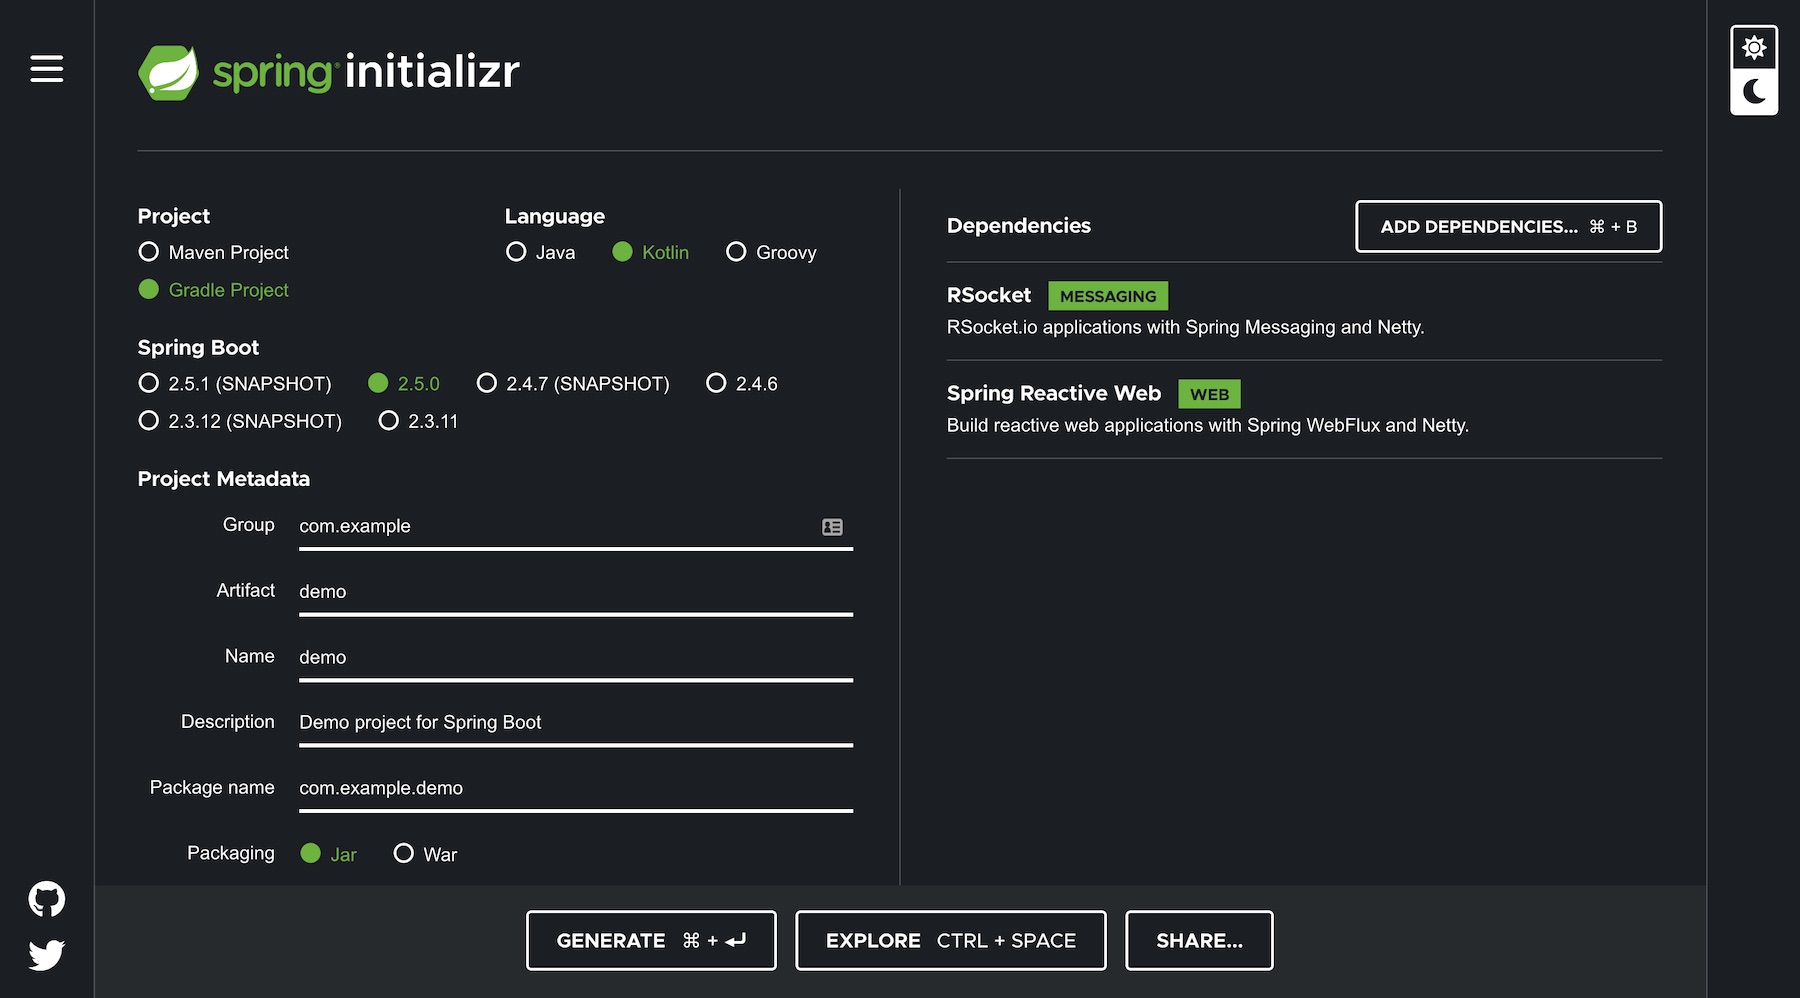
We will make use of Spring Initilizr to bootstrap the project structure for us. The application presented here is written in Kotlin, which allows us to forego much of the boilerplate code found in a Java application. In the screenshot below, you can see the WebFlux and RSocket libraries have been selected:
The generated Gradle build configuration file build.gradle.kts looks like this:
import org.jetbrains.kotlin.gradle.tasks.KotlinCompile

plugins {
    id("org.springframework.boot") version "2.4.5"
    id("io.spring.dependency-management") version "1.0.11.RELEASE"
    kotlin("jvm") version "1.4.32"
    kotlin("plugin.spring") version "1.4.32"
}

group = "com.matthewcasperson"
version = "0.0.1-SNAPSHOT"
java.sourceCompatibility = JavaVersion.VERSION_11

repositories {
    mavenCentral()
}

dependencies {
    implementation("org.springframework.boot:spring-boot-starter-webflux")
    implementation("org.springframework.boot:spring-boot-starter-rsocket")
    implementation("com.fasterxml.jackson.module:jackson-module-kotlin")
    implementation("io.projectreactor.kotlin:reactor-kotlin-extensions")
    implementation("org.jetbrains.kotlin:kotlin-reflect")
    implementation("org.jetbrains.kotlin:kotlin-stdlib-jdk8")
    implementation("org.jetbrains.kotlinx:kotlinx-coroutines-reactor")
    implementation("org.apache.commons:commons-lang3:3.8.1")
    testImplementation("org.springframework.boot:spring-boot-starter-test")
    testImplementation("io.projectreactor:reactor-test")
}

tasks.withType<KotlinCompile> {
    kotlinOptions {
        freeCompilerArgs = listOf("-Xjsr305=strict")
        jvmTarget = "11"
    }
}

tasks.withType<Test> {
    useJUnitPlatform()
}
We also have a settings file called settings.gradle.kts with the following values:
rootProject.name = "webflux"
The server logic has been defined in a file called WebFluxApplication.kt. The complete file is shown below:
package com.matthewcasperson.webflux

import org.apache.commons.lang3.RandomStringUtils
import org.apache.commons.logging.LogFactory
import org.springframework.boot.autoconfigure.SpringBootApplication
import org.springframework.boot.runApplication
import org.springframework.messaging.handler.annotation.MessageMapping
import org.springframework.stereotype.Controller
import org.springframework.stereotype.Service
import reactor.core.publisher.Flux
import java.time.Duration.ofSeconds
import kotlin.random.Random

@SpringBootApplication
class ServiceApplication

fun main() {
    runApplication<ServiceApplication>()
}

@Controller
class CarRegoRSocketController(private val carRegoService: CarRegoService) {

    @MessageMapping("cars")
    fun cars() = carRegoService.streamOfCars()
}

@Service
class CarRegoService {
    private val log = LogFactory.getLog(javaClass)

    fun streamOfCars(): Flux<Car> {
        return Flux
            .interval(ofSeconds(3))
            .map { Car(
                RandomStringUtils.randomAlphabetic(6).toUpperCase(),
                "image" + Random.nextInt(1, 5) + ".png") }
            .doOnSubscribe { log.info("New subscription") }
            .share()
    }
}

data class Car(val rego: String, val image: String)
There is a lot going on in this file, so let's break down the code.
Our web server will emulate a license plate scanner that is continually scanning cars and providing their details to a client application. Obviously, in this demo, we will not concern ourselves with trying to perform any such image processing and instead will fake this functionality by providing a stream of randomly generated license plates and links to placeholder images.
We start by creating a class annotated with @SpringBootApplication. This annotation enables a set of common functionality for configuring the application and scanning for additional components:
@SpringBootApplication
class ServiceApplication
We then provide an entry point to our application via the main function, which starts our Spring application:
fun main() {
    runApplication<ServiceApplication>()
}
Next, we define a controller called CarRegoRSocketController. This class will expose the reactive stream consumed by our client application when a stream called cars is requested:
@Controller
class CarRegoRSocketController(private val carRegoService: CarRegoService) {

    @MessageMapping("cars")
    fun cars() = carRegoService.streamOfCars()
}
The logic to provide the stream of car registrations is defined in a service called CarRegoService. The streamOfCars() function returns a Flux of type Car. Flux defines a stream returning multiple entities, and in our case, defines an infinite stream that continually returns a Car with a random license plate and associated image.
This fluent style of chained function calls is common in reactive applications. Here we chain a number of function calls to define a Flux that generates a new Car object every three seconds and prints a message to the log when a client subscribes:
@Service
class CarRegoService {
    private val log = LogFactory.getLog(javaClass)

    fun streamOfCars(): Flux<Car> {
        return Flux
            .interval(ofSeconds(3))
            .map { Car(
                RandomStringUtils.randomAlphabetic(6).toUpperCase(),
                "image" + Random.nextInt(1, 5) + ".png") }
            .doOnSubscribe { log.info("New subscription") }
            .share()
    }
}
Finally, we define the Car class holding the license plate number and image:
data class Car(val rego: String, val image: String)
To expose our endpoints via an RSocket server, we need to define the following values in the application.properties file:
spring.rsocket.server.transport=websocket
spring.rsocket.server.mapping-path=/rsocket
Starting this application will then expose a RSocket server via websockets on ws://localhost:8080/rsocket.
The Browser Based Client
Our browser-based app will be bare bones, serving to establish a connection to the server via RSockets and display the randomly generated license plates and images.
We create a basic HTML page with elements that will eventually display the licence plate and image. We also import a script file called app.js. The HTML file (along with other static web assets) is located under src/main/resources/static, which allows Spring to host it alongside the reactive endpoints, and embed it in the final self-contained JAR file:
<html>
<head>
    <meta content="text/html;charset=utf-8" http-equiv="Content-Type">
    <meta content="utf-8" http-equiv="encoding">
    <style>
        .center {
            display: block;
            margin-left: auto;
            margin-right: auto;
            width: 50%;
            text-align: center;
        }
    </style>
</head>
<body>
    <h2 class="center" id="rego"></h2>
    <img class="center" id="image" src="data:," alt/>
    <script src="app.js"></script>
</body>
</html>
The logic to connect to the server and update the web page exists in a JavaScript file called index.js. For convenience this file is also located under src/main/resources/static, but as we'll see later on index.js is not accessed by the web client, but instead is used to compile the app.js file that is referenced by the HTML page above:
const {
    RSocketClient,
    JsonSerializer,
    IdentitySerializer
} = require('rsocket-core');
const RSocketWebSocketClient = require('rsocket-websocket-client').default;

const toDataURL = url => fetch(url)
    .then(response => response.blob())
    .then(blob => new Promise((resolve, reject) => {
        const reader = new FileReader()
        reader.onloadend = () => resolve(reader.result)
        reader.onerror = reject
        reader.readAsDataURL(blob)
    }))

// Create an instance of a client
const client = new RSocketClient({
    // send/receive objects instead of strings/buffers
    serializers: {
        data: JsonSerializer,
        metadata: IdentitySerializer
    },
    setup: {
        // ms btw sending keepalive to server
        keepAlive: 60000,
        // ms timeout if no keepalive response
        lifetime: 180000,
        // format of `data`
        dataMimeType: 'application/json',
        // format of `metadata`
        metadataMimeType: 'message/x.rsocket.routing.v0',
    },
    transport: new RSocketWebSocketClient({url: 'ws://localhost:8080/rsocket'}),
});

var subscription = null;

// Open the connection
client.connect().subscribe({
    onError: error => console.error(error),
    onSubscribe: cancel => {/* call cancel() to abort */},
    onComplete: socket => {
        socket.requestStream({
            data: null,
            metadata: String.fromCharCode("cars".length) + "cars"
        })
        .subscribe({
            onComplete: () => console.log("requestStream done"),
            onError: error => {
                console.log("got error with requestStream");
                console.error(error);
            },
            onNext: value => {
                console.log("got next value in requestStream..");
                console.log(value.data);
                document.getElementById("rego").innerText = "Registration Number: " + value.data.rego;
                toDataURL("images/" + value.data.image).then(dataUrl => {
                    document.getElementById("image").src = dataUrl;
                    subscription.request(1);
                })
            },
            // Nothing happens until `request(n)` is called
            onSubscribe: sub => {
                console.log("subscribe request Stream!");
                subscription = sub;
                subscription.request(1);
            }
        });
    }
});
We start this script with a function to load an image and convert it into a base 64 data blob. We'll use this function to update the <img> element in the web page:
const toDataURL = url => fetch(url)
    .then(response => response.blob())
    .then(blob => new Promise((resolve, reject) => {
        const reader = new FileReader()
        reader.onloadend = () => resolve(reader.result)
        reader.onerror = reject
        reader.readAsDataURL(blob)
    }))
We then use the RSocket client library to establish a connection to the server. There are a few interesting aspects to this code.
The serializers provide methods for processing the data and metadata fields we'll define when connecting to the cars stream exposed by the server. JsonSerializer converts strings to and from JSON objects, while IdentitySerializer passes the supplied data straight through without modification.
The dataMimeType field then sets the mime type of the data field, which is set to application/json, matching the JsonSerializer noted above.
The metadataMimeType field is set to message/x.rsocket.routing.v0, which indicates the metadata field is used to define an RSocket route.
We connect the client to ws://localhost:8080/rsocket, which is a websocket URL exposed by the Spring application, with the path that was assigned to the spring.rsocket.server.mapping-path property:
const client = new RSocketClient({
    // send/receive objects instead of strings/buffers
    serializers: {
        data: JsonSerializer,
        metadata: IdentitySerializer
    },
    setup: {
        // ms btw sending keepalive to server
        keepAlive: 60000,
        // ms timeout if no keepalive response
        lifetime: 180000,
        // format of `data`
        dataMimeType: 'application/json',
        // format of `metadata`
        metadataMimeType: 'message/x.rsocket.routing.v0',
    },
    transport: new RSocketWebSocketClient({url: 'ws://localhost:8080/rsocket'}),
});
We define a global variable called subscription to reference the RSocket subscription to be established next:
var subscription = null;
The client is connected to the server. We provide two simple methods to respond to the onError and onSubscribe events:
client.connect().subscribe({
    onError: error => console.error(error),
    onSubscribe: cancel => {/* call cancel() to abort */},
Inside the onComplete event handler, an object is passed to the socket requestStream() function, including the data and metadata fields that were configured in the RSocketClient constructor.
The data field is null, as the associated stream exposed by the server does not take any parameters. If we needed to provide parameters to the server's cars() function, they would have been defined in a JavaScript object passed to the data field. Because the cars() function has no parameters, data must be null.
The metadata field starts with a character whose code represents the length of the name of the stream we are connecting to, followed by the name of the stream. This format is defined as part of the routing metadata extension:
    onComplete: socket => {
        socket.requestStream({
            data: null,
            metadata: String.fromCharCode("cars".length) + "cars"
        })
Upon subscribing to the stream, we again provide a few simple functions to handle the onComplete and onError events:
        .subscribe({
            onComplete: () => console.log("requestStream done"),
            onError: error => {
                console.log("got error with requestStream");
                console.error(error);
            },
The onNext event is where we respond to a new item passed to the client via the stream. The function here displays the car's registration number, and loads the image path as a base 64 data url an updates the <img> element in the web page. Once the image has been loaded, it then requests the next item by calling subscription.request(1):
            onNext: value => {
                console.log("got next value in requestStream..");
                console.log(value.data);
                document.getElementById("rego").innerText = "Registration Number: " + value.data.rego;
                toDataURL("images/" + value.data.image).then(dataUrl => {
                    document.getElementById("image").src = dataUrl;
                    subscription.request(1);
                })
            },
The onSubscribe event is used to capture the subscription object, and request the first item from the stream. This initial request is what triggers the onNext event defined above:
            onSubscribe: sub => {
                console.log("subscribe request Stream!");
                subscription = sub;
                subscription.request(1);
            }
        });
    }
});
We've made use of a number of libraries, which are defined in the package.json file:
{
  "name": "webflux-application",
  "private": true,
  "description": "Webflux Application",
  "version": "0.0.1",
  "repository": {
    "type": "git",
    "url": "https://github.com/mcasperson/Auth0WebFlux"
  },
  "license": "MIT",
  "dependencies": {
    "fbjs": "^0.8.12",
    "rsocket-core": "^0.0.10",
    "rsocket-flowable": "^0.0.10",
    "rsocket-tcp-server": "^0.0.10",
    "rsocket-types": "^0.0.10",
    "rsocket-websocket-client": "^0.0.10",
    "rsocket-websocket-server": "^0.0.10",
    "ws": "^5.2.1"
  }
}
To download these libraries, run:
npm install
We then need to convert the index.js file into something that can be used in a web browser. To do this, we'll make use of Browserify to build a self-contained JavaScript file. Run the following command to generate the app.js file referenced in the HTML page:
browserify index.js > app.js
At this point, we can now build the entire application with the command:
./gradlew build
The resulting JAR file created at build/libs/webflux-0.0.1-SNAPSHOT.jar can be run with:
java -jar build/libs/webflux-0.0.1-SNAPSHOT.jar
Open the web app at http://localhost:8080. It will establish a websocket connection to the server via the RSocket client and proceed to display the registration plates and images returned by the reactive stream:

For the impatient, this sample application has also been published as a Docker image, which can be run with the command:
docker run -p 8080:8080 mcasperson/auth0webflux
Conclusion
WebFlux provides a reactive platform for Spring developers to create non-blocking, asynchronous applications that integrate with the wider Spring ecosystem. By exposing WebFlux streams via RSocket, we can integrate many different clients with our WebFlux server, including browser-based apps.
In this post, we wrote a simple WebFlux server in Kotlin, exposed it via RSocket, and wrote a simple web application to consume the WebFlux streams via rsocket-js.
About the author

Matthew Casperson
Product Manager at Octopus Deploy