


As a developer, you likely interact with CLIs daily to install libraries, run applications, check out your code, and much more. So you realize the potential of CLIs for automation and how simple it is to perform some tasks. But that's not the only use case for CLI applications, there are situations in which we may not even have access to a visual environment, where the terminal is our only choice, and there CLI applications are a must.
When building a CLI, perhaps you need to interact with private APIs, or you may want to validate the user accessing the application. In either case, you require to add authentication to your application. But the question then is, what would be the best way to do it?
That is the focus of this article today. We will explore authentication methods for CLI applications and their use cases and build our own hello to me CLI with Python and Auth0.
The Authorization Flow
When choosing the best authentication flow for our CLI application, we must consider its use case first.
There are available three options when it comes to CLIs, and today, we will be focusing on the device authorization flow which is the most secure way, and thanks to Auth0 it is also easy to integrate with the full power of Universal Login, which we will see in action later on this post.
How device flow works
With device flow, rather than directly authenticating users, the Application provides instructions to the user to access a website and authorize the device (in our case, the CLI) there.
This flow has grown in popularity in recent years with the introduction of smart TVs and other IoT devices, where for example, your TV would ask you to go to your YouTube app on your phone and confirm a code to access your user profile.
If you want to learn the flow details, I recommend reading the device flow guide.
The Sample Application
As we mentioned, we will build a hello to me CLI application using Python. The CLI will authenticate a user using device flow and, upon completing the authentication process, will extract information about the user and display it on the screen.
Let's get started by creating our project's directory.
mkdir awesome-cli
cd awesome-cli
Next, we create and activate the virtual environment, I'll be using Python's integrated VENV, but you can use pipenv, conda, or any other.
python3 -m venv venv
source venv/bin/activate
Next, we need to install some dependencies. Here is the list and the command to set them up:
- typer: Typer is a library for building CLI applications.
- auth0-python: Auth0's Python SDK, which we will use to validate our tokens.
- requests: To make HTTP calls.
pip install auth0-python requests typer
Finally, let's build the app's skeleton and run it.
touch main.py
Next, open the file main.py and paste the following code:
import time

from auth0.authentication.token_verifier import TokenVerifier, AsymmetricSignatureVerifier
import jwt
import requests
import typer

app = typer.Typer()

@app.command()
def say_hi():
    print(f"Hello world!")

if __name__ == "__main__":
    app()
Finally, to run it:
python main.py
You should see the message Hello world! on your terminal if all is well.
Because we added only one command, we can run the file, and
Typerwill automatically execute it. If you have more than one command, you must provide the wanted command to run it by doing something likepython main.py say-hi.
Set up an Auth0 CLI Application
Now that you have the basic CLI project, we can start working on adding authentication.
Step 1: Register for an Auth0 account
If you don't have one, you can sign up for a FREE Auth0 account.
Step 2: Register the application with Auth0
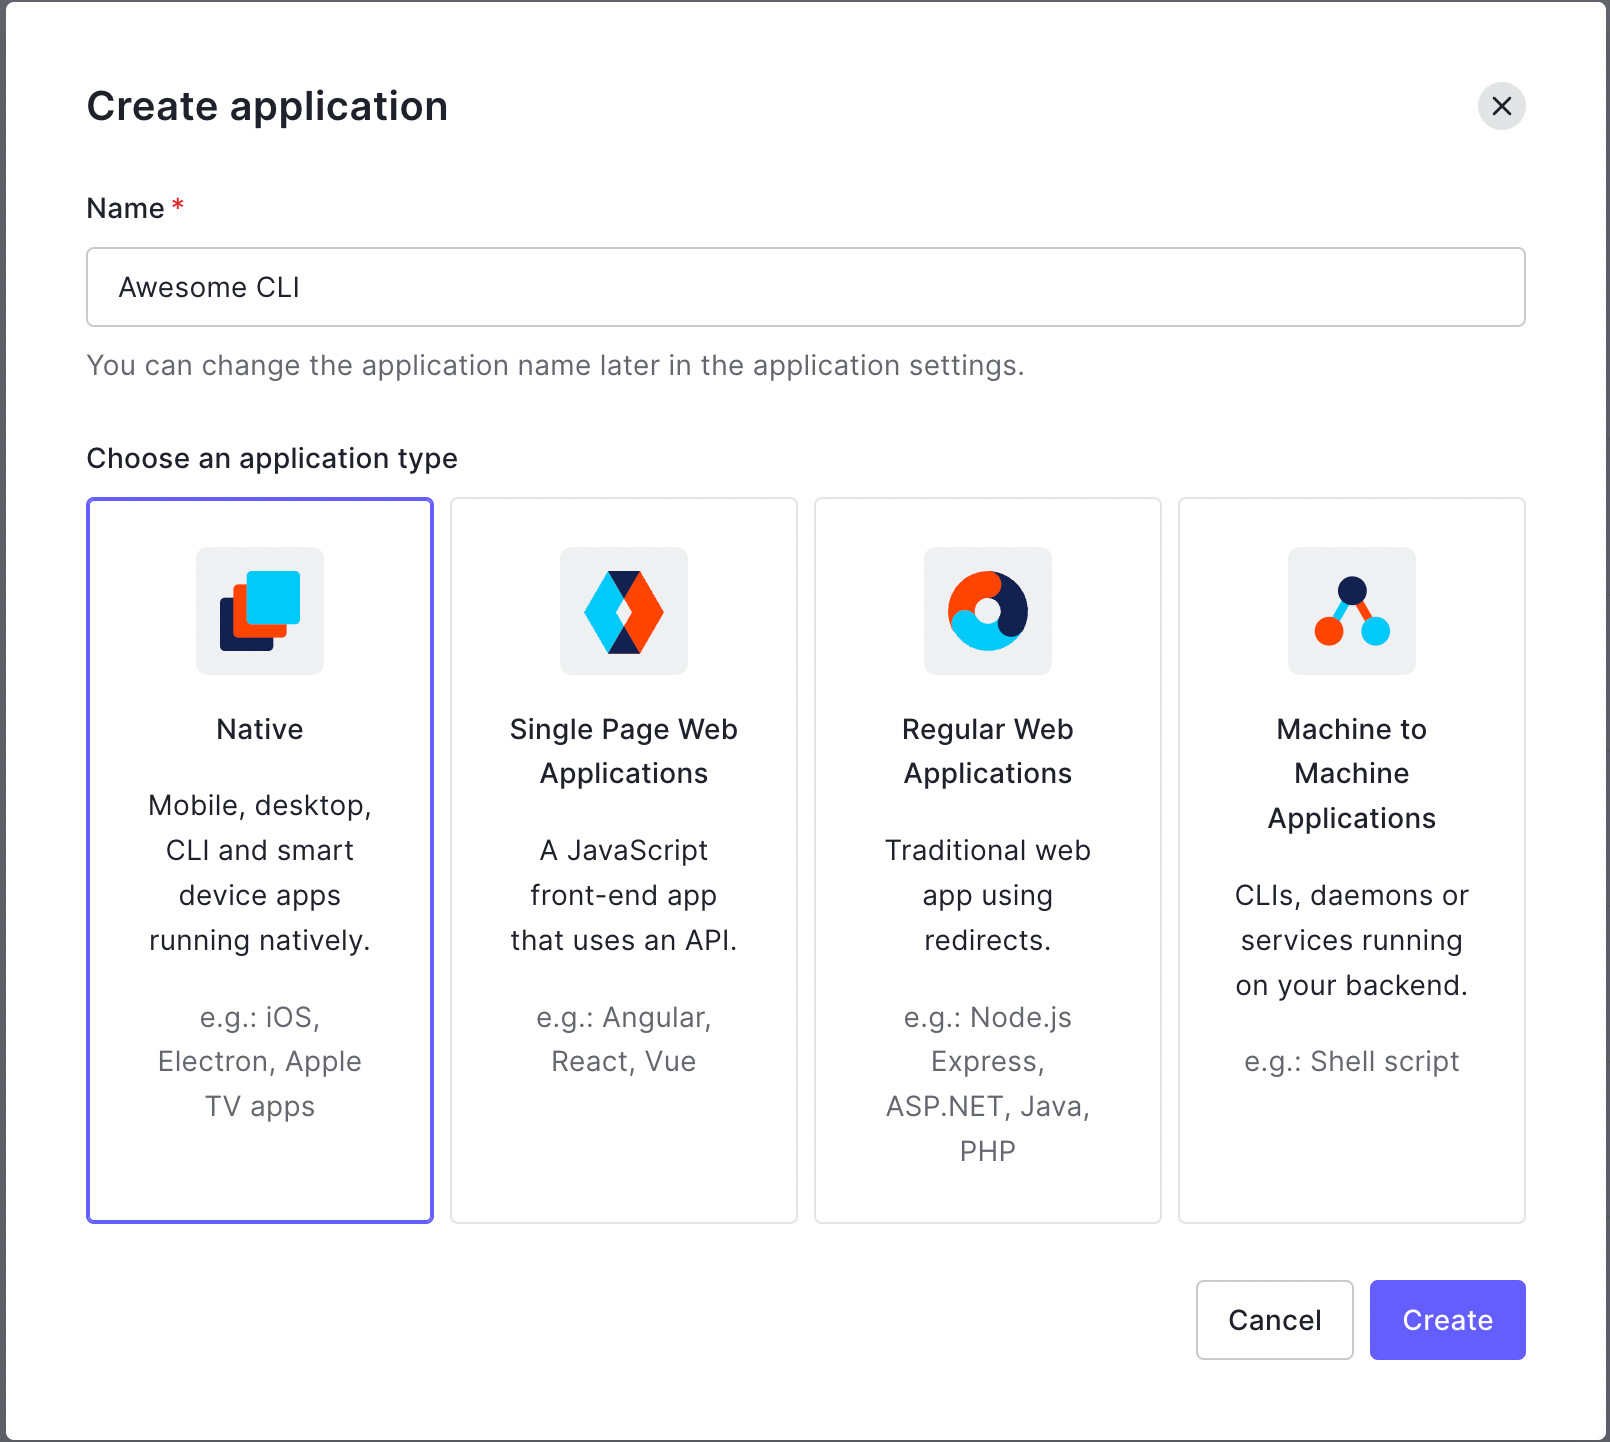
- Go to the Auth0 Dashboard and select Applications > Applications and click Create Application.
- Enter your application name (e.g., Awesome CLI), select Native, and click Create.
- After the Quick Start page for the app appears, click the Settings tab.
- Once there, scroll near the bottom to the section named Advanced Settings, and click the chevron to expand it.
- Next, click the OAuth tab and ensure that OIDC Conformant is in the “on” position. It should be on by default if you just created the application.

- Select the Grant Types tab and check Device Code. It is unchecked by default.
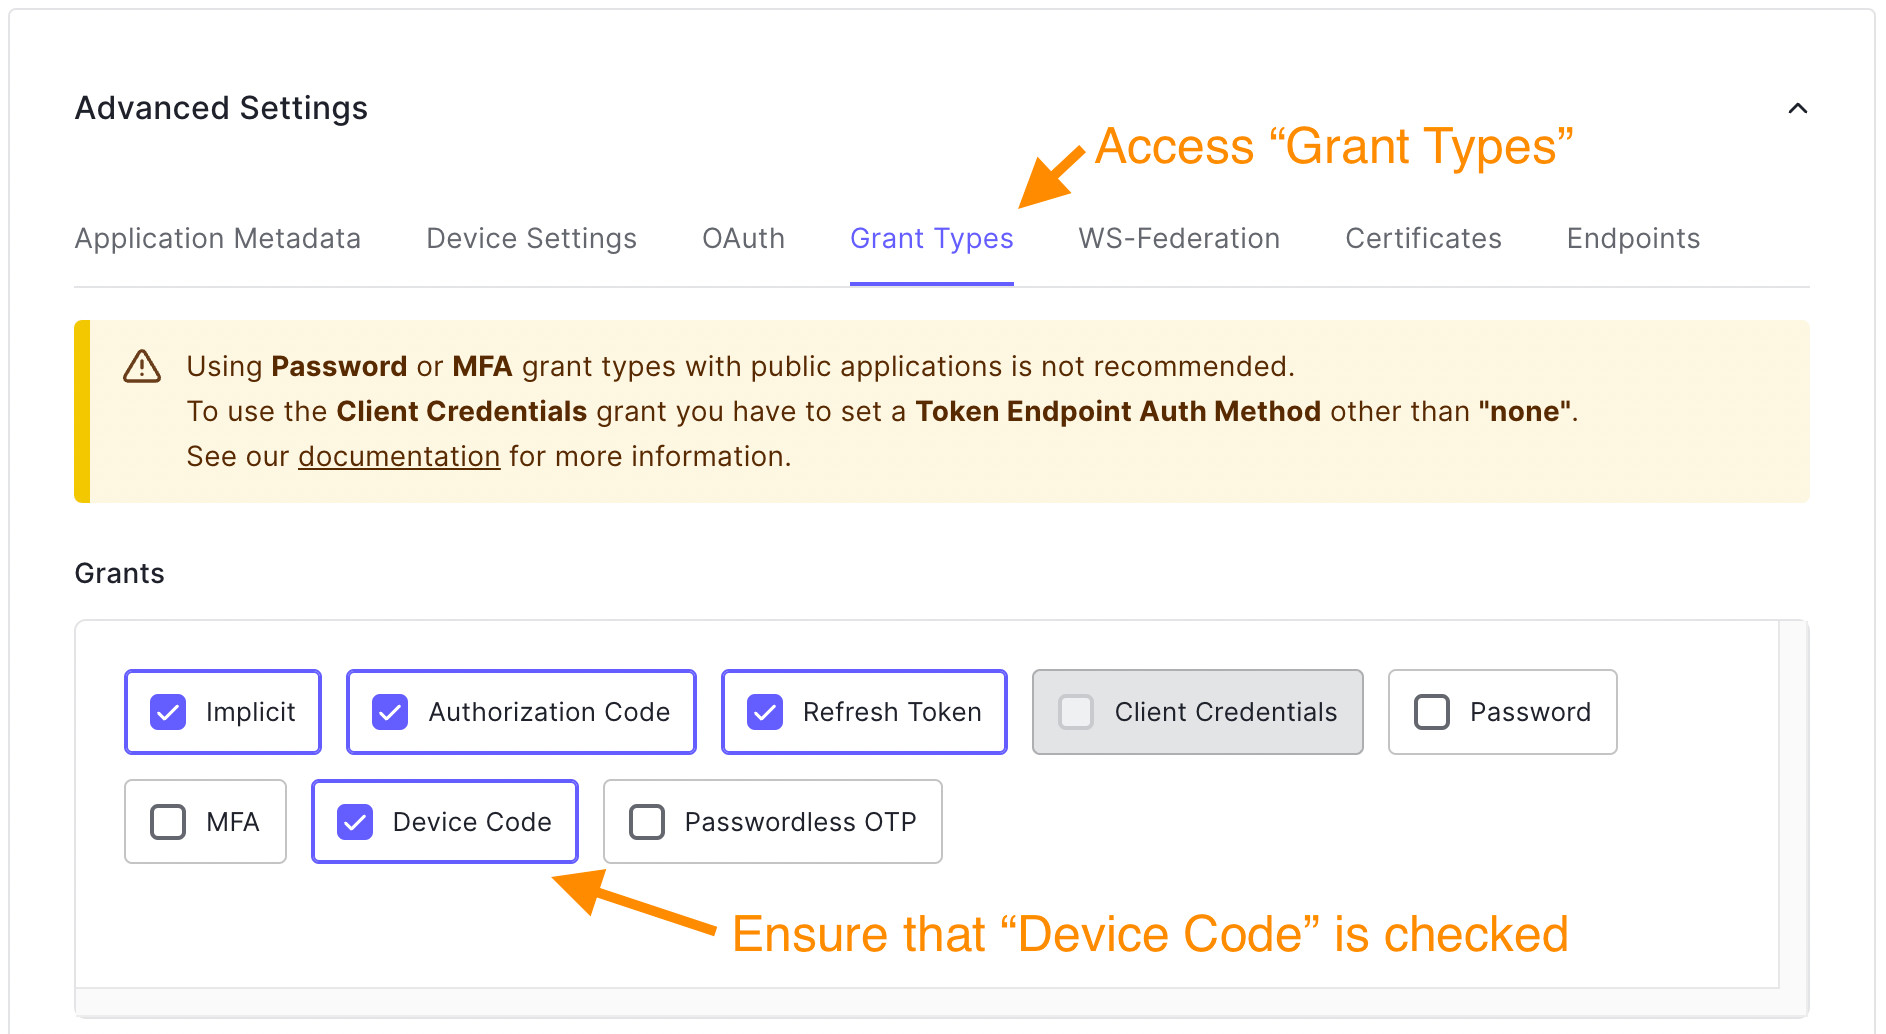
- Finally, click the Save Changes button.
Auth0 provides default settings for the randomly generated codes, but if you need to customize them, you can define new patterns in the Device User Code Settings.
Implementing Authorization Flow with Python
As we mentioned, Device Code Flow requires a series of steps. In our case, we will implement them in the following logical order:
- Request device code
- Request tokens
- Receive tokens
Request device code
During this step, we will use Auth0's API to initiate a Device Authorization Flow and provide us with the setup URL and user code needed to authenticate and validate the device.
We'll have to get data from the Auth0 Dashboard to call the required APIs, so let's get them and set them as python variables like these:
# main.py

...
import typer

# New code 👇
AUTH0_DOMAIN = 'your-domain.auth0.com'
AUTH0_CLIENT_ID = 'your-client-id'
ALGORITHMS = ['RS256']
# New code 👆

app = typer.Typer()
...
To capture the Auth0 domain and client ID, visit your Auth0 application's dashboard under the Settings tab. Both values will be available on the screen. Please copy and paste them into the corresponding variable.

Next, let's create a new login() function and add our code.
# main.py

...
import typer

app = typer.Typer()

# New code 👇
def login():
    """
    Runs the device authorization flow and stores the user object in memory
    """
    device_code_payload = {
        'client_id': AUTH0_CLIENT_ID,
        'scope': 'openid profile'
    }
    device_code_response = requests.post('https://{}/oauth/device/code'.format(AUTH0_DOMAIN), data=device_code_payload)

    if device_code_response.status_code != 200:
        print('Error generating the device code')
        raise typer.Exit(code=1)

    print('Device code successful')
    device_code_data = device_code_response.json()
    print('1. On your computer or mobile device navigate to: ', device_code_data['verification_uri_complete'])
    print('2. Enter the following code: ', device_code_data['user_code'])
# New code 👆

@app.command()
def say_hi():
    print(f"Hello world!")

if __name__ == "__main__":
    app()
After calling Auth0's device code API, we get a JSON object response that, among other properties, contains:
verification_uri: URL the user needs to visit to authenticate the device.user_code: The user should input the code at theverification_urito authorize the device.verification_uri_complete: The user can visit this URL to authorize the device without manually entering the user code. You may prefer this oververification_uridepending on your case.interval: The interval (in seconds) at which the app should poll the token URL to request a token — more on that in the next section.
We display this information to the user on the screen. In more advanced UIs like smart TVs, you'll find QR codes or other tricks to facilitate user interaction.
Note: When we call the API, we send a specific payload. In our case, we specified the scope, set as
openid profile, so we can receive anid_token. In other scenarios where you perhaps need to call an API, you'll need an access token, and thus you should also provide anaudience. Check out the guide on calling APIs with Device Flow for more information.
Request tokens
Next, two things in parallel happen. While the user accesses the URL and completes the authentication flow, the CLI will continuously check with Auth0's API for the status of the process.
Because the authentication flow occurs outside the scope of the application, maybe even on a different device from the one with our code, we have no way of knowing when the user completes the request. To overcome this situation, we will poll the API for the current status every few seconds until one of the following happens:
- The user aborts the application.
- We receive a cancellation.
- Success from the API.
Now you may wonder: how often should we be querying the API? Auth0 provided us with that information when we initiated the flow, with the attribute interval we discussed before.
Let's do just that with code:
# main.py

...
def login():
    """
    Runs the device authorization flow and stores the user object in memory
    """
    device_code_payload = {
        'client_id': AUTH0_CLIENT_ID,
        'scope': 'openid profile'
    }
    device_code_response = requests.post('https://{}/oauth/device/code'.format(AUTH0_DOMAIN), data=device_code_payload)

    if device_code_response.status_code != 200:
        print('Error generating the device code')
        raise typer.Exit(code=1)

    print('Device code successful')
    device_code_data = device_code_response.json()
    print('1. On your computer or mobile device navigate to: ', device_code_data['verification_uri_complete'])
    print('2. Enter the following code: ', device_code_data['user_code'])

    # New code 👇
    token_payload = {
        'grant_type': 'urn:ietf:params:oauth:grant-type:device_code',
        'device_code': device_code_data['device_code'],
        'client_id': AUTH0_CLIENT_ID
    }

    authenticated = False
    while not authenticated:
        print('Checking if the user completed the flow...')
        token_response = requests.post('https://{}/oauth/token'.format(AUTH0_DOMAIN), data=token_payload)

        token_data = token_response.json()
        if token_response.status_code == 200:
            print('Authenticated!')
            print('- Id Token: {}...'.format(token_data['id_token'][:10]))
            authenticated = True
        elif token_data['error'] not in ('authorization_pending', 'slow_down'):
            print(token_data['error_description'])
            raise typer.Exit(code=1)
        else:
            time.sleep(device_code_data['interval'])
    # New code 👆
...
We use the token endpoint while we wait for the user to authenticate.
Once the user authenticates, the API will respond with a 200 status code and provide us with the requested token information. In our case, since we only asked for openid, we will receive an id_token, but we can also retrieve access_token and refresh_token if specified during the flow initiation and the app configuration allows for it.
While the user is not authenticated, we will continually receive 4xx error responses. We must look into these responses in more detail, as some mean we are still waiting, while others will indicate to us to terminate the authentication sequence.
Authentication pending: You will see this error (shown below) while waiting for the user to take action. Continue polling using the suggested interval retrieved in the previous step of this tutorial.
{
    "error": "authorization_pending",
    "error_description": "..."
}
Slow down: You are polling too fast. Slow down and use the suggested interval retrieved in the previous step of this tutorial. To avoid receiving this error due to network latency (shown below), you should start counting each interval after receipt of the last polling request's response.
{
    "error": "slow_down",
    "error_description": "..."
}
Expired token: The user has not authorized the device quickly enough, so the device_code has expired. Your application should notify the user that the flow has expired and prompt them to reinitiate the flow.
{
    "error": "expired_token",
    "error_description": "..."
}
Access denied: Finally, if access is denied, you will receive:
{
    "error": "access_denied",
    "error_description": "..."
}
This can occur if the authentication flow is interrupted for a variety of reasons, including:
- The user refused to authorize the device.
- The authorization server denied the transaction.
- A configured Action or Rule denied access. (To learn more, read Auth0 Actions or Auth0 Rules.)
Receive tokens
When the user authorizes the device and completes the authentication flow, we can retrieve the tokens successfully. Still, we haven't done anything with them yet, other than displaying a few characters on the screen.
In the response from the token API, we got an HTTP 200 response with a payload containing access_token, id_token, token_type, and expires_in values.
Before we store or use any of these tokens, we need to validate them. In our application, we will validate the id_token we need, but you can also validate access_tokens. Read more on validating access tokens and the Auth0 Python SDK.
We'll start by defining a validation token function:
# main.py

...
app = typer.Typer()

# New code 👇
current_user = None

def validate_token(id_token):
    """
    Verify the token and its precedence

    :param id_token:
    """
    jwks_url = 'https://{}/.well-known/jwks.json'.format(AUTH0_DOMAIN)
    issuer = 'https://{}/'.format(AUTH0_DOMAIN)
    sv = AsymmetricSignatureVerifier(jwks_url)
    tv = TokenVerifier(signature_verifier=sv, issuer=issuer, audience=AUTH0_CLIENT_ID)
    tv.verify(id_token)
# New code 👆

def login():
...
To validate the token, we use the Auth0 Python SDK.
We also created a global variable, current_user, which we will use next when we integrate the token validation into our login function.
...
def login():
            ...
        print('Authenticated!')
            print('- Id Token: {}...'.format(token_data['id_token'][:10]))

            # New code 👇
            validate_token(token_data['id_token'])
            global current_user
            current_user = jwt.decode(token_data['id_token'], algorithms=ALGORITHMS, options={"verify_signature": False})
            # New code 👆

            authenticated = True
            ...
When we detect that the user logged in successfully, we validate the id_token, decode the user data from it, and store it in the global variable current_user.
Last but not least, we need to connect our login function to the application:
...
@app.command()
def say_hi():
    # New code 👇
    if current_user is None:
        login()
    print(f"Welcome {current_user['name']}!")
    # New code 👆

if __name__ == "__main__":
    app()
You made it! Now you have a working app, but in case it has been too many code snippets to follow, here is the complete code:
import time

from auth0.authentication.token_verifier import TokenVerifier, AsymmetricSignatureVerifier
import jwt
import requests
import typer

AUTH0_DOMAIN = 'your-domain.auth0.com'
AUTH0_CLIENT_ID = 'your-client-id'
ALGORITHMS = ['RS256']

app = typer.Typer()

current_user = None

def validate_token(id_token):
    """
    Verify the token and its precedence

    :param id_token:
    """
    jwks_url = 'https://{}/.well-known/jwks.json'.format(AUTH0_DOMAIN)
    issuer = 'https://{}/'.format(AUTH0_DOMAIN)
    sv = AsymmetricSignatureVerifier(jwks_url)
    tv = TokenVerifier(signature_verifier=sv, issuer=issuer, audience=AUTH0_CLIENT_ID)
    tv.verify(id_token)

def login():
    """
    Runs the device authorization flow and stores the user object in memory
    """
    device_code_payload = {
        'client_id': AUTH0_CLIENT_ID,
        'scope': 'openid profile'
    }
    device_code_response = requests.post('https://{}/oauth/device/code'.format(AUTH0_DOMAIN), data=device_code_payload)

    if device_code_response.status_code != 200:
        print('Error generating the device code')
        raise typer.Exit(code=1)

    print('Device code successful')
    device_code_data = device_code_response.json()
    print('1. On your computer or mobile device navigate to: ', device_code_data['verification_uri_complete'])
    print('2. Enter the following code: ', device_code_data['user_code'])

    token_payload = {
        'grant_type': 'urn:ietf:params:oauth:grant-type:device_code',
        'device_code': device_code_data['device_code'],
        'client_id': AUTH0_CLIENT_ID
    }

    authenticated = False
    while not authenticated:
        print('Checking if the user completed the flow...')
        token_response = requests.post('https://{}/oauth/token'.format(AUTH0_DOMAIN), data=token_payload)

        token_data = token_response.json()
        if token_response.status_code == 200:
            print('Authenticated!')
            print('- Id Token: {}...'.format(token_data['id_token'][:10]))

            validate_token(token_data['id_token'])
            global current_user
            current_user = jwt.decode(token_data['id_token'], algorithms=ALGORITHMS, options={"verify_signature": False})
            # New code 👆

            authenticated = True
        elif token_data['error'] not in ('authorization_pending', 'slow_down'):
            print(token_data['error_description'])
            raise typer.Exit(code=1)
        else:
            time.sleep(device_code_data['interval'])

@app.command()
def say_hi():
    if current_user is None:
        login()
    print(f"Welcome {current_user['name']}!")

if __name__ == "__main__":
    app()
Application demo
Let's try the application now and follow all the steps until we the "welcome" message.
First, we run the application:
python main.py
When the application starts, it runs the login() function and requests a device code. Almost immediately, we receive the instructions to log in on the screen, and we see the CLI polling the token API in intervals.
(venv) ➜ awesome-cli python main.py
Device code successful
1. On your computer or mobile device navigate to: https://dev2-bajcmartinez.eu.auth0.com/activate?user_code=RPSW-HMCW
2. Enter the following code: RPSW-HMCW
Checking if the user completed the flow...
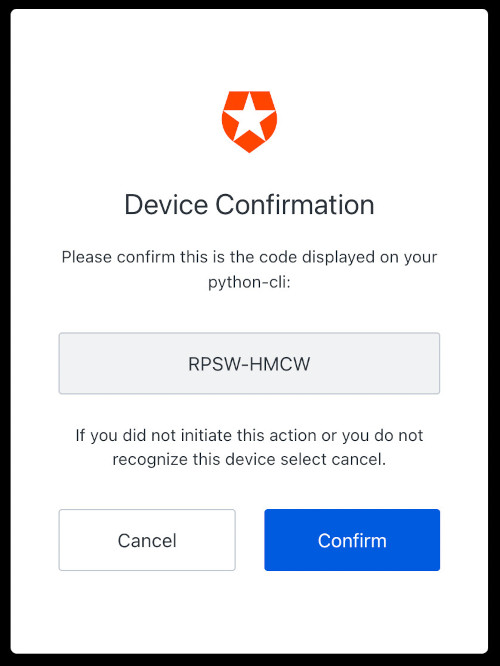
When we access the link on the browser or another device, we see the Auth0 Universal Login page with the device code already pre-loaded. We must look at the code and ensure it is the same as presented on the CLI. Once we confirm that, we click Continue.
You probably know the following screen if you are already familiar with Auth0 Universal Login. It is where you can sign up or sign in using credentials, social logins, MFA, and more.
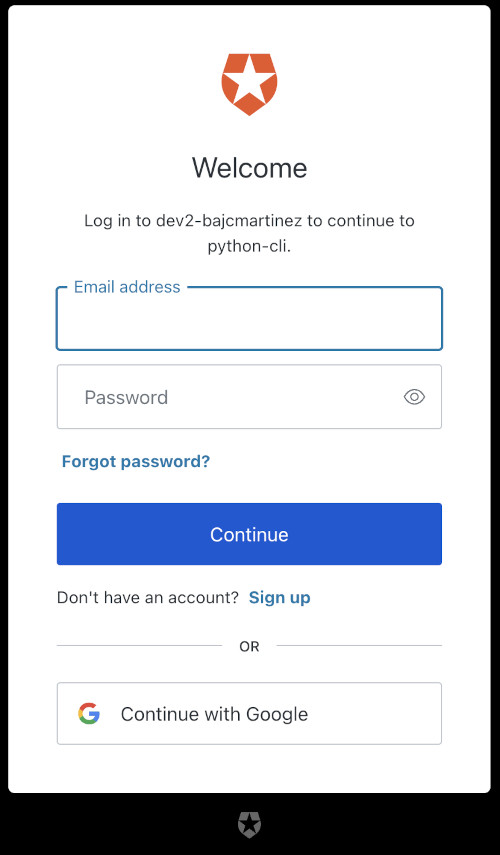
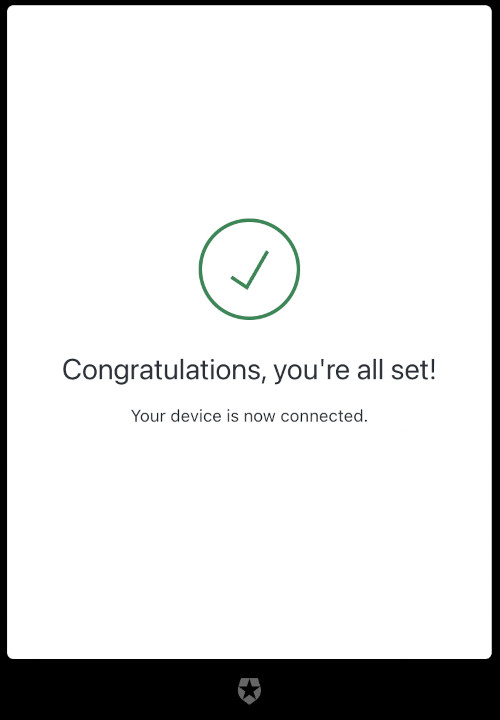
Either register a new user or sign in to continue. Once you do, you will see the confirmation page that your device is now connected.
You may now close that window and head back to the CLI, where you will see your welcome message.
(venv) ➜ awesome-cli python main.py
Device code successful
1. On your computer or mobile device navigate to: https://dev2-bajcmartinez.eu.auth0.com/activate?user_code=RPSW-HMCW
2. Enter the following code: RPSW-HMCW
Checking if the user completed the flow...
Checking if the user completed the flow...
Checking if the user completed the flow...
Checking if the user completed the flow...
Authenticated!
- Id Token: eyJhbGciOi...
Welcome Juan!
What's Next?
Congratulations! Today, you learned to use Device Authorization Flow with Python and Auth0 to authenticate users into CLI applications.
But this is only the beginning. There's so much more to learn.
Here are some great additional resources for your reference:
- Call Your API Using the Device Authorization Flow
- Auth0 Device Code API
- Device Authorization Flow, how does it work?
- Building CLIs with Python
Thanks for reading!