
In this article, you will learn how to build minimal Web APIs with .NET 6 and add authorization with JWT access tokens coming from Auth0. The code for this article is available from this GitHub repository.
The Journey to Minimal Web APIs
It has been a long journey since Microsoft released WCF REST Services around 2006 for developing REST services in the .NET framework. This framework did not last long because of the complexities inherited from the WCF programming model and the limited support for using many of the features available in HTTP. It was fine for developing chatty RPC services on top of HTTP, but not more than that.
WCF REST Services was around for a few years until the ASP.NET team introduced ASP.NET Web APIs. This brand new framework resulted from a long collaboration between Microsoft and many experts in the industry.
They also moved away from the term REST, which implied the API implementation should stick to any of the levels in Richardson's Maturity Model and all the constraints described in it.
The ASP.NET Web APIs framework is still around and has gone through minor refactors over the years and a recent port to .NET Core. However, the ASP.NET team recently announced the availability of minimal Web APIs, a new way to develop and host Web APIs starting with .NET 6.
This article will discuss many of the improvements and simplifications introduced with minimal Web APIs and a practical example that shows how to implement a TODO list Web API integrated with Auth0 for authorization control.
A First Glance at Minimal Web APIs
The best way to show you what a minimal Web API looks like is with code. Take a look at the following code snippet:
var app = WebApplication.CreateBuilder(args).Build();

app.MapGet("/", () => "Hello World!");

app.Run();
That code is a good definition of what the term "minimal" implies. We only required three lines of code to get an API up and running.
The ASP.NET team removed the friction around configuring APIs and only left the bare bones for running them. It is a top-down approach. They come configured with a basic set of features required to run and let you add more code and features on top as you need.
Where is the Main entry point?
If you noticed, the Program class and Main entry point have gone. That change is part of the new language features introduced with C# 9: Top Level Statements.
Before C# 9, every console program required a namespace and a Program class with a static Main method used as the entry point.
Top Level Statements in C# 9 let you write shorter programs by skipping all those requirements. You can start writing code for your Main method, and the compiler will inject the rest of the code behind the scenes for you.
For the minimal Web API shown before, the resulting code would be equivalent to the following:
namespace APIs
{
  public class MyProgram
  {
    public static void Main(params string[] args)
    {
      var app = WebApplication.CreateBuilder(args).Build();
      app.MapGet("/", () => "Hello World!");
      app.Run();
    }
  }
}
What else from C# 9 and 10?
The good news is that Top Level Statements is not the only feature we could leverage in our minimal Web APIs. We also have "Records", and "File-scoped namespaces". Since we will use them later on, let's discuss those a little more in detail.
Records
A Record is a new reference type, similar to a class or struct but implements value-based equality. That means two different variables of the same record type are equal if the values on every field are the same.
You could accomplish the same thing in the past with a class by overriding the Equals method, but that is no longer necessary with Records. In addition, Records don't need property getters or setters or a constructor to be declared.
The following sample shows a record for a TODO item:
public record TodoItem(string id, string description, bool completed);

var myTodo = new TodoItem("1", "buy milk", false);
Records are immutable by definition. That means you have to create a copy of a record's instance when any of its properties need to be changed. C# also offers a language expression for cloning a record and changing properties on the way:
var myTodo = myTodo with { completed = true };
The code above creates a copy of our existing TodoItem but sets the value for the completed property to true.
File-scoped namespaces
Previous versions of C# required you to enclose all your classes and types between "{}" if you wanted to make them part of a namespace. From C# 10 and on, that is no longer a requirement. You define a top namespace in a file, and all the types in that file will be part of it:
namespace MyNamespace;

public record TodoItem(string name, string description);
In the example above, the record TodoItem will be part of the namespace MyNamespace. We did not have to use any curly brace at all.
Prerequisites
The ASP.NET minimal Web APIs require at least the .NET 6 SDK, which you can install from the .NET download section of the Microsoft website.
You can also install Visual Studio 2022, which supports minimal Web APIs and all the new .NET 6 features.
Creating the TODO API Project
You can create the project from Visual Studio 2022 by using the "ASP.NET Core Web API" project template. Alternatively, you can use the .NET CLI by running the command dotnet new webapi -minimal in a terminal window. Check out the official documentation to learn more about using the .NET CLI to create a minimal Web API.
This article will focus on Visual Studio only. From the "File" menu, select the option "New Project" and use the "ASP.NET Core Web API" template afterward. Pick any name for your Web API project, such as MyTodoWebApi. Once Visual Studio finishes the project creation, we can start playing with it.
Implementing the repository
The first thing we will want to do in our API is abstract how we persist the items in the TODO list. We will use the Repository pattern for that purpose. This pattern consists of an interface with all the available methods for persisting changes in the TODO list and one or more concrete implementations. For simplicity, the implementation for our sample will use a hash table in memory.
Add a new file TodoItem.cs to the project and paste the following code:
// TodoItem.cs

namespace MyTodoWebApi;

public record TodoItem(string id, string description, bool? completed);
That's one of the beauties of the new Record types. We were able to define the representation of a TODO item with a single line of code.
Let's now focus on the repository implementation.
Add a new file TodoRepository.cs to the project and paste the following code:
// TodoRepository.cs

namespace MyTodoWebApi;

public interface ITodoRepository
{
    Task<string> CreateAsync(string name);
    Task<IEnumerable<TodoItem>> GetAllAsync();
    Task<TodoItem> Get(string id);
    Task Delete(string id);
    Task Update(string id, bool completed);
}

public class TodoRepository : ITodoRepository
{
    private readonly Dictionary<string, TodoItem> items = new Dictionary<string, TodoItem>();

    public Task<string> CreateAsync(string description)
    {
        var id = Guid.NewGuid().ToString("N");

        items.Add(id, new TodoItem(id, description, false));

        return Task.FromResult(id);
    }

    public Task Delete(string id)
    {
        items.Remove(id);

        return Task.CompletedTask;
    }

    public Task<TodoItem> Get(string id)
    {
        if (items.ContainsKey(id))
            return Task.FromResult(items[id]);

        return Task.FromResult<TodoItem>(null);
    }

    public Task<IEnumerable<TodoItem>> GetAllAsync()
    {
        var values = items.Select(i => i.Value);
        return Task.FromResult(values);
    }

    public Task Update(string id, bool completed)
    {
        if (items.ContainsKey(id))
        {
            items[id] = items[id] with { completed = completed };
        }

        return Task.CompletedTask;
    }
}
We defined the abstraction ITodoRepository and implementation TodoRepository in the same file. This repository contains all the basic methods to support CRUD in our Web API.
Implementing the minimal Web API
The code for the host configuration and implementation of the API is in the Program.cs file that Visual Studio created with the project.
We will start by injecting the repository implementation in the dependency injection container used by the API. Replace the content of the Program.cs file with the code below:
// Program.cs

using MyTodoWebApi;
using System.Net;

var builder = WebApplication.CreateBuilder(args);

builder.Services.AddSingleton<ITodoRepository, TodoRepository>();

var app = builder.Build();

if (app.Environment.IsDevelopment())
{
    app.UseDeveloperExceptionPage();
}

app.Run();
The repository will be a singleton that persists all the items in memory.
We can now start implementing the different methods for our API. The first one will be for creating new items in a TODO list, and we can map it to the HTTP POST verb for the route /todo. Add the code below to the existing one in the Program.cs file as it is described here:
// Program.cs

//...existing code

if (app.Environment.IsDevelopment())
{
    app.UseDeveloperExceptionPage();
}

// 👇 this is the new code
app.MapPost("/todo", async (
    HttpRequest req,
    HttpResponse res,
    ITodoRepository repo) =>
{
    if (!req.HasJsonContentType())
    {
        throw new BadHttpRequestException("Only application/json supported",
            (int)HttpStatusCode.NotAcceptable);
    }

    var todo = await req.ReadFromJsonAsync<TodoItem>();

    if (todo != null || string.IsNullOrWhiteSpace(todo.description))
    {
        throw new BadHttpRequestException("Description is required",
            (int)HttpStatusCode.BadRequest);
    }

    var id = await repo.CreateAsync(todo.description);
    res.StatusCode = (int)HttpStatusCode.Created;
    res.Headers.Location = $"/todo/{id}";
});
// 👆 this is the new code

app.Run();
The implementation checks that the content type is application/json and deserializes the request body payload into a new instance of the TodoItem record. We only use the description property and ignore the rest. It later calls the repository with the new TodoItem instance and returns the Created (201) status code and Location header.
For retrieving a single item or all the items in the TODO list, we will add two new methods mapped to the HTTP GET method and URLs /todo/{id} and /todo, respectively.
You could potentially use the same method and declare the
idparameter as optional, but two different methods better demonstrate the purpose.
Add the code highlighted below to the Program.cs file:
// Program.cs

// ...existing code

if (app.Environment.IsDevelopment())
{
    app.UseDeveloperExceptionPage();
}

// 👇 this is the new code
app.MapGet("/todo", async (ITodoRepository repo) =>
{
    var todos = await repo.GetAllAsync();
    return todos;
});

app.MapGet("/todo/{id}", async (string id, ITodoRepository repo) =>
{
    if (string.IsNullOrWhiteSpace(id))
    {
        throw new BadHttpRequestException("id is required",
          (int)HttpStatusCode.BadRequest);
    }

    var todo = await repo.Get(id);
    if (todo == null)
    {
        throw new BadHttpRequestException("item not found",
                    (int)HttpStatusCode.NotFound);
    }

    return todo;
});
// 👆 this is the new code

// ...existing code
To change the status of an item in the list, we will use the HTTP PUT method. Copy the following code right after the other methods for getting an item:
// Program.cs

// ...existing code

// 👇 this is the new code
app.MapPut("/todo/{id}", async (string id, HttpRequest req, ITodoRepository repo) =>
{
    if (!req.HasJsonContentType())
    {
        throw new BadHttpRequestException("Only application/json supported",
            (int)HttpStatusCode.NotAcceptable);
    }

    var todo = await req.ReadFromJsonAsync<TodoItem>();

    if(todo != null || !todo.completed.HasValue)
    {
        throw new BadHttpRequestException("Completed is required",
            (int)HttpStatusCode.BadRequest);
    }
    await repo.Update(id, todo.completed);
});
// 👆 this is the new code

// ...existing code
The implementation is very similar to the POST method. It checks for the content type and deserializes the request body content into a TodoItem record instance. This time, we only use the completed property.
Finally, we will add the last method for removing items from the TODO list. Copy the following code right after the method for doing the update:
// Program.cs

// ...existing code

// 👇 this is the new code
app.MapDelete("/todo/{id}", async (string id, ITodoRepository repo) =>
{
    if (string.IsNullOrWhiteSpace(id))
    {
        throw new BadHttpRequestException("id is required",
          (int)HttpStatusCode.BadRequest);
    }
    await repo.Delete(id);
});
// 👆 this is the new code

// ...existing code
If something is wrong with the received parameters, all the validations in our methods return a BadHttpRequestException. Unfortunately, ASP.NET Core Web API will not map the status code in the exception to the status code of the HTTP response.
We can do that mapping with custom middleware that runs right after the method call. Add the following to the existing code:
// Program.cs

// ...existing code

if (app.Environment.IsDevelopment())
{
    app.UseDeveloperExceptionPage();
}

// 👇 this is the new code
app.Use(async (ctx, next) =>
{
    try
    {
        await next();
    }
    catch(BadHttpRequestException ex)
    {
        ctx.Response.StatusCode = ex.StatusCode;
        await ctx.Response.WriteAsync(ex.Message);
    }
});
// 👆 this is the new code

// ...existing code
The order of middleware in the execution pipeline is essential. This one should run before any of the API methods, so we configure it before them.
Documenting the Web API
Many languages have emerged in the development community over the years for documenting Web APIs. Swagger and RAML have been two of the most strong contenders in the space, but the former seems to be the winner as it has recently become a standard called OpenAPI. These languages offer a way to document your Web API in terms of specifications and a foundation for code generation tools developers can leverage in their development environments. Microsoft has also entered this space with ApiExplorer, a framework for annotating ASP.NET Core Web APIs with metadata. The idea is that developers can leverage the exposed metadata for generating documentation or as a tool for generating API specifications in OpenAPI or RAML, for example. As part of this article, we will focus on Swashbuckle, a .NET implementation for generating OpenAPI specifications (or Swagger documentation) in your ASP.NET minimal Web APIs.
While you can still use ApiExplorer with minimal Web APIs, you are responsible for generating the documentation pages for your APIs. The support for leveraging ApiExplorer in Swashbuckle is minimal.
If you left the "Enable OpenAPI support" check box set in the Visual Studio's dialog window when you created your API, you would find all the code to support documentation in place.
Open the Package Manager Console for NuGet in Visual Studio and run the following command:
Install-Package Swashbuckle.AspNetCore
Once the Package Manager installs the Nuget packages in our project, you can configure the Swashbuckle middleware in the Program.cs file under the project's root folder.
Copy the following code right after the registration of the TODO repository:
// Program.cs

// ...existing code

builder.Services.AddSingleton<ITodoRepository, TodoRepository>();

// 👇 this is the new code
builder.Services.AddEndpointsApiExplorer();
builder.Services.AddSwaggerGen();
// 👆 this is the new code

// ...existing code
Those lines will register all the services required by Swashbuckle to generate the documentation.
Next, we need to add the code highlighted below to configure the middleware:
// Program.cs

// ...existing code

if (app.Environment.IsDevelopment())
{
    app.UseDeveloperExceptionPage();
}

// 👇 this is the new code
app.MapSwagger();
app.UseSwaggerUI();
// 👆 this is the new code

// ...existing code
The configuration of the middleware uses all the default settings. Swagger exposes the UI pages under /swagger and the Swagger API specification under /swagger/v1/swagger.json.
We can modify some of those settings to include additional information about the APIs, as shown in the following example:
builder.Services.AddSwaggerGen(c =>
{
    c.SwaggerDoc("v1", new Microsoft.OpenApi.Models.OpenApiInfo {
        Title = "TODO API",
        Description = "Web APIs for managing a TODO list",
        Version = "v1"
    });
});
Unfortunately, a good part of the integration between Swashbuckle and ASP.NET Core Web API relies heavily on XML comments on methods and properties, which do not work well with the minimal API programming model based on delegates. For the time being, we can generate basic documentation about the APIs, which is still helpful but does not get into specific details.
Securing the Web API with Auth0
Now you have a working API allowing you to perform the typical CRUD actions on a TODO list. Let's see how to secure it by integrating it with Auth0.
Create an API in the Auth0 Dashboard
Before adding anything to the code, we need to create an Auth0 API in the Auth0 Dashboard. If you haven't an Auth0 account, you can sign up for a free one. Then, go to the APIs section and click on Create API.
This will open a new window for configuring the API. Set the following fields in that window:
- Name, a friendly name or description for the API. Enter TODO API for this sample.
- Identifier, which is an identifier that the client application uses to request access tokens for the API. Enter the string
https://www.todo.com. This identifier is also known as audience. - Signing Algorithm, leave the default setting, RS256.
After entering those values, click the Create button.
In the configuration page of the newly created API, click the Permissions tab and add a new permission todo:read-write with a description like this: It allows reading and managing items in the TODO list. This is the scope that Auth0 will inject into the access token if the user approves it in the consent screen.
Now, move to the Settings tab and scroll down to the RBAC Settings section. Here, click both the Enable RBAC and the Add Permissions in the Access Token toggle buttons.
Finally, click on the Save button to save the changes. At this point, our API is ready to be used from your ASP.NET Core minimal Web API.
Configuring the .NET Core Middleware
To prove that they are authorized to call your Web API, clients will need to provide a JWT access token issued by Auth0. That requires configuring the ASP.NET Core middleware for JWT authentication.
Open the Package Manager Console for NuGet in Visual Studio and run the following command:
Install-Package Microsoft.AspNetCore.Authentication.JwtBearer
Once the NuGet packages are installed in your project, you can go ahead and configure them in the Program.cs file. Add the following code right after the builder.Services.AddSwaggerGen(); line:
// Program.cs

// ...existing code

builder.Services.AddSwaggerGen();

// 👇 this is the new code
builder.Services.AddAuthentication(JwtBearerDefaults.AuthenticationScheme)
     .AddJwtBearer(JwtBearerDefaults.AuthenticationScheme, c =>
     {
         c.Authority = $"https://{builder.Configuration["Auth0:Domain"]}";
         c.TokenValidationParameters = new Microsoft.IdentityModel.Tokens.TokenValidationParameters
         {
             ValidAudience = builder.Configuration["Auth0:Audience"],
             ValidIssuer = $"{builder.Configuration["Auth0:Domain"]}"
         };
     });
// 👆 this is the new code

// ...existing code
This middleware will intercept any call to your Web API and authenticate any received request by validating its JWT bearer token. If the validation is successful, it will initialize the security principal associated with the current execution context in the HttpContext class.
You will also want to perform authorization checks to ensure the JWT includes the scope required to execute your API. You can configure authorization for our API with the following middleware injected right after the authentication one:
builder.Services.AddAuthorization(o =>
    {
        o.AddPolicy("todo:read-write", p => p.
            RequireAuthenticatedUser().
            RequireClaim("scope", "todo:read-write"));
    });
The policy checks for a claim or attribute called scope with a value todo:read-write, which is the scope you previously configured in the Auth0 Dashboard for your API.
You also need to instruct the Web API to use the configured middleware for authentication and authorization. That's done with the following lines:
// Program.cs

// ...existing code

app.UseSwaggerUI();

// 👇 this is the new code
app.UseAuthentication();
app.UseAuthorization();
// 👆 this is the new code

app.Use(async (ctx, next) =>

// ...existing code
To provide your API with the setting registered in the Auth0 Dashboard, update the existing appSettings.json file by adding an Auth0 section with the Domain and Audience properties, as shown below:
{
  "Logging": {
      "LogLevel": {
      "Default": "Information",
      "Microsoft": "Warning",
      "Microsoft.Hosting.Lifetime": "Information"
      }
    },
  "AllowedHosts": "*",
  "Auth0": {
    "Domain": "<YOUR_DOMAIN>",
    "Audience": "https://www.todo.com"
  }
}
Replace the <YOUR_DOMAIN> placeholder with the value of your Auth0 domain.
Your Auth0 domain is a string in the form
YOUR-TENANT-NAME.auth0.comwhereYOUR-TENANT-NAMEis the name you provided when you created your account with Auth0. For more information, check out the documentation.
Require authorization in the API controller
All the methods for our minimal Web API controller will allow anonymous access by default. We will convert them to require authenticated calls using the RequireAuthorization method during the configuration. That method will also reference the policy we previously defined in the AddAuthorization call. Modify each method as outlined below:
// Program.cs

// ...existing code

app.MapGet("/todo", async (ITodoRepository repo) =>
{
.... // Code hidden for the sake of simplicity
}).RequireAuthorization("todo:read-write");

app.MapGet("/todo/{id}", async (string id, ITodoRepository repo) =>
{
    .... // Code hidden for the sake of simplicity
}).RequireAuthorization("todo:read-write");

app.MapPost("/todo", async (
    HttpRequest req,
    HttpResponse res,
    ITodoRepository repo) =>
{
    .... // Code hidden for the sake of simplicity
}).RequireAuthorization("todo:read-write");

app.MapDelete("/todo/{id}", async (string id, ITodoRepository repo) =>
{
    .... // Code hidden for the sake of simplicity
}).RequireAuthorization("todo:read-write");

app.MapPut("/todo/{id}", async (string id, HttpRequest req, ITodoRepository repo) =>
{
    .... // Code hidden for the sake of simplicity
}).RequireAuthorization("todo:read-write");

// ...existing code
This method will do two things,
- It will activate the authorization middleware to validate the request and initialize the security principal for the current execution context.
- It will run the
todo:read-writepolicy to ensure the security principal is authorized to call that endpoint. In our case, it will check the access token includes a scope calledtodo:read-write.
Once we run this project in Visual Studio, the API will only accept authenticated requests with access tokens coming from Auth0.
Learn web security through a hands-on exploration of some of the most notorious threats.
Download the free ebook
Testing the API
Just for testing purposes, you will use the OAuth Client Credentials flow. That will give us the flexibility of using well-known tools like Curl, Fiddler, or Postman. When you register a new API in the Auth0 Dashboard, a client application for testing the API is automatically created by Auth0 for you. That client application is generated using the following name convention "<Your API name> (Test Application)".
You will leverage that application to use Curl and get an access token for your API.
Go to the TODO API definition in the Auth0 Dashboard, and click on the Machine to Machine Applications tab. Under the list of applications in that tab, look for TODO API (Test Application) and make sure that the Authorized checkbox is enabled. If not, click on the Authorized checkbox to enable it.
Now click on the Test tab. Here you can get a token to test your Web API by clicking the Copy Token icon as shown in the following picture:
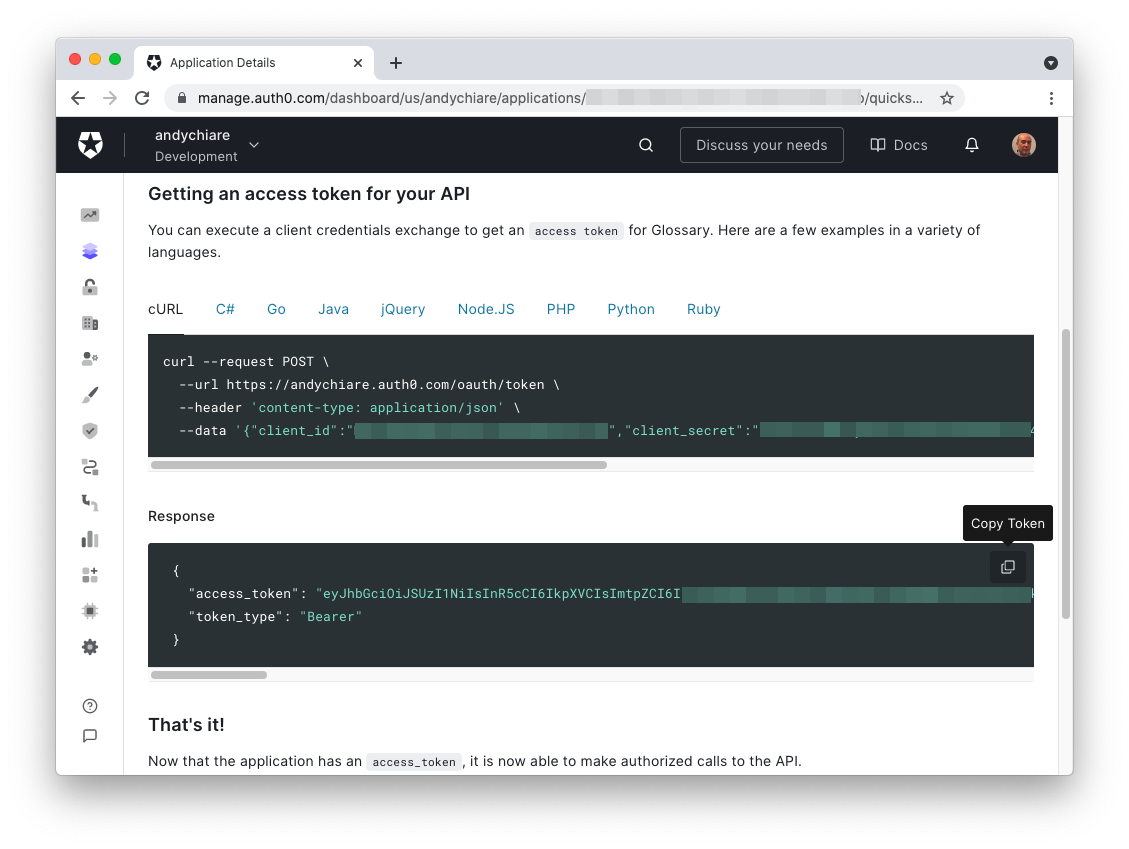
After copying the test access token, you can use it to call your minimal Web API. Run the project in Visual Studio, and use Curl or any other HTTP client tool of your preference to pass the access token in the Authorization header using the Bearer scheme, as in the following example:
curl --request GET \
  --url https://localhost:5001 \
  --header 'Authorization: Bearer <YOUR_ACCESS_TOKEN>
A new Auth0-powered .NET app in less than a minute? Try out our templates
Install the Nugget package
Conclusion
The simplification of the code required for running a new Web API represents a great addition to .NET 6 and a step forward for Microsoft to break the entry barrier for developers jumping from other platforms.
As you learned throughout the article, despite the simplification, you can still leverage the power of classical ASP.NET Core Web APIs to secure your endpoints with Auth0.
You can download the complete code of the sample project from this GitHub repository.
About the author

Pablo Cibraro
Agilesight Cofounder
Pablo is an internationally recognized expert and entrepreneur with more than 22 years of experience in designing and implementing large distributed systems with Microsoft technologies and a Connected System MVP.
For the last few years, Pablo has helped numerous Microsoft teams develop tools and frameworks for building service-oriented and web applications with .NET.
Pablo now focuses on technologies that enable developers to build large-scale systems and web applications on the cloud, such as HTML5, Node.js, ASP.NET, Windows Azure and Amazon AWS.