

TL;DR RxJS is a library that allows us to easily create and manipulate streams of events and data. This makes developing complex but readable asynchronous code much easier.
Creating large asynchronous applications is not the easiest thing to do. We have all witnessed the issues callback hell can cause. Due to this growing concern, people have taken it upon themselves to improve the landscape of the asynchronous JavaScript landscape. We have all heard of promises, generators, and async/await. There is another solution, and it is called RxJS.
From their Github README, RxJS is defined as "a set of libraries for composing asynchronous and event-based programs using observable sequences and fluent query operators". In English, these means we can create streams from events and other sources of data. We can then merge, mash, split, and more with this data. Once we have the data how we want it, we can iterate over the data and do something with it.
This concept of an "observable", or "stream" as I like to call them, can be difficult to grasp at first. Instead of thinking about it as a singular event or piece of data that we use at a single point in time, I think about it as a collection of events or pieces of data over a period of time.
To demonstrate how this all works, we are going to build a simple weather app. There will be a text input that we type a zip code into. Then we click the button to submit it. A request will be sent to get the current temperature at the zip code. Once we get the temperature back, we will display the zip code and the temperature together on page. We will be able to put as many temperatures to watch on the page. Then we will create a timer that will refresh the temperature after a set time period. Let's get to it!
The code for this application can be found on Github.
Update: This article has been updated to RxJS version 5. There are very few changes to the original code. The changes that were made will be highlighted where necessary.
Setting Things Up
First thing we need to do is create a basic HTML page that loads the RxJS library into the document so we can use it. We will also include some CSS that will organize things a bit.
  <!DOCTYPE html>
  <html lang="en">
  <head>
    <meta charset="UTF-8">
    <title>Weather Monitoring in RxJS</title>
    <style>
      #form {
        margin-bottom: 20px;
      }
      .location {
        float: left;
        padding: 10px;
        margin-right: 20px;
        margin-bottom: 20px;
        border: 1px solid #ddd;
        border-radius: 5px;
      }
      .location p {
        margin-top: 10px;
        margin-bottom: 10px;
        text-align: center;
      }
      .zip { font-size: 2em; }
      .temp { font-size: 4em; }
    </style>
  </head>
  <body>
    <div id="app-container">
      <div id="form">
        <label>Zip Code:</label>
        <input type="text" id="zipcode-input">
        <button id="add-location">Add Location</button>
      </div>
    </div>
    <!-- <script src="https://cdnjs.cloudflare.com/ajax/libs/rxjs/4.1.0/rx.all.min.js"></script> -->
    <script src="https://cdnjs.cloudflare.com/ajax/libs/rxjs/5.0.0-beta.12/Rx.min.js"></script>
    <script>
      // our code will go here
      console.log('RxJS included?', !!Rx);
  </script>
  </body>
  </html>
Load this file in your favorite browser, and open up your developer console. You should see RxJS included? true. If you do, then you're ready to start writing some reactive JavaScript! Notice we have a simple "form" consisting of our zip code input and a button. Our first piece of JavaScript will grab those elements and create streams from their events. We will also grab a reference to the app-container that we will add our elements to later.
Update: We have included RxJS version 5 through the CDN instead of the previous version 4.1.
// Grab HTML elements
const appContainer = document.getElementById('app-container');
const zipcodeInput = document.getElementById('zipcode-input');
const addLocationBtn = document.getElementById('add-location');
This is plain ol' JavaScript. Nothing too crazy going on here.
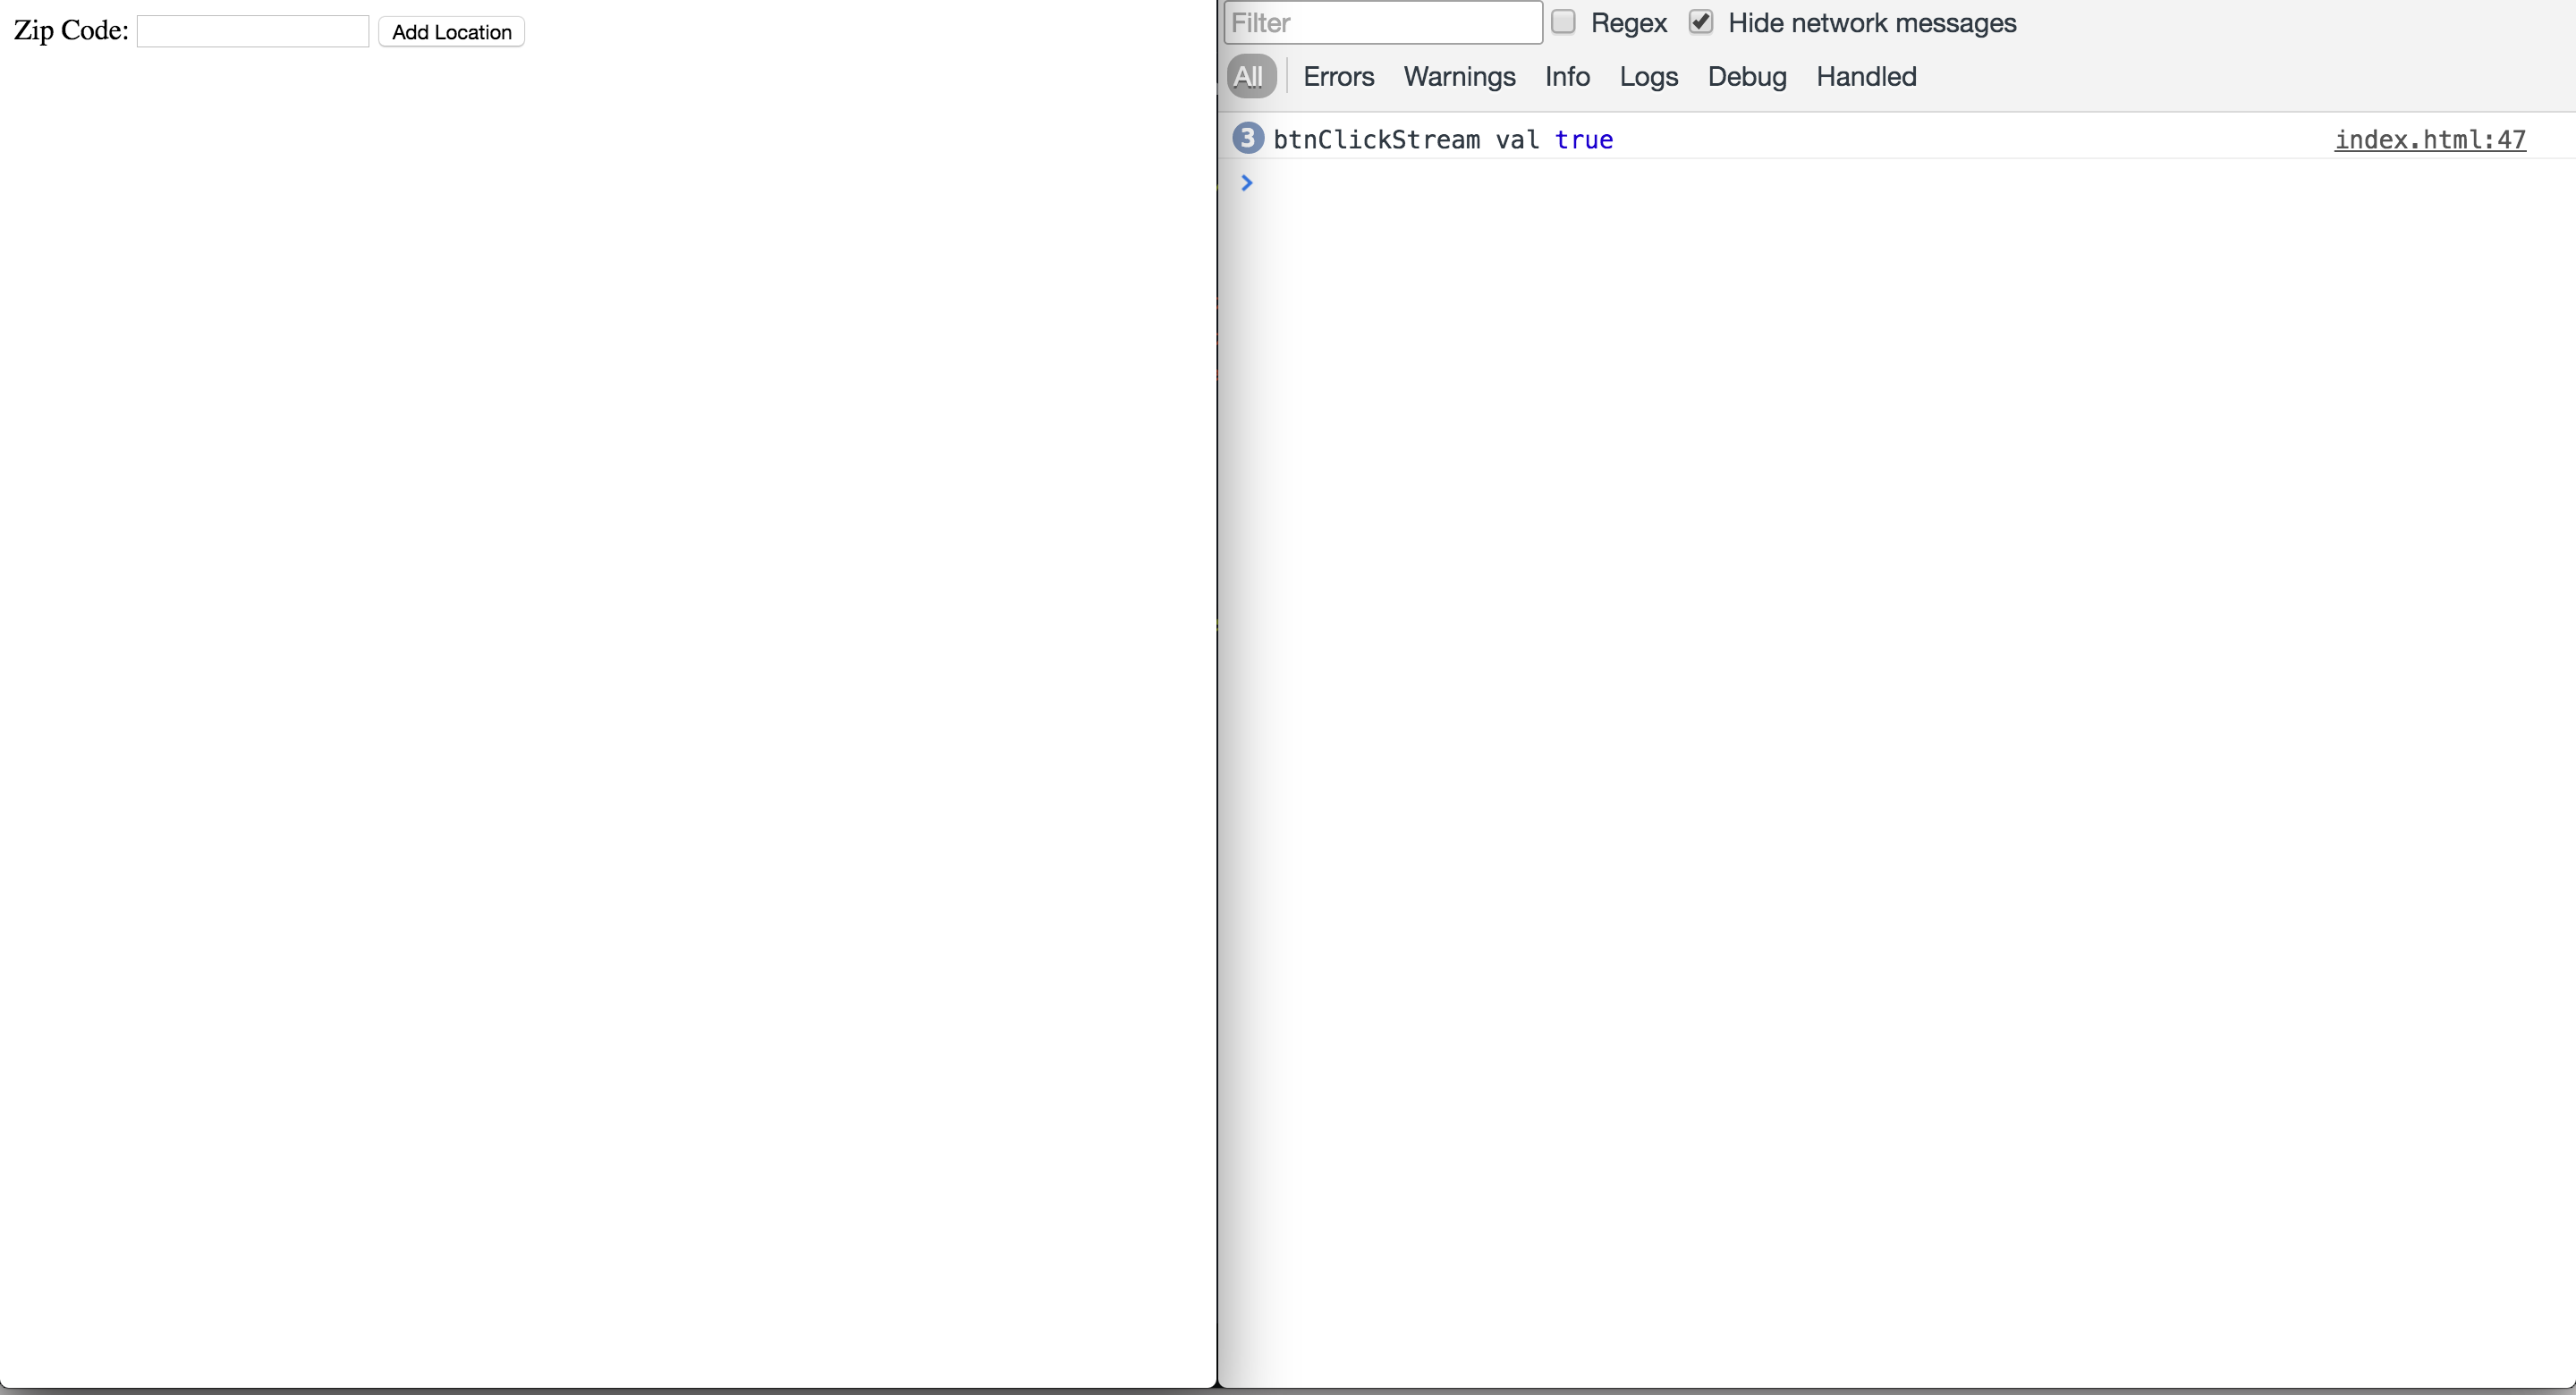
// Get stream of button clicks
const btnClickStream =
  Rx.Observable
    .fromEvent(addLocationBtn, 'click')
    // .map(() => true)
    .mapTo(true)
    .forEach(val => console.log('btnClickStream val', val));
Here is our first look at RxJS! We are using the fromEvent method on the Rx.Observable object to create a stream from the click event that will be emitted by our addLocationBtn. This means, any time it is clicked, that event object will be sent down this btnClickStream. We will use the mapTo method on the returned stream to map each value to the value true. I like to do this to simplify the logic in my mind. Since I only care that an event happened, I mapTo the value to a simple boolean value. This is just the way I like to do things. If it's not your cup of tea, it's an optional step and can be removed in your app. Lastly, to make sure it's working, we use forEach, which adds a subscriber to the stream. Here we are simply logging the value.
Update: The
mapTomethod was added in version 5 and make the code a bit more readable than usingmapwith a function that just returns true. The same thing is accomplished both ways.
Reload the page, click the button a few times, and look at the output in the console. It's working! Go ahead and remove that forEach on the button stream. We won't be needing it. Now let's get our zip codes. We want to listen to any change in the value of the input but only allow values through that are five characters long.
// Get stream of zip codes
const zipInputStream =
  Rx.Observable
    .fromEvent(zipcodeInput, 'input')
    .map(e => e.target.value)
    .filter(zip => zip.length === 5)
    .forEach(val => console.log('zipInputStream val', val));
Here, we are creating a stream from the input event that is emitted from our input element. We are using mapto extract the value of the input from the event. Then we are using filter to remove all values that are not equal to five characters in length. filter takes a condition that, if it returns true, tells the method to put the current value into the stream that is returned. Lastly, we again iterate over each value and log it to the console.
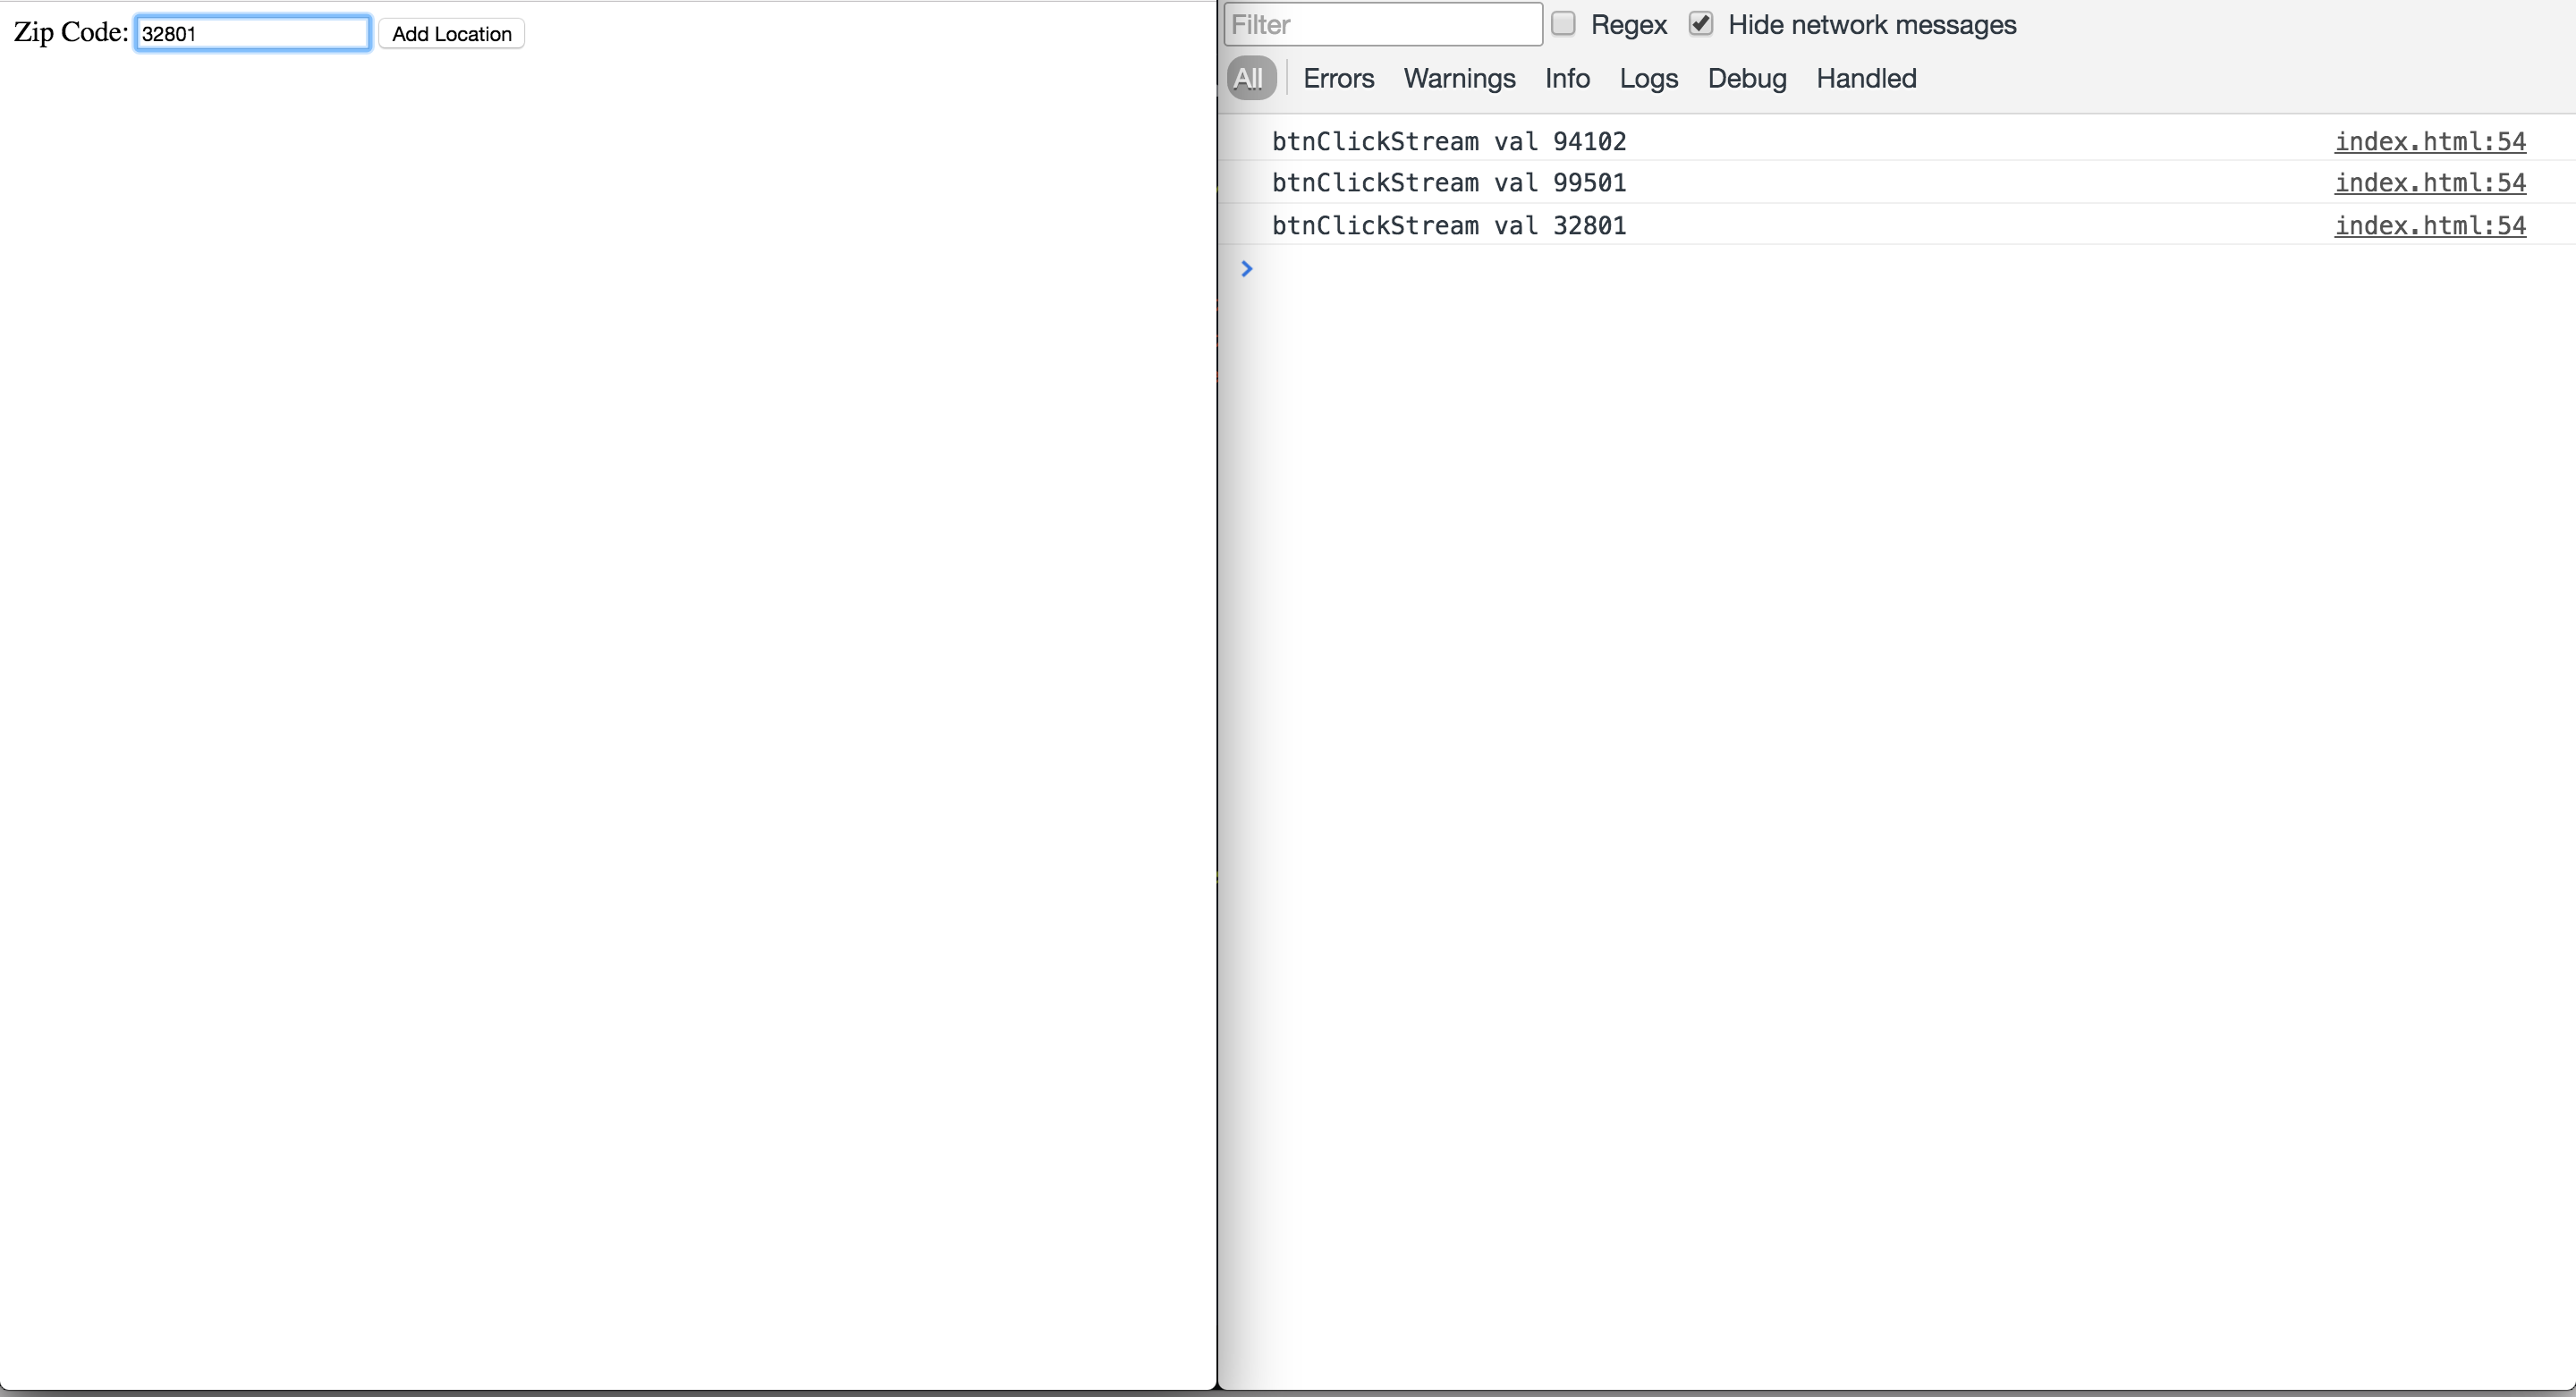
Reload the page, type in some values, and see how only five character values are allowed through. We are on our way. Remove that forEach. Now we need to make sure we pass the current value in the input only when the user clicks the button. Let's create a new stream for that!
// Get zipcode after button clicked
const zipcodeStream =
  btnClickStream
    .withLatestFrom(zipInputStream, (click, zip) => zip)
    .distinct()
    .forEach(val => console.log('zipcodeStream val', val));
Here, we are calling withLatestFrom on the btnClickStream and giving it the zipInputStream. This means that whenever it sees a value on the btnClickStream, it will grab the most recent value from the zipInputStream and pass those two values to the "result selector," which is a function that works like map. Whatever we return from this function is what is sent down the stream that is returned from withLatestFrom. Next, we use the distinct method to make sure that we only get new values. If any are repeated, they will not be sent down the stream that is returned from distinct. And, of course, we use forEach to log out the results to make sure it is all working.
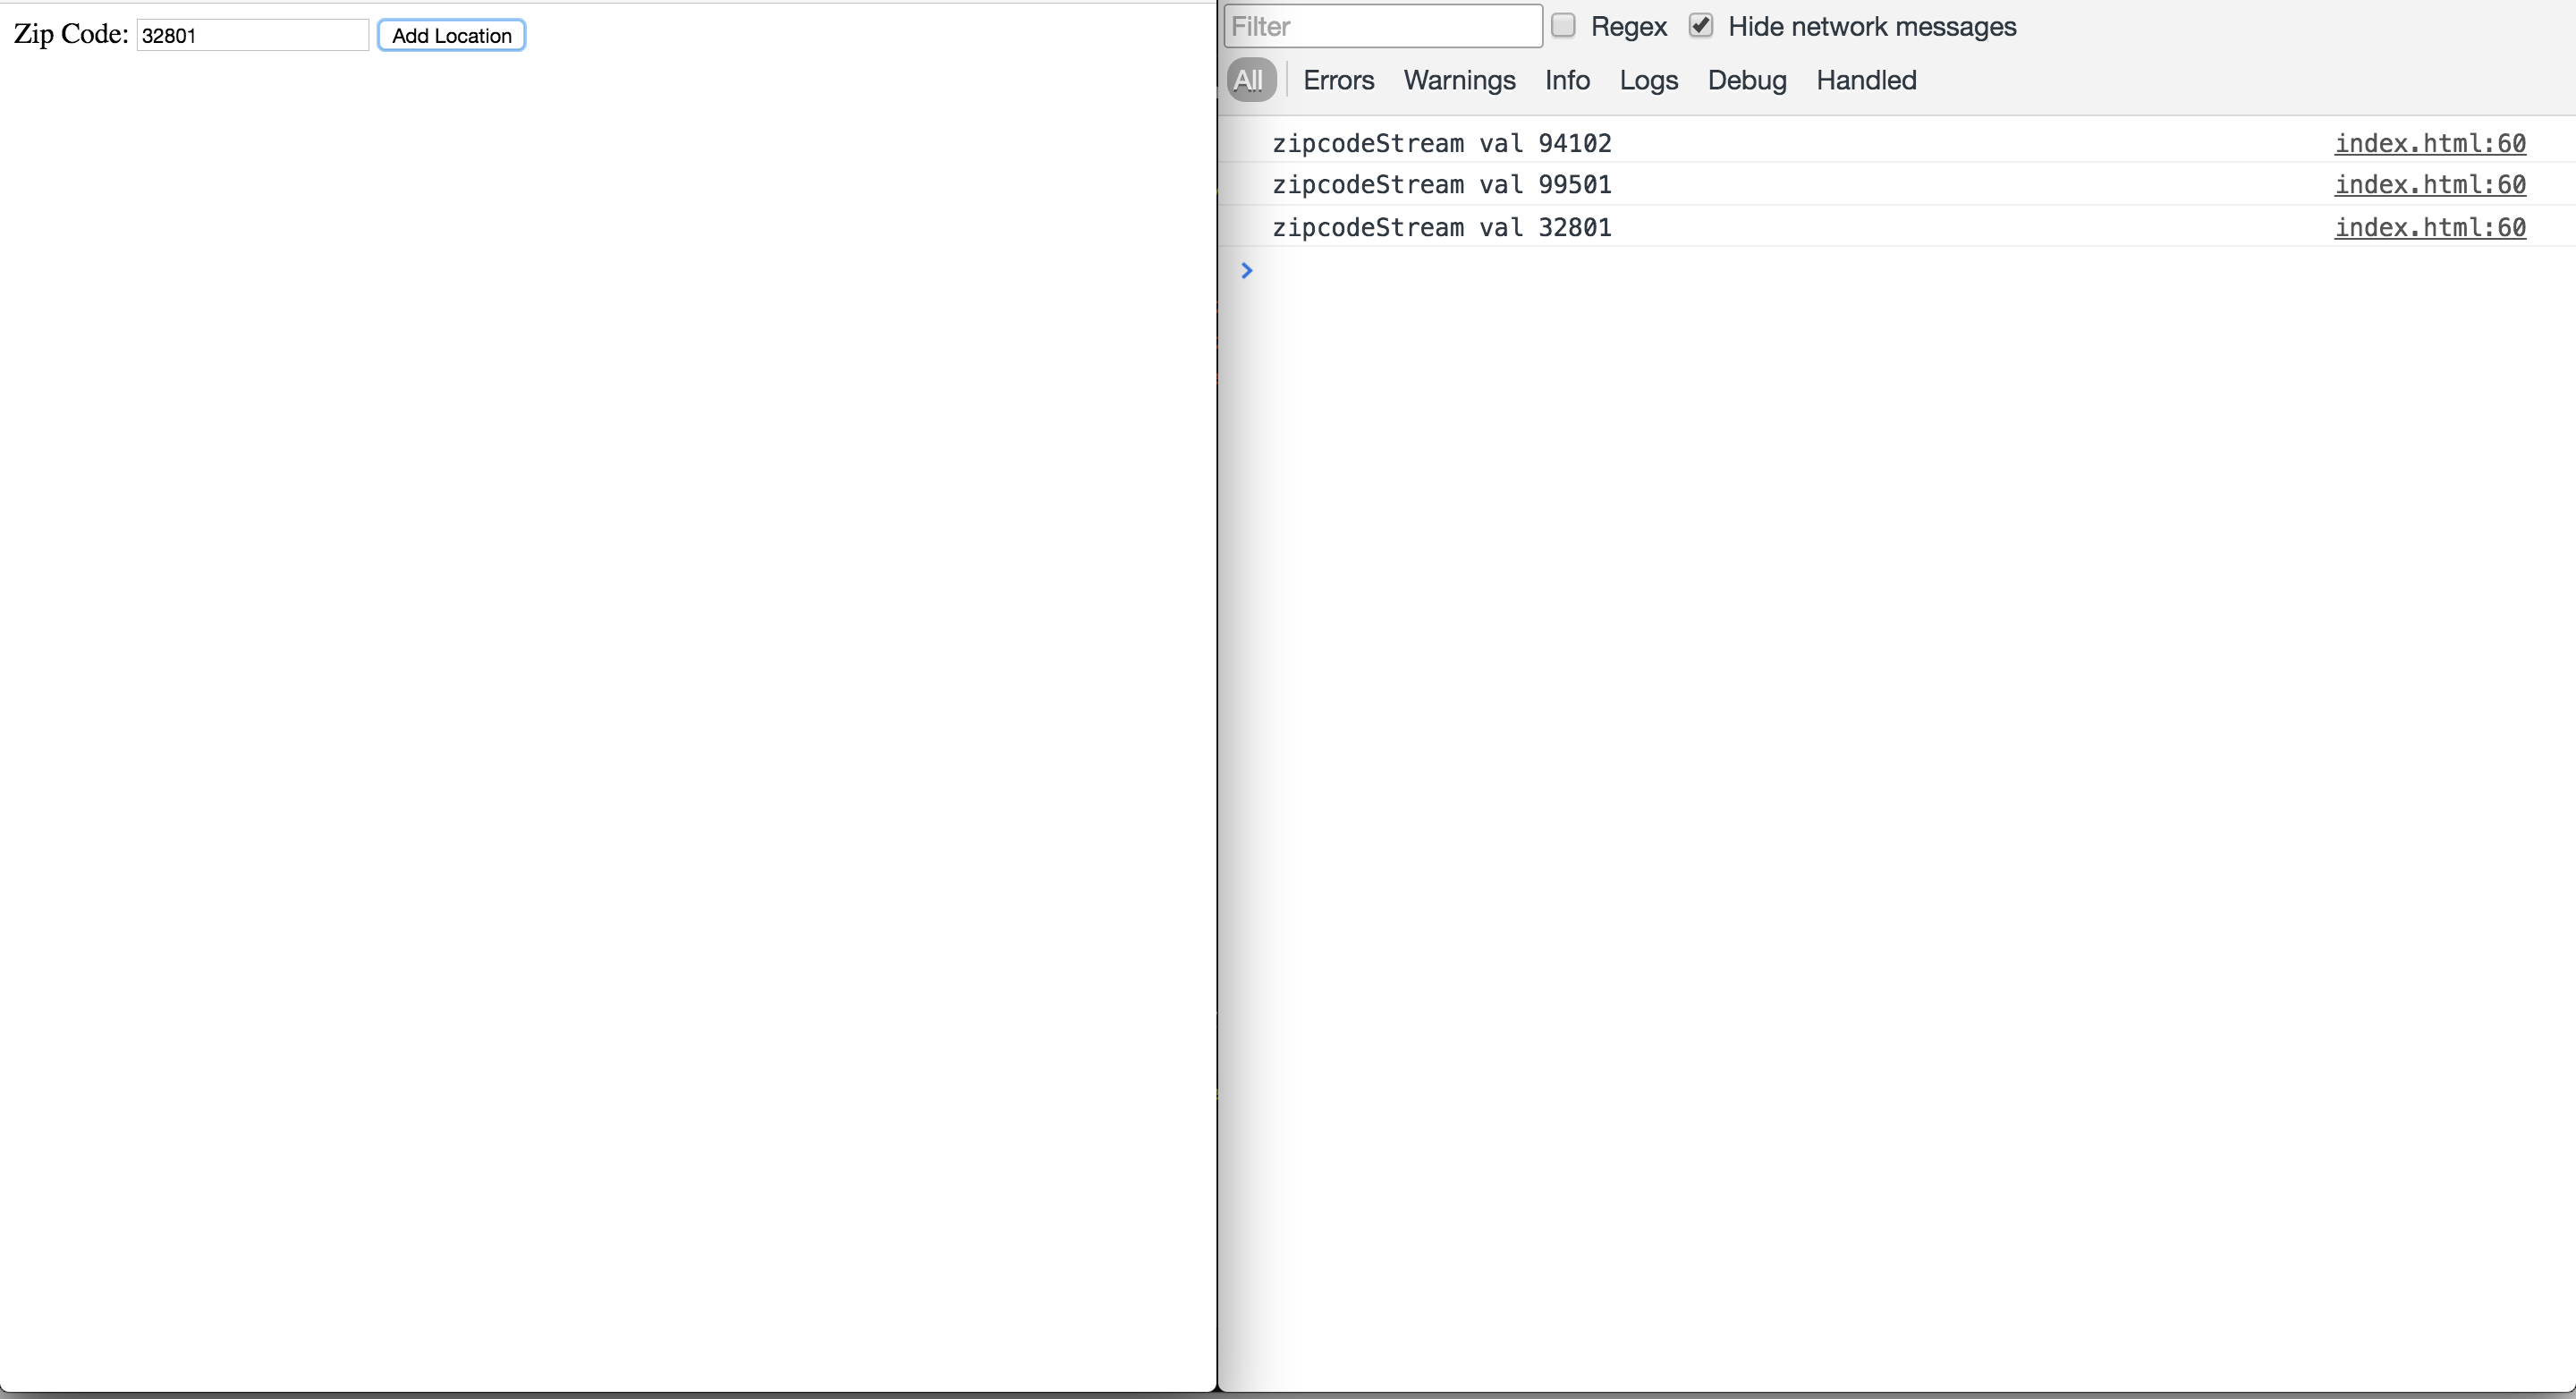
Reload the page, enter a zip code, and click the button. Make sure to watch the dev console so you can see that the zip code is only submitted on that stream once the button is clicked. Now, like usual, remove the forEach call. We need to create a reusable way of making calls to the weather API since we will be using it when a zip code is added and when the timer ticks.
// Create reusable temperature fetching stream
const getTemperature = zip =>
  fetch(`http://api.openweathermap.org/data/2.5/weather?q=${zip},us&units=imperial&APPID=<APPID>`)
    .then(res => res.json());

const zipTemperatureStreamFactory = zip =>
  Rx.Observable
    .fromPromise(getTemperature(zip))
    .map(({ main: { temp } }) => ({ temp, zip }));
We have created two functions. The first one, getTemperature, takes a zip code and makes a request to the weather API to get the temperature. Since fetch returns a promise, we then call then on that promise. This promise receives the response, and we return the JSON form of that response so we can more easily work with it. This means this function returns a promise. This is important. Also, make sure to change <APPID> to the application ID you can get for free from the API keys page in the OpenWeatherMap admin page.
The second function also takes a zip code. We return a stream by using the fromPromise method on the Rx.Observable object to create one from the promise that is returned from calling our getTemperature function and passing it the current zip code. Since this returns a stream, we can operate on it with any of the available methods that Rx.Observable instances have on them. Since we only care about the current zip code and its temperature, let's return an object that only has these pieces of data on them. We map over the promise stream, destructuring the input to get the temperature out, and return an object containing the data we want. For more information on the new destructuring syntax in the ES2015 version of JavaScript, visit the MDN documentation.
Now that we have our functions that will get the data from the weather API, let's finally add our elements to the page.
// Get new zip at each button click, get its
// temperature, and paint it to the screen
zipcodeStream
  .flatMap(zipTemperatureStreamFactory)
  .forEach(({ zip, temp }) => {
    const locationEle = document.createElement('div');
    locationEle.id = `zip-${zip}`;
    locationEle.classList.add('location');

    const zipEle = document.createElement('p');
    zipEle.classList.add('zip');
    zipEle.innerText = zip;

    const tempEle = document.createElement('p');
    tempEle.classList.add('temp');
    tempEle.innerHTML = `${temp}°F`;

    locationEle.appendChild(zipEle);
    locationEle.appendChild(tempEle);
    appContainer.appendChild(locationEle);

    zipcodeInput.value = '';
  });
We take the stream of zip codes and call flatMap on it. flatMap works just like regular map except it takes a stream of streams, pulls the value out of each stream, and makes it available in the stream returned from the method. This means it will flatten out the streams created by our request to the weather API and give us the values from those streams to act on, namely, the objects of zip codes and temperatures.
The last part uses our trusty forEach to get each piece of data and add it to the page. Everything in the callback is vanilla JavaScript. We construct the elements and add them to the page. Then we empty out the value of the zipcodeInput.
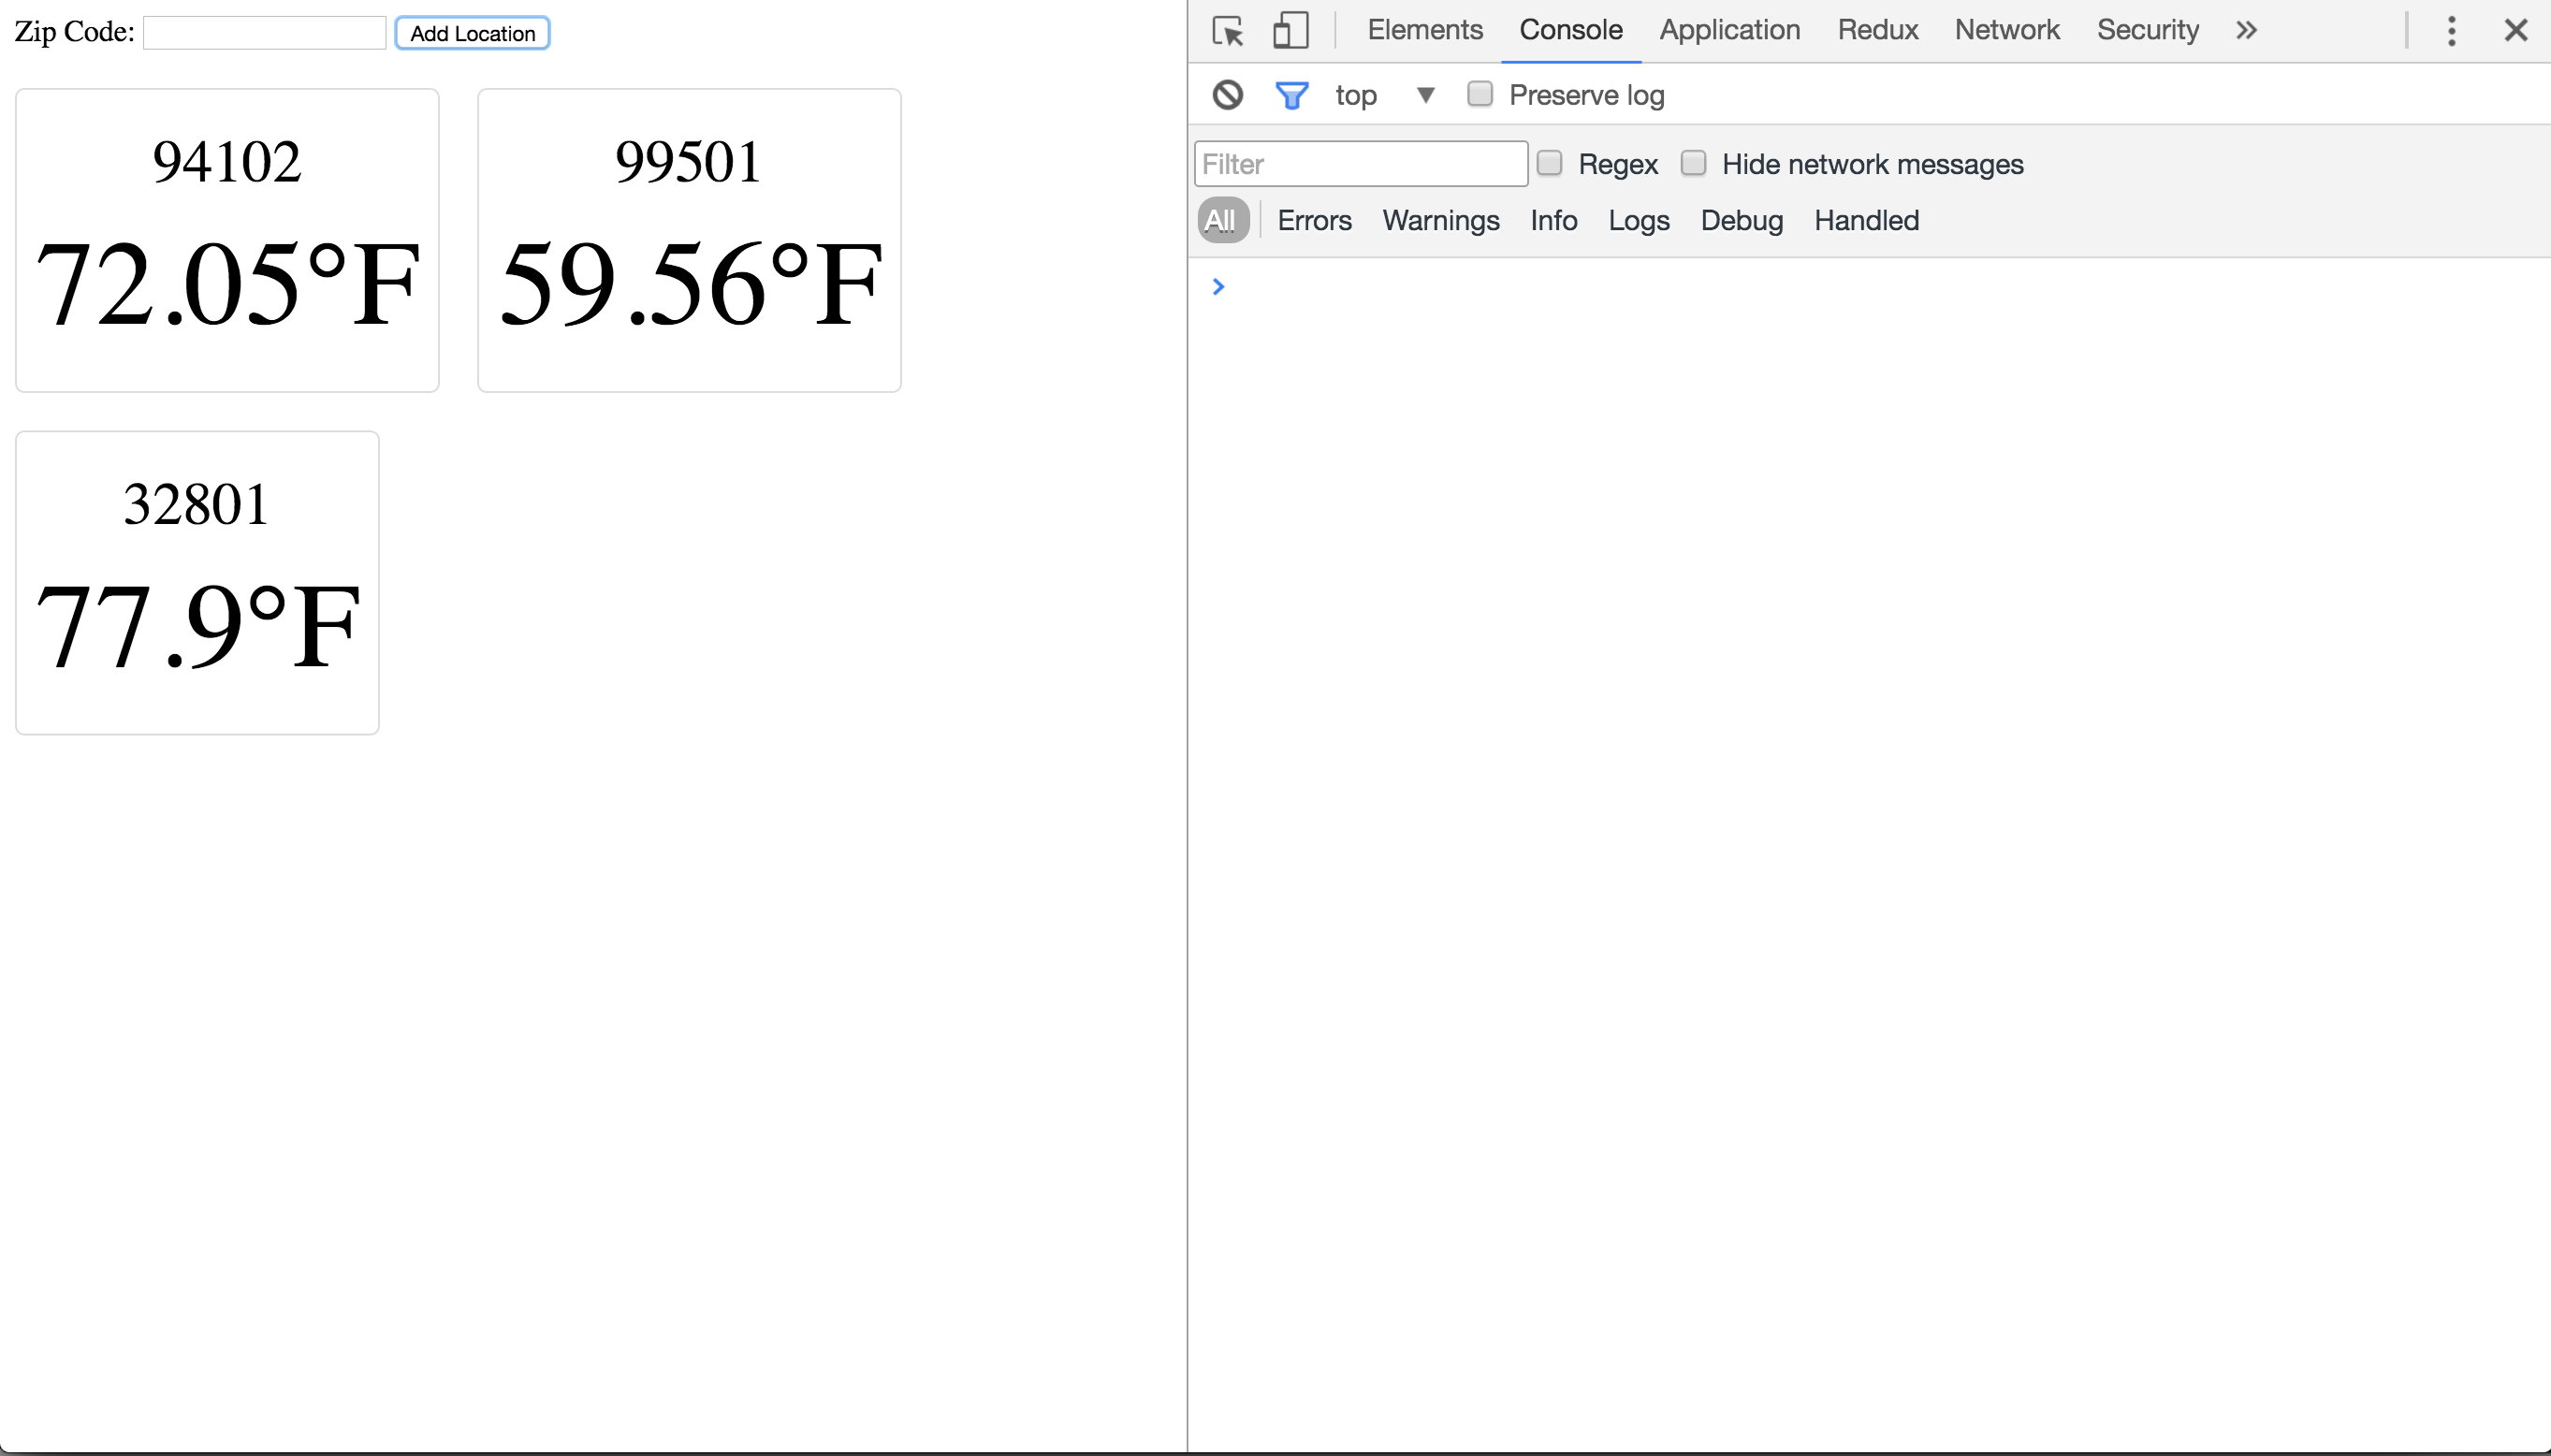
Reload the page in the browser, and submit a couple zip codes. You will see new elements added to the page that have the zip code and temperature in it. Sick!
Now that we have the temperatures showing on the page, we need to make sure they are updated. We can create a stream that will output a value at an interval that we specify. However, we need to make sure we can get all the zip codes that have been entered so far. To do this, we can use a ReplaySubject. A ReplaySubject can subscribe to a stream and will remember all the values that come down that stream. Then it can replay them whenever we want.
// Create stream that can replay all zips at will
const replayZipsStream = new Rx.ReplaySubject();
zipcodeStream.subscribe(replayZipsStream);
Here we are creating a new ReplaySubject and then subscribing it to our zipcodeStream. This means our ReplaySubject will remember all the zip codes that we enter. Let's use it!
// Create a timer to refresh the data
// and update the page
Rx.Observable
  .interval(20000)
  // .flatMapLatest(() => replayZipsStream)
  .switchMap(() => replayZipsStream)
  .flatMap(zipTemperatureStreamFactory)
  .forEach(({ zip, temp }) => {
    console.log('Updating!', zip, temp);

    const locationEle = document.getElementById(`zip-${zip}`);
    const tempEle = locationEle.querySelector('.temp');

    tempEle.innerHTML = `${temp}°F`;
  });
The first thing we do is create a stream that will output a value at a specified interval. The value is nothing we care about. We just want to act when we see that value. We then use a new method, switchMap, to flatten the stream we get from the callback function, which is just our ReplaySubject. The reason we use switchMap instead of flatMap is because we want to make sure that our replayZipsStream only has one subscriber on it. If we used flatMap, we would be adding multiple subscribers to the same ReplaySubject, which would cause us to send out a bunch of extra requests to the weather API. After all this, we will have a stream of zip codes like we did when adding a zip code to the page. So we can operate on it the same way. We use flatMap and pass it our factory function that will make a request to the weather API. Lastly, we iterate over each one we get back and update the data on that page.
Update: The
flatMapLatestmethod was changed toswitchMapin version 5.
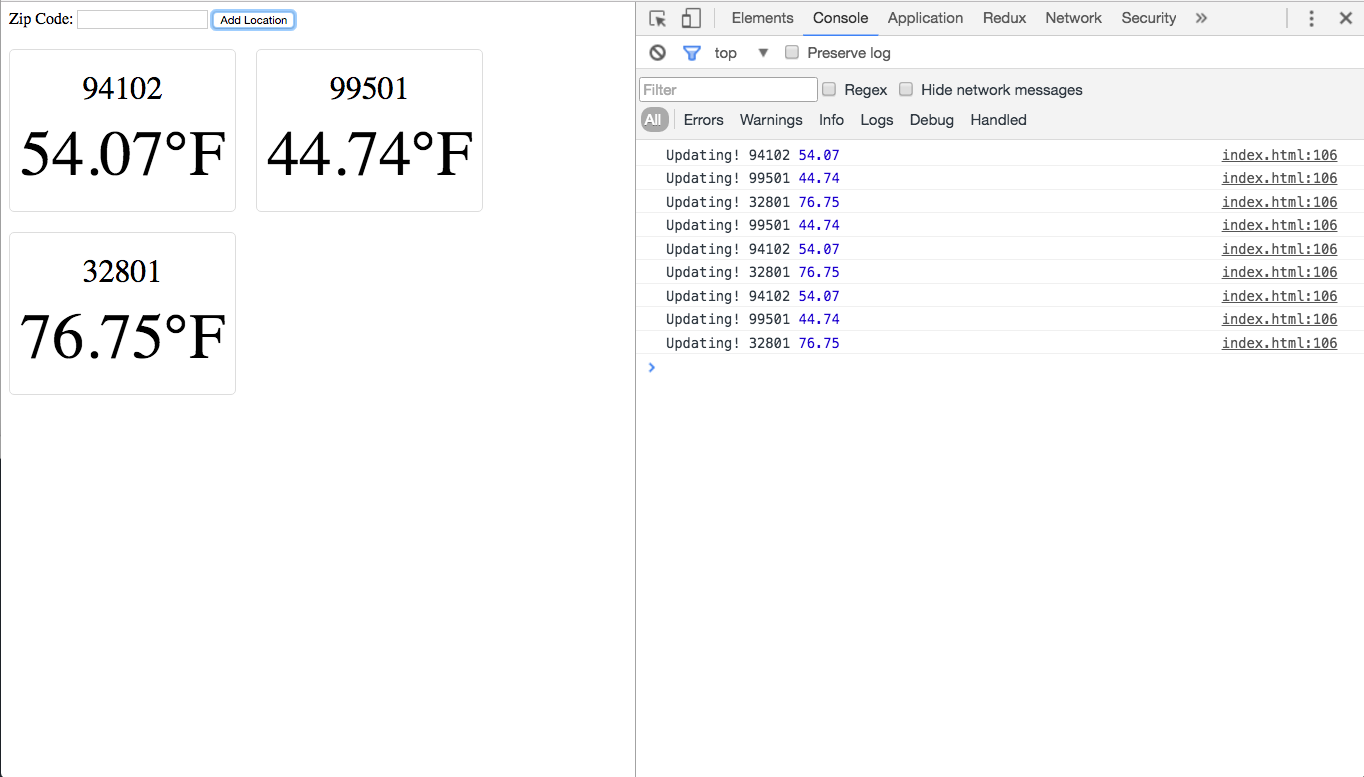
Reload the page one last time, and add a few zip codes. You will see them added to the page, like normal. If you wait 20 seconds, you will see our message in the console that tells us things have been updated. Depending on how much the temperature has changed in those 20 seconds, you may not see anything change on page. If you want the iterval to run more or less often, you can change the number that we gave Rx.Observable.interval to suit your needs.
Aside: Authentication With Auth0
Now, say you're using streams like a boss. You decide you want to use Auth0 for your application's authentication solution.
How would we implement it? Well, it's super simple. Most of the work is handled by the library. We just need to make sure the centralized login page is launched on a button click. Let's do it!
Sign Up for Auth0
You'll need an Auth0 account to manage authentication. You can sign up for a free account here. Next, set up an Auth0 Client so Auth0 can interface with your site.
Set Up a Client
- Go to your Auth0 Dashboard and click the "create a new client" button.
- Name your new app, select "Single Page Web Applications", and click the "Create" button.
- In the Settings for your new Auth0 client app, add
http://localhost:8080(or whatever URL you'll be using for your webserver) to the Allowed Callback URLs. - Scroll down to the bottom of the Settings section and click "Show Advanced Settings". Choose the OAuth tab and verify that the JsonWebToken Signature Algorithm is set to
RS256. - Click the "Save Changes" button.
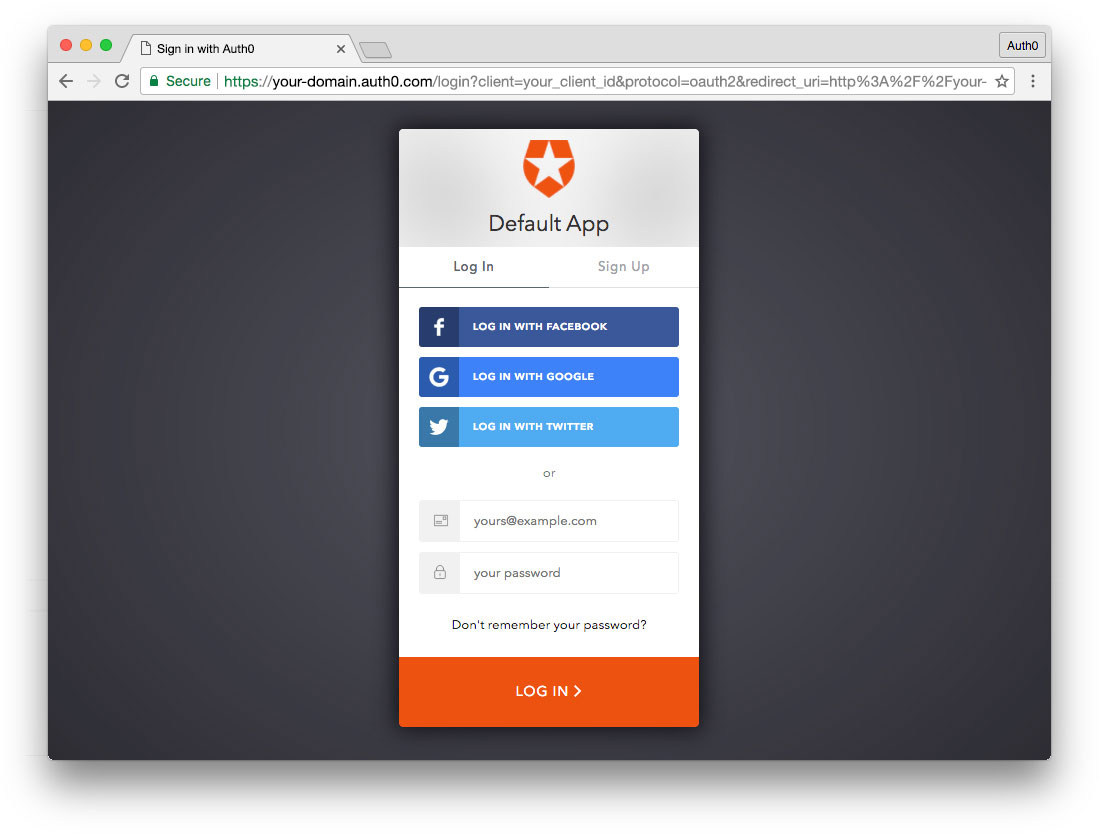
- If you'd like, you can set up some social connections. You can then enable them for your app in the Client options under the Connections tab. The example shown in the screenshot above utilizes username/password database, Facebook, Google, and Twitter.
Implement Auth0
First, we need to include the auth0.js library, initialize a WebAuth instance, and add a login button that will launch the page.
...
<head>
  ...
  <script src="https://cdnjs.cloudflare.com/ajax/libs/rxjs/5.5.2/Rx.min.js"></script>
  <script src="https://cdn.auth0.com/js/auth0/9.0.0/auth0.min.js"></script>
  <script>
    const webAuth = new auth0.WebAuth({
      domain: '[YOUR_AUTH0_DOMAIN]', // e.g., you.auth0.com
      clientID: '[YOUR_AUTH0_CLIENT_ID]',
      scope: 'openid profile email',
      responseType: 'token id_token',
      redirectUri: 'http://localhost:8080' // your webserver URL
    });

    webAuth.parseHash({ hash: window.location.hash }, (err, authResult) => {
      if (err) {
        return console.error(err);
      }
      if (authResult) {
        webAuth.client.userInfo(authResult.accessToken, (err, user) => {
          localStorage.setItem('profile', JSON.stringify(user));
          localStorage.setItem('access_token', authResult.accessToken);
          localStorage.setItem('id_token', authResult.idToken);
          localStorage.setItem('expiration', authResult.expiresIn * 1000 + Date.now());
        });
      }
      window.location.hash = '';
    });
  </script>
</head>
<body>
  <button id="login">Log In</button>
  ...
The only thing left is to turn the click events from the button into a stream, and launch the centralized login page whenever we see a piece of data on that stream. Execute the following code after the document is ready (before the closing </body> tag):
const source = Rx.Observable
  .fromEvent(document.getElementById('login'), 'click')
  .subscribe(() => webAuth.authorize());
That's it! You now have access to the user's profile, ID token, access token, and token expiration. You can use this information to protect and personalize your site, authorize API requests, and more.
Note: If you want to use Auth0 authentication to authorize API requests, always use the access token to do so. You can read more about making API calls with Auth0 here.
Gotta Stream Them All
Thinking in terms of observables or streams may be a little strange at first. The way I think about it is as a collection of events over time instead of as a singular event. Once this clicks, thinking of all events from the DOM as streams will be a piece of cake. RxJS allows you to easily create and interact with these streams of events. It can be a powerful way to keep the logic of your application and the code itself much cleaner than when using other frameworks or libraries. As always, reach out in the comments, and let us know how you're liking RxJS!