


Sooner or later, your application will need to present the user with an important announcement immediately after logging in. It could be about:
- Upcoming maintenance, during which time the application will be unavailable
- Changes to the application that will affect its functionality or the user experience
- Notifications about the user’s account, such as an approaching expiry date or that they are running out of storage space allotted to their account
- Every system administrator’s worst nightmare: an outage
The announcement is important enough to interrupt the usual Login flow with a separate page or screen that requires the user to activate a button, link, or other user interface control before proceeding to the application.
While you can predict some of these announcements (e.g., informing the user that their account is about to expire or is running out of storage space or some other resource), many situations that need these announcements will arise with little or no warning. This includes things that are hard to predict, such as unscheduled downtime.
When surprises like these appear, you shouldn’t make changes to your application just to display an announcement. This is especially true if your application has different versions for different platforms, requiring you to make changes in multiple codebases.
These situations need a way to insert a step into the login process to present the announcement to the user. That’s where Actions can help.
Look for the 🛠 emoji if you’d like to skim through the content while focusing on the build and execution steps.
Introducing Actions
Actions are Node.js functions that execute when triggered by specific events. They allow you to extend Auth0 beyond what it can do “out of the box” by adding logic to login, user registration, password changes, and other events during authentication and other identity-related processes.
Instead of coding Actions into your application, you write and store them in the Auth0 dashboard, where they are part of your tenant’s settings. Like Auth0’s Universal Login web page and authentication and authorization services, Actions are run by Auth0’s servers.
You write Actions to insert them into flows, which are processes that happen when using Auth0. The flows that currently support Actions are:
- Login: Takes Actions that execute immediately after the user has logged in and before the ID token is issued.
- Machine to Machine: Takes Actions that execute during a machine-to-machine credentials exchange, just after the ID token is requested and before it is issued.
- Pre User Registration: Takes Actions that execute immediately after a user has provided the information to register for a database or passwordless connection and before that connection is registered with Auth0.
- Post User Registration: Takes Actions that execute immediately after a user’s database or passwordless connection is registered with Auth0.
- Post Change Password: Takes Actions that execute immediately after the user changes their password.
- Send Phone Message: Takes Actions that execute immediately after a third-party multi-factor authentication provider is asked to send an authentication message to the user and before the message is sent.
This tutorial covers showing an announcement immediately after login, which involves writing Actions for the Login flow.
Prerequisites
You’ll need the following for this tutorial’s exercises:
- Auth0 account: Actions are an Auth0 feature, which means you need an Auth0 account to use them. You can sign up for free, and the process is pretty painless.
- Any application that uses your Auth0 tenant to provide Universal Login. Any web-based, mobile, or desktop application will do, just as long as it is one of your tenant’s applications. You’ll need it to log in and see how defining Actions changes how login works. If you don’t have any applications that use Auth0 for authentication, you can download one from the Auth0 Quickstarts page.
- Your favorite web application development environment. You’ll need to write a small web application that accepts a query parameter and embeds it in a link. I’ll provide implementations in Express and Flask, but feel free to write the web application using your favorite framework or language.
Your First Action: A Rickroll!
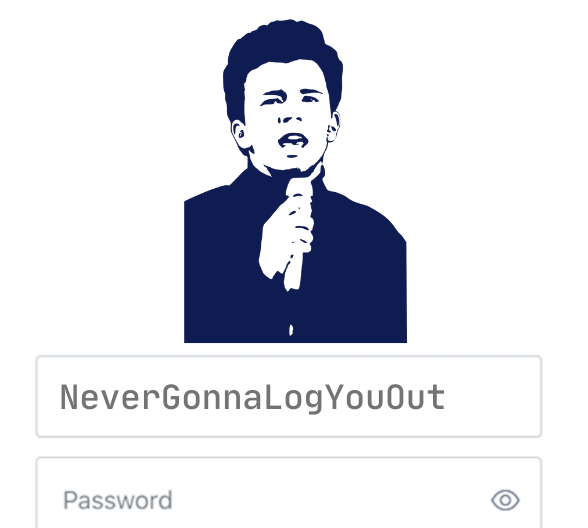
Let’s start with something fun: writing an Action that sends the user to the video for Rick Astley’s 1987 hit Never Gonna Give You Up after they log in.
In case you’re not familiar with the Internet prank known as “Rickrolling”, here’s Wikipedia’s page on the topic.
The Login flow
🛠 Log into the Auth0 dashboard, select Actions from the menu on the left side of the page, then select Flows. You’ll be on the Choose Flow page, which lists the Auth0 flows that you can modify with one or more Actions:
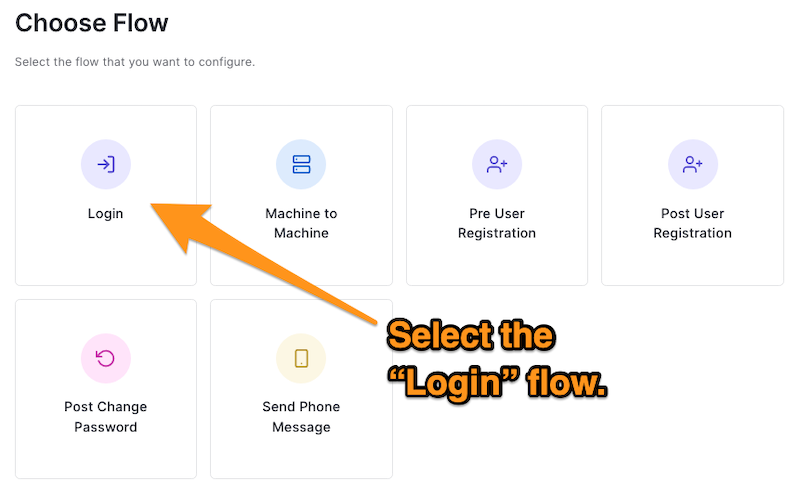
We want to change what happens after the user logs in, which we can do by modifying the Login flow.
🛠 Select the Login flow, which will take you to the Login flow page:
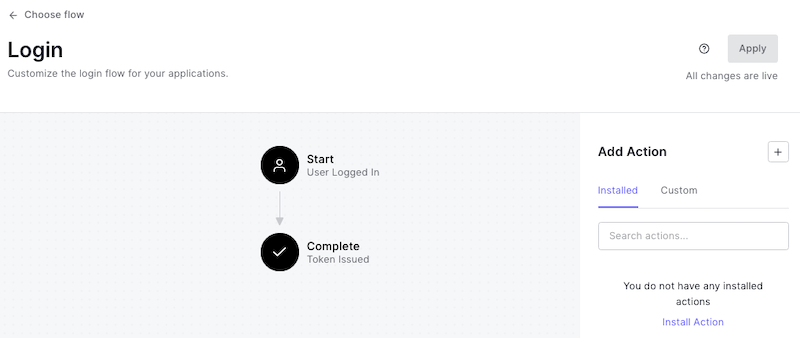
The diagram in the center of the page shows the default Login flow’s two states:
- Start: The user has just provided valid credentials.
- Complete: The system issues an ID token to the user.
You add Actions between these states to add additional steps to the Login flow by dragging them from the Add Action panel on the right side of the page.
The Add Action panel has two tabs:
- Installed: These are Actions that you have selected from the Auth0 Marketplace, where Auth0 partners provide you with Actions that integrate with their services to add extra functionality to your flows. These Actions do things such as presenting terms and conditions to the user, requesting and collecting additional authentication credentials, sending SMS messages, and more. We won’t be using any of them in this tutorial’s exercises, but you’ll want to explore them later.
- Custom: You write these Actions in the Auth0 dashboard. The dashboard’s code editor checks your syntax and versions your functions' code so that you can always revert to a previous version if needed. You’ll write custom Actions in this tutorial’s exercises.
Define “Rickroll,” your first custom Action
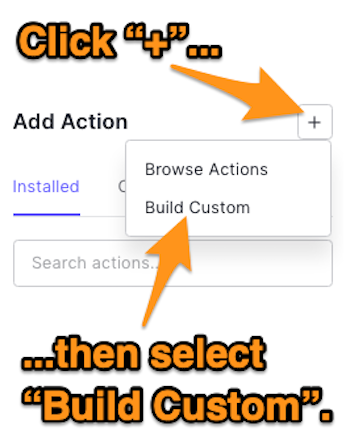
🛠 Click the + button to the right of the Add Action heading of the Add Action panel on the right side of the page. Select Build Custom from the menu that appears:
🛠 The Create Action dialog box will appear. Enter a name for the Action (I used “Rickroll”) and make sure that Login / Post Login is selected under Trigger and that Node 16 is selected under Runtime:
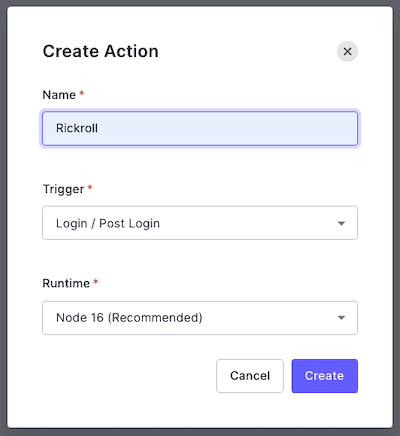
🛠 Click the Create button. You’ll be taken to the editor page for your newly created Rickroll Action:
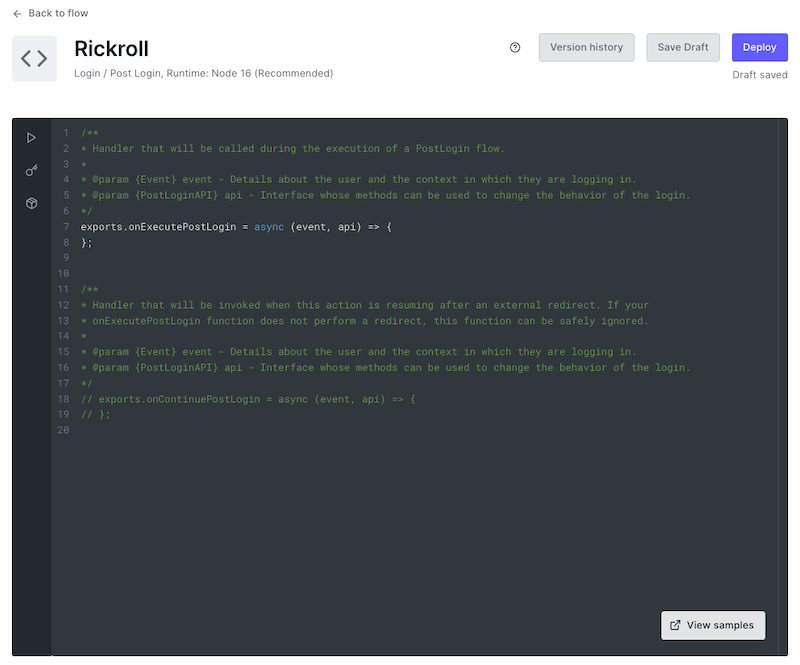
Look at the contents of the editor. You’ll see that there are two JavaScript arrow functions:
onExecutePostLogin: Defines what should happen immediately after the user provides login credentials that Auth0 recognizes. This function takes two parameters, which provide access to Auth0 objects:event: Contains details about the user and the context in which they are logging in.api: Contains methods that can change the login’s behavior.
onContinuePostLogin: Defines what should happen when control returns to the Login Action after a redirect to another web page. It’s used only when the user returns after being redirected, which is why it’s commented out by default. We’ll take a closer look at this function in the next exercise.
🛠 Update onExecutePostLogin to the following:
exports.onExecutePostLogin = async (event, api) => {
  api.redirect.sendUserTo('https://www.youtube.com/watch?v=dQw4w9WgXcQ')
};
You’ve just added a single line of code to onExecutePostLogin. That line uses onExecutePostLogin’s api argument to access its redirect property, an object that contains redirection methods. We’re using redirect’s sendUserTo() method to redirect the user to one of the most popular YouTube pages of all time.
🛠 Click the Deploy button to save your changes.
You’ve just defined your first custom Action. It’s time to insert it into the Login flow.
Add the Action to the Login flow
🛠 Click the Back to flow link near the upper left corner of the page to return to the Login flow page.
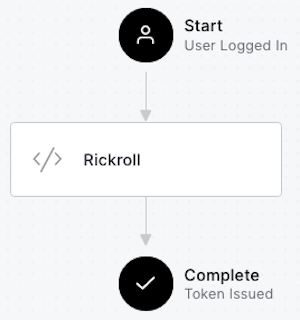
🛠 In the Add Action panel, click the Custom tab to reveal your collection of custom Actions. Drag the Rickroll Action to the flow diagram in the center of the page and drop it on the area labeled Drop here:

The flow diagram should now look like this:
🛠 Click the Apply button at the upper right corner of the page to apply the new Login flow you just defined.
Test the Action and get Rickrolled
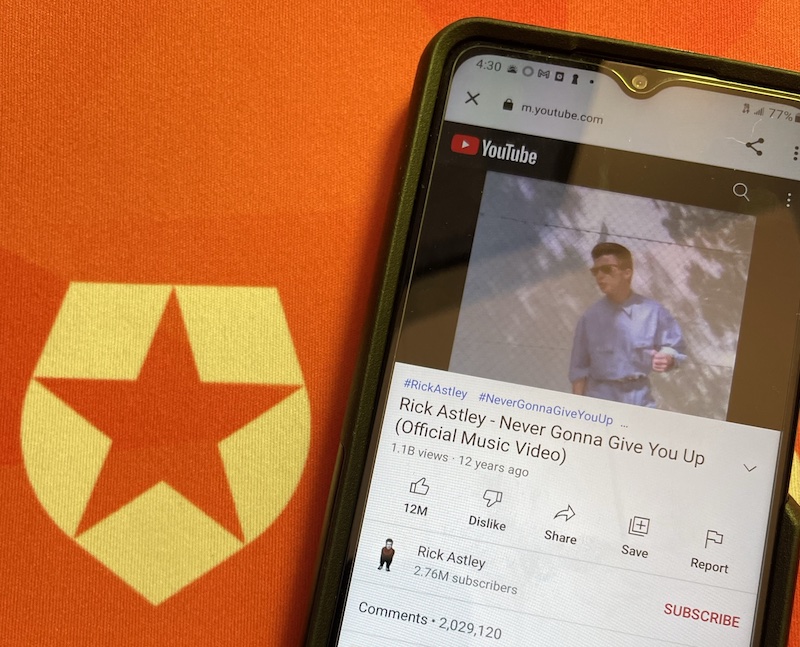
🛠 And now comes the fun part: log into any of your tenant’s applications that use Universal Login and see what happens!
You could also use the Try your Login box option in the Auth0 dashboard’s Getting Started page (select Getting Started in the left-side menu, then click Try it out in the Try your Login box section).
Instead of going to the screen that your application shows immediately after login, you’ll see a video so beloved it has over a billion views. This will happen as long as the application uses Universal Login, whether it’s a web application, desktop application, or even a mobile app:
Redirecting to a Page and Back to the Application
The Rickroll Action, while not terribly useful, demonstrates that you can change the default Login flow to redirect the user to a web page after they log in.
It’s one of the few cases when you’d want to send the user to another page after logging in without returning to the application. The more likely scenario is where you send users to an intermediate page after login, then bring them back to the application once they’ve finished with the page.
The /continue endpoint
After you send the user to another web page after they log in, how do you bring them back to the application?
Fortunately, there’s an endpoint that redirects the user back to the Login flow, issues them an ID token, and returns them to the application. It’s called the /continue endpoint and it takes this form:
https://{YOUR TENANT DOMAIN}/continue?state={STATE}The two values you need to replace are:
{YOUR TENANT DOMAIN}: The domain of your tenant, which you can find in the Auth0 dashboard.{STATE}: The value in a query parameter namedstatethat Auth0 includes in the URL when an Action redirects the user to another web page. This value is proof that an Action redirected you and prevents unauthorized parties from using the/continueendpoint to access the application.
The announcement page will have a link that uses this endpoint. Once the user has finished reading the announcement, they’ll follow the link and return to the application.
Create an announcement page
Let’s create a web application that outputs an announcement page containing a link to the /continue endpoint. Once we do this, we can create a new login Action that redirects the user to this web application.
If you want to use Express or Flask to make the application, you can use the scripts below. If you use another web application framework, you can use the scripts below as examples to follow.
Here’s the Express version of this web application...
var express = require('express');
var app = express();

app.get('/', function(req, res){
    // Retrieve the value for the `state` parameter
    const state = req.query.state;

    // Don’t forget to fill in {YOUR TENANT DOMAIN}!
    const continueUrl = `https://{YOUR TENANT DOMAIN}/continue?state=${state}`;

    pageContent = `
<!doctype html>
<html lang=en>
<head>
    <meta charset=utf-8>
    <title>Special Announcement</title>
</head>
<body>
    <h1>Special Announcement</h1>
    <p>Here’s some material that you should read before using the app...</p>
    <p><a href="${continueUrl}">Continue to the app</a></p>
</body>
</html>
`;
    res.send(pageContent);
});
...and here’s the Flask version:
from flask import Flask, request

app = Flask(__name__)

@app.route('/')
def index():
    # Retrieve the value for the `state` parameter
    state = request.args.get('state')

    # Don’t forget to fill in {YOUR TENANT DOMAIN}!
    continue_url = f'https://{YOUR TENANT DOMAIN}/continue?state={state}'

    page_content = f"""
<!doctype html>
<html lang=en>
<head>
    <meta charset=utf-8>
    <title>Special Announcement</title>
</head>
<body>
    <h1>Special Announcement</h1>
    <p>Here’s some material that you should read before using the app...</p>
    <p><a href="{continue_url}">Continue to the app</a></p>
</body>
</html>
    """
    return page_content

if __name__ == '__main__':
    app.run()
Remove Rickroll from the Login flow
Before we create a new Action to redirect the user to the announcement page, we need to remove the Rickroll Action first.
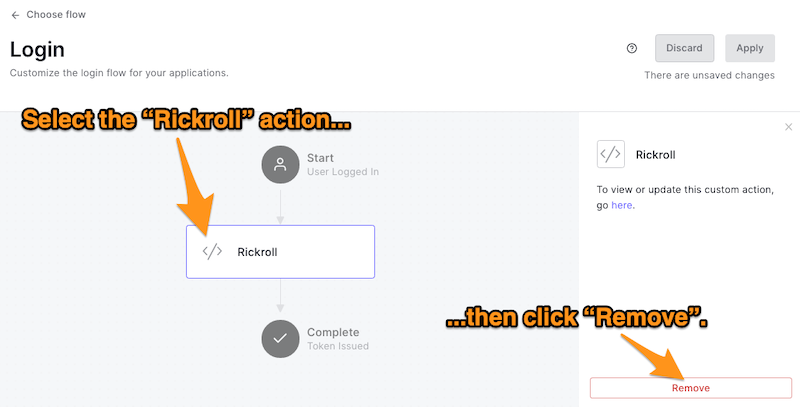
🛠 In the Auth0 dashboard, return to the Flows page (select Actions → Flows from the left-side menu), then select Login. This will take you to the Login flow page, which will show that the Rickroll Action is currently part of the Login flow:
🛠 To remove the Rickroll Action, select it in the Login flow diagram. The panel on the right side of the page will update to display controls for the selected Action. Click the Remove button at the bottom of the panel:
The Login flow will return to its original state:
Define a new custom Action: Announcement
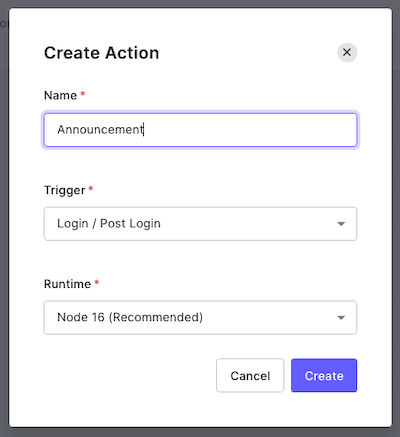
🛠 Let’s create the new Action. Once again, click the + button to the right of the Add Action heading of the Add Action panel on the right side of the page. Select Build Custom from the menu that appears:
🛠 You’ll see the Create Action dialog box again. Enter a name for the Action (I used “Announcement”) and make sure that Login / Post Login is selected under Trigger and that Node 16 is selected under Runtime:
🛠 Click the Create button. You’ll be taken to the editor page for your newly created Announcement Action.
🛠 In the editor, update the onExecutePostLogin arrow function to the following:
// Redirect the user to the announcement page

exports.onExecutePostLogin = async (event, api) => {
  api.redirect.sendUserTo('{ANNOUNCEMENT PAGE URL}');
};
🛠 In the code above, replace {ANNOUNCEMENT PAGE URL} with the URL for the announcement page.
Remember that onExecutePostLogin executes after the user submits valid login credentials. When that happens, the function will redirect the user to the URL for the announcement page. That URL will have a query parameter named state added to it.
🛠 Uncomment the last two lines of code in the editor, which will enable the onContinuePostLogin arrow function. They should look like this:
exports.onContinuePostLogin = async (event, api) => {
};
onContinuePostLogin executes after the user returns from a redirect made in the onExecutePostLogin function by following the /continue endpoint. Even though this function is empty, it’s still necessary when the user is expected to return to the application after being redirected.
🚨Warning:🚨 If the user returns after being redirected and the
onContinuePostLoginfunction isn’t defined — even as an empty function — the login process will fail, and the user will see a web page with a single word: Unauthorized.
🛠 Click the Deploy button to save your changes.
Add the Action to the Login flow
Just as you added the Rickroll Action to the Login flow earlier, it’s time to add the Announcement Action.
🛠 Follow these steps:
- Click the Back to flow link near the upper left corner of the page to return to the Login flow page.
- In the Add Action panel, click the Custom tab to reveal your collection of custom Actions.
- Drag the Announcement Action to the flow diagram in the center of the page and drop it on the area labeled Drop here:

🛠 Finally, click the Apply button at the upper right corner of the page to apply this new Login flow.
Test the Action
🛠 Try the Action! Run the web application that generates the announcement page and log into any application that uses your tenant and Universal Login.
Instead of being Rickrolled, you’ll see the announcement page this time (you’ll probably want to make a better-looking one for a production application). Here’s what it looks like on an Android emulator:
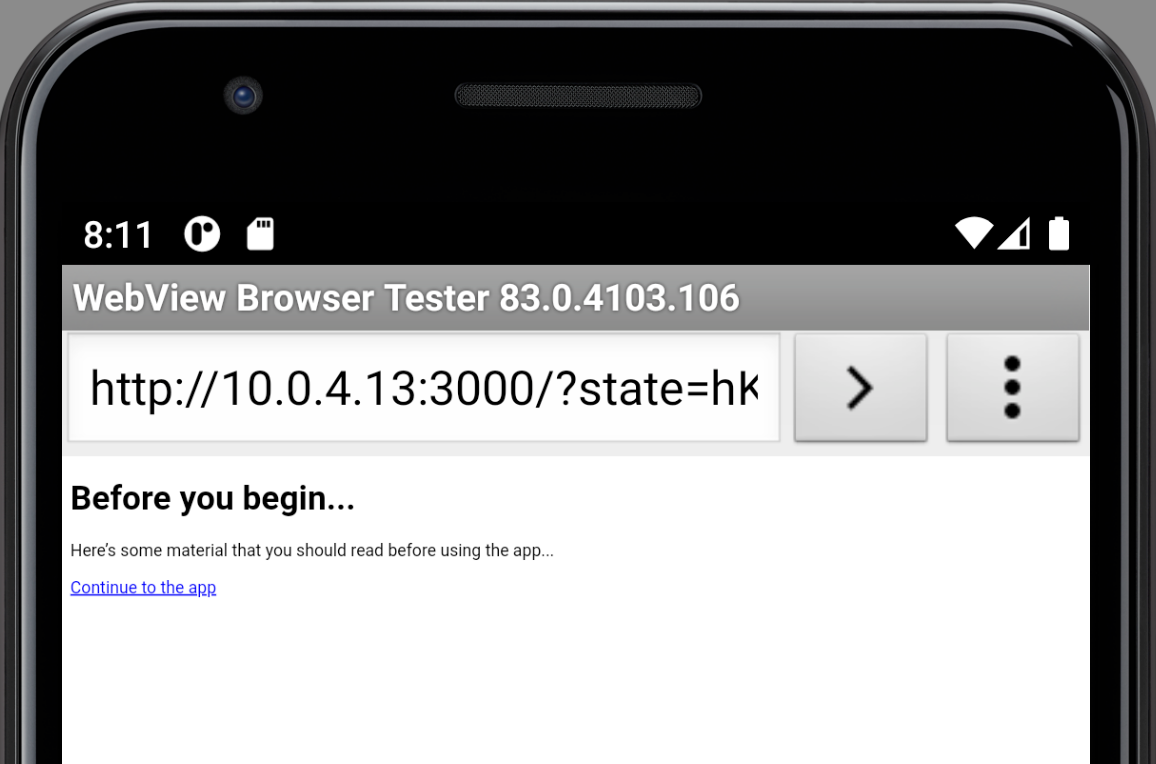
Note that the browser displaying the Universal Login page contains the URL for the announcement page, complete with the state query parameter. That parameter is also used in the URL for the “Continue to the app” link.
🛠 Click or tap on the “Continue to the app” link. The Universal Login page will disappear, and you’ll now be in the application. Behind the scenes, Auth0 will have issued an ID token to the application.
You now have an announcement page that appears after the user provides valid credentials and before the application starts.
Improving the Announcement Action
In its current state, the announcement page has a couple of issues:
- It appears every time the user logs in. You might prefer that each user sees the announcement page only once.
- It appears for every application in your tenant. You probably want the announcement to appear only for a specific application.
Track when the user has seen the announcement
Users might get annoyed if they see the announcement every time they log in. Let’s make a change so that they see it only once. To do this, we’ll need to store a value that tracks if the user has viewed the announcement — for every user.
Rather than set up a database to track which users have seen the announcement, let’s take advantage of the metadata stored with every user account.
Each Auth0 user account stores two kinds of metadata for each user:
- User metadata: Stores data about the user that the user can view and edit. It’s meant for data that doesn’t affect the application’s key functionality. It’s for storing information such as user settings and preferences.
- App metadata: Stores data that the user cannot view or edit — only the application can access and modify this data. It’s meant for data that does affect the application’s key functionality. It’s for storing information about the user’s state, making it a good place to store a flag indicating that the user has seen an announcement.
User metadata and app metadata are stored as collections of key-value pairs. When you interact with them in JavaScript, these collections are in dictionary form.
Let’s update the onExecutePostLogin function in the Announcements Action to check for the presence of a viewed_announcement_page key in the user’s app metadata dictionary. If the key doesn’t exist, we’ll send the user to the announcement page.
🛠 Change onExecutePostLogin in the Announcements Action to the following:
// Show the announcement page if the user hasn’t seen it yet
exports.onExecutePostLogin = async (event, api) => {
  if (!event.user.app_metadata['viewed_announcement_page']) {
    api.redirect.sendUserTo("{ANNOUNCEMENT PAGE URL}");
  }
};
In the code above, we’re using onExecutePostLogin’s event argument to access its user property. The user object contains an object representing the account of the user who just logged in. user’s properties contain data about the user, and one of them is app_metadata. We’re checking to see if it doesn’t contain a key named viewed_announcement_page, and if that’s the case, we redirect the user to the announcement.
We’ll also need to record that the user has seen the announcement. We can do that in the onContinuePostLogin function, which executes only after the user has returned from the announcement page.
🛠 Change onContinuePostLogin in the Announcements Action to the following:
// After returning from the announcement page,
// record that the user has seen it.
exports.onContinuePostLogin = async (event, api) => {
  api.user.setAppMetadata('viewed_announcement_page', true);
};
The user property of the api object lets us add or modify key-value pairs in the user metadata and the app metadata. We’ll use it to add a new key, viewed_announcement_page, to the app metadata if it doesn’t already exist, then set that key’s value to true.
🛠 Once you’ve made these changes, click the Deploy button at the upper right corner of the page.
🛠 Make sure that the web application that generates the announcement page is running and log into any application that uses your tenant and Universal Login. The first time you do this, you’ll see the announcement.
🛠 Log out of the application, then log in again with the same user. This time, you won’t be redirected to the announcement page.
If you go to the Details page for the user’s account in the Auth0 dashboard (select User Management from the left-side menu, then Users, then the user, and make sure the Details tab is selected), you’ll see that the app_metadata section contains the following key-value pair: "viewed_announcement_page": true.
Remember that you can edit any user’s user and app metadata directly from their account page in the dashboard.
Limit the announcement to a specific app
To ensure that the only users logging into a specific application see the announcement, we need to write code to identify the application.
There are a couple of ways to identify the application that the user is logging into, and they’re both accessible from the event object’s client property:
event.client.client_id: The client ID of the app that the user is logging into.event.client.name: The name of the app that the user is logging into.
I don’t recommend identifying the application by its name. This value is editable in the dashboard, which means you could unknowingly break your Action simply by renaming an application. You should identify applications by their client ID, which can’t be changed.
Select an application in your tenant that you want to display the announcement. Make a note of its client ID (client IDs are listed with the applications on the dashboard’s Applications page).
🛠 Change onExecutePostLogin in the Announcements Action to the following:
exports.onExecutePostLogin = async (event, api) => {
  if ((event.client.client_id === '{CLIENT ID}') &&
    (!event.user.app_metadata['viewed_announcement_page'])) {
      api.redirect.sendUserTo('{ANNOUNCEMENT PAGE URL}');
    }
  }
};
🛠 In the code above:
- Replace
{CLIENT ID}with the client ID of the application that will display the announcement. - Replace
{ANNOUNCEMENT PAGE URL}with the URL of the page that you want to redirect the user to.
🛠 Once you’ve made this change, click the Deploy button at the upper right corner of the page.
🛠 Select a user that you will use to log in. Visit their page and remove any instance of "viewed_announcement_page": true from the app_metadata section of their page.
🛠 Make sure that the web application that generates the announcement page is running.
🛠 Log into an application that isn’t supposed to show the announcement after login. You should not see the announcement.
🛠 Now log into the application that is supposed to show the announcement. You should see the announcement the first time you log in, but not after subsequent logins.
You now have an Action that displays an announcement for a specific application after login if the user hasn’t seen the announcement before!
Ideas to Try
We designed Actions to help you customize how Auth0 works with your applications and enhance what it already does. I showed you only a couple of creative ways to write Login flow-based Actions that redirect the user; here are a few more ideas you might want to try:
- A better Rickroll: Instead of redirecting the user to the Never Gonna Give You Up YouTube page, redirect the user to a page containing the video and a
/continueendpoint link to get back to the application. - “April Fools’” and similar holidays: Many cultures have “April Fools’ Day” or a similar day where people play practical jokes and pranks on each other. You could use redirect the user to a joke page similar to the one proposed in A better Rickroll.
- System downtime: I mentioned this earlier, but it’s so useful that it bears repeating. Suppose the system(s) hosting your application are down or experiencing connection issues. In that case, you could use an Action and the Login flow to redirect the user to a page announcing the downtime after login. This page doesn’t need the
continueendpoint and should be hosted on a different system than the one(s) hosting your application. - Getting additional information from first-time users: If the user doesn’t have a “first-time user” flag in their app metadata, you can redirect them to a page where they can provide additional information and return them to the application afterward.
- Enforcing security requirements: One of my favorite examples comes from the winners of the Auth0 Actions Hackathon, who used the Login flow and redirection to authenticate the user’s VPN during login. The Action they created redirects the user to a page that verifies if the user is currently in the corporate network and, if not, starts the VPN client software on the user machine to connect to VPN.
Actions are a great place to get creative and experiment. See what you can come up with!


