TL;DR: Learn about the "Sign In with Apple" feature announced at Apple WWDC 2019. This authentication option, which Apple has stated will be mandatory for all App Store apps soon, may present some challenges to application developers, but aims to provide a better user experience for those in the Apple ecosystem through enhanced privacy and seamless login across web and native applications.
“Learn about Sign In with Apple, the new identity provider announced at Apple WWDC 2019.”
Tweet This
Sign In with Apple? Why?
One of the main messages that Apple is trying to convey at WWDC this year is that the company cares about privacy. Along with other efforts to sustain this message, the Senior VP of Software Engineering Craig Federighi presented the introduction of the "Sign In with Apple" feature, which is slated to be released with iOS 13 and MacOS Catalina.
As he mentions, using social accounts to log into applications can lead to traceability by app developers and social providers. After presenting the privacy issue this common practice introduces, Craig offered a solution to the problem: Sign In with Apple.
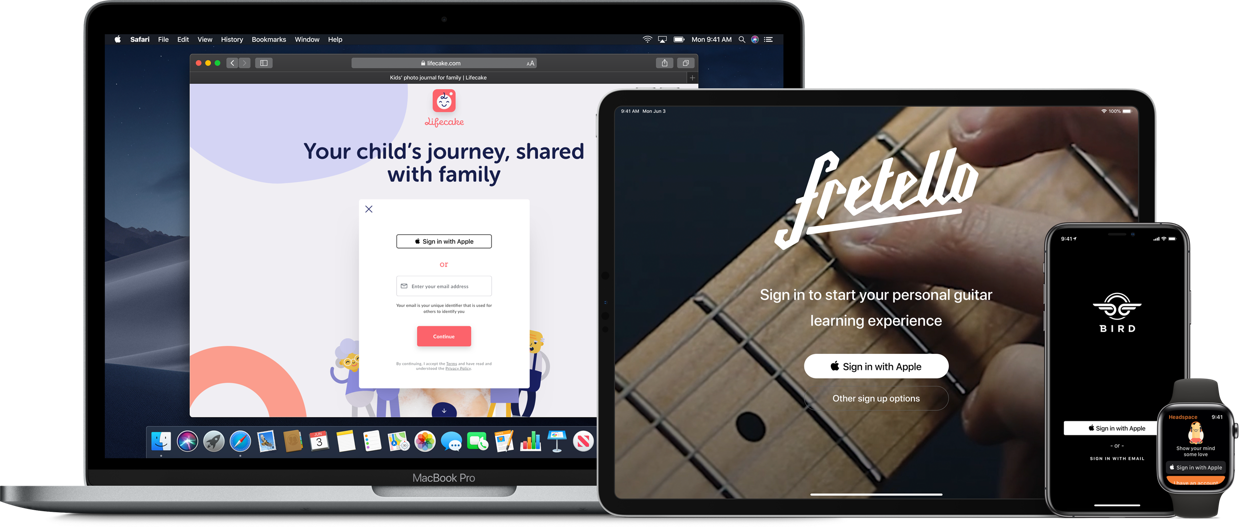
In Craig’s words, this solution will have "a simple API that allows developers to put a Sign with Apple button right in their app." Then, when users opt to use this identity provider to sign into an app, Apple will authenticate them "without revealing any personal information" (unless users choose otherwise).
One of the focuses of this part of the WWDC 2019 keynote was that the feature would allow users to either:
- share their real email addresses (the default behavior for most social identity providers)
- share unique, randomly-created email addresses that work as a firewall for users' real email addresses
For privacy-conscious users, the first option is not ideal, as it results in personal email addresses being shared with the app they are trying to use. For these users, the second option will be very appealing.
As Craig explained, when users decide to hide their email addresses, Apple will only share randomly-created email addresses that are unique to each app. The uniqueness of these email addresses per application is one of the most interesting parts of the new feature. With this approach, Apple will allow users to "mute" apps that they don't care about anymore in a few clicks (they'll just need to get rid of the randomly-created email address that the app is using).
“Sign In with Apple will let users share randomly-created email addresses that are unique to each app. As such, getting rid of noise apps will be a breeze.”
Tweet This
Do I Need to Support Sign In with Apple?
As you can see in Apple's announcement, they will be strongly encouraging the adoption of the Sign in With Apple feature. In fact, Apple mentions that this feature:
"will be required as an option for users in apps that support third-party sign-in when it is commercially available later this year."
That is, if you have an app published on the App Store and you support different third-party sign-in options (e.g., Facebook, Google, or Twitter), you will have to support this feature soon. For the time being, you don’t have to support Apple as an identity provider in your apps. As the same document says "this feature is still in beta testing", and there is no public due date to make it mandatory yet.
“It looks like Apple will be requiring that most apps support the new Sign In with Apple feature.”
Tweet This
A Challenge for Application Developers
Introducing support for this feature could be a lot of work for application developers. Refactoring apps is never an easy task, especially when the refactoring includes sensitive functionality like identity management.
Companies that manage identity providers on their own, integrating one-by-one, will need to add support for yet another provider. This means writing more sensitive code and integrations, and the workload can escalate quickly if these need to be written in multiple languages.
While you might think this will only be a concern for iOS apps, things are not so simple. If you have a web application, for example, that has an associated iOS app, it will also need to support Sign In with Apple. Imagine this situation otherwise: An iOS user wants to use the web version of your app—how would they sign in? You can't expect them to create another account.
On the other hand, an identity management system like Auth0 can help you alleviate much of this burden. Once the identity management system adds support for a new identity provider, you can extend this option to your applications with the flip of a switch.
In the next section, you will see one of our first attempts to integrate a web application with the Sign In with Apple feature. If you are not interested in the technical steps yet, feel free to skip this section.
Implementing Sign In with Apple
Although this new identity provider is still in beta testing, we already put together a sample that integrates Sign In with Apple in a Node.js and Express web application.
In this section, you will learn what you would need to do to run the sample. However, be aware that the steps here are for demonstration purposes only. That is, the following code is here for reference and must not be used in production (nor it must be taken as official guidance on how to integrate with the provider).
How Sign In with Apple works
Luckily for the community, Apple decided to adhere to open standards to support the Sign In with Apple feature. They don't publicly say that they are using these standards, and there is not a single mention of them in the official documentation. However, as you will see in the sections that follow, Apple is using parts of the OAuth 2.0 and OpenID Connect (OIDC) standards.
Learn about the de facto standard for handling authentication in the modern world.
Download the free ebook
Note: The only mention Apple has made so far of these standards is at minute eleven (11:00) of the "Introducing Sign In with Apple" presentation at WWDC 2019. At this part of the video, the speaker says: "If you integrated with existing OAuth systems, adapting Sign In with Apple will be very familiar."
What you will see next is that the app you are about to create will use the OIDC flavor of the Authorization Code Grant flow to authenticate users. As such, when your users try to sign into your app, the following process will take place:
- Your app will redirect users to Apple so they can authenticate.
- After a successful authentication, Apple will redirect users back to your app with an authorization code.
- Your app will exchange this code for a token.
When step number three is done, your app will obtain an id token that carries some information about the user (nothing sensitive, though).
Note: For the moment, we couldn't figure out how to get anything more meaningful than a random user identifier (like an email address, for example). Not even playing with
scopes.
“Luckily, Apple decided to adhere to OAuth and OpenID Connect while building the Sign In with Apple feature.”
Tweet This
Prerequisites
If you are interested in following along with the steps presented, you will need two things mainly: a domain (e.g., brunokrebs.com) that you can use and point to the web app you are about to create; and a "real" server where you will run the app, and that responds on behalf of this domain (real as in an internet-accessible server).
Besides that, you will need to configure this server with a TLS certificate (Apple won't accept unsecured HTTP connections) and npm and Node.js (so you can run the web application). Lastly, to be able to use the Email Relay Service, you will need to configure your domain with Sender Policy Framework (SPF) DNS TXT records. The official Sign In with Apple documentation explains how you can achieve that.
Note: An easy way to get a set up like this is by using DigitalOcean (and some tutorials like this one and this one), Freenom, and Let's Encrypt.
Make sure you have those properly configured before proceeding.
Configuring your Apple Developer Account
For starters, you will need an Apple Developer Account that you can use to register the application on their platform. Unfortunately, this type of account is paid, and there is no free trial available (unless you are part of their iOS Developer University Program).
When you sign into the developer account, you will have to head to the "Certificates, IDs, & Profiles" section, and choose the "Identifiers" subsection on the left menu.
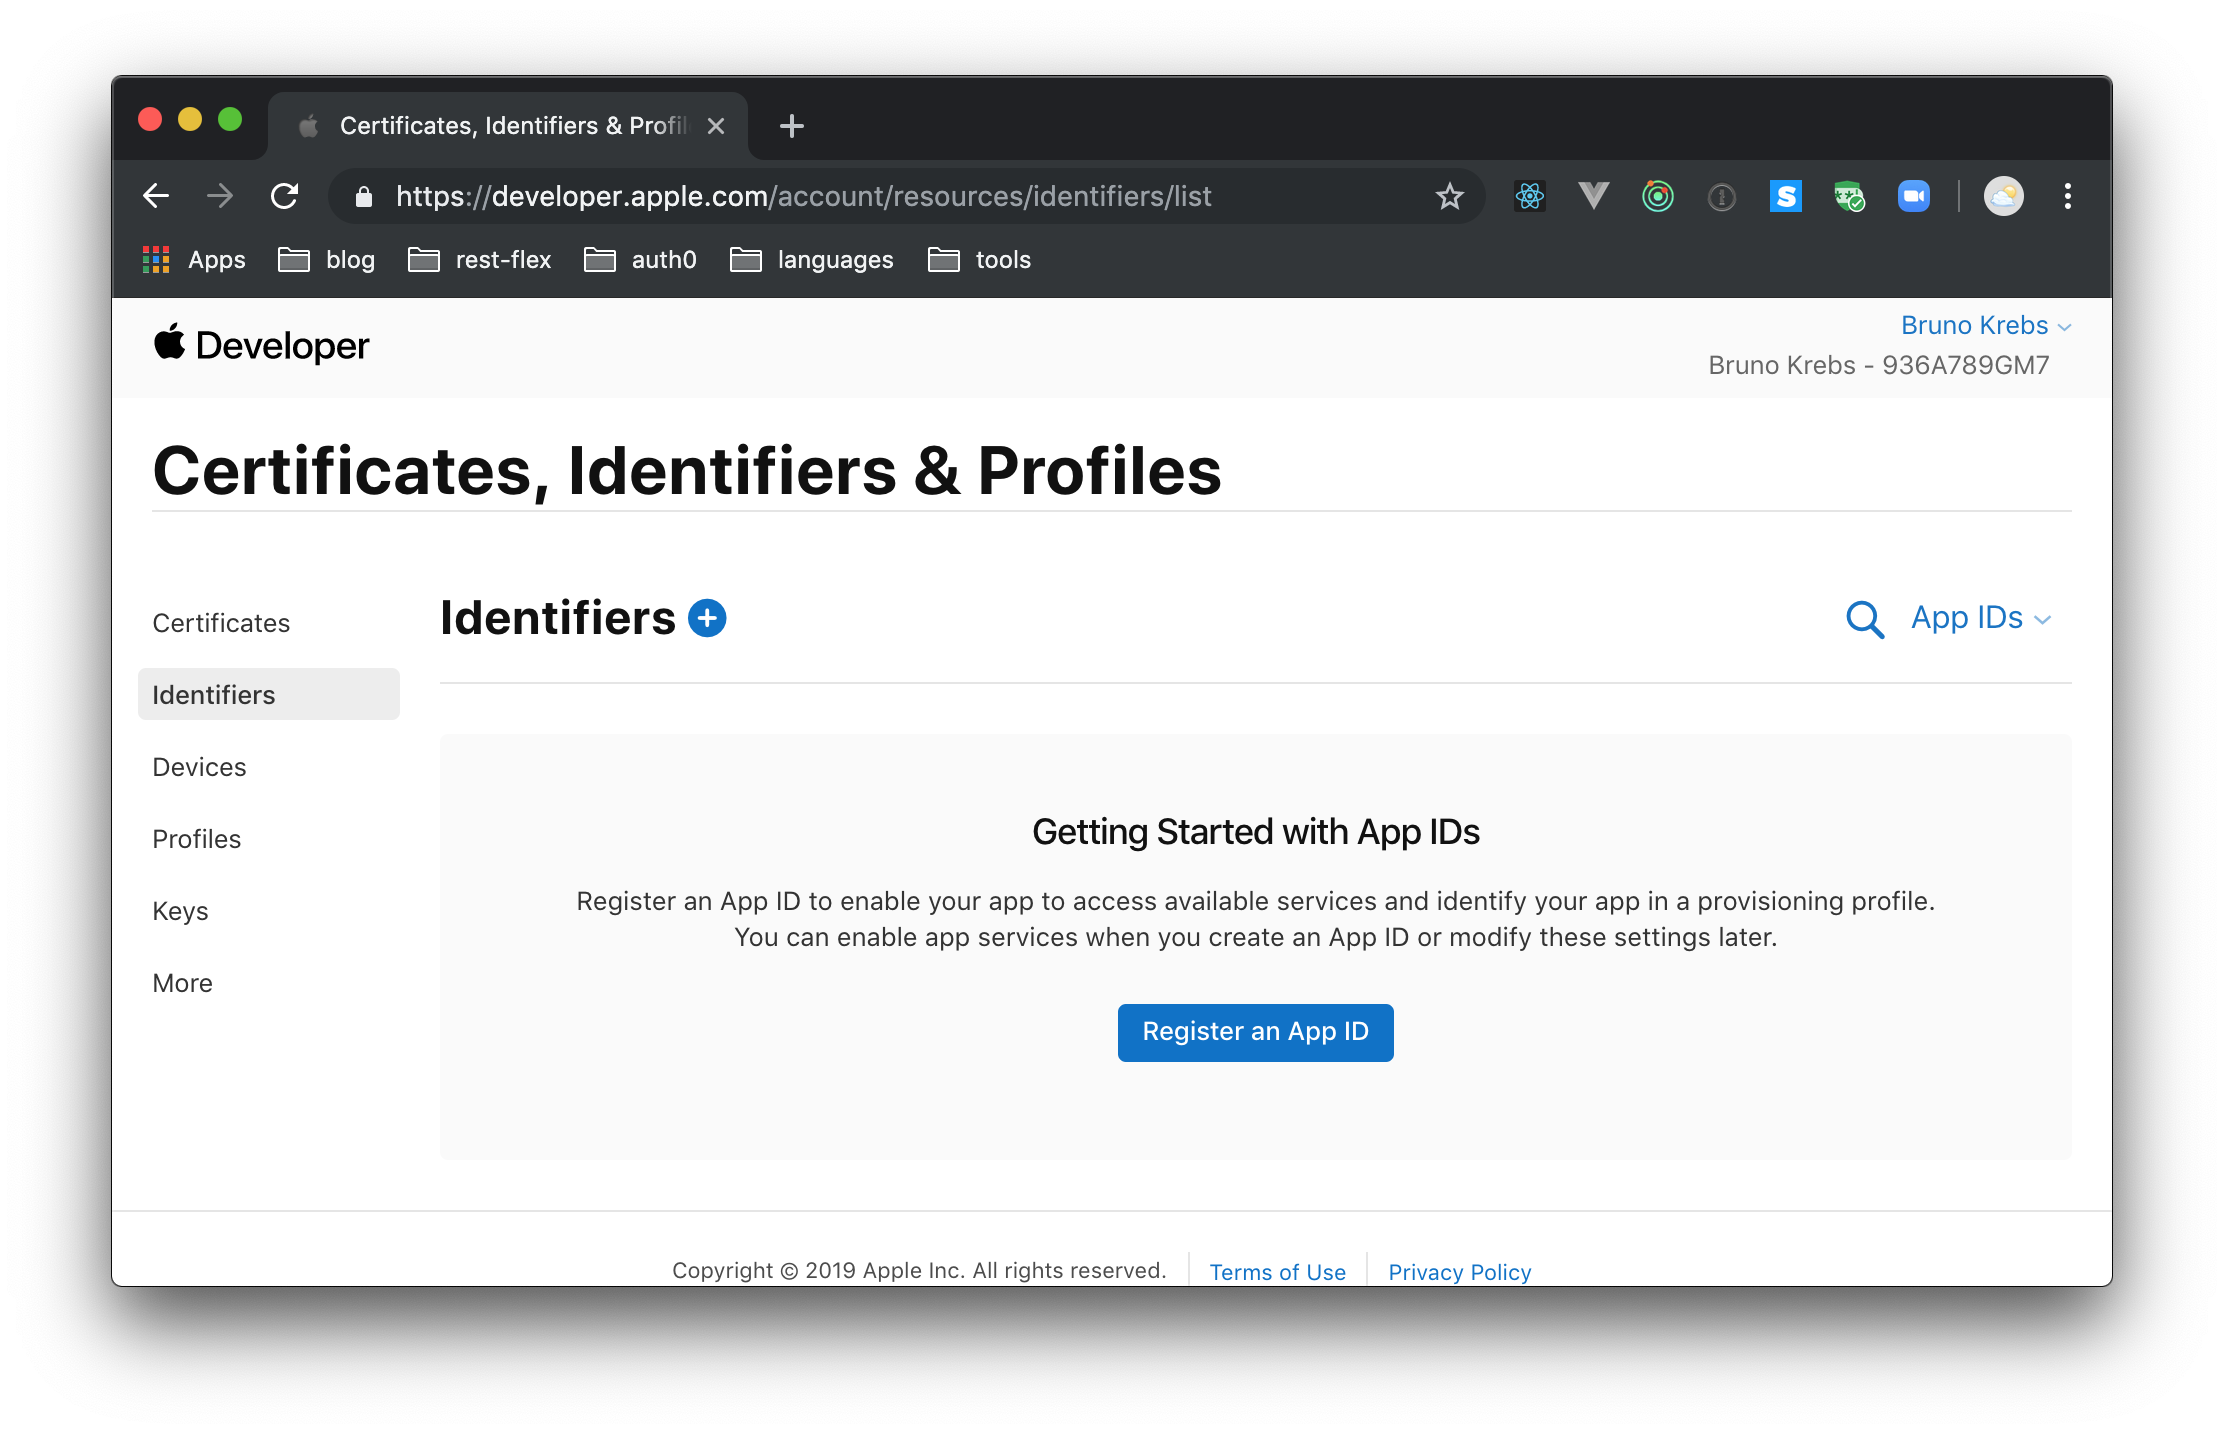
On this subsection, click on the "Register an App ID button", choose App IDs as the identifier type, and hit "Continue". After doing so, you will have to provide a description for your new App ID (something like "Sign In with Apple Experimentation" will work) and a Bundle ID. For the latter, Apple recommends using a reverse-domain name style string (e.g., com.brunokrebs.appid). Then, scroll down a bit and check the "Sign In with Apple" feature. You won't have to use the "Edit" button that Apple presents. You will configure this feature in a bit.
Now, leave the other options with their default values and hit "Continue". When you click on this button, Apple will present a summary of the options you just filled. If everything is in place, hit the "Register" button to end the process.
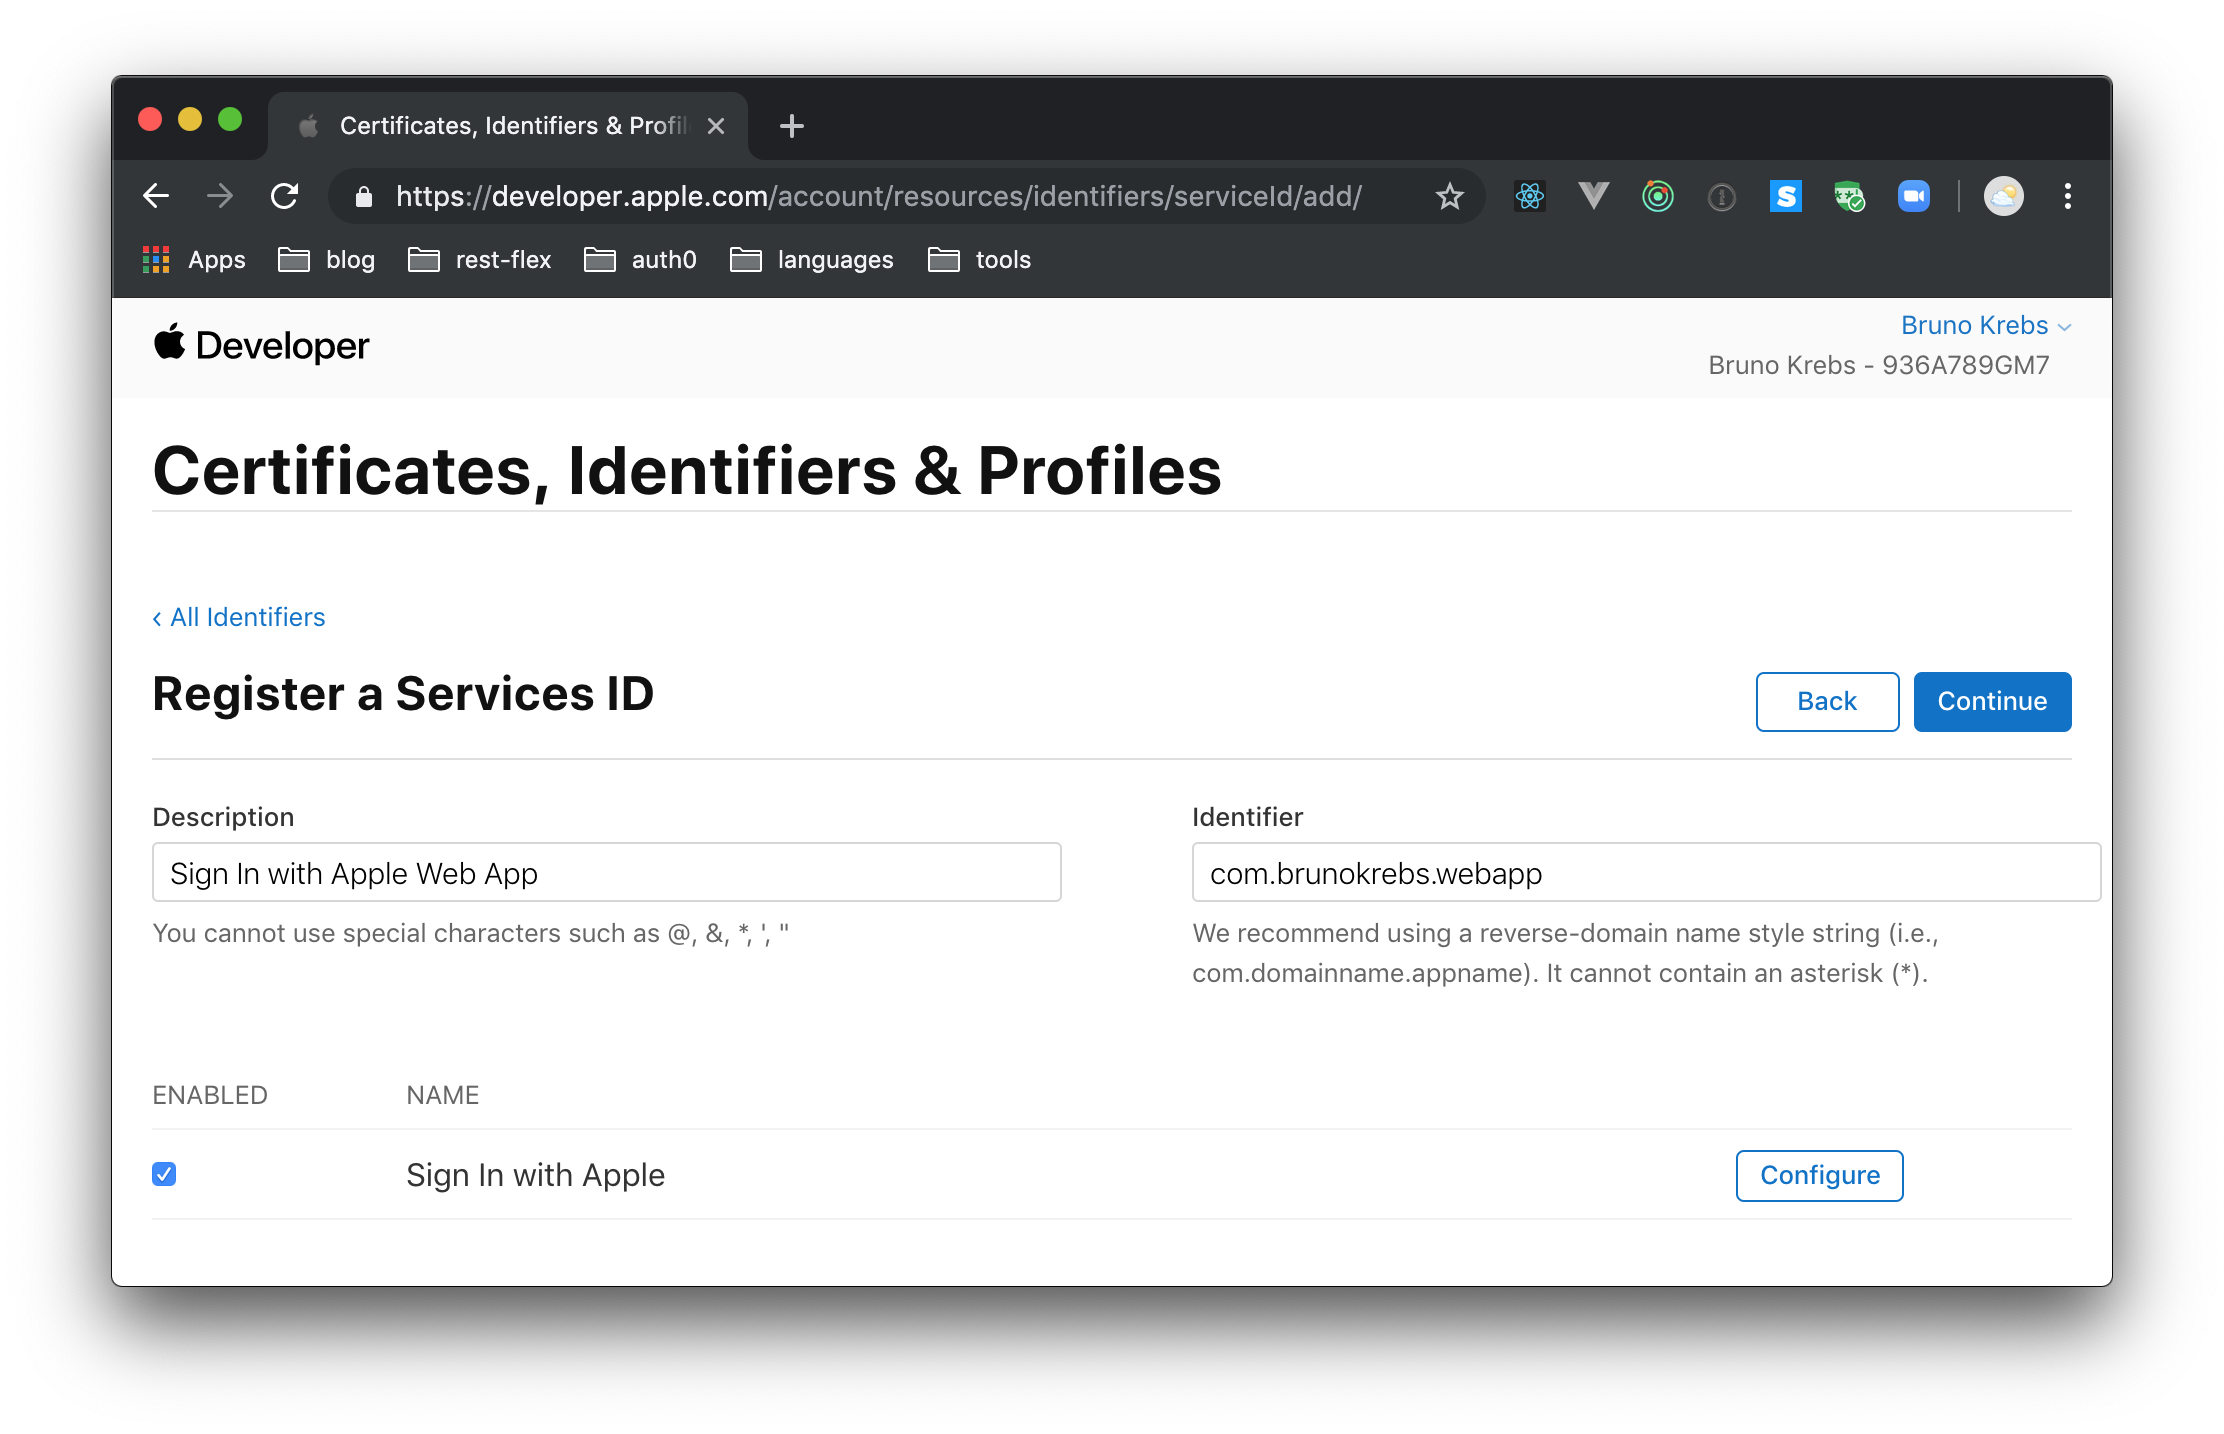
In a second or so, Apple will redirect you to the "Certificates, Identifiers & Profiles" subsection again, this time listing your new App ID. What you will need next is to create a Service ID that represents your Node.js application. This might look like a redundant effort, but Apple organizes things like that so you can nest multiple Services IDs under the same App ID (this makes much more sense when you have distinct versions of your app to support different devices).
So, click on the round, blue icon next to the "Identifiers" header; then choose "Services IDs" and click on "Continue". On the next screen, you will have to fill the same fields as before (i.e., description and identifier), and you will have to enable the "Sign In with Apple" feature. For the two fields, you can use values like "Sign In with Apple Web App" (description) and com.brunokrebs.webapp.
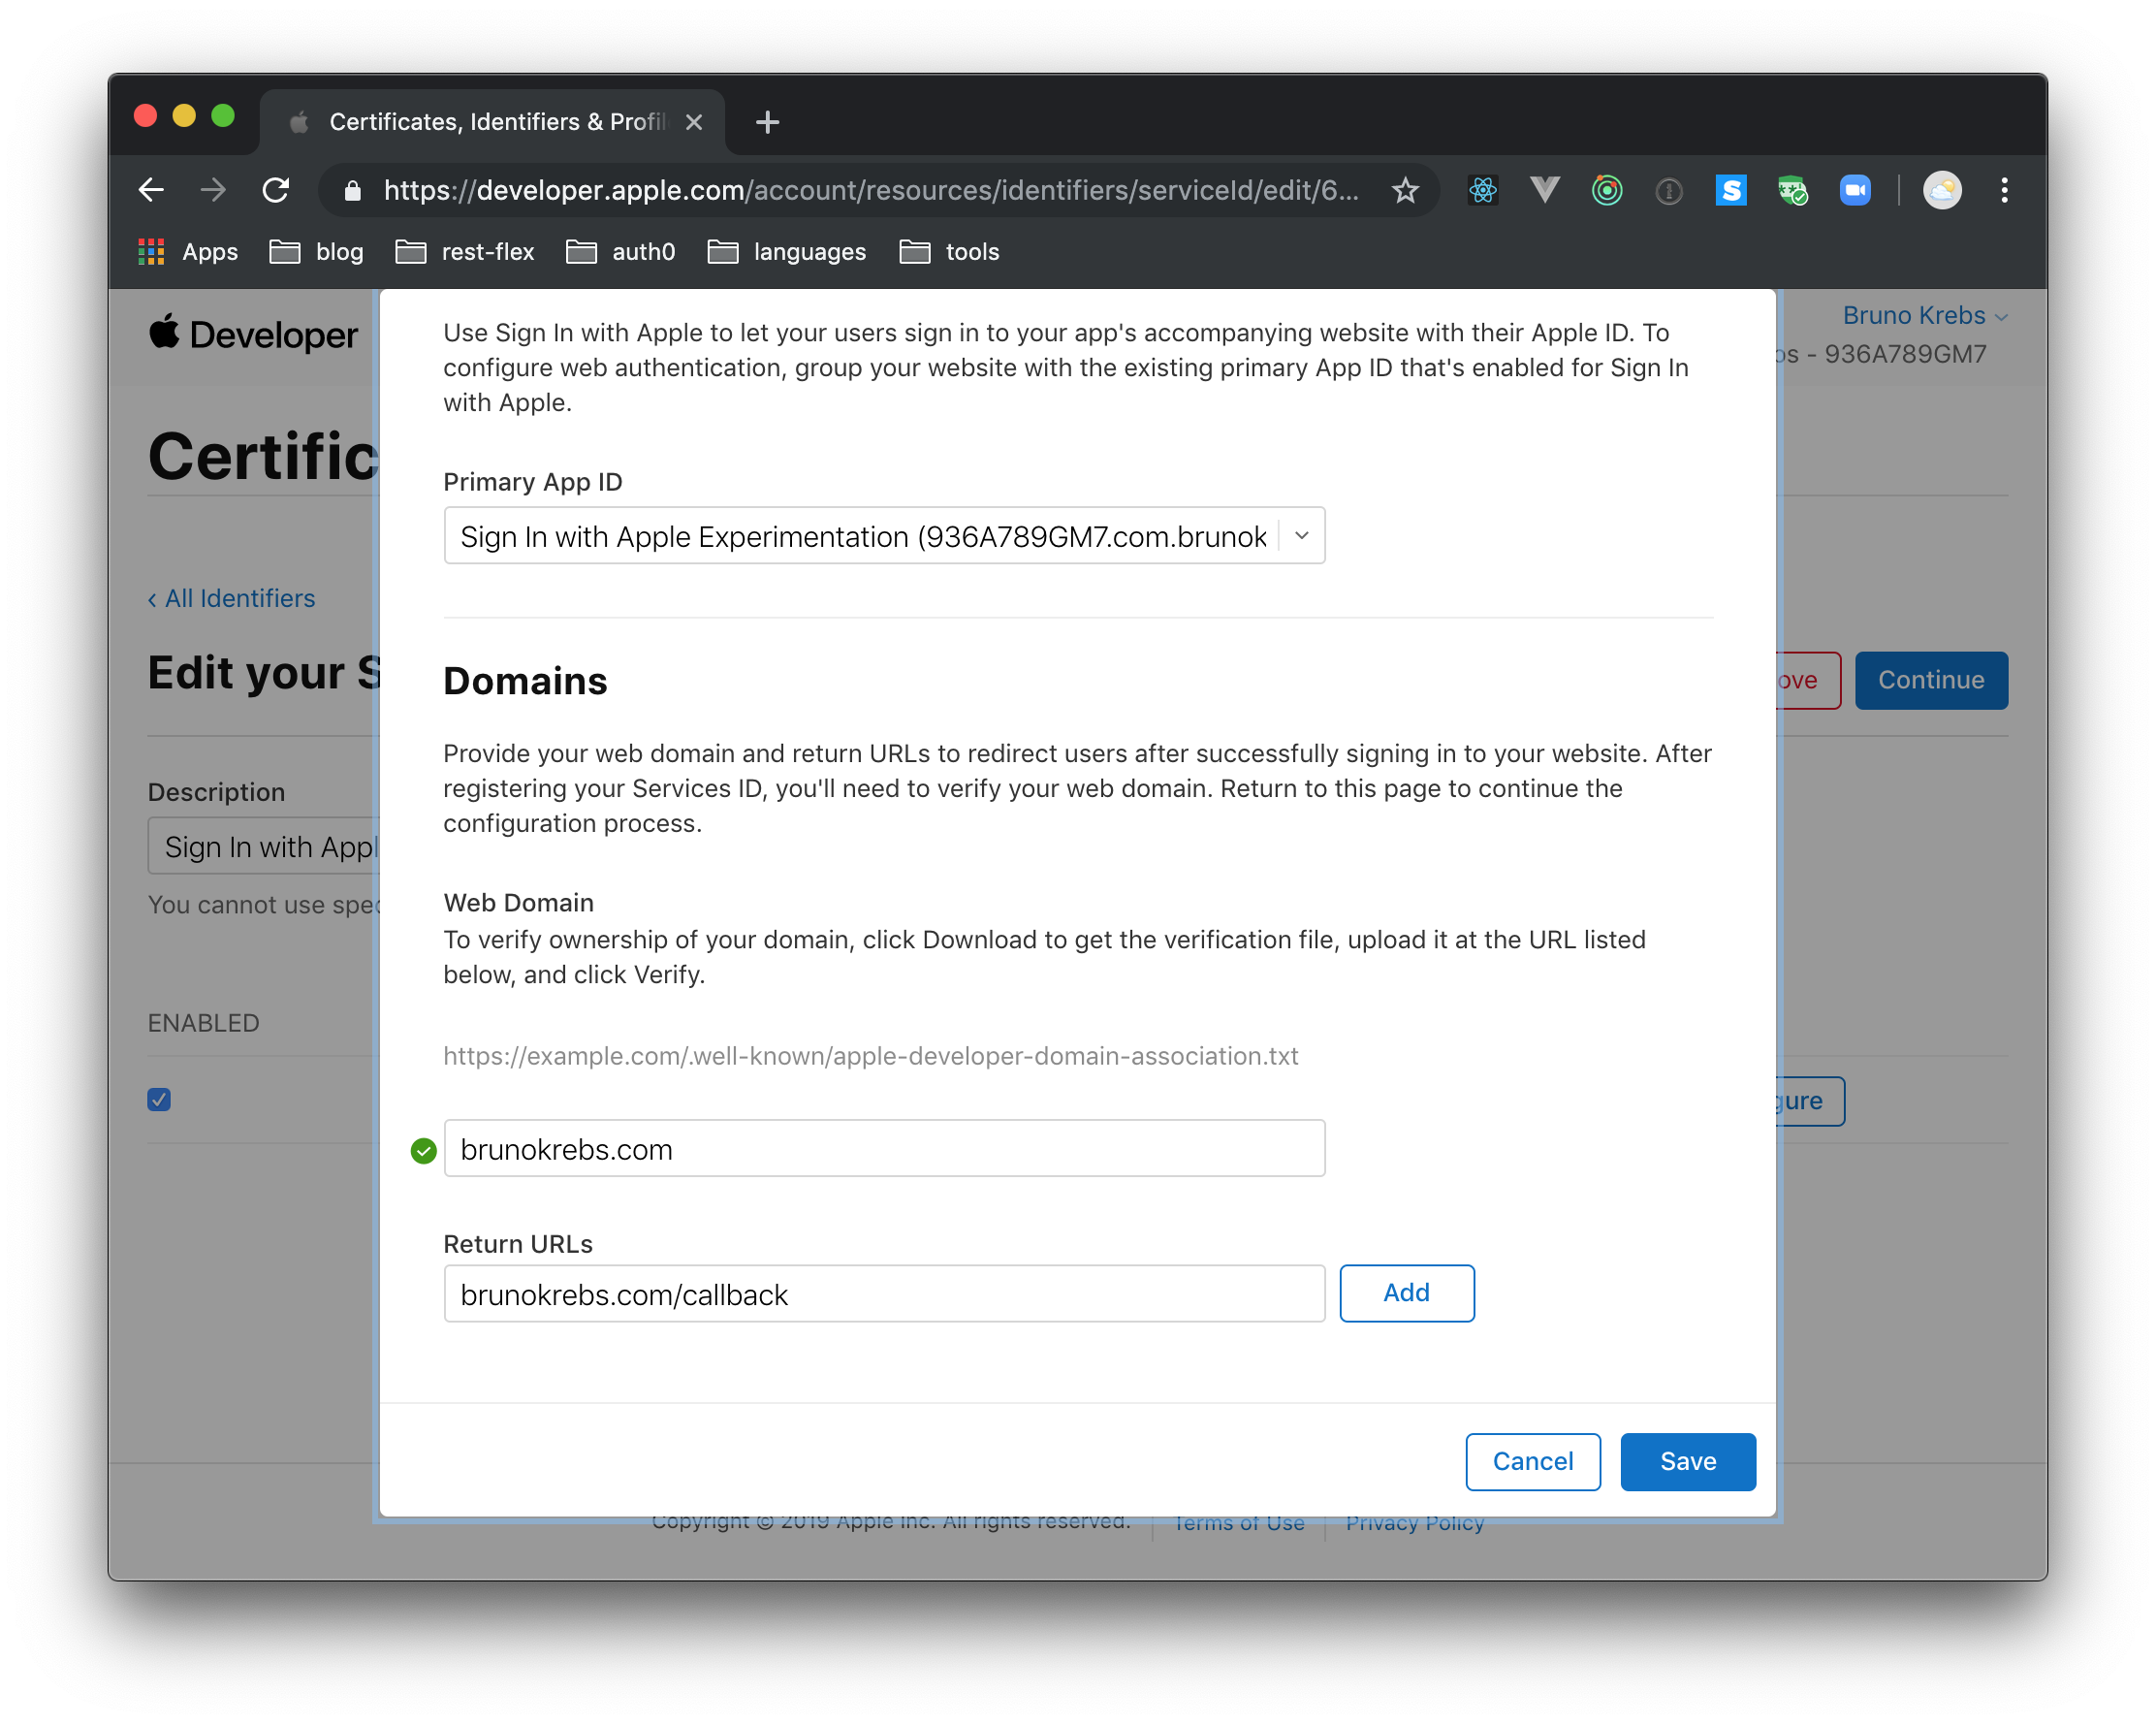
Besides that, after checking the "Sign In with Apple" feature, you will have to click on the "Configure" button right next to it. When you click on this button, Apple will show a dialog where you will have to define what "Web Domain" you will be using (e.g., brunokrebs.com) and add a "Return URL" (e.g., brunokrebs.com/callback). After providing this information, you can click on the "Save" button. Then, back on the "Register a Services ID" screen, you can click on "Continue" and, on the next screen, on "Register".
After registering your Service ID, Apple will redirect you to the "Certificates, Identifiers & Profiles" page once more. There, you will see your newly-created Service ID, and you will have to click on it to do some last configuration steps (unfortunately, these steps are not available until after registering the service).
When you click on it, Apple will show you the details of the service. There, you will have to hit the "Configure" button next to the "Sign In with Apple" feature. This time you will see that Apple shows two new buttons next to your domain: "Download" and "Verify".
If you click on the "Download" button, Apple will send you a file called apple-developer-domain-association.txt. Keep this file around as you will have to use it soon. Also, keep the page open. In a few moments, you will have to use the "Verify" button.
Creating the web application
After configuring the Apple developer account, you can start working on the web application code. To do so, open a terminal and create a new directory where you usually save your projects (you can call this directory apple-sign-in-sample). Then, inside the new directory, create an npm project and install a few dependencies:
# start the npm project
npm init -y

# install its dependencies
npm i dotenv \
  express \
  express-session \
  jsonwebtoken \
  passport \
  passport-oauth
You will need these dependencies for the following reasons:
dotenv: You will need some environment variables that are better kept out of the code itself.express: You will need to make your project an Express web app.express-session:passportwill need this package to manage users' sessions.jsonwebtoken: You will need to generate a JWT to work as the client secret while configuringpassport.passport: You will need to use this package to handle user authentication in your app.passport-oauth: You will need to use thispassportstrategy to integrate with Apple's identity provider.
After installing these packages, create a new file called app.js and insert the following code into it:
const express = require("express");
const session = require("express-session");
const port = process.env.PORT || 3000;
const passport = require("passport");
const OAuth2Strategy = require("passport-oauth").OAuth2Strategy;
const fs = require("fs");
const jwt = require("jsonwebtoken");

const domainAssociation = fs.readFileSync(
  "./apple-developer-domain-association.txt",
  "utf8"
);
const appleStrategy = "apple";

const app = express();

app.use(
  session({
    secret: "secret",
    saveUninitialized: false,
    resave: false
  })
);

app.use(passport.initialize());
app.use(passport.session());

passport.use(
  "apple",
  new OAuth2Strategy(
    {
      authorizationURL: "https://appleid.apple.com/auth/authorize",
      tokenURL: "https://appleid.apple.com/auth/token",
      clientID: process.env.CLIENT_ID,
      clientSecret: process.env.CLIENT_SECRET,
      callbackURL: process.env.CALLBACK,
      state: Date.now() // bleh
    },
    (accessToken, refreshToken, payload, profile, done) => {
      done(null, { profile, payload });
    }
  )
);

passport.serializeUser((user, done) => {
  done(null, user);
});

passport.deserializeUser((user, done) => {
  done(null, user);
});

app.get("/.well-known/apple-developer-domain-association.txt", (req, res) => {
  res.send(domainAssociation);
});

app.get("/auth/apple", passport.authenticate(appleStrategy));

app.get(
  "/callback",
  passport.authenticate(appleStrategy, {
    successRedirect: "/",
    failureRedirect: "/login"
  })
);

app.get("/profile", (req, res) => {
  res.send(
    jwt.decode(req.session.passport.user.payload.id_token, { complete: true })
  );
});

app.get("/", (req, res) => {
  console.log("User", req.user);
  res.send(JSON.stringify({ Hello: "World" }));
});

app.listen(port, () => {
  console.log(`Apple Login POC listening on port ${port}!`);
});
If you check the code above, you will notice that there is a reference to the apple-developer-domain-association.txt file. You will need to make this file available to the app while running it in your server so Apple can check you are the owner of the domain you used in the previous section. So, move the file you downloaded from Apple to the project root.
Then, to confirm that the code is working, execute the following commands locally:
export CLIENT_ID=test
export CLIENT_SECRET=test
export CALLBACK=test

npm start
Note: You can leave the
testvalues on the environment variables for the moment. You will configure these variables later.
If everything works as expected, you will be able to see the contents of the domain association file at the following link: http://localhost:3000/.well-known/apple-developer-domain-association.txt. If that is the case, you are ready to make your app run on the real server.
Verifying the domain ownership on Apple
Now, move the project code to your server and make it run like you did locally (i.e., you still don't need to provide the final environment variables). To achieve that, you can use whatever means you prefer. For example, you can use Git, or you can move the files manually (with the help of scp or similar). The former would be probably easier, though.
After running this project on a real server (which must respond on behalf of the domain you configured in the Apple developer account), you can head back to the page you left open, and click on the "Verify" button. If you got everything right, Apple would be able to confirm that you own the informed domain.
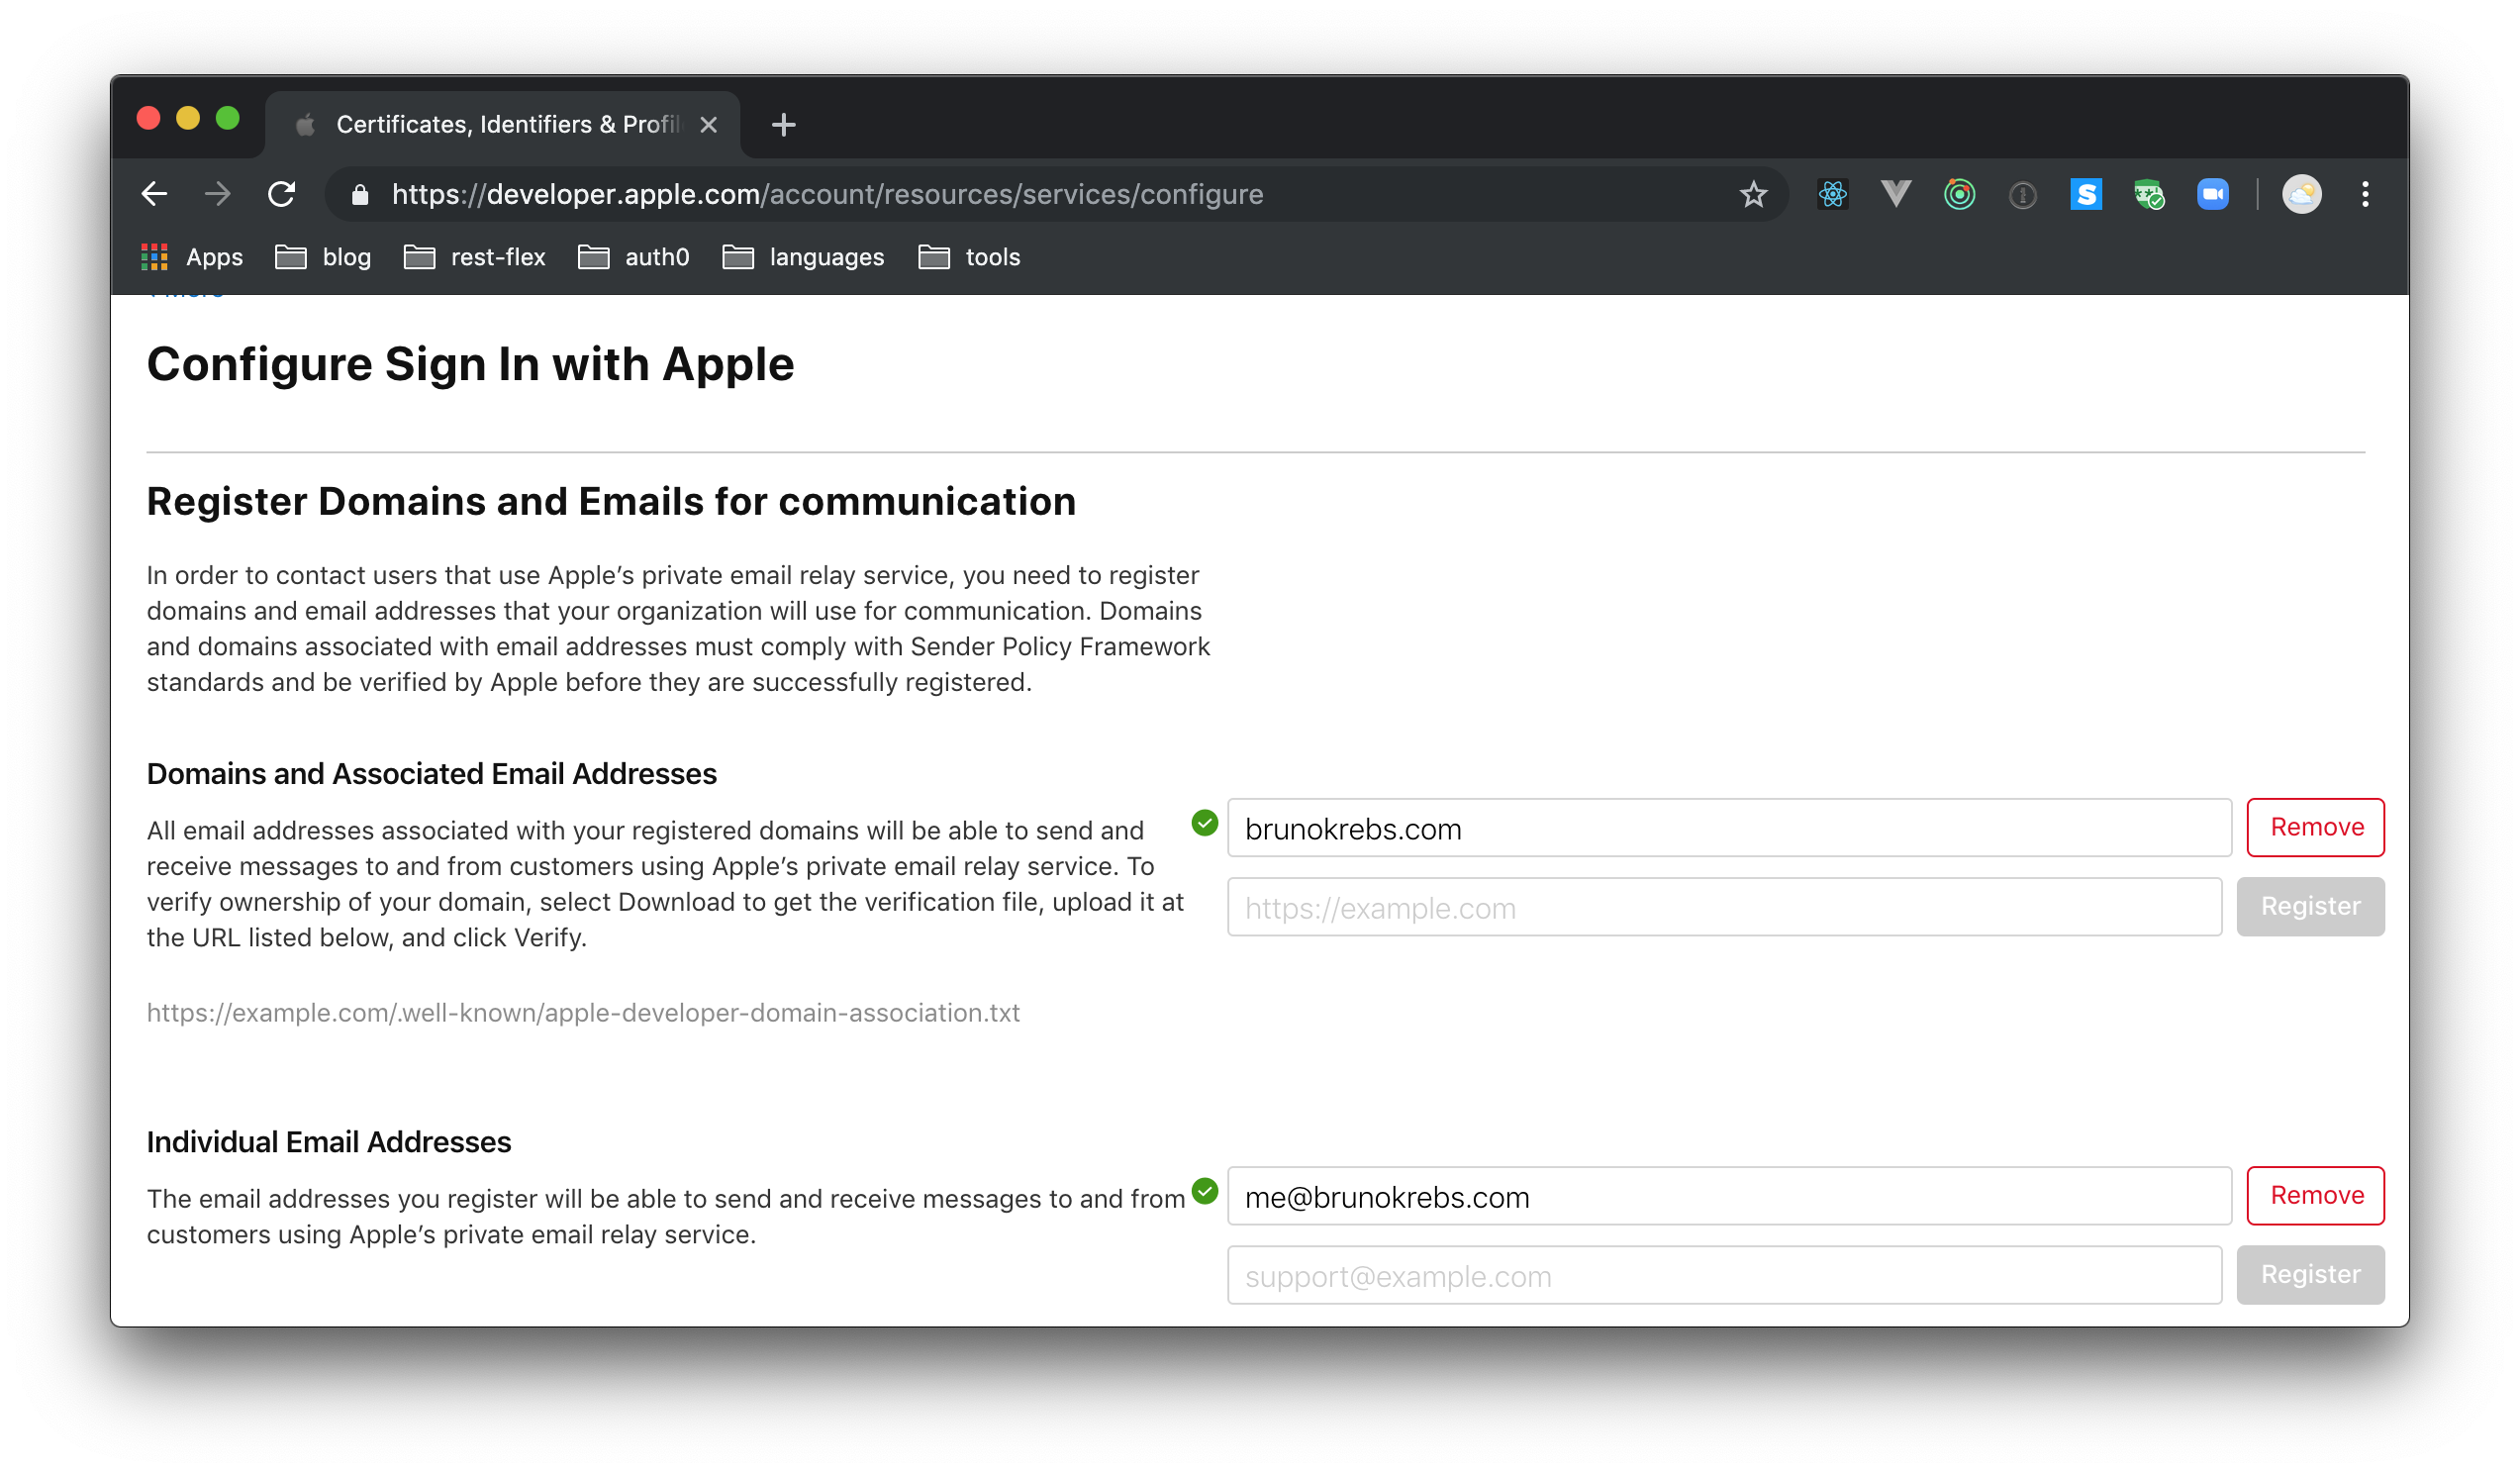
Besides that, to be able to use the Email Relay Service that Apple provides, you will need to head to "More" under the "Certificates, Identifiers, & Profiles" section and hit "Configure". On the next page, add your domain (e.g., brunokrebs.com) on the field available on "Domains and Associated Email Addresses" and hit "Register". Then, add an email address (e.g., me@brunokrebs.com) on "Individual Email Addresses" and hit "Register".
Note: For the moment, even if you do configure this property, you won't be able to use the relay service. The documentation doesn't say how to get unique, randomly-created emails for the users that sign in. Also, using OpenID Connect scopes like
As Apple explains:
In order to contact users that use Apple’s private email relay service, you need to register domains and email addresses that your organization will use for communication. Domains and domains associated with email addresses must comply with Sender Policy Framework standards and be verified by Apple before they are successfully registered.
Generating the client secret for the Sign In with Apple configuration
Now that you have verified your domain with Apple, you can start worrying about defining the environment variables needed to use this identity provider. For starters, you can easily configure two of these variables:
CLIENT_ID: This one will get the value that you used as the identifier of the Service ID you created at Apple (e.g.,com.brunokrebs.webapp).CALLBACK: This one represents the URL to which the user will be redirected after the authentication process takes place. You will have to use the value you passed to the "Return URL" field (e.g.,brunokrebs.com/callback) on the same Service ID.
After defining these variables, the last one you are left with is CLIENT_SECRET. On most OAuth-compliant identity providers out there, this parameter is static. However, Apple decided to make this secret rotate by using signed JSON Web Tokens (JWTs) that carry the exp claim.
To generate this key, you will first need to head to "Keys" under the "Certificates, Identifiers, & Profiles" section in your developer dashboard. There, you will have to click on the round, blue icon to add a new key. When Apple shows the form, use "Sign In with Apple Key" to fill the "Key Name" field, and check the "Sign In with Apple" option. Still on this page, click on "Configure" to make sure the "Choose a Primary App ID" field is filled with your App ID. With that in place, you will have to hit "Save", then "Continue", then "Register" (three buttons, three pages).
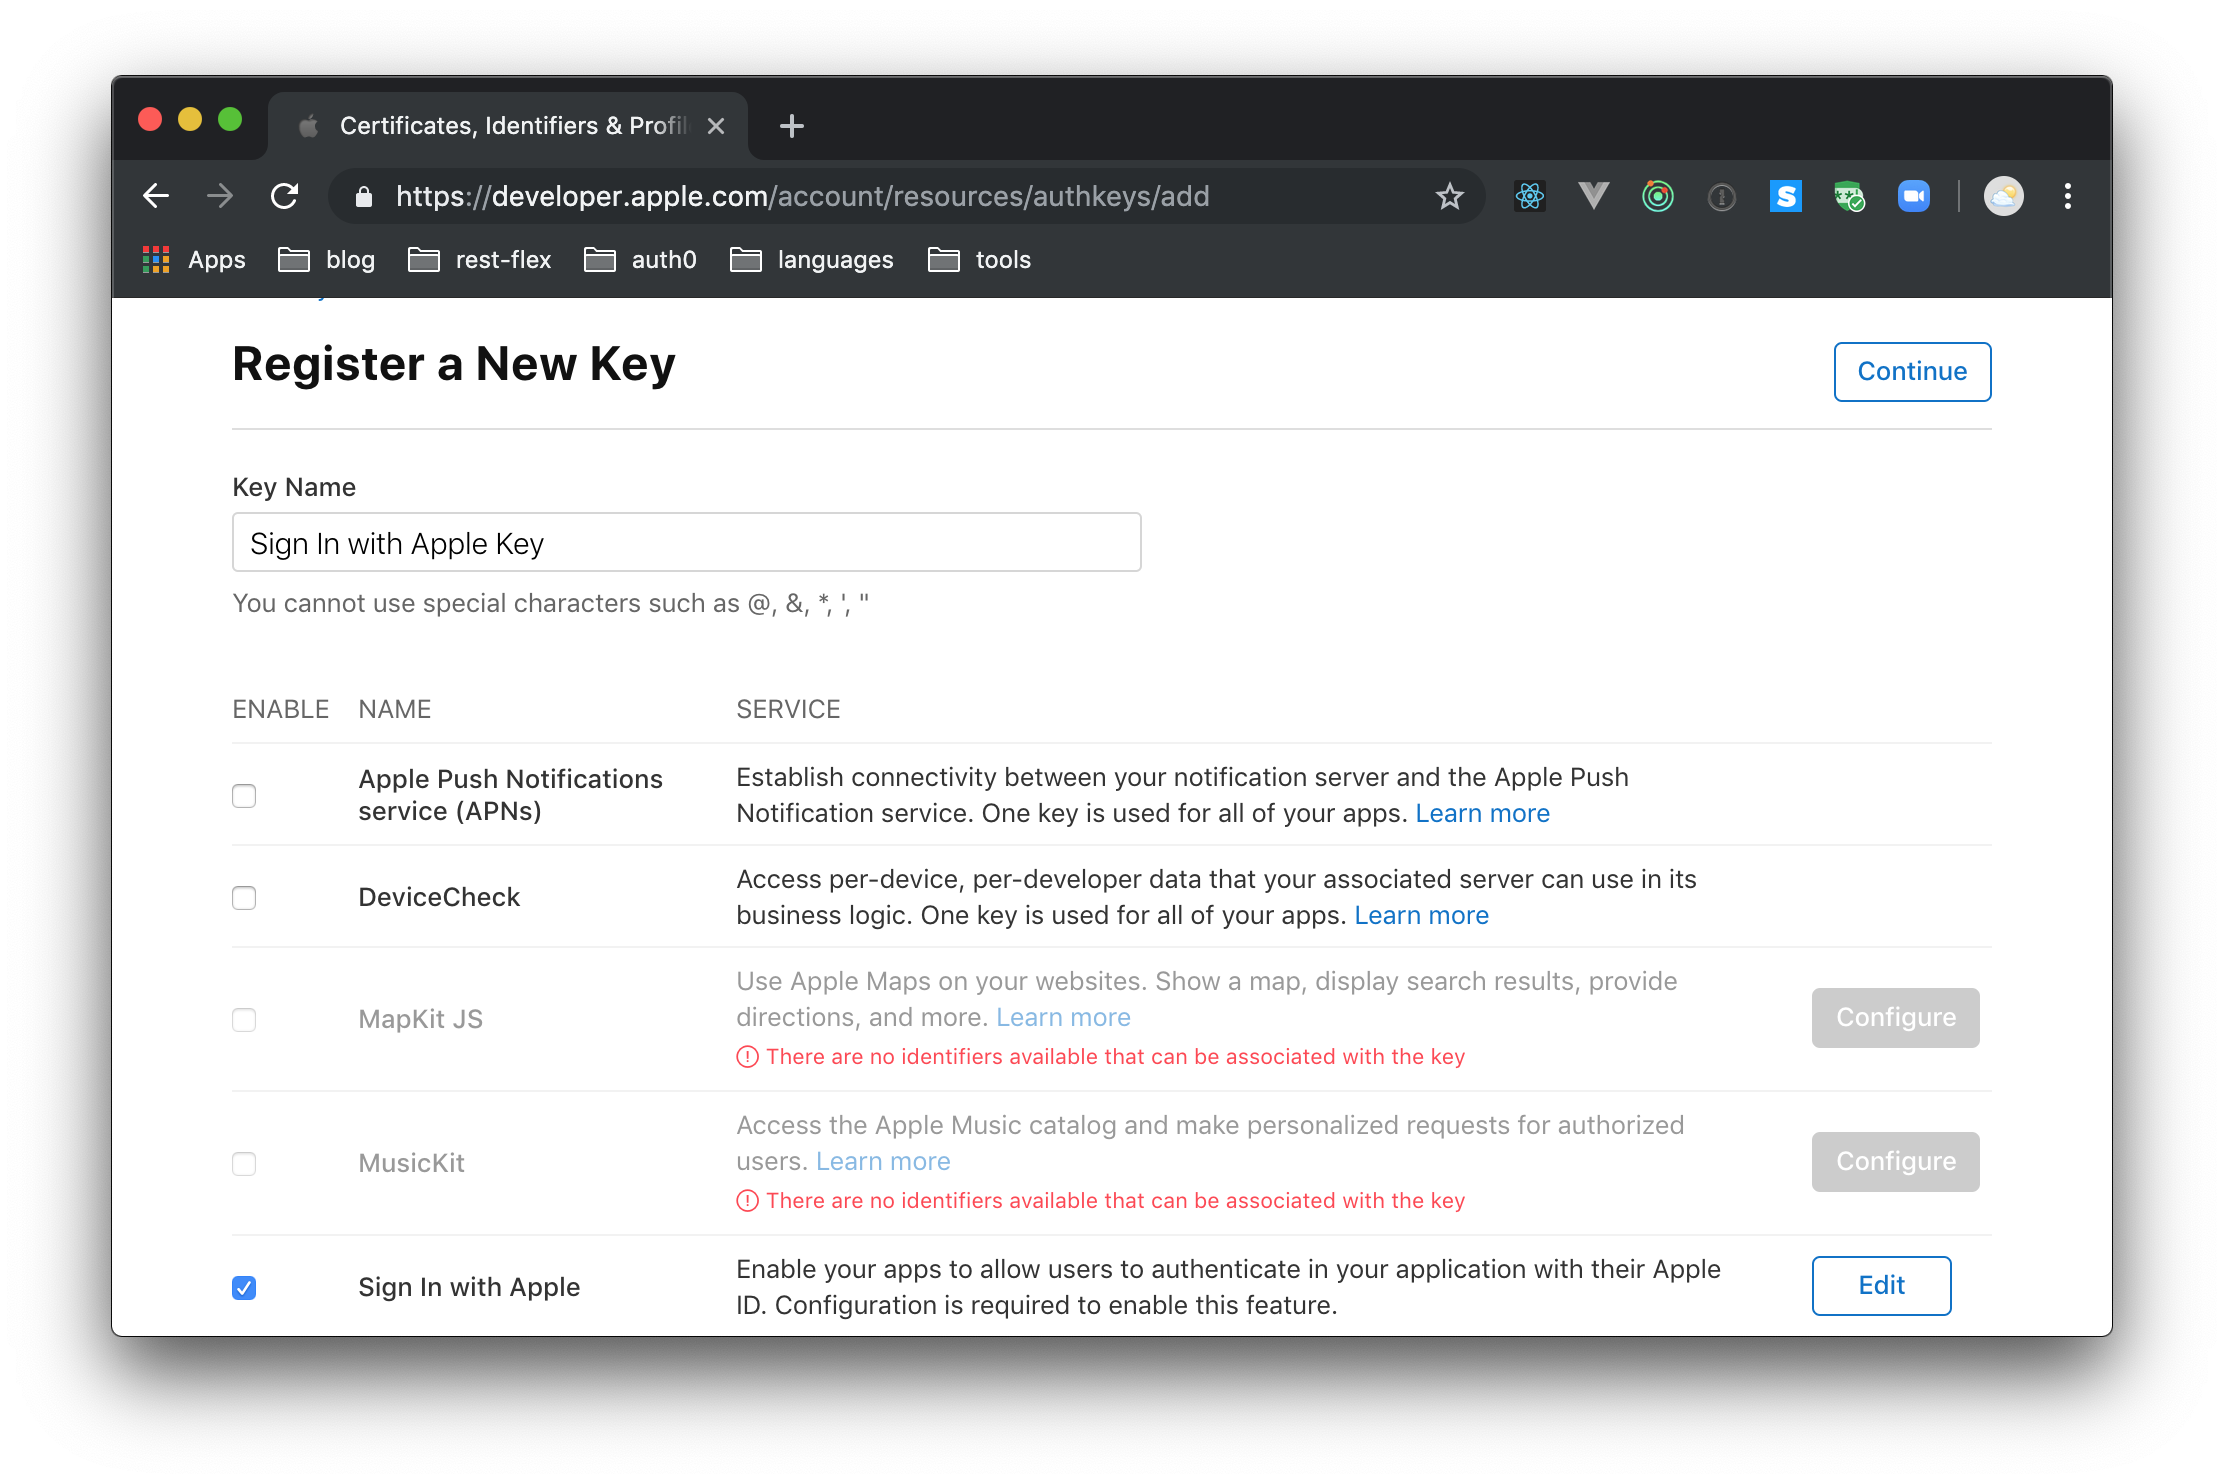
When you hit "Register" on the last screen, Apple will redirect you to a page where you will be able to download the new key. So, click on this button and, after downloading it, move the file to the project root. To facilitate things, while moving the file, rename it to authkey.p8. Back in the Apple Developer Portal, click "Done" and make a note of the Key ID.
After that, create a new file called generate-secret.js inside the project root, and add the following code to it:
const jwt = require("jsonwebtoken");
const fs = require("fs");

const privateKey = fs.readFileSync("./authkey.p8");
const token = jwt.sign({}, privateKey, {
  algorithm: "ES256",
  expiresIn: "2 days",
  audience: "https://appleid.apple.com",
  issuer: "TEAM_ID",
  subject: "com.brunokrebs.webapp",
  keyid: "KEY_ID"
});

console.log("The token is:", token);
Note: You will have to replace
com.brunokrebs.webappwith the identifier for your Service ID andTEAM_IDwith your Team ID. To find this value, visit this page. You'll also need to replaceKEY_IDwith the Key ID you noted earlier.
Now, run this small script to generate a new token:
node generate-secret.js
The value that the script outputs is the value that you will use on the CLIENT_SECRET environment variable. So, head to your server, stop the web app instance that is running, and issue the following commands:
# now you need to use the real values
export CLIENT_ID=com.brunokrebs.webapp
export CLIENT_SECRET=eyJ...KsA
export CALLBACK=https://brunokrebs.com/callback

npm start
Note: This time you will have to set the environment variables with the final values.
If things work as expected, you will be able to see the app running under your domain again. Then, if you request for the /auth/.apple route under this domain, your app will redirect you to the Sign In with Apple page so you can log into your application
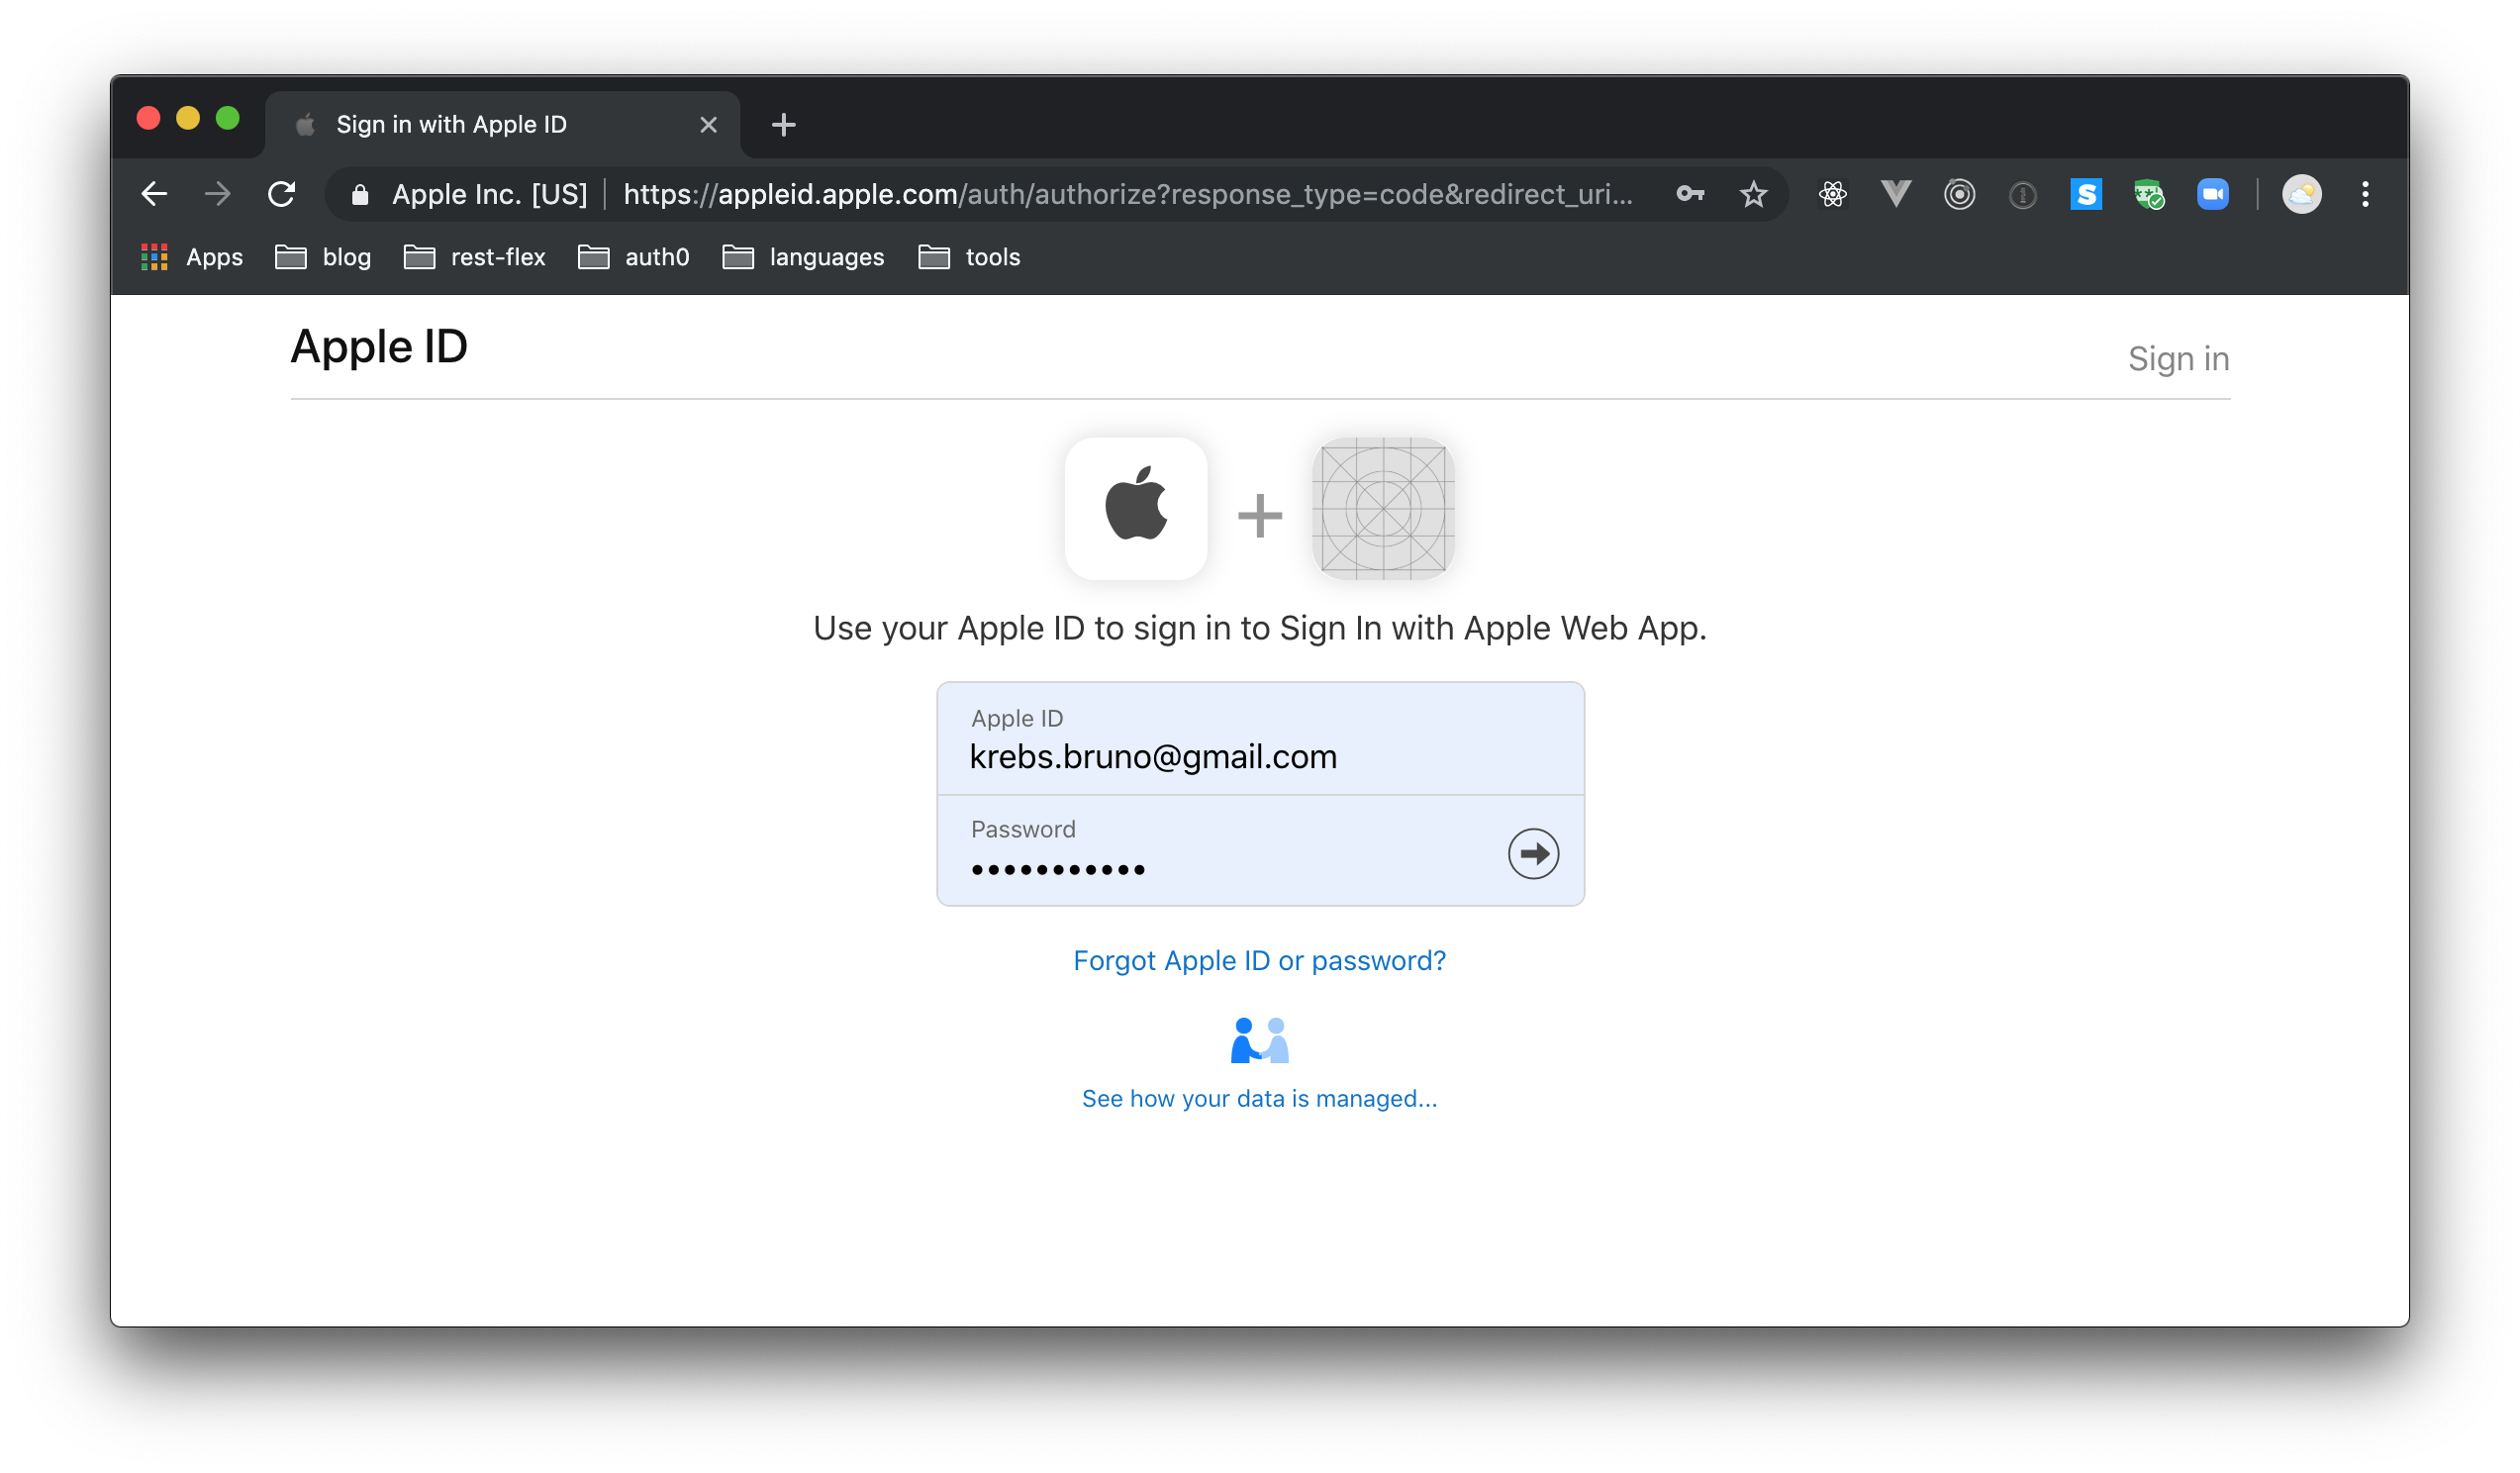
On this page, if you use valid credentials, Apple will sign you into the app (after the multifactor authentication process).
Although the contents are still at an early stage, you can refer to the Sign In with Apple documentation for more information about this topic and the steps illustrated above.
What Comes Next?
There’s a still a lot to learn about the Sign In with Apple feature. Since the announcement, multiple teams across Auth0 have been working to understand the full implications, and we’ll continue to share what we know about how this will impact Apple users and app developers. At the same time, we’ll be building out support and sharing examples of how Auth0 can make the implementation of the Sign In with Apple feature as easy and powerful as possible.
If you have any questions for us about this feature, please ask in the comments section at the bottom of this post!
About the author

Bruno Krebs
R&D Content Architect (Auth0 Alumni)