
What is a DTO?
DTO, which stands for Data Transfer Object, is a design pattern conceived to reduce the number of calls when working with remote interfaces. As Martin Fowler defines in his blog, the main reason for using a Data Transfer Object is to batch up what would be multiple remote calls into a single one.
For example, lets say that we were communicating with a RESTful API that exposes our banking account data. In this situation, instead of issuing multiple requests to check the current status and latest transactions of our account, the bank could expose an endpoint that returned a DTO summarizing everything. As one of the most expensive operations in remote applications is the round-trip time between the client and the server, this coarse-grained interface can help improving performance by a great deal.
DTOs and Spring Boot APIs
Another advantage of using DTOs on RESTful APIs written in Java (and on Spring Boot), is that they can help hiding implementation details of domain objects (aka. entities). Exposing entities through endpoints can become a security issue if we do not carefully handle what properties can be changed through what operations.
As an example, let's imagine a Java API that exposes user details and accepts user updates through two endpoints. The first endpoint would handle GET requests and return user data, and the second endpoint would accept PUT requests to update these details. If this application didn't take advantage of DTOs, all the properties of the user would be exposed in the first endpoint (e.g. password) and the second endpoint would have to be very selective on what properties would accept when updating a user (e.g. not everybody can update the roles of a user). To overcome this situation, DTOs can come in handy by exposing only what the first endpoint is intended to expose, and by helping the second endpoint to restrict what it accepts. This characteristic helps us to keep the integrity of the data in our applications.
“DTOs can help us to keep the integrity of data on Java applications.”
Tweet This
Throughout this article, we will take advantage of DTOs to help us handle situations like that. As we will see, this design pattern will introduce a few more classes to our application, but will improve its security.
ModelMapper Introduction
To avoid having to write cumbersome/boilerplate code to map DTOs into entities and vice-versa, we are going to use a library called ModelMapper. The goal of ModelMapper is to make object mapping easy by automatically determining how one object model maps to another. This library is quite powerful and accepts a whole bunch of configurations to streamline the mapping process, but it also favors convention over configuration by providing a default behavior that fits most cases.
The user manual of this library is well written and can be a valuable resource if time comes where we need to tweak the mapping process. To give a little taste of what this library can do, let's say that we had a User like that:
// assume getters and setters
class User {
  long id;
  String firstName;
  String lastName;
  String email;
  String password;
  String securitySocialNumber;
  boolean isAdmin;
}
And wanted to expose just the id, firstName, and email. By using ModelMapper we would have to create a DTO like this:
// assume getters and setters
class UserDTO {
  long id;
  String firstName;
  String email;
}
And then call ModelMapper as follows:
ModelMapper modelMapper = new ModelMapper();
// user here is a prepopulated User instance
UserDTO userDTO = modelMapper.map(user, UserDTO.class);
That is, only by defining the structure that we want to expose and by calling modelMapper.map, we achieve our goal and hide what is not meant to be exposed. One might argue that libraries like Jackson provide annotations to ignore some properties when serializing objects, but this solution restrict developers to a single way to express their entities. By using DTOs and ModelMapper, we can provide as many different versions (with different structures) of our entities as we want.
What Will We Build?
From now on, we are going to focus on using DTOs to expose entities of a Spring Boot RESTful API. We are going to use ModelMapper to map from the entities that compose this API to DTOs, and vice-versa. As we don't want to spend too much time setting up a new project from the ground, we are going to take advantage of the QuestionMarks project that we stated building in the previous article. There is no need to read the full article, we will clone the GitHub repository that supports the project, and we are going to checkout a specific Git tag that will give us a solid basis to focus on what we are interested on.
The idea behind QuestionMarks is that this application will enable users to practice and enhance their knowledge by answering a set of multiple choice questions. To provide a better organization, these questions will be grouped in different exams. For example, there could be an exam called JavaScript Interview that would hold a set of JavaScript related questions to help users to prepare for interviews. Of course, in this article we won't build the whole application as it would take a lot of time and would make the article huge, but we will be able to see the technologies aforementioned in action.
Throughout the previous article, we have integrated Spring Data JPA, PostgreSQL, and Liquibase to manage the persistence layer. We didn't created any RESTful endpoint before, as there was no good way of exposing entities. That is the main goal of this article.
Launching PostgreSQL
Before cloning the existing project, we need to setup a PostgreSQL instance to support our database operations and persistence. As stated in the previous article, Docker can be a great solution to launch applications without installing them on our development machine.
We do need Docker installed, but the process of installing it is quite simple (for MacOS check this link, for Windows this link, and for Ubuntu this link). Having Docker properly installed, we can run a dockerized instance of PostgreSQL as follows:
docker run --name questionmarks-psql \
    -p 5432:5432 \
    -e POSTGRES_DB=questionmarks \
    -e POSTGRES_PASSWORD=mysecretpassword \
    -d postgres
Note that if we do not want to launch PostgreSQL inside a Docker instance, or if we do have another PostgreSQL instance already available, we will need to guarantee that we have a database called questionmarks on it, and that the postgres user has mysecretpassword as password. Or, we can change these values in the ./src/main/resources/application.properties file:
spring.datasource.url=jdbc:postgresql://localhost/questionmarks
spring.datasource.username=postgres
spring.datasource.password=mysecretpassword
spring.datasource.driver-class-name=org.postgresql.Driver
Cloning QuestionMarks
Next step is to clone the GitHub repository that supports QuestionMarks, and checkout the specific tag for this article. We achieve that by issuing the following commands:
git clone https://github.com/auth0-blog/questionmarks-server.git
cd questionmarks-server
git checkout post-2
Since we haven't created any endpoints in the previous article, there wouldn't be a good reason to run the application now. Running it would do no harm, and Liquibase would create the tables structures to support the five entities already created. But waiting to run it after developing our endpoints will produce the same effect.
After that we just need to import the Spring Boot project in our preferred IDE (Integrated Development Environment).
Adding Dependencies
Having the QuestionMarks project cloned and imported on our IDE, we can start evolving it to handle automatic mapping of DTOs. The first step we need to take is to add ModelMapper as a dependency in our ./build.gradle file. We will also add a dependency to hibernate-java8 library. We will need this artifact to be able to map Java8-specific classes to columns on our database.
// ... other definitions

dependencies {
    // ... other dependencies
  compile('org.modelmapper:modelmapper:1.1.0')
  compile('org.hibernate:hibernate-java8:5.1.0.Final')
}
Refactoring the Exam Entity
To witness the real advantage of using DTOs, and to have a more meaningful example of the mapping process in action, we are going to refactor the Exam entity a little bit. We are going to add two date properties on it to keep track of when the exam was created and when it was last edited, and we are going to add a flag that indicates if it's published (available to the open public) or not. Let's open the ./src/main/java/com/questionmarks/model/Exam.java file and add the following lines of code:
// ... other imports
import java.time.LocalDateTime;

// ... annotations
public class Exam {
    // ... other properties

    @NotNull
    private LocalDateTime createdAt;

    @NotNull
    private LocalDateTime editedAt;

    @NotNull
    private boolean published;
}
Note that without the hibernate-java8 library imported in the last section, JPA/Hibernate wouldn't be able to automatically map LocalDateTime to the database. Fortunately this library exists to help us, otherwise we would need to create our own converters.
We also have to add the new properties (as columns) to the PostgreSQL database that supports our application. Since in the last article we set up Liquibase to handle schema migrations, we just have to create a new file with the commands to add the new columns. We will call this file v0002.sql and will add it to the ./src/main/resources/db/changelog/changes/ folder with the following content:
alter table exam
  add column created_at timestamp without time zone not null default now(),
  add column edited_at timestamp without time zone not null default now(),
  add column published boolean not null default false;
The next time that we run our application, Liquibase will read this file and run these commands to add three columns. The SQL commands will also populate these columns with some default values for any pre-existing records. Besides that, there is nothing else that we need to change to make JPA/Hibernate aware of the columns and capable of handling it.
Creating DTOs
As we have changed the Exam entity to hold some sensitive properties that we don't want users to change directly, we are going to create two DTOs to better handle user requests. The first DTO will be responsible for the creation of new exams and, as such, will be called ExamCreationDTO. We will create this DTO class in a new package called dto inside the com.questionmarks.model package. This class will contain the following source code:
package com.questionmarks.model.dto;

import com.fasterxml.jackson.annotation.JsonIgnore;
import lombok.Getter;
import lombok.Setter;

import javax.validation.constraints.NotNull;
import java.time.LocalDateTime;

@Getter
@Setter
public class ExamCreationDTO {
    @NotNull
    private String title;

    @NotNull
    private String description;

    @JsonIgnore
    private final LocalDateTime createdAt = LocalDateTime.now();

    @JsonIgnore
    private final LocalDateTime editedAt = LocalDateTime.now();
}
Users willing to create new exams will need to send requests containing the structure defined in our new DTO. That is, they will need to send nothing more and nothing less then a title and a description. Both the createdAt and the editedAt properties are populated by the DTO itself. If any user tries to send values through these properties, our application will ignore them as they are marked with @JsonIgnore. Besides that, the published property that we've added to the Exam entity was completely hidden from the outside world, as the DTO didn't include it.
The second DTO that we will create will be responsible for the update of existing exams. We will call this DTO as ExamUpdateDTO and will include it in the com.questionmarks.model.dto package with the following code:
package com.questionmarks.model.dto;

import com.fasterxml.jackson.annotation.JsonIgnore;
import lombok.Getter;
import lombok.Setter;

import javax.persistence.Id;
import javax.validation.constraints.NotNull;
import java.time.LocalDateTime;

@Getter
@Setter
public class ExamUpdateDTO {
    @Id
    @NotNull
    private Long id;

    @NotNull
    private String title;

    @NotNull
    private String description;

    @JsonIgnore
    private final LocalDateTime editedAt = LocalDateTime.now();
}
The difference from the other DTO is that this one includes the id property of the exam that it wants to update, and it doesn't have the createdAt property since it wouldn't make sense to update this field.
From the perspective of the DTOs this is pretty much what we need to be able to securely handle the creation and updates of exams. From now on we are going to focus on streamlining the process of mapping DTOs to entities to avoid having to manually manipulating these mappings.
But wait! Before proceeding to the next tasks, let's create a small unit test to guarantee that ModelMapper is in fact capable of mapping our DTOs to the Exam entity. Let's create a new package called model inside the com.questionmarks package that resides in the test code (in the ./src/test/java/com/questionmarks/ folder) and then create a class called ExamUT inside it with the following code:
package com.questionmarks.model;

import com.questionmarks.model.dto.ExamCreationDTO;
import com.questionmarks.model.dto.ExamUpdateDTO;
import org.junit.Test;
import org.modelmapper.ModelMapper;

import static org.junit.Assert.assertEquals;

public class ExamUT {
    private static final ModelMapper modelMapper = new ModelMapper();

    @Test
    public void checkExamMapping() {
        ExamCreationDTO creation = new ExamCreationDTO();
        creation.setTitle("Testing title");
        creation.setDescription("Testing description");

        Exam exam = modelMapper.map(creation, Exam.class);
        assertEquals(creation.getTitle(), exam.getTitle());
        assertEquals(creation.getDescription(), exam.getDescription());
        assertEquals(creation.getCreatedAt(), exam.getCreatedAt());
        assertEquals(creation.getEditedAt(), exam.getEditedAt());

        ExamUpdateDTO update = new ExamUpdateDTO();
        update.setTitle("New title");
        update.setDescription("New description");

        modelMapper.map(update, exam);
        assertEquals(update.getTitle(), exam.getTitle());
        assertEquals(update.getDescription(), exam.getDescription());
        assertEquals(creation.getCreatedAt(), exam.getCreatedAt());
        assertEquals(update.getEditedAt(), exam.getEditedAt());
    }
}
The only @Test defined in this class creates an instance of ExamCreationDTO with a specific title and description and then uses an instance of ModelMapper to generate a new Exam. It then checks if this Exam contains the same title, description, createdAt, and editedAt values as the ones held by ExamCreationDTO.
Lastly, it creates an instance of ExamUpdateDTO and applies it to the Exam instance created before to checks if the title, description, and editedAt properties were updated and if the createdAt property remained unchanged. Running the tests now, through the IDE or through the gradle test command, should gives us a positive result. Therefore, we can now build the rest of the engine to map DTOs to entities.
Mapping DTOs to Entities Automatically
Although the ModelMapper library contains an extension specifically designed for Spring, we won't use it because it doesn't help us exactly how we need. Since we are going to build a RESTful API that handles DTOs and we want these DTOs to be converted to our entities as automatically as possible, we will create our own set of generic classes to do the magic for us.
The most attentive readers will have noted that the id property in the ExamUpdateDTO class was marked with @Id. We added this annotation because our solution will integrate Spring MVC, JPA/Hibernate, and ModelMapper to fetch instances of existing entities persisted in the database with the value of these @Ids. For the DTOs that do not include @Id properties, we will simply generate new entities based on the values sent, without querying the database.
We could restrict our solution to handle only instances of Exam and its DTOs, but as the QuestionMarks project grows, new DTOs and new entities will need to be converted among each other. Therefore, it makes sense to create a generic solution to handle scenarios for any entities and DTOs that arise.
The first artifact that we will create will be an annotation that activates the automatic mapping of DTOs into entities. We will create a new package called util inside the com.questionmarks package, and will create a DTO interface on it with the following code:
package com.questionmarks.util;

import java.lang.annotation.ElementType;
import java.lang.annotation.Retention;
import java.lang.annotation.RetentionPolicy;
import java.lang.annotation.Target;

@Target(ElementType.PARAMETER)
@Retention(RetentionPolicy.RUNTIME)
public @interface DTO {
    Class value();
}
This interface actually creates an annotation, as it's defined as @interface, and it aims to be used on method parameters (@Target(ElementType.PARAMETER)) on runtime (@Retention(RetentionPolicy.RUNTIME)). The only property that this annotation exposes is value, and its goal is to define from which DTO the entity will be created/updated.
The next element that we will create is the class responsible for the hard lifting. This class will get the request made by a user, which should comply to the structure of some DTO, and will transform the DTO on an specific entity. This class will also be responsible for querying the database in the case the DTO sent contains an @Id. Let's call this class as DTOModelMapper and create it inside the com.questionmarks.util package with the following source code:
package com.questionmarks.util;

import com.fasterxml.jackson.databind.ObjectMapper;
import org.modelmapper.ModelMapper;
import org.springframework.core.MethodParameter;
import org.springframework.core.annotation.AnnotationUtils;
import org.springframework.http.HttpInputMessage;
import org.springframework.http.converter.HttpMessageNotReadableException;
import org.springframework.http.converter.json.MappingJackson2HttpMessageConverter;
import org.springframework.web.HttpMediaTypeNotSupportedException;
import org.springframework.web.bind.WebDataBinder;
import org.springframework.web.bind.support.WebDataBinderFactory;
import org.springframework.web.context.request.NativeWebRequest;
import org.springframework.web.method.support.ModelAndViewContainer;
import org.springframework.web.servlet.mvc.method.annotation.RequestResponseBodyMethodProcessor;

import javax.persistence.EntityManager;
import javax.persistence.Id;
import javax.validation.constraints.NotNull;
import java.io.IOException;
import java.lang.annotation.Annotation;
import java.lang.reflect.Field;
import java.lang.reflect.Type;
import java.util.Collections;

public class DTOModelMapper extends RequestResponseBodyMethodProcessor {
    private static final ModelMapper modelMapper = new ModelMapper();

    private EntityManager entityManager;

    public DTOModelMapper(ObjectMapper objectMapper, EntityManager entityManager) {
        super(Collections.singletonList(new MappingJackson2HttpMessageConverter(objectMapper)));
        this.entityManager = entityManager;
    }

    @Override
    public boolean supportsParameter(MethodParameter parameter) {
        return parameter.hasParameterAnnotation(DTO.class);
    }

    @Override
    protected void validateIfApplicable(WebDataBinder binder, MethodParameter parameter) {
        binder.validate();
    }

    @Override
    public Object resolveArgument(MethodParameter parameter, ModelAndViewContainer mavContainer, NativeWebRequest webRequest, WebDataBinderFactory binderFactory) throws Exception {
        Object dto = super.resolveArgument(parameter, mavContainer, webRequest, binderFactory);
        Object id = getEntityId(dto);
        if (id == null) {
            return modelMapper.map(dto, parameter.getParameterType());
        } else {
            Object persistedObject = entityManager.find(parameter.getParameterType(), id);
            modelMapper.map(dto, persistedObject);
            return persistedObject;
        }
    }

    @Override
    protected Object readWithMessageConverters(HttpInputMessage inputMessage, MethodParameter parameter, Type targetType) throws IOException, HttpMediaTypeNotSupportedException, HttpMessageNotReadableException {
        for (Annotation ann : parameter.getParameterAnnotations()) {
            DTO dtoType = AnnotationUtils.getAnnotation(ann, DTO.class);
            if (dtoType != null) {
                return super.readWithMessageConverters(inputMessage, parameter, dtoType.value());
            }
        }
        throw new RuntimeException();
    }

    private Object getEntityId(@NotNull Object dto) {
        for (Field field : dto.getClass().getDeclaredFields()) {
            if (field.getAnnotation(Id.class) != null) {
                try {
                    field.setAccessible(true);
                    return field.get(dto);
                } catch (IllegalAccessException e) {
                    throw new RuntimeException(e);
                }
            }
        }
        return null;
    }
}
So far, this is the most complex class that we have created, but let's break it in small pieces to understand what is going on:
- This class extends
RequestResponseBodyMethodProcessor. We take advantage of this processor to avoid having to write the whole process of converting requests into classes. For those who are used to Spring MVC, the class extended is the one that process and populates@RequestBodyparameters. This means that it takes, e.g., a JSON body and transforms on an instance of a class. In our case we tweak the base class to populate an instance of the DTO instead. - This class contains a static instance of
ModelMapper. This instance is used to map all DTOs into entities. - This class contains an instance of
EntityManager. We inject an entity manager in this class to be able to query the database for existing entities based on theidpassed through DTOs. - We overwrite the
supportsParametermethod. Without overwriting this method, our new class would be applied for@RequestBodyparameters, just like the base class. Therefore we need to tweak it to make it apply for@DTOannotations only. - We overwrite
validateIfApplicable. The base class runs bean validation only if the parameter is marked with@Validor@Validated. We change this behavior to apply bean validation on all DTOs. - We overwrite
resolveArgument. This is the most important method in our implementation. We tweak it to embed theModelMapperinstance in the process and make it map DTOs into entities. But before mapping, we check if we are handling a new entity, or if we have to apply the changes proposed by the DTO in an existing entity. - We overwrite the
readWithMessageConvertersmethod. The base class simply takes the parameter type and converts the request into an instance of it. We overwrite this method to make the conversion to the type defined in theDTOannotation, and leave the mapping from the DTO to the entity to theresolveArgumentmethod. - We define a
getEntityIdmethod. This method iterates over the fields of the DTO being populate to check if there is one marked with@Id. If it finds, it returns the value of the field soresolveArgumentcan query the database with it.
Although large, the implementation of this class is not hard to understand. In summary, what it does is to populate an instance of a DTO, defined in the @DTO annotation, and then maps the properties of this DTO into an entity. What makes it a little bit more magic is that instead of always populating a new instance of an entity, it first checks if there is an @Id property in the DTO to see if it needs to fetch a pre-existing entity from the database or not.
To activate the DTOModelMapper class in our Spring Boot application, we will need to extend WebMvcConfigurerAdapter to add it as an argument resolver. Let's create a class called WebMvcConfig in the com.questionmarks package with the following content:
package com.questionmarks;

import com.fasterxml.jackson.databind.ObjectMapper;
import com.questionmarks.util.DTOModelMapper;
import org.springframework.beans.factory.annotation.Autowired;
import org.springframework.context.ApplicationContext;
import org.springframework.context.annotation.Configuration;
import org.springframework.http.converter.json.Jackson2ObjectMapperBuilder;
import org.springframework.web.method.support.HandlerMethodArgumentResolver;
import org.springframework.web.servlet.config.annotation.WebMvcConfigurerAdapter;

import javax.persistence.EntityManager;
import java.util.List;

@Configuration
public class WebMvcConfig extends WebMvcConfigurerAdapter {
    private final ApplicationContext applicationContext;
    private final EntityManager entityManager;

    @Autowired
    public WebMvcConfig(ApplicationContext applicationContext, EntityManager entityManager) {
        this.applicationContext = applicationContext;
        this.entityManager = entityManager;
    }

    @Override
    public void addArgumentResolvers(List<HandlerMethodArgumentResolver> argumentResolvers) {
        super.addArgumentResolvers(argumentResolvers);
        ObjectMapper objectMapper = Jackson2ObjectMapperBuilder.json().applicationContext(this.applicationContext).build();
        argumentResolvers.add(new DTOModelMapper(objectMapper, entityManager));
    }
}
When an instance of the WebMvcConfig configuration class is created by Spring, it gets two components injected: ApplicationContext and EntityManager. The latter is used to create the DTOModelMapper and help it querying the database as explained before. The ApplicationContext is used to create an instance of ObjectMapper. This mapper provides functionality for converting between Java objects and matching JSON structures, which is needed by the DTOModelMapper and its superclass, RequestResponseBodyMethodProcessor.
“Mapping DTOs to entities automatically on Spring Boot”
Tweet This
With the WebMvcConfig properly configured in our project, we can now take advantage of the @DTO annotation on RESTful APIs to automatically map DTOs into entities. To see this in action, we are going to create a controller to expose the endpoints that accept requests to create and update exams, and also an endpoint to list all the existing exams. But before creating this controller, we are going to create a class that will enable us to handle exam persistence. We are going to call this class as ExamRepository, and are going to create it in a new package called com.questionmarks.persistence with the following code:
package com.questionmarks.persistence;

import com.questionmarks.model.Exam;
import org.springframework.data.jpa.repository.JpaRepository;

public interface ExamRepository extends JpaRepository<Exam, Long> {
}
As the JpaRepository interface contains methods like save(Exam exam), findAll(), and delete(Exam exam), we won't need to implement anything else on it. Therefore, we can create the controller that will use this repository interface and expose the endpoints aforementioned. Let's create a new package called com.questionmarks.controller and add a class called ExamRestController on it:
package com.questionmarks.controller;

import com.questionmarks.model.Exam;
import com.questionmarks.model.dto.ExamCreationDTO;
import com.questionmarks.model.dto.ExamUpdateDTO;
import com.questionmarks.persistence.ExamRepository;
import com.questionmarks.util.DTO;
import org.springframework.http.HttpStatus;
import org.springframework.web.bind.annotation.GetMapping;
import org.springframework.web.bind.annotation.PostMapping;
import org.springframework.web.bind.annotation.PutMapping;
import org.springframework.web.bind.annotation.RequestMapping;
import org.springframework.web.bind.annotation.ResponseStatus;
import org.springframework.web.bind.annotation.RestController;

import java.util.List;

@RestController
@RequestMapping("/exams")
public class ExamRestController {
    private ExamRepository examRepository;

    public ExamRestController(ExamRepository examRepository) {
        this.examRepository = examRepository;
    }

    @GetMapping
    public List<Exam> getExams() {
        return examRepository.findAll();
    }

    @PostMapping
    public void newExam(@DTO(ExamCreationDTO.class) Exam exam) {
        examRepository.save(exam);
    }

    @PutMapping
    @ResponseStatus(HttpStatus.OK)
    public void editExam(@DTO(ExamUpdateDTO.class) Exam exam) {
        examRepository.save(exam);
    }
}
The implementation of this class ended up being quite simple. We just created three methods, one for each endpoint, and injected the ExamRepository interface through the constructor. The first method defined, getExams, was implemented to handle GET requests and to return a list of exams. The second endpoint, newExam, was implemented to handle POST requests that contains ExamCreationDTO and, with the help of DTOModelMapper, to convert to new instances of Exam. The third and last method, called editExam, defined an endpoint to handle PUT requests and to convert ExamUpdateDTO objects into existing instances of Exam.
It's important to highlight that this last method uses the id sent through the DTO to find a persisted instance of Exam, and then replaces three properties on it before providing to the method. The properties replaced are title, description, and editedAt, exactly as defined in the ExamUpdateDTO.
Running the application now, through our IDE or through the gradle bootRun command, will start our application and allow users to interact with the endpoints created. The following list of commands shows how to use curl to create, update, and retrieve exams, using the DTOs created:
# retrieves all exams
curl http://localhost:8080/exams

# adds a new exam
curl -X POST -H "Content-Type: application/json" -d '{
    "title": "JavaScript",
    "description": "JS developers."
}' http://localhost:8080/exams

# adds another exam while ignoring fields not included in the DTO
curl -X POST -H "Content-Type: application/json" -d '{
    "title": "Python Interview Questions",
    "description": "An exam focused on helping Python developers.",
    "published": true
}' http://localhost:8080/exams

# updates the first exam changing its title and description
curl -X PUT -H "Content-Type: application/json" -d '{
    "id": 1,
    "title": "JavaScript Interview Questions",
    "description": "An exam focused on helping JS developers."
}' http://localhost:8080/exams
Aside: Securing Spring APIs with Auth0
Securing Spring Boot APIs with Auth0 is easy and brings a lot of great features to the table. With Auth0, we only have to write a few lines of code to get solid identity management solution, single sign-on, support for social identity providers (like Facebook, GitHub, Twitter, etc.), and support for enterprise identity providers (like Active Directory, LDAP, SAML, custom, etc.).
In the following sections, we are going to learn how to use Auth0 to secure APIs written with Spring Boot.
Creating the API
First, we need to create an API on our free Auth0 account. To do that, we have to go to the APIs section of the management dashboard and click on "Create API". On the dialog that appears, we can name our API as "Contacts API" (the name isn't really important) and identify it as https://contacts.blog-samples.com (we will use this value later).
Registering the Auth0 Dependency
The second step is to import a dependency called auth0-spring-security-api. This can be done on a Maven project by including the following configuration to pom.xml (it's not harder to do this on Gradle, Ivy, and so on):
<project ...>
    <!-- everything else ... -->
    <dependencies>
        <!-- other dependencies ... -->
        <dependency>
            <groupId>com.auth0</groupId>
            <artifactId>auth0-spring-security-api</artifactId>
            <version>1.0.0-rc.3</version>
        </dependency>
    </dependencies>
</project>
Integrating Auth0 with Spring Security
The third step consists of extending the WebSecurityConfigurerAdapter class. In this extension, we use JwtWebSecurityConfigurer to integrate Auth0 and Spring Security:
package com.auth0.samples.secure;

import com.auth0.spring.security.api.JwtWebSecurityConfigurer;
import org.springframework.beans.factory.annotation.Value;
import org.springframework.context.annotation.Configuration;
import org.springframework.security.config.annotation.method.configuration.EnableGlobalMethodSecurity;
import org.springframework.security.config.annotation.web.builders.HttpSecurity;
import org.springframework.security.config.annotation.web.configuration.EnableWebSecurity;
import org.springframework.security.config.annotation.web.configuration.WebSecurityConfigurerAdapter;

@Configuration
@EnableWebSecurity
@EnableGlobalMethodSecurity(prePostEnabled = true)
public class SecurityConfig extends WebSecurityConfigurerAdapter {
    @Value(value = "${auth0.apiAudience}")
    private String apiAudience;
    @Value(value = "${auth0.issuer}")
    private String issuer;

    @Override
    protected void configure(HttpSecurity http) throws Exception {
        JwtWebSecurityConfigurer
                .forRS256(apiAudience, issuer)
                .configure(http)
                .cors().and().csrf().disable().authorizeRequests()
                .anyRequest().permitAll();
    }
}
As we don't want to hard code credentials in the code, we make SecurityConfig depend on two environment properties:
auth0.apiAudience: This is the value that we set as the identifier of the API that we created at Auth0 (https://contacts.blog-samples.com).auth0.issuer: This is our domain at Auth0, including the HTTP protocol. For example:https://blog-samples.auth0.com/.
Let's set them in a properties file on our Spring application (e.g. application.properties):
auth0.issuer:https://blog-samples.auth0.com/
auth0.apiAudience:https://contacts.blog-samples.com/
Securing Endpoints with Auth0
After integrating Auth0 and Spring Security, we can easily secure our endpoints with Spring Security annotations:
package com.auth0.samples.secure;

import com.google.common.collect.Lists;
import org.springframework.security.access.prepost.PreAuthorize;
import org.springframework.web.bind.annotation.GetMapping;
import org.springframework.web.bind.annotation.PostMapping;
import org.springframework.web.bind.annotation.RequestBody;
import org.springframework.web.bind.annotation.RequestMapping;
import org.springframework.web.bind.annotation.RestController;

import java.util.List;

@RestController
@RequestMapping(value = "/contacts/")
public class ContactController {
    private static final List<Contact> contacts = Lists.newArrayList(
            Contact.builder().name("Bruno Krebs").phone("+5551987654321").build(),
            Contact.builder().name("John Doe").phone("+5551888884444").build()
    );

    @GetMapping
    public List<Contact> getContacts() {
        return contacts;
    }

    @PostMapping
    public void addContact(@RequestBody Contact contact) {
        contacts.add(contact);
    }
}
Now, to be able to interact with our endpoints, we will have to obtain an access token from Auth0. There are multiple ways to do this and the strategy that we will use depends on the type of the client application we are developing. For example, if we are developing a Single Page Application (SPA), we will use what is called the Implicit Grant. If we are developing a mobile application, we will use the Authorization Code Grant Flow with PKCE. There are other flows available at Auth0. However, for a simple test like this one, we can use our Auth0 dashboard to get one.
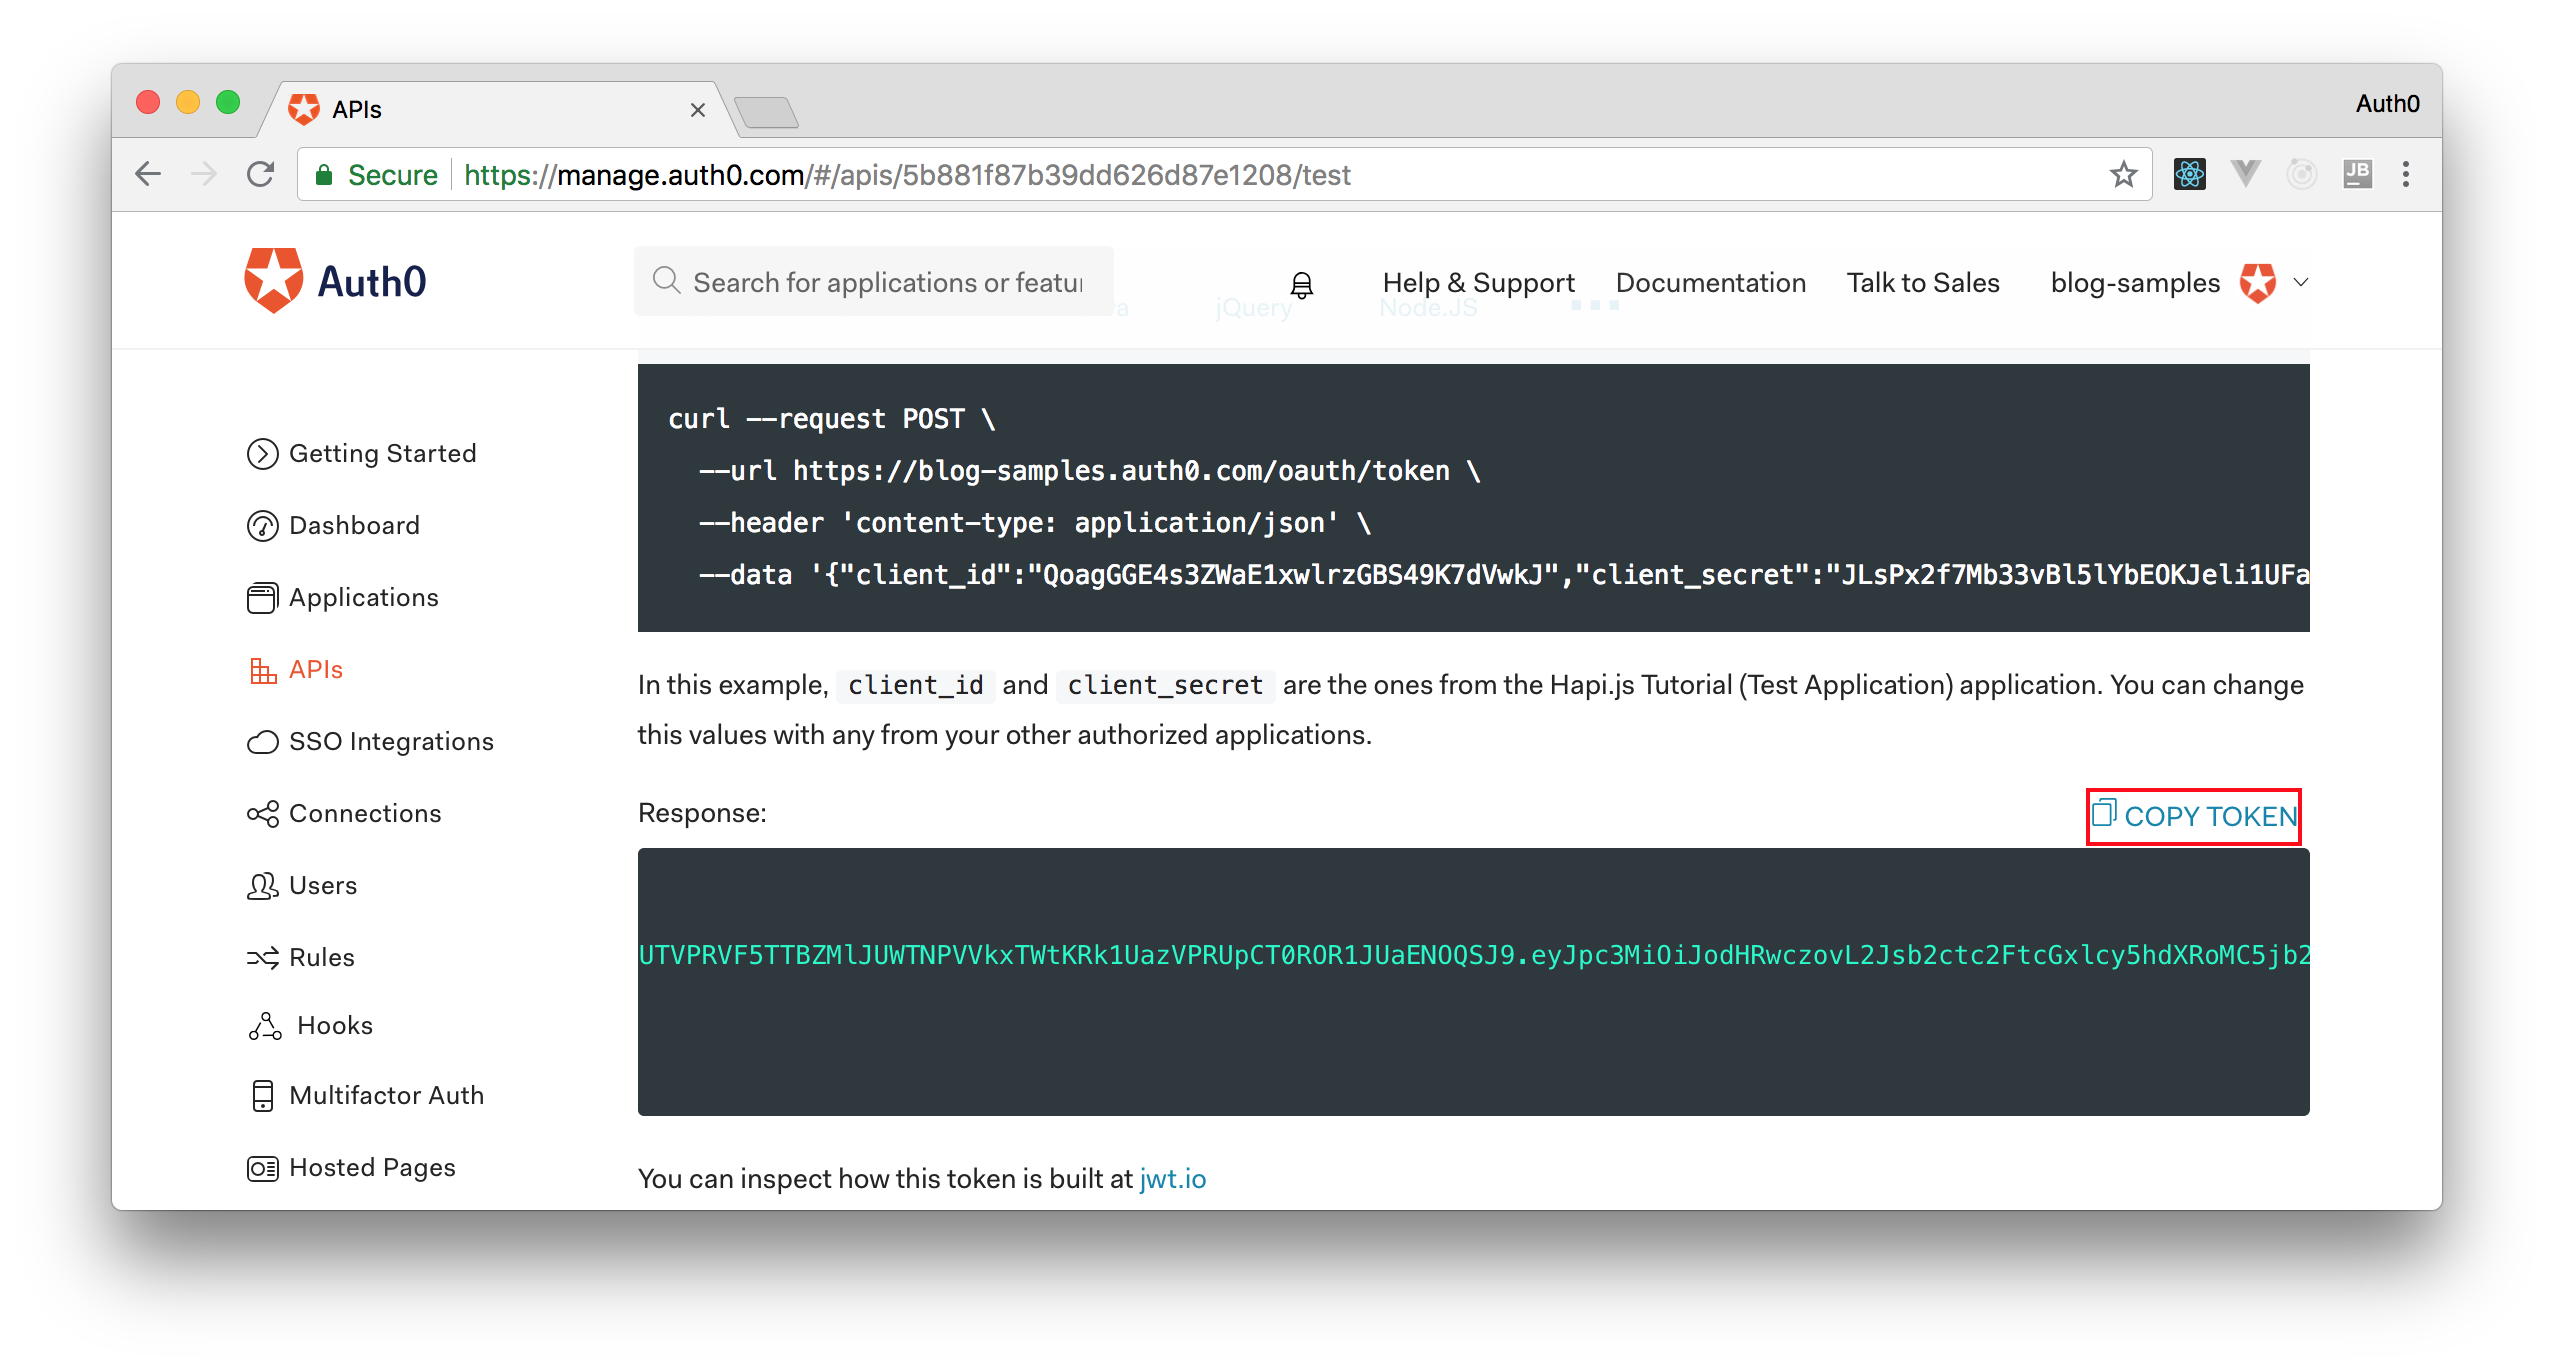
Therefore, we can head back to the APIs section in our Auth0 dashboard, click on the API we created before, and then click on the Test section of this API. There, we will find a button called Copy Token. Let's click on this button to copy an access token to our clipboard.
After copying this token, we can open a terminal and issue the following commands:
# create a variable with our token
ACCESS_TOKEN=<OUR_ACCESS_TOKEN>

# use this variable to fetch contacts
curl -H 'Authorization: Bearer '$ACCESS_TOKEN http://localhost:8080/contacts/
Note: We will have to replace
<OUR_ACCESS_TOKEN>with the token we copied from our dashboard.
As we are now using our access token on the requests we are sending to our API, we will manage to get the list of contacts again.
That's how we secure our Node.js backend API. Easy, right?
Next Steps: Exception Handling and I18N
With the @DTO annotation and its companion DTOModelMapper, we have built a solid basis that allow us to easily hide implementation details about our entities. Together, they smoothen the development process of RESTful endpoints by automatically mapping DTOs into entities and also by validating the data sent through these DTOs. Now, what we are missing is a proper way to handle exceptions thrown during these validations, and also unexpected exceptions that might occur during the flight.
We want to provide an experience as great as possible for whomever consume our API, and this includes giving well formatted error messages. More than that, we want to be able to communicate with users that speak other languages, besides English. Therefore, in the next article, we are going to tackle exception handling and I18N (Internationalization) on Spring Boot APIs. Stay tuned!
About the author

Bruno Krebs
R&D Content Architect (Auth0 Alumni)