
As an iOS Swift developer, at some point, you'll likely need to add user authentication - or, as it's more commonly referred to, login and logout - to your app. Hopefully, you'll have integrated this with Auth0. But if not - or if you're still deciding whether user authentication is something you do actually need - I'd highly recommend you start by visiting either Get Started with iOS Authentication using SwiftUI, Part 1: Login and Logout or Get Started with iOS Authentication using Swift and UIKit (depending on your preference) before going any further. In this article, I will show you how to configure Auth0 to deliver an OAuth 2.0 Access Token that will allow you to safely, securely, and on behalf of a user, call a protected API from within your app. For clarification, this will be some first-party (custom) protected API that you build/own rather than some third-party API provided by Facebook, Google, Microsoft, or the like; that's a topic for another time 😉.
What Is an OAuth 2.0 Access Token
OAuth 2.0 allows the generation of an Access Token for use as part of a call to a protected end-point - a.k.a. an API - on behalf of a user and with that user's consent. This is often referred to as Delegated Authorization workflow and typically involves using an Authorization Server like Auth0. An Access Token, often referred to as a Bearer Token - and usually supplied as the Authorization: Bearer header - acts as the security credential for a REST-based API call, providing a more secure and more auditable mechanism than either Basic Authentication or an API Key - particularly for a native app or SPA - Single Page Application - where the threat landscape can be more complex than that for a Regular Web Application. Though they can be similar, e.g., both being in JWT format in Auth0, an OAuth 2.0 Access Token is different from an OIDC ID Token - which is a token intended for application use and created as part of OpenID Connect workflow; you can read more about this here.
Configuring Auth0
In this blog post, I'm going to show you how to leverage Auth0 (acting as an OAuth 2.0 Authorization Server) to generate an Access Token that'll allow your Swift app to call your (custom) API securely. To do this, I'm going to build on the Get Started with iOS Authentication using SwiftUI, Part 1: Login and Logout blog post I mentioned previously; I'll also continue with the convention in that article of using the 🛠 emoji if you’d like to skim through the content while focusing on the build and execution steps.
Why SwiftUI? Well, we're not too concerned with the UX at this point, so whether you use SwiftUI or Swift with UIKit is something of a moot point. Access Token generation requires Authentication as a pre-requisite, and leveraging the IdP (a.k.a. Identity Provider) capabilities in Auth0 is typically a good way of doing that.
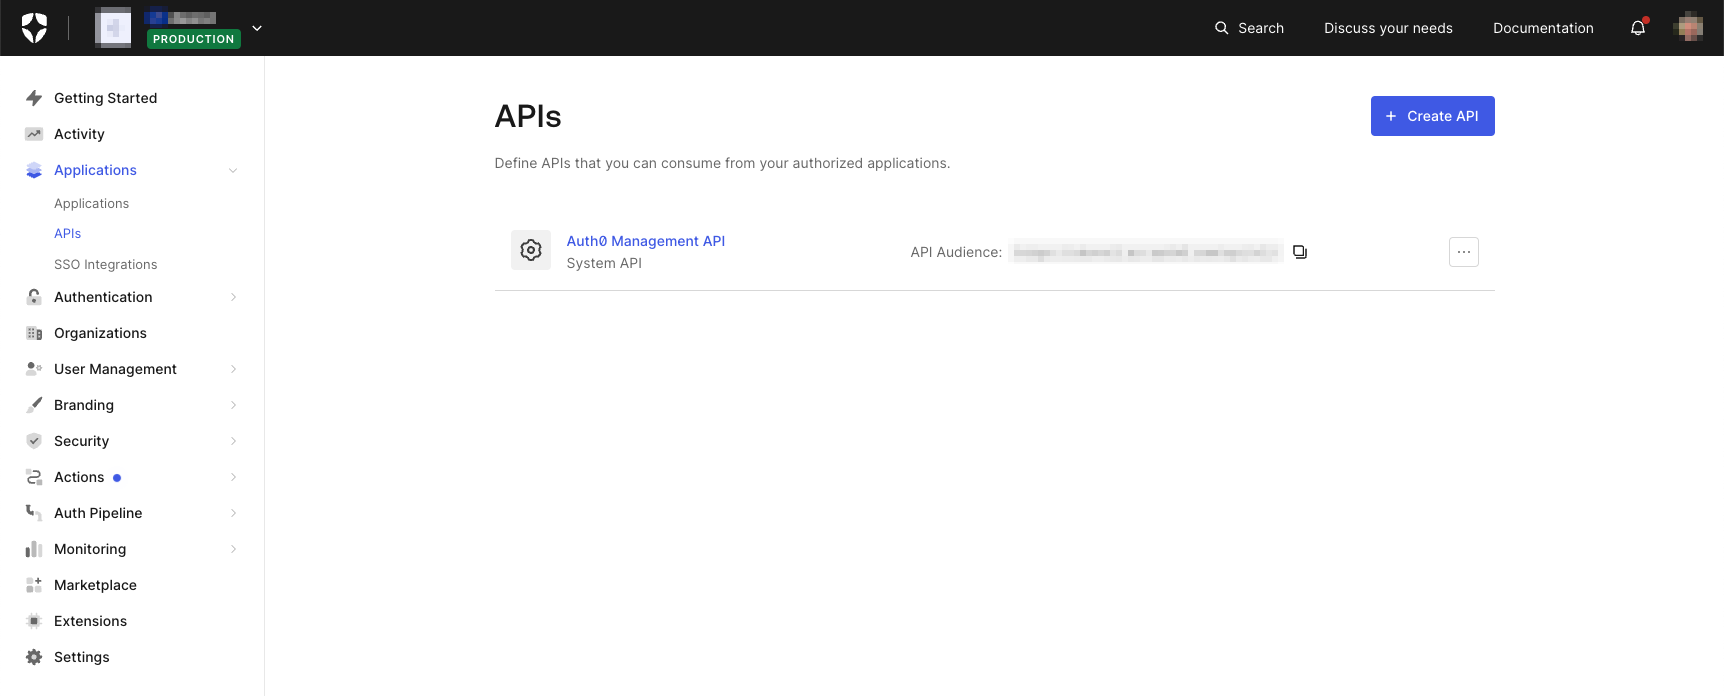
🛠 Let's start by using the Dashboard to configure Auth0. I'm going to register a new API by clicking the Create API button near the top right of the page shown below (note: the Auth0 tenant I'm using is a Production class tenant, but yours will probably say Development; for the purpose of this article, the tenant classification is irrelevant):
This will bring up the following dialog from which I can create my API definition:
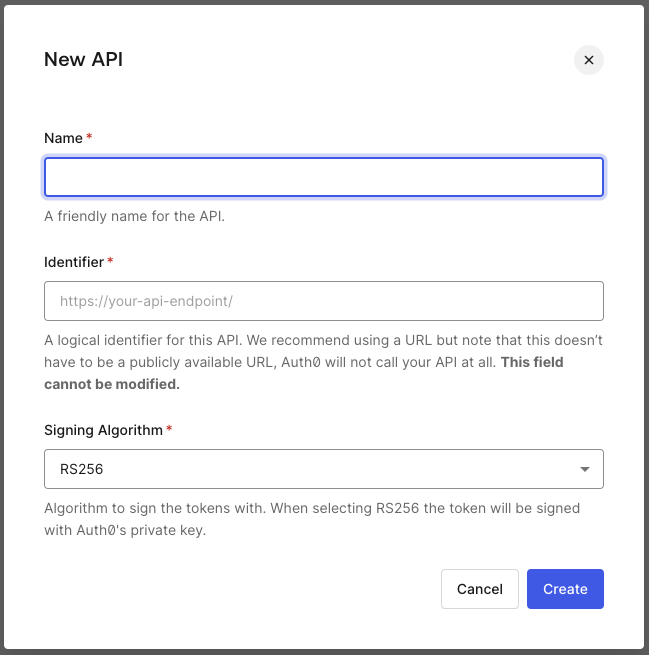
There are a few parts to this dialog, so let's go through them one by one:
- Name is the symbolic name for your API, and you can change it later if you wish.
- Identifier is a value in URI format that cannot be changed later. This identifier represents the (custom)
audiencevalue we'll be using subsequently; being a URI, it has a similar structure to a URL, but instead, it is the symbolic identifier for the API, not where the API lives. - Signing Algorithm indicates the algorithm used to sign the Access Token, and it's almost always preferable to leave this as the default
RS256. In Auth0, an Access Token is, in a similar fashion to an ID Token, typically in JWT format and likewise has a signature component. While Auth0 supports asymmetric signing (RS256) using a public-private key pair and symmetric signing (HS256; using a single shared key), the former is almost always recommended over the latter from a security and convenience perspective.
🛠 I'm not going to go into the details of the API implementation here - I'll leave you, dear reader, to follow up on the Auth0 Developer Center Backend API samples or the like at your leisure. For now, I'm going to go ahead and use some sample values; feel free to populate the following with something similar for your API scenario:
- Name:
MyAPI - identifier:
https://myapi.com Signing Algorithm:
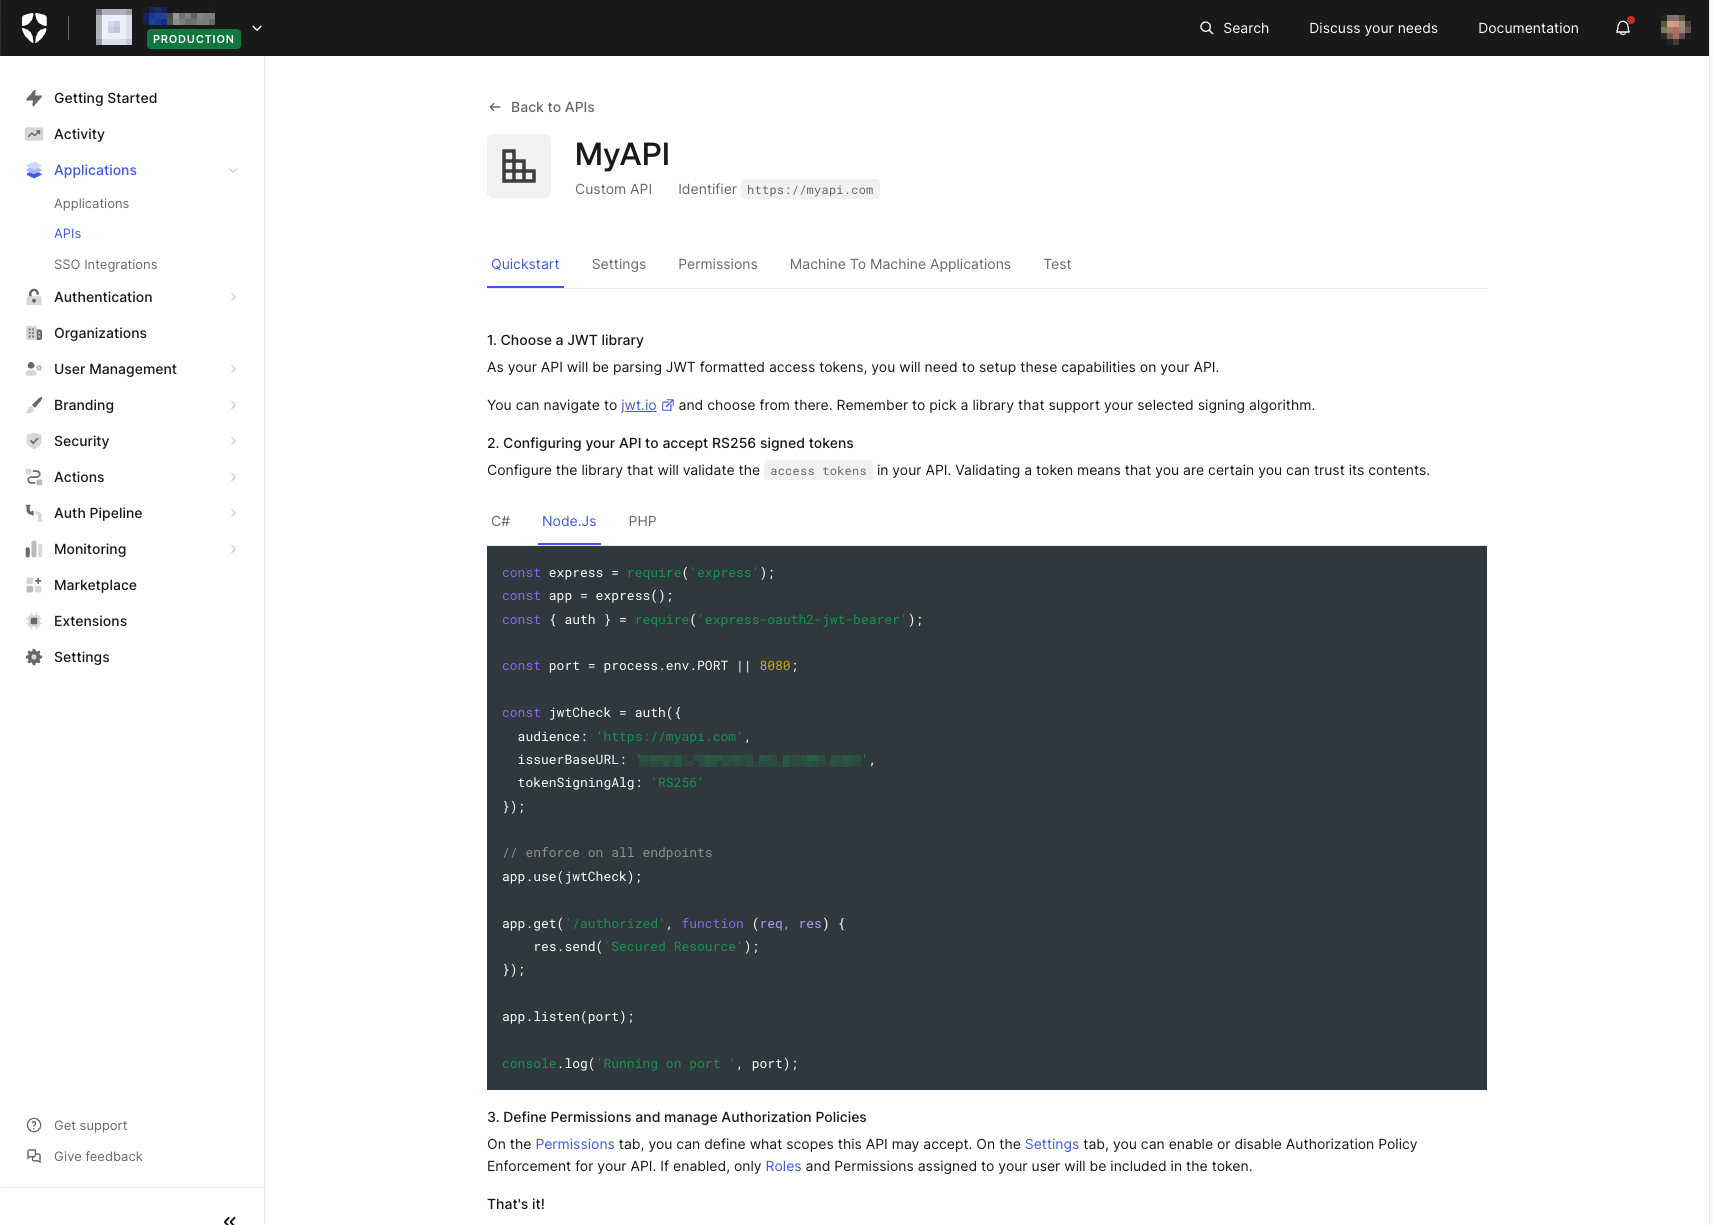
RS256(the default)🛠 Click Create, and the (custom) API configuration page for the app should eventually appear. The page will typically start at the Quickstart section, which will give you some examples for configuring popular API technology stacks; this one shows a sample configuration for Node.js with Express, for example:
Settings
At this point, I want to focus on two specific aspects of API configuration in Auth0, and we'll start with the details on the Settings tab. Click the Settings tab, and if you scroll down a little, you'll see a page that looks similar to the following; the fields you will have scrolled past to arrive at the display illustrated below will be showing immutable information about the API configuration - such as the internal Id and (custom) audience identifier - as well as giving you the option to change the symbolic API Name:
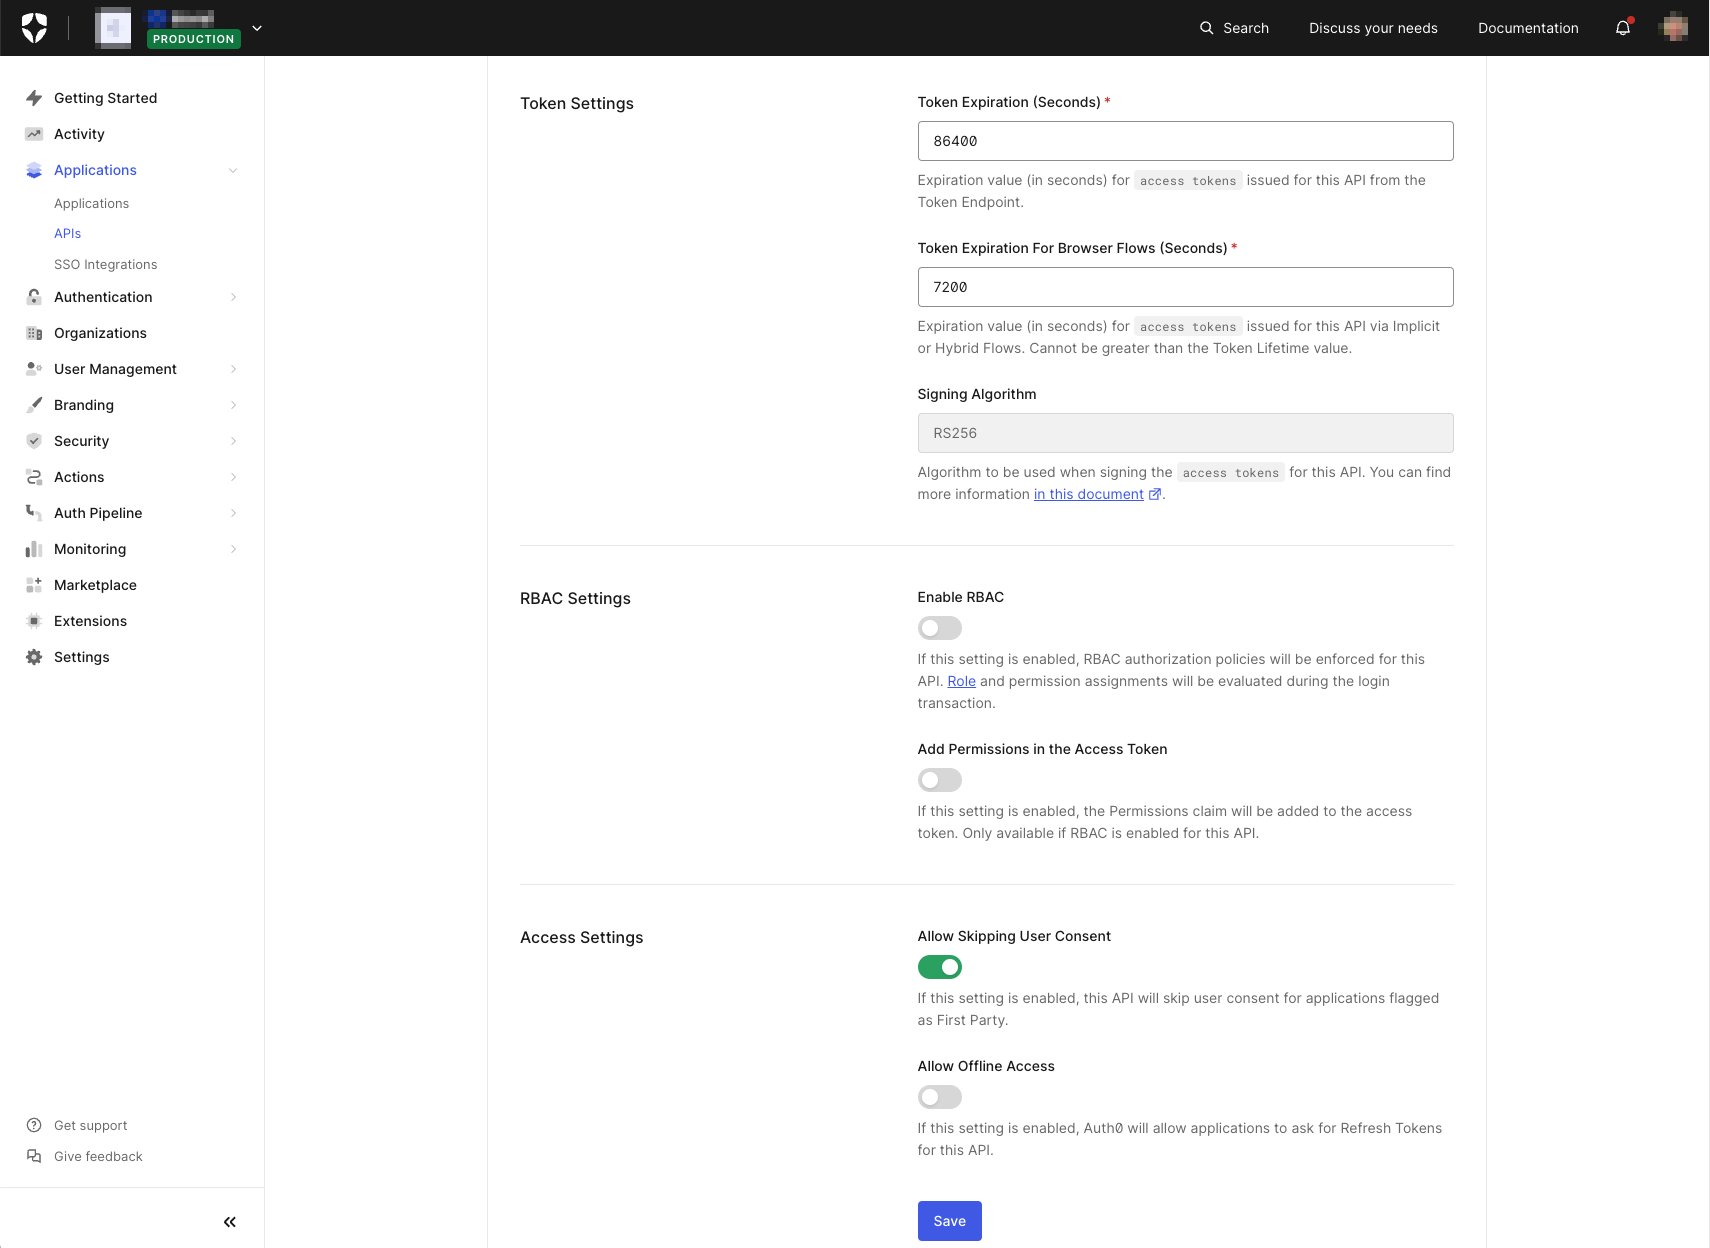
- Token Expiration (Seconds): we'll leave it set to the default value for now. However, this is a value you'll likely want to revisit at some point, as it controls the expiry of the Access Token issued by Auth0 for the given (custom)
audienceidentifier. This is important, particularly for security-sensitive operations - such as those involving financial transactions - where you'll likely want to keep this value as low as possible, meaning that an Access Token will only have a lifetime just long enough for the operation in question and so reduce the threat landscape should the token get inadvertently leaked. - Allow Skipping User Consent will allow an application defined in Auth0 - a.k.a. a first-party application by default; see here for more details - to skip interactive user consent when an Access Token is requested. A fundamental part of the OAuth 2.0 specification allows a user to explicitly consent to what an application can do on their behalf. I'll talk more about it in the Permissions section below. For first-party applications - i.e., an application that you also own and build in addition to the (custom) API - consent is often implied, so with this setting, Auth0 gives you the option to do away with unnecessary user interaction.
All of the other settings we can leave for now.
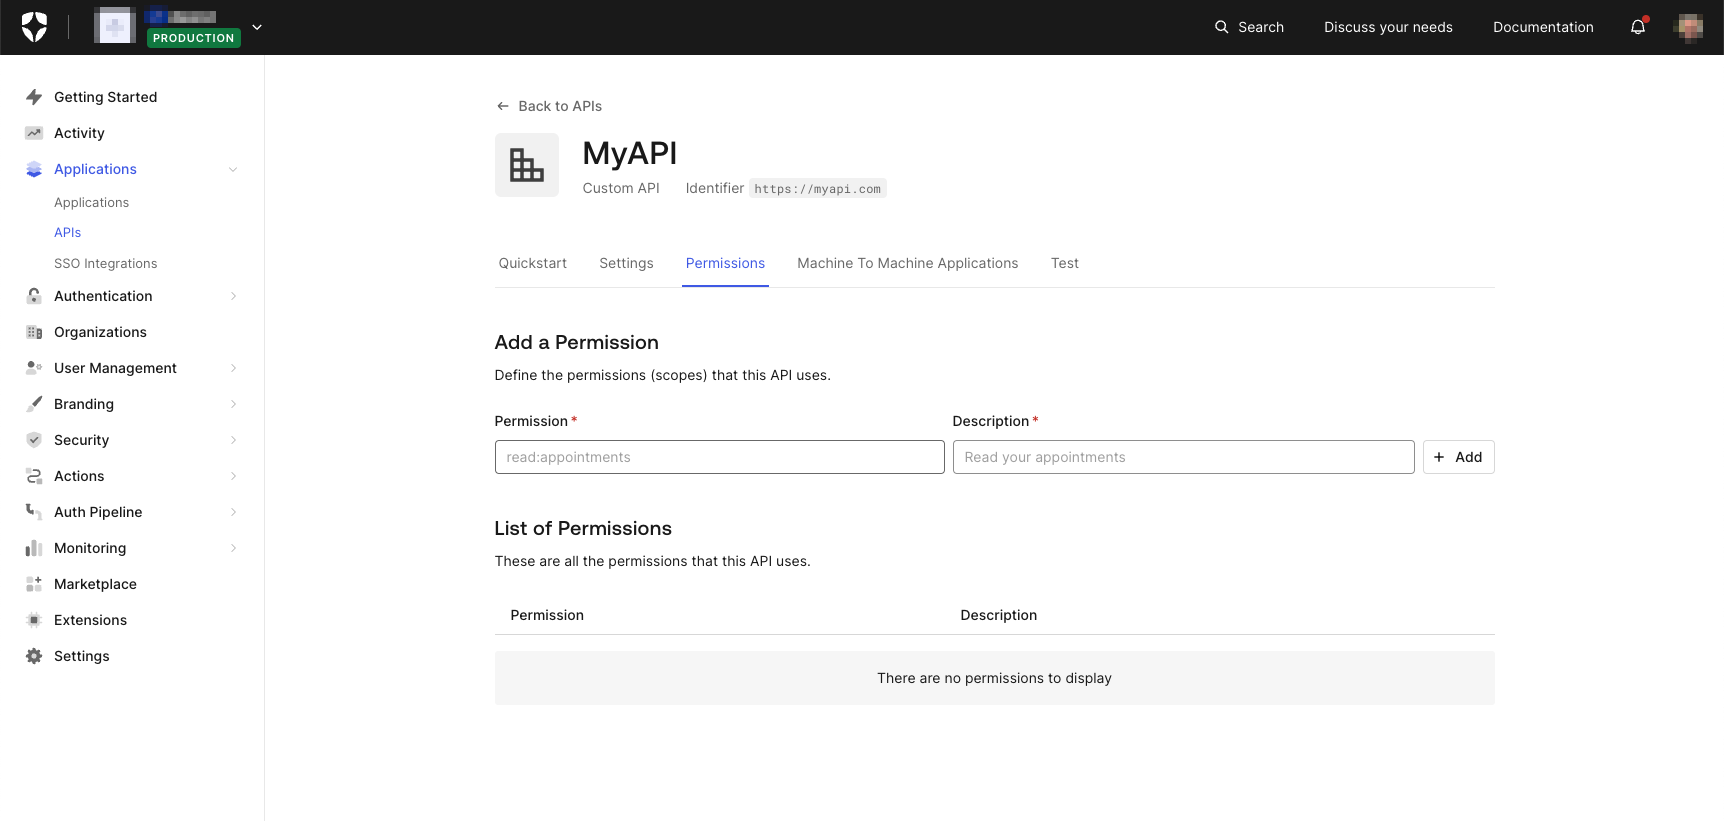
Permissions
The other aspect I want to discuss when it comes to API configuration in Auth0 is Permissions - accessed via the Permissions tab, as shown in the diagram below. The term Permission can be a little confusing as it has more than one meaning in an Auth0 context - particularly when Auth0 RBAC (i.e., Role Based Access Control) is enabled against an API. I'm not going into more details here, but suffice it to say that we will define at least one scope - the default meaning for Permission in Auth0 when RBAC is not enabled against an API. If you want to read more, the Auth0 Blog article here can provide you with additional details.
scope is part of OAuth 2.0 Delegated Authorization and defines what an application can do on behalf of a user and with that user's consent. While it's entirely feasible to omit scope definitions - the OAuth 2.0 spec does not make them mandatory - doing so can lead to problematic situations, for example:
- Using an unscoped Access Token essentially violates the Principle of Least Privilege in that such a token would be valid against any API route.
- There is no mechanism for a user to rescind consent on one or more specific scopes. This can make following the likes of GDPR or other regulatory compliance problematic.
- If an API is opened up to a Third-Party application, it becomes impossible to comply with the OAuth 2.0 spec without going back and refactoring both the API and the (custom) API definition in Auth0.
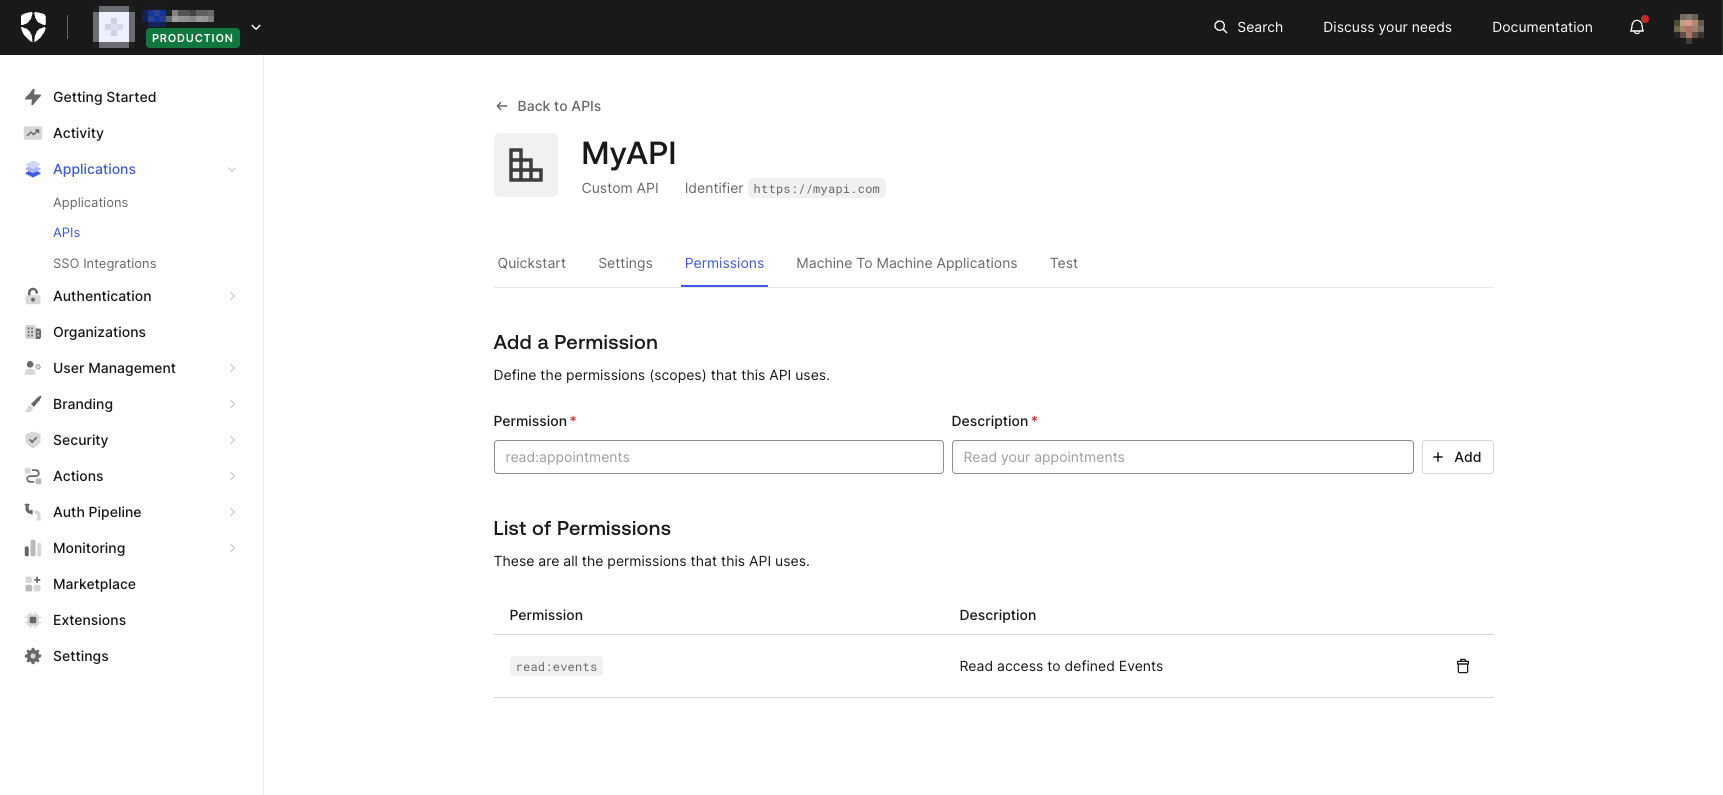
🛠 So we're going to define at least one permission. In the Permission field, enter something like read:events, and in the Description field, enter a suitable description, such as Read access to defined Events. Click + Add, and the page should be updated in line with the image below:
Ok. That's all we need to do for now in Auth0, so let's look at how you request an Access Token for use when calling your API.
Requesting an Access Token
In this section, we're going to see how to request an Access Token from Auth0. As previously mentioned, I'm going to build on the Get Started with iOS Authentication using SwiftUI, Part 1: Login and Logout article I mentioned previously, and also continue with the convention(s) that the article uses - like employing the 🛠 emoji for those of you who'd like to skim through the content while focusing on the build and execution steps.
Updating the Project
🛠 From the completed code as part of Get Started with iOS Authentication using SwiftUI, Part 1: Login and Logout - either the code you completed as part of the walkthrough or found in the iOS SwiftUI Login (completed) directory as part of the download - open the project in Xcode (if it isn't already) and update the login() function in the manner illustrated below. The rest of the code should remain unchanged. You can also download all the code we're going to be creating from this GitHub repository
// [ 📄 ContentView.swift ]

  func login() {
    Auth0
      .webAuth()
      .audience("https://myapi.com")  // 1
      .scope("openid profile email read:events")  // 2
      .start { result in
        switch result {
          case .failure(let error):
            print("Failed with: (error)")

          case .success(let credentials):
            self.isAuthenticated = true
            self.userProfile = Profile.from(credentials.idToken)
            print("Credentials: (credentials)")
            print("ID token: (credentials.idToken)")
            print("Access token: (credentials.accessToken)") // 3
        }
      }
  }
The notes below correspond to the numbered comments above:
- Add the
audienceparameter specifying the Identifier from the (custom) API you created in the Configuring Auth0 section above. - Add
scopeto include theread:eventsscope defined in the Permissions section (above). Because we'll override the default value, we'll also need to explicitly specify the OIDC scopes typically included by default - namely,openid,profile, andemail. You can read more about these here. - Add the
printline to display the returned Access Token in the XCode. This will help with debugging - especially from the perspective of decoding the returned Access Token.
Running the App
🛠 Now run the app (either in the Simulator that comes with XCode or on a real device) and watch what happens when you press the Log in button. Nothing very different, right?!
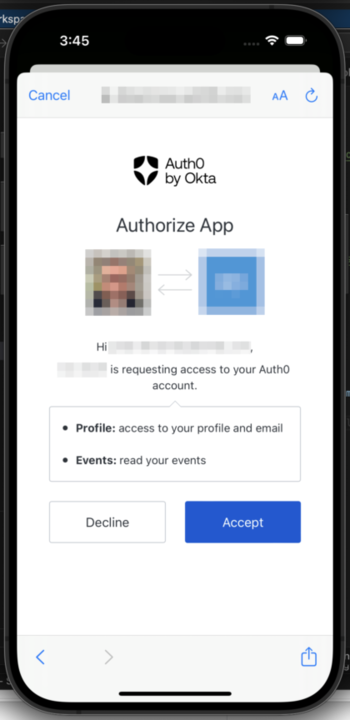
Remember that Allow Skipping User Consent option in the Settings section (discussed above) that's enabled by default? Well, this disables Auth0 from displaying the consent dialog because the definition in Auth0 that's being used is for a first-party application (the default when an Application is defined via the Auth0 Dashboard). If that option had been disabled - or the definition was for a third-party application - then you would have seen a screen similar to that shown below when run for the first time:
Information returned.
Whilst you won't necessarily see anything different occur, there are some changes in the information that will have been returned from Auth0. Firstly, in XCode, you'll see that the credentials print statement in the code above shows an accessToken: "<REDACTED>" line in the debug console log, an expiresIn value and also scope: Optional("openid profile email read:events"). We independently print the value of the accessToken, so I'll discuss that in just a second; scope now echoes the values from the scope requested, and the expiresIn is now calculated based on the Token Expiration discussed earlier in the Settings section above.
The accessToken that's returned is what we're going to use when calling our API. Ordinarily, an Access Token should be treated as opaque from the perspective of the application. However, because in Auth0, an Access Token is delivered in JWT format - at least when a (custom) API audience is specified, the default being JWE format when no specific audience` is used - we can take the value and decode it using [jwt.io] (https://jwt.io/). Doing so should yield something similar to the following (portions redacted for security):
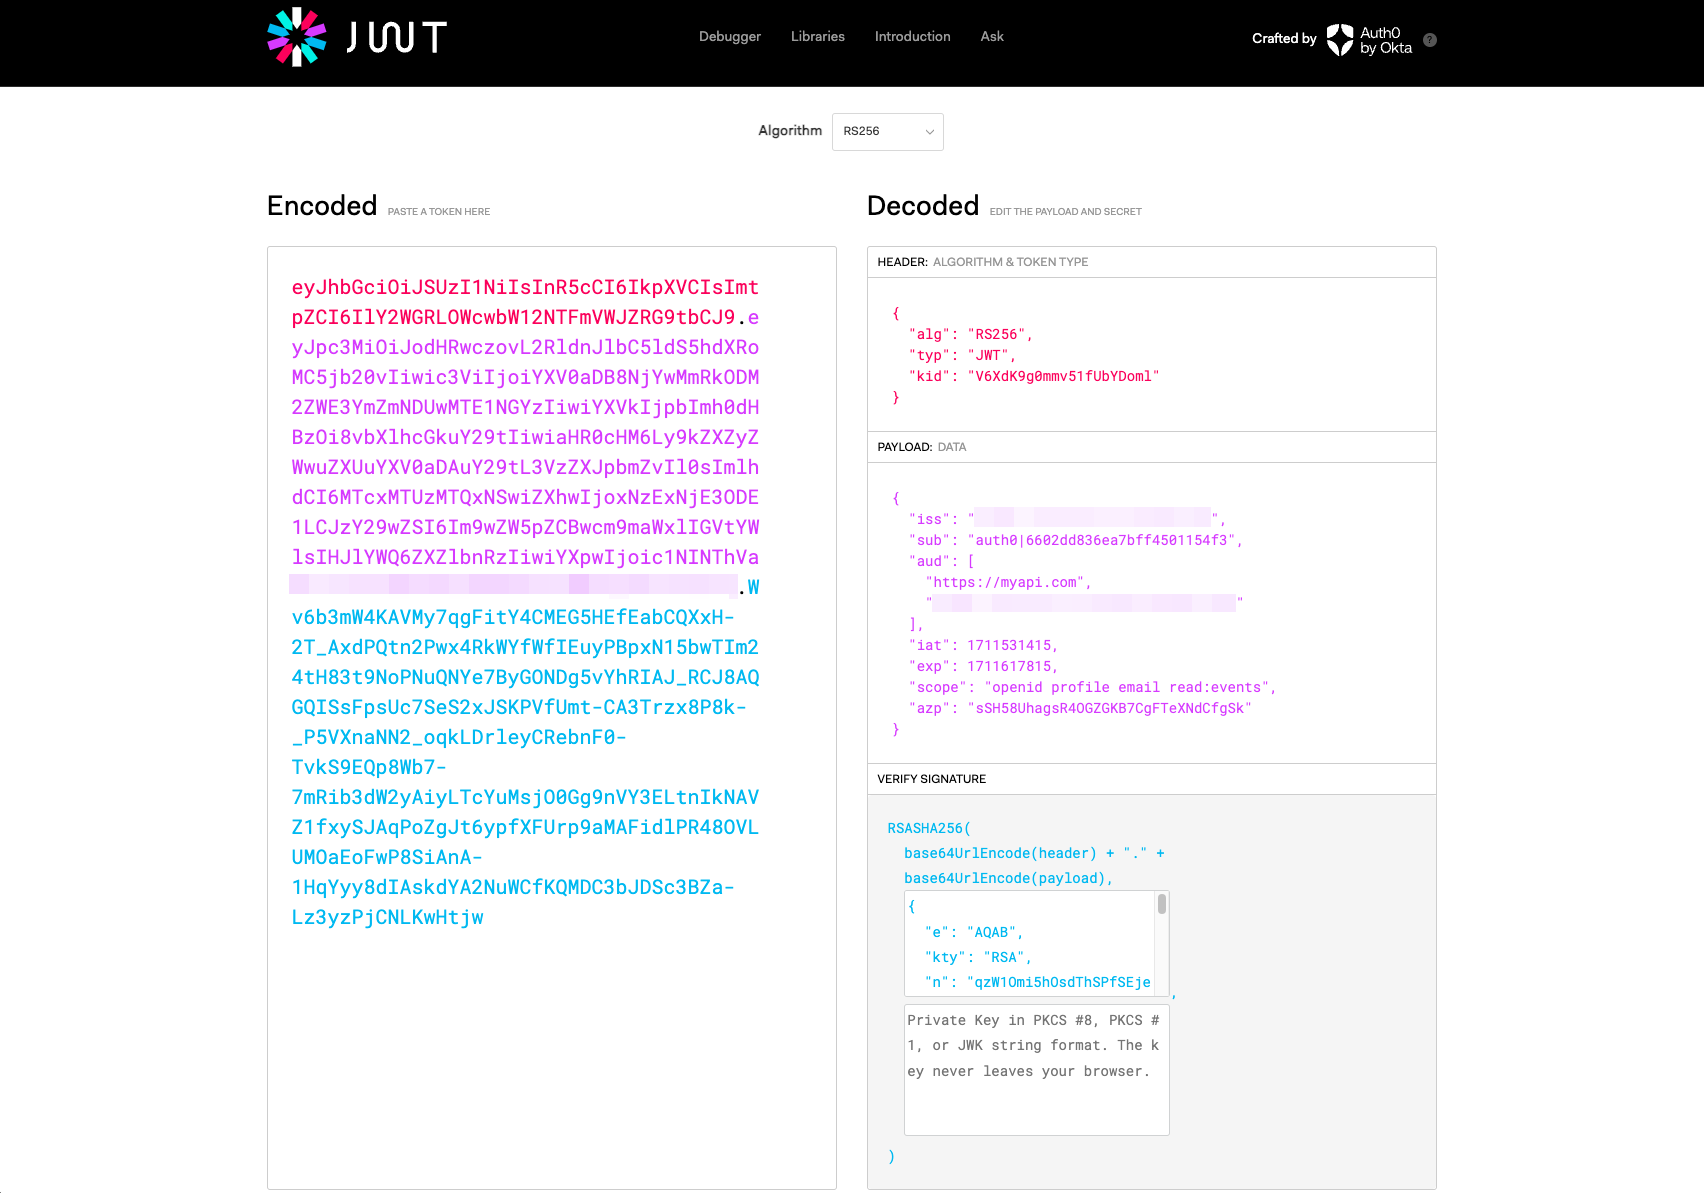
Of particular note, you'll see the https://myapi.com identifier included in the audience claim and the scopes we specified included as part of the scope claim. You'll also notice the sub claim, containing the Auth0 internal identifier for the user on behalf of whom the Access Token has been generated. All of these are standard claims as defined by the OAuth 2.0 specification, and any of the claims displayed would typically be used by the resource server (i.e. the API) to determine the validity of a request. See here in the Auth0 Docs for further information.
Using an Access Token
Now, let's put the Access Token to use.
🛠 Returning to the XCode project, update the code as shown in the illustration below to save the credentials returned from the Auth0 webAuth() request. We'll likely want to use said credentials in a number of places within the app, and we can use the Auth0-provided CredentialsManager to safely and securely store these. I'm not going to go into the process in too much detail here, but you can read more about it by following the link to the Auth0 SDK documentation. Or, alternatively, follow this link to the Examples section in the SDK GitHub repo.
// [ 📄 ContentView.swift ]

  func login() {
    let credentialsManager = CredentialsManager(authentication: Auth0.authentication()) // 1

    Auth0
      .webAuth()
      .audience("https://myapi.com")
      .scope("openid profile email read:events")
      .start { result in
        switch result {
          case .failure(let error):
            print("Failed with: (error)")

          case .success(let credentials):
            self.isAuthenticated = true
            self.userProfile = Profile.from(credentials.idToken)
            // Pass the credentials over to the Credentials Manager
            let didStore = credentialsManager.store(credentials: credentials) // 2
            print("Credentials: (credentials)")
            print("ID token: (credentials.idToken)")
            print("Access token: (credentials.accessToken)")
        }
      }
  }
Some notes that correspond to the numbered comments above:
- Create a reference to the Auth0
CredentialsManager. - Store the returned credentials for later use.
!🛠 Now we need to make a call to the actual API implementation, passing the Access Token as an Authorization: Bearer within the HTTP request header. I've created a separate module to isolate this functionality and, in doing so, will (hopefully) make the process easier to follow; I've added some notes below, too, for things that I feel are relevant:
// [ 📄 APICallView.swift ]

import SwiftUI
import Auth0

struct Event: Identifiable, Codable {  // 1
    let id: Int
    let title: String
    let body: String
}

enum NetworkError: Error {  // 2
    case badUrl
    case invalidRequest
    case badResponse
    case badStatus
    case failedToDecodeResponse
}

class WebService: Codable {
    func credentials() async throws -> Credentials {  // 3
        let credentialsManager = CredentialsManager(authentication: Auth0.authentication())

        return try await withCheckedThrowingContinuation { continuation in
            credentialsManager.credentials { result in
                switch result {
                case .success(let credentials):
                    continuation.resume(returning: credentials)
                    break

                case .failure(let reason):
                    continuation.resume(throwing: reason)
                    break
                }
            }
        }
    }

    func downloadData<T: Codable>(fromURL: String) async -> T? {
        do {
            guard let url = URL(string: fromURL) else { throw NetworkError.badUrl }
            var request = URLRequest(url: url)
            let credentials = try await credentials();

            /* Convention is for an Access Token to be supplied as Authorization Bearer in the header of an HTTP request. Apple's documentation is somewhat ambiguous when it comes to how to do this, so for the purpose of this example I'll follow the advice suggested at https://ampersandsoftworks.com/posts/bearer-authentication-nsurlsession/
             */
            request.setValue("Bearer (credentials.accessToken)", forHTTPHeaderField: "Authorization") // 4

            let (data, result) = try await URLSession.shared.data(for: request)
            guard let response = result as? HTTPURLResponse else { throw NetworkError.badResponse }
            guard response.statusCode >= 200 && response.statusCode < 300 else { throw NetworkError.badStatus }
            guard let decodedResponse = try? JSONDecoder().decode(T.self, from: data) else { throw NetworkError.failedToDecodeResponse }
            return decodedResponse
        } catch NetworkError.badUrl {
            print("There was an error creating the URL")
        } catch NetworkError.badResponse {
            print("Did not get a valid response")
        } catch NetworkError.badStatus {
            print("Did not get a 2xx status code from the response")
        } catch NetworkError.failedToDecodeResponse {
            print("Failed to decode response into the given type")
        } catch {
            print("An error occurred downloading the data")
        }

        return nil
    }
}

class EventViewModel: ObservableObject {
    @Published var eventData = [Event]()

    func fetchData() async {
        guard let downloadedEvents: [Event] = await WebService().downloadData(fromURL: "<API URL goes here>") else {return} // 5
        DispatchQueue.main.async {
            self.eventData = downloadedEvents
        }
    }
}

struct APICallView: View {
    @StateObject var vm = EventViewModel()

    var body: some View { // 6
        List(vm.eventData) { event in
            HStack {
                Text("(event.id)")
                    .padding()
                    .overlay(Circle().stroke(.blue))

                VStack(alignment: .leading) {
                    Text(event.title)
                        .bold()
                        .lineLimit(1)

                    Text(event.body)
                        .font(.caption)
                        .foregroundColor(.secondary)
                        .lineLimit(2)
                }
            }
        }
        .onAppear {
            if vm.eventData.isEmpty {
                Task {
                    await vm.fetchData()
                }
            }
        }
    }
}
The following notes correspond to the numbered comments above:
- Sample
Eventobject structure for the data delivered from the API - A sample enumeration for potential errors generated as a result of calling the API
- Wrapping the Auth0
CredentialsManagerfor Async/Await operation - Adding the Access Token as the
Authorization: Bearerheader - Prefer to get the API URL from some .plist file entry
- Displaying the events returned from the API
API call UX
To make it easy to access the API, I've updated the existing function to add a convenient button that will trigger the API call; the code below shows the changes made to the struct ContentView declaration, with the customary notes added for good measure.
// [ 📄 ContentView.swift ]

  @State private var isAuthenticated = false
  @State private var isAPICall = false // 1
  @State var userProfile = Profile.empty

  var body: some View {

    if isAuthenticated {
        if isAPICall {

            APICallView() // 2

        } else {
            // “Logged in” screen
            // ------------------
            // When the user is logged in, they should see:
            //
            // - The title text “You’re logged in!”
            // - Their photo
            // - Their name
            // - Their email address
            // - The "Log out” button

            VStack {

                Text("You’re logged in!")
                    .modifier(TitleStyle())

                UserImage(urlString: userProfile.picture)

                VStack {
                    Text("Name: (userProfile.name)")
                    Text("Email: (userProfile.email)")
                }
                .padding()

                HStack {

                    Button("Log out") {
                        logout()
                    }
                    .buttonStyle(MyButtonStyle())

                    Button("Call API") {  // 3
                        isAPICall = true;
                    }
                    .buttonStyle(MyButtonStyle())

                } // HStack

            } // VStack
        }

    } else {

      // “Logged out” screen
      // ------------------
      // When the user is logged out, they should see:
      //
      // - The title text “SwiftUI Login Demo”
      // - The ”Log in” button

      VStack {

        Text("SwiftUI Login demo")
          .modifier(TitleStyle())

        Button("Log in") {
          login()
        }
        .buttonStyle(MyButtonStyle())

      } // VStack

    } // if isAuthenticated

  } // body
- Added a new state flag
- Trigger the rendering API call results
- Button to update the added state flag trigger
Building a sample API
As mentioned, I won't be going into the specifics of the API implementation here. However, for a personal SaaS project I'm working on, I've been experimenting using the Amazon API Gateway and have been following this Amazon Blog article; you probably won't need to leverage any of the SaaS aspects - like the Auth0 Organizations feature - however, that article does a pretty good job of describing the (Access) Token validation process...at least in an AWS context. Below are some screenshots of my implementation - a simple API that returns a list of events - which might help you if you decide to go a similar route 😎

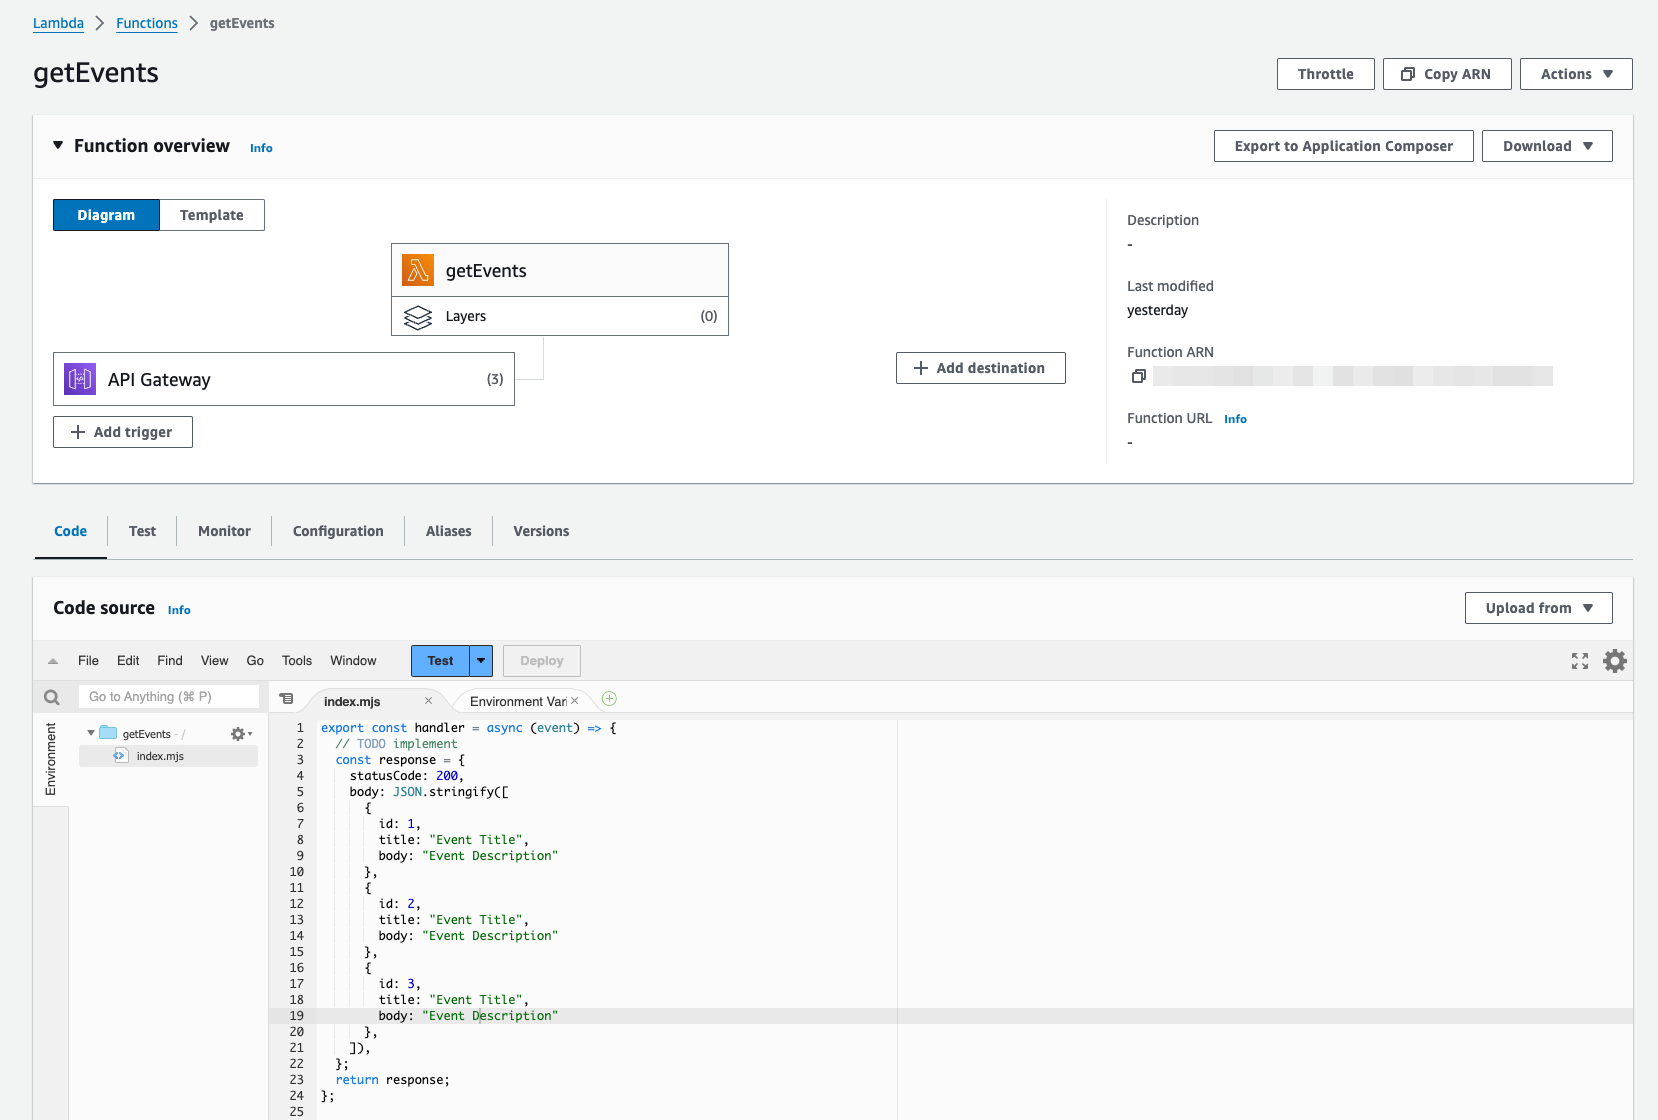
My simple API function is implemented in Node.js, but you can implement an API using any backend language (e.g. Python, PHP, Ruby, etc.) together with any server-side - or server-less - platform. Sticking with an Apple theme and also staying with AWS, here's a great example of how you can leverage server-side Swift (in a serverless environment) to build an API:

Learn how to create and deploy a serverless HTTP API using Swift and AWS Lambda.
Refreshing an Access Token
Using a Refresh Token is typically the recommended approach in a mobile app environment, so, as a follow-up, you'll definitely want to check out my follow-on article on the subject when you get the chance:

A step-by-step guide to leveraging OAuth 2.0 Refresh Tokens in an iOS app built with Swift and integrated with Auth0.
Where to Go Next
Don't forget to check out all the code we created by visiting this GitHub repository. And, of course, feel free to comment below and tell us what you think - we always love to hear feedback, positive or otherwise, as it helps us to improve our content! Thank you. Aside from that, here are some additional resources you might like to follow up on that can help you on your journey. Well, that's all I have for now. Have fun, and I'll catch up with you next time! 😁
About the author

Peter Fernandez
Principal Developer Advocate