If you make iOS or iPadOS apps, you’ll eventually have to build one that requires users to log in. This article will show you how to use Auth0 to add fully-featured login and logout to a UIKit-based iOS/iPadOS app so that you can focus your time and effort on its actual functionality.
Adding authentication — the more formal term for “login/logout” — only looks simple. It often turns into its own project. Just handling the many ways users want to log in can quickly grow into an all-consuming task. You’d also have to deal with user management, scaling, and security issues, each of which has dozens of considerations, risks, issues, and edge cases.
Auth0 solves this problem. With Auth0 and a few lines of code, your app can have a full-featured system that supports logging in with a username/password combination and single sign-on. You’ll also be able to add features such as social accounts, multi-actor authentication, passwordless login, biometrics, and more. You won’t have to update it yourself or handle “behind the scenes” issues, either! Instead, you can concentrate your efforts on what your app does.
This is a UIKit-based app
The phrase “May you live in interesting times” is both a blessing and a curse, and it’s an interesting time for iOS and iPadOS developers. That’s because there are currently two very different UI frameworks for iOS development:
- SwiftUI, which is also known as “the new one.” With SwiftUI, you build user interfaces using Swift code using a declarative approach, which means that you specify how the UI should look and what it should do in different states. You don’t have to specify how the UI moves between those states — it takes care of that for you. If you know React programming, you’ll find SwiftUI familiar. We cover adding login and logout to SwiftUI apps in our article, Get Started with iOS Authentication using SwiftUI, Part 1: Login and Logout.
- UIKit, also known as “the original one.” With UIKit, you build user interfaces by dragging user interface elements onto storyboards. You then connect those elements to variables and methods in the app’s view controllers using outlets and actions. You program UIKit apps imperatively, which means that you define how the app moves between states, how the UI should change appearance when the app changes state, and how the app should behave in different states. This article is about adding login and logout to UIKit apps.
What You’ll Build
You’ll use Auth0 to build a single-screen iOS app that allows users to log in and log out. I’ve purposely kept it as simple as possible to keep the focus on authentication.
While logged in, the user will be able to see the following information from their user profile:
- Full name
- Email address
- Picture
When you launch the completed app, you’ll see a greeting, a Log In button, and a disabled Log Out button:
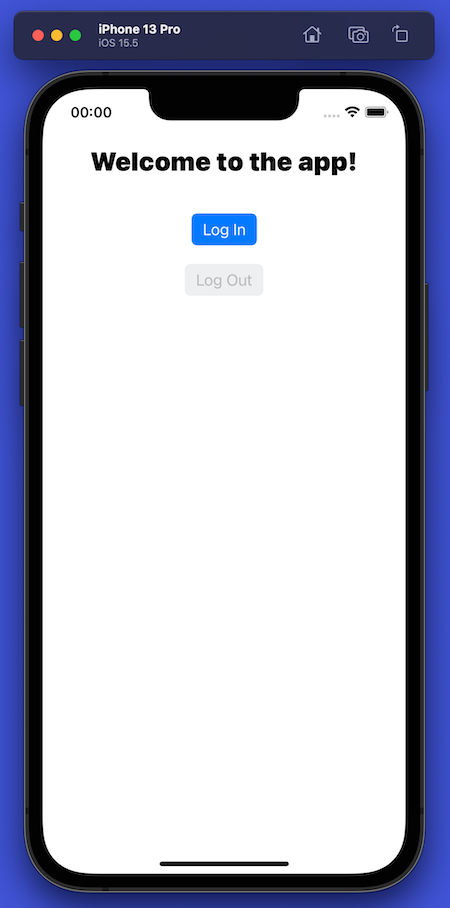
Note that the buttons look like buttons instead of blue text. iOS 15 introduced four pre-defined button styles, three of which provide a background that lets the user know that it is indeed a button. The buttons in the app use the Filled button style.
Pressing the Log In button starts the process that leads to the Auth0 Universal Login screen. However, before that happens, the user will see an alert box:
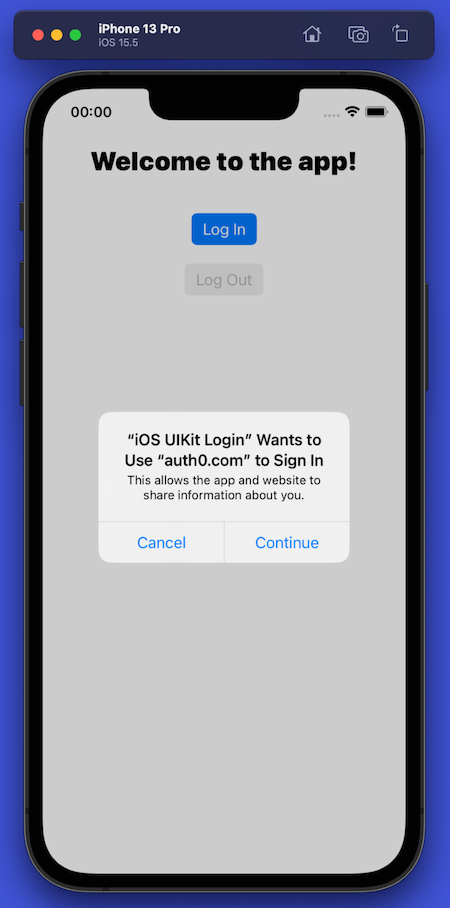
The app delegates the login process to Auth0, and after the user logs in, Auth0 sends information to the app about the user, such as their name, email address, and the URL for the user’s photo. iOS’ privacy policy requires the user to be informed when an app is sending or receiving personal information about the user from a third party (Auth0 in this case). iOS automatically displays the alert to let users know their personal data is being shared as part of the login process.
Pressing the Continue button on the alert box takes the user to the Auth0 Universal Login screen. It appears in a web browser view embedded in your app:
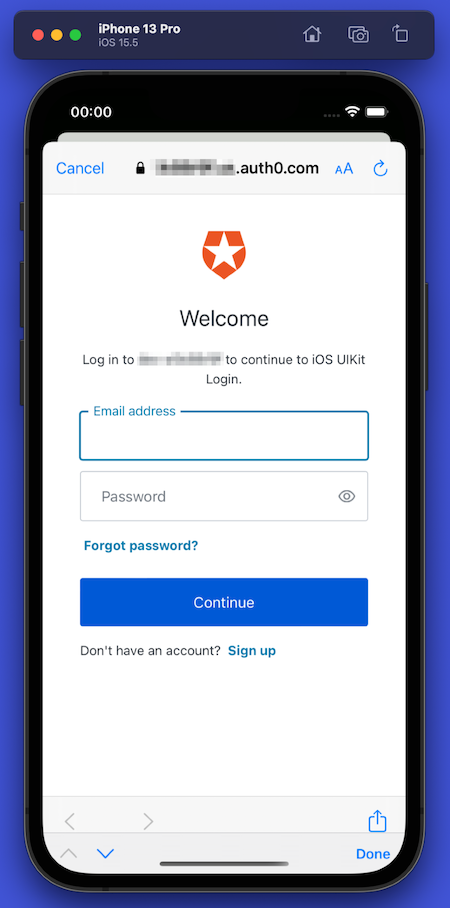
When you use Auth0 to add login/logout capability to your apps, you delegate authentication to an Auth0-hosted login page. If you use Google web applications such as Gmail and YouTube, you’ve seen this in action. These services redirect you to log in using accounts.google.com. After logging in, Google returns you to the web application as a logged-in user.
If you’re worried that using Auth0’s Universal Login means that your app’s login screen will be stuck with the default Auth0 “look and feel,” I have good news for you: you can customize it to match your app or organization’s brand identity.
The Universal Login page saves you from having to code your own authentication system. It gives your applications a self-contained login box with several features to provide a great user experience.
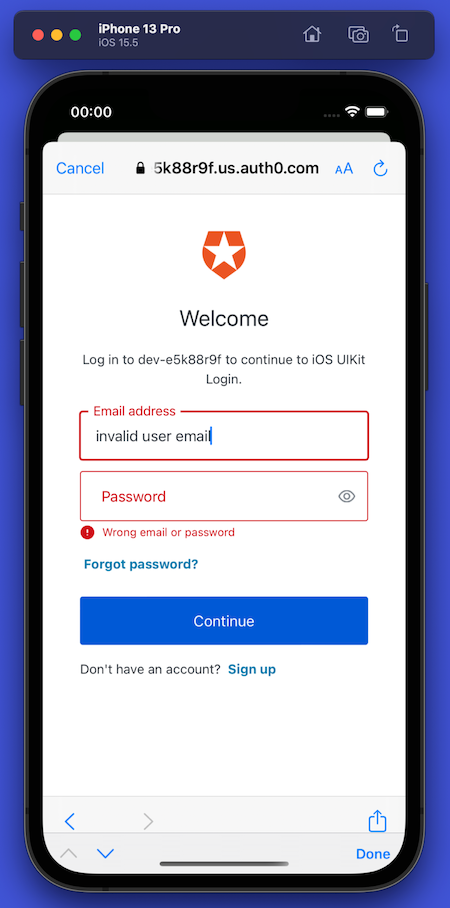
If the user enters an invalid email address/password combination, it displays an error message and gives them another chance to log in:
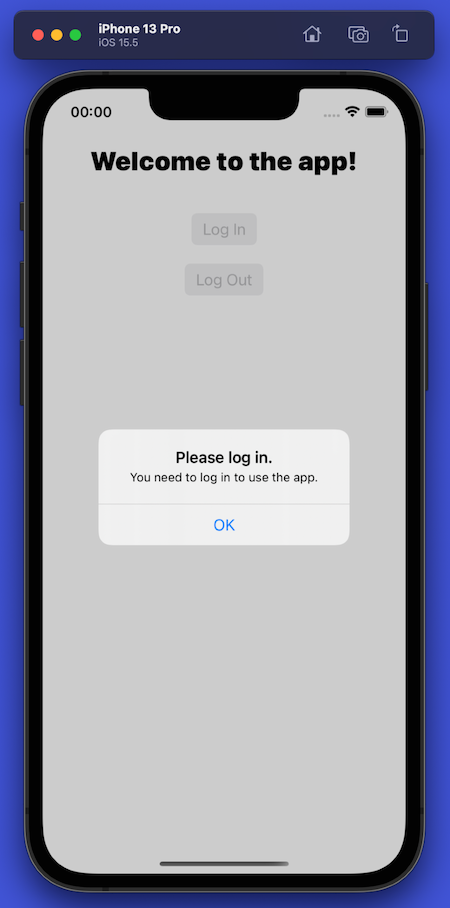
There are two ways to exit the Universal Login screen. There’s the “unhappy path,” where the user presses the Cancel button at the upper left corner of the screen, which dismisses the Universal Login screen and returns them to the opening screen. When the app detects that the user has canceled login, it displays this alert message:
The “happy path” out of the Universal Login appears when the user enters a valid email address/password combination. When this happens, Auth0 authenticates the user, the embedded web view and Universal Login will disappear, and control will return to the app, which will now look like this:
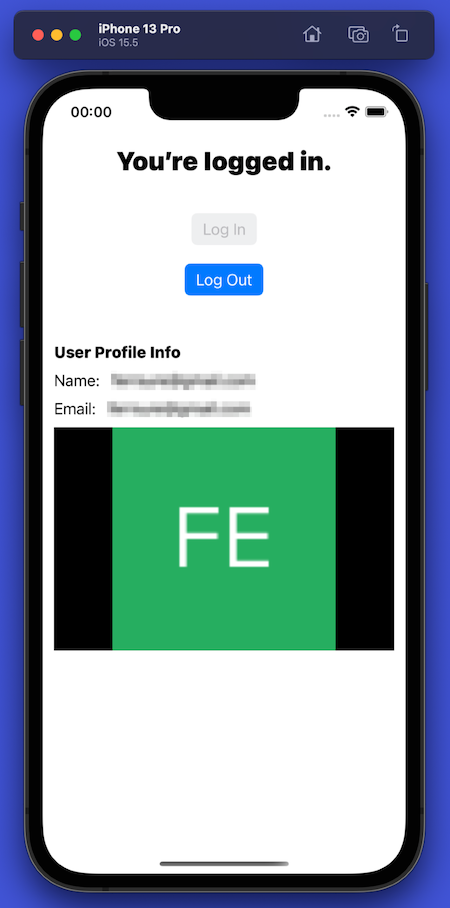
Here’s what changed after the user logged in:
- The title text at the top of the screen now says, “You’re logged in.”
- The Log In button is disabled, and the Log Out button is enabled.
- The name, email address, and photo associated with the user’s account appear onscreen.
As you might expect, the user logs out by pressing the Log Out button. Doing so causes the logout alert box to appear:
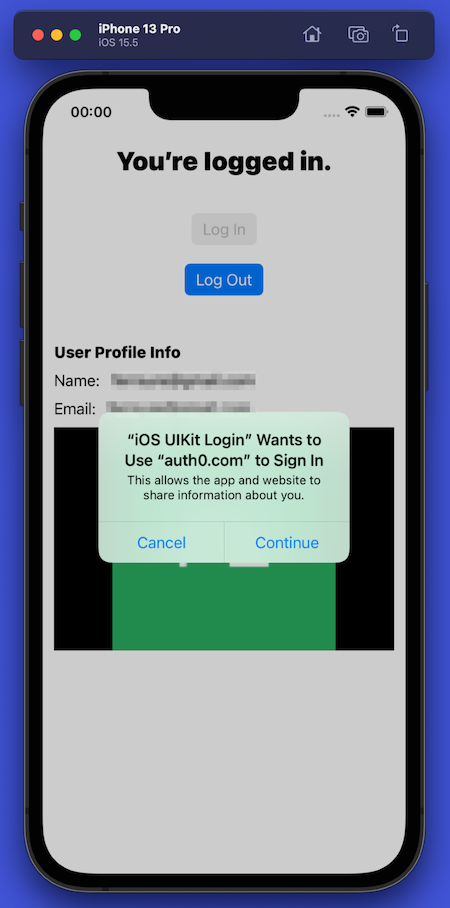
iOS also displays an alert during logout. Once again, this is part of iOS’ security policy, which informs the user that the app is sharing information about them with a third party (Auth0).
The alert uses the phrase “Sign In” even though the user is signing out of the app. This is an error on Apple’s part, and many developers — us included — have reported this bug.
It is possible to disable the alert boxes that appear during login and logout, but as you might expect, there are tradeoffs for doing so. You can find out more in the Auth0.swift FAQ.
Pressing the Continue button completes the logout process and returns the user to the app, which now looks like this:
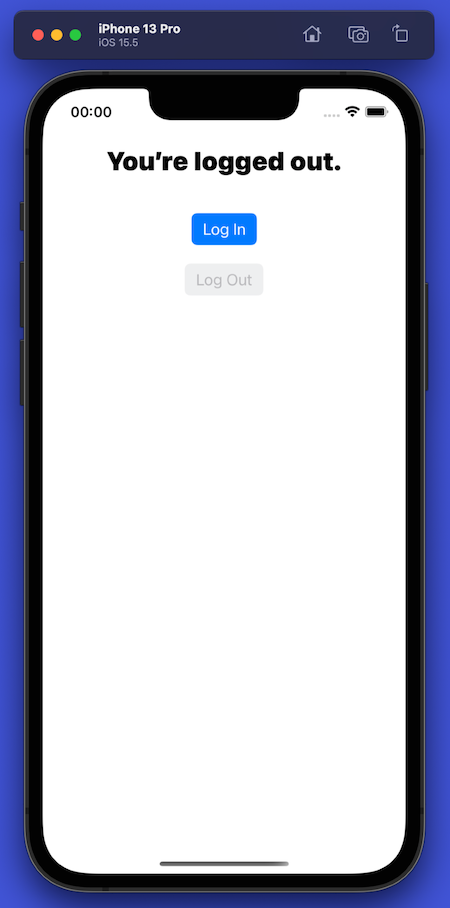
Note that:
- The text at the top of the screen says, “You’re logged out.”
- The Log In button is enabled, and the Log Out button is disabled.
- The other controls that were visible when logged in are no longer visible.
What You’ll Need
You’ll need the following to build the app:
1. An Auth0 account
The app uses Auth0 to provide authenticate users, which means that you need an Auth0 account. You can sign up for a free account, which lets you add login/logout to 10 applications, with support for 7,000 users and unlimited logins. This should suit your prototyping, development, and testing needs.
2. An iOS/iPadOS development setup
To develop applications for iOS and iPadOS, you’ll need:
- Any Mac computer from 2013 or later — MacBook, MacBook Air, MacBook Pro, iMac, iMac Pro, Mac Mini, Mac Pro, or Mac Studio — with at least 8 GB RAM. When it comes to RAM, more is generally better.
- Apple’s developer tool, Xcode version 11.0 (September 2019) or later. When writing this article, I used the current version at the time: 13.4 (build 13F17a), released on May 16, 2022.
3. An iOS device, virtual or real
Xcode comes with the Simulator application, which simulates recent iPhone, iPad, and iPod Touch models. Xcode 13.4’s virtual devices run iOS 15.5 by default.
To install earlier versions of iOS for the Simulator, select Preferences… from the Xcode menu, followed by the Components tab. You’ll see a list of older versions of not just iOS but watchOS and tvOS as well.
One of the benefits of using the Simulator is that you don’t need an Apple Developer account — free or paid — to use it.
While the Simulator is convenient, there’s no substitute for an actual physical device. It provides a more realistic testing experience, and there are certain things you can’t do on the Simulator (such as motion/tilt sensing and augmented reality).
You need a free Apple Developer account to deploy an app directly to a device for testing (you need the paid one to deploy an app to the App Store), and you need to register the device in your developer account to deploy apps to it. For more details, see Apple’s article, Distributing Your App to Registered Devices.
To find out more about running apps on virtual and real iOS devices, start with Apple’s Running Your App in the Simulator or on a Device.
4. A little experience
While not completely necessary, it would help if you were familiar with the Swift programming language and iOS development. If these are new to you, the Swift programming language, or the UIKit framework, try this Apple tutorial: Getting Started with Today.
First Steps
Download and run the starter project
To keep this tutorial focused on implementing Auth0 authentication in a UIKit-based iOS app, I created a starter project that you can download. It contains a view with controls already laid out and connected to corresponding methods in the view controller. By starting with this project, you’ll be able to focus on adding login and logout to an app without the distraction of building a user interface.
🛠 Download the .zip file containing the starter and completed projects for the app (421 KB) and uncompress it. This will create a get-started-ios-authentication-swift-uikit-main folder on your local drive.
🛠 Open the get-started-ios-authentication-swift-uikit-main folder and look for the iOS UIKit Login (starter) folder. Open that folder, then open the starter project file, iOS UIKIt Login.xcodeproj.
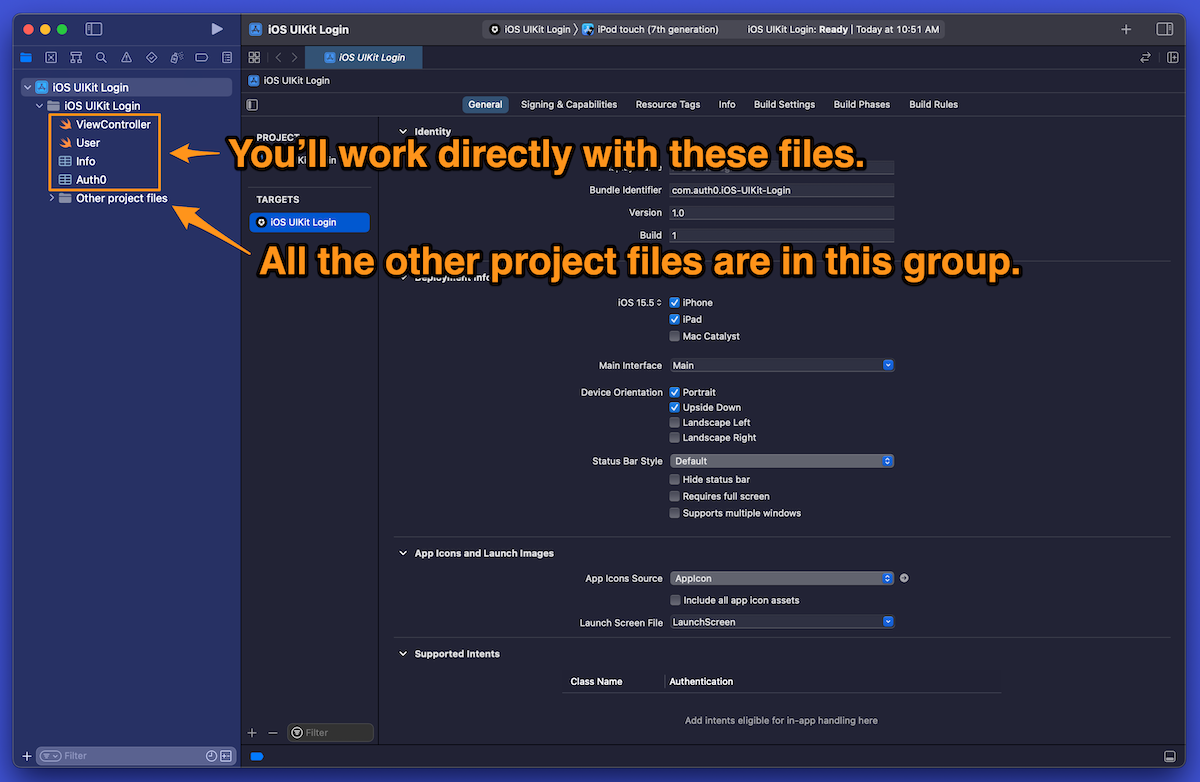
If you look at the Project navigator, you’ll see the project’s files. I’ve organized them so that the files you’ll directly work with are immediately visible, while all the others are in a group named Other project files:
🛠 Confirm that the starter project works. Select a simulator or device from the device and run the app. It should look like this:
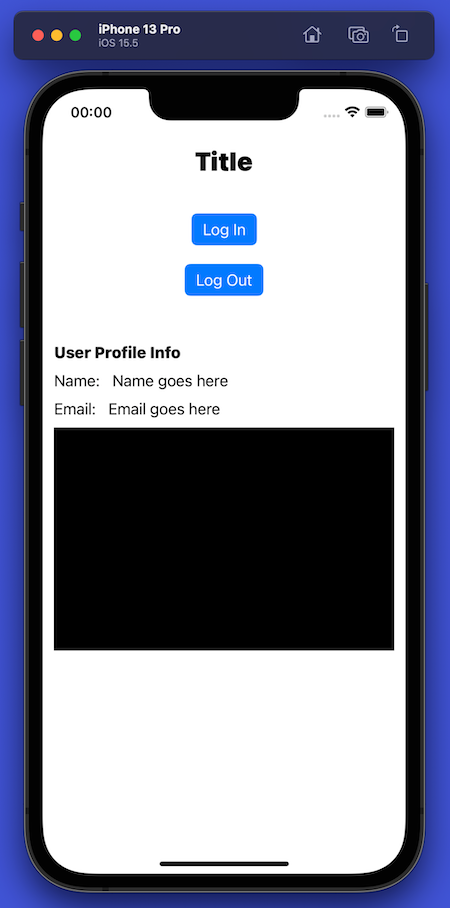
Right now, the app simply draws a user interface on the screen. You can press the buttons, but they won’t do anything yet.
Find the app’s bundle identifier
There’s one more task to perform before we set things up on the Auth0 side: you need to note the app’s bundle identifier, a string that uniquely identifies the app.
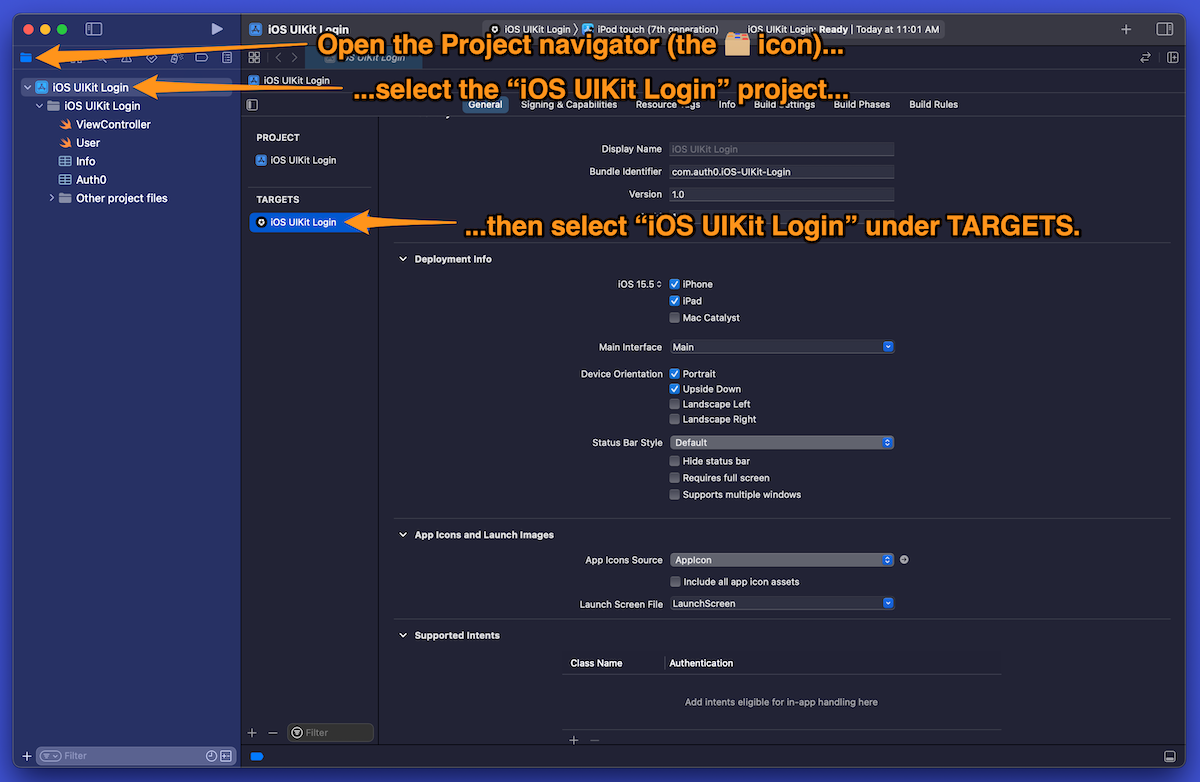
🛠 Find the bundle identifier by opening the Project navigator (click on the folder icon at the top of Xcode’s left column), then select the iOS UIKit Login project. Then under Targets, select iOS UIKit Login:
🛠 Select the General tab in Xcode’s center pane and look for the Bundle Identifier field value:
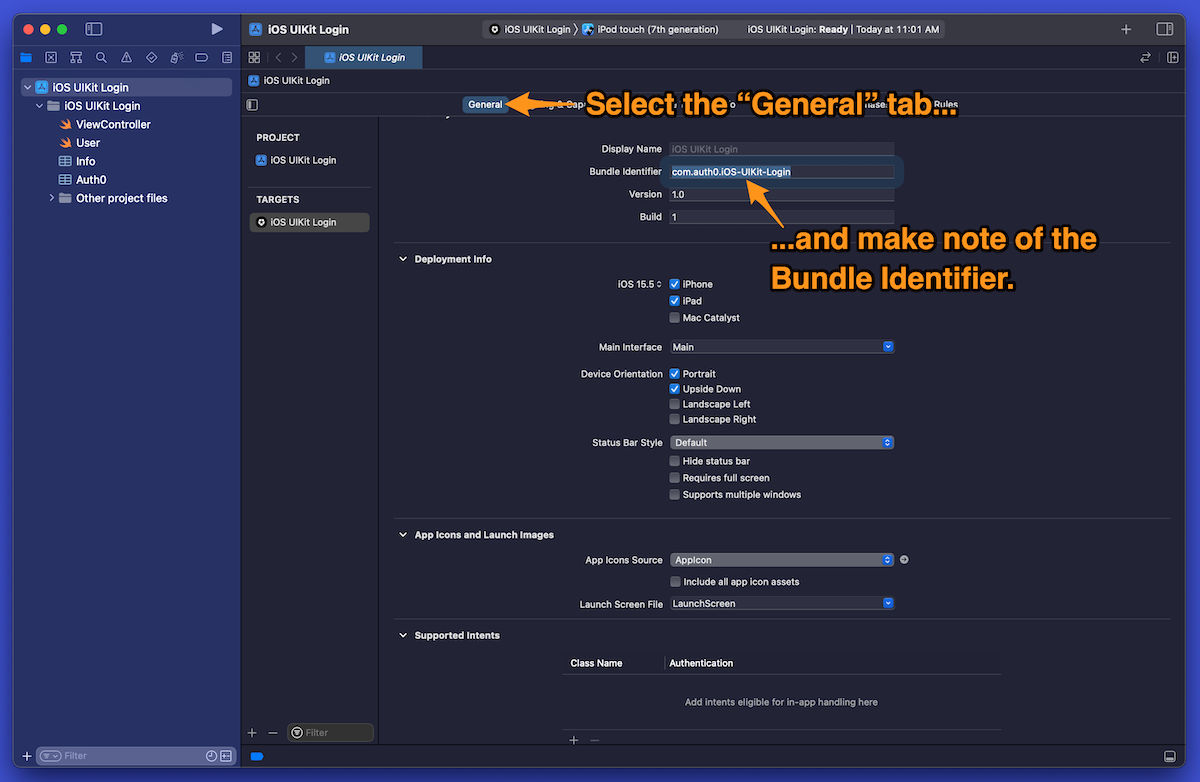
You can keep the bundle identifier currently defined in the starter project — com.auth0.iOS-UIKit-Login — or you can define your own.
Apple encourages developers to use reverse domain name notation for application bundle identifiers. For example, if you own the domain
examplesoftwarecompany.comand the app's name is “Example App”, the recommended bundle identifier iscom.examplesoftwarecompany.exampleapp.
Remember the bundle identifier — you’ll use it in the next step!
Register the App in the Auth0 Dashboard
The next step is to register the app in your Auth0 dashboard. In this process, you will:
- Add the app to your Auth0 dashboard’s list of registered applications.
- Gather two pieces of information that the app will need to delegate login/logout to Auth0: your tenant’s domain and the client ID that Auth0 will assign to the app.
- Provide Auth0 with the necessary callback URLs to contact the app: one to call at the end of the login process and the other to call at the end of the logout process.
🚨 To perform this step, you’ll need an Auth0 account. 🚨
🛠 If you already have an Auth0 account, log in, skip the next section, and proceed to the part titled Add the app to the Applications list.
If you don’t have an Auth0 account yet...
🛠 ...go ahead and sign up for one! It’s free, and we’ve taken great care to make the process as painless as possible.
Add the app to the Applications list
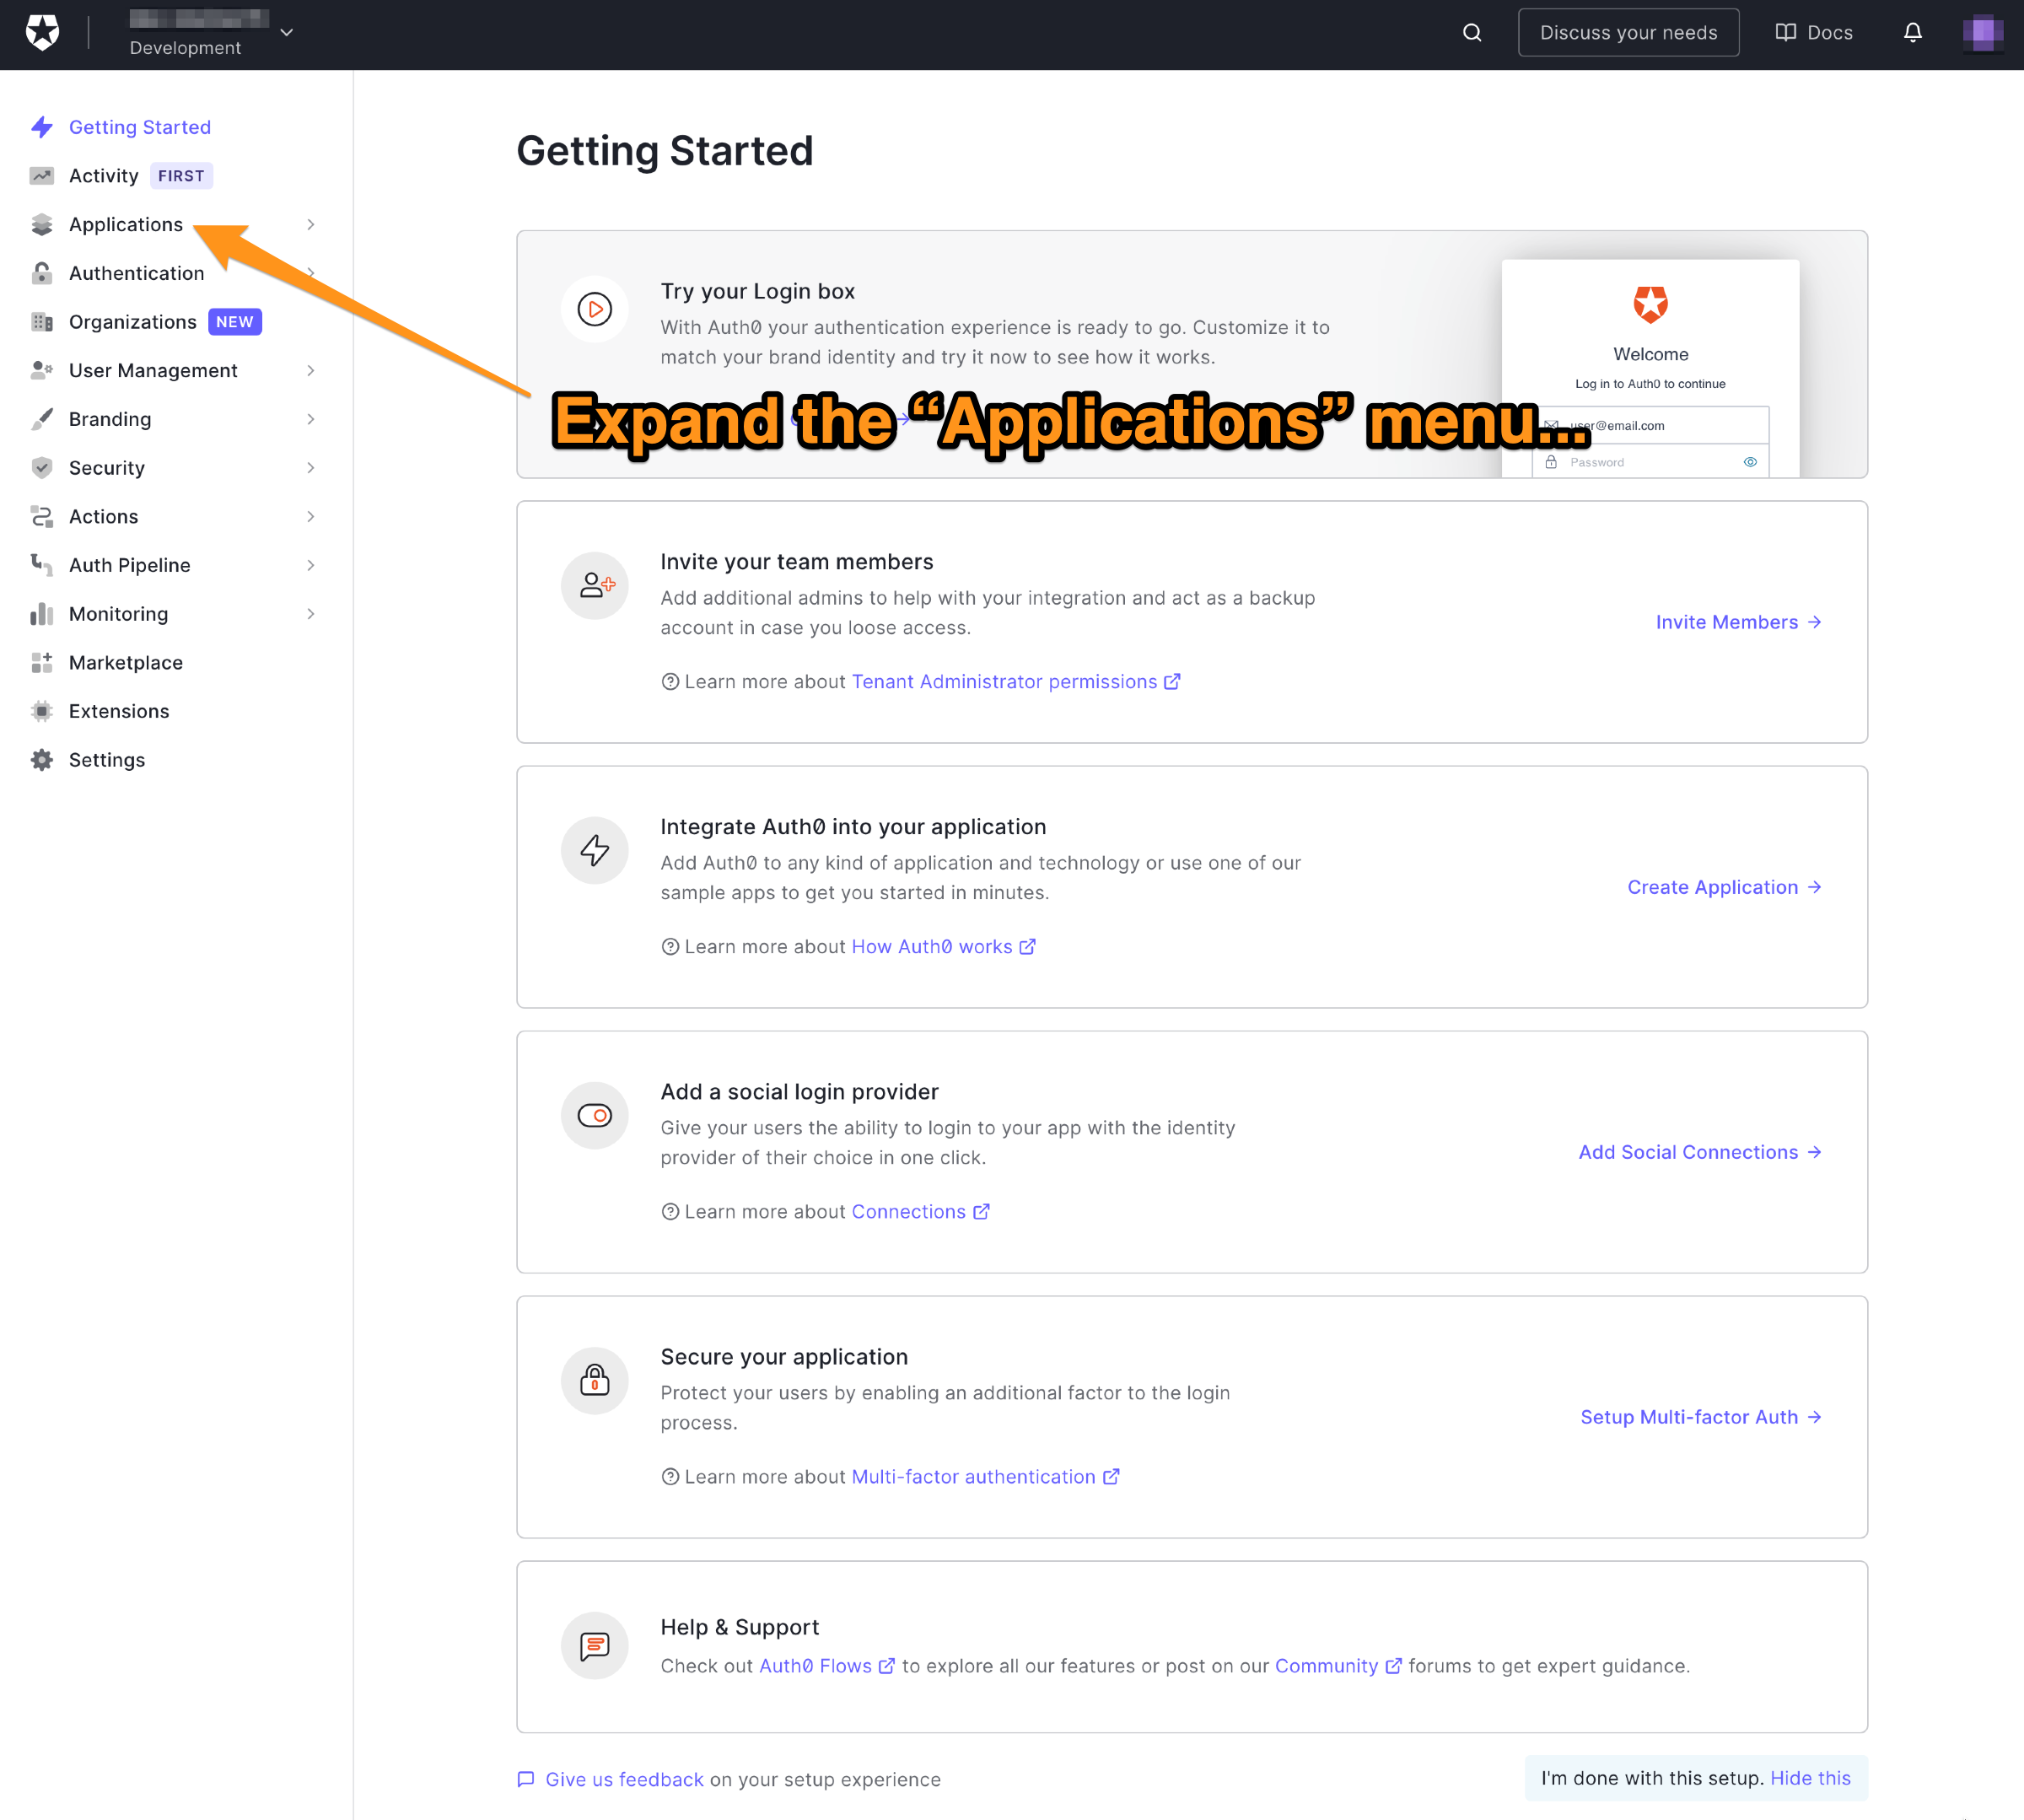
🛠 In the left side menu of the Auth0 dashboard, click on Applications:
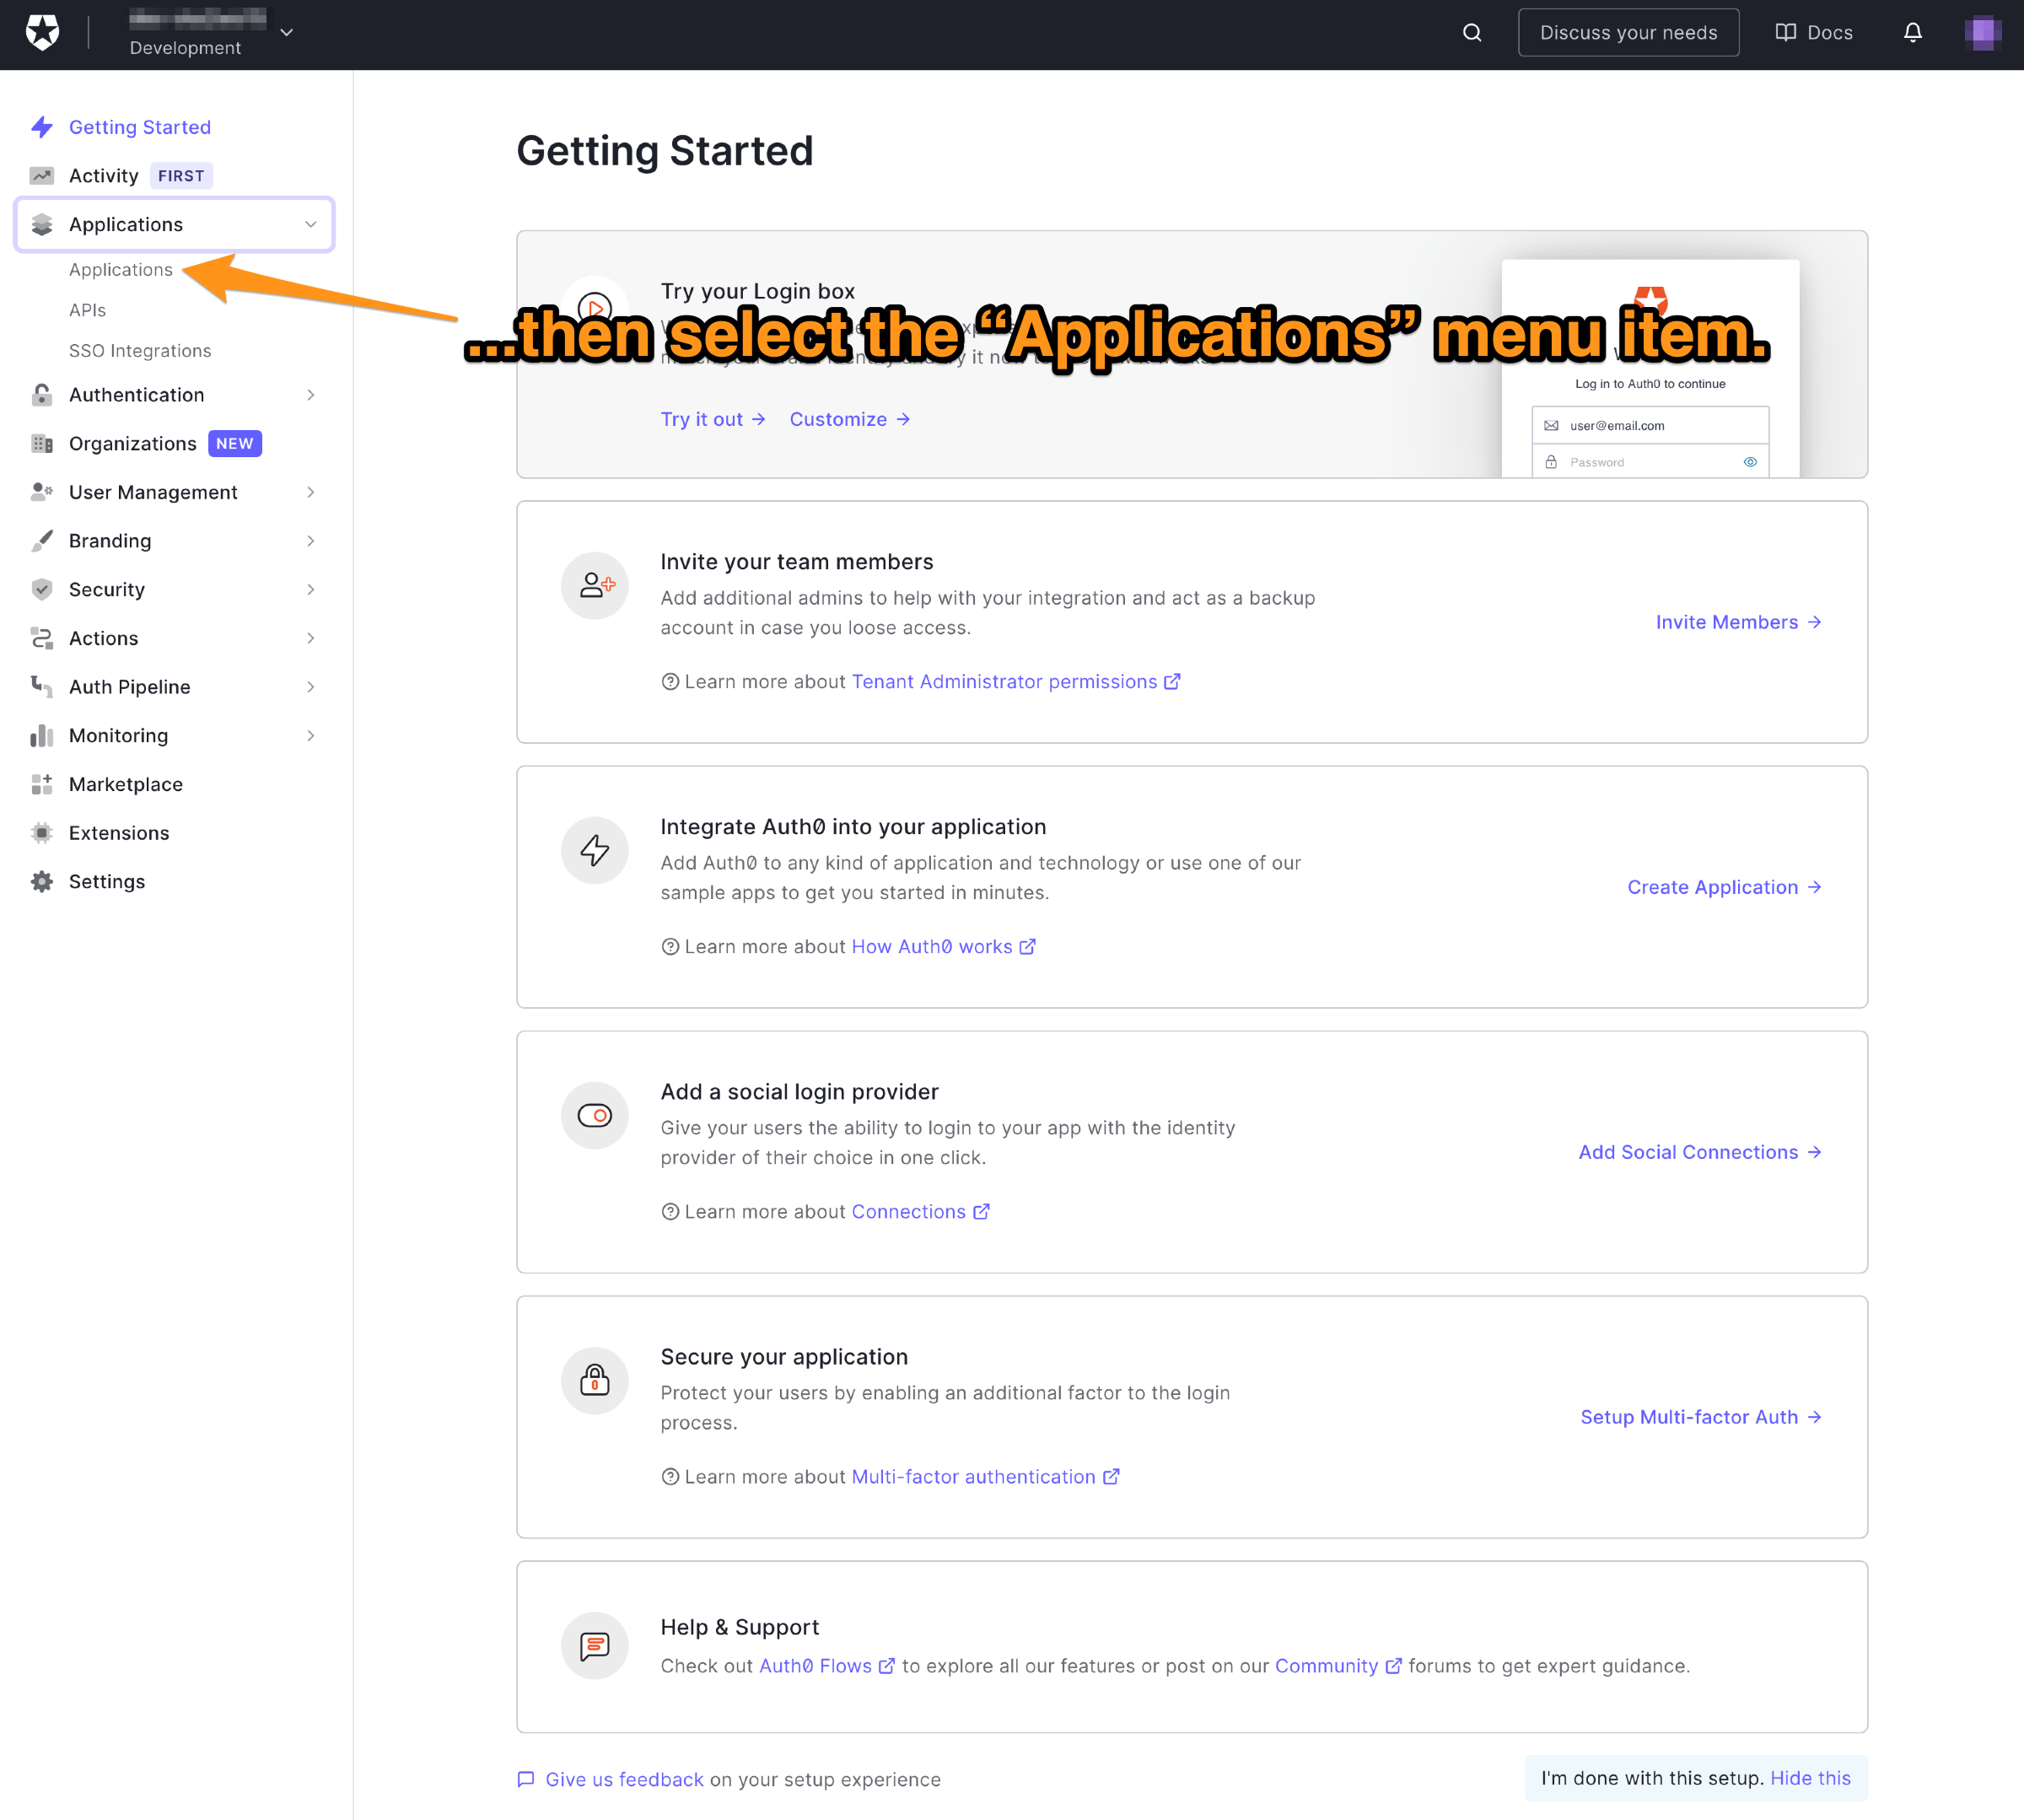
🛠 This will expand the Applications menu. Select the first item in that menu, which also has the name Applications:
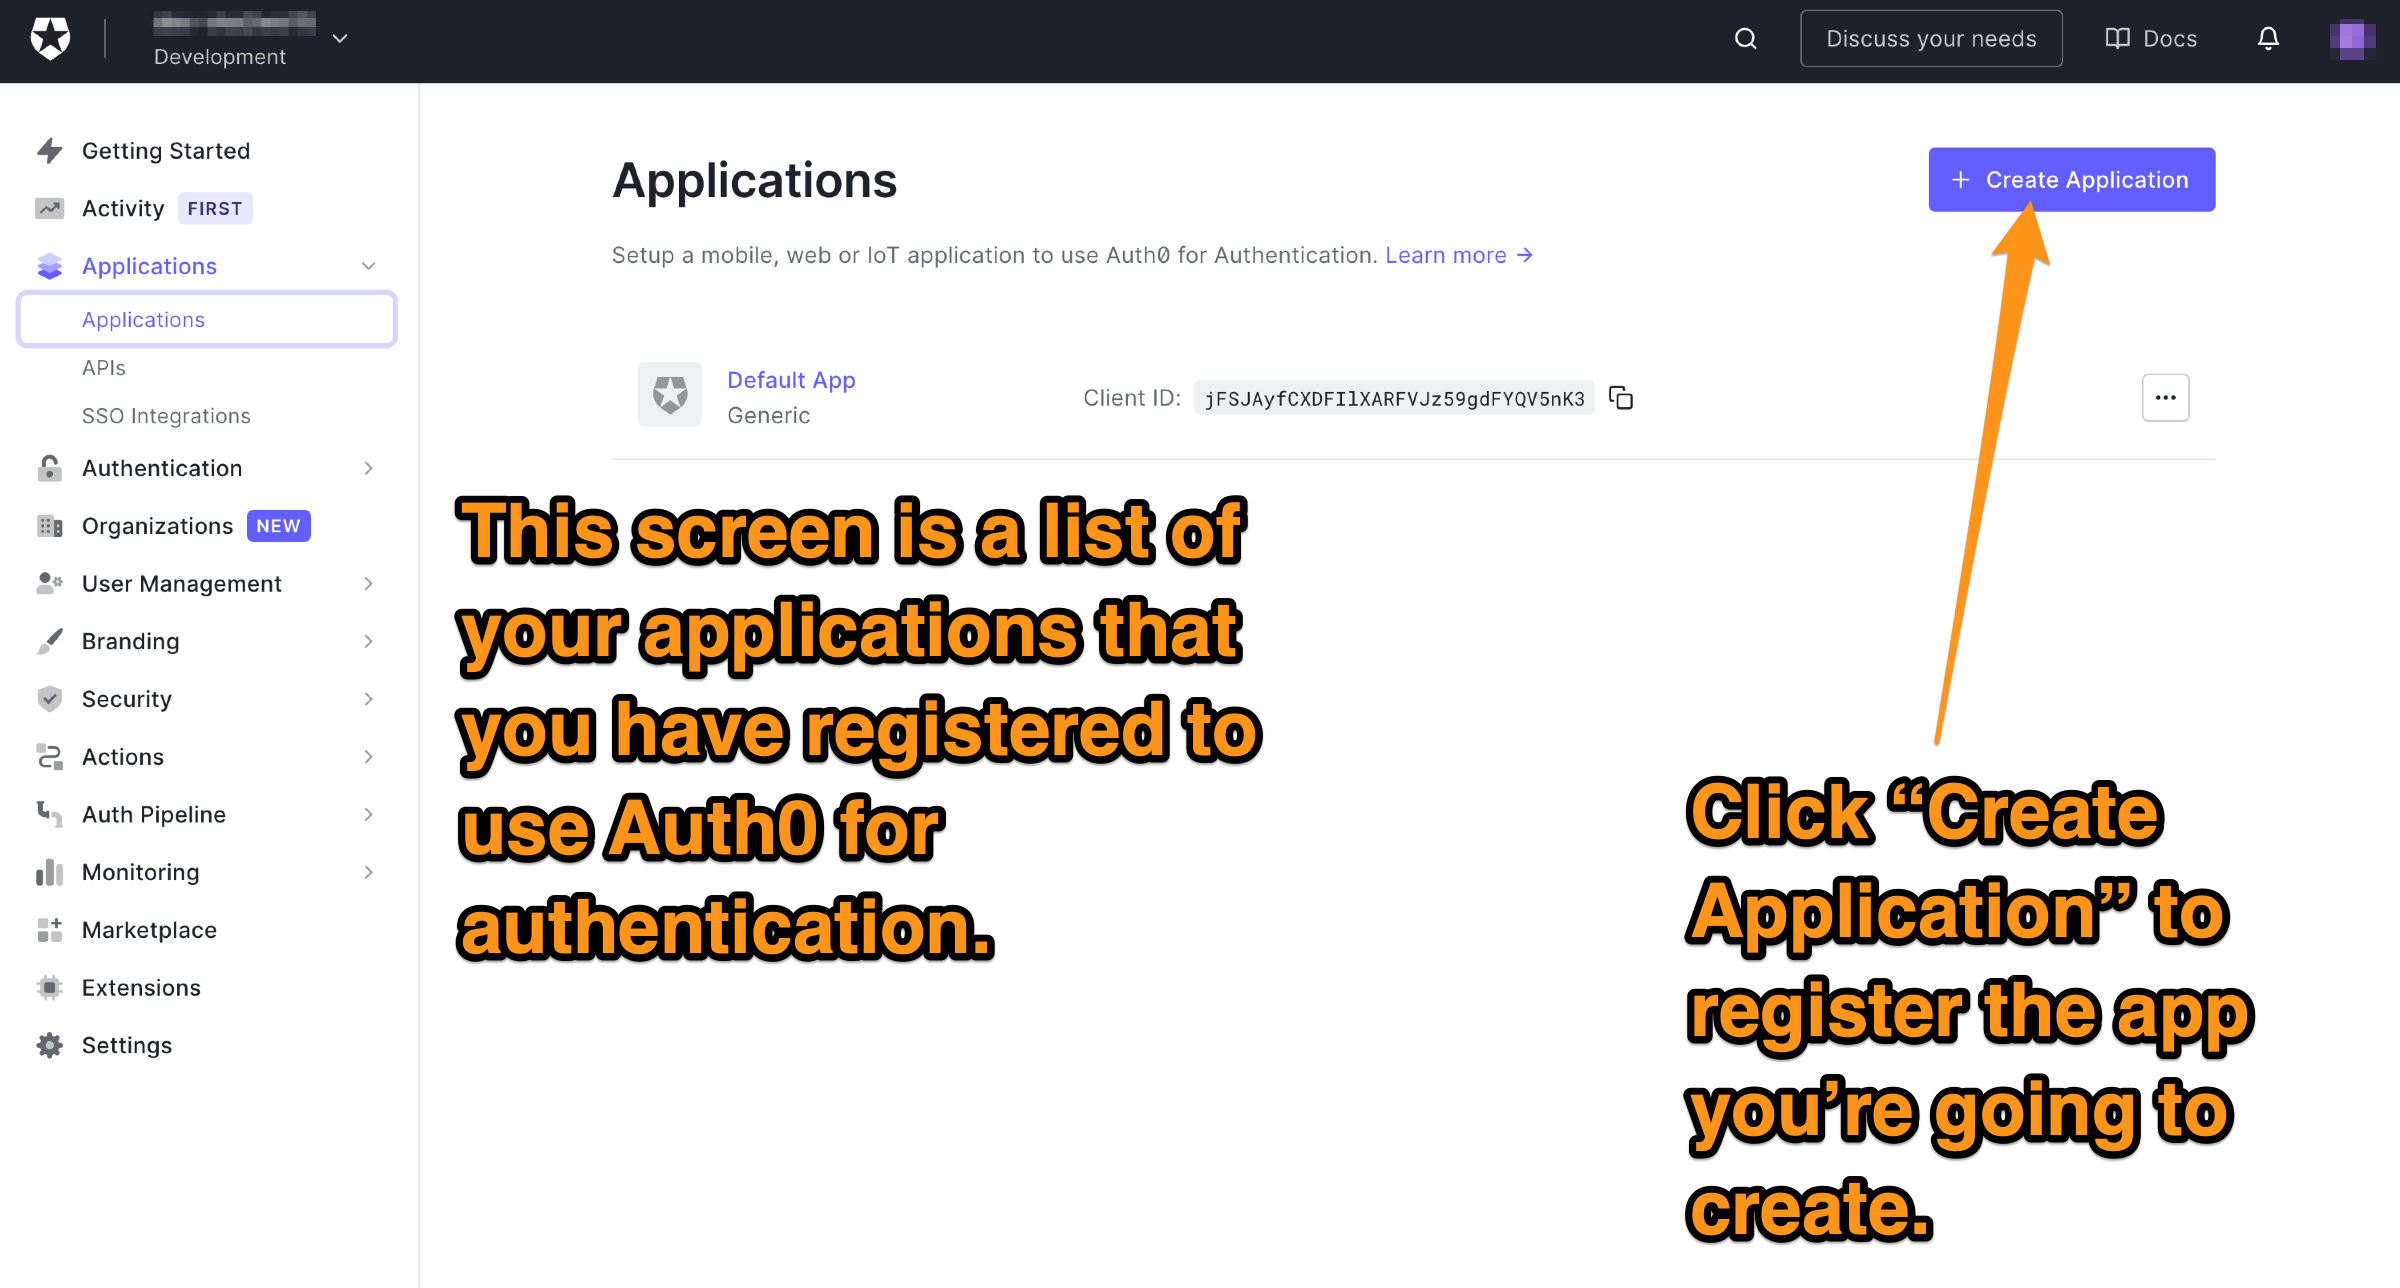
You will now be on the Applications page. It lists all the applications that you have registered to use Auth0 for authentication and authorization.
🛠 Let’s register the app. Do this by clicking the Create application button near the top right of the page:
You’ll see this dialog appear:
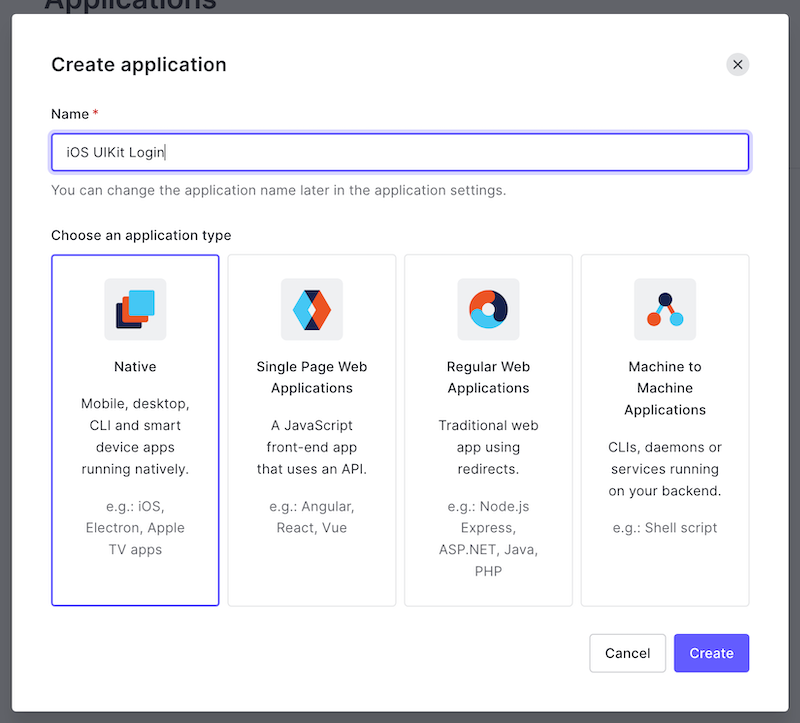
🛠 You’ll need to provide two pieces of information to continue:
- Enter a name for the app in the name field. It might be simplest to use the same name as your Xcode project (if you’ve been following my example, use the name iOS UIKit Login).
- Specify the application type, which in this case is Native.
Click Create. The Quick Start page for the app will appear:
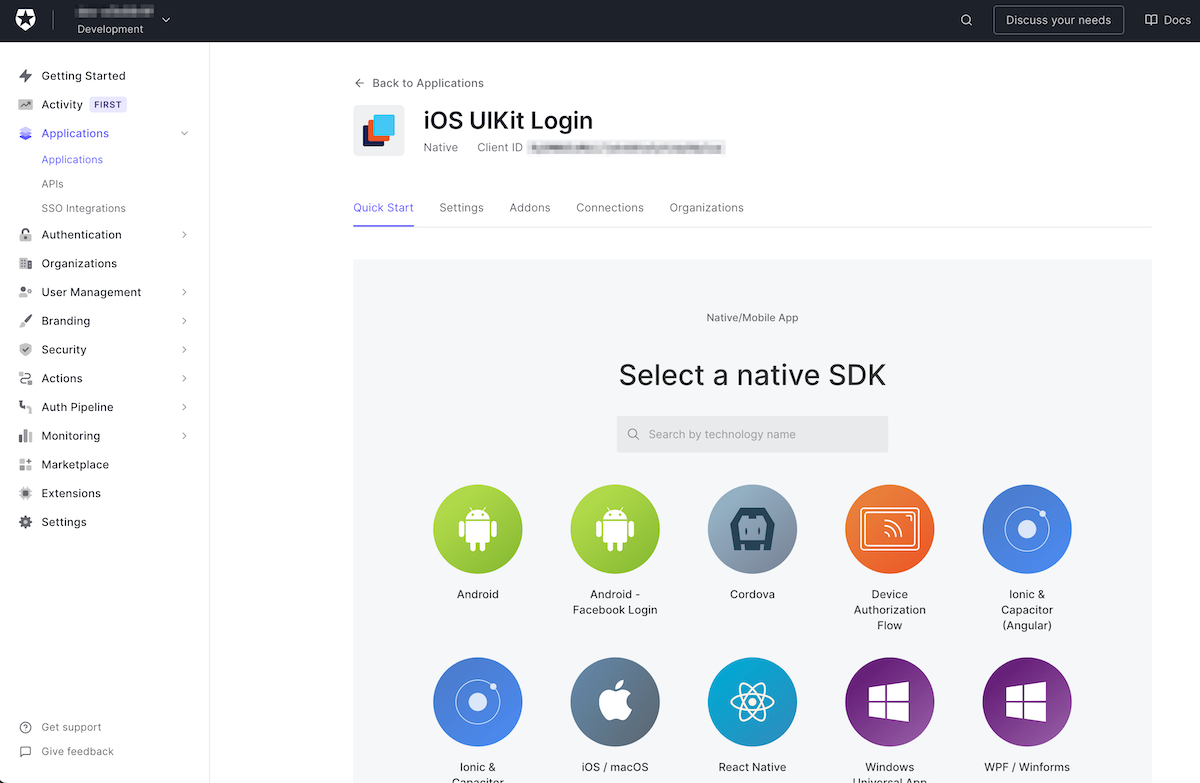
This page provides ready-made projects for several different platforms that you can use as the basis for an application that delegates login/logout to Auth0. You won’t be using any of them in this exercise; instead, you’ll use a couple of Auth0 libraries and write the code yourself. It’s more educational — and more importantly, fun — that way.
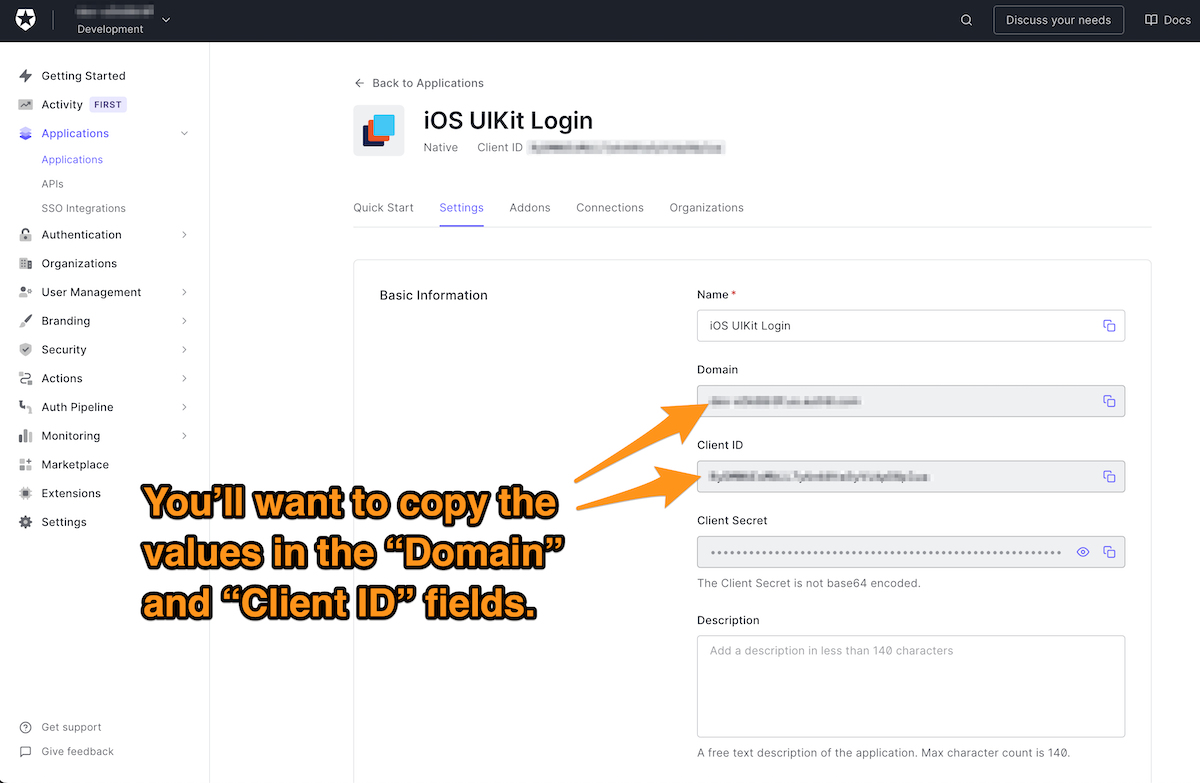
🛠 Click the Settings tab, which will take you to this page:
You’re going to do two critical things on this page:
- Get information that the app needs to know about Auth0, and
- Provide information that Auth0 needs to know about the app.
Let’s take care of the first one: Getting the information that the app needs, namely:
- The domain. You need it to build the URL that the app will use to contact Auth0. It uniquely identifies your Auth0 tenant, a collection of applications, users, and other information that you have registered with your Auth0 account.
- The client ID, the identifier that Auth0 assigned to the app. It’s how Auth0 knows which app it’s working with.
🛠 Get this information by copying the contents of the Domain and Client ID fields for later reference. You’ll enter them into your Xcode project soon.
🛠 Scroll down the page to the Applications URIs section:
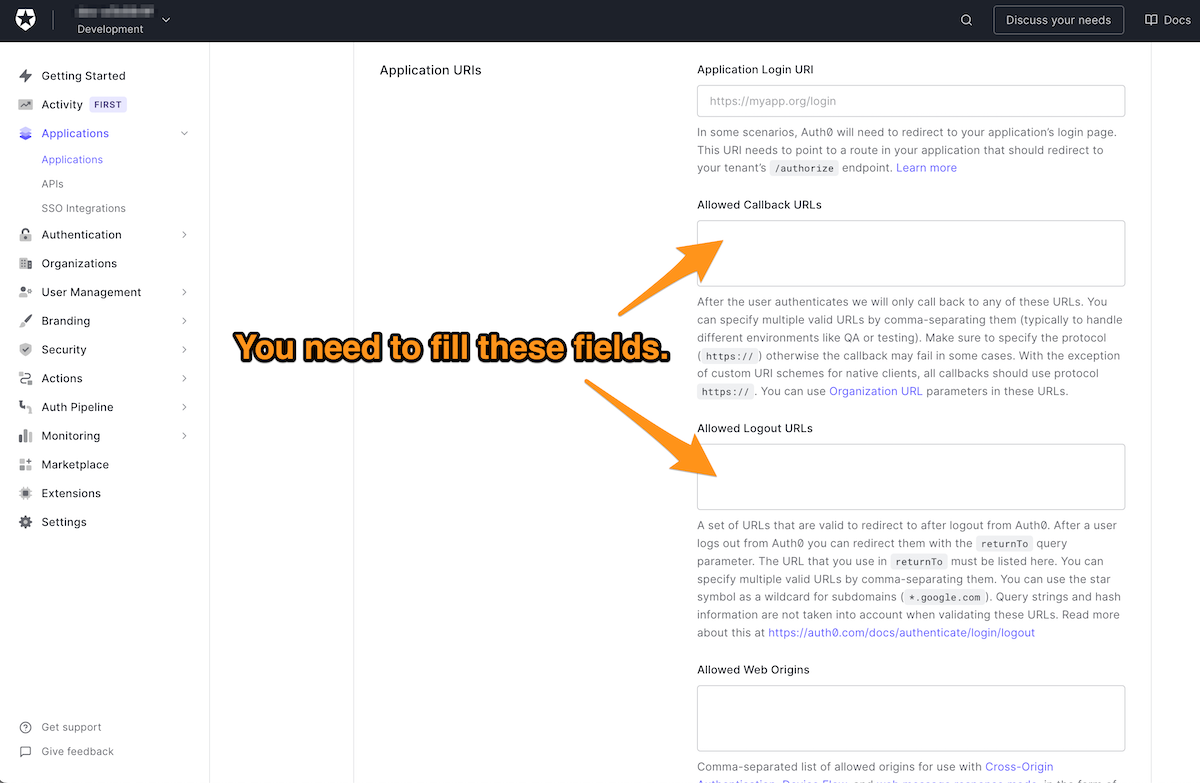
This is where you provide two pieces of information that Auth0 needs to know about the app, which are:
- A callback URL: the URL that Auth0 will redirect to after the user successfully logs in. There can be more than one of these.
- A logout URL: the URL that Auth0 will redirect to after the user logs out. There can be more than one of these.
In case you were wondering what the difference between a URI and a URL is, we have answers for you in this article: URL, URI, URN: What's the Difference?
You’re probably thinking: “Wait a minute — I’m writing an iOS app. It doesn’t have web pages that you navigate to using URLs, but Views with underlying code in View Controllers!”
You’re absolutely right. In the case of native applications, the callback and logout URLs are the same string, and Auth0 sends that string to the app to inform it that a user has logged in or logged out.
The string that native iOS apps use for both the callback URL and the logout URL follows this format:
{BUNDLE_IDENTIFIER}://{YOUR_DOMAIN}/ios/{BUNDLE_IDENTIFIER}/callback
🛠 To construct the string, do the following:
- Replace
{BUNDLE_IDENTIFIER}with the app’s bundle identifier. If you didn’t change the bundle identifier in the starter project, this value iscom.auth0.iOS-UIKit-Login. Note that{BUNDLE_IDENTIFIER}appears twice in the URL; you’ll need to replace it twice. - Replace
{YOUR_DOMAIN}with the value from the Domain field that you saw earlier on this page.
🛠 Enter the URL you just constructed into both the Allowed Callback URLs and Allowed Login URLs fields. Remember, the same URL goes into both fields.
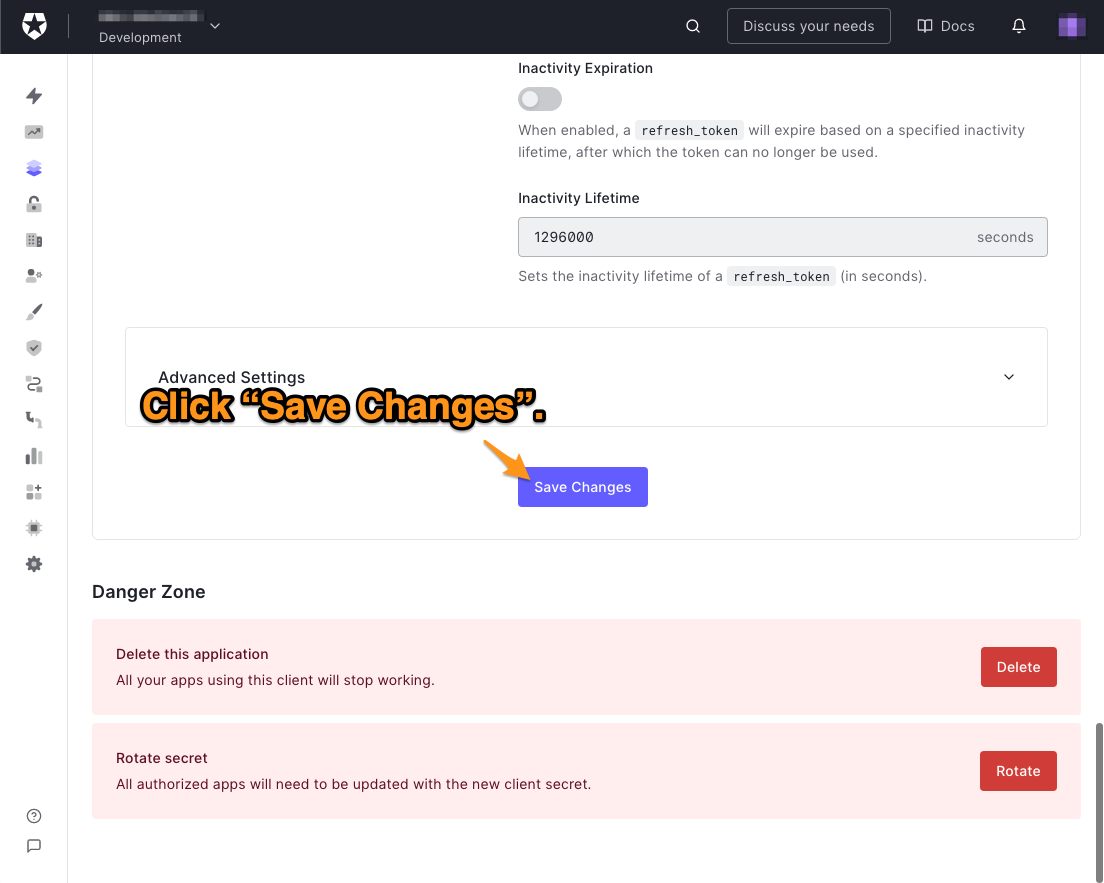
🛠 You’ve done everything you need to do on this page. Scroll down to the bottom of the page and click the Save Changes button:
Create a user if your tenant doesn’t have any
If you just created an Auth0 account, your tenant is brand new. It won’t have any user accounts, so there won’t be any way to log in to the app. If this is the case, follow these steps to create a user.
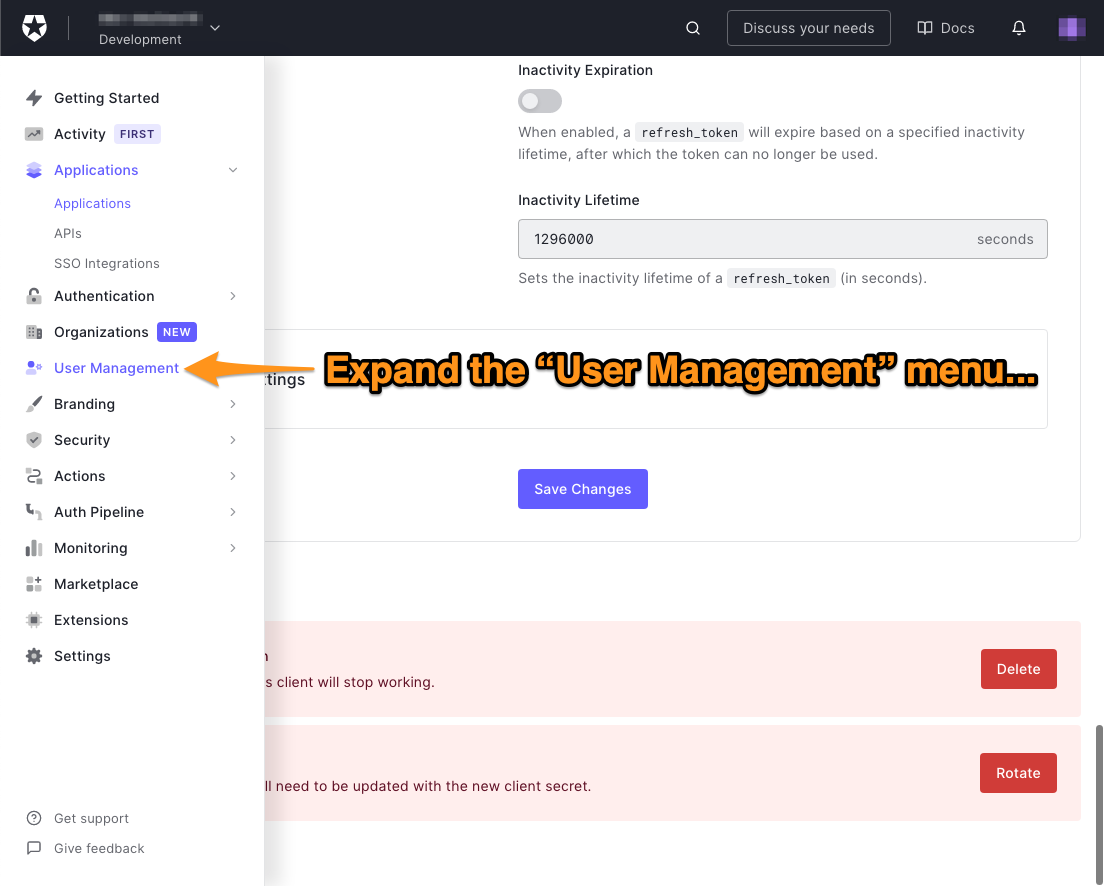
🛠 In the menu on the left side of the Auth0 dashboard, click on User Management:
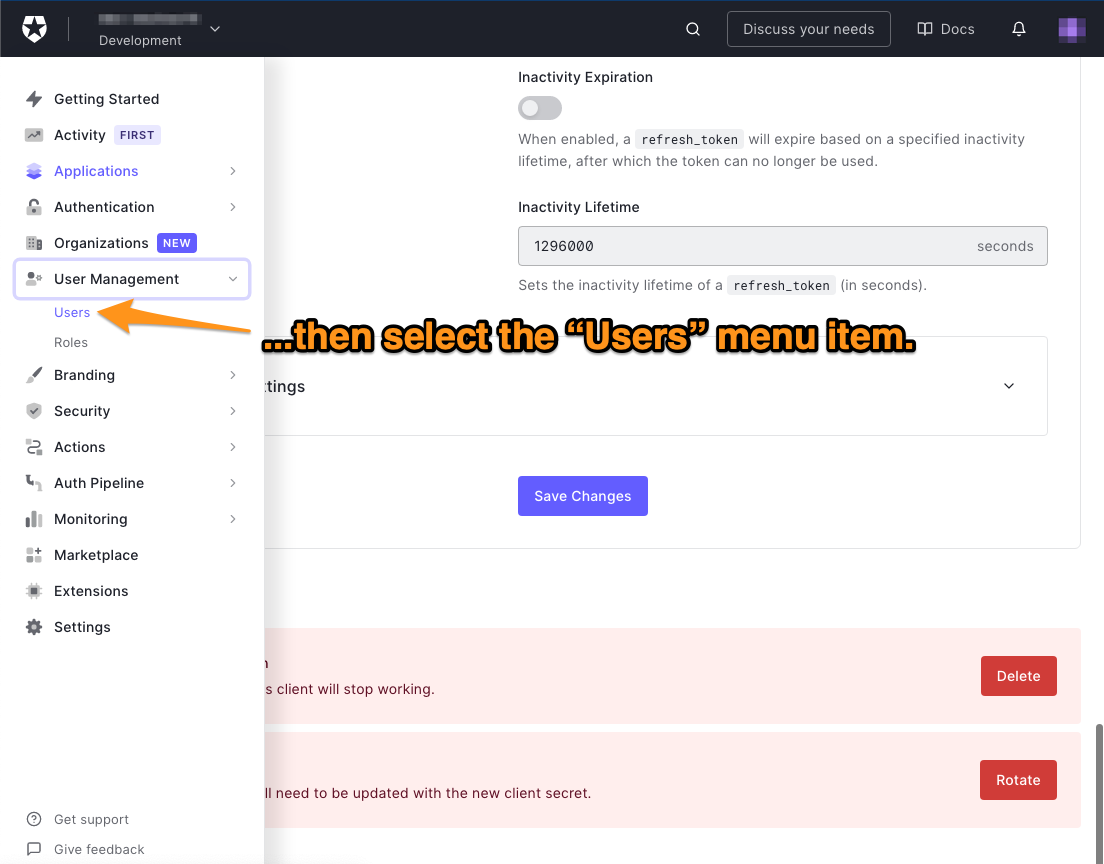
🛠 This will expand the User Management menu. Select the Users item in that menu:
The Users page will appear. It lists all the users registered to your tenant. You’ll see the “You don’t have any users yet” message if there are no users.
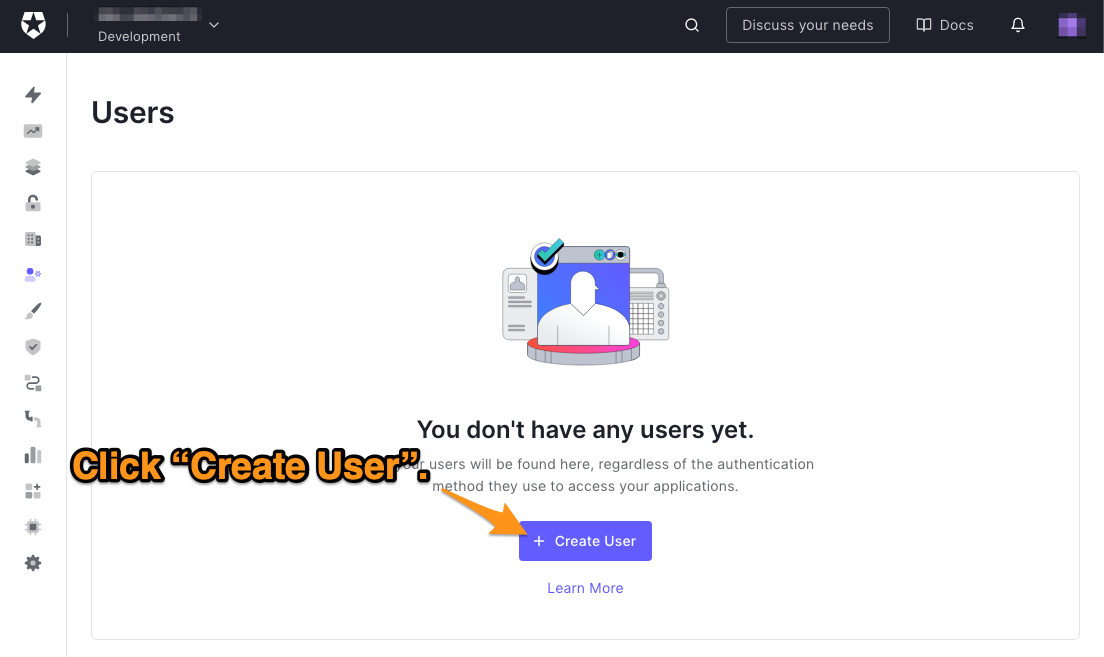
🛠 Click the Create User button to create a new user, which will make this dialog box appear:
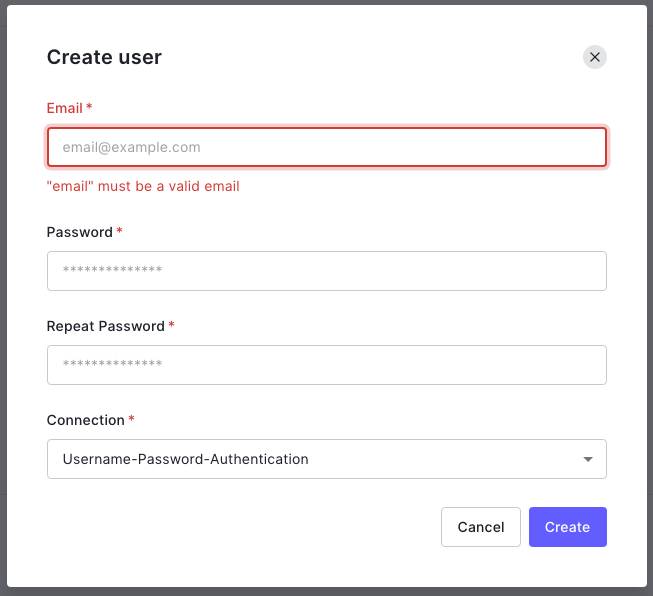
🛠 Enter an email address and password for the user. The only option for the Connection will be Username-Password-Authentication, so leave it as it is. Make a note of that email address and password — you’ll be using them to log in to the app.
🛠 Click the Create button to create the user. The user’s Details page will appear:
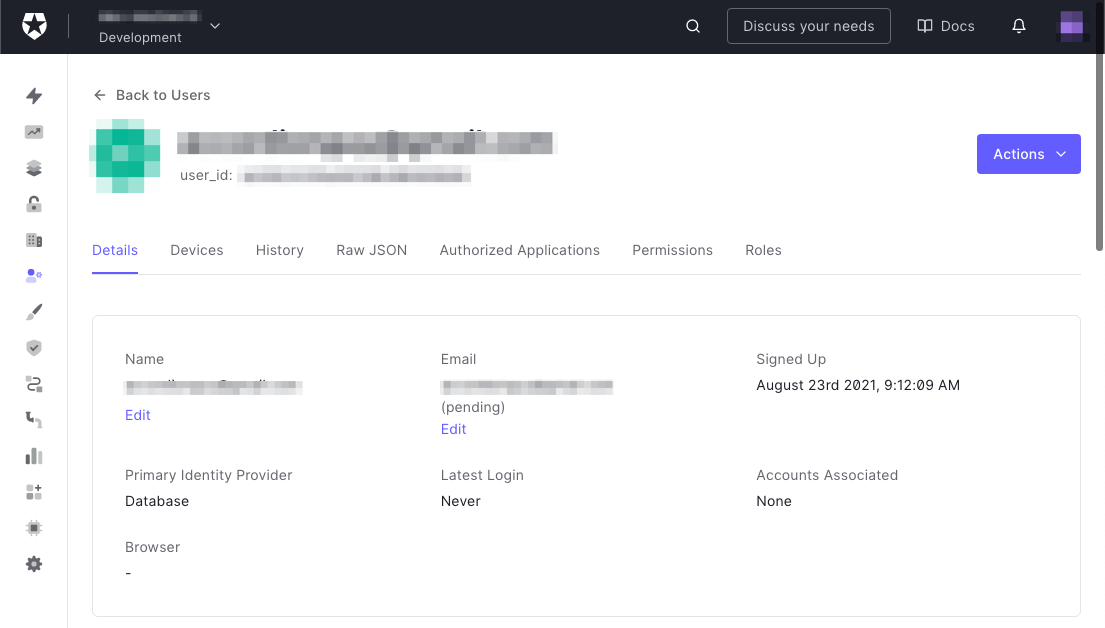
That takes care of all the setup you need to do within the Auth0 dashboard. It’s time to go back to Xcode and the app.
Set Up the App to Connect to Auth0
There are a few steps that you’ll need to perform before you can start coding:
- Install the Auth0.swift package.
- Store the domain and client ID values from the Auth0 dashboard in the app.
- Configure the app’s callback URLs.
Install the Auth0.swift package
The Auth0.swift package is a collection of libraries that allow applications written in Swift to make use of Auth0’s authorization and authentication functionality. At the time of writing, the latest version of Auth0.swift is 2.0.
Auth0.swift contains these Swift libraries:
Auth0: A toolkit for using Auth0’s APIs, including the Authentication API. You’ll use it to implement login and logout in the app.JWTDecode: A library for decoding JWTs (JSON web tokens). You’ll use it to extract information from the ID token that Auth0 returns after the user logs in.SimpleKeychain: A wrapper for the iOS Keychain useful for securely storing small chunks of data. You won’t use it in this app, but I’ll cover it in a later article.
There are three ways to install Auth0.swift:
- Swift Package Manager, Apple’s dependency manager.
- Cocoapods, a long-standing third-party package manager, first released in 2011 and used in many projects.
- Carthage, another third-party package manager.
You’ll use Swift Package Manager in this tutorial since it’s the choice that requires the least work. It’s built into Xcode and doesn’t require additional software.
If you prefer to use Cocoapods or Carthage to install Auth0.swift, you can find the instructions for doing so on this Auth0.swift Quickstart page.
🛠 Open the File menu and select Add Packages.... This window will appear:
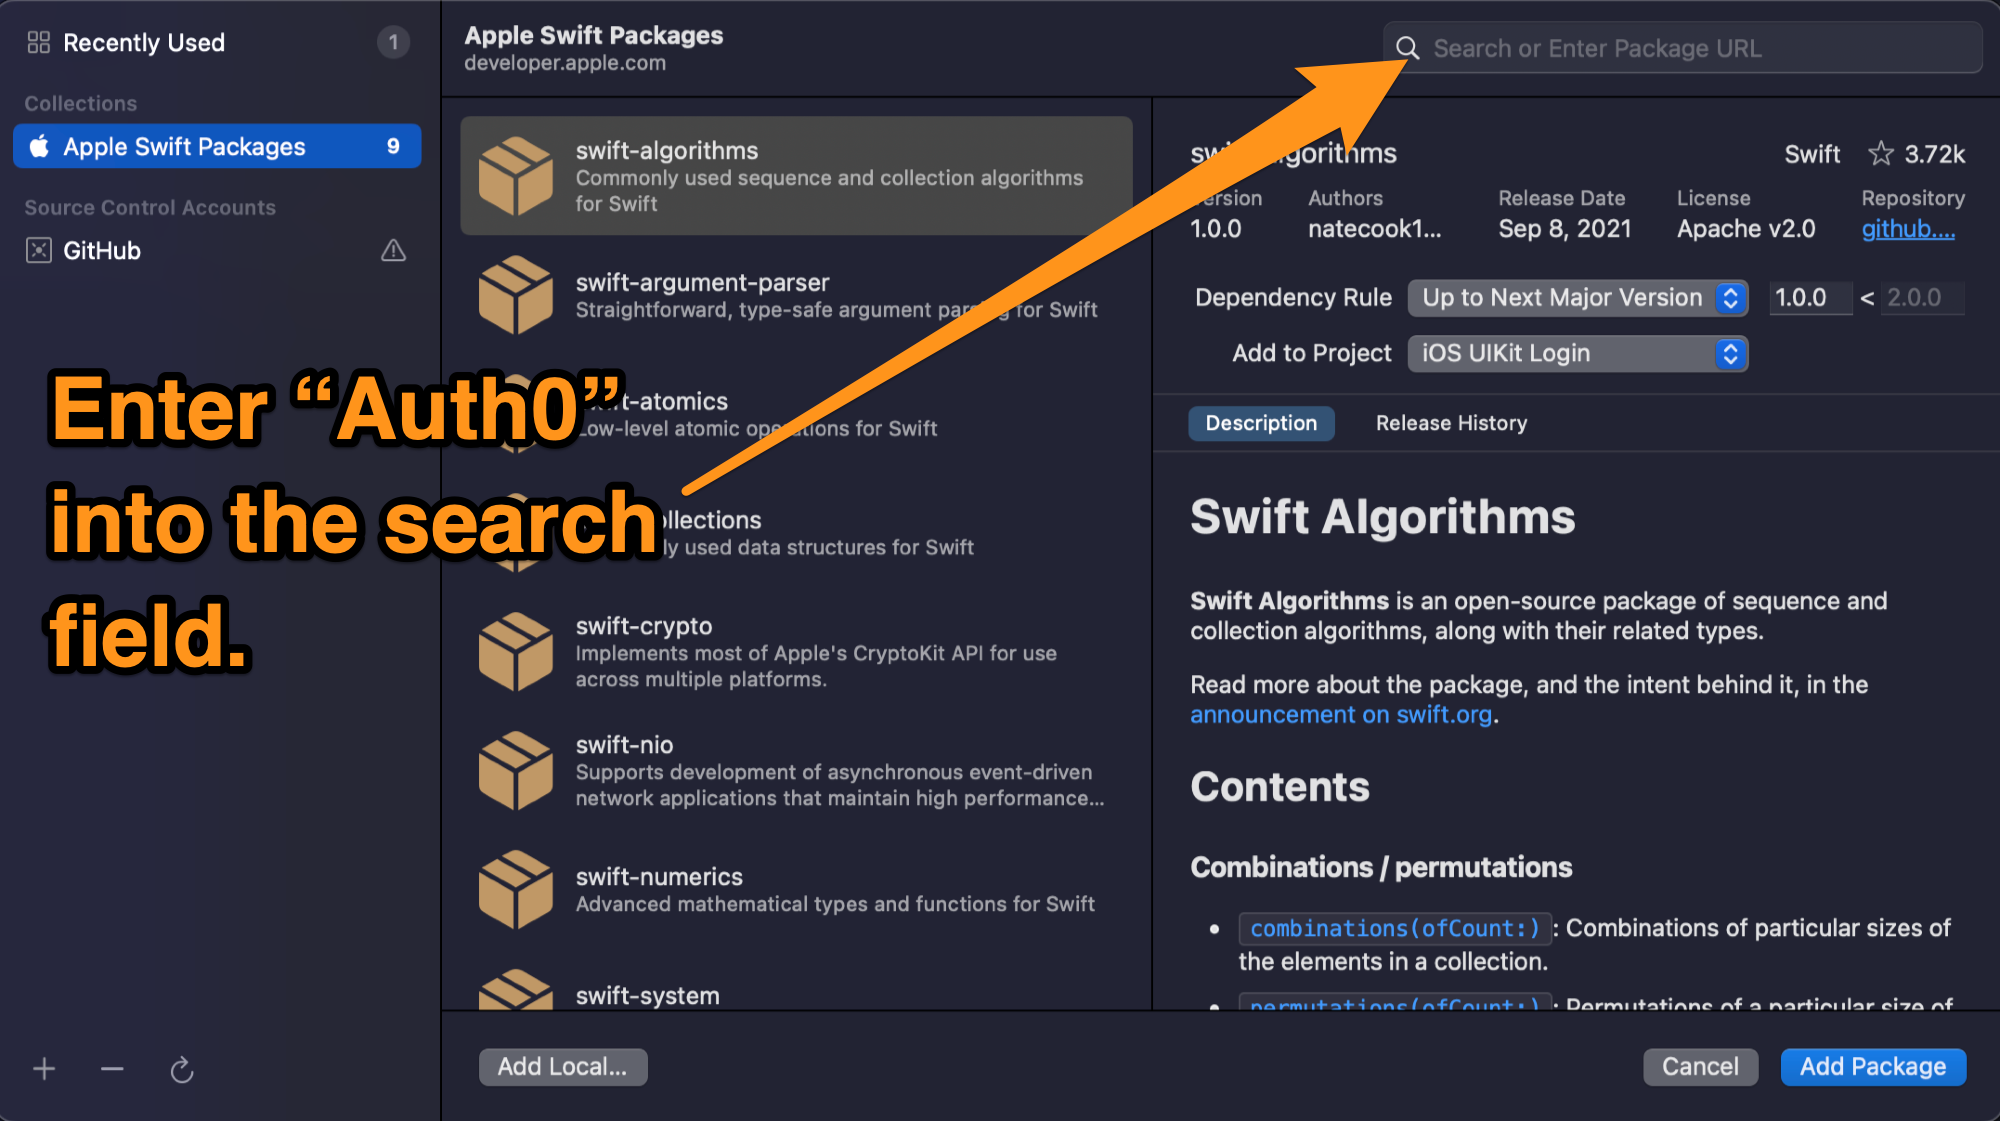
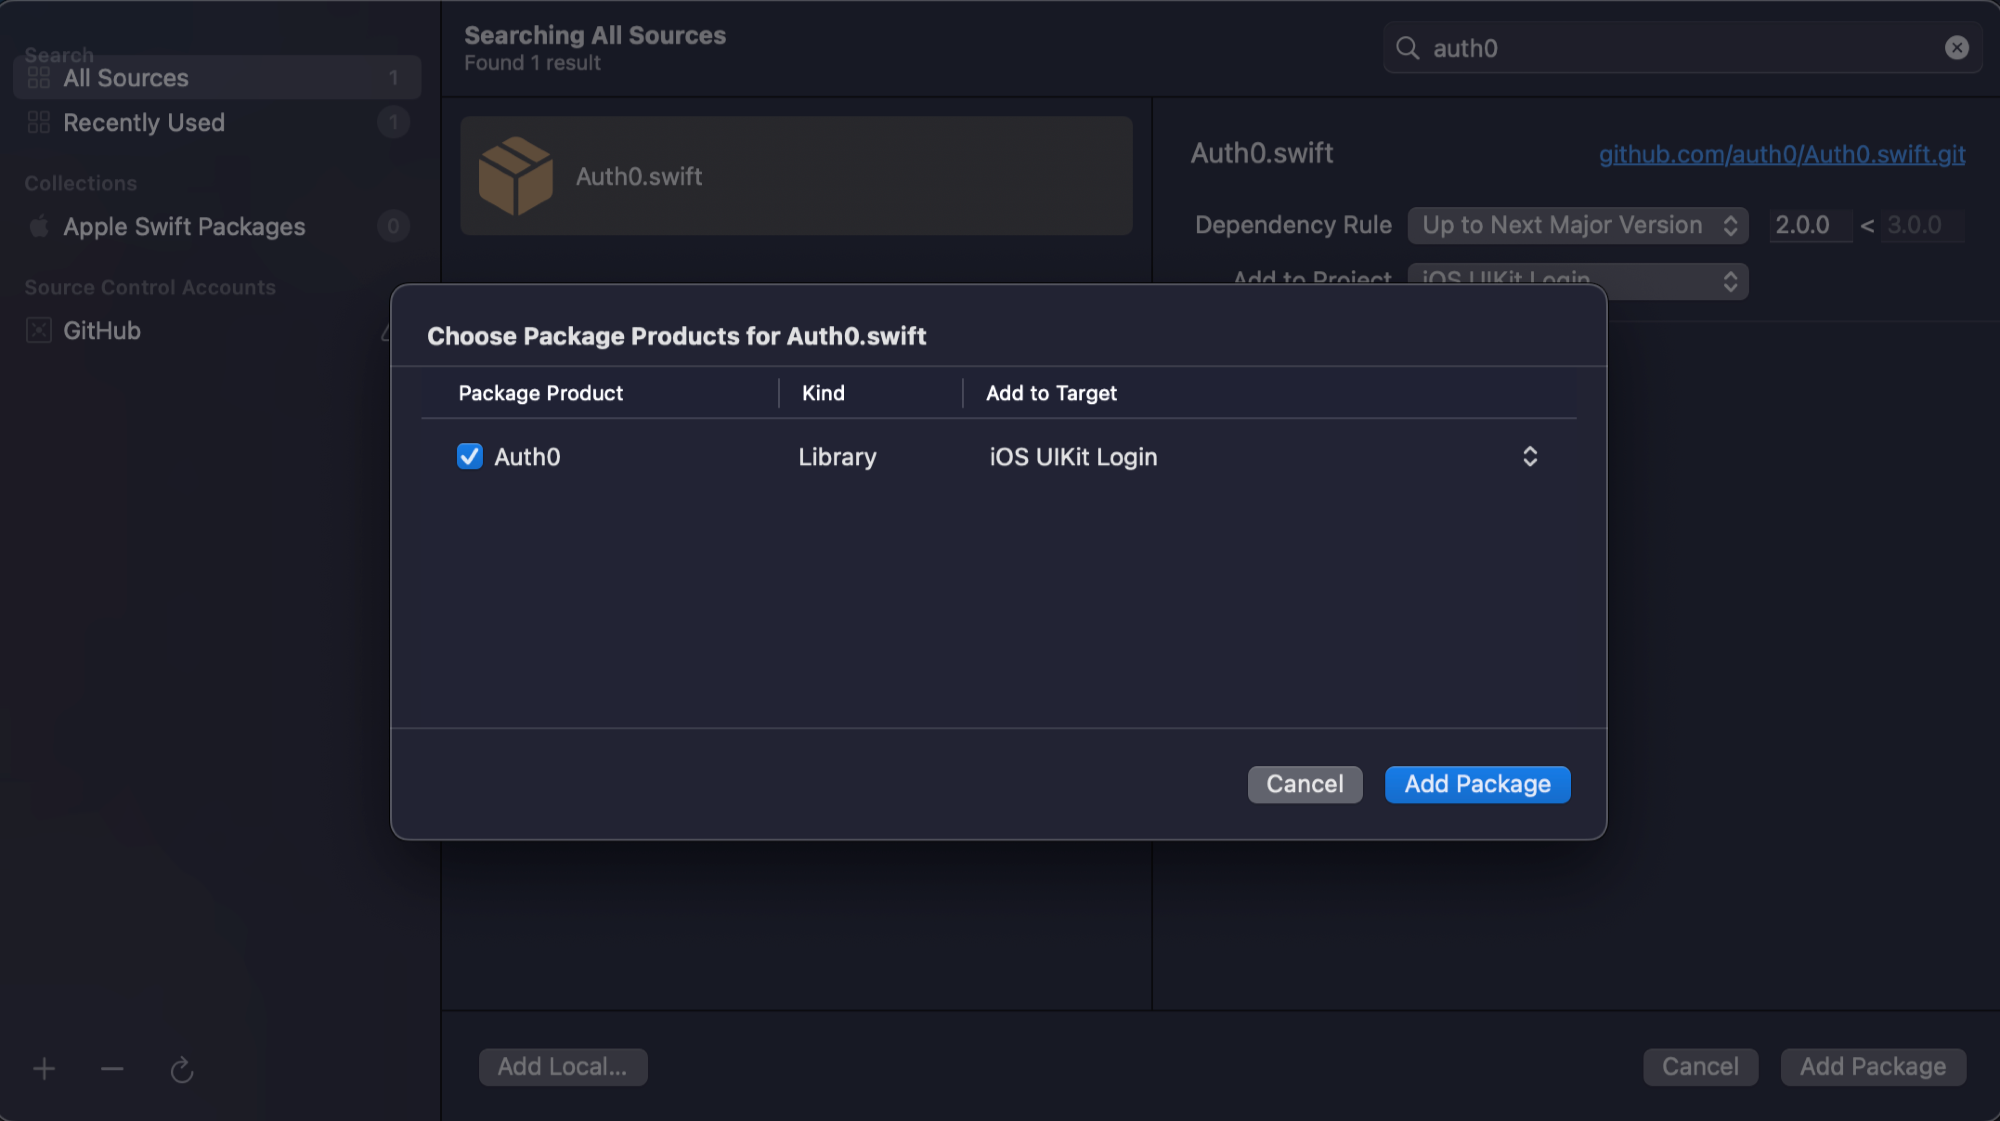
🛠 Enter auth0 into the window’s search field, select Auth0.swift when it appears in the list, then click Add Package:

🛠 You’ll be asked to confirm that you want to add the Auth0.swift package. Click Add Package to reassure Xcode that yes, you want Auth0.swift:
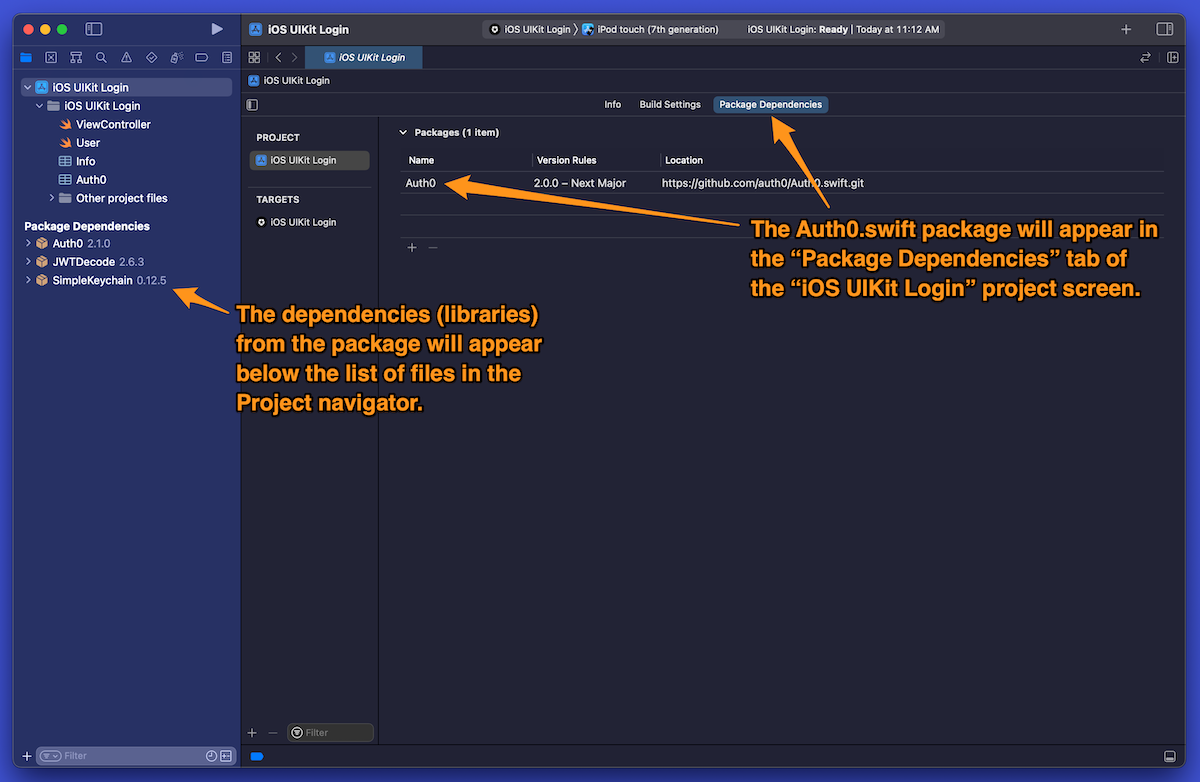
When Auth0.swift finishes installing, its package will appear in the list under the Package Dependencies tab of the iOS Auth project screen. You’ll see Auth0.swift’s libraries listed in the Project navigator pane:
Store the domain and client ID in the Auth0 property list
Earlier in this exercise, you registered the app in the Auth0 dashboard, which gives Auth0 the information it needs to interact with the app. It’s time to do the same thing on the app side of the equation and give it the information it needs to interact with Auth0, namely:
- Your tenant’s domain, which the app will use to determine which URL to use to contact Auth0.
- The app’s client ID, which the app will use to identify itself to Auth0.
Starting with version 2.0, the Auth0.swift package expects to find these values defined in a property list (plist) file in the project. We recommend that you store these values in a separate property list named Auth0.plist, which I’ve included in the starter project.
🛠 Open the Auth0 property list by clicking on it in the Project navigator:

🛠 In the Domain row, make sure that the Type column is set to String, and enter your tenant’s domain into the Value column.
🛠 In the ClientId row, make sure that the Type column is set to String, and enter your app’s client ID into the Value column.
Configure the app’s callback URLs
When an application delegates login and logout to Auth0, it navigates to an URL for an authentication server through a dedicated browser window. The browser-based approach ensures that the login window is always up to date and looks the same across all platforms.
When the login or logout process finishes, the authentication server needs a way to return control to the application. In a web application, you would create a route and provide the URL for this route to Auth0. When Auth0 finishes logging in or logging out, it calls this URL, returning control to the web application.
iOS apps aren’t web applications; they don’t use URLs. For Auth0 to return control to an iOS app, you need to provide the app with some configuration information to allow Auth0 to use the callback URL to return control to the app.
You’ll provide this configuration information by adding it to Info.plist, a file included in every default iOS project that stores configuration information.
Unlike the information you entered into Auth0.plist, the configuration information you need to add to Info.plist is more complex. It will be easier to enter as XML.
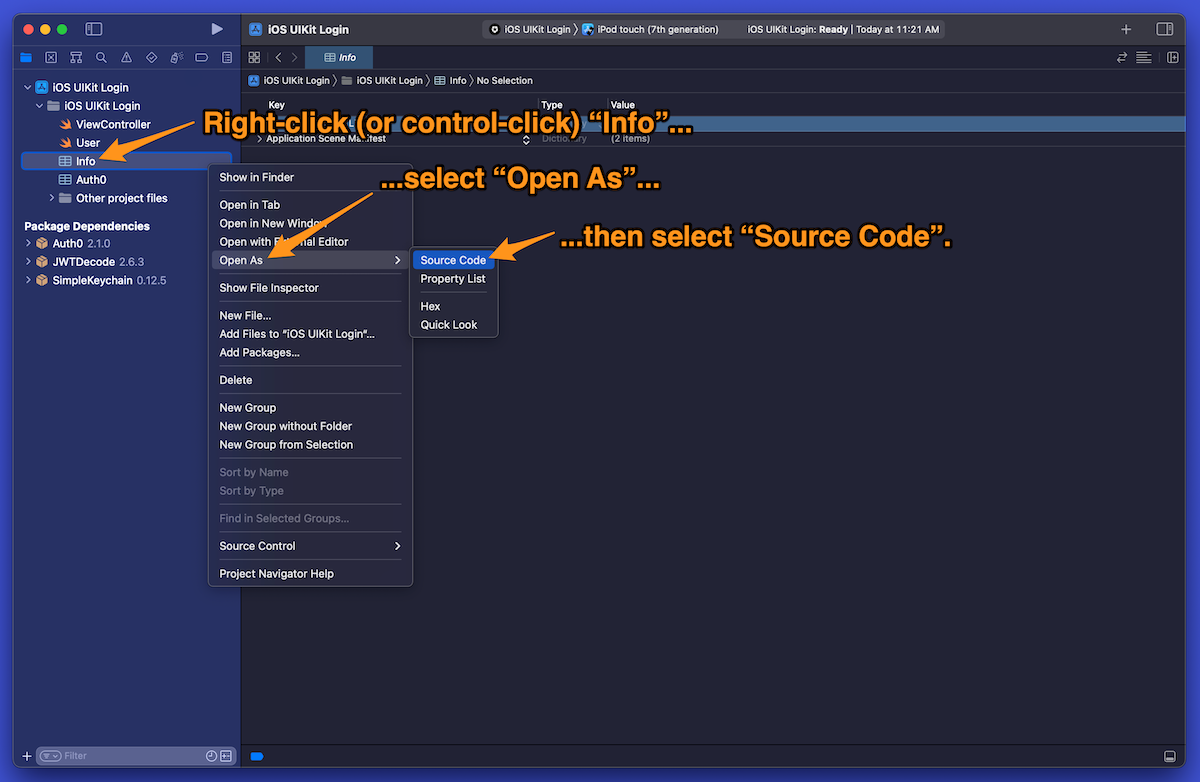
🛠 Open Info.plist as an XML file. Right-click (or control-click) on the Info in the Project navigator, select Open As from the menu that appears, then select Source Code from the sub-menu that appears:
Xcode will display the contents of Info.plist in XML form. It will look like this:
<!-- Info.plist -->

<?xml version="1.0" encoding="UTF-8"?>
<!DOCTYPE plist PUBLIC "-//Apple//DTD PLIST 1.0//EN" "http://www.apple.com/DTDs/PropertyList-1.0.dtd">
<plist version="1.0">
<dict>

<!-- (about 80 lines of configuration) -->

</dict>
</plist>
🛠 Update the XML in Info.plist so that the start of the file appears as follows. The new XML should start immediately after the first <dict> tag and end immediately before the <key>UIApplicationSceneManifest</key> line:
<!-- Info.plist -->

<?xml version="1.0" encoding="UTF-8"?>
<!DOCTYPE plist PUBLIC "-//Apple//DTD PLIST 1.0//EN" "http://www.apple.com/DTDs/PropertyList-1.0.dtd">
<plist version="1.0">
<dict>
  <!-- New XML starts here 👇🏽 -->
  <!-- Enable app to respond to callback and logout URL calls -->
  <key>CFBundleURLTypes</key>
  <array>
    <dict>
      <key>CFBundleTypeRole</key>
      <string>None</string>
      <key>CFBundleURLName</key>
      <string>auth0</string>
      <key>CFBundleURLSchemes</key>
      <array>
        <string>$(PRODUCT_BUNDLE_IDENTIFIER)</string>
      </array>
    </dict>
  </array>
  <!-- New XML ends here 👆🏽 -->
  <key>UIApplicationSceneManifest</key>
<dict>
  <key>UIApplicationSupportsMultipleScenes</key>
  <false/>
  <key>UISceneConfigurations</key>


...the rest of the file is here...
The newly added XML enables the app to respond to Auth0’s calls when the user logs in or out. It defines a type of URL named auth0 and whose scheme is the app’s bundle identifier. In other words, the part of the URL that comes before :// isn’t http or https; it’s the app’s bundle identifier. This matches the values you entered as the callback and logout URLs in the Auth0 dashboard.
You’ve done all the setup for connecting Auth0 to the app and the app to Auth0. It’s time to start coding!
Create a Struct to Represent the User
What happens when the user logs in
With all the necessary setup on both the Auth0 and app sides complete, we can discuss the login process.
When the user presses the Log In button, the app delegates control to Auth0 by opening an embedded web view that displays the Universal Login screen.
Auth0 returns control to the app when the Universal Login screen is closed. As I mentioned earlier, there are two ways to make this happen:
- The user presses the Cancel button. This dismisses the Universal Login screen, and the app receives a notification that the user canceled the login process.
- The user enters a username and password combination that Auth0 recognizes. The app receives a notification that the user has successfully logged in. It also gets a
Credentialsobject, whose properties contain tokens — digital information about who the user is and what they’re allowed to do.
To keep things simple, this app will use only one Credentials property: the ID token. An ID token is a proof that a user has been authenticated. It contains information about the user and what happened during authentication. The app will extract the user’s name, email address, and picture URL from the ID token and display them onscreen when the user is logged in.
If you’d like to find out more about ID tokens as well as their counterpart, access tokens, see our article, ID Token and Access Token: What's the Difference?, which is part of our series, The Confused Developer.
The ID token comes in the form of a JSON Web Token, or JWT for short (you may hear some people pronounce “JWT” as “jot”). JWTs are signed and encoded JSON objects used to send information securely.
You can experiment with JWTs at jwt.io. This site features a JWT debugger that lets you interactively encode and decode JWTs.
Implement the User struct
The app needs to decode and store the ID token’s contents. We’ll give the app that capability by implementing the User struct.
We’ll follow a common pattern for coding structs and classes in Swift, where the state is defined in the struct or class itself while the behavior is defined in an extension.
🛠 Open the User.swift file by clicking on User in the Project navigator. Replace the TODO: Implement User’s state. line with the following:
// User.swift

import JWTDecode

struct User {

  let id: String
  let name: String
  let email: String
  let emailVerified: String
  let picture: String
  let updatedAt: String

}

// ...the rest of the file continues below
Users imports JWTDecode, a Swift library for decoding JWTs that comes as part of the Auth0.swift package. It also defines a set of string properties to hold the user information that it will extract from the ID token. We’ll need only the name, email, and picture properties for this app.
🛠 Replace the TODO: Implement User’s behavior. line with the following:
// User.swift

// ...the rest of the file continues above

extension User {

  static var empty: Self {
    return User(
      id: "",
      name: "",
      email: "",
      emailVerified: "",
      picture: "",
      updatedAt: ""
    )
  }

  static func from(_ idToken: String) -> Self {
    guard
      let jwt = try? decode(jwt: idToken),
      let id = jwt.subject,
      let name = jwt.claim(name: "name").string,
      let email = jwt.claim(name: "email").string,
      let emailVerified = jwt.claim(name: "email_verified").boolean,
      let picture = jwt.claim(name: "picture").string,
      let updatedAt = jwt.claim(name: "updated_at").string
    else {
      return .empty
    }

    return User(
      id: id,
      name: name,
      email: email,
      emailVerified: String(describing: emailVerified),
      picture: picture,
      updatedAt: updatedAt
    )
  }

}
The extension adds the following to User:
empty: A variable property that defines a blankUserobject. Its properties are all set to the empty string.from(): A method that takes an ID token and extracts its information to fill theUserobject’s properties. These properties are:id: A string that uniquely identifies the user.name: The user’s full name.email: The user’s email address.emailVerified:trueif the user has verified their email with Auth0.picture: The URL for the user’s picture.updatedAt: The date when the user’s information was last updated.
Implement Login
Now that we have something that can decode an ID token and store the user information it contains, we can implement login (and eventually, logout).
This is a simple single-screen app, so you’ll implement login (and logout) in the app’s single view controller, located in the file named ViewController.swift.
Import the Auth0 library
🛠 Open the view controller class by clicking on ViewController in the Project navigator. You’ll write code that uses functionality from the Auth0 library. Import the library by adding the following after the import UIKit statement near the start of the file:
// ViewController.swift

import UIKit
// New code 👇🏽
import Auth0
// New code 👆🏽

// ...the rest of the file continues below
Add properties to ViewController
Once again, we’ll follow the Swift pattern of building structs and classes by defining the state in the struct or class and defining behavior in an extension.
The ViewController class, which defines its state, contains these subsections:
On-screen controls: These variables reference user elements on the app’s single screen. I’ve already declared these variables and connected them to their matching UI elements in the view to save time.App and user status: This empty subsection will contain variables to keep track of the app’s and user’s state.Auth0 data: This empty subsection will contain variables to store data received from Auth0’s authentication server — credentials, user information, and user metadata.
🛠 Update the App and user status and Auth0 data subsections by replacing the TODO: comments, so they look like this:
// ViewController.swift

// ...the rest of the file continues above

  // App and user status
  // New code 👇🏽
  private var appJustLaunched = true
  private var userIsAuthenticated = false
  // New code 👆🏽

  // Auth0 data
  // New code 👇🏽
  private var user = User.empty
  // New code 👆🏽

// ...the rest of the file continues below
Here’s an overview of the properties you just added to ViewController:
- The
App and user statusproperties:appJustLaunched: This property will betrueonly immediately after the app launches. We’ll use its value to determine the contents oftitleLabel, the title text at the top of the app’s screen. We want it to display a greeting at the start and show the user’s logged in/logged out status afterward.userIsAuthenticated: This property will betrueif the user is logged in andfalseotherwise.
- The
Auth0 dataproperties:user: Contains information about the logged-in user.
Code the login() method
Let’s define ViewController’s behavior, which we’ll define in the extension. We’ll start with login.
The login() method will call the Auth0 authentication server and provide the appropriate actions for a successful login and a failed one. We’ll implement it a little bit at a time.
🛠 Replace the TODO: comment in login() so that the method looks like this:
// ViewController.swift

// ...the rest of the file continues above

  func login() {
    // New code 👇🏽
    Auth0
      .webAuth()
      .start { result in

        switch result {

          case .failure(let error):
            // The user either pressed the “Cancel” button
            // on the Universal Login screen or something
            // unusual happened.
            // TODO: Handle login failure.

          case .success(let credentials):
            // The user successfully logged in.
            // TODO: Handle login success.

        } // switch

      } // start()
      // New code 👆🏽
  }

// ...the rest of the file continues below
If you ignore the closure, comments, and newline characters, the code in this method effectively becomes a short chain of method calls:
Auth0.webAuth().start()
This is the Builder design pattern in action. Each method in the chain returns an object that it passes to the next method in the chain.
The Auth0 object provides access to the imported Auth0 library.
The webAuth() method creates a WebAuth object, which controls the Universal Login screen and its underlying functionality. It expects to find key-value pairs named domain and clientId in a property list. You entered these values into Auth0.plist earlier.
The start() method takes the return value from webAuth() and initiates the authentication process. Doing so opens an embedded web view that displays the Universal Login page. start() has a single parameter: a closure that takes an argument representing the possible outcomes:
- One where the user manually closes the web view without logging in, and
- One where the user successfully logs in and the web view closes automatically.
The switch statement in the closure handles these outcomes. Let’s implement it, one case at a time, starting with the one where the user cancels the authentication process.
Handle the failure() case
🛠 In the login() method’s switch statement, replace the TODO: comment in the .failure(let error) case so that it looks like this:
// ViewController.swift

// ...the rest of the file continues above

          case .failure(let error):
            // The user either pressed the “Cancel” button
            // on the Universal Login screen or something
            // unusual happened.
            // New code 👇🏽
            if error == .userCancelled {
              let alert = UIAlertController(
                title: "Please log in.",
                message: "You need to log in to use the app.",
                preferredStyle: .alert)
              alert.addAction(
                UIAlertAction(
                  title: NSLocalizedString(
                    "OK",
                    comment: "Default action"
                  ),
                  style: .default,
                  handler: { _ in
                    NSLog("Displayed the "Please log in" alert.")
              }))
              self.present(alert, animated: true, completion: nil)

            } else {
              print("An unexpected error occurred: (error.localizedDescription)")
            }
            // New code 👆🏽
// ...the rest of the file continues below
The failure() case arises when the Universal Login page's web view closes without the user logging in. This usually happens when the user manually closes the web view by pressing its Cancel button, which sets the value of the error parameter to .userCancelled (the abbreviated form of WebAuthError.userCancelled). When this happens, the app displays an alert box notifying the user that they can’t use the app without logging in.
In the (very unlikely) case where the value of error isn’t .userCancelled, the app simply prints the error to the console.
Handle the success() case
🛠 Update the .success(let credentials) case by replacing the TODO: comment so that it looks like this:
// ViewController.swift

// ...the rest of the file continues above

          case .success(let credentials):
            // The user successfully logged in.
            // New code 👇🏽
            self.userIsAuthenticated = true
            self.user = User.from(credentials.idToken)

            DispatchQueue.main.async {
              self.updateTitle()
              self.updateButtonsAndStack()
              self.updateUserInfoUI()
            }
            // New code 👆🏽

// ...the rest of the file continues below
The success() case occurs when the user successfully logs in. After a successful login, Auth0 returns a Credentials object via the credentials parameter.
The success() case code does the following:
- It marks the user as logged in by setting the
userIsAuthenticatedproperty totrue. - It decodes the ID token, extracts the user information it contains, and stores it in the
userproperty, making this information available to the app. - It changes the user interface to the “logged in” state by updating the title, setting the button states appropriately, and updating and revealing the contents of the user information portion of the screen.
Since the calls to the UI methods — updateTitle(), updateButtonsAndStack(), and userInfoUI() — are inside a closure, I put them inside a Dispatch.main.async block. This ensures that they execute asynchronously in the main thread, which is the only thread where UI updates are allowed.
Update the user interface
It’s time to take care of the user interface. The first step is to initialize the UI when the app launches, which we’ll do in the viewDidLoad() method.
🛠 Update the viewDidLoad() method by replacing the TODO: comment so that it looks like this:
// ViewController.swift

// ...the rest of the file continues above

  // MARK: View events
  // =================

  override func viewDidLoad() {
    super.viewDidLoad()

    // New code 👇🏽
    updateTitle()
    userInfoStack.isHidden = true
    loginButton.isEnabled = true
    logoutButton.isEnabled = false
    // New code 👆🏽
  }

// ...the rest of the file continues below
The next step is to make the Log In button call the login() method — but only if the user isn’t already logged in.
🛠 Replace the TODO: comment in loginButtonPressed() method, located in the Actions section, so that the method looks like this:
// ViewController.swift

// ...the rest of the file continues above

// MARK: Actions
// =============

  @IBAction func loginButtonPressed(_ sender: UIButton) {
    // New code 👇🏽
    if !userIsAuthenticated {
      login()
    }
    // New code 👆🏽
  }

// ...the rest of the file continues below
Finally, the app needs methods to update the user interface based on the login status. These are the unimplemented updateTitle() and updateButtonsAndStack() methods referred to in the login() method.
🛠 Update the updateTitle(), updateButtonsAndStack(), and updateUserInfoUI() methods in the UI updaters section by replacing their TODO: comments so that they look like this:
// ViewController.swift

// ...the rest of the file continues above

  // MARK: UI updaters
  // =================

  func updateTitle() {
    // New code 👇🏽
    if appJustLaunched {
      titleLabel.text = "Welcome to the app!"
      appJustLaunched = false
    } else {
      if userIsAuthenticated {
        titleLabel.text = "You’re logged in."
      } else {
        titleLabel.text = "You’re logged out."
      }
    }
    // New code 👆🏽
  }

  func updateButtonsAndStack() {
    // New code 👇🏽
    loginButton.isEnabled = !userIsAuthenticated
    logoutButton.isEnabled = userIsAuthenticated
    userInfoStack.isHidden = !userIsAuthenticated
    // New code 👆🏽
  }

  func updateUserInfoUI() {
    // New code 👇🏽
    userNameLabel.text = user.name
    userEmailLabel.text = user.email
    userPicture.load(url: URL(string: user.picture)!)
    // New code 👆🏽
  }

// ...the rest of the file continues below
The last line of
updateUserInfoUI()uses a method calledload()to fill an image view with a picture at a given URL.load()is an extension method for the image view class,UIImageView, and you’ll find its definition in UIImageView+Extensions, located in the Other project files group.
Implement Logout
There’s only one thing left to do: implement logout!
🛠 Replace the TODO: comment in logout() so that the method looks like this:
// ViewController.swift

// ...the rest of the file continues above

  func logout() {
    // New code 👇🏽
    Auth0
      .webAuth()
      .clearSession { result in
        switch result {

          case .failure(let error):
            print("Failed with: (error)")

          case .success():
            self.userIsAuthenticated = false
            self.user = User.empty

            DispatchQueue.main.async {
              self.updateTitle()
              self.updateButtonsAndStack()
            }

        } // switch

    } // clearSession()
   // New code 👆🏽
  }

// ...the rest of the file continues below
The call to webAuth() should seem familiar; it’s the same method you used for the login process.
As with the login() method, webAuth() returns a WebAuth object. Unlike login(), logout() uses WebAuth’s clearSession() method, which logs the user out.
clearSession()’s parameter is a closure that takes a boolean argument. This argument is true if the user has successfully logged out. When this happens, we set the userIsAuthenticated property to false, clear all the cached information received from Auth0, and update the user interface.
🛠 The final step is to connect the Log Out button to the logout() method. Update the logoutButtonPressed() method so that it looks like this:
// ViewController.swift

// ...the rest of the file continues above

@IBAction func logoutButtonPressed(_ sender: UIButton) {
  // New code 👇🏽
  if userIsAuthenticated {
    logout()
  }
  // New code 👆🏽
}

// ...the rest of the file continues below
Run the Completed App
🛠 Run the app and log in. The first time you log in, the browser window that displayed the login page will display this “Authorize App” page:
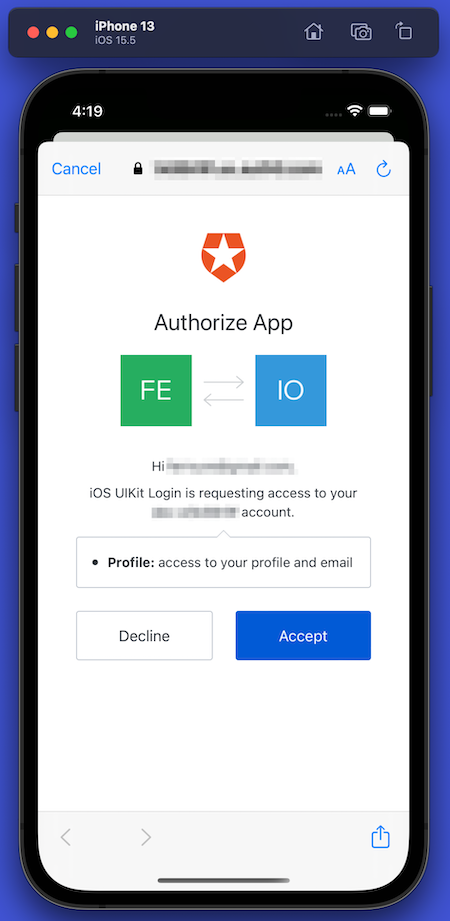
This is the Authorize App screen, where the app asks for the user’s permission to access information or perform actions on their behalf. In this case, the app is asking for permission for access to the user’s profile information, which includes the information that the app will display: the user’s name, email address, and photo.
🛠 Press the Accept button to allow this access. Once you’ve accepted, this page will not appear again.
You’ll now be logged in, with the user’s information visible onscreen.
🛠 Log out of the app and confirm that the user information section disappears and that the text at the top of the screen reads ‘You’re logged out.”
Conclusion
You’ve just built an iOS app that features basic username/password authentication. In addition to logging a known user in and out, it can also retrieve basic user information from their user profile and display it onscreen.
You can find the starter and completed projects in the get-started-ios-authentication-swift-uikit repository on the Auth0 Blog Samples GitHub account.
Just remember that the best way to understand how the app integrates with Auth0 is to get the starter project and work towards the completed one following the steps in this tutorial! As the saying goes, “I hear, I forget; I see, I remember; I do, I understand.”
Keep an eye on this blog for upcoming articles on iOS development with Auth0. Future articles will feature deeper dives into authentication, authorization, and alternatives to the standard username-and-password approach. Watch this space!
About the author

Joey deVilla
Senior Developer Advocate (Auth0 Alumni)