


If you build Android apps with React Native, this tutorial will show you how quickly you can use Auth0 to add authentication to your apps. You’ll make an app that lets users log in with an app-specific username/password combination or a Google account.
This tutorial contains the steps specific to creating Android apps written with React Native. It has a companion article, Get Started with Auth0 Authentication in React Native iOS Apps. The app code is the same in both tutorials, but the Android and iOS versions require different configuration steps.
Look for the ⚛️ emoji if you’d like to skim through the content while focusing on the build and execution steps. Harness the power of control-F/command-F to build the app in this tutorial quickly!
What You’ll Build
This tutorial will walk you through the steps to build the app shown below:
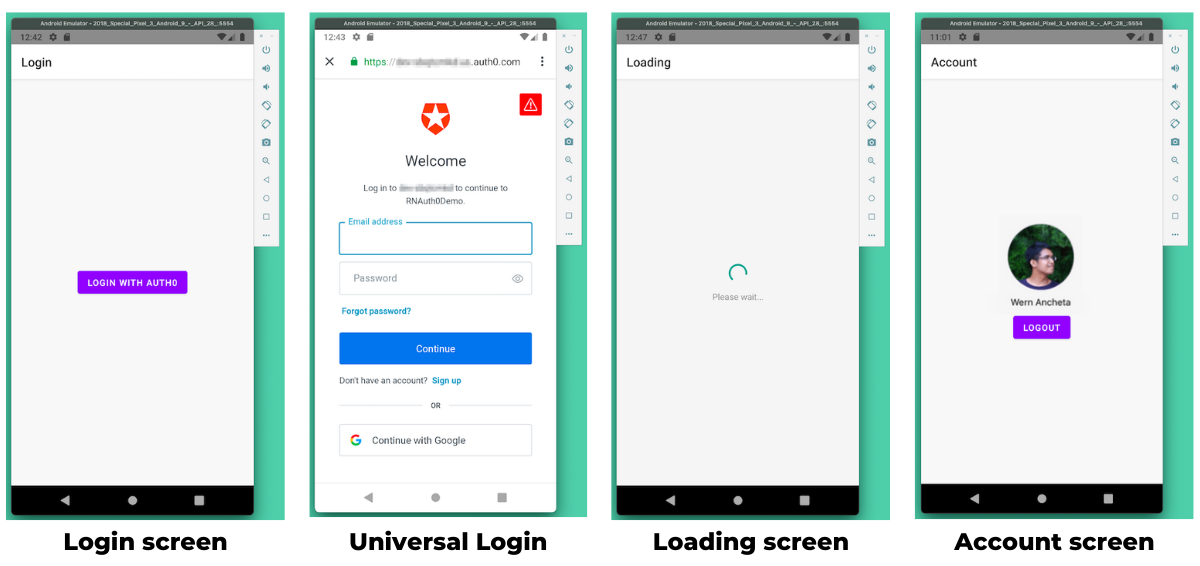
The app will have four screens:
- The Login screen, which the user will see when the app launches. It has a Login With Auth0 button that takes the user to the Universal Login screen when pressed.
- The Universal Login screen, where the user authenticates themself — that is, where they enter their user name and password or perform some other action to prove their identity. You don’t have to code this screen; a call to the Auth0 API brings it up. After logging in, the app takes the user to the Loading screen.
- The Loading screen displays an activity indicator while the app determines the user’s login status. In many cases, the user won’t even see this screen.
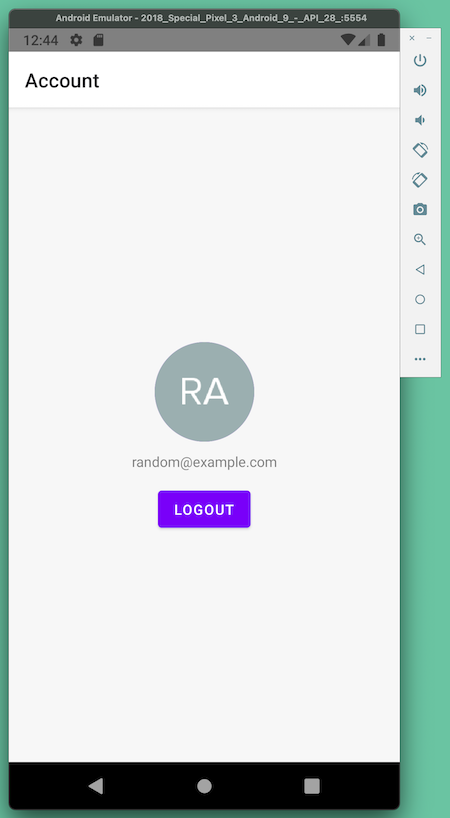
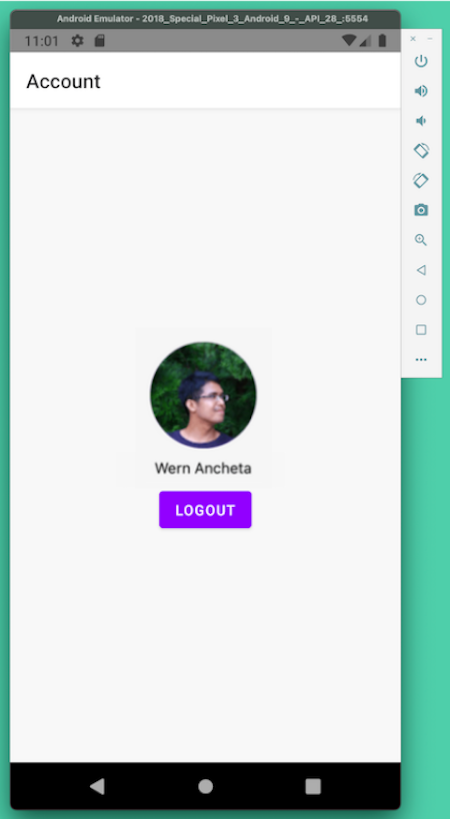
- The Account screen, where the user goes if they log in successfully. It displays a picture of the user and the user’s name and a Logout button that takes them to the Login screen when pressed.
Let’s take a closer look at the Universal Login screen shown below:
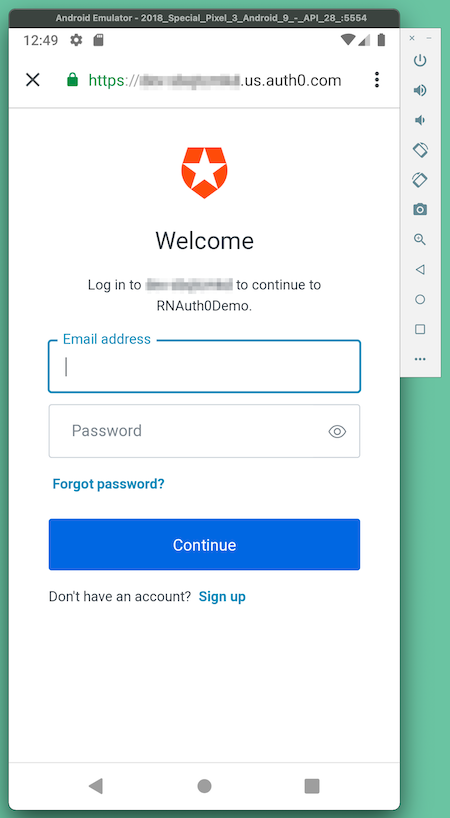
A call to the Auth0 API brings up the Universal Login screen, which is a web page that, in native mobile apps, is contained within a web view. The screenshot above shows the basic form of the Universal Login page, which presents the user with fields for their email address and password, and a button that the user can click to submit their credentials. It also has links that allow the user to sign up for an account and get a new password in the event that they forgot theirs.
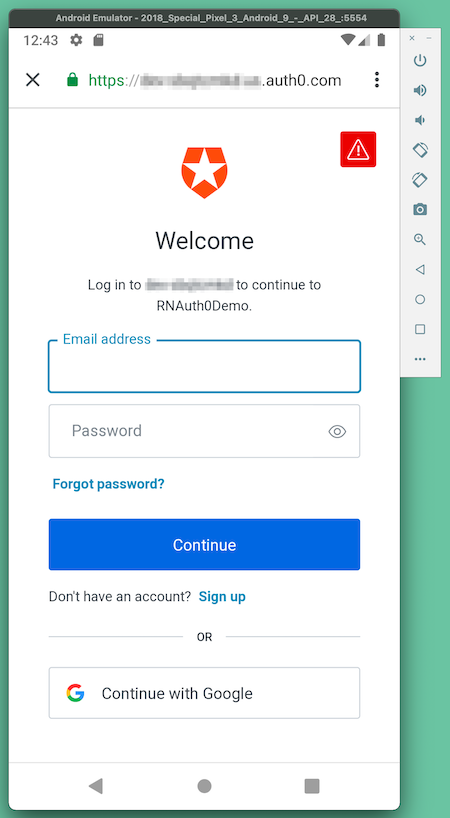
You can add ways for a user to log in without doing any coding. For example, you need only a few clicks to add the ability for users to log in using a social account. You’d expect some of these, such as Facebook, Apple, and Microsoft, while others might surprise you, such as Spotify, Twitch, RenRen, or even an Ethereum wallet. In this article’s exercise, you’ll do this by enabling users to log in with their Google account (note the Continue with Google button):
You can also customize the appearance of the Universal Login screen in the Auth0 dashboard to display a specific logo and use the colors of your choice. If you’d like to find out more, see the Customize New Universal Login Pages page in our documentation.
Prerequisites
To follow this tutorial, you’ll need the following:
- An Auth0 account. The app featured in this tutorial uses Auth0 to provide login and logout functionality. As its developer, you’ll need an Auth0 account. You can sign up for a free account, which lets you add authentication to 10 applications and supports 7000 user accounts. This should be enough for evaluating the platform, prototyping, development, and testing.
- The React Native CLI (Command-Line Interface) development environment. React Native’s Setting up the development environment page walks you through the process of installing the React Native CLI environment on your machine. Note that this tutorial uses the React Native CLI, not the Expo CLI.
- Android Studio. React Native requires Android Studio to build apps for Android.
You’ll need to be familiar with JavaScript, and it would be helpful if you had some familiarity with React, React Native, and React Hooks.
Set Up a New React Native Project
Let’s start with a new React Native project. If you’re an experienced React Native developer, feel free to create a new project as you see fit and then skip ahead to the Install the dependencies section.
Generate a new React Native project
⚛️ Open your preferred terminal application and create a new React Native project using npx react-native init. The command shown below creates a new React Native app named RNAuth0Demo in a directory with the same name:
npx react-native init RNAuth0Demo
You’ll see the following while the app is generated:
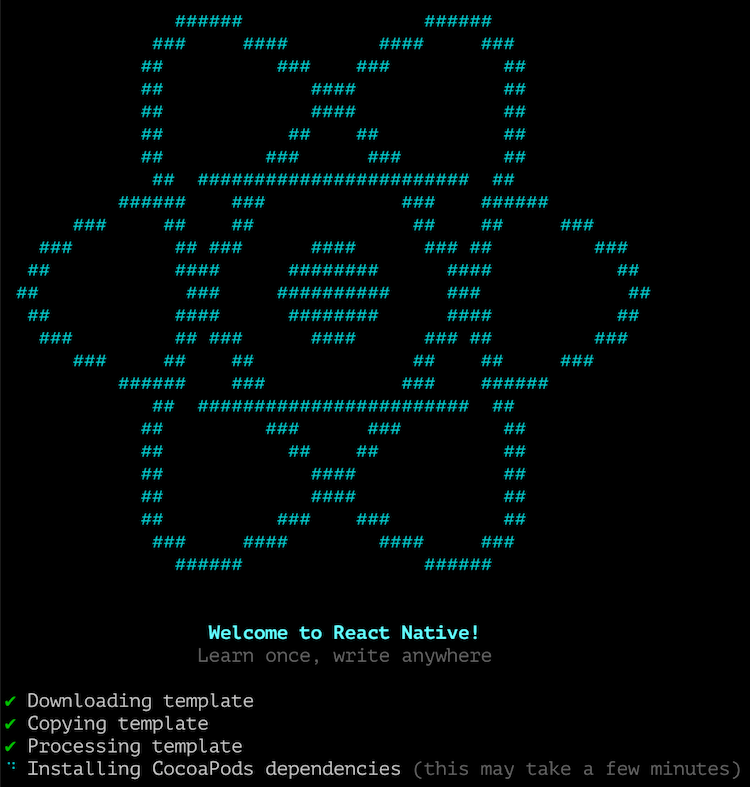
Depending on your system, the process can take a couple of minutes or longer.
⚛️ Once React Native has generated the app, change to the project’s root directory. If you named the project RNAuth0Demo, this command will take you there:
cd RNAuth0Demo
You’ll issue commands to React Native from the project’s root directory, so it’s a good idea to keep a terminal or Command Prompt window open there.
Confirm that the new app works
It’s always a good idea (and reassuring, too!) to run an app immediately after generating it.
⚛️ Start an Android emulator or connect an Android device to your computer. Then make sure that you’re on the project’s root directory and enter the following command:
npx react-native run-android
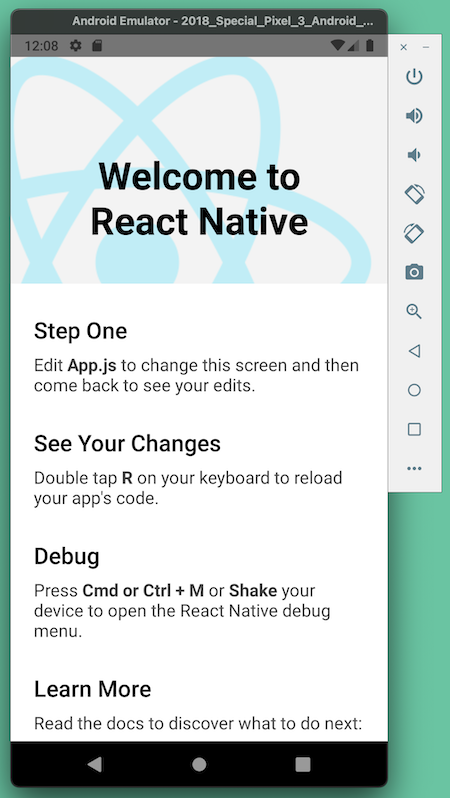
React Native will run the app on the first device it finds — physical or virtual — and shortly, you should see a screen like this:
If your system is connected to multiple physical or virtual Android devices, use the following command to get a list of these devices and their device IDs:
adb devices
To run the app on a specific Android device, use the following command...
npx react-native run-android --deviceId={DEVICE ID}
...replacing {DEVICE ID} with the device ID of the device where the app should run.
Install the dependencies
The app project relies on a set of dependencies, which you’ll install in this step.
⚛️ In the terminal or Command Prompt, make sure that you’re at the project’s root directory.
Authentication-related dependencies
Although you can install the project’s dependencies in any order, let’s install the ones that play a role in authentication first.
⚛️ React Native Auth0: This provides the libraries for implementing Auth0 authentication and authorization. Install it with the following command:
npm install react-native-auth0
⚛️ jwt-decode: This will enable your app to decode the information contained within a JSON Web Token (JWT, sometimes pronounced as “jot”). This is the format of the ID token that Auth0 will send to the app when a user logs in. Install it with the following command:
npm install jwt-decode
⚛️ React Native Sensitive Info: The app will use this to securely store sensitive information (such as the ID token) as encrypted data in Android’s Shared Preferences or in the Keychain in the iOS version. Install it with the following command:
npm install react-native-sensitive-info
Visit React Native Sensitive Info’s documentation for more information on how to configure it.
Other dependencies
These dependencies provide functionality not directly related to authentication but used by the app.
⚛️ React Navigation and its associated dependencies provide the functionality to allow the user to navigate between screens in the app. Install them with the following commands:
npm install @react-navigation/native
npm install @react-navigation/stack
npm install @react-navigation/native-stack
npm install react-native-screens react-native-safe-area-context
Consult the React Navigation documentation for more information on configuring it.
⚛️ React Native Dotenv provides functions to read configuration information from a .env file. Install it with the following command:
npm install react-native-dotenv
⚛️ Update the project’s /babel.config.js file to the following. This will make React Native Dotenv’s functionality available to the app:
module.exports = {
  presets: ['module:metro-react-native-babel-preset'],
  // 👇🏾👇🏾👇🏾 New code here
  plugins: [['module:react-native-dotenv']],
  // 👆🏾👆🏾👆🏾 New code here
};
⚛️ React Native Paper provides customizable user interface components that follow Google’s Material Design guidelines. Install it with the following command:
npm install react-native-paper
Consult the React Paper documentation for more information on configuring it.
⚛️ React Native Paper requires React Native Vector Icons. Install it with the following command:
npm install react-native-vector-icons
npx react-native link react-native-vector-icons
Integrate Your App with Auth0
Now that you’ve created a starter version of your app, it’s time to register it with Auth0. Once registered, your app will be able to use Auth0 to authenticate users.
If you don’t have an Auth0 account yet...
You’ll need an Auth0 account in order to proceed. If you don’t have one, you can sign up for free! The sign-up process is quite painless: the only information you’ll have to enter is an email address and password, and you won’t have to provide a credit card number.
Immediately after you sign up for an account, you’ll be taken to the Auth0 dashboard, which will look like this:
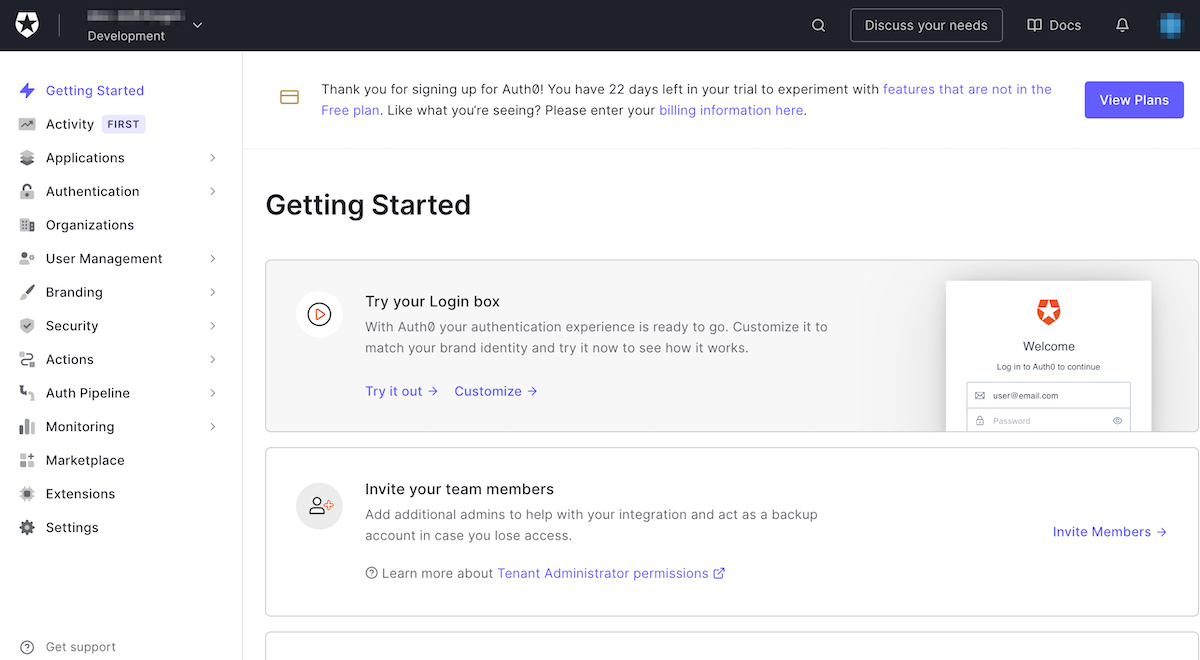
The dashboard gives you a view into your tenant, which you can think of as a collection of applications, user profiles, and ways for users to log in.
Register your app
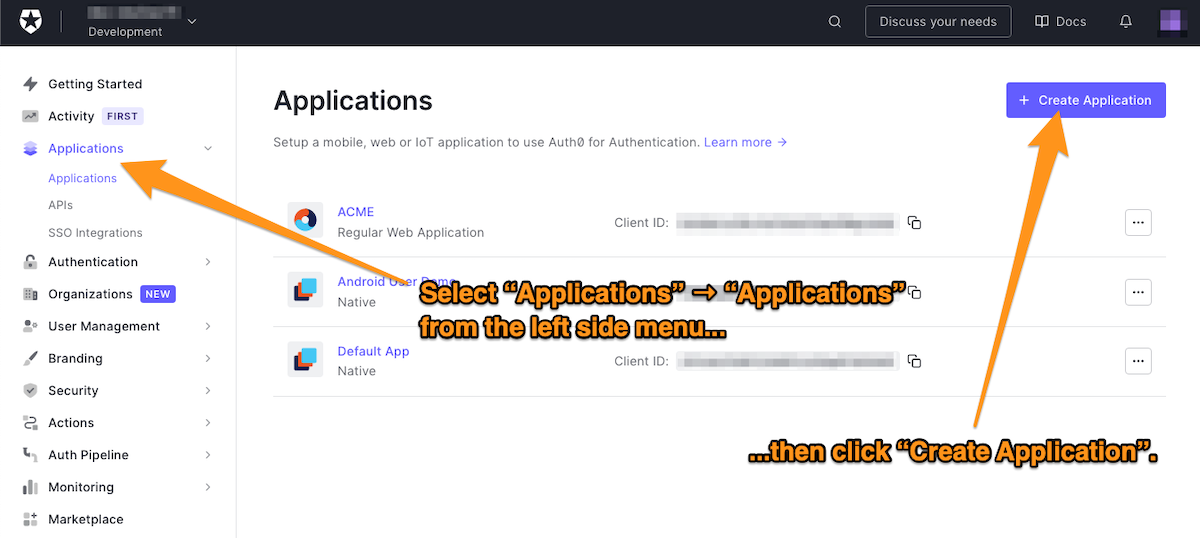
If you haven’t already done so, sign in to the Auth0 dashboard. Create a new application by selecting Applications → Applications from the menu on the left side of the page, then click the Create Application button near the upper right corner:
The Create application dialog will appear:
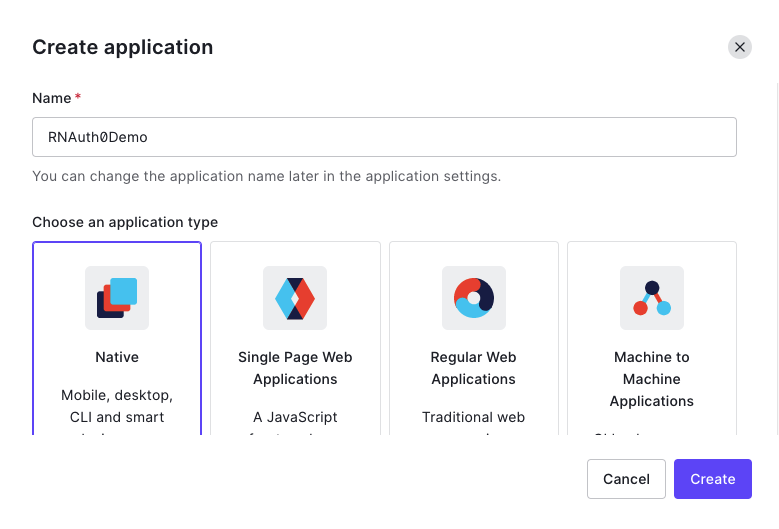
⚛️ You’ll need to provide two pieces of information to continue:
- Enter a name for the application in the Name field. For this exercise, we’re using the name
RNAuth0Demo. - Specify the application type. For a React Native app, select Native.
⚛️ Click Create. This will register the app, and once it’s done, the app’s Quick Start page will appear:
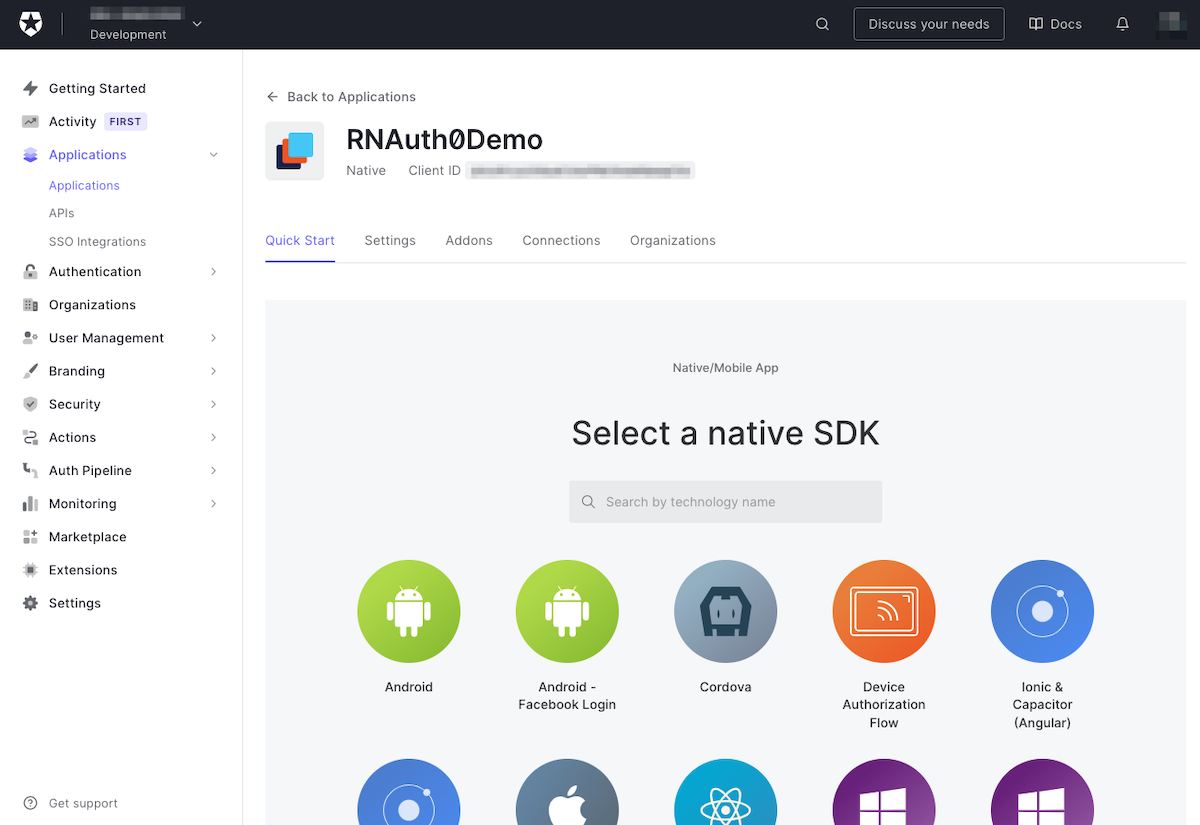
This page provides you with several Quick Starts, which are starter projects for apps that use Auth0, with support for several platforms. You won’t use the React Native Quick Start in this exercise; instead, you’ll build a React Native project “from scratch”, incorporate a couple of Auth0 libraries, and write the code yourself.
⚛️ Click the Settings tab, which will take you to this page:
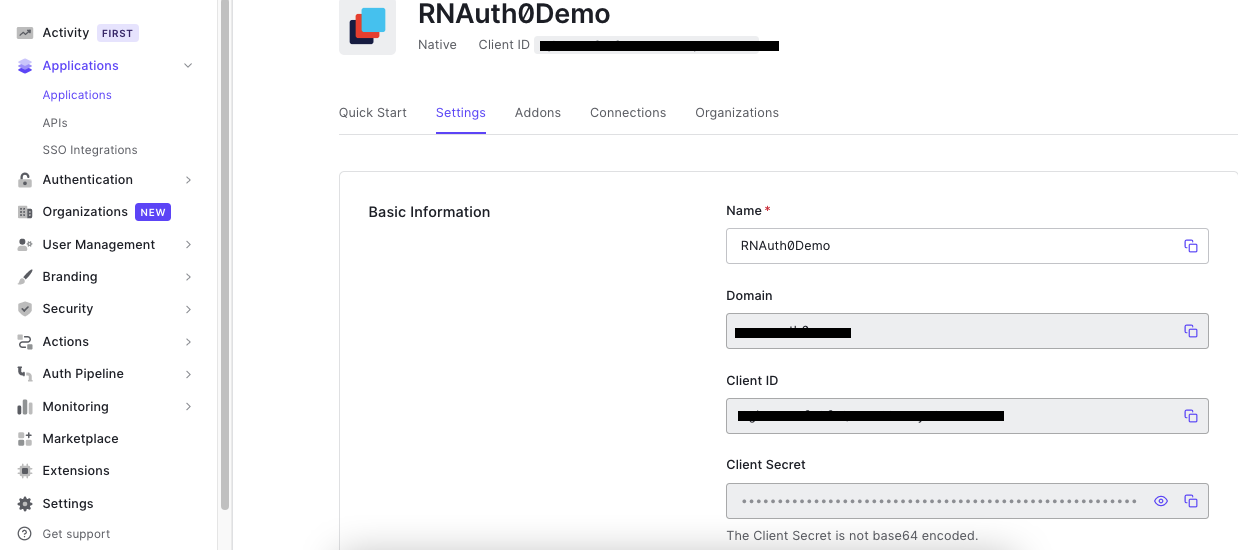
Keep this page open! You’ll use it for two crucial tasks, which you’ll perform next:
- Providing information about your app that Auth0 needs
- Getting information about Auth0 that your app needs
Provide information about your app that Auth0 needs
Auth0 requires two key pieces of information to work with your app:
- The Callback URL, which it will redirect to after the user provides their login credentials on the Universal Login screen. There can be more than one of these.
- The Logout URL, which it will redirect to after the user logs out of the app. There can be more than one of these.
You may be wondering why you’re dealing with URLs even though you’re working with React Native app, which has Views, not web pages. For native applications, the callback and logout URLs are the same string, and Auth0 sends that string to the app to inform it that a user has logged in or logged out.
Provide the Callback/Logout URL string
The first step in providing the Callback and Logout URL string for the app is to determine the app’s uniquely identifying name: the package name. This name is based on your React Native project’s name, and you can find it in the project’s android/app/src/main/AndroidManifest.xml file.
⚛️ Go back to the Settings page for your app in the Auth0 dashboard and paste the template text below into the Allowed Callback URLs field (it’s about halfway down the page):
{APP_PACKAGE_NAME}://{YOUR_TENANT_DOMAIN}/android/{APP_PACKAGE_NAME}/callback
This text is the template for the Android Callback and Login URLs. You’ll replace the placeholders, {APP_PACKAGE_NAME} and {YOUR_TENANT_DOMAIN}, with their actual values in the next couple of steps.
⚛️ Open /android/app/src/main/AndroidManifest.xml and look for the <manifest> tag at the start of the file. It should look like this:
<!-- /android/app/src/main/AndroidManifest.xml (excerpt) -->

<manifest xmlns:android="http://schemas.android.com/apk/res/android"
  package="com.rnauth0demo">
⚛️ The app’s package name is the value of the package attribute of the <manifest> tag. The app’s package name is com.rnauth0demo in the example above. Copy this value.
⚛️ Go back to the Allowed Callback URLs field on your app’s Settings page and replace both instances of {APP_PACKAGE_NAME} in the template text with the package name you just copied. If the package name is com.rnauth0demo, the template text should now look like this:
com.rnauth0demo://{YOUR_TENANT_DOMAIN}/android/com.rnauth0demo/callback
⚛️ Copy the value of your tenant’s domain from the Domain field (located near the top of the page) and replace the instance of {YOUR_TENANT_DOMAIN} in the template text with it. If your tenant’s domain is dev-example.us.auth0.com, the template text should now look like this:
com.rnauth0demo://dev-example.us.auth0.com/android/com.rnauth0demo/callback
⚛️ Copy the URL from the Allowed Callback URLs field and paste it into the Allowed Logout URLs field.
⚛️ Scroll to the bottom of the page and click the Save Changes button.
Provide information about Auth0 that your app needs
Your app requires two critical pieces of information to work with Auth0:
- Your tenant’s domain, the unique identifier for your Auth0 tenant.
- Your app’s client ID, the unique identifier that Auth0 assigned to your app.
These credentials are stored as environment variables in the app, which it will read from a file for environment values, .env.
⚛️ Create a file named .env in the project’s root directory with the following content:
// /.env

AUTH0_DOMAIN="{YOUR_TENANT_DOMAIN}"
AUTH0_CLIENT_ID="{CLIENT_ID}"
⚛️ Go to your app’s Settings page in the Auth0 dashboard, copy the value from the Domain field and replace the instance of {YOUR_TENANT_DOMAIN} in .env with it.
⚛️ From the same page, copy the value from the Client ID field and replace the instance of {CLIENT_ID} in .env with it.
Now that you’ve gathered the domain and client ID information, it’s time to provide it to Android Studio’s build system, Gradle.
⚛️ Open the /android/app/build.gradle file and look for the defaultConfig section. In a project whose package name is com.rnauth0demo, the first two lines of that section should look like this:
// /android/app/build.gradle (excerpt)

    defaultConfig {
        applicationId "com.rnauth0demo"
⚛️ Add the following line immediately after the applicationId so that the first three lines of the defaultConfig section look like this:
// /android/app/build.gradle (excerpt)

    defaultConfig {
        applicationId "com.rnauth0demo"
        // 👇🏾👇🏾👇🏾 New line
        manifestPlaceholders = [auth0Domain: "**DOMAIN**", auth0Scheme: "${applicationId}"]
        // 👆🏾👆🏾👆🏾 New line
⚛️ Go to your app’s Settings page in the Auth0 dashboard, copy the value from the Domain field and replace the instance of **DOMAIN** in /android/app/build.gradle with it.
Confirm that the app still works
After all the changes you’ve made to the app so far, it’s a good idea to run the app to make sure that it still works.
⚛️ Run the app by entering npx react-native run-android on the command line at the project’s root directory.
Set Up the App
Now that the app and Auth0 are “aware of each other,” the next step is to set up the app’s two main files, index.js and App.js.
Set up React Native Paper
Let’s start by adding React Native Paper to the app, which adds a cross-platform theme based on Google’s Material Design.
⚛️ Open the /index.js file and replace its contents with the following:
// /index.js

import * as React from "react";
import { AppRegistry } from "react-native";
import { Provider as PaperProvider } from "react-native-paper";

import App from "./App";
import { name as appName } from "./app.json";

export default function Main() {
  return (
    <PaperProvider>
      <App />
    </PaperProvider>
  );
}

AppRegistry.registerComponent(appName, () => Main);
This code expands on the default index.js by wrapping <App> object inside <PaperProvider>, React Native Paper’s context provider. By wrapping <App> within <PaperProvider>, all of <App>’s components have access to the <PaperProvider> theme, no matter how deep it is in the <App> component tree.
Import the navigation modules
Earlier, you installed the React Navigation dependencies to allow the user to navigate between the app’s screens. It’s time to import their modules.
For this app, you’ll add the following from React Navigation:
NavigationContainer, which manages the app’s navigation state.createNativeStackNavigator, which creates a Native Stack Navigator that looks and behaves like each platform’s stack navigation UI control.
⚛️ Open App.js and look for the import statements at the start of the file. They should look like this:
// /App.js (excerpt)

import React from 'react';
import type {Node} from 'react';
import {
  SafeAreaView,
  ScrollView,
  StatusBar,
  StyleSheet,
  Text,
  useColorScheme,
  View,
} from 'react-native';

import {
  Colors,
  DebugInstructions,
  Header,
  LearnMoreLinks,
  ReloadInstructions,
} from 'react-native/Libraries/NewAppScreen';
⚛️ Add the import statements for React Navigation’s NavigationContainer and createNativeStackNavigator to the end of the import statements. Once you’ve done so, the start of the file should look like this:
// /App.js (excerpt)

import React from 'react';
import type {Node} from 'react';
import {
  SafeAreaView,
  ScrollView,
  StatusBar,
  StyleSheet,
  Text,
  useColorScheme,
  View,
} from 'react-native';

import {
  Colors,
  DebugInstructions,
  Header,
  LearnMoreLinks,
  ReloadInstructions,
} from 'react-native/Libraries/NewAppScreen';

// 👇🏾👇🏾👇🏾 New code
// Navigation
import {NavigationContainer} from '@react-navigation/native';
import {createNativeStackNavigator} from '@react-navigation/native-stack';
// 👆🏾👆🏾👆🏾 New code

...
Import the screens
It’s time to import the app’s screens: Loading, Login, and Account. You’ll define each screen in its own file, and these files will live in the /src/screens/ directory.
⚛️ The /src/screens directory doesn’t exist yet, so create it now. Create the src directory at the project root, then create screens as a subdirectory of src.
⚛️ Add the import statements to /App.js for the screen files. The start of the file should look like this:
// /App.js (excerpt)

import React from 'react';
import type {Node} from 'react';
import {
  SafeAreaView,
  ScrollView,
  StatusBar,
  StyleSheet,
  Text,
  useColorScheme,
  View,
} from 'react-native';

import {
  Colors,
  DebugInstructions,
  Header,
  LearnMoreLinks,
  ReloadInstructions,
} from 'react-native/Libraries/NewAppScreen';

// Navigation
import {NavigationContainer} from '@react-navigation/native';
import {createNativeStackNavigator} from '@react-navigation/native-stack';

// 👇🏾👇🏾👇🏾 New code
// Screens
import LoadingScreen from './src/screens/LoadingScreen';
import LoginScreen from './src/screens/LoginScreen';
import AccountScreen from './src/screens/AccountScreen';
// 👆🏾👆🏾👆🏾 New code

...
You’ll define these screens soon.
Import the AuthContext provider
AuthContextProvider provides the app with authentication states and methods. The app needs to import its file, where you’ll implement the login() and logout() methods later.
⚛️ Add the import statement for AuthContextProvider to /App.js. The start of the file should look like this:
// /App.js (excerpt)

import React from 'react';
import type {Node} from 'react';
import {
  SafeAreaView,
  ScrollView,
  StatusBar,
  StyleSheet,
  Text,
  useColorScheme,
  View,
} from 'react-native';

import {
  Colors,
  DebugInstructions,
  Header,
  LearnMoreLinks,
  ReloadInstructions,
} from 'react-native/Libraries/NewAppScreen';

// Navigation
import {NavigationContainer} from '@react-navigation/native';
import {createNativeStackNavigator} from '@react-navigation/native-stack';

// Screens
import LoadingScreen from './src/screens/LoadingScreen';
import LoginScreen from './src/screens/LoginScreen';
import AccountScreen from './src/screens/AccountScreen';

// 👇🏾👇🏾👇🏾 New code
import {AuthContextProvider} from './src/context/AuthContext';
// 👆🏾👆🏾👆🏾 New code

...
Return the <App> component
With the import section complete, it’s time to look at the /App.js main purpose: to return the <App> component.
⚛️ Replace the contents of /App.js after the import statements so that the file looks like this:
// /App.js

import React from 'react';
import type {Node} from 'react';
import {
  SafeAreaView,
  ScrollView,
  StatusBar,
  StyleSheet,
  Text,
  useColorScheme,
  View,
} from 'react-native';

import {
  Colors,
  DebugInstructions,
  Header,
  LearnMoreLinks,
  ReloadInstructions,
} from 'react-native/Libraries/NewAppScreen';

// Navigation
import {NavigationContainer} from '@react-navigation/native';
import {createNativeStackNavigator} from '@react-navigation/native-stack';

// Screens
import LoadingScreen from './src/screens/LoadingScreen';
import LoginScreen from './src/screens/LoginScreen';
import AccountScreen from './src/screens/AccountScreen';

import {AuthContextProvider} from './src/context/AuthContext';

// 👇🏾👇🏾👇🏾 New code
const Stack = createNativeStackNavigator();

const App: () => Node = () => {
  const isDarkMode = useColorScheme() === 'dark';

  return (
    <SafeAreaView style={styles.root}>
      <StatusBar barStyle={isDarkMode ? 'light-content' : 'dark-content'} />
      <AuthContextProvider>
        <NavigationContainer>
          <Stack.Navigator>
            <Stack.Screen name="Loading" component={LoadingScreen} />
            <Stack.Screen name="Login" component={LoginScreen} />
            <Stack.Screen name="Account" component={AccountScreen} />
          </Stack.Navigator>
        </NavigationContainer>
      </AuthContextProvider>
    </SafeAreaView>
  );
};

const styles = StyleSheet.create({
  root: {
    flex: 1,
    justifyContent: 'center',
  },
});

export default App;
// 👆🏾👆🏾👆🏾 New code
From the inside out, <App> comprises these components:
- The three screens,
LoadingScreen,LoginScreen, andAccountScreen, each one an instance ofStack.Screen - A Stack Navigator, which contains the screens. The Stack Navigator is inside a
NavigationContainer. - A
StatusBarand anAuthContextProviderthat wraps around theNavigationContainerand provides the authentication functionality (which you’ll implement soon). - A
SafeAreaView. The Android version of the app ignores this component, which ensures that the app renders content away from the “notch” on iOS devices. Including it ensures that the project is cross-platform.
The app’s main modules are complete, so we can now implement various parts, starting with authentication.
Add Authentication
The authentication functionality for the app comes from the AuthContext object, which provides all the states and methods needed to manage the user authentication. In this section, you’ll define this object.
Initialization
⚛️ We’ll need a place for source code specific to this app. Create a directory named src at the project’s root level.
⚛️ In the /src directory, create a subdirectory for context objects: context.
⚛️ Create AuthContext.js inside /src/context with the following code:
// /src/context/AuthContext.js

import React, { useState, useEffect } from "react";
import { AUTH0_DOMAIN, AUTH0_CLIENT_ID } from "@env";
import SInfo from "react-native-sensitive-info";
import Auth0 from "react-native-auth0";
import jwtDecode from "jwt-decode";

const auth0 = new Auth0({
  domain: AUTH0_DOMAIN,
  clientId: AUTH0_CLIENT_ID,
});

const AuthContext = React.createContext();
The code above does the following:
- It imports required modules.
- It creates an
Auth0object, which communicates with your Auth0 tenant. It uses your tenant’s domain and your app’s client ID from the/.envfile you created earlier. - It creates an
AuthContextobject, which the app will use to access this module’s authentication functionality.
The rest of the file defines the AuthContext providers and their parts.
Define the state variables
⚛️ Add the following to AuthContext.js:
// /src/context/AuthContext.js (excerpt)

const AuthContextProvider = (props) => {
  const [loading, setLoading] = useState(true);
  const [loggedIn, setLoggedIn] = useState(null);
  const [userData, setUserData] = useState(null);
This code defines the start of the AuthContext provider and its state variables:
loading:truewhen the app is loading data.loggedIn:truewhen the user is logged in.userData: contains the retrieved data about the logged-in user, including the URL for their picture and their name.
Get the user’s data
⚛️ Add the following to AuthContext.js, immediately after the state variables:
// /src/context/AuthContext.js (excerpt)

  const getUserData = async id => {
    const idToken = id ? id : await SInfo.getItem('idToken', {});
    const {name, picture, exp} = jwtDecode(idToken);

    if (exp < Date.now() / 1000) {
      throw new Error('ID token expired!');
    }

    return {
      name,
      picture,
    };
  };
The getUserData() function uses a given ID token or one saved in secure storage, extracts the user’s name and picture, and returns them.
Define what happens when the app renders the AuthContext.
⚛️ Add the following to AuthContext.js immediately after the code you added in the previous step:
// /src/context/AuthContext.js (excerpt)

  // Executed whenever the component is rendered
  useEffect(() => {
    (async () => {
      try {
        const user_data = await getUserData();
        if (user_data) {
          setLoggedIn(true);
          setUserData(user_data);
        }
      } catch (err) {
        setLoggedIn(false);
      }
    })();
  }, []);
This useEffect() hook attempts to get the user’s details:
- If the attempt succeeds, it means that a user is logged in. The app accordingly sets the
loggedInstate variable and sets theuserDatastate variable to an object containing the user’s name and picture URL. - If the attempt fails, the app considers the user logged out, and sets the
loggedInstate variable accordingly.
Define what happens just after the user logs in
⚛️ Add the following to AuthContext.js, immediately after the useEffect() hook you added in the previous step:
// /src/context/AuthContext.js (excerpt)

  // Executed just after the user logs in
  useEffect(() => {
    (async () => {
      try {
        if (loggedIn) {
          const user_data = await getUserData();
          if (user_data) {
            setLoggedIn(true);
            setUserData(user_data);
          }
        }
      } catch (err) {
        alert('Error logging in');
      }
    })();
  }, [loggedIn]);
The app calls the useEffect() hook immediately after the user successfully logs in on the Universal Login screen. The app attempts to get the user’s details from the ID token and sets the loggedIn and userData variables accordingly.
Define login()
⚛️ It’s time to define the function that logs the user in. Add the following to AuthContext.js immediately after the useEffect() hook you added in the previous step:
// /src/context/AuthContext.js (excerpt)

  const login = async () => {
    try {
      const credentials = await auth0.webAuth.authorize({
        scope: 'openid email profile',
      });
      await SInfo.setItem('idToken', credentials.idToken, {});
      const user_data = await getUserData(credentials.idToken);
      setLoggedIn(true);
      setUserData(user_data);
    } catch (err) {
      alert('Error logging in');
    }
  };
When called, this function opens a web view (an embedded browser window) within the app and displays the Universal Login page. The call to auth0.webAuth.authorize() initiates this process, and the app passes it an object with a property named scope.
The scope property is a space-delimited list of OpenID Connect (OIDC) scopes. This is a list of requests for authorization to access details about the user. In this case, the requested scopes are:
openid: Authorization request to use OIDC to verify the user’s identity.profile: Authorization to access the user’s name and picture information.email: Authorization to access the user’s email address.
If the login is successful, the app saves the ID token locally to authenticate the user when they open the app in a later session.
Define logout()
Since there’s a login() function, there must also be a logout one as well.
⚛️ Add the following to AuthContext.js, immediately after the login() function you added in the previous step:
// /src/context/AuthContext.js (excerpt)

  const logout = async () => {
    try {
      await auth0.webAuth.clearSession({});
      await SInfo.deleteItem('idToken', {});
      setLoggedIn(false);
      setUserData(null);
    } catch (err) {
      alert('Error logging in');
    }
  };
Like login(), logout() calls a method of the auth0.webAuth object: clearSession(). It also opens a web view that logs the user out, which is dismissed once the logout process is complete.
Once the user logs out, the app clears the ID token from local storage and resets the state. This state change will automatically navigate the user back to the login screen.
Finish the module
With all the functionality defined, it’s time to make it available via a value object and return the component that this module creates.
⚛️ Add the following to AuthContext.js immediately after the logout() function you added in the previous step:
  const value = {
    loading,
    loggedIn,
    login,
    logout,
    userData,
  };

  return (
    <AuthContext.Provider value={value}>{props.children}</AuthContext.Provider>
  );
};

export { AuthContext, AuthContextProvider };
The authentication functionality is complete. There’s one last set of tasks: building the app’s screens.
Build the App’s Screens
Define the Loading screen
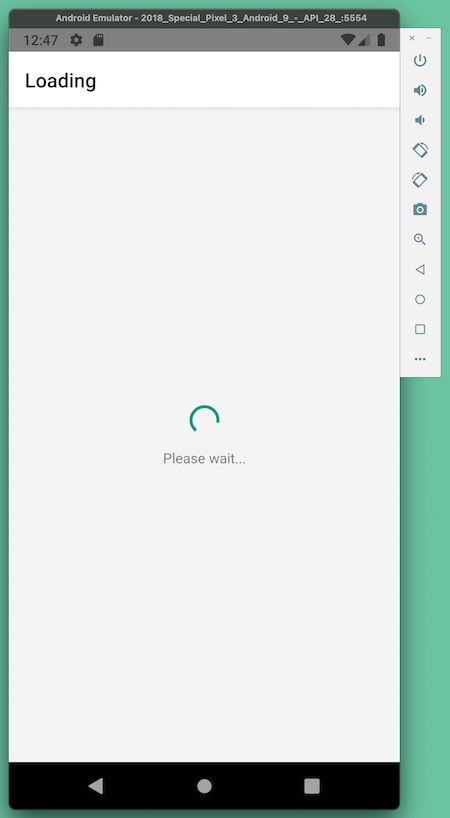
The Loading screen shows an activity indicator while the app determines the user’s login status.
⚛️ Create a new file, LoadingScreen.js, in the /src/screens directory with the following code:
// /src/screens/LoadingScreen.js

import React, { useEffect, useContext } from "react";
import { View, Text, ActivityIndicator, StyleSheet } from "react-native";
import { StackActions } from "@react-navigation/native";

import { AuthContext } from "../context/AuthContext";

function LoadingScreen({ navigation }) {
  const { loading, loggedIn } = useContext(AuthContext);

  useEffect(() => {
    if (loggedIn) {
      navigation.dispatch(StackActions.replace("Account"));
    } else if (loggedIn === false) {
      navigation.dispatch(StackActions.replace("Login"));
    }
  }, [loggedIn]);

  return (
    <View style={styles.container}>
      {loading && (
        <React.Fragment>
          <ActivityIndicator size="large" />
          <View style={{ marginTop: 10 }}>
            <Text>Please wait...</Text>
          </View>
        </React.Fragment>
      )}
    </View>
  );
}

const styles = StyleSheet.create({
  container: {
    flex: 1,
    justifyContent: "center",
    alignItems: "center",
  },
});

export default LoadingScreen;
The AuthContext provider makes the user’s login status available via the loggedIn state variable. The app watches for the updates to this value using the useEffect hook. The value of loggedIn affects which screen is displayed:
- If the value is truthy, the app navigates to the Account screen.
- Otherwise, it navigates to the Login screen.
The code uses navigation.dispatch(StackActions.replace("ScreenName")) instead of navigation.navigate("ScreenName") because we want to replace the current screen. navigation.navigate() simply pushes the screen on top of the stack, making it possible for the user to go back to the previous screen via the back button. By using navigation.dispatch(), the entire stack is completely renewed, so it will be as if the specified screen is the only screen in the stack. We don’t want the user to go back to the Loading screen after they’ve already logged in.
Define the Login screen
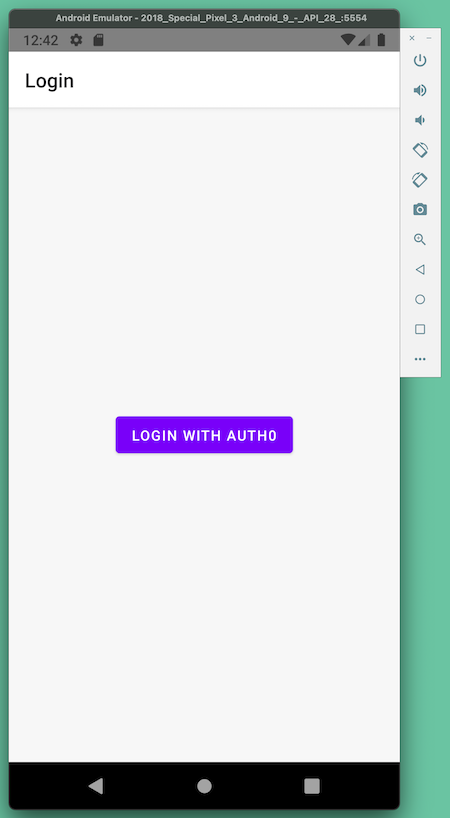
The Login screen displays a Login With Auth0 button that brings up the Universal Login screen when pressed.
⚛️ Create a new file, LoginScreen.js , in the /src/screens directory with the following code:
// /src/screens/LoginScreen.js

import React, { useContext, useEffect } from "react";
import { View, Text, StyleSheet } from "react-native";
import { Button, withTheme } from "react-native-paper";
import { StackActions } from "@react-navigation/native";

import { AuthContext } from "../context/AuthContext";

const LoginScreen = ({ navigation, theme }) => {
  const { colors } = theme;

  const { loggedIn } = useContext(AuthContext);

  useEffect(() => {
    if (loggedIn) {
      navigation.dispatch(StackActions.replace("Account"));
    }
  }, [loggedIn]);

  const { login } = useContext(AuthContext);

  return (
    <View style={[styles.container, { backgroundColor: colors.background }]}>
      <Button mode="contained" onPress={() => login()}>
        Login with Auth0
      </Button>
    </View>
  );
};

const styles = StyleSheet.create({
  container: {
    flex: 1,
    paddingRight: 30,
    paddingLeft: 30,
    flexDirection: "column",
    justifyContent: "center",
    alignItems: "center",
  },
});

export default withTheme(LoginScreen);
When the user clicks the Login With Auth0 button, the app calls the login() method, displaying the Universal Login page.
The app watches the loggedIn state via the useEffect hook. When its value becomes truthy, the app navigates the user to the Account screen, which we’ll define next.
Define the Account screen
The Account screen displays the user’s photo, name, and a Logout button that logs the user out when pressed.
⚛️ Create a new file, AccountScreen.js , in the /src/screens directory with the following code:
// /src/screens/AccountScreen.js

import React, { useContext, useEffect } from "react";
import { View, Text, StyleSheet } from "react-native";
import { Avatar, Button, withTheme } from "react-native-paper";
import { StackActions } from "@react-navigation/native";

import { AuthContext } from "../context/AuthContext";

const AccountScreen = ({ navigation, theme }) => {
  const { logout, loggedIn, userData } = useContext(AuthContext);
  const { colors } = theme;

  useEffect(() => {
    if (loggedIn === false) {
      navigation.dispatch(StackActions.replace("Login"));
    }
  }, [loggedIn]);

  return (
    <View style={[styles.container, { backgroundColor: colors.background }]}>
      {userData && (
        <View style={styles.userContainer}>
          <Avatar.Image size={100} source={{ uri: userData.picture }} />
          <View style={styles.textContainer}>
            <Text>{userData.name}</Text>
          </View>
        </View>
      )}

      <Button mode="contained" onPress={() => logout()}>
        Logout
      </Button>
    </View>
  );
};

const styles = StyleSheet.create({
  container: {
    flex: 1,
    paddingRight: 30,
    paddingLeft: 30,
    flexDirection: "column",
    justifyContent: "center",
    alignItems: "center",
  },
  userContainer: {
    alignItems: "center",
    marginBottom: 20,
  },
  textContainer: {
    marginTop: 10
  },
});

export default withTheme(AccountScreen);
This code also needs to watch the loggedIn state. Calling the logout() method from this screen will change the user’s login status, resulting in a return to the Login screen.
userData contains the user’s information. This app renders only two of its properties: the user’s profile picture and name.
Log In
You’ve implemented the complete app! Go ahead, take it for a test run.
⚛️ Run the app. Press the Login With Auth0 button when it appears. You should see the Universal Login appear:
If you just created an Auth0 account, your tenant won’t have any user accounts. You can’t log in until you do at least one of the following:
- Sign up for an account on the Universal Login screen.
- Create a new user account using the dashboard.
- Enable users to log in to your app with a Google account.
These are covered in detail below.
1. Sign up for an account on the Universal Login screen
This option is immediately available to the user: it’s the Sign up link at the bottom of the Universal Login screen. Pressing it takes them to the Sign Up screen, where they provide the email address and password for the account:
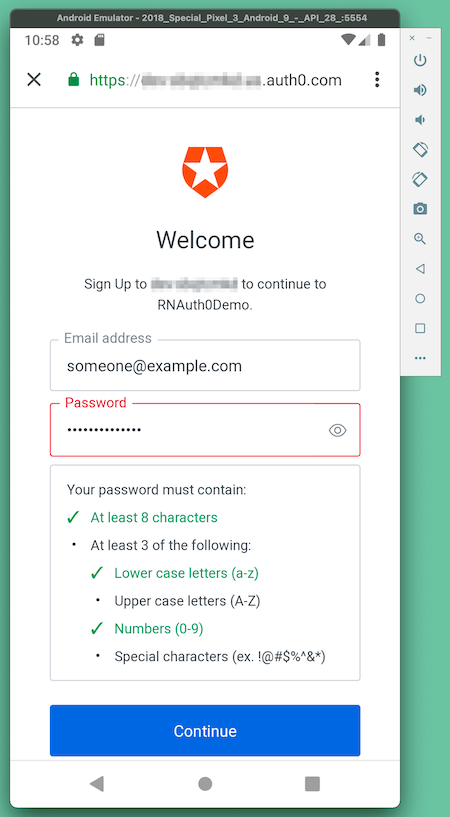
Note that the Sign Up screen has features you’d expect from a professional application, including hints telling the user if their password meets the password policy. (And yes, you can adjust the password policy in the Auth0 dashboard to meet your security needs.)
Once the user has provided their email address and password, Auth0 creates the account and logs them in. This takes the user to the Account screen, which displays their default picture and default name, both based on the email address they provided:
2. Create a new user account using the dashboard
This option is for developers, administrators, and other people with access to the tenant’s Auth0 dashboard. It uses the Auth0 dashboard’s User Management section.
Note: A user account in a given tenant has access to all the applications in that tenant.
Let’s create a new user!
⚛️ In the menu on the left side of the Auth0 dashboard, select User Management → Users:
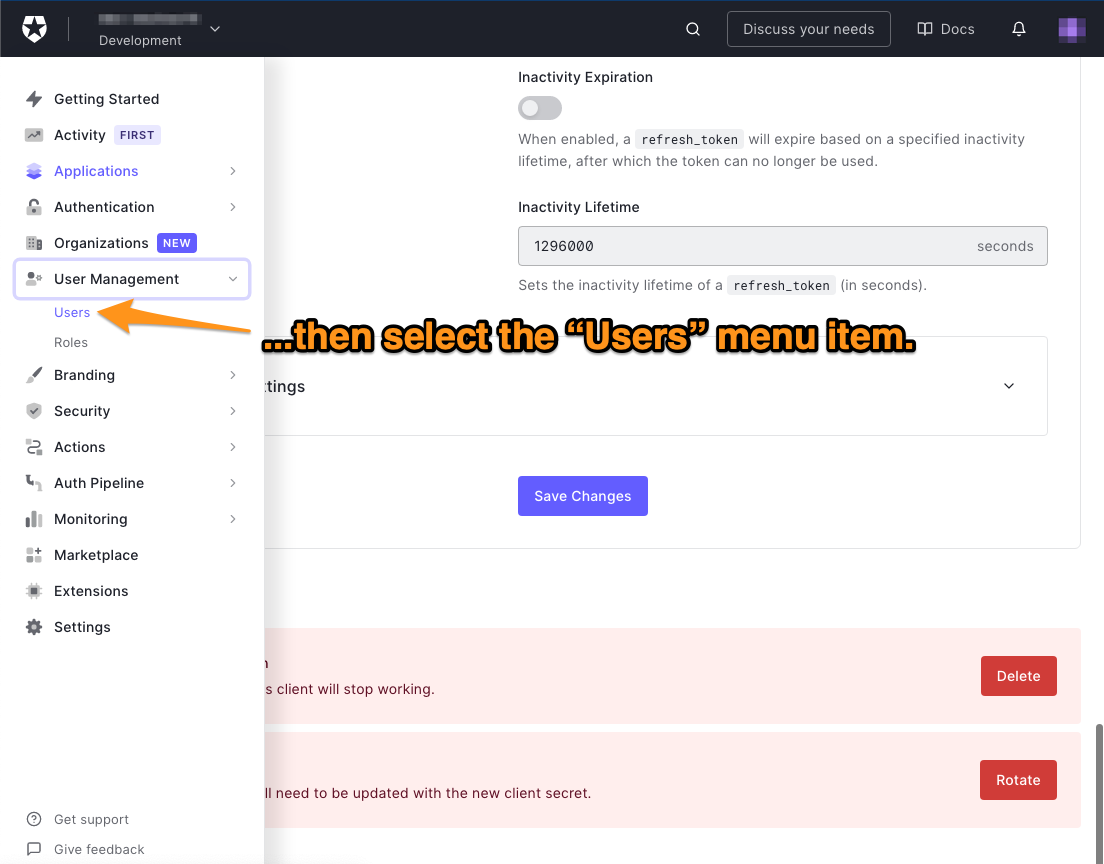
The Users page will appear. It lists all the users registered to your tenant. You’ll see the “You don’t have any users yet” message.
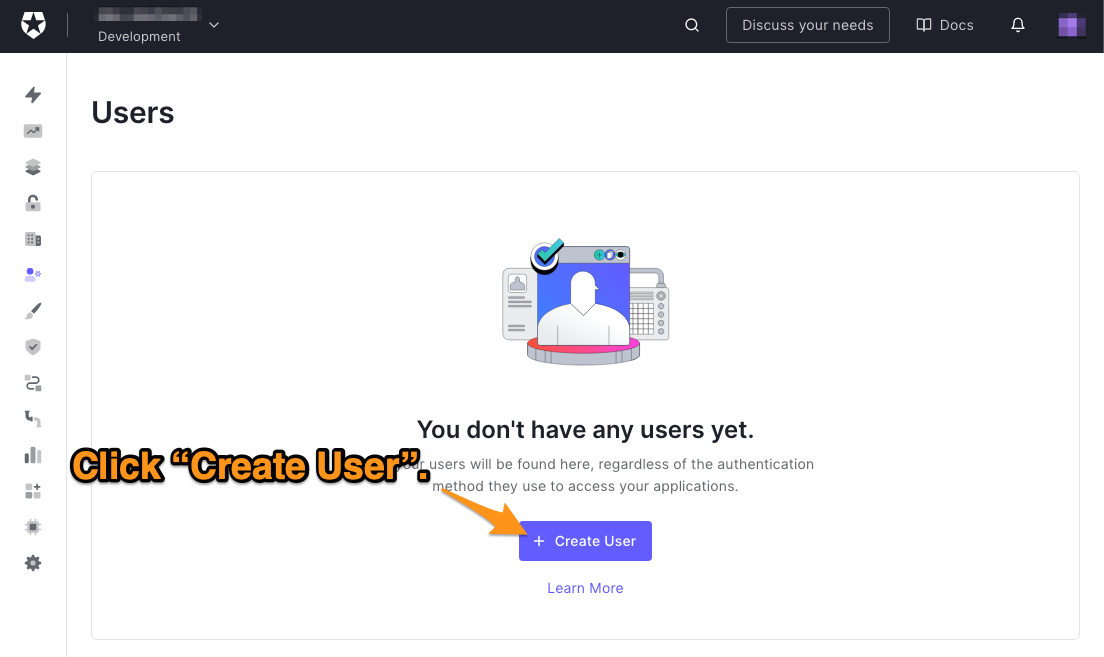
⚛️ Click the Create User button to create a new user, which will make this dialog box appear:
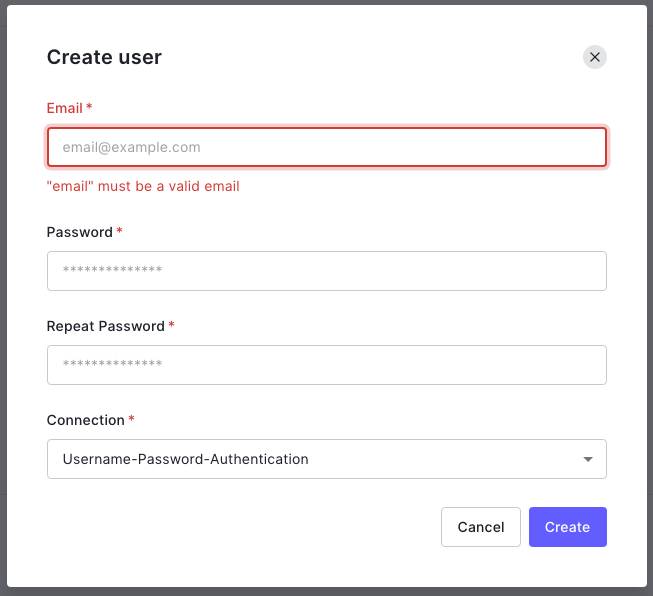
⚛️ Enter an email address and password for the user. The only option for the Connection will be Username-Password-Authentication, so leave it as it is.
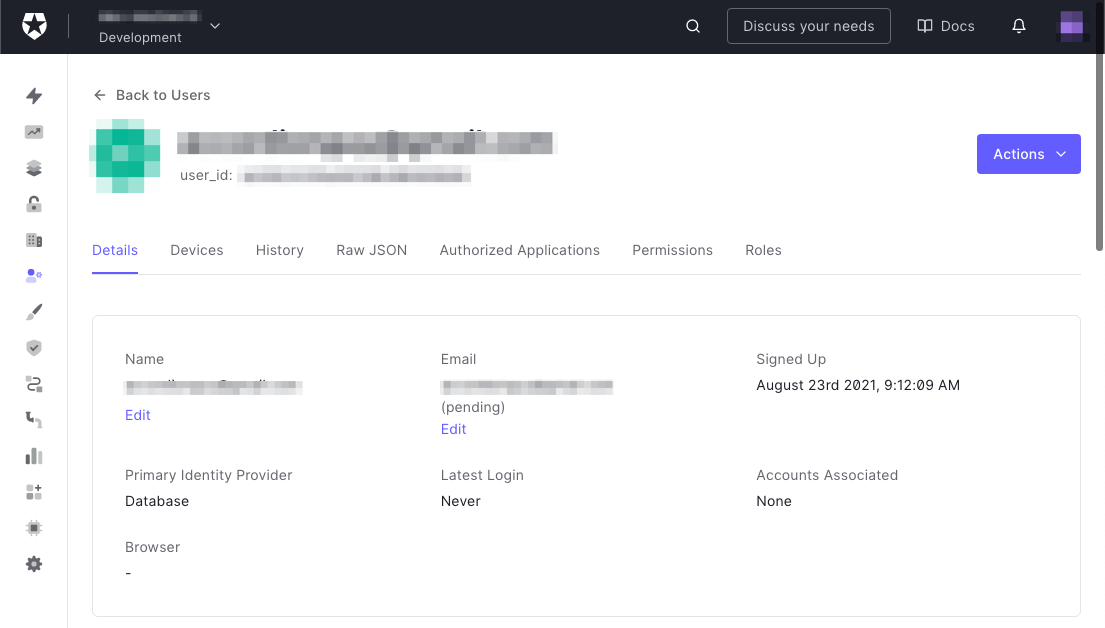
⚛️ Click the Create button to create the user. The user’s Details page will appear:
⚛️ Run the app. Press the Login With Auth0 button when it appears. You should see the Universal Login appear.
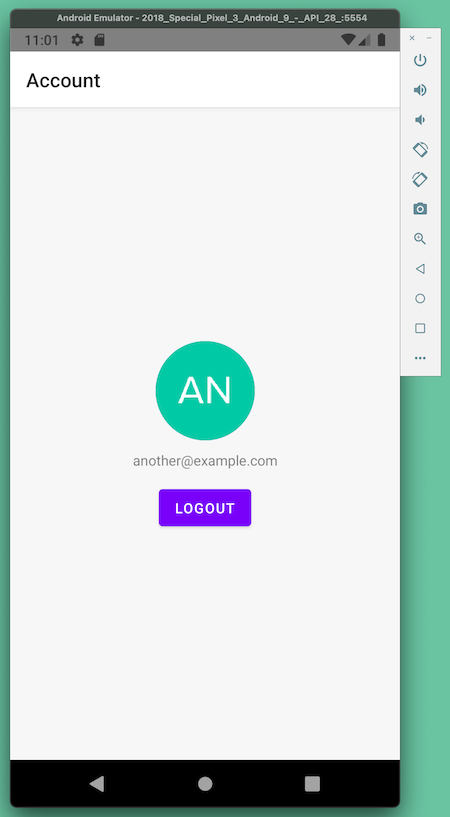
⚛️ Log in using the username and password you provided for the user you just created. This will take you to the Account screen, which displays the user’s default picture and default name, both based on their email address:
3. Enable users to log in to your app with a Google account
This option allows users to log in using their Google accounts. With over 1.8 billion active accounts — many of them used daily — your users will likely already have one. Many users find it convenient to log in to applications using one of their social media accounts; it’s one less username/password combination to memorize, and it often lets them skip the login process. Having users use their social media identities also reduces any user management on your part.
Let’s set up a social connection between your app and Google.
⚛️ Go to the Auth0 dashboard and select Authentication → Social from the menu on the left side of the page. This will take you to the Social Connections page:
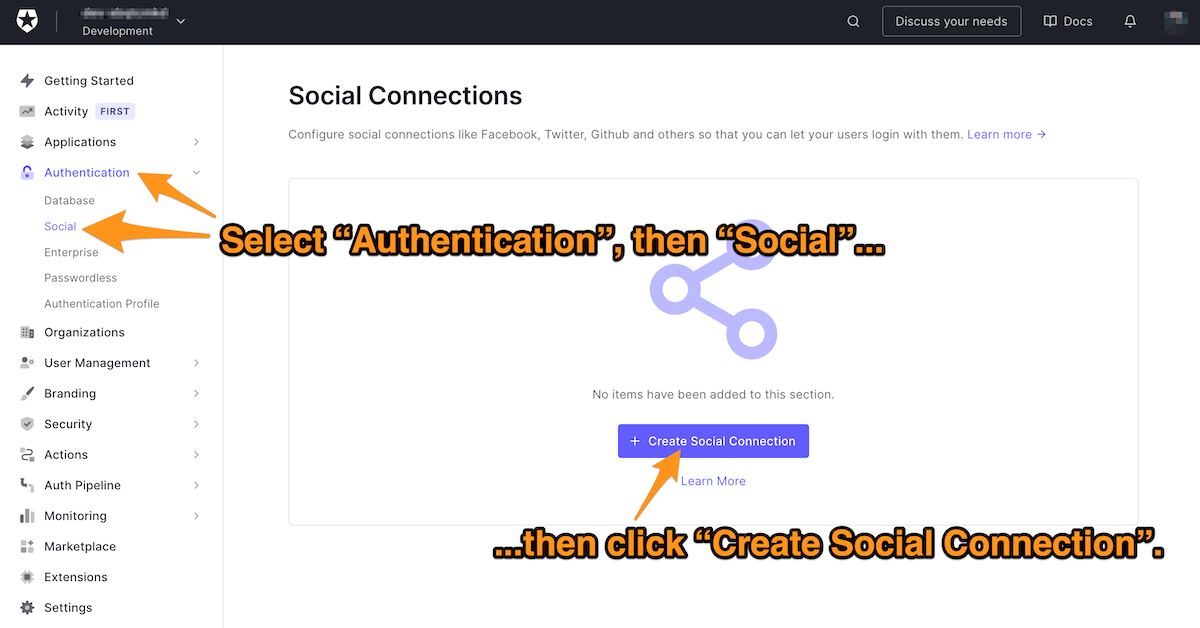
This page lists all the social networking sites and systems that your users can use to log in to applications on your tenant. If your account is new, this list will probably be empty.
⚛️ Click the Create Social Connection to go to the New Social Connection page:
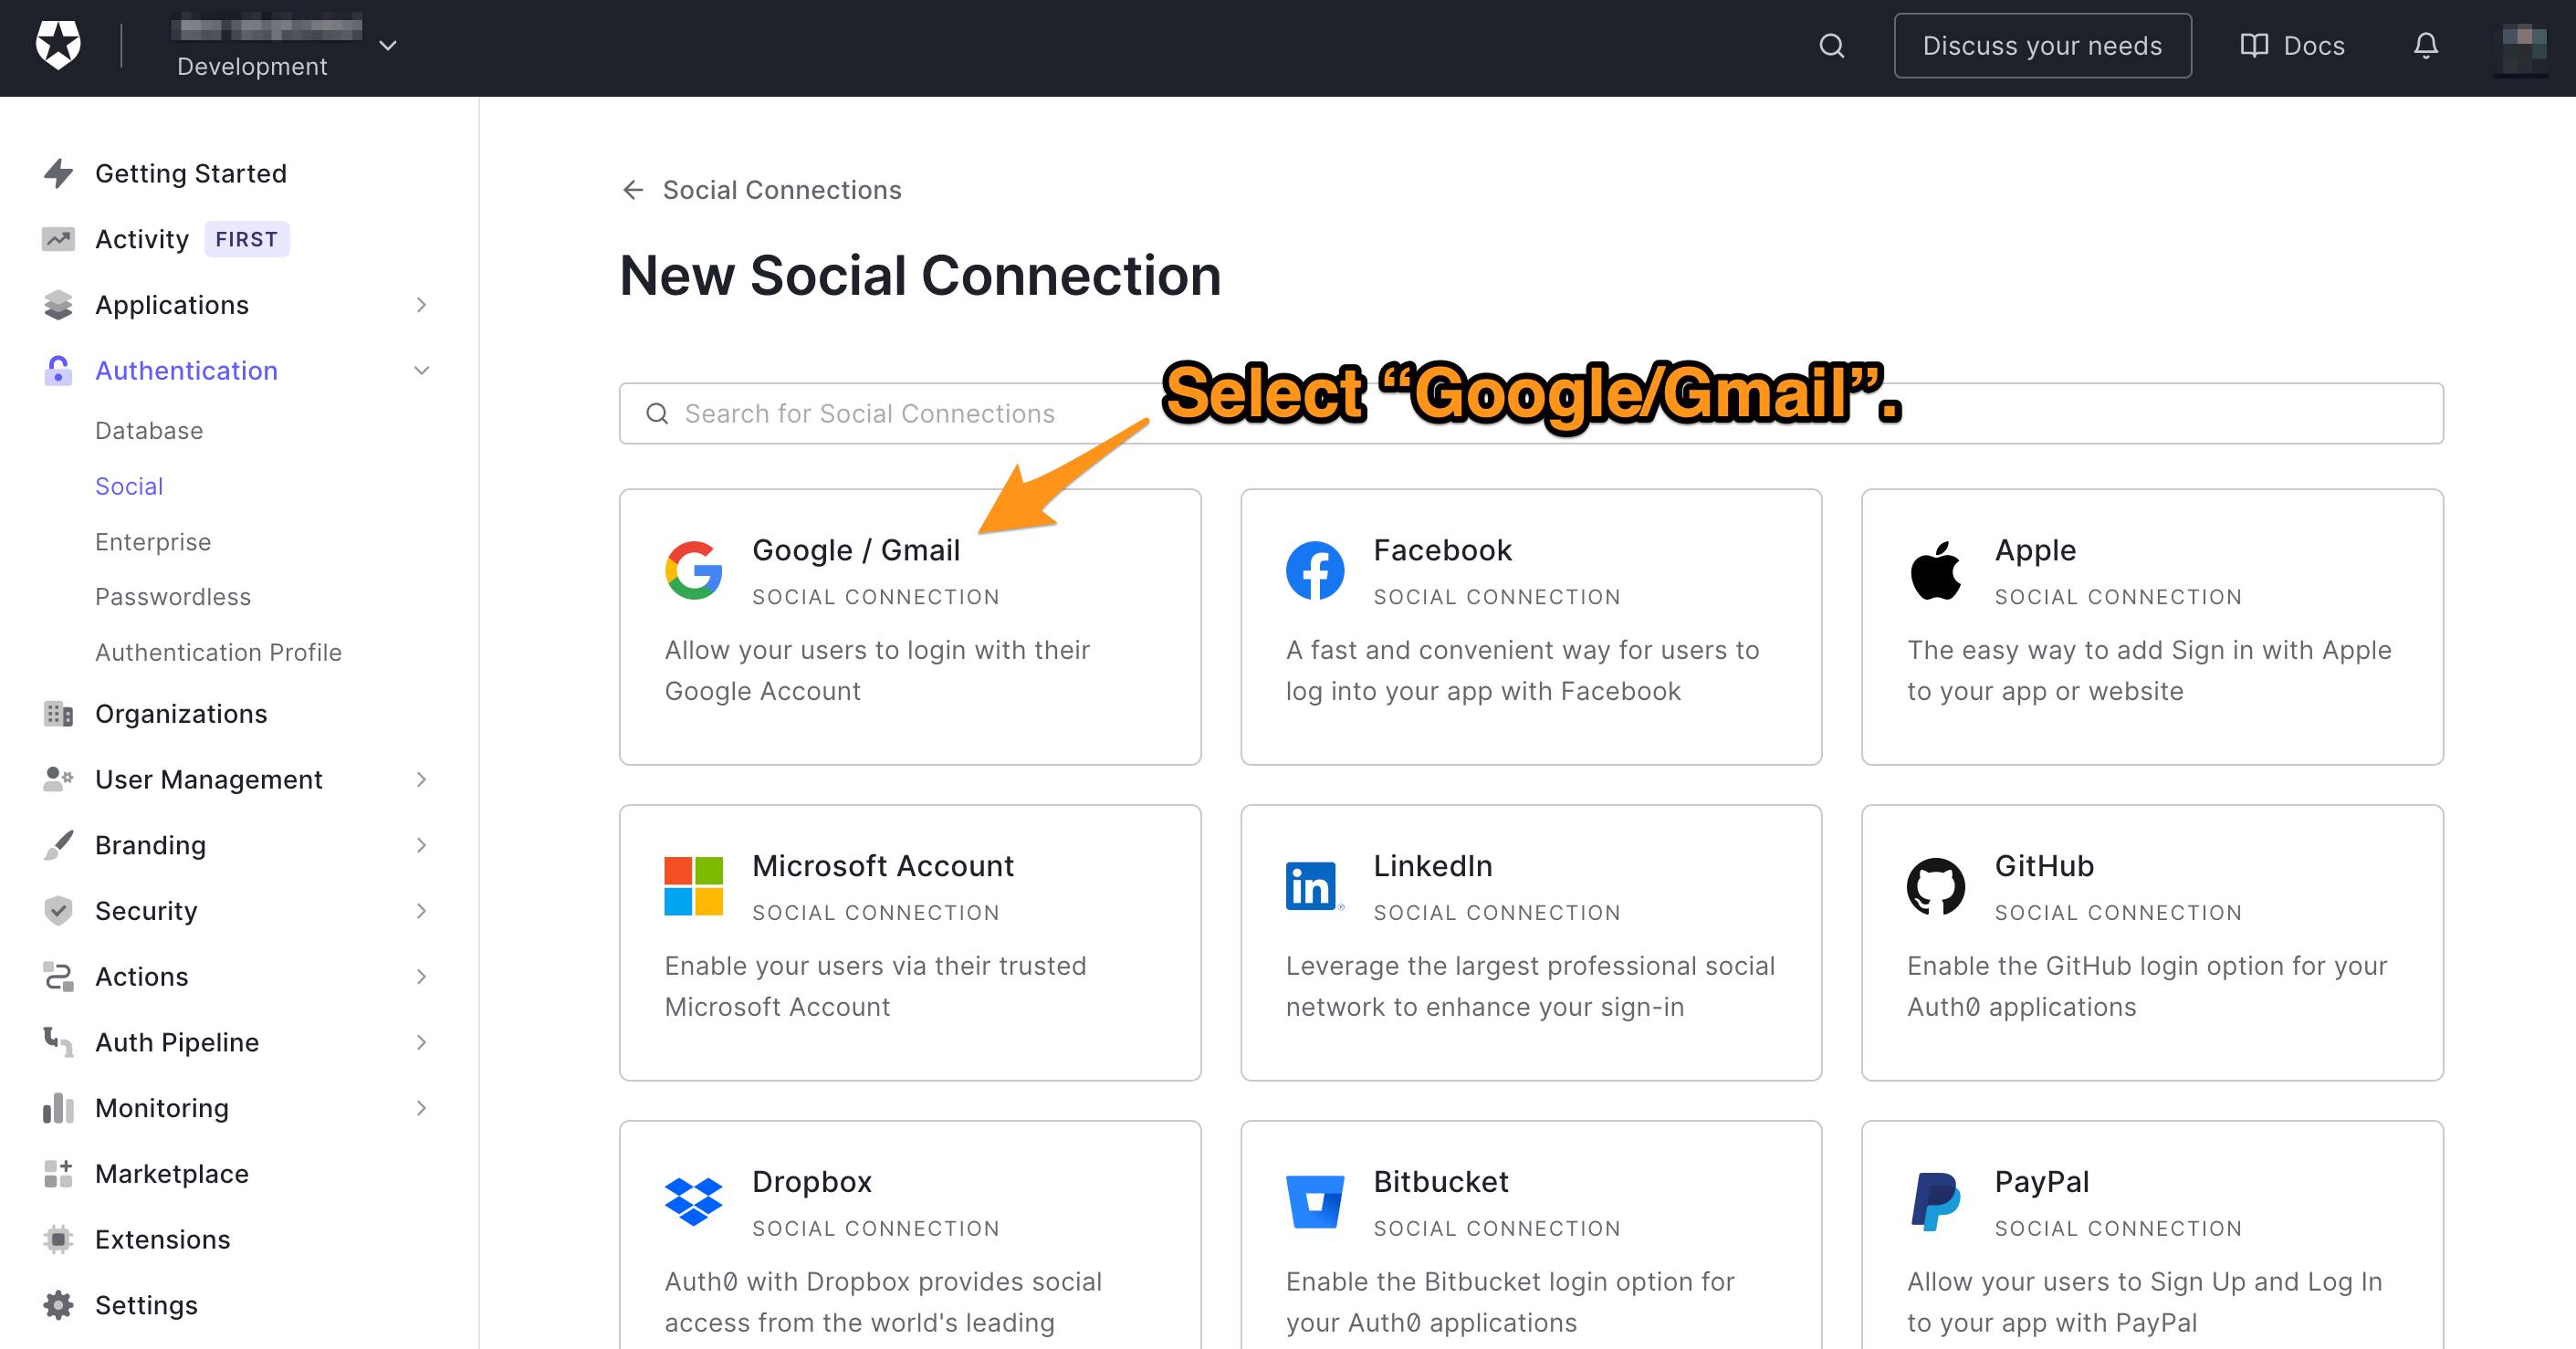
There are dozens of social networking sites listed on this page. By connecting a site on this list to your tenant, you enable registered users of that site to use their credentials to log in to your tenant’s applications.
⚛️ Start connecting Google users to your app by selecting Google/Gmail in the list. You’ll be asked to confirm that you want to create a new Google/Gmail social connection on the page that appears:
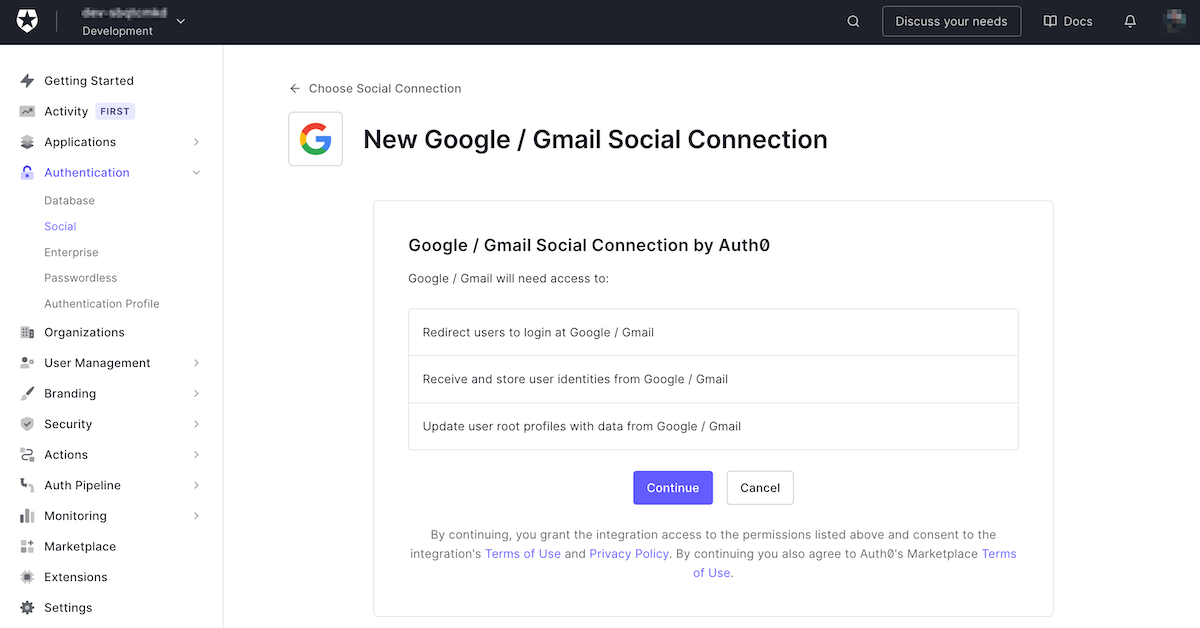
⚛️ Click Continue to go to the next page, where you can provide additional details about the connection. Just use the default values and scroll to the bottom of the page:
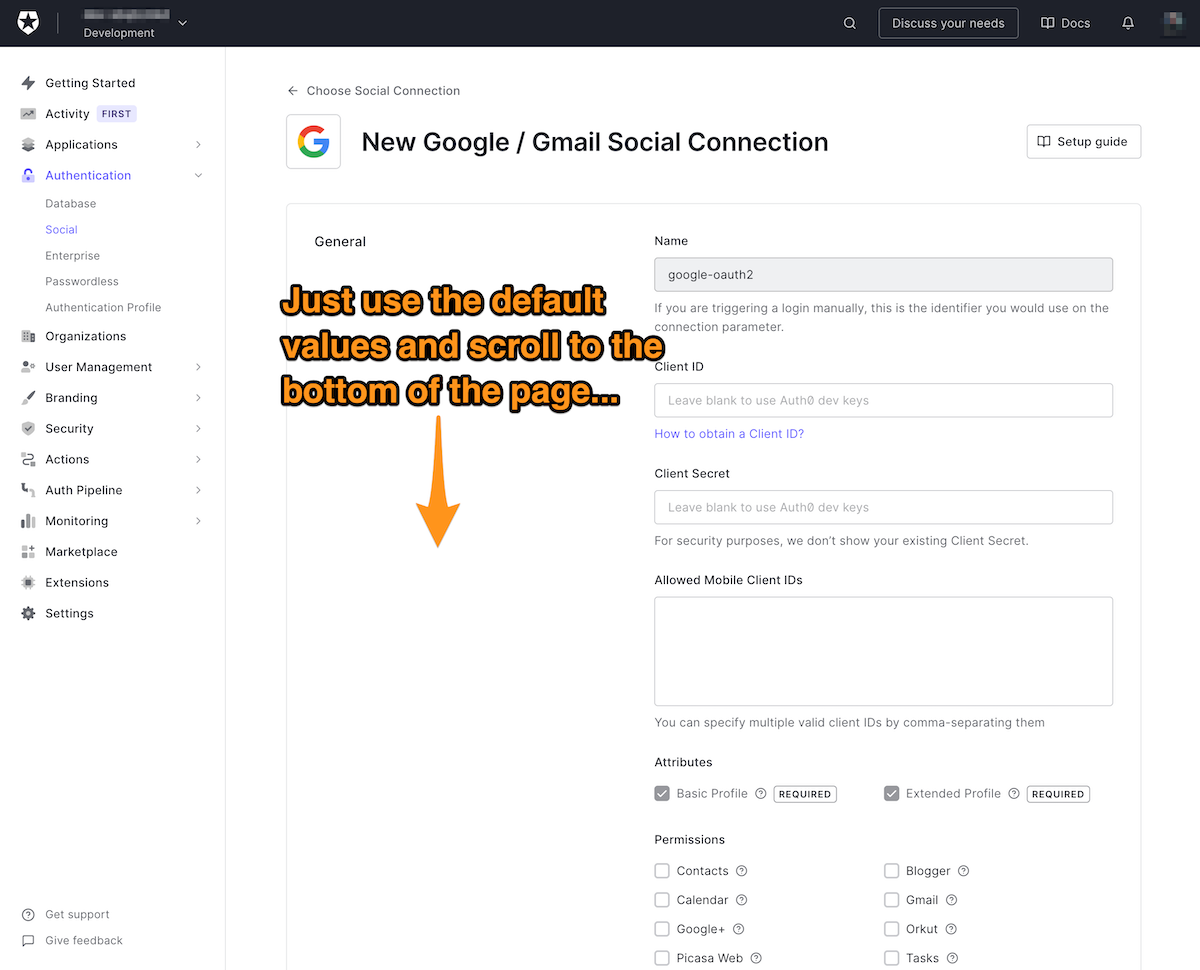
⚛️ Click the Create button at the bottom of the page to create the connection:
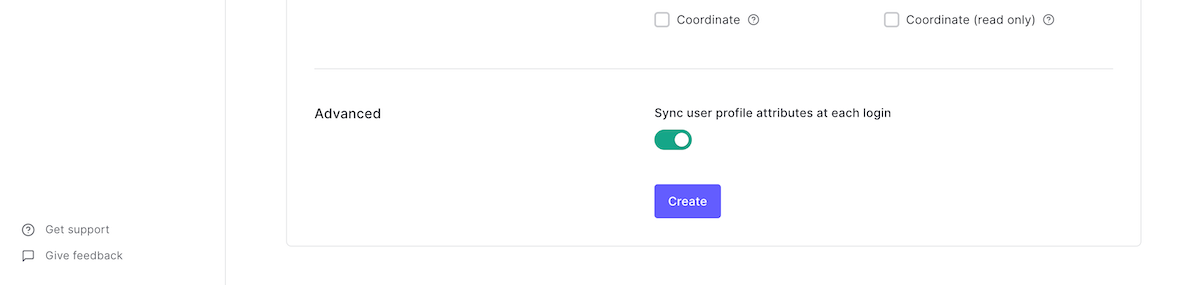
⚛️ Click the Create button at the bottom of the page to create the connection. You’ll end up at the page listing the applications that use the connection:
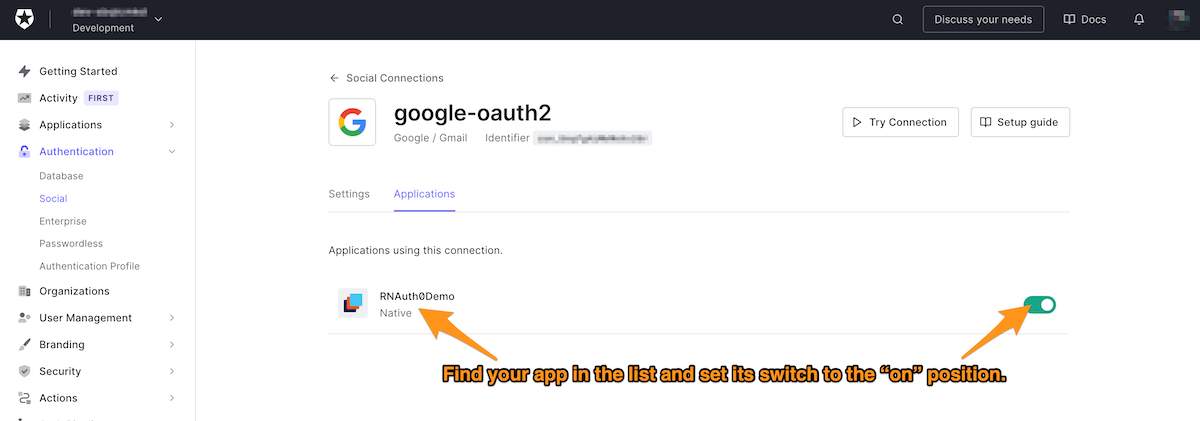
⚛️ You’ll end up at the page listing the applications that use the connection. Find your app in the list and set its switch to the “on” position. Your app’s users can now log in using their Google account.
⚛️ Confirm that the connection works. Run the app and press the Login With Auth0 button. When the Universal Login appears, you should see the Continue with Google button at the bottom of the screen:
⚛️ Click the Continue with Google button and log in using your Google account credentials. This will take you to the Account screen, which will display the photo and name associated with your Google account:
Conclusion and Next Steps
Congratulations and 🙌🏼 high-fives 🙌🏼 all around! You’ve built an Android app with React Native that uses Auth0 to authenticate users. In the process, you learned how to configure Auth0 and use it alongside libraries developers commonly use. You used React Navigation and React Native Paper for handling navigation and styling. You also used React Native Dotenv to read environment variables, and React Native Sensitive Info securely store the ID token.
From here, you can start iterating on the app by adding other social logins, multi-factor authentication, and even passwordless login. If you want to manage users who logged in with Auth0, you can do that via the user management API.
You can view the full source code of the app on its GitHub repo.