


If you’re an iOS developer, you will have to add authentication to your app sooner or later. This tutorial will show you how to add authentication — or, more simply, login and logout — to a SwiftUI-based iOS app with the help of Auth0. You’ll use the Auth0.swift package. You’ll become familiar with the Auth0 dashboard and learn how to use it to register applications and manage users.

Looking for a step-by-step guide to leveraging OAuth 2.0 when accessing protected APIs via an iOS app built with Swift? If you're integrating with Auth0, then this is everything you need to know!
You can follow the text in this article, or if you prefer learning by video, you can follow the steps in this article’s companion video:
Look for the 🛠 emoji if you’d like to skim through the content while focusing on the build and execution steps.
The 📺 emoji highlights links to specific points in the video.
Apple’s SwiftUI Framework
SwiftUI is a user interface toolkit and “the new way” for building apps that Apple introduced in 2019. With SwiftUI, you build user interfaces using Swift code with a declarative approach, which means that you specify how the UI should look and behave under different states. You don’t have to specify how the UI moves between those states — it takes care of that for you. If you know React programming, you’ll find SwiftUI familiar.
The SwiftUI approach is quite different from the one used by UIKit, iOS’ original UI toolkit, which dates back to 2007. With UIKit, you build user interfaces using Interface Builder, a drag-and-drop layout tool to graphically build the app’s views. Using outlets and actions, you connect UI elements to variables and methods in the app’s view controllers. UIKit uses an imperative approach, which means you define how the program moves between states and how the UI should look and behave in those states.
Auth0 and the Auth0.swift package

Adding login and logout to an app may seem like a simple task — until you try it. You have to handle the many ways to log in, confirm email addresses and passwords, manage users, and handle security and scalability. Each issue has dozens of considerations, risks, and edge cases.
Auth0 solves this problem. With Auth0 and a few lines of code, your app can have a full-featured system that supports logging in with a username/password combination, single sign-on and social accounts, passwordless login, biometrics, and more. You won’t have to handle the “behind the scenes” issues! Instead, you can focus on your app’s main functionality.
Auth0.swift is the Auth0 package for all Apple platforms: not just iOS, but macOS, iPadOS, watchOS, and tvOS. It’s our third most-used SDK, accounting for 11% of all API requests made to our systems. If you’re building an Apple device application that needs to authenticate or authorize its users, you need Auth0.swift!
The newest version of Auth0.swift, version 2.3.0, incorporates what we’ve learned from securing applications on Apple devices over the past five years. If you’ve used earlier versions, you’ll appreciate its updated error handling, support for async/await and Combine, improved default configuration, new documentation, and that we removed deprecated methods and legacy features. If you’re new to Auth0, you’ll be pleasantly surprised at how little code you’ll need to write to add authentication to your apps.
What You’ll Build
📺 The What You’ll Build section of the video
In this tutorial, you’ll build a simple, single-screen iOS app that allows users to log in and out using Auth0. While logged in, the screen will have a different appearance and show the user their name, email address, and photo from their profile.
Before we begin, let’s take a look at the completed app.
A quick tour of the app
When you launch the completed app, you’ll see a logo icon, some status text, the app’s title, and a Log in button:
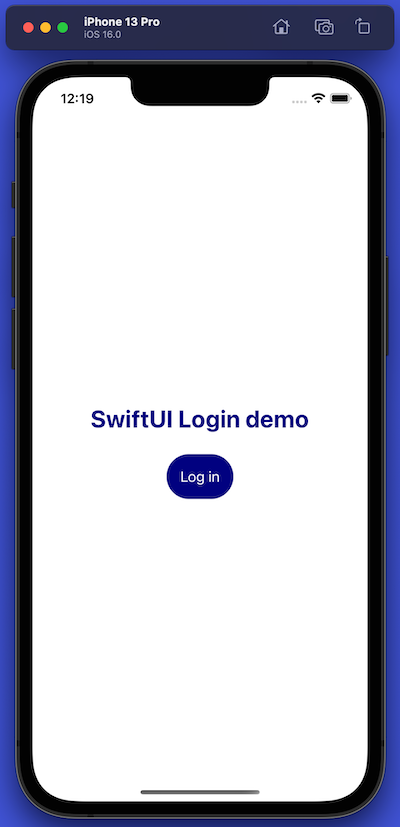
Note: The Log in button is set with the
Filledstyle, on of the iOS 15 introduced four pre-defined button styles, and thus it displays a background instead of the more classic blue text link look.
Pressing the Log in button starts the login process. The first thing you’ll see is this alert box:

This alert box is a privacy feature built into iOS. You’re seeing it because the app is about to receive information about the user — you — from Auth0 as part of the login process. This information will include identifying information about you, such as your name, email address, and the URL for your profile picture. It may also include additional metadata about you that Auth0 has stored.
iOS’ privacy policy requires it to inform the user when an app is sending or receiving personal information about them from a third party (Auth0 in this case), which it does with the alert box.
There is a way to disable the login alert box, but it’s beyond the scope of this article. For more details, see How can I disable the login alert box? in the FAQ for the Auth0.swift library.
Pressing the Continue button takes you to the Auth0 Universal Login screen, which appears in a web browser view embedded in the app:
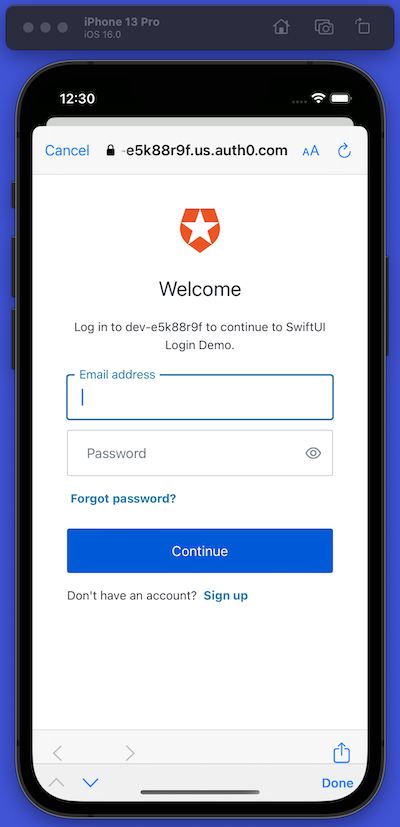
When you use Auth0 Universal Login to add login/logout capability to your apps, you delegate authentication to an Auth0-hosted login page. You've seen this in Google web applications such as Gmail and YouTube. These services redirect you to log in using accounts.google.com. After logging in, Google returns you to the web application as a logged-in user.
If you’re worried that using Auth0’s Universal Login means that your app’s login screen will be stuck with the default Auth0 “look and feel,” I have good news for you: you can customize it to match your app or organization’s brand identity.
The Universal Login page saves you from having to code an authentication system. It gives your applications a self-contained login box with several features to provide a great user experience.
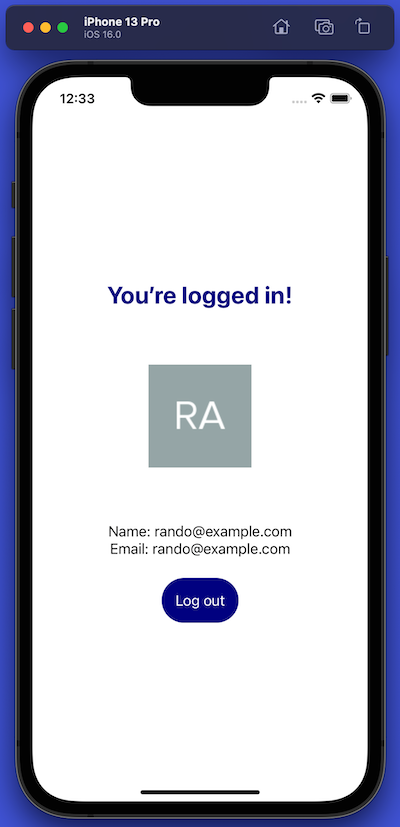
When you log in successfully, the Universal Login screen and browser window disappear, and you return to the app, which now displays selected information from your profile: your profile photo, name, and email address. The app also shows a Log out button:
Pressing the Log out button starts the logout process. It begins with iOS’ alert box telling you once again that the app is using Auth0 to sign you in, even though you’re signing out. That’s because iOS is displaying the same alert box whether you log in or out; we hope that Apple will someday correct this:

After you press the Continue button on the alert box, you return to the app’s initial screen:
Prerequisites
Here’s a list of the software, hardware, and knowledge you’ll need for this exercise.
An Auth0 account
The app you will write for this article’s exercise uses Auth0 to provide login and logout functionality. As its developer, you’ll need an Auth0 account. You can sign up for a free account, which lets you add authentication for up to 10 applications and 7000 users. This free account should be enough for evaluating the platform and prototyping, development, and testing.
An iOS development setup
To develop applications for any Apple hardware, you need a Mac computer running Xcode, Apple’s integrated development environment:
- Most Macs from mid-2013 or later with at least 8 GB RAM (16 GB preferred).
- One of the recent releases of macOS, preferably version 11 (“Big Sur”) or version 12 (“Monterey”). Big Sur runs on most Macs from 2013 and after, while Monterey requires a Mac from 2015 or later.
- Xcode version 11.0 (September 2019) or later. When writing this article, I used XCode 13.2.1 on Big Sur and Xcode 14.0.1 on Monterey.
An iOS device, virtual or real
Xcode comes with the Simulator, an application that creates virtual devices that simulate recent models of the iPhone, iPad, and iPod Touch models. The latest version of Xcode, version 14, comes with Simulators that run iOS 16.
To install earlier versions of iOS for the Simulator, select Preferences… from the Xcode menu, followed by the Components tab. You’ll see a list of older versions of not just iOS but also watchOS and tvOS.
One of the benefits of using the Simulator is that you don’t need an Apple Developer account — free or paid — to use it.
While the Simulator is convenient, there’s no substitute for an actual physical device. It provides a more realistic testing experience since you can’t do certain things on the Simulator, such as motion/tilt sensing and augmented reality.
To deploy an app directly to a device for testing, you need a free Apple Developer account, which requires an Apple ID. If you don’t have an Apple ID, sign up for one here. Once you have an Apple ID, go to developer.apple.com, click Account at the top of the page, and sign in.
You need to register the device in your developer account to deploy apps to it; you do so on this page in the Apple Developer site. You can register up to 100 devices per membership year. You’ll need to provide the device’s UDID (Unique Device IDentifier), and you may find this site helpful. Once you’ve registered a device, you can deploy apps directly to it; see Distributing Your App to Registered Devices for more information.
You'll need a paid account to deploy apps to the App Store. For more details, see the Apple Developer enrollment page.
To learn more about running apps on virtual and real iOS devices, start with Apple’s article, Running Your App in the Simulator or on a Device.
Some knowledge of Swift and structs
While not completely necessary, it would help if you were familiar with the Swift programming language and iOS development. If these are new to you, the Swift programming language, or the UIKit framework, try this Apple tutorial: Getting Started with Today,.
SwiftUI relies heavily on structs, so you may find it helpful to review their basics. You may find Hacking with Swift’s article, How to create your own structs, helpful.
The Starter Project
📺 The Starter Project section of the video
Rather than make you start from scratch, we’ve provided you with a starter project for this exercise.
Get the starter project and try it out
🛠 Download the starter project. You can do so in a couple of ways:
You can get it from this Github repository, or You can download this ZIP file.
The starter project is in the iOS SwiftUI Login (starter) directory, and you can open it by double-clicking on iOS SwiftUI Login.xcodeproj.
There’s more than just the starter version of the project in the repository you downloaded. You’ll also find a completed version in the
iOS SwiftUI Login (completed)directory. If you have experience integrating Auth0 into applications, the completed version of the app will run once you enter your tenant’s domain and app’s client ID into the app’sAuth0property list.
🛠 Run the starter project. You’ll see this screen:
🛠 Press the Log in button. The app doesn’t incorporate Auth0 yet, so pressing Log in takes you to this screen without an intermediate step where you have to provide a username and password:
This screen currently displays placeholders where information will eventually go.
🛠 Press the Log out button, which will return you to the initial screen.
Let’s look at two critical files in the starter project: ContentView.swift and Profile.swift.
ContentView: the app’s main view
📺 The ContentView section of the video
The ContentView struct defines the app’s user interface. Let’s take a closer look at it.
🛠 Open ContentView.swift by selecting ContentView in the Project navigator. This file contains the ContentView struct and its extension.
I’ve structured this file to follow a popular Swift programming convention that separates a struct’s state and behavior:
- Anything that defines
ContentView’s state, such as its property variables, goes into the mainstruct. - Anything that defines
ContentView’s behavior, such as its methods, goes into an extension, which you’ll find farther down in the file.
ContentView’s state
Near the start of ContentView’s definition, you’ll see that it has two state variables:
isAuthenticated: A boolean variable that will eventually be set totruewhen the user is logged in andfalsewhen the user is logged out.userProfile: An instance of theProfilestruct that will eventually decode and store user information received from Auth0.
The body property of ContentView defines the user interface. To keep it simple, I coded it as an if statement that specifies one of two VStacks: one for the case where the user is authenticated and one for the case where the user isn’t.
When the user is authenticated, the app presents this VStack to the user:
// [ 📄 ContentView.swift ]

// [ More code here ]

      VStack {

        Text("You’re logged in!")
          .modifier(TitleStyle())

        UserImage(urlString: userProfile.picture)

        VStack {
          Text("Name: (userProfile.name)")
          Text("Email: (userProfile.email)")
        }
        .padding()

        Button("Log out") {
          logout()
        }
        .buttonStyle(MyButtonStyle())

      }

// [ More code here ]
UserImage is a custom view that I defined. You’ll find its code just after the // MARK: Custom views comment. Given a URL string, it will asynchronously download and then display the image retrieved from that URL. While downloading the image, or if there is no image, it shows a placeholder graphic.
To make the app look less plain, I defined a couple of modifiers to style the title text and Log out button. You’ll find them just after the // MARK: View modifiers comment:
TitleStyleis a custom view modifier. Since it adopts theViewModifierprotocol, it must define abody()method that can apply changes to a view’s appearance. Thebody()method ofTitleStyledefines the style of the app’s title text, and theTextview’smodifier()method applies that style to “You’re logged in!”MyButtonStyleadopts theButtonStyleprotocol, which can change the appearance ofButtonviews. TheButtonStyleprotocol requires the definition of amakeBody()method, which defines a button’s style, and the Log out button’sbuttonStyle()method applies that style to the button.
When pressed, the Log out button calls the logout() method, which I’ll cover in the section about ContentView’s behavior.
When the user is not authenticated, the app presents a simpler VStack to the user:
// [ 📄 ContentView.swift ]

// [ More code here ]

      VStack {

        Text("SwiftUI Login demo")
          .modifier(TitleStyle())

        Button("Log in") {
          login()
        }
        .buttonStyle(MyButtonStyle())

      }

// [ More code here ]
When pressed, the Log in button calls the login() method, which I’ll cover below.
ContentView’s behavior
Here’s the complete code for ContentView’s extension:
// [ 📄 ContentView.swift ]

// [ More code here ]

extension ContentView {

  private func login() {
    // TODO: Implement a full `login()` method.
    isAuthenticated = true
  }

  private func logout() {
    // TODO: Implement a full `logout()` method.
    isAuthenticated = false
  }

}

// [ More code here ]
In their current form, the login() and logout() methods simply change the value of isAuthenticated. When we integrate Auth0 into the app, we’ll replace the TODO: comments with code that delegate login and logout to Auth0.
Profile: where user info lives
📺 The Profile section of the video
The other item of interest is the Profile struct. Its job will be to decode and store user information about the user received from Auth0.
🛠 Open Profile.swift by selecting Profile in the Project navigator. This file contains the Profile struct, which contains code relating to its state, and its extension, which contains code that defines its behavior.
Profile’s state
Profile’s properties contain this information:
// [ 📄 Profile.swift ]

struct Profile {

  let id: String
  let name: String
  let email: String
  let emailVerified: String
  let picture: String
  let updatedAt: String
}

// [ More code here ]
Some notes about the properties:
id: A unique system identifier for the username: The user’s display name. The system defaults to using the user’s email address for this value if the name is unknown.email: The user’s email address.emailVerified: A string representation of a boolean that specifies if the user verified their email address.picture: The URL of the user’s picture.updatedAt: The date when the user’s profile information was last updated.
Profile’s state
The profile extension has a computed value called empty, which returns a Profile instance whose properties are all empty strings and is used to create a new blank Profile instance.
A TODO: comment just after empty hints that we’ll need to implement a from() method. This method will decode the ID token and extract its information into Profile’s properties.
Install Auth0.swift
📺 The Auth0.swift section of the video
Now that you’ve explored the project, it’s time to integrate the app with Auth0 so that it can authenticate users.
There are three ways to install Auth0.swift:
- Swift Package Manager, Apple’s dependency manager
- Cocoapods, a long-standing third-party package manager first released in 2011 and used in many projects
- Carthage, another third-party package manager
I chose to use Swift Package Manager for this tutorial because it’s built into Xcode and doesn’t require additional software. If you’d rather use Cocoapods or Carthage to install Auth0.swift, see these instructions.
🛠 To install the Auth0.swift package, open the File menu and select Add Packages.... The Add Packages window will appear.
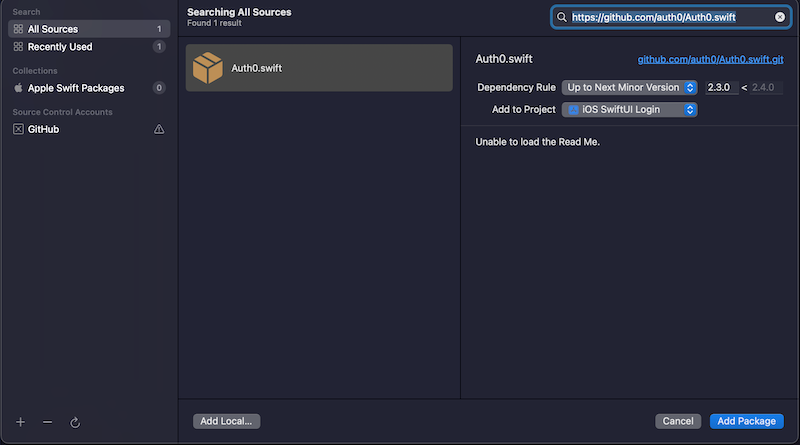
🛠 Enter the URL for the Github repo for Auth0.swift — https://auth0.com/docs/libraries/auth0-swift — into the window’s search field. Xcode will search online and display any packages that match this term. The search should produce a single result: Auth0.swift.
🛠 Select the Auth0.swift package when it appears in the list. In the Dependency Rule menu, select Up to Next Minor Version, then click Add Package.
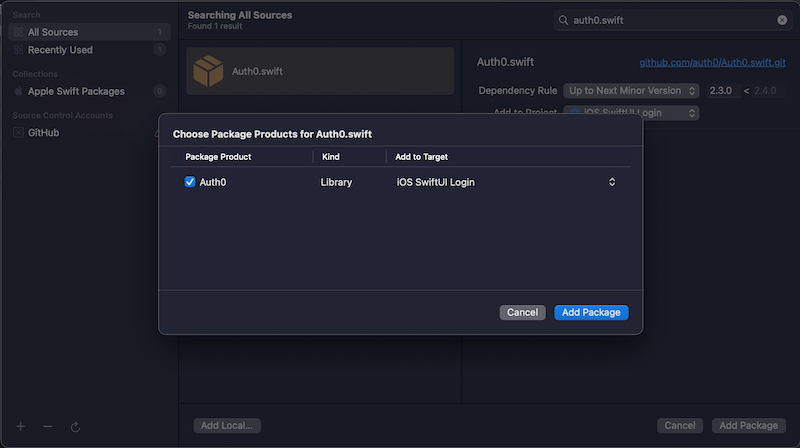
🛠 You’ll be asked to confirm that you want to add the Auth0.swift package. Click Add Package to reassure Xcode that you want Auth0.swift:
When Auth0.swift finishes installing, its package will appear in the list under the Package Dependencies tab of the Project screen. You’ll see Auth0.swift’s libraries are listed in the Project navigator:
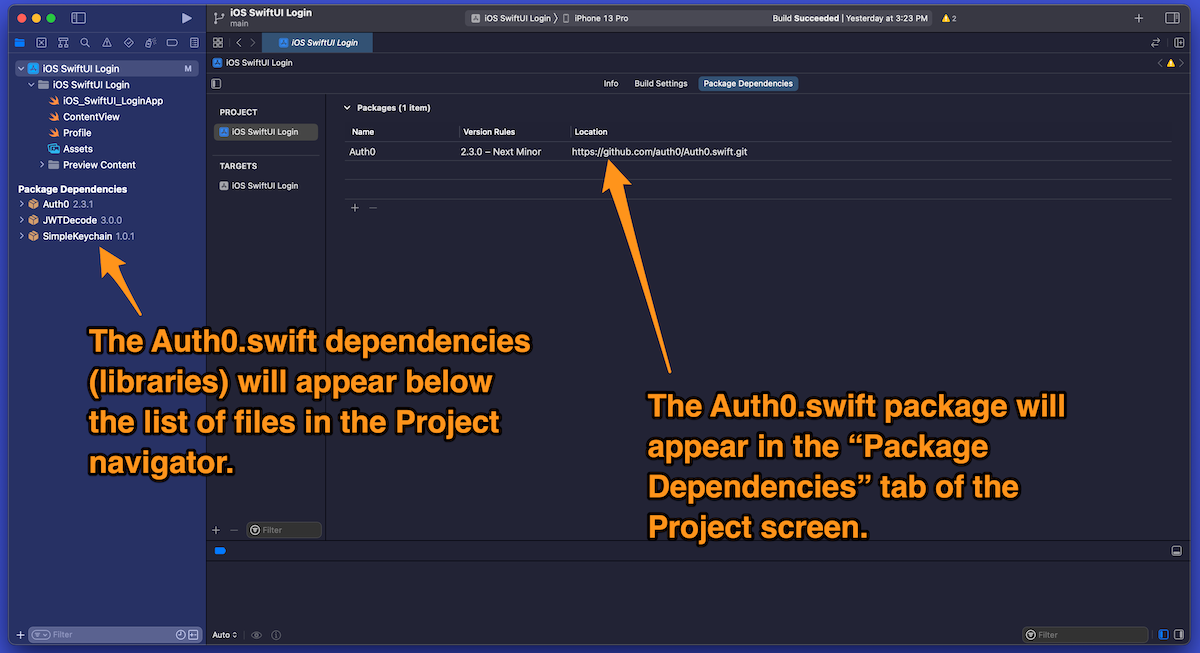
These libraries are:
Auth0: A toolkit for using Auth0’s APIs, including the Authentication API. You’ll use this inContentViewto implement login and logout.JWTDecode: A library for decoding JWTs (JSON web tokens). You’ll use this inProfileto extract the user information from the ID token.SimpleKeychain: A wrapper for the iOS Keychain useful for securely storing small chunks of data, such as user credentials. You won’t use it in this project.
At this point, the functionality contained within Auth0.swift is now available to your app. You’ll start using it once you’ve done all the necessary Auth0 setup.
Register the App with Auth0
📺 The Register the App with Auth0 section of the video
🚨 You’ll need an Auth0 account from this step onward. Once again, you can sign up for an Auth0 account for free! We’ve taken great care to make the process as painless as possible.
Now that you’ve set up the app to work with Auth0, it’s time to set up your Auth0 tenant to work with the app. To accomplish this, you’ll do the following:
- Add the app to your Auth0 dashboard’s list of registered applications
- Gather two pieces of information that the app will need to delegate login/logout to Auth0:
- Your tenant’s domain
- The client ID that Auth0 will assign to the app
- Provide Auth0 with the necessary callback URLs to contact the app: one to call at the end of the login process and the other to call at the end of the logout process
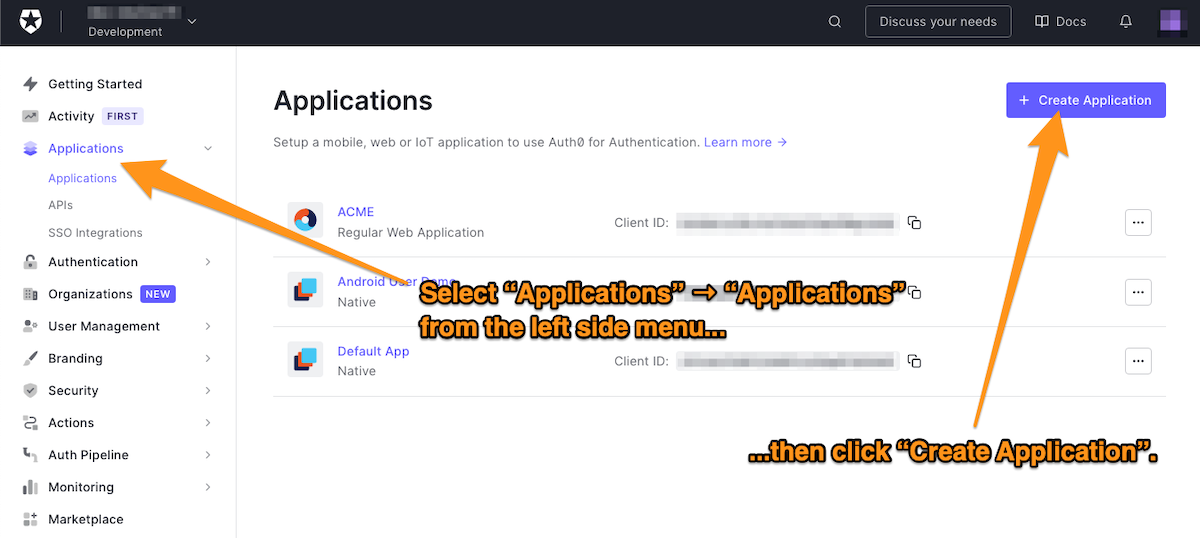
🛠 Log into the Auth0 dashboard and select Applications → Applications from the menu on the left side of the page.
You will now be on the Applications page, which lists all the applications you have registered with Auth0. Let’s add your app to the list.
🛠 Start the process of registering a new app by clicking the Create application button near the top right of the page:
You’ll see this dialog appear:
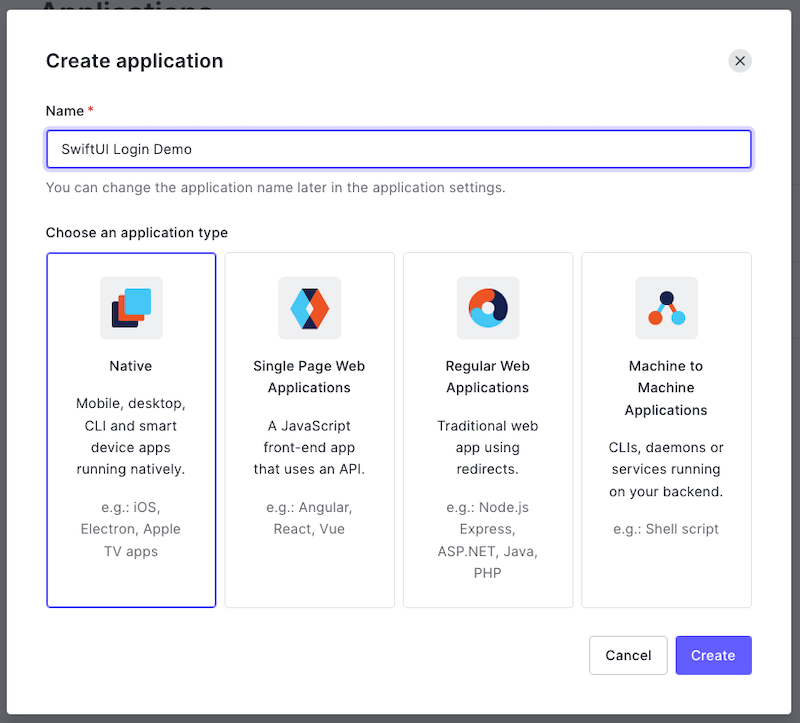
🛠 You’ll need to provide two pieces of information to continue:
- Enter a name for the app in the name field. It might be simplest to use the same name as your Xcode project (if you’ve been following my example, use the name SwiftUI Login Demo).
- Specify the application type, which in this case is Native.
🛠 Click Create. The Quick Start page for the app will appear:
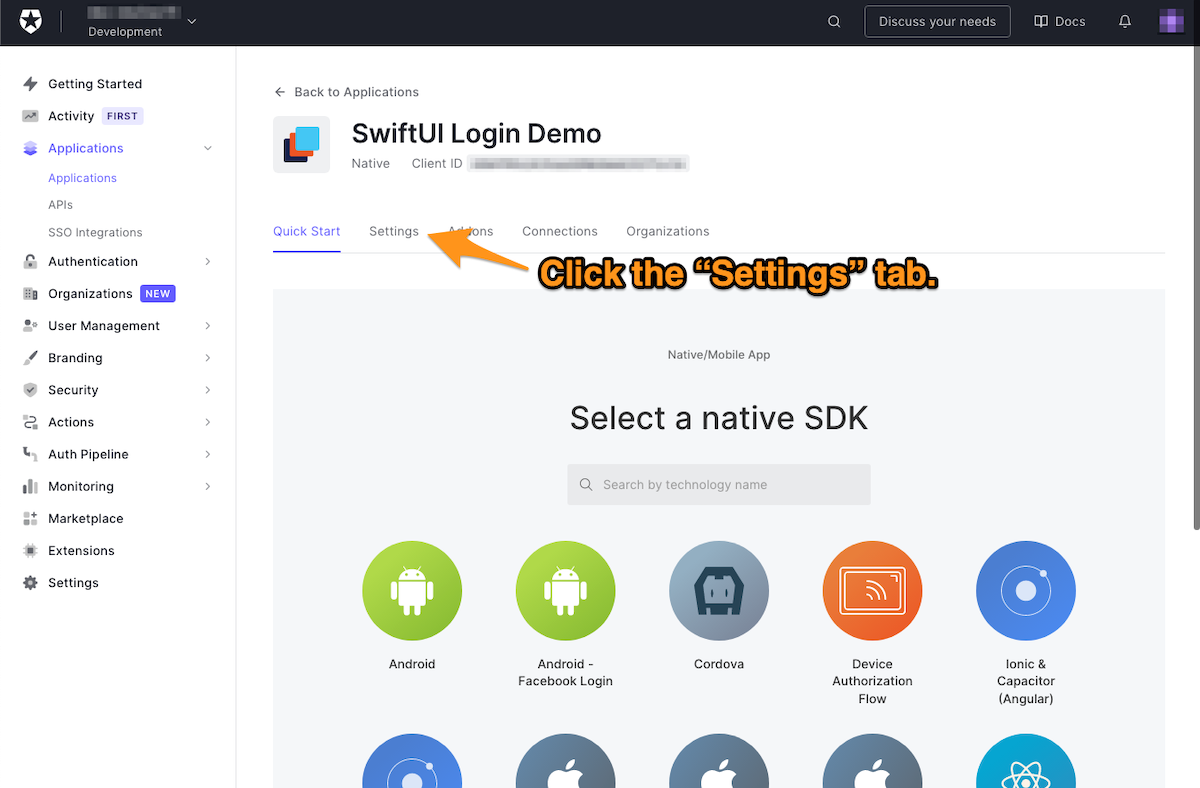
This page provides you with ready-made projects for several different platforms that you can use as the basis for an application that delegates authentication to Auth0. You won’t use any of them in this exercise; instead, you’ll use a couple of Auth0 libraries and write the code yourself. It’s more educational — and more importantly, fun — that way.
🛠 Click the Settings tab, which will take you to this page:
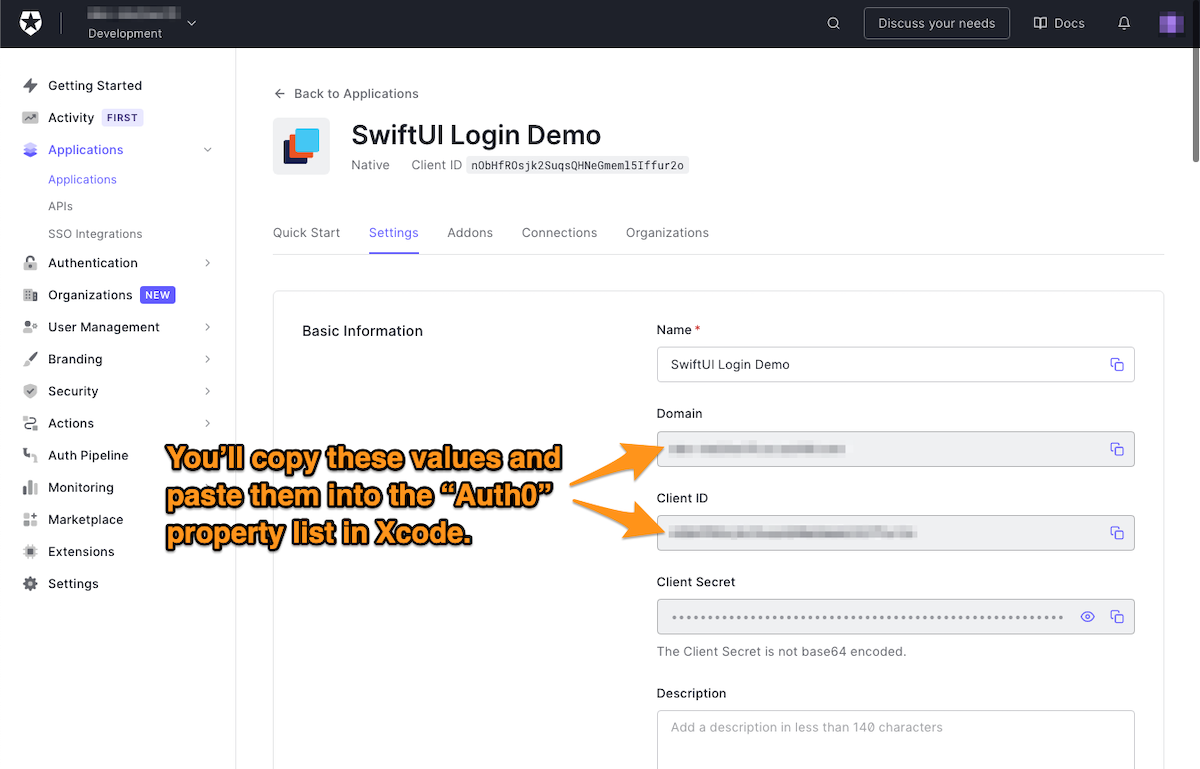
You’re going to do two critical things on this page:
- Get information that the app needs to know about Auth0, and
- Provide information that Auth0 needs to know about the app.
Let’s take care of the first one: Get the information that the app needs, namely the domain and client ID, which you’ll enter into a property list.
Create a Property List
📺 The Create a Property List section of the video
To use Auth0 to authenticate users, your app needs to:
- Communicate with the appropriate Auth0 tenant, and
- Identify itself to that server.
You do this by providing the app with that tenant’s identifier, a value known as the domain, and the app’s identifier, the client ID. Auth0.swift expects to find these values in a property list (a .plist file), so let’s create one.
Auth0.swift expects your tenant’s domain and your app’s client ID in a property list (a .plist file), so let’s create one.
🛠 Create a new property list file by right-clicking (or control-clicking) the iOS SwiftUI Login folder in the Project navigator and selecting New File…:
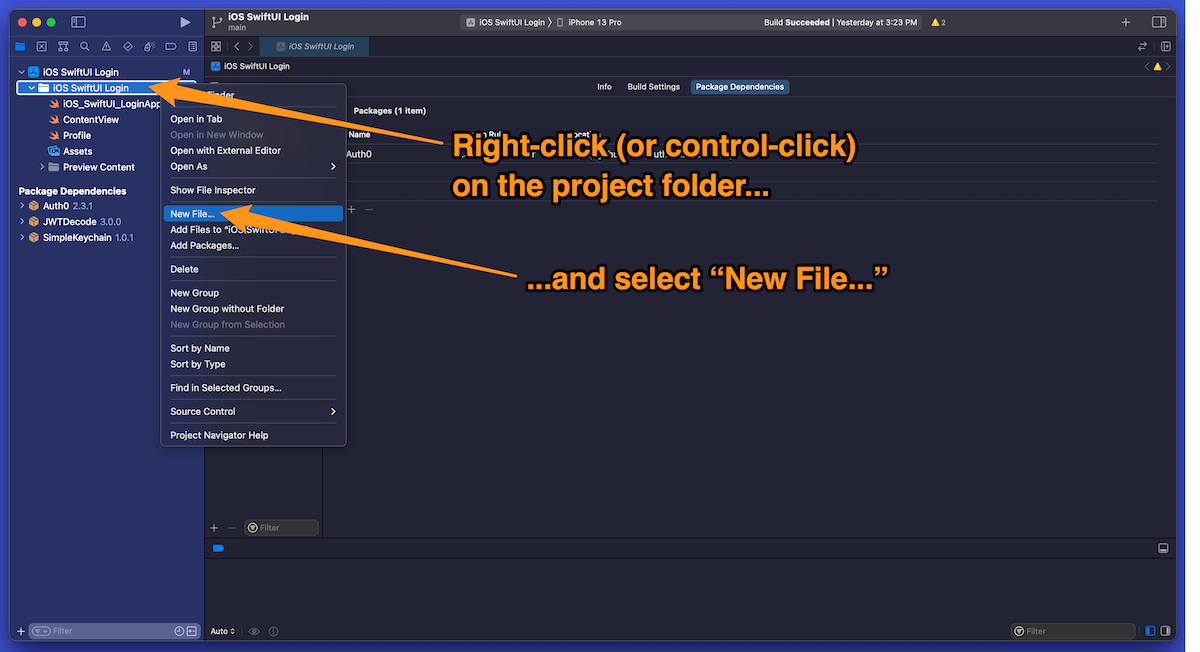
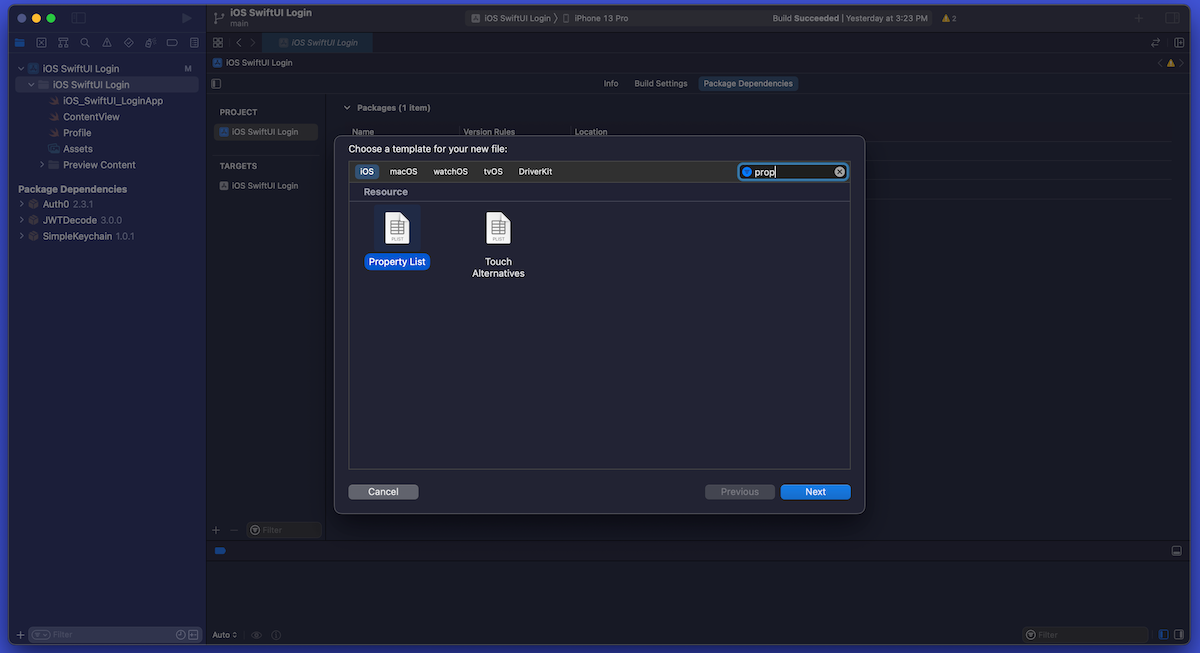
🛠 In the “Choose a template for your new file:” window, Find the Property List icon (it’s easier to find if you enter the first few letters of “property list” in the search text field). Select it, then click Next:
🛠 When the “Save As:” window appears, give the new file the name Auth0.plist and click Create. Xcode will create the property list file, and it will appear in the Project navigator as Auth0:

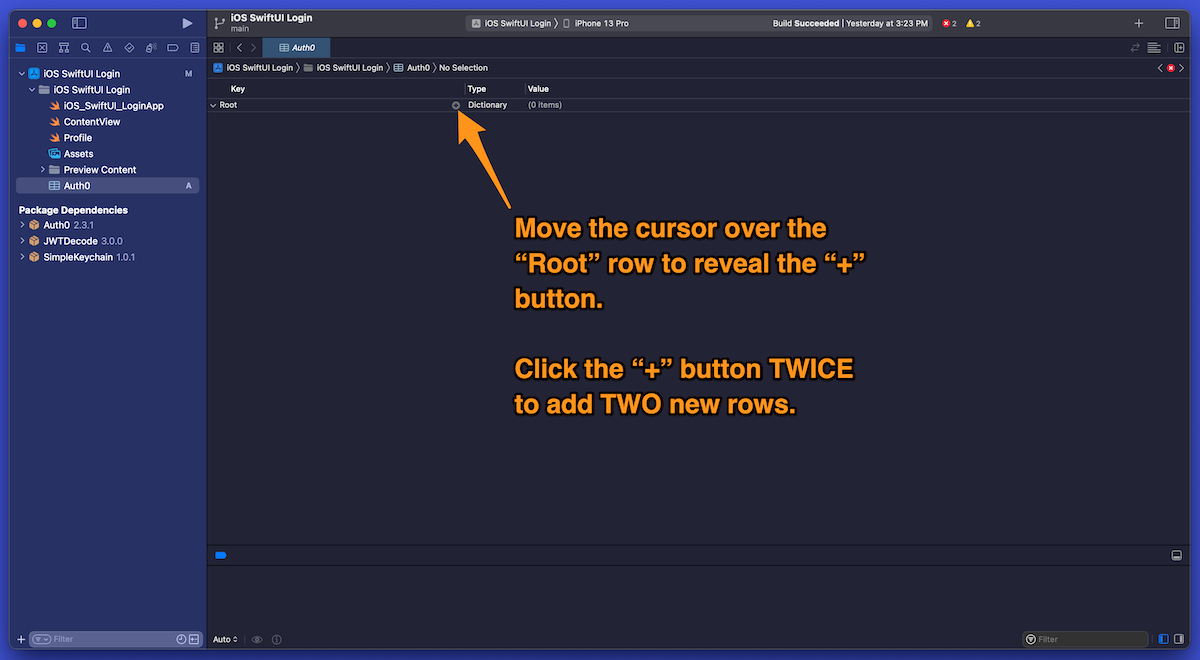
Xcode will display the new Auth0.plist file in a table format. Let’s add two rows to the table to hold the domain and client ID values.
🛠 Move the cursor over the Root row to reveal the + button. Click on the + button twice to add two rows:
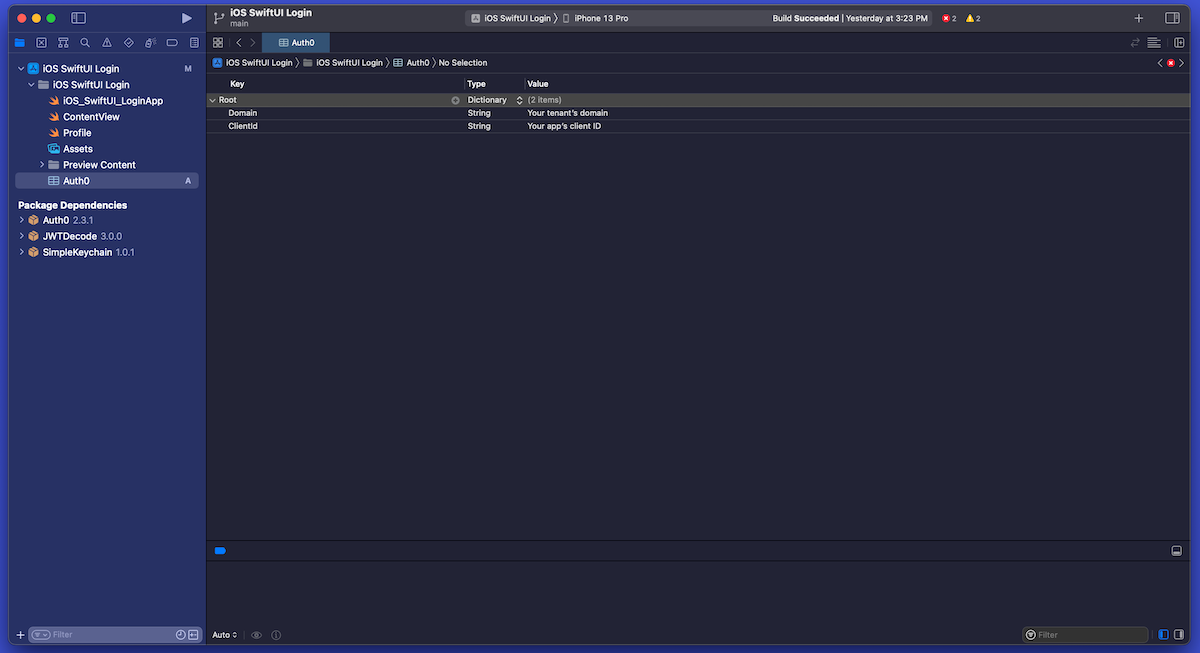
🛠 Enter the following values into the two rows:
- Row 1:
- Key:
Domain - Type:
String - Value: Copy the contents of the Domain field from your app’s page on the Auth0 dashboard and paste it here.
- Key:
- Row 2:
- Key:
ClientId - Type:
String - Value: Copy the contents of the Client ID field from your app’s page on the Auth0 dashboard and paste it here.
- Key:
The property list should look similar to this:
Create the Callback URLs
📺 The Create the Callback URLs section of the video
With the property list created, the app knows how to communicate with Auth0. It’s time to do the inverse and tell Auth0 how to communicate with the app.
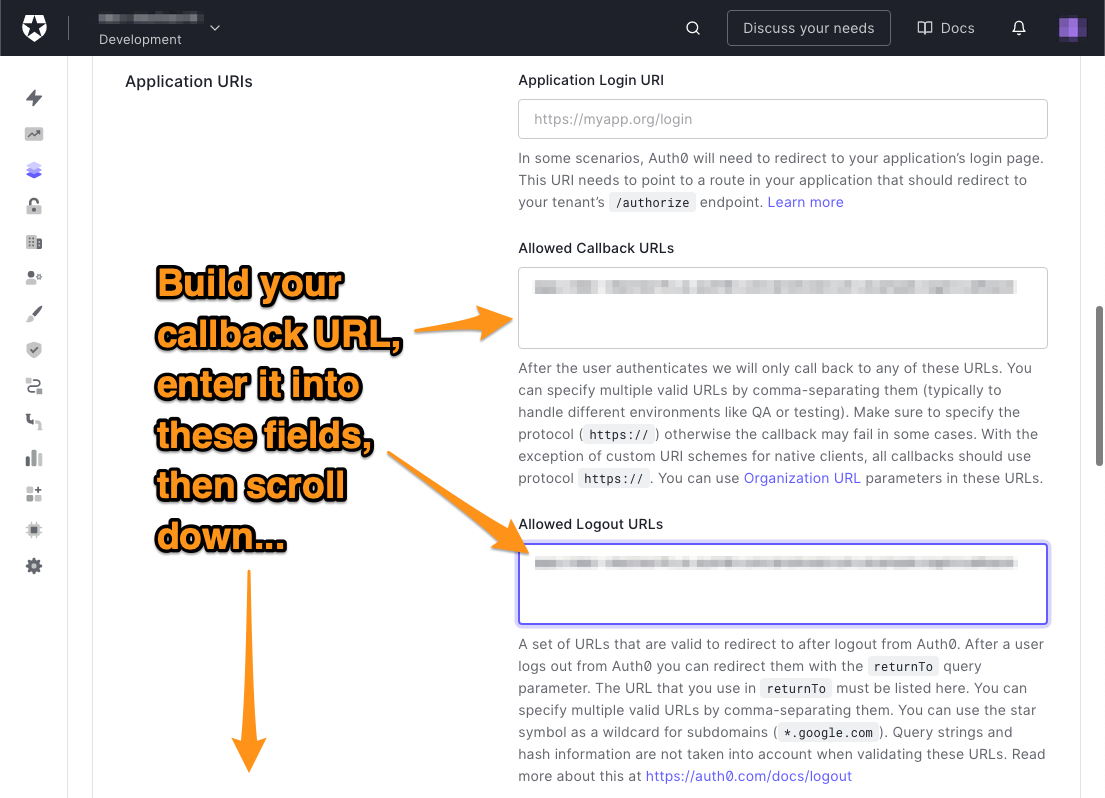
🛠 Return to the Auth0 dashboard and scroll down to the Applications URIs section:
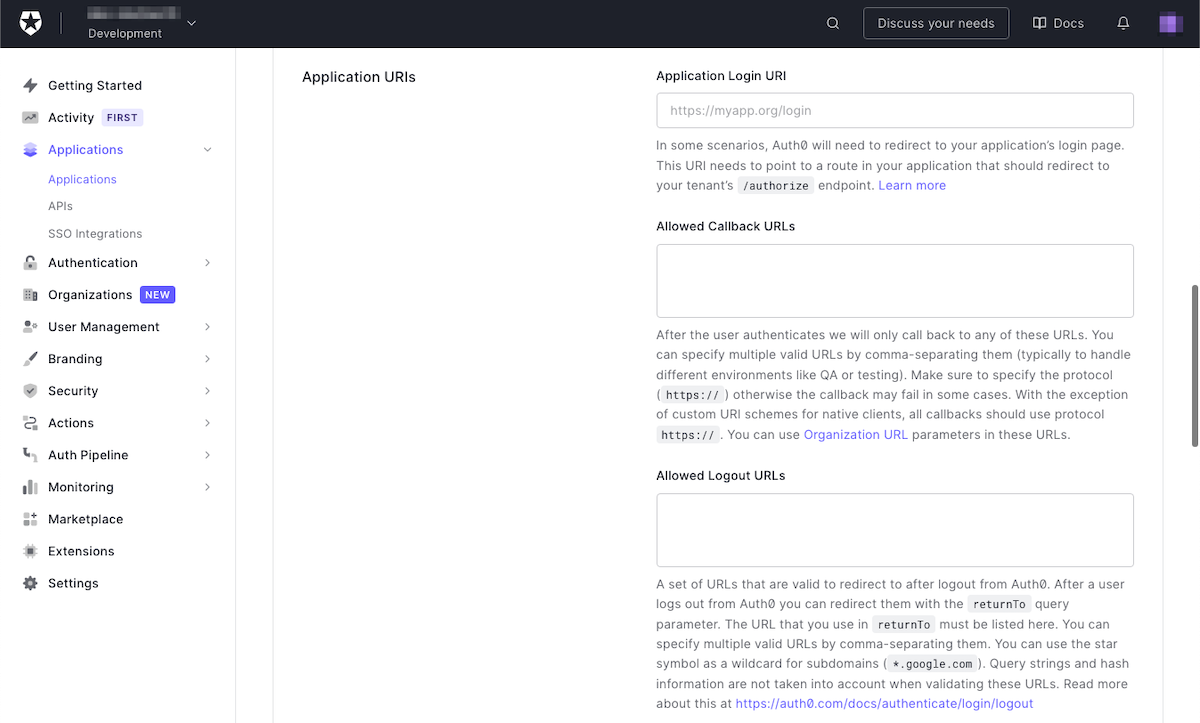
This is where you provide Auth0 with two pieces of information that it needs to know about your app:
- The callback URL: the URL that Auth0 will redirect to after the user successfully logs in. There can be more than one of these.
- The logout URL: the URL that Auth0 will redirect to after the user logs out. There can be more than one of these.
At this point, you’re probably thinking: “Wait a minute — I’m writing a iOS app using SwiftUI. It doesn’t have web pages that you navigate to using URLs, but Views!”
You’re right. For native applications, the callback and logout URLs are the same string, and Auth0 sends that string to the app to inform it that a user has logged in or logged out.
The string that native iOS apps use for both the callback URL and the logout URL follows this format:
{BUNDLE_IDENTIFIER}://{YOUR_DOMAIN}/ios/{BUNDLE_IDENTIFIER}/callback
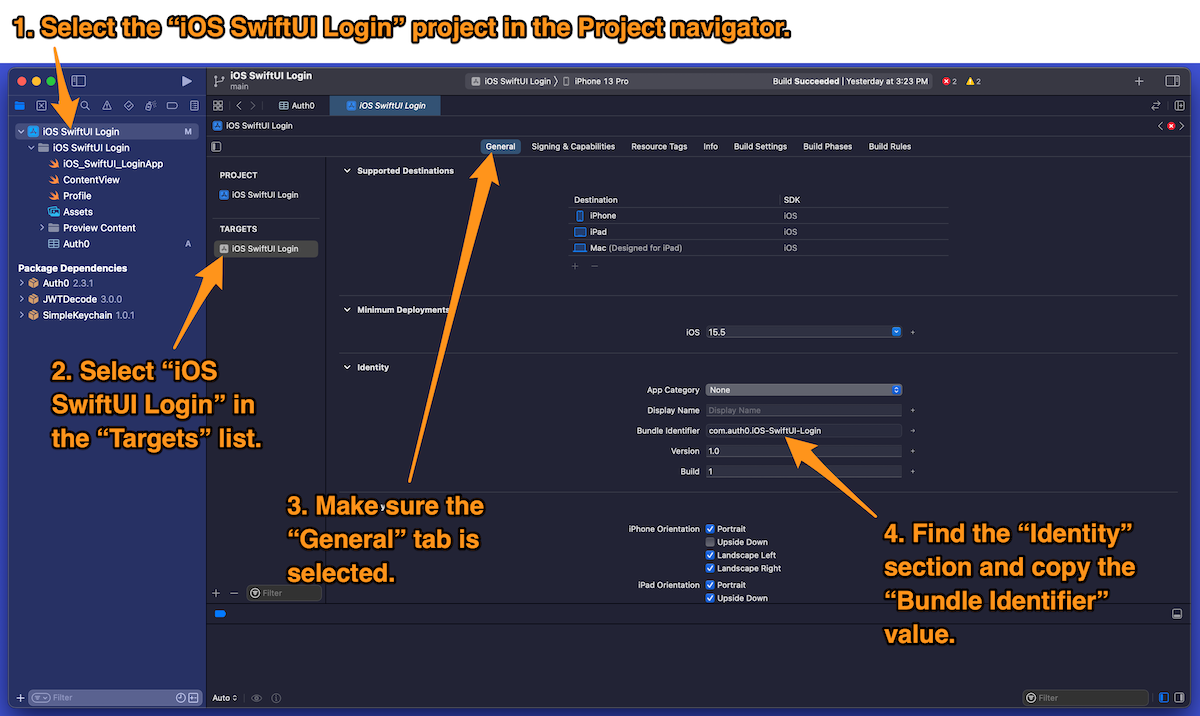
To construct this string, you’ll need your app’s bundle identifier.
🛠 In Xcode, click on the project in the Project navigator, click on the project in the Targets menu, and select the General tab. Copy the bundle identifier value, which you’ll find in the Bundle Identifier field in the Identity section near the top of the center pane:
🛠 Copy the URL format string above and make the following changes to create a new URL:
- Replace
{BUNDLE_IDENTIFIER}with the bundle identifier you copied. Note that{BUNDLE_IDENTIFIER}appears twice in the URL — replace it both times. - Replace
{YOUR_DOMAIN}with your tenant’s domain.
🛠 Enter the URL you just constructed into both the Allowed Callback URLs and Allowed Login URLs fields. Remember, the same URL goes into both fields.
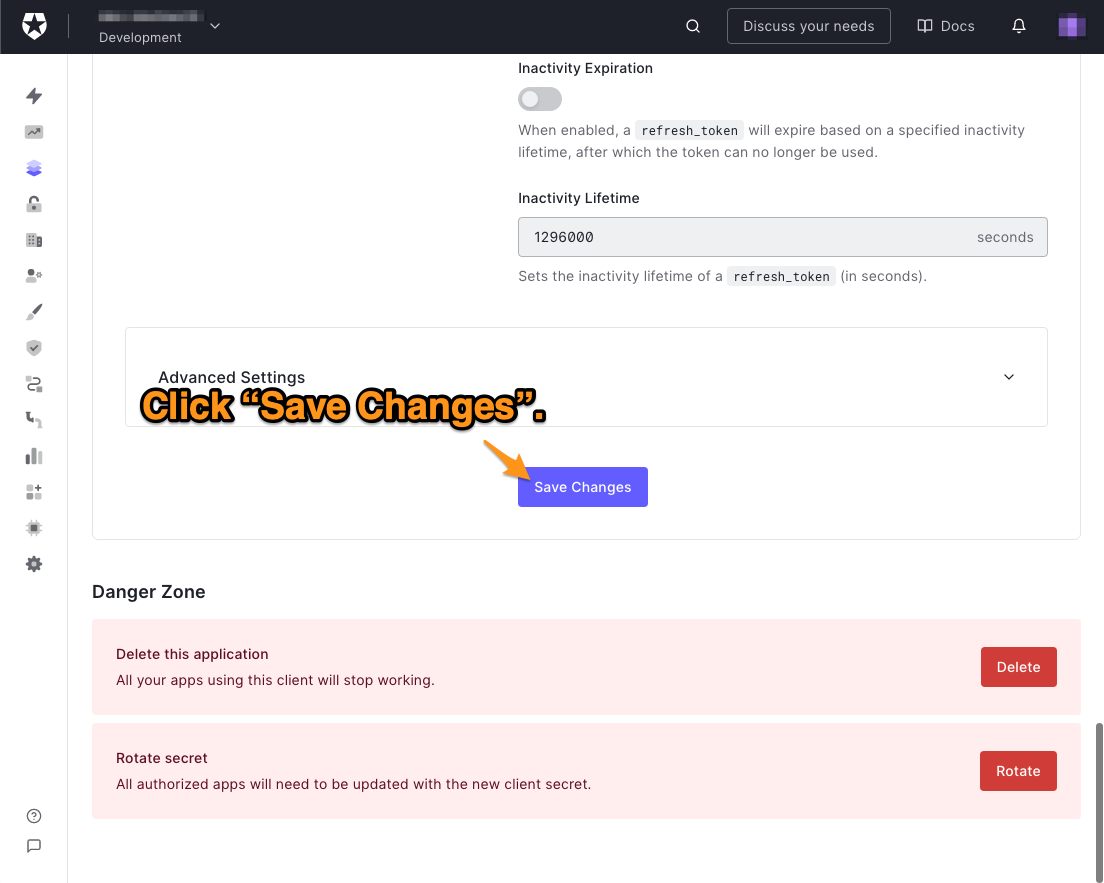
🛠 You’ve done everything you need to do on this page. Scroll down to the bottom of the page and click the Save Changes button:
Create a User
📺 The Create a User section of the video
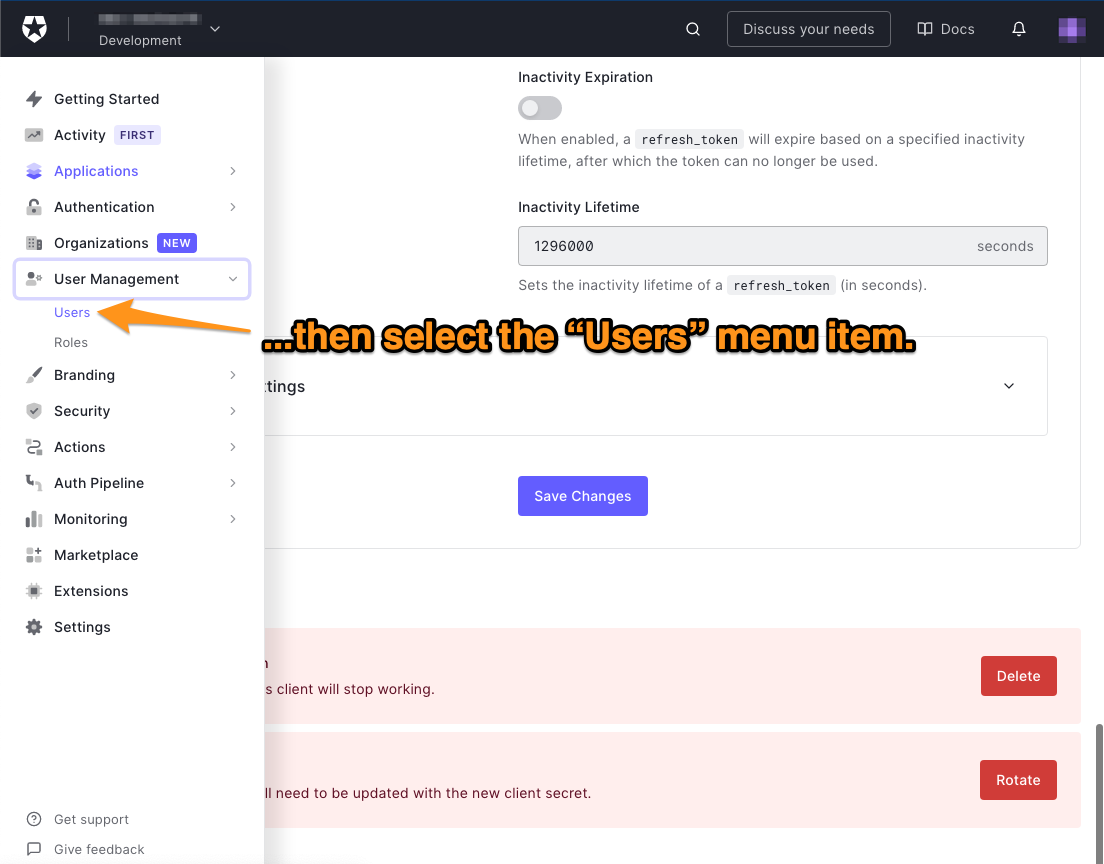
If you just created an Auth0 account, your tenant won’t have any user accounts. You’ll need at least one user account to log into the app. Follow these steps to create a user.
🛠 In the menu on the left side of the Auth0 dashboard, select User Management → Users:
The Users page will appear. It lists all the users registered to your tenant. You’ll see the “You don’t have any users yet” if there are no users.
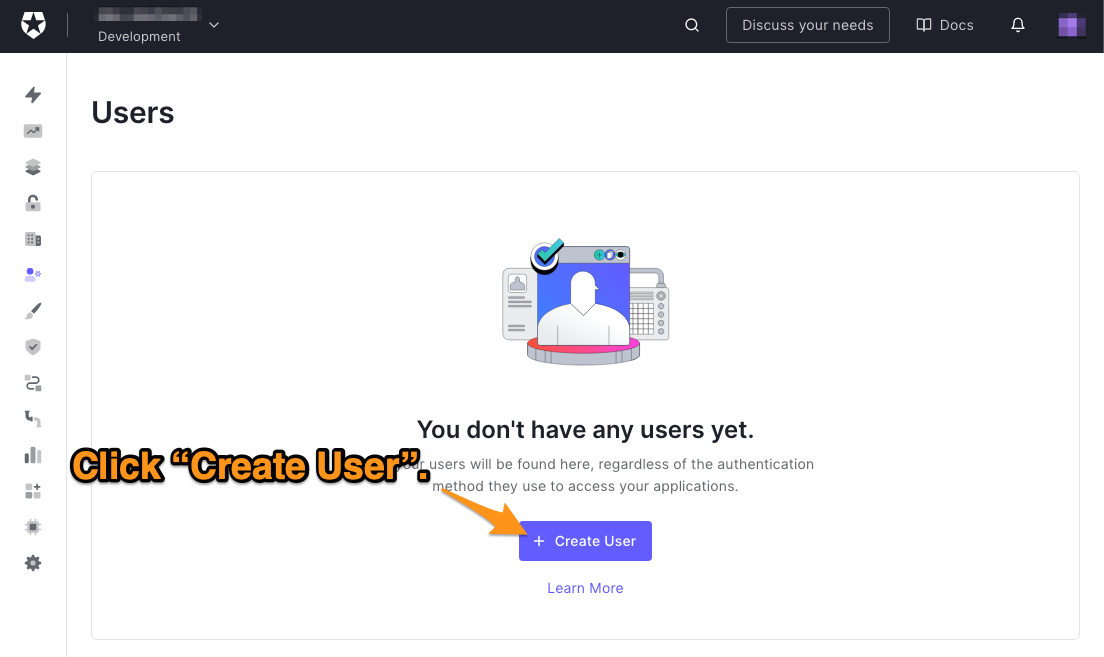
🛠 Click the Create User button to create a new user, which will make this dialog box appear:
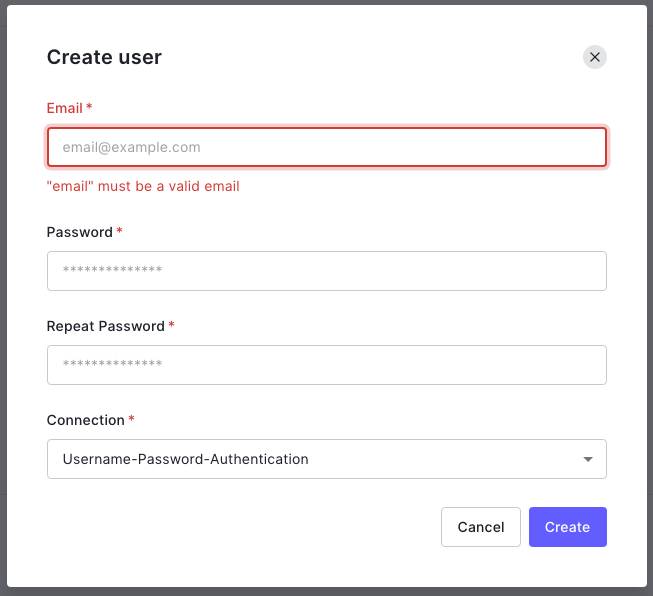
🛠 Enter an email address and password for the user. The only option for the Connection will be Username-Password-Authentication, so leave it as it is. Make a note of that email address and password — you’ll be using them to log in to the app.
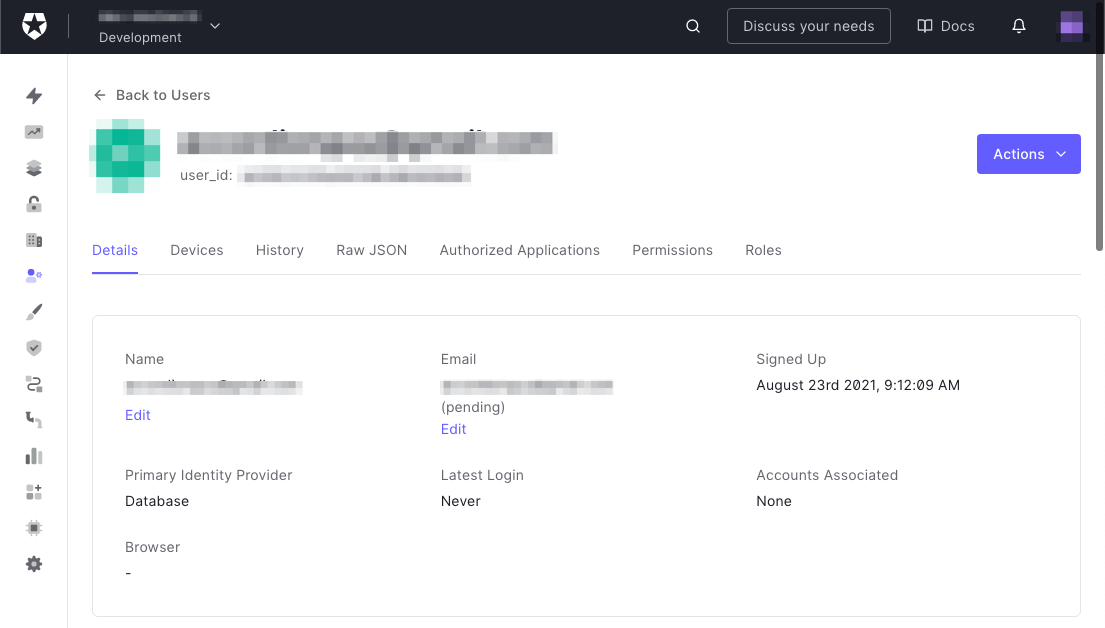
🛠 Click the Create button to create the user. The user’s Details page will appear:
That takes care of all the setups you need within the Auth0 dashboard. It’s time to go back to Xcode and the app.
Implement login
📺 The Implement Login section of the video
Currently, the login() method merely simulates the login process. Let’s make it real.
The first step is to import Auth0.swift.
🛠 Switch to Xcode, find the import statement near the beginning of ContentView, and add a line to import Auth0.swift. The result should look like this:
// [ 📄 ContentView.swift ]

import SwiftUI
// 👇🏽👇🏽👇🏽 New line of code here!
import Auth0
// 👆🏽👆🏽👆🏽

// [ More code here ]
This addition will allow the app to use the Auth0 object and its methods and properties.
The next step is to update login().
🛠 Scroll down to the ContentView extension and replace the current login() method with this one:
// [ 📄 ContentView.swift ]

// [ More code here ]

  func login() {
    Auth0 // 1
      .webAuth() // 2
      .start { result in // 3
        switch result {
          // 4
          case .failure(let error):
            print("Failed with: (error)")
          // 5
          case .success(let credentials):
            self.isAuthenticated = true
            print("Credentials: (credentials)")
            print("ID token: (credentials.idToken)")
        }
      }
  }

// [ More code here ]
The notes below correspond to the numbered comments above:
- The Auth0 package’s
Auth0object provides methods for the authentication process. Many of these methods perform one of the necessary steps for authentication, and you can chain these methods together to do different authentication tasks. webAuth()is the first method in the chain. It creates aWebAuthobject, which initiates Universal Login. It required the tenant’s domain and app’s client ID, which it collects from theAuth0property list.start()is the method that presents the login box. It takes a closure whose sole parameter represents the result of the user’s attempt to log in. The two possible outcomes — a failed login and a successful login — are handled within the closure.- We’re keeping things simple in the failure case. In the case of an unsuccessful login, the app simply prints an error message in the debug console.
- If the user successfully logs in, two things happen:
- The app receives the user’s credentials, a collection of information about the user. One of these credentials is the ID token. For now, the app will simply use
credentials’idTokenproperty to print the ID token to the debug console. In a later revision, it will extract the user’s information from the token. - The
isAuthenticatedstate variable is set totrue, and this change causes the UI to update to the “logged in” view.
- The app receives the user’s credentials, a collection of information about the user. One of these credentials is the ID token. For now, the app will simply use
Implement logout
📺 The Implement Logout section of the video
Just as you did with login(), it’s time to give the logout() method some actual functionality.
🛠 Replace the current logout() method with this one:
// [ 📄 ContentView.swift ]

// [ More code here ]

  func logout() {
    Auth0 // 1
      .webAuth() // 2
      .clearSession { result in // 3
        switch result {
          // 4
          case .failure(let error):
            print("Failed with: (error)")
            // 5
          case .success:
            self.isAuthenticated = false
        }
      }
  }

// [ More code here ]
The notes below correspond to the numbered comments above:
- We’re chaining methods from the
Auth0object again. - Just as with
login(),webAuth()is the first method in the chain, and once again, we’re using it to activate Universal Login. clearSession()does the actual work of logging out. Like thestart()method inlogin(),clearSession()takes a closure with a single parameter that represents the result of that request.- As with
login(), the app just prints an error message if the system can’t log the user out. - If the user successfully logs out, the
isAuthenticatedstate variable is set tofalse, and this change causes the UI to update to the “logged out” view.
Run the App
📺 The Run the App section of the video
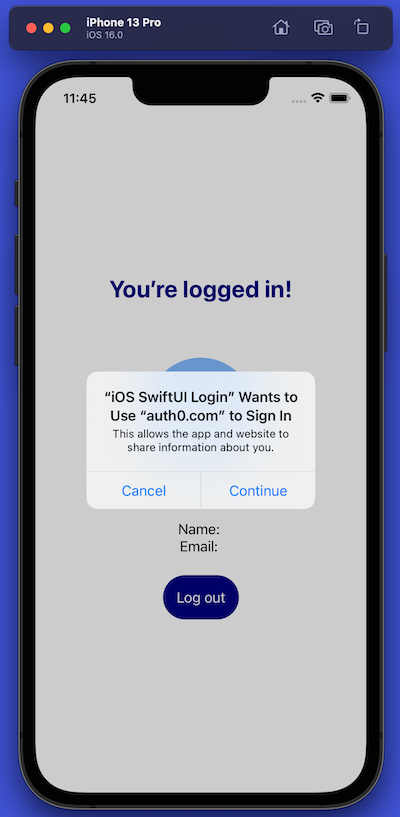
🛠 Run the app to confirm that the app actually authenticates users. This time, when you press the Log in button, instead of going directly to the “logged in” view, you’ll see the login alert...
...followed by the Universal Login screen:
You’ll need to enter a valid username and password to see that second screen; use the user you created earlier in this exercise.
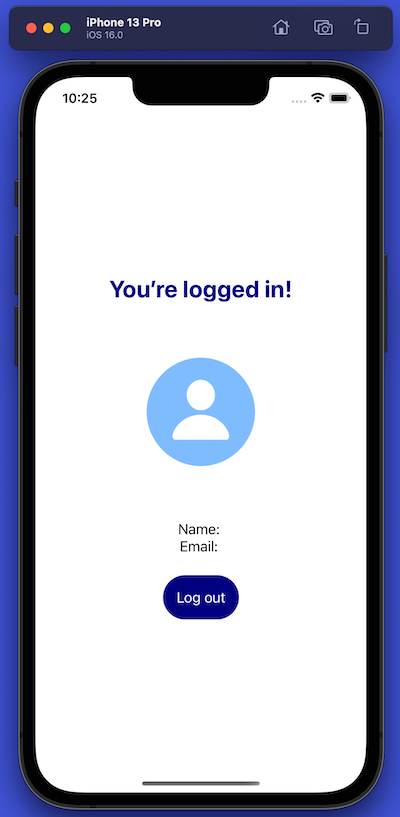
You’ll be at the “You’re logged in!” screen when you log in. Unfortunately, it doesn’t display the user’s information yet:
Press the Log out button to confirm that it works. You should see the logout alert (remember, it may say “Sign In,” but you’re actually signing out)...
...and when you click Continue, you’ll return to the opening screen.
At this point, you’ve confirmed that login and logout work. Well done! The next step is to update the “You’re logged in!” screen to display the user’s information, which we’ll extract from the ID token. We’ll do that in Part 2.