
If you make apps for Android, you’ll eventually have to build one that requires users to log in. This article will show you how to use Auth0 to add fully-featured login and logout to an Android app so that you can focus your time and effort on its actual functionality.
Adding authentication — the more formal term for “login/logout” — only looks simple. It often turns into its own project. Just handling the many ways users want to log in can quickly become an all-consuming task. You’d also have to deal with user management, scaling, and security issues, each having dozens of considerations, risks, issues, and edge cases.
Auth0 solves this problem. With Auth0 and a few lines of code, your app can have a full-featured system that supports logging in with a username/password combination and single sign-on. You’ll also be able to add features such as social accounts, multi-factor authentication, passwordless login, biometrics, and more. You won’t have to update it yourself or handle “behind the scenes” issues, either! Instead, you can concentrate your efforts on what your app does.
This tutorial will show you how to add authentication — or, more simply, login and logout — to an Android app with the help of Auth0 and the Auth0.Android package. You’ll become familiar with the Auth0 dashboard and learn how to use it to register applications and manage users.
You can follow the text in this article, or if you prefer learning by video, you can follow the steps in this article’s companion video:
Look for the 🛠 emoji if you’d like to skim through the content while focusing on the build and execution steps.
What You’ll Build
You’ll use Auth0 to build a single-screen Android app that allows users to log in and out. I’ve purposely kept it as simple as possible to keep the focus on authentication.
While logged in, the user will be able to see the following information from their user profile:
- Full name
- Email address
- Picture
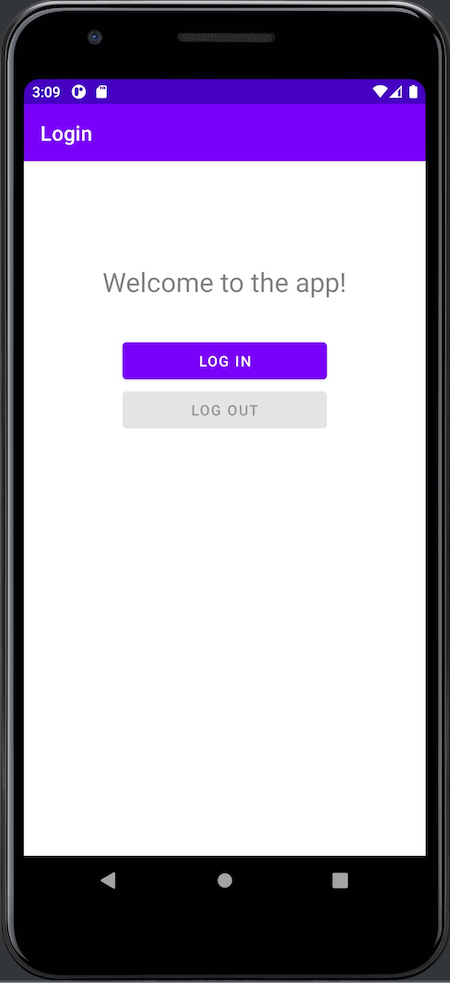
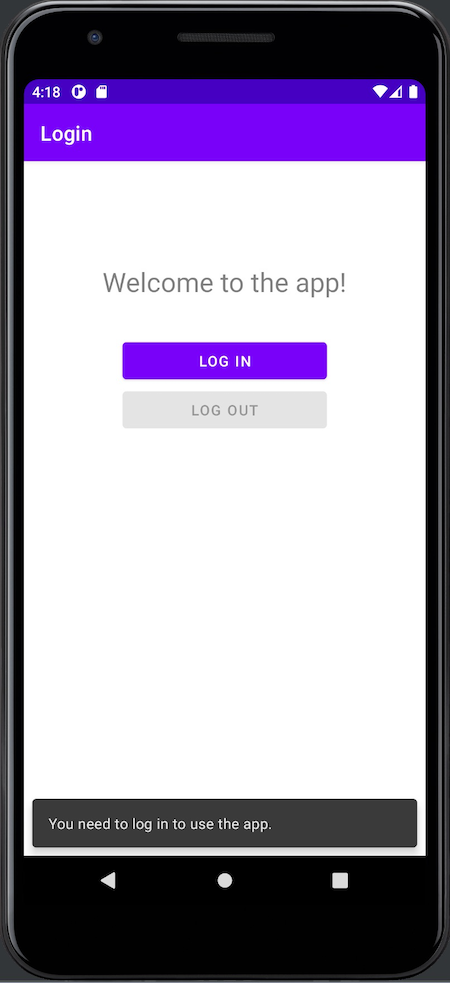
When you launch the completed app, you’ll see a greeting, a Log In button, and a disabled Log Out button:
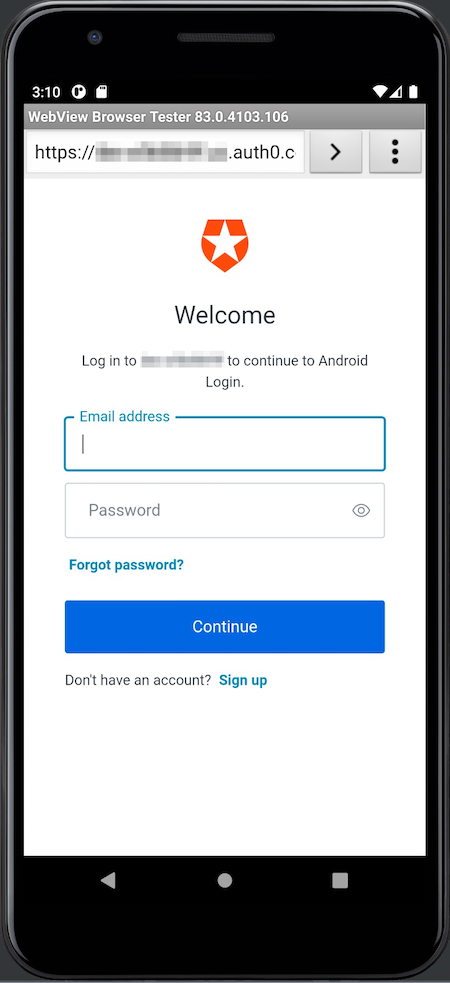
Pressing the Log In button takes the user to the Auth0 Universal Login screen. It appears in a web browser view embedded in your app. Here’s what it looks like in an emulator...
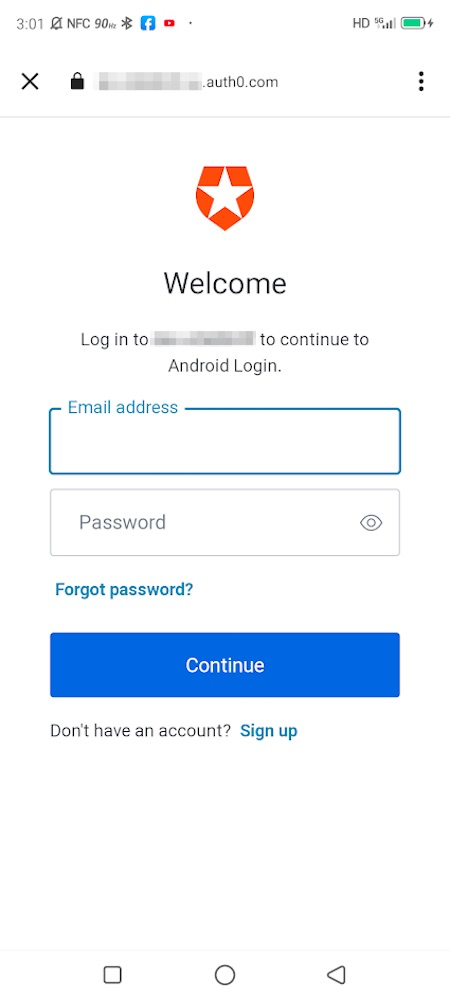
...and here’s what it looks like on a device:
When you use Auth0 to add login/logout capability to your apps, you delegate authentication to an Auth0-hosted login page. You've probably seen this in Google web applications such as Gmail and YouTube. These services redirect you to log in using accounts.google.com. After logging in, Google returns you to the web application as a logged-in user.
If you’re worried that using Auth0’s Universal Login means that your app’s login screen will be stuck with the default Auth0 “look and feel,” I have good news for you: you can customize it to match your app or organization’s brand identity.
The Universal Login page saves you from having to code an authentication system. It gives your applications a self-contained login box with several features to provide a great user experience.
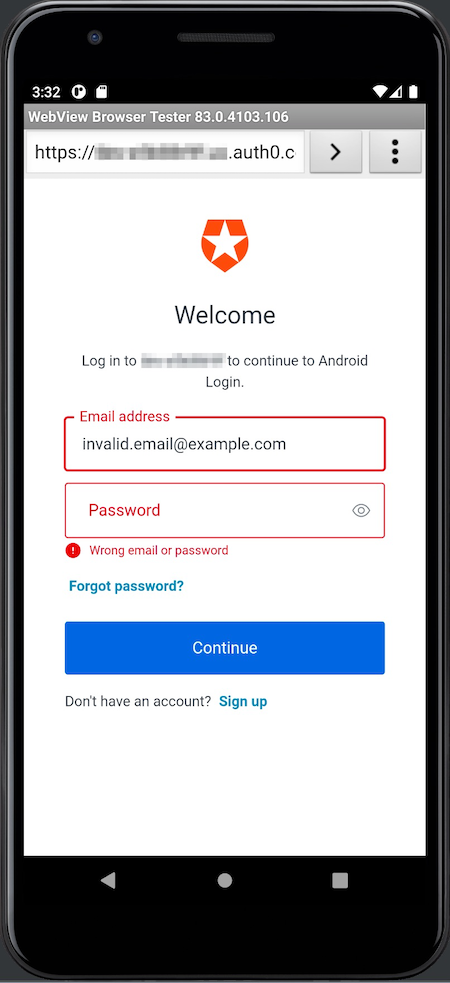
If the user enters an invalid email address/password combination, it displays an error message and gives them another chance to log in:
There are two ways to exit the Universal Login screen. There’s the “unhappy path,” where the user presses the Cancel button at the upper left corner of the screen, which dismisses the Universal Login screen and returns them to the opening screen. When the app detects that the user has canceled login, it displays a Snackbar that informs the user that they need to log in to use the app:
The “happy path” out of the Universal Login appears when the user enters a valid email address/password combination. When this happens, Auth0 authenticates the user, the embedded web view and Universal Login will disappear, and control will return to the app, which will now look like this:
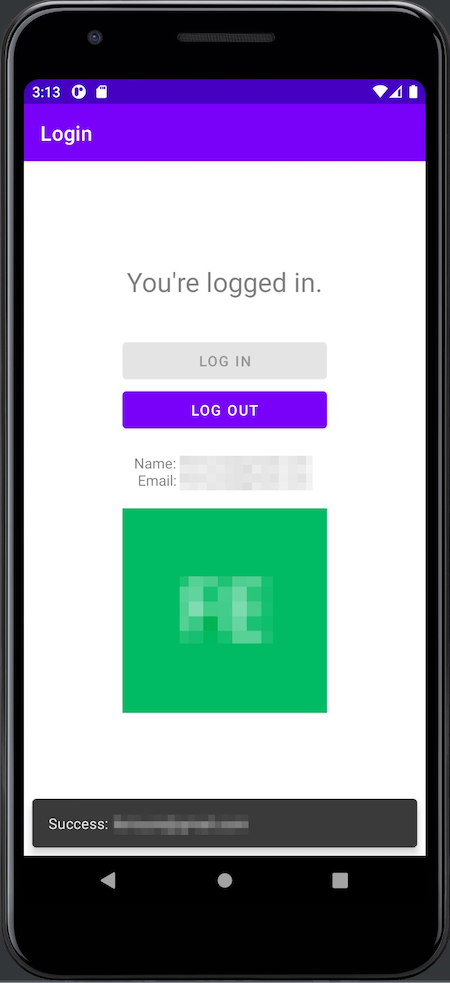
Here’s what changed after the user logged in:
- The title text at the top of the screen now says, “You’re logged in.”
- The Log In button is disabled, and the Log Out button is enabled.
- The name, email address, and photo associated with the user’s account appear onscreen.
- A Snackbar displays “Success:” and the user’s name.
As you might expect, the user logs out by pressing the Log Out button, which takes them to this screen:
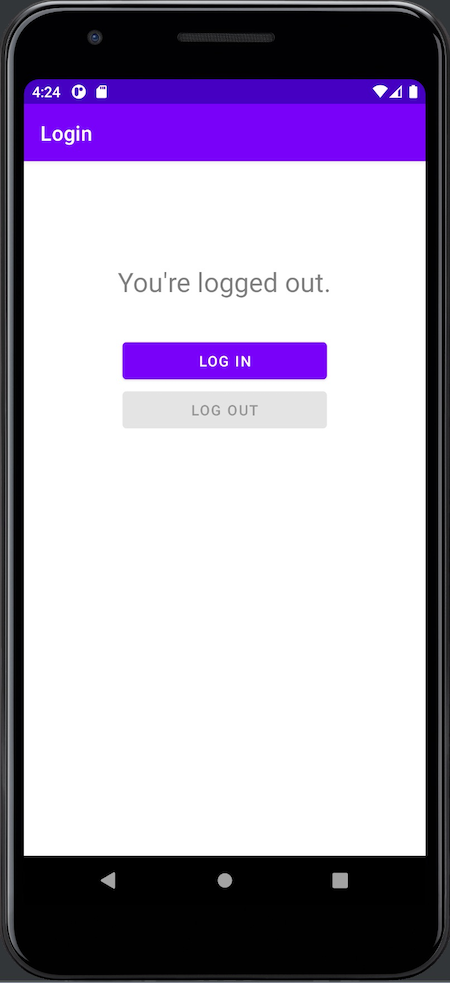
Note that:
- The text at the top of the screen says, “You’re logged out.”
- The Log In button is enabled, and the Log Out button is disabled.
- The other controls that were visible when logged in are no longer visible.
What You’ll Need
You’ll need the following to build the app:
1. An Auth0 account
The app uses Auth0 to authenticate users, meaning you need an Auth0 account. You can sign up for a free account, which lets you add login/logout to 10 applications, with support for 7,000 users and unlimited logins — plenty for your prototyping, development, and testing needs.
2. An Android development setup
To develop applications for Android, make sure you have the following, in the order given below:
- Any computer running Linux, macOS, or Windows from 2013 or later with at least 8 GB RAM. When it comes to RAM, more is generally better.
- Java SE Developer Kit (JDK), version 11 or later. You can find out which version is on your computer by opening a command-line interface and entering
java --version. - Android Studio, version 3.6 (February 2020) or later. I used the current stable version of Android Studio when writing this article: version 2021.2.1, also known as “Chipmunk.”
- At least one Android SDK (Software Development Kit) platform. You can confirm that you have one (and install one if you don’t) in Android Studio. Open Tools → SDK Manager. You’ll see a list of Android SDK platforms. Select the current SDK (Android 11.0 (R) at the time of writing), click the Apply button, and click the OK button in the confirmation dialog that appears. Wait for the SDK platform to install and click the Finish button when installation is complete.
- An Android device, real or virtual:
- Using a real device: Connect the device to your computer with a USB cable. Make sure that your device has Developer Options and USB debugging enabled.
- Using a virtual device: Using Android Studio, you can build a virtual device (emulator) that runs on your computer. Here’s my recipe for a virtual device that simulates a current-model inexpensive Android phone:
- Open Tools → AVD Manager (AVD is short for “Android Virtual Device”). The Your Virtual Devices window will appear. Click the Create Virtual Device... button.
- The Select Hardware window will appear. In the Phone category, select Pixel 3a and click the Next button.
- The System Image window will appear, and you’ll see a list of Android versions. Select R (API 30, also known as Android 11.0). If you see a Download link beside R, click it, wait for the OS to download, then click the Finish button. Then click the Next button.
- The Android Virtual Device (AVD) window will appear. The AVD Name field should contain Pixel 3a API 30; the two rows below it should have the titles Pixel 3a (a reasonable “representative” phone, released three years ago at the time of writing) and R, and in the Startup orientation section, Portrait should be selected. Click the Finish button.
- You will be back at the Your Virtual Devices window. The list will now contain Pixel 3a API 30, and that device will be available to you when you run the app.
3. A little familiarity with Android development.
If you’re new to Android development or the Kotlin programming language, you might find Android Basics in Kotlin to be a good introduction.
First Steps
Download and run the starter project
To keep this tutorial focused on implementing Auth0 authentication in an Android app, I created a starter project that you can download. It contains an activity with controls already laid out and includes all the necessary files. By starting with this project, you’ll be able to focus on adding login and logout to an app without distractions, such as building a user interface.
🛠 Download the .zip file containing the starter and completed projects for the app (257 KB) and uncompress it. This will create a get-started-android-authentication-kotlin-main folder on your local drive.
🛠 Start Android Studio and open the starter project. Do this by selecting File → Open, navigating to the Android Login (starter) folder, and clicking the Open button.
The project should take a few seconds to load into Android Studio.
🛠 Confirm that the starter project works. Select a simulator or device from the device menu and run the app. It should look like this:
Right now, the app simply displays the “Welcome” screen. You can press the buttons, but they won’t do anything yet.
Get the App’s Package Name
There’s one more task to perform before we set things up on the Auth0 side: you need to get the app’s package name, the string that uniquely identifies an Android app. For the starter project, the package name is com.auth0.androidlogin.
If you need to add authentication to an existing Android project, you can use the app’s package name in its project manifest file, which contains information for the build tools and Android operating system.
The manifest file, AndroidManifest.xml, is an XML file. You can find the app’s package name in that file’s manifest tag in its package attribute. In the example below, the package name is com.example.packagename:
<!-- Example AndroidManifest.xml file -->

<?xml version="1.0" encoding="utf-8"?>
<manifest xmlns:android="http://schemas.android.com/apk/res/android"
    xmlns:tools="http://schemas.android.com/tools"
    package="com.example.packagename">

<!-- The rest of the file goes here... -->
Remember the package name — you’ll use it in the next step! Once again, the app package name in the starter project is com.auth0.androidlogin.
Register the App in the Auth0 Dashboard
The next step is to register the app in your Auth0 dashboard. In this process, you will:
- Add the app to your Auth0 dashboard’s list of registered applications.
- Gather two pieces of information the app will need to delegate login/logout to Auth0: your tenant’s domain and the client ID that Auth0 will assign to the app.
- Provide Auth0 with the necessary callback URLs to contact the app: one to call at the end of the login process and the other to call at the end of the logout process.
🚨 To perform this step, you’ll need an Auth0 account. 🚨
🛠 If you already have an Auth0 account, log in, skip the next section, and proceed to the part titled Add the app to the Applications list.
If you don’t have an Auth0 account yet...
🛠 ...go ahead and sign up for one! It’s free, and we’ve taken great care to make the process as painless as possible.
Add the app to the Applications list
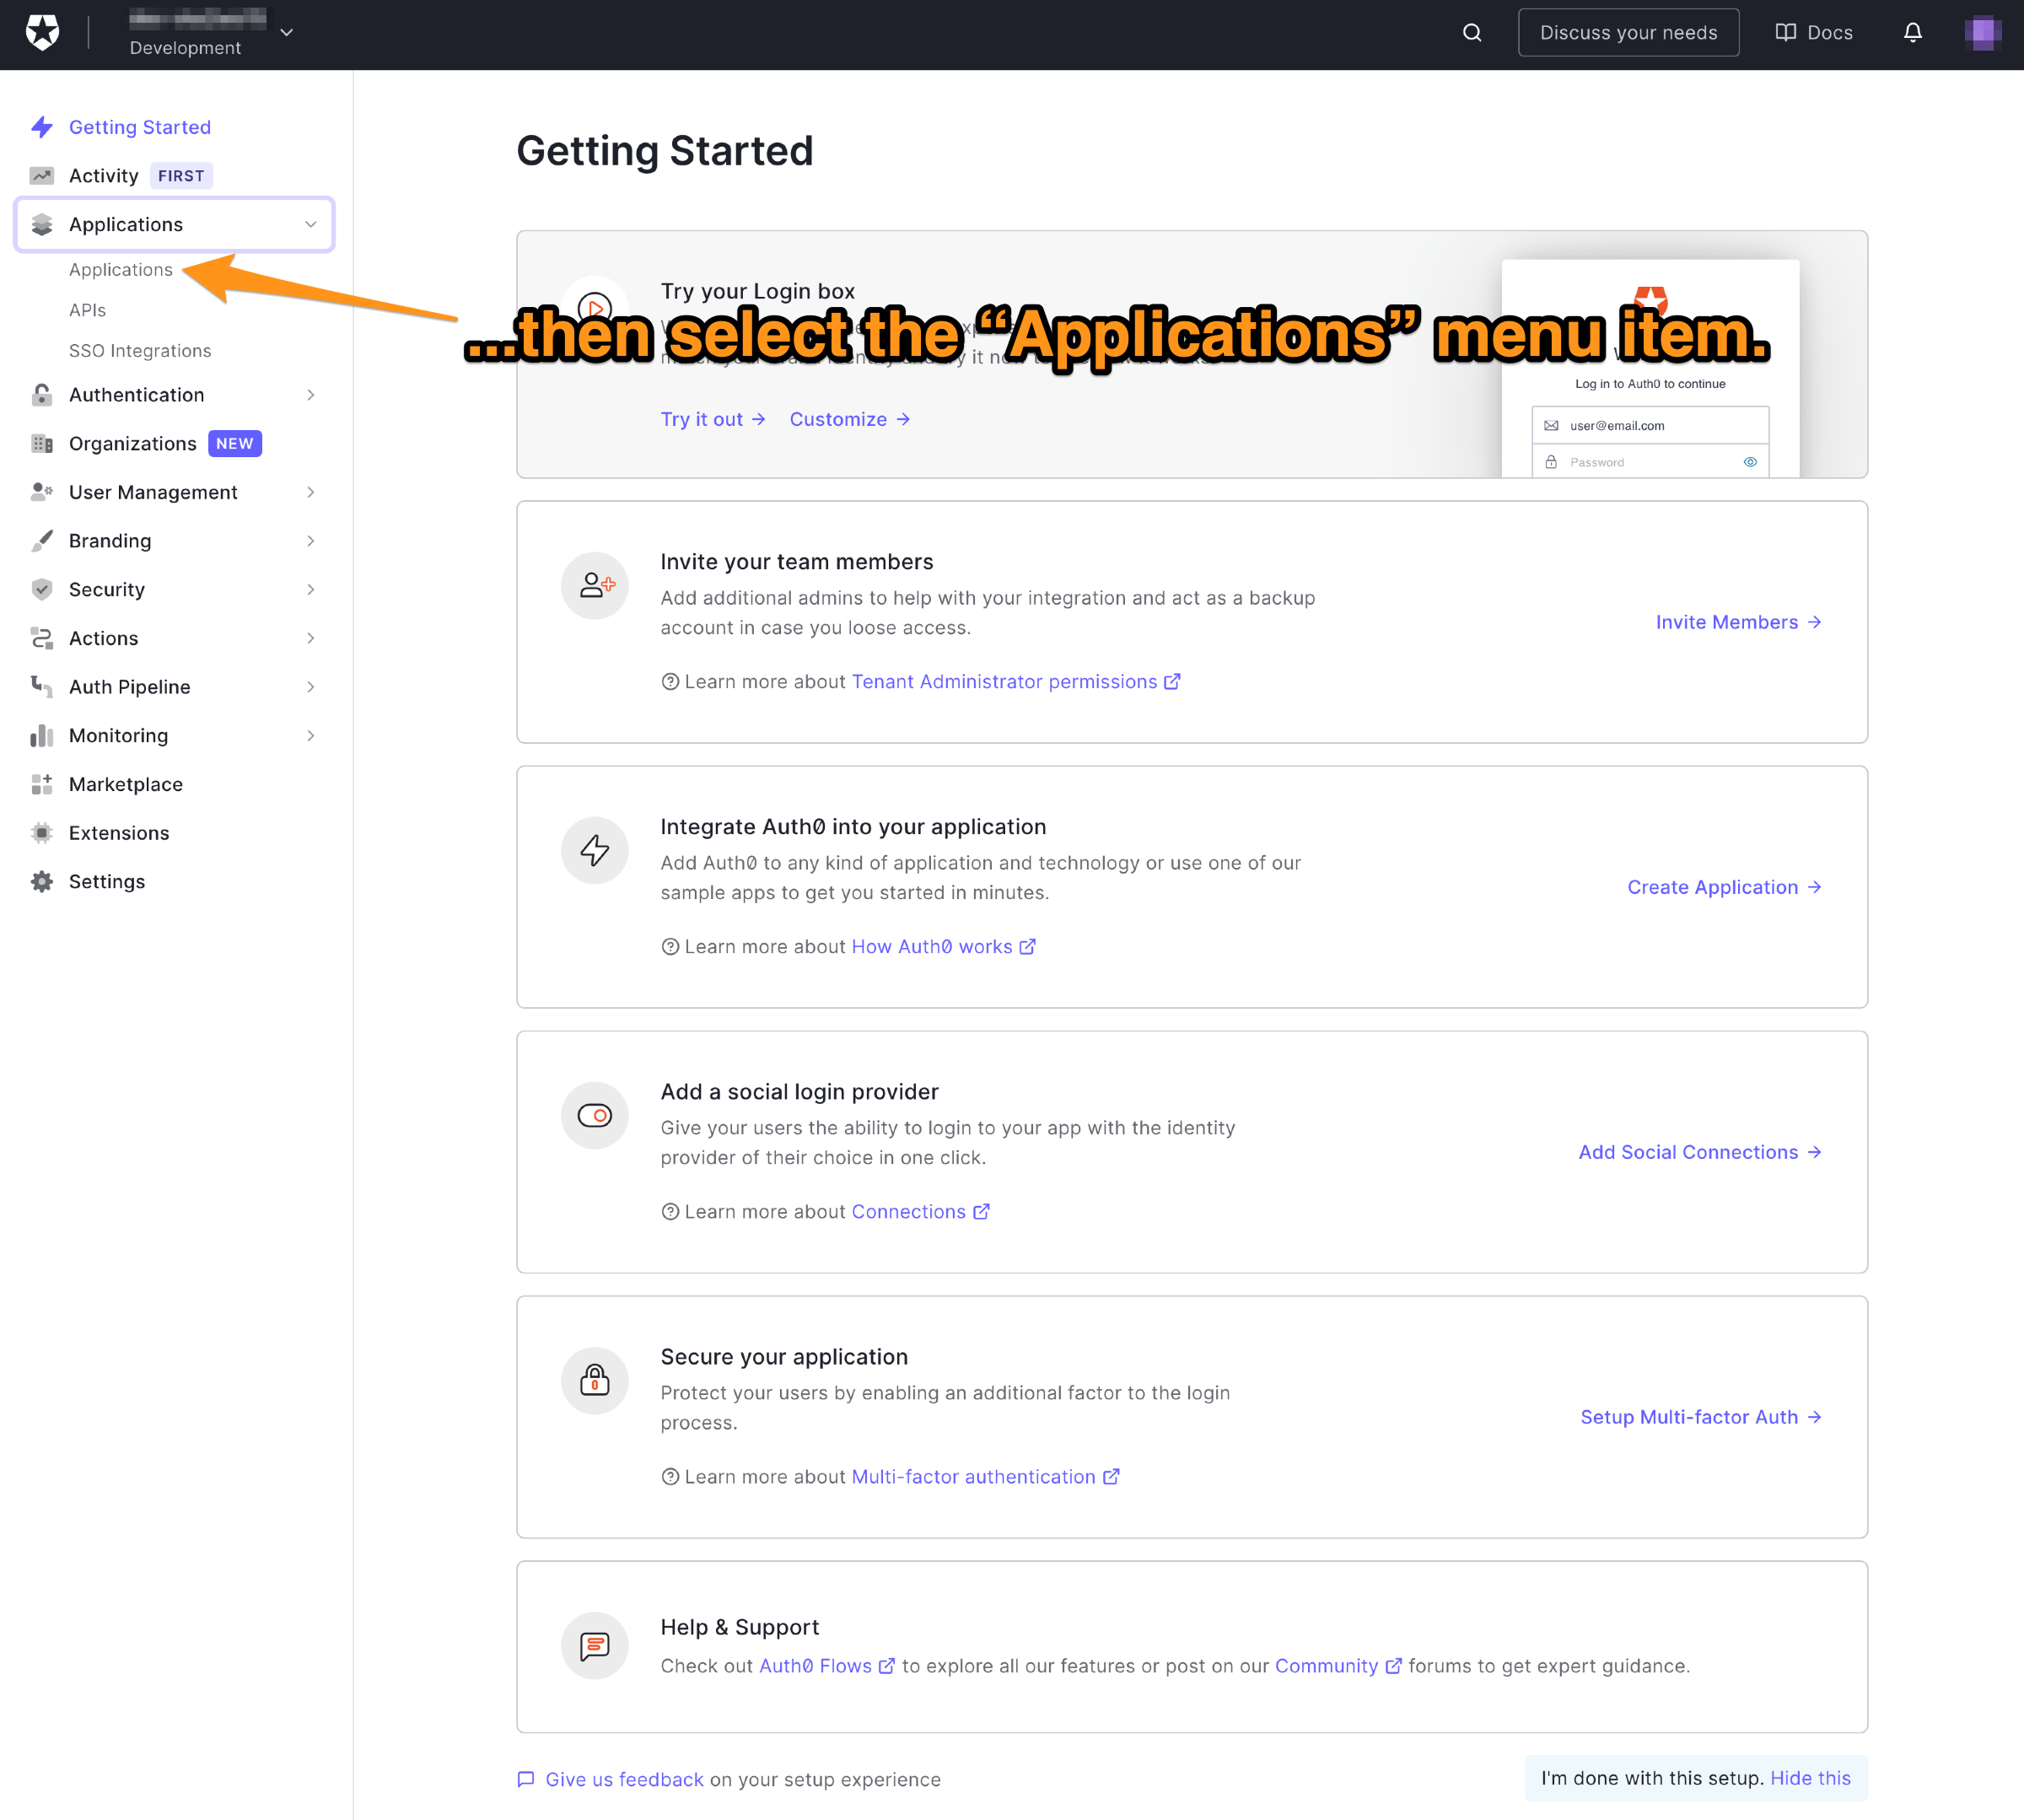
🛠 In the left side menu of the Auth0 dashboard, click on Applications:
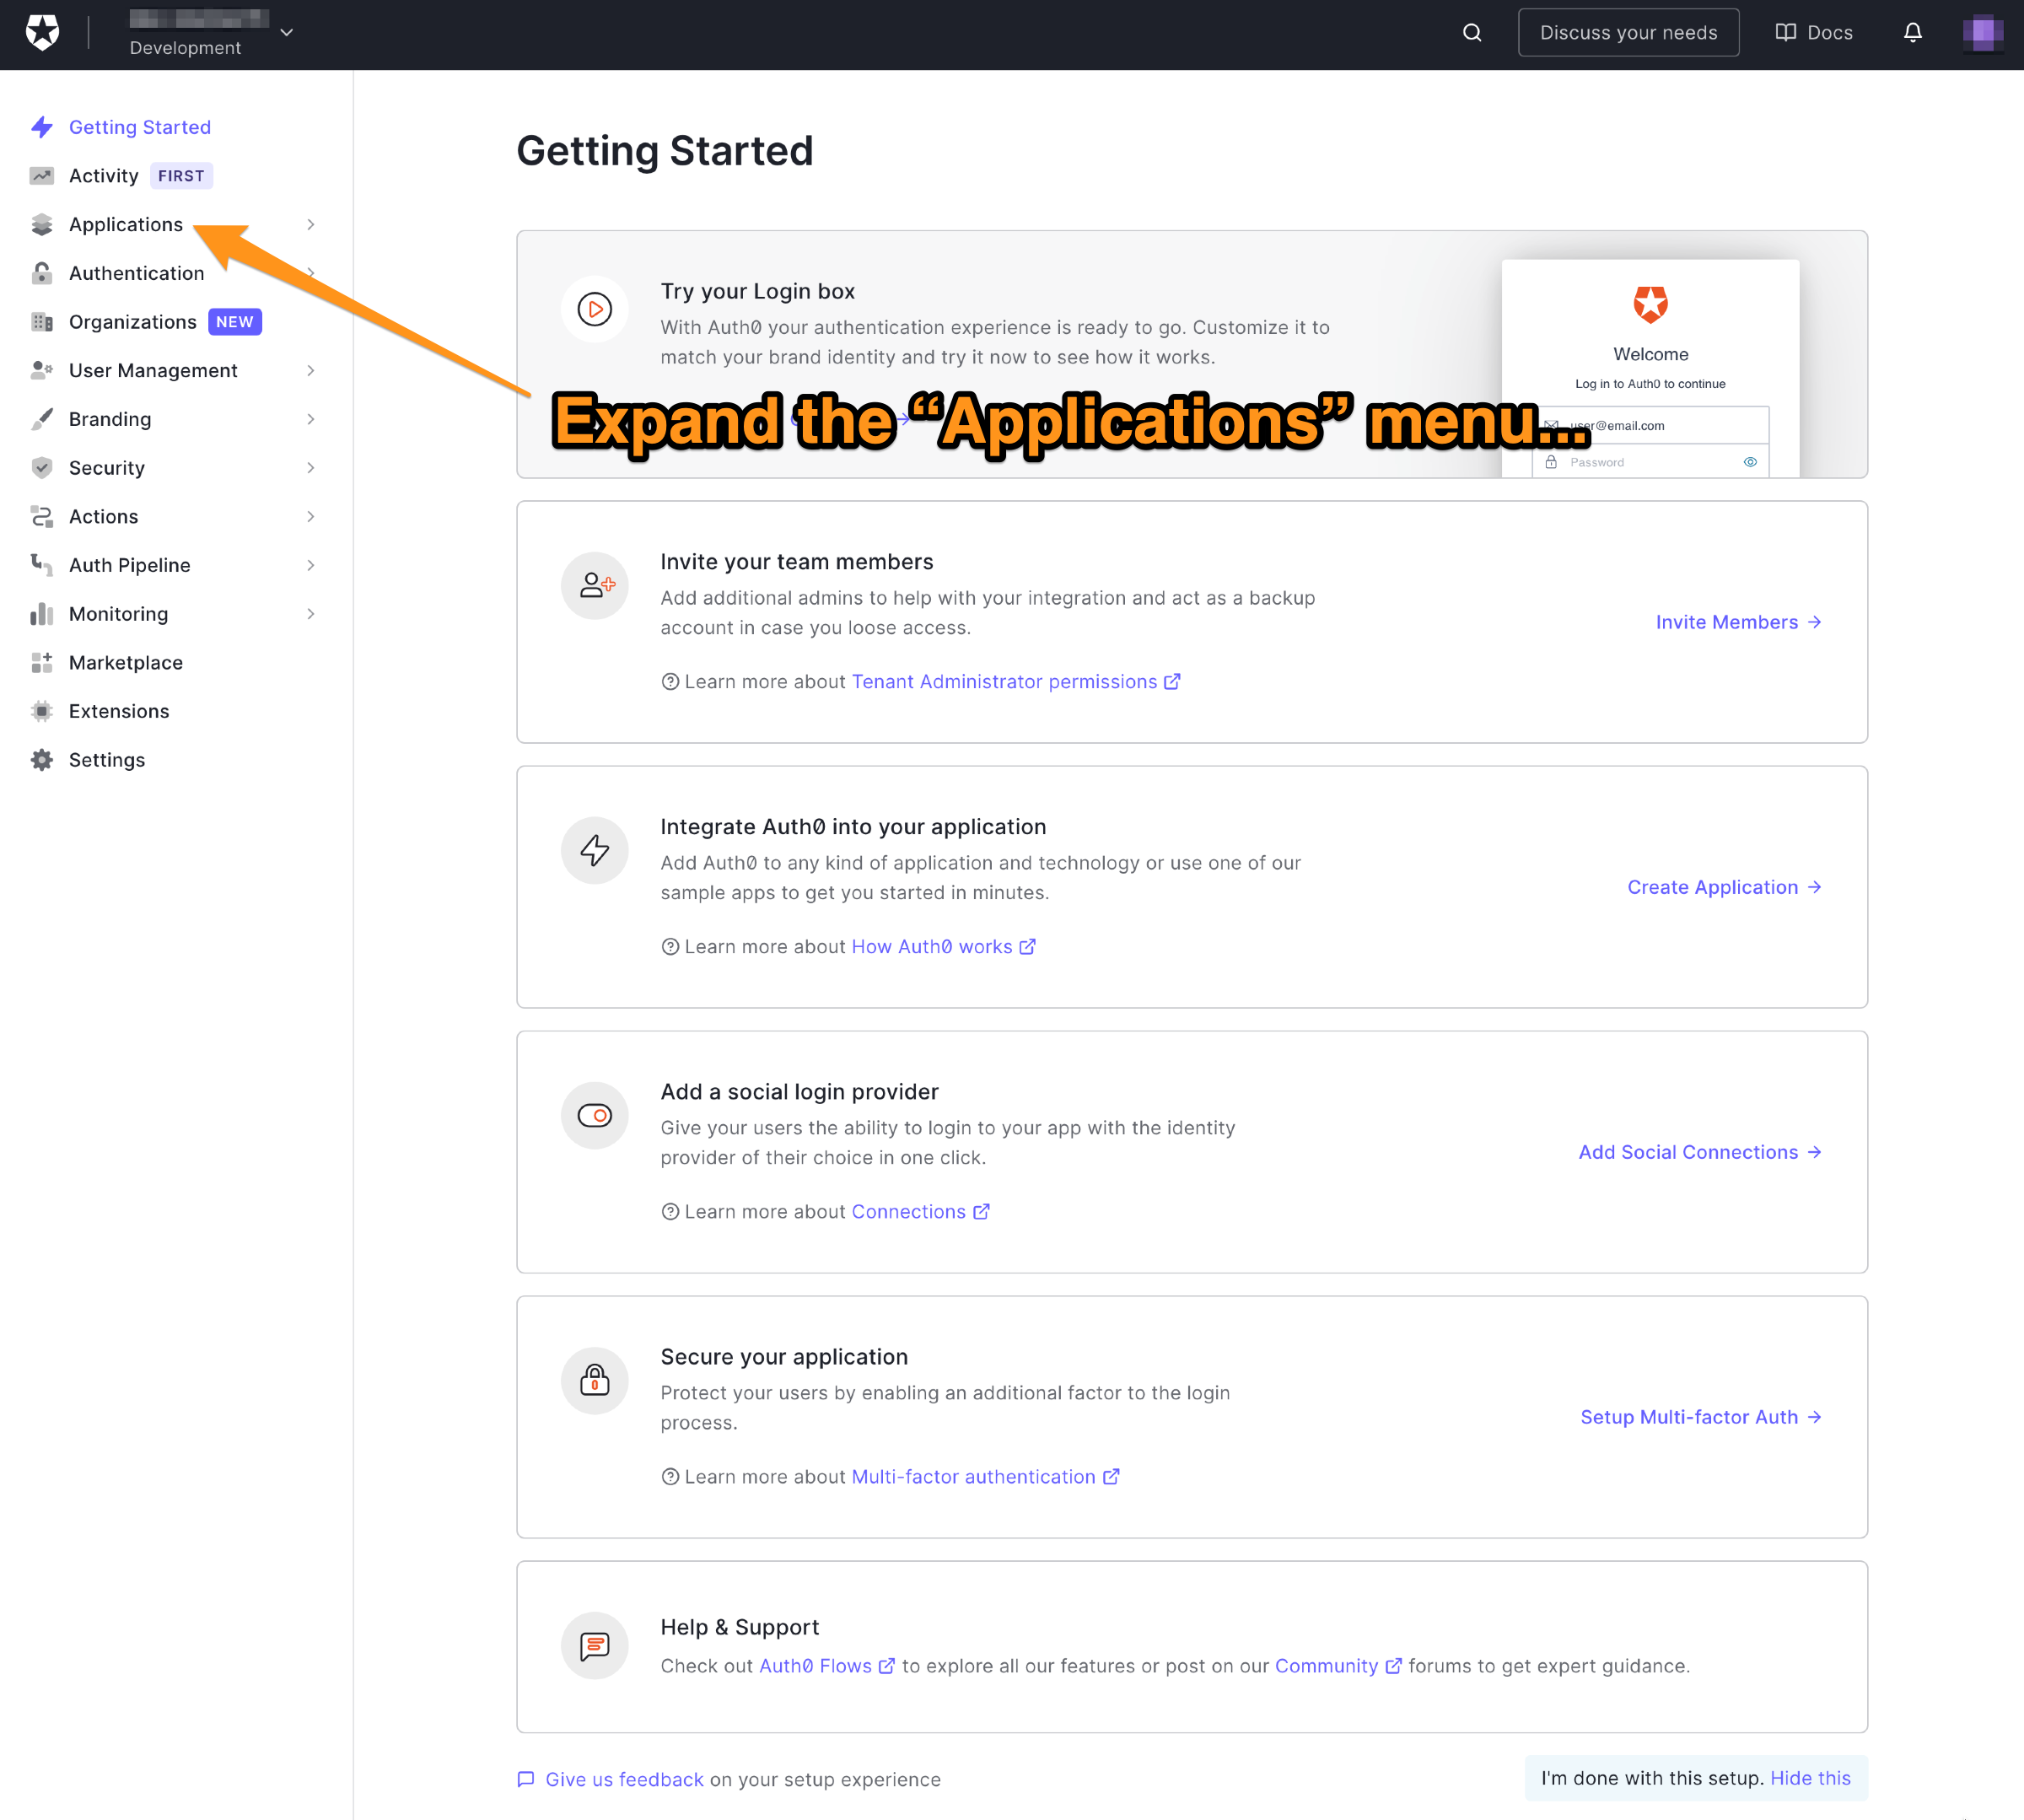
🛠 This will expand the Applications menu. Select the first item in that menu, which also has the name Applications:
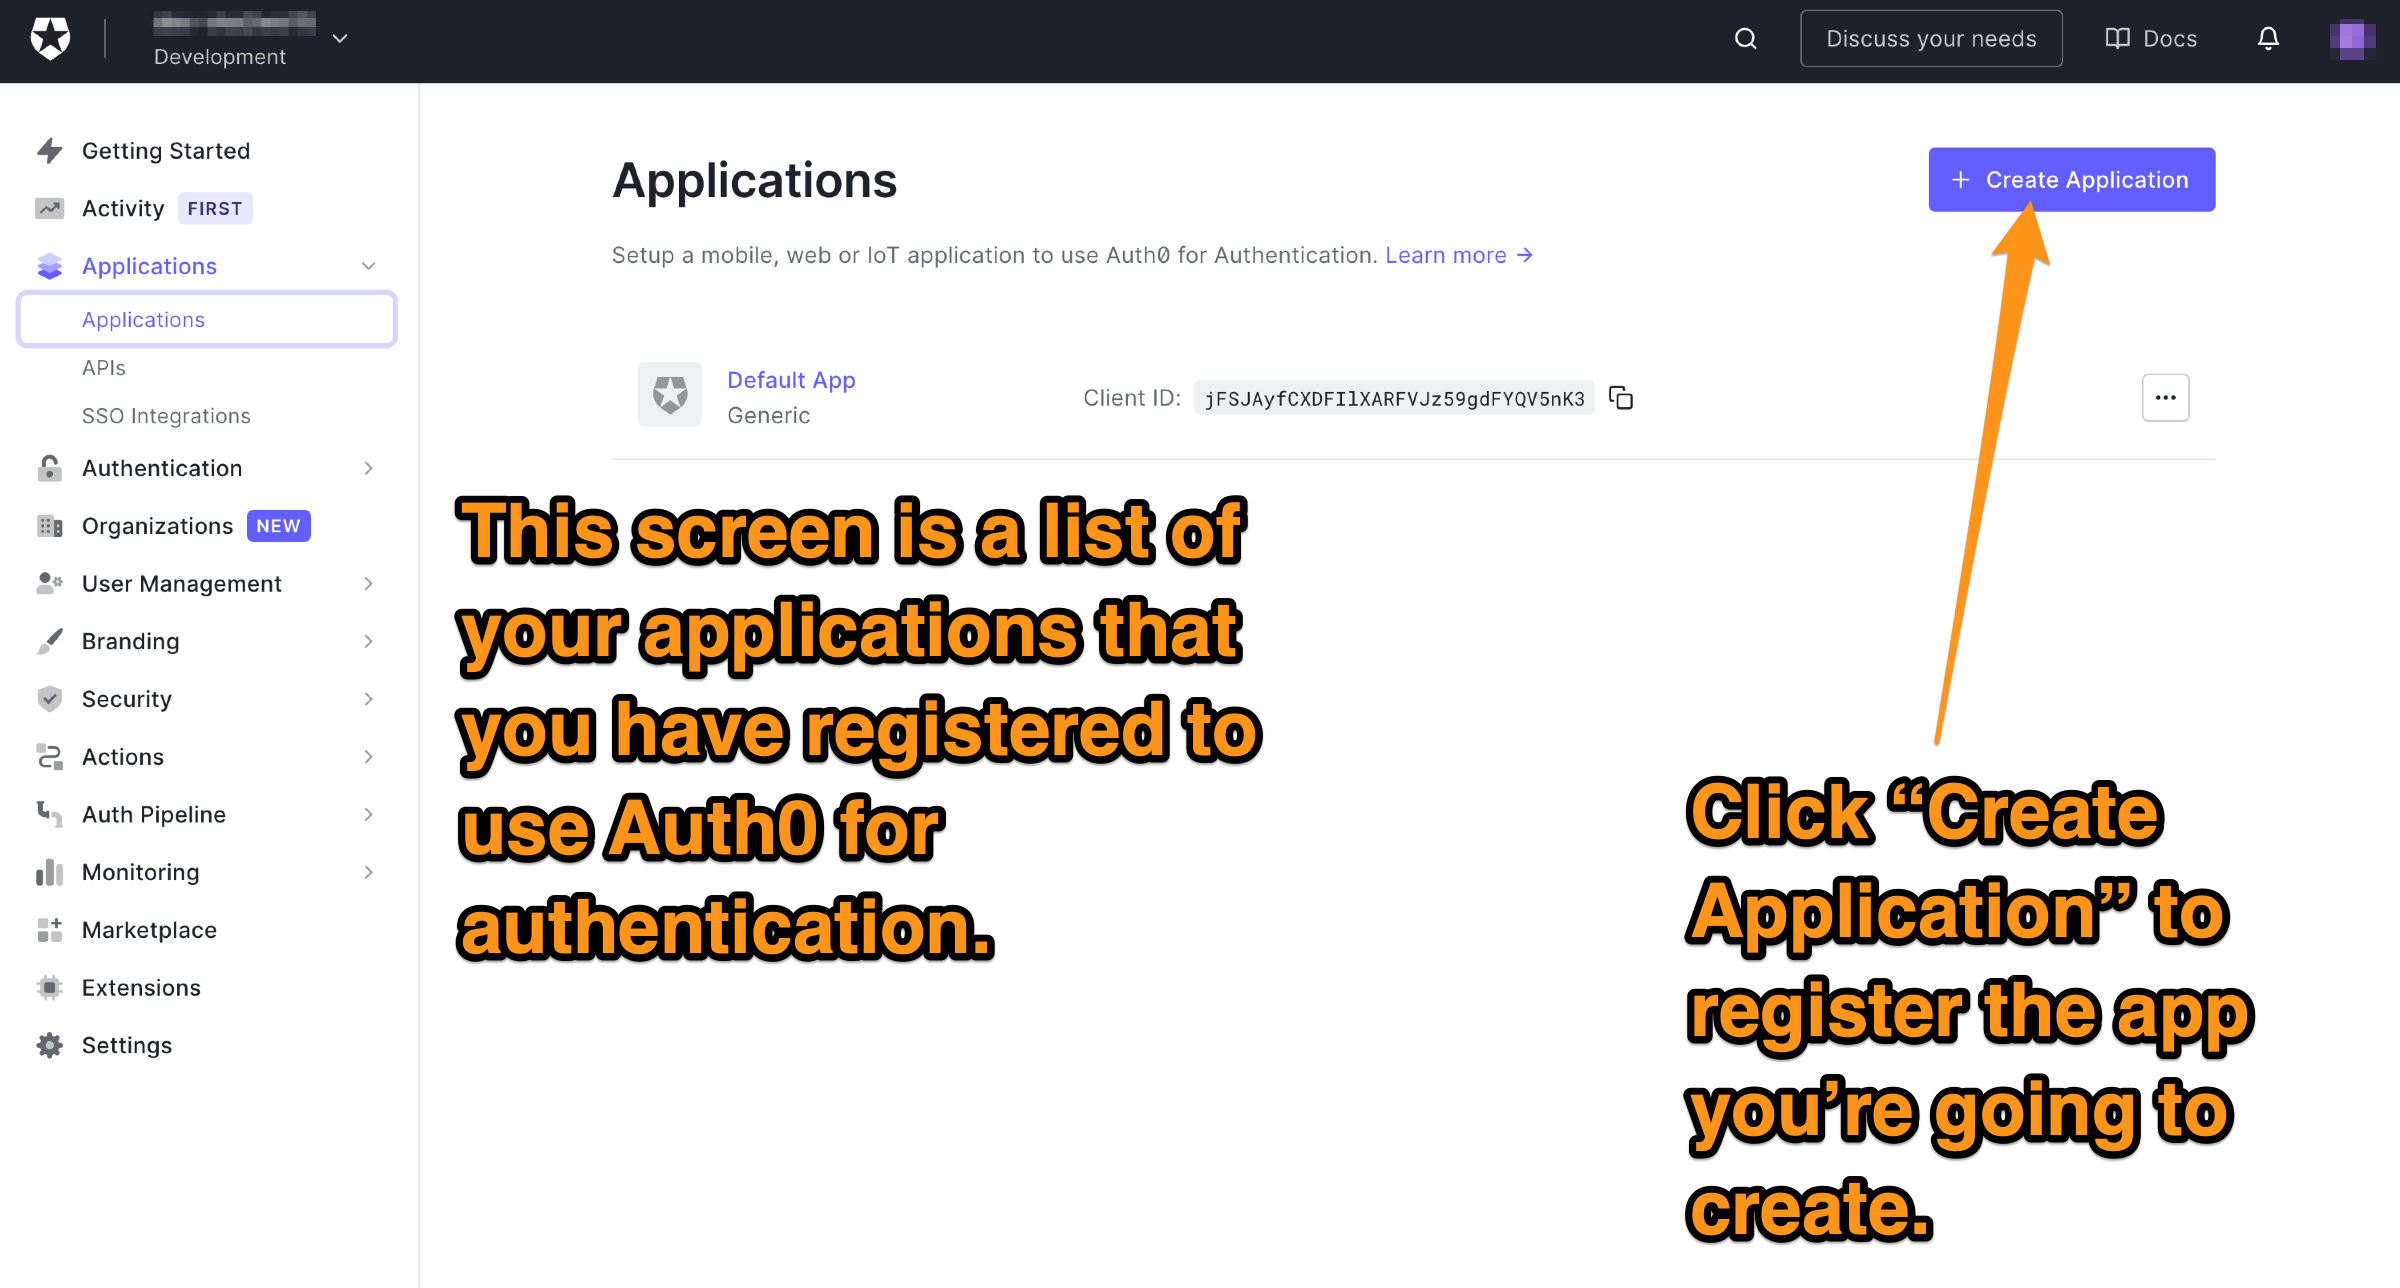
You will now be on the Applications page. It lists all the applications that you have registered to use Auth0 for authentication and authorization.
🛠 Let’s register the app. Do this by clicking the Create application button near the top right of the page:
You’ll see this dialog appear:
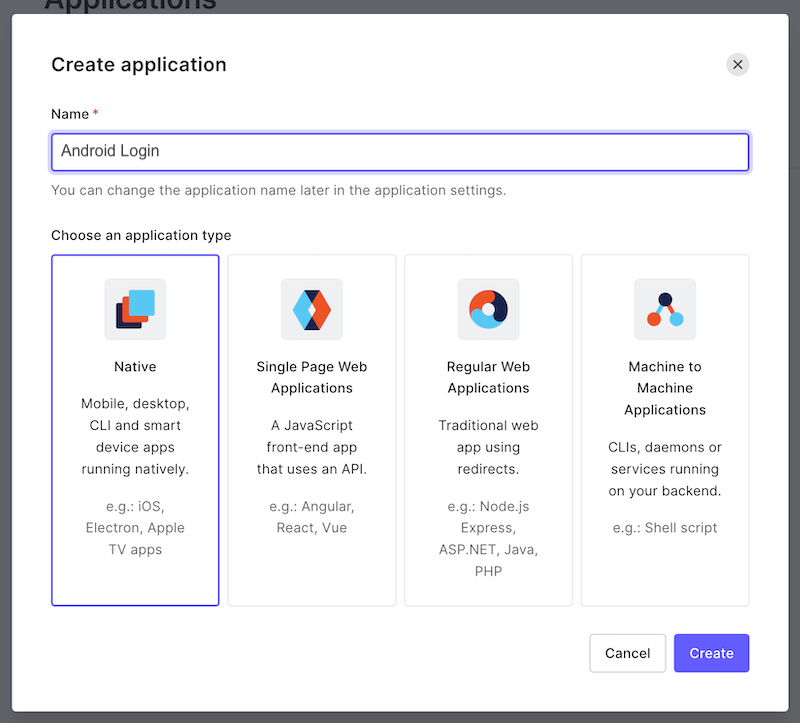
🛠 You’ll need to provide two pieces of information to continue:
- Enter a name for the app in the name field. It might be simplest to use the same name as your Android Studio project (if you’ve been following my example, use the name
Android Login). - Specify the application type, which in this case is Native.
Click Create. The Quick Start page for the app will appear:
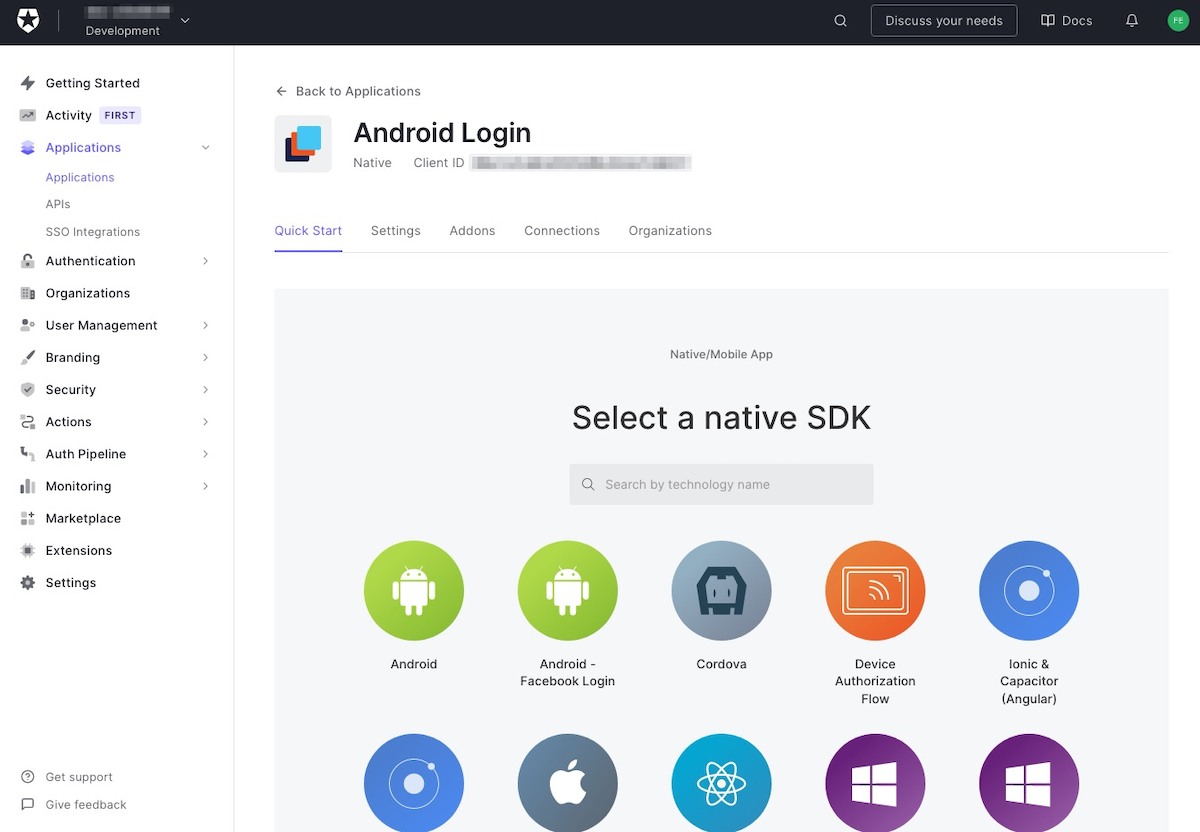
This page provides ready-made projects for several different platforms you can use as the basis for an application that delegates login/logout to Auth0. You won’t use any of them in this exercise; instead, you’ll use a couple of Auth0 libraries and write the code yourself. It’s more educational — and, more importantly, fun — that way.
🛠 Click the Settings tab, which will take you to this page:

You’re going to do two critical things on this page:
- Get information that the app needs to know about Auth0, and
- Provide information that Auth0 needs to know about the app.
Let’s take care of the first one, i.e., getting the information that the app needs, namely:
- The domain. You need it to build the URL the app will use to contact Auth0. It uniquely identifies your Auth0 tenant, a collection of applications, users, and other information you have registered with your Auth0 account.
- The client ID, the identifier that Auth0 assigned to the app. It’s how Auth0 knows which app it’s working with.
🛠 Get this information by copying the contents of the Domain and Client ID fields for later reference. You’ll enter them into your Android Studio project soon.
🛠 Scroll down the page to the Application URIs section:
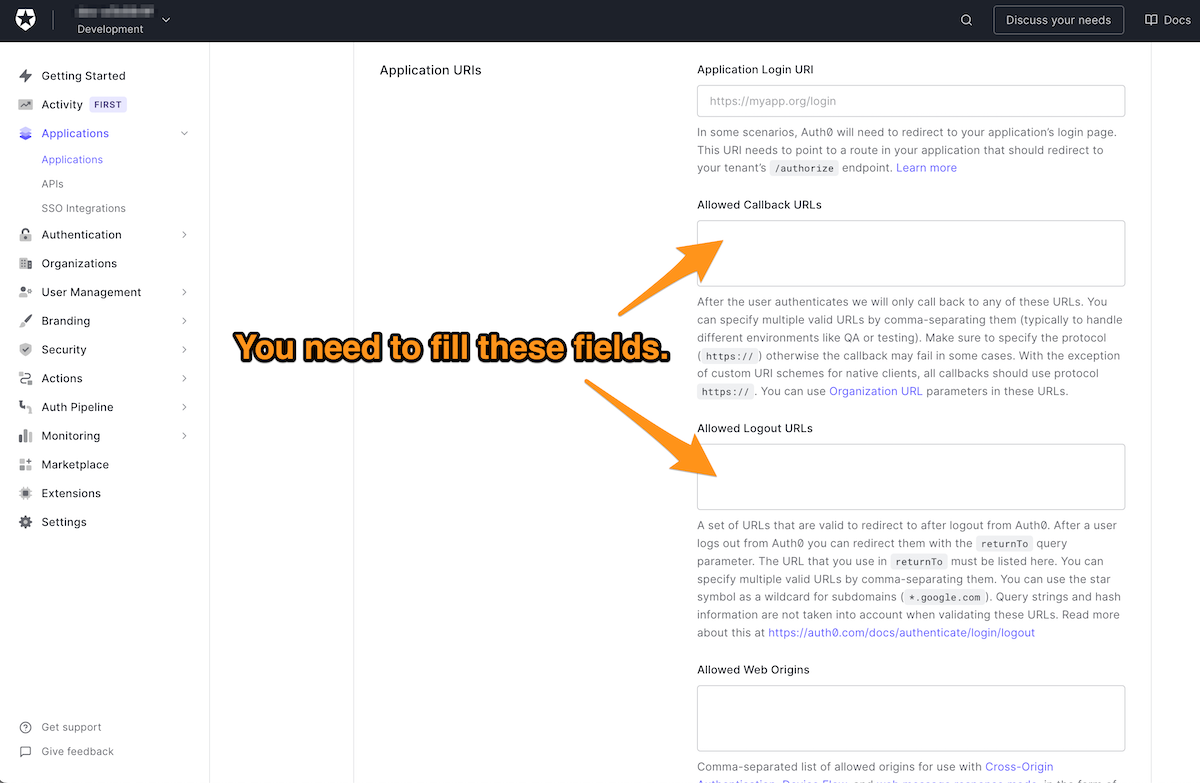
This is where you provide two pieces of information that Auth0 needs to know about the app, which are:
- A callback URL: the URL that Auth0 will redirect to after the user successfully logs in. There can be more than one of these.
- A logout URL: the URL that Auth0 will redirect to after the user logs out. There can be more than one of these.
In case you were wondering what the difference between a URI and a URL is, we have answers for you in this article: URL, URI, URN: What's the Difference?
You’re probably thinking: “Wait a minute — I’m writing an Android app. It doesn’t have web pages that you navigate to using URLs, but Views with underlying code in Controllers!”
You’re absolutely right. In the case of native applications, the callback and logout URLs are identical strings, and Auth0 sends that string to the app to inform it that a user has logged in or logged out.
The string that native Android apps use for both the callback URL and the logout URL follows this format:
{SCHEME}://{YOUR_DOMAIN}/android/{YOUR_APP_PACKAGE_NAME}/callback
🛠 To construct the string, do the following:
- Replace
{SCHEME}withapp.{SCHEME}is the URL’s protocol, and if you were writing a web app, this value would behttp, or better,https. Since this is an Android-native app, you can pick any string for this value. I like to useapp. - Replace
{YOUR_DOMAIN}with the value from the Domain field you saw earlier on this page. - Replace
{YOUR_APP_PACKAGE_NAME}with the app’s bundle identifier. If you didn’t change the package name in the starter project, this value iscom.auth0.Android-Login.
🛠 Enter the URL you just constructed into both the Allowed Callback URLs and Allowed Login URLs fields. Remember, the same URL goes into both fields.
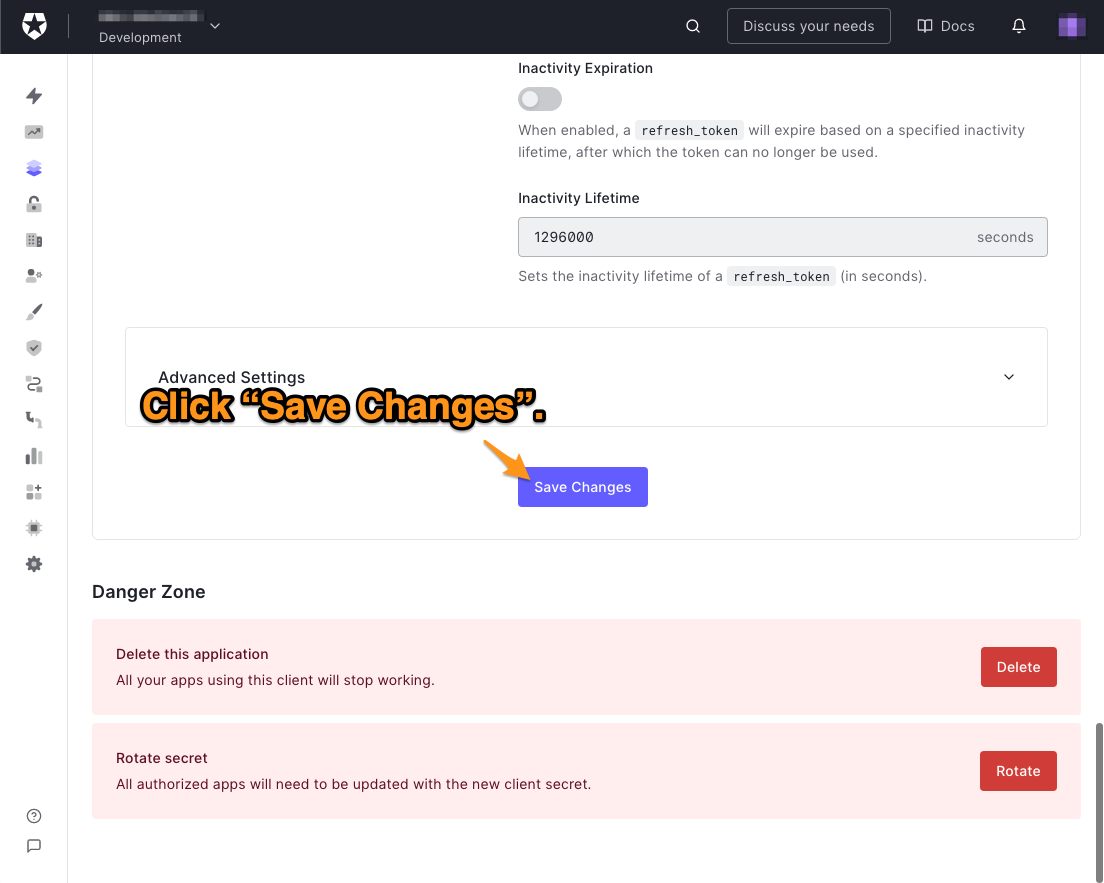
🛠 You’ve done everything you need to do on this page. Scroll down to the bottom of the page and click the Save Changes button:
Create a user if your tenant doesn’t have any
If you just created an Auth0 account, your tenant is brand new. It won’t have any user accounts, so there won’t be any way to log in to the app. If this is the case, follow these steps to create a user.
🛠 In the menu on the left side of the Auth0 dashboard, click on User Management:
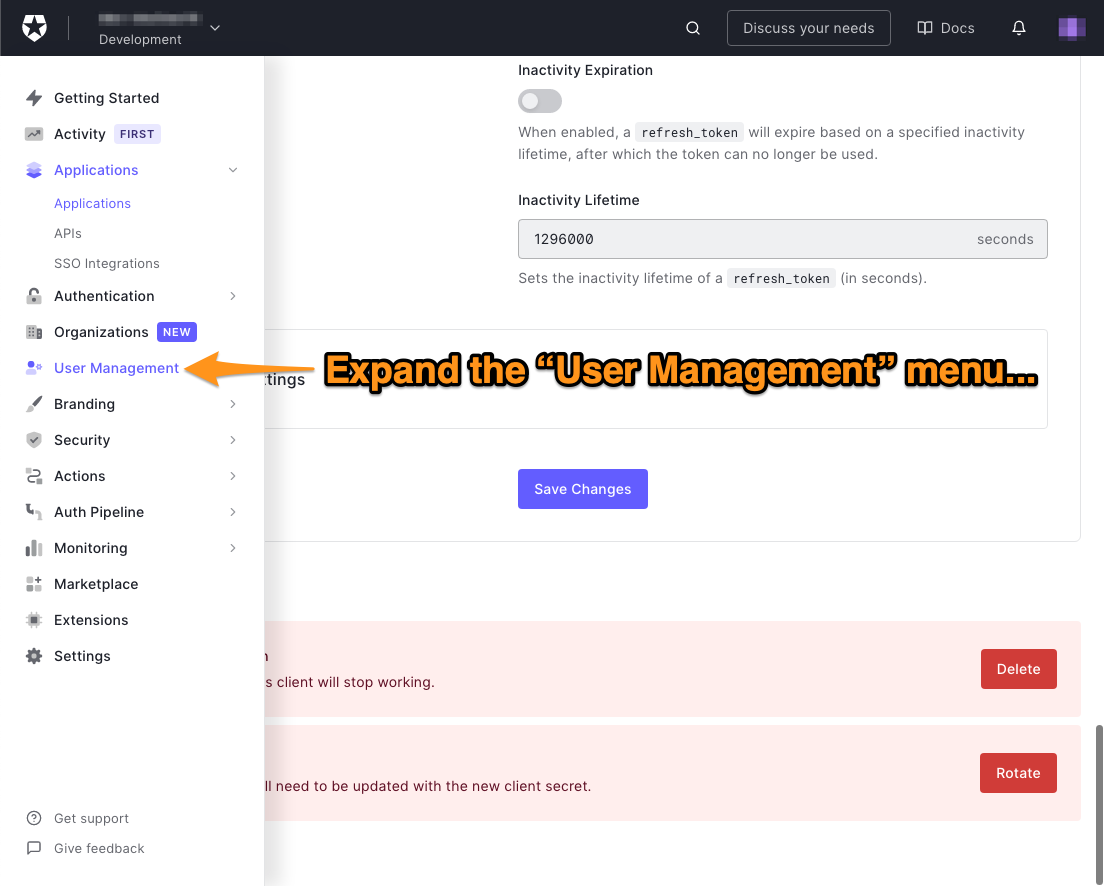
🛠 This will expand the User Management menu. Select the Users item in that menu:
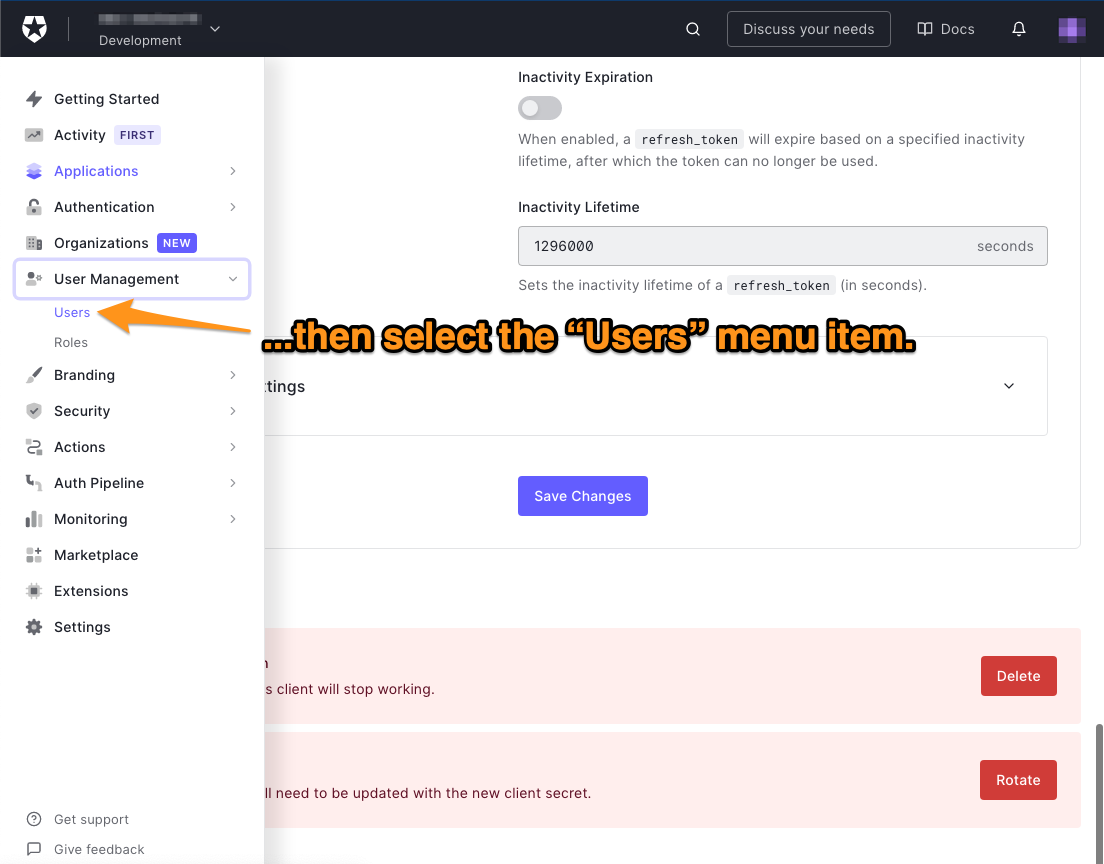
The Users page will appear. It lists all the users registered to your tenant. You’ll see the “You don’t have any users yet” message if there are no users.
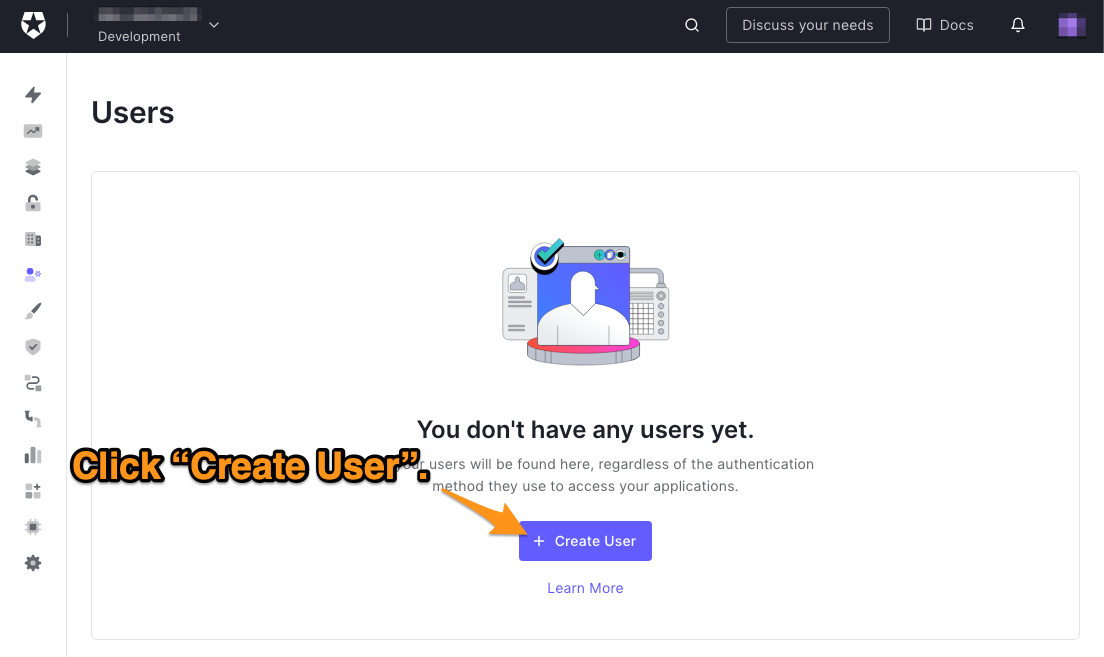
🛠 Click the Create User button to create a new user, which will make this dialog box appear:
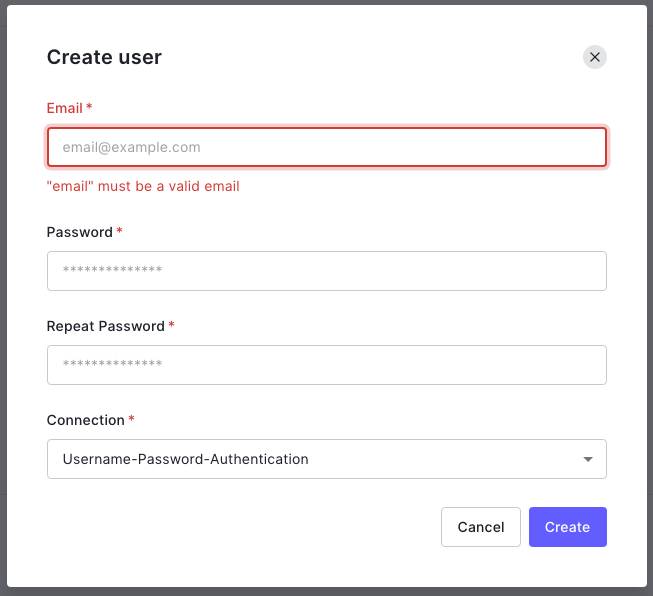
🛠 Enter an email address and password for the user. The only option for the Connection will be Username-Password-Authentication, so leave it as it is. Make a note of that email address and password — you’ll be using them to log in to the app.
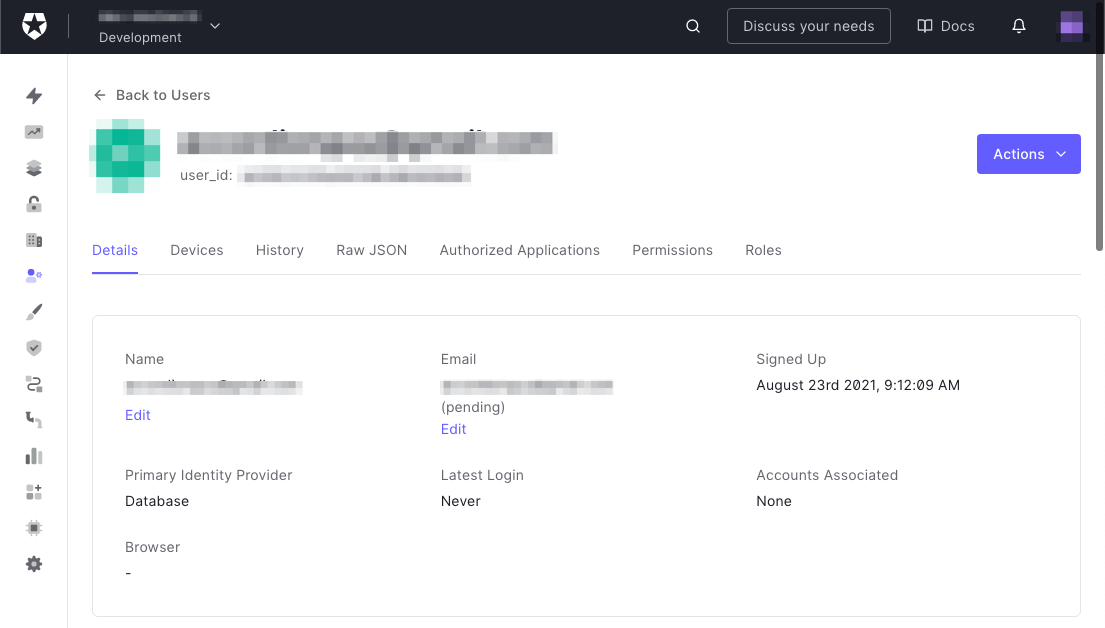
🛠 Click the Create button to create the user. The user’s Details page will appear:
That takes care of all the setting up you need to do within the Auth0 dashboard. It’s time to go back to Android Studio and the app.
Configure the App
Before you can start coding, you’ll need to configure the app to communicate with Auth0.
Enable the app to respond to the callback and logout URLs
Earlier in this exercise, you created the callback and logout URLs that Auth0 uses to notify the app that a user has logged in or logged out. In this step, you’ll make it possible for the app to respond to these URLs.
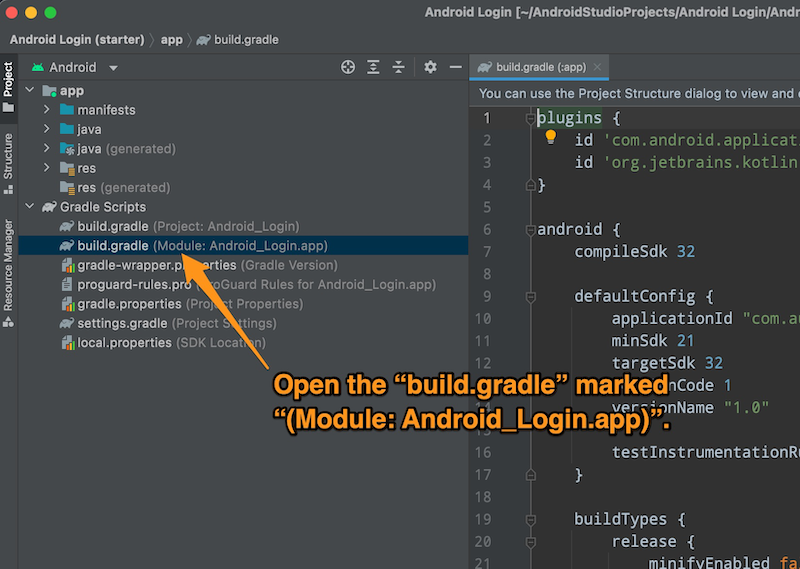
🛠 Open build.gradle for the app, and not the project. In the list of files in Android Studio’s Project tab, open build.gradle (Module: Android_Login.app), located in the Gradle Scripts folder:
🛠 Update the android block of build.gradle (Module: Android_Login.app) to the following. I’ve highlighted where you need to make changes with New code comments:
// Gradle Scripts/build.gradle (Module: Android_Login.app)

// (Other code here)

android {
    compileSdk 32

    defaultConfig {
        applicationId "com.auth0.androidlogin"
        minSdk 21
        targetSdk 32
        versionCode 1
        versionName "1.0"
        // New code 👇🏽
        manifestPlaceholders = [auth0Domain: "@string/com_auth0_domain", auth0Scheme: "@string/com_auth0_scheme"]
        // New code 👆🏽

        testInstrumentationRunner "androidx.test.runner.AndroidJUnitRunner"
    }

    // (Other options here)
}

// (The rest of the file is here)
You just added manifest placeholders to the file. These variables within the manifest file define an intent filter, which determines how the app responds to intents. The app will interpret the callback and logout URLs as intents.
Install the Auth0 libraries
To make the app work with Auth0, you’ll need to install two libraries:
- The Auth0.Android package. This is a collection of libraries that enables Android apps to use Auth0’s APIs, including the Authentication API, which you’ll use to implement login and logout in your app.
- The JWTDecode.Android library. The app will use it to decode the user’s identity information, which is in JSON Web Token (JWT) format.
🛠 Install the libraries by adding two new items to the dependencies block in build.gradle (Module: Android_Login.app) as shown below:
// Gradle Scripts/build.gradle (Module: Android_Login.app)

// (Other code here)

dependencies {
    implementation 'androidx.core:core-ktx:1.7.0'
    implementation 'androidx.appcompat:appcompat:1.4.2'
    implementation 'com.google.android.material:material:1.6.1'
    implementation 'androidx.constraintlayout:constraintlayout:2.1.4'
    testImplementation 'junit:junit:4.13.2'
    androidTestImplementation 'androidx.test.ext:junit:1.1.3'
    androidTestImplementation 'androidx.test.espresso:espresso-core:3.4.0'

    // New code 👇🏽
    // Auth0 dependencies
    implementation 'com.auth0.android:auth0:2.7.0'
    implementation 'com.auth0.android:jwtdecode:2.0.1'
    // New code 👆🏽
}
After making these changes to the Gradle file, you’ll need to synchronize the project with the new build configuration you defined. Android Studio will notify you that it detected the changes to the Gradle file and present you with the option to synchronize the project with the updated file.
🛠 Click the Sync Now link that appears in the notification near the top of the Android Studio window:
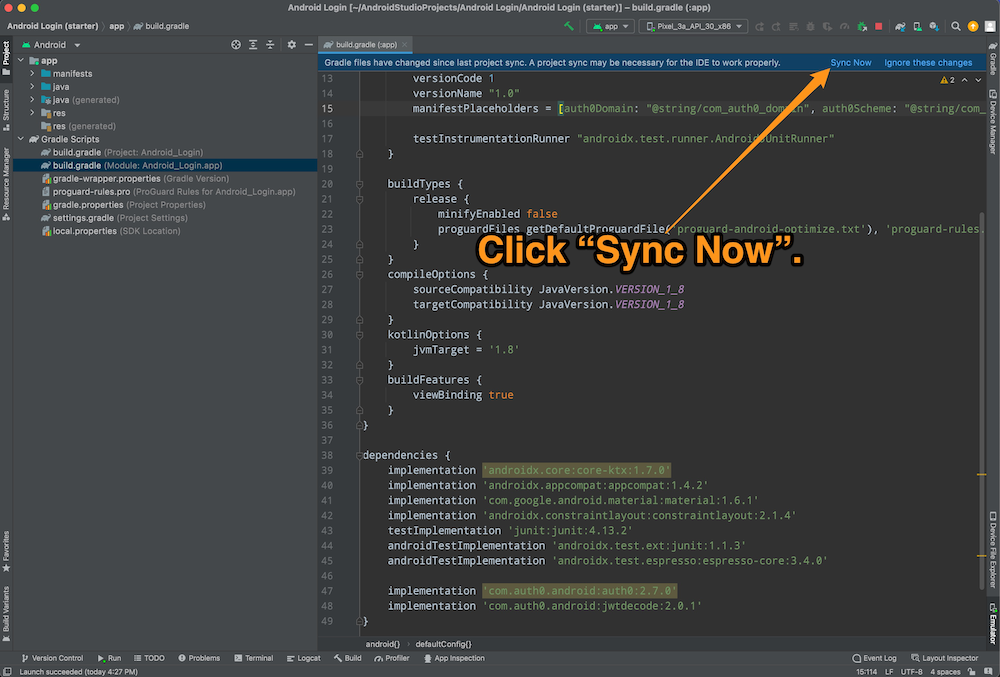
Android Studio will display the message “Gradle project sync in progress...” for a few moments, and then the sync will complete.
Store the domain and client ID in the Auth0 resource file
Earlier in this exercise, you registered the app in the Auth0 dashboard, which gives Auth0 the information it needs to interact with the app. It’s time to do the same thing on the app side of the equation and give it the information it needs to interact with Auth0, namely:
- Your tenant’s domain, which the app will use to determine the URL it will use to contact Auth0.
- The app’s client ID, which the app will use to identify itself to Auth0.
You should store this information in a string resource file, the preferred place to store text strings for Android projects. We’ll follow the recommended practice of using a separate string resource file named auth0.xml to store Auth0-specific strings. The starter project already has an auth0.xml file to save time.
🛠 Open auth0.xml, located inside the app/res/values folder. It should contain the following:
<!-- app/res/values/auth0.xml -->

<?xml version="1.0" encoding="utf-8"?>
<resources>

    <!--
    Auth0 identifiers and settings
    ==============================
    These values are required to connect to Auth0 for authorization,
    which is why we're storing them in their own string resource file.
    -->

    <string name="com_auth0_scheme">TODO: Enter the scheme for your app’s callback and logout URLs here.</string>

    <string name="com_auth0_domain">TODO: Enter your tenant’s domain name here.</string>
    <string name="com_auth0_client_id">TODO: Enter your app’s client ID here.</string>

</resources>
🛠 Change the contents of the <string name="com_auth0_scheme"> tag from TODO: Enter the scheme for your app’s callback and logout URLs here. to the scheme for these URLs, which should be app.
🛠 Change the contents of the <string name="com_auth0_domain"> tag from TODO: Enter your tenant’s domain name here. to your tenant’s domain, which you copied from the Settings page of the Auth0 dashboard.
🛠 Change the contents of the <string name="com_auth0_client_id"> tag from TODO: Enter your app’s client ID here. to your app’s client ID, which you copied from the Settings page of the Auth0 dashboard.
Enable the app to access the internet
The login/logout process requires the app to communicate with Auth0, and it needs permission to access the internet. You specify this permission in the app’s manifest file.
🛠 Open the app’s manifest file, AndroidManifest.xml, located in the app/manifests folder, and add a <uses-permission> XML element as shown below:
<!-- app/manifests/AndroidManifest.xml -->

<?xml version="1.0" encoding="utf-8"?>
<manifest xmlns:android="http://schemas.android.com/apk/res/android"
    xmlns:tools="http://schemas.android.com/tools"
    package="com.auth0.androidlogin">

    <!-- New code 👇🏽 -->
    <uses-permission android:name="android.permission.INTERNET" />
    <!-- New code 👆🏽 -->

    <application
        android:allowBackup="true"
        android:dataExtractionRules="@xml/data_extraction_rules"
        android:fullBackupContent="@xml/backup_rules"
        android:icon="@mipmap/ic_launcher"
        android:label="@string/app_name"
        android:roundIcon="@mipmap/ic_launcher_round"
        android:supportsRtl="true"
        android:theme="@style/Theme.AndroidLogin"
        tools:targetApi="31">
        <activity
            android:name=".MainActivity"
            android:exported="true">
            <intent-filter>
                <action android:name="android.intent.action.MAIN" />

                <category android:name="android.intent.category.LAUNCHER" />
            </intent-filter>
        </activity>
    </application>

</manifest>
Define a Data Class to Represent the User
What happens when the user logs in
All the necessary setup on both the Auth0 and app sides is complete. We can now discuss the login process.
When the user presses the Log In button, the app delegates control to Auth0 by opening an embedded web view that displays the Universal Login screen.
Auth0 returns control to the app when the Universal Login screen is closed. As I mentioned earlier, there are two ways to make this happen:
- The user presses the Cancel button. This dismisses the Universal Login screen, and the app receives a notification that the user canceled the login process.
- The user enters a username and password combination that Auth0 recognizes. The app receives a notification that the user has successfully logged in. It also gets a
Credentialsobject, whose properties contain tokens — digital information about who the user is and what they’re allowed to do.
This app will use only one Credentials property to keep things simple: the ID token. An ID token is proof that a user has been authenticated. It contains information about the user and what happened during authentication. The app will extract the user’s name, email address, and picture URL from the ID token and display them onscreen when the user is logged in.
If you’d like to find out more about ID tokens as well as their counterpart, access tokens, see our article, ID Token and Access Token: What's the Difference?, which is part of our series, The Confused Developer.
The ID token comes in the form of a JSON Web Token, or JWT for short (you may hear some people pronounce “JWT” as “jot”). JWTs are signed and encoded JSON objects used to send information securely.
You can experiment with JWTs at jwt.io. This site features a JWT debugger that lets you interactively encode and decode JWTs.
Implement the User data class
The app needs to decode and store the ID token’s contents. We’ll give the app that capability by implementing the User data class. Given an ID token in JWT format, it decodes the token and creates an instance that exposes the user information through its properties.
🛠 Update the contents of User (located in app/java/com.auth0.androidlogin) to the following:
// app/java/com.auth0.androidlogin/User

package com.example.login

import com.auth0.android.jwt.JWT


data class User(val idToken: String? = null) {

    var id = ""
    var name = ""
    var email = ""
    var emailVerified = ""
    var picture = ""
    var updatedAt = ""

    // New code 👇🏽
    init {
        try {
            // Attempt to decode the ID token.
            val jwt = JWT(idToken ?: "")

            // The ID token is a valid JWT,
            // so extract information about the user from it.
            id = jwt.subject ?: ""
            name = jwt.getClaim("name").asString() ?: ""
            email = jwt.getClaim("email").asString() ?: ""
            emailVerified = jwt.getClaim("email_verified").asString() ?: ""
            picture = jwt.getClaim("picture").asString() ?: ""
            updatedAt = jwt.getClaim("updated_at").asString() ?: ""

        } catch (e: com.auth0.android.jwt.DecodeException) {
            // The ID token is NOT a valid JWT,
            // so leave the user properties as empty strings.
        }
    }
    // New code 👆🏽
}
User does the following:
- It imports
com.auth0.android.jwt.JWT, the library for decoding JWTs that comes as part of the Auth0.Android package. - It also defines a set of string properties to hold the user information that it will extract from the ID token. These properties are:
id: A string that uniquely identifies the user.name: The user’s full name.email: The user’s email address.emailVerified:trueif the user has verified their email with Auth0.picture: The URL for the user’s picture.updatedAt: The date when the user’s information was last updated.
- It attempts to decode the given ID token. If successful, it extracts the user information from the token and uses it to populate the
Userobject properties. TheUserobject properties remain blank if it can’t decode the token (probably because it’s invalid).
Implement Login
Now that we have something that can decode an ID token and store the user information it contains, we can implement login (and, eventually, logout).
This is a single-screen app, so you’ll implement login (and logout) in the app’s single activity, MainActivity.
Set up MainActivity
🛠 Open MainActivity (located in app/java/com.auth0.androidlogin) and update its import statements to the following:
// app/java/com.auth0.androidlogin/MainActivity

// (Other code here)

import androidx.appcompat.app.AppCompatActivity
import android.os.Bundle
import androidx.core.view.isVisible
// New code 👇🏽
import com.auth0.android.Auth0
import com.auth0.android.authentication.AuthenticationException
import com.auth0.android.callback.Callback
import com.auth0.android.provider.WebAuthProvider
import com.auth0.android.result.Credentials
// New code 👆🏽
import com.google.android.material.Snackbar.Snackbar
import com.example.login.databinding.ActivityMainBinding

// (The rest of the file is here)
🛠 Add properties to the App and user status and Auth0 data sections of the MainActivity class so that they appear as follows:
// app/java/com.auth0.androidlogin/MainActivity

// (Other code here)

    // App and user status
    // New code 👇🏽
    private lateinit var account: Auth0
    private var appJustLaunched = true
    private var userIsAuthenticated = false
    // New code 👆🏽

    // Auth0 data
    // New code 👇🏽
    private var user = User()
    // New code 👆🏽

// (The rest of the file is here)
The properties you just added are:
account: An object containing account information about the app, including the app’s client ID and its tenant’s domain.appJustLaunched:trueonly immediately when the app is launched, after which its value immediately will becomefalse. You’ll use this property to display a welcome message at the top of the screen immediately after the user launches the app.userIsAuthenticated:trueif a user is logged in,falseotherwise.user: An instance of theUserclass containing identity information about the current user.
🛠 Initialize MainActivity by adding code to its onCreate() method as shown below:
// app/java/com.auth0.androidlogin/MainActivity

// (Other code here)

    override fun onCreate(savedInstanceState: Bundle?) {
        super.onCreate(savedInstanceState)

        binding = ActivityMainBinding.inflate(layoutInflater)
        setContentView(binding.root)

        // New code 👇🏽
        account = Auth0(
            getString(R.string.com_auth0_client_id),
            getString(R.string.com_auth0_domain)
        )

        binding.buttonLogin.setOnClickListener { login() }
        binding.buttonLogout.setOnClickListener { logout() }
        // New code 👆🏽
    }

// (The rest of the file is here)
The code you just added does the following:
- It initializes
accountwith the app’s client ID and its tenant’s domain. Both thelogin()andlogout()methods useaccount. - It connects the Log In and Log Out buttons to the
login()andlogout()methods, respectively.
Code the login() method
The login() method will call the Auth0 authentication server and provide the appropriate actions for a successful and failed login. We’ll implement it a little bit at a time.
🛠 Update the login() method to the following:
// app/java/com.auth0.androidlogin/MainActivity

// (Other code here)

    private fun login() {
        WebAuthProvider
            .login(account)
            .withScheme(getString(R.string.com_auth0_scheme))
            .start(this, object : Callback<Credentials, AuthenticationException> {

                override fun onFailure(exception: AuthenticationException) {
                    // The user either pressed the “Cancel” button
                    // on the Universal Login screen or something
                    // unusual happened.
                    // TODO: Handle login failure.
                }

                override fun onSuccess(credentials: Credentials) {
                    // The user successfully logged in.
                    // TODO: Handle login success.
                }
            })
    }

// (The rest of the file is here)
If you ignore the closure, comments, and newline characters, the code in this method effectively becomes a short chain of method calls:
WebAuthProvider.login().withScheme().start()
This is the Builder design pattern in action. Each method in the chain returns an object that it passes to the next method in the chain.
The WebAuthProvider object provides access to the Auth0 library’s web authentication library.
The login() method sets up the WebAuthProvider object to authenticate users. It takes a single parameter: MainActivity’s account property, which contains the app’s client ID and the tenant’s domain.
withScheme() takes the return value from login() and specifies the scheme for the custom URLs that Auth0 will use to notify the app when the user has logged in or out. We’re using the string app as the scheme in this case, which means that these URLs will begin with app instead of http or https.
The default scheme is
https. I prefer to use a custom scheme likeappbecause, in some setups, thehttpsscheme causes Android to open a new browser window instead of giving control back to the app.
The start() method takes the value returned from withScheme() and initiates the authentication process. Doing so opens an embedded web view that displays the Universal Login page. The final argument that start() expects is an object with two methods to respond to the possible outcomes:
onFailure(), which executes when the user manually closes the web view without logging in, andonSuccess(), which executes when the user successfully logs in, and the web view closes automatically.
Let’s implement these methods.
Implement onFailure()
🛠 In onFailure(), replace the TODO: comment so that the method looks like this:
// app/java/com.auth0.androidlogin/MainActivity

// (Other code here)

                override fun onFailure(exception: AuthenticationException) {
                    // The user either pressed the “Cancel” button
                    // on the Universal Login screen or something
                    // unusual happened.
                    showSnackbar(getString(R.string.login_failure_message))
                }

// (The rest of the file is here)
This method displays a Snackbar displaying the type of exception that occurred when login failed.
Implement onSuccess()
🛠 In onSuccess(), replace the TODO: comment so that the method looks like this:
// app/java/com.auth0.androidlogin/MainActivity

// (Other code here)

                override fun onSuccess(credentials: Credentials) {
                    // The user successfully logged in.
                    val idToken = credentials.idToken
                    user = User(idToken)
                    userIsAuthenticated = true
                    showSnackbar("Success: ${user.name}")
                    updateUI()
                }

// (The rest of the file is here)
After a successful login, Auth0 returns a Credentials object via the credentials parameter. onSuccess() does the following:
- It takes the ID token from
credentialsand uses it to instantiateuser, which decodes the ID token and extracts the user information. - It marks the user as logged in by setting the
userIsAuthenticatedproperty totrue. - It updates the UI to reflect the user’s logged-in state.
Implement Logout
The logout() method is similar to login(). Just like login(), we’ll implement it a little at a time.
🛠 Update the logout() method to the following:
// app/java/com.auth0.androidlogin/MainActivity

// (Other code here)

    private fun logout() {
        WebAuthProvider
            .logout(account)
            .start(this, object : Callback<Void?, AuthenticationException> {

                override fun onFailure(exception: AuthenticationException) {
                    // For some reason, logout failed.
                    // TODO: Handle logout failure.
                }

                override fun onSuccess(payload: Void?) {
                    // The user successfully logged out.
                    // TODO: Handle logout success.
                }

            })
    }

// (The rest of the file is here)
As with login(), logout() also uses the Auth0 SDK’s WebAuthProvider class and the Builder pattern. This time, it calls the logout() method, which also takes MainActivity’s account property as its single parameter.
withScheme() takes the return value from login() and specifies the scheme for the custom URLs that Auth0 will use to notify the app when the user has logged in or out.
The start() method logs the user out. It takes an object with two methods to respond to the possible outcomes:
onFailure(), which executes when logout fails, andonSuccess(), which executes when the user successfully logs out.
Let’s implement these methods.
Implement onFailure()
🛠 In onFailure(), replace the TODO: comment so that the method looks like this:
// app/java/com.auth0.androidlogin/MainActivity

// (Other code here)

                override fun onFailure(exception: AuthenticationException) {
                    // For some reason, logout failed.
                    showSnackbar(getString(R.string.general_failure_with_exception_code,
                                           exception.getCode()))
                }

// (The rest of the file is here)
This method displays a Snackbar displaying the type of exception that occurred when logout failed.
Implement onSuccess()
🛠 In onSuccess(), replace the TODO: comment so that the method looks like this:
// app/java/com.auth0.androidlogin/MainActivity

// (Other code here)

                override fun onSuccess(payload: Void?) {
                    // The user successfully logged out.
                    user = User()
                    userIsAuthenticated = false
                    updateUI()
                }

// (The rest of the file is here)
After a successful logout, onSuccess() does the following:
- It changes
userto a blankUserinstance. - It marks the user as logged out by setting the
userIsAuthenticatedproperty tofalse. - It updates the UI to reflect the user’s logged-out state.
Update the UI
Only one task remains: updating the user interface based on the app’s state.
🛠 In updateUI(), replace the TODO: comment so that the method looks like this:
// app/java/com.auth0.androidlogin/MainActivity

// (Other code here)

    private fun updateUI() {
        if (appJustLaunched) {
            binding.textviewTitle.text = getString(R.string.initial_title)
            appJustLaunched = false
        } else {
            binding.textviewTitle.text = if (userIsAuthenticated) {
                getString(R.string.logged_in_title)
            } else {
                getString(R.string.logged_out_title)
            }
        }

        binding.buttonLogin.isEnabled = !userIsAuthenticated
        binding.buttonLogout.isEnabled = userIsAuthenticated

        binding.textviewUserProfile.isVisible = userIsAuthenticated
        binding.textviewUserProfile.text = getString(R.string.user_profile,
            user.name,
            user.email)

        binding.imageviewUser.isVisible = userIsAuthenticated
        binding.imageviewUser.loadImage(user.picture)
    }

// (The rest of the file is here)
updateUI() does the following:
- It sets the app’s title to the appropriate text.
- It sets the Log In and Log Out buttons to the appropriate states.
- It sets the TextView containing the user’s name and email address and the ImageView containing the user’s photo to the appropriate content and visibility.
Run the Completed App
🛠 You’ve finished coding the app! Run the app to confirm that it works.
Conclusion
You’ve just built an Android app with basic username/password authentication. In addition to logging a known user in and out, it can retrieve basic user information from their user profile and display it onscreen.
You can find the starter and completed projects in the get-started-android-authentication-kotlin repository on the Auth0 Blog Samples GitHub account.
Just remember that the best way to understand how the app integrates with Auth0 is to get the starter project and work towards the completed one by following the steps in this tutorial! As the saying goes, “I hear, I forget; I see, I remember; I do, I understand.”
Keep an eye on this blog for upcoming articles on mobile development with Auth0. Future articles will feature deeper dives into authentication, authorization, and alternatives to the standard username-and-password approach. Watch this space!
About the author

Joey deVilla
Senior Developer Advocate (Auth0 Alumni)