
TL;DR: In this blog post, we are going to learn how to use Spring Data JPA, along with Liquibase and PostgreSQL, to manage the persistence layer of a Spring Boot application. We are also going to use Project Lombok to avoid writing some tedious boilerplate code that Java and JPA require.
Throughout this post, we will create the basis of an application called QuestionMarks. The idea is that this application will enable users to practice and enhance their knowledge by answering a set of multiple choice questions. To provide a better organization, these questions will be grouped in different exams. For example, there could be an exam called JavaScript Interview that would hold a set of JavaScript related questions to help users to prepare for interviews. Of course, in this article, we won't build the whole application as it would take a lot of time and would make the article huge. However, we will be able to see the technologies aforementioned in action.
Before diving into integrating these technologies, let's first take a look at their definition.
“Using JPA, Liquibase, and PostgreSQL on Spring Boot is easy.”
Tweet This
What is Spring Data JPA?
Spring Data JPA is the Spring module that adds support and extends JPA. JPA (which stands for Java Persistence API) is a Java specification for accessing, persisting, and managing data between Java objects/classes and relational databases (e.g. PostgreSQL, MySQL, SQLServer, etc). The process of mapping object-oriented entities to entity-relationship models is also know as ORM (Object-Relation Mapping) and JPA is the contract defined by the Java community to manage such mappings.
As JPA is just an specification, we will need an implementation to do the dirty work for us (creating the SQL queries). Hibernate is the most popular implementation of the JPA specification, and actually the specification itself was created based on Hibernate. Besides that, when we import Spring Data JPA on Spring, we also get Hibernate by default. Therefore, there is no reason to search for another JPA implementation.
For the sake of completeness, here is a list of existing Hibernate alternatives: Oracle TopLink, Apache OpenJPA, DataNucleus, and ObjectDB.
What is Liquibase?
Liquibase is a tool that help developers to source control the database. In other words, with Liquibase we can keep our database schema and data synced with our Java entities. This is achieved by creating, in our Java project, files that contain changesets to be run on the database. These changesets are instructions to change/refactor the database. We will see Liquibase and its changesets in action in a while.
What is PostgreSQL?
Probably PostgreSQL does not need presentations, but for those who don't know here it is: PostgreSQL is a powerful, open source object-relational database system. It has more than 15 years of active development and a proven architecture that has earned it a strong reputation for reliability, data integrity, and correctness.
As a database server, its primary functions are to store data securely and return that data in response to requests from other software applications. It can handle workloads ranging from small single-machine applications to large internet-facing applications with many concurrent users.
Launching a Dockerized PostgreSQL Instance
Since we are going to need a PostgreSQL server running locally to test the integration of the tools in question, Docker might come in handy. Instead of installing PostgreSQL directly in our machine, we will use Docker to make this database disposable. Like this, if we need a newer version of PostgreSQL, or if we need a completely different database server, we won't need to struggle to update or uninstall PostgreSQL.
Of course we will need Docker installed on our development machine, but the process of installing it is really simple (for MacOS check this link, for Windows this link, and for Ubuntu this link) and opens a whole world of disposable, containerized services (e.g. PostgreSQL, MySQL, NGINX, NodeJS, etc).
After having Docker installed on our machine, we can issue the following command to run a dockerized instance of PostgreSQL:
docker run --name questionmarks-psql \
    -p 5432:5432 \
    -e POSTGRES_DB=questionmarks \
    -e POSTGRES_PASSWORD=mysecretpassword \
    -d postgres
The command above achieves the following:
- Runs a Docker container that contains PostgreSQL and name it as
questionmarks-psql. - Defines that the
5432local port must be bridged to the same port in the container. - Defines that a database called
questionmarksmust be created in the PostgreSQL instance. - Defines that the password for the
postgresuser ismysecretpassword.
Case we need to stop, restart, or remove this Docker container, we can issue the following commands:
docker stop questionmarks-psql

docker start questionmarks-psql

docker rm questionmarks-psql
Bootstrapping a Spring Boot App
Next step is to bootstrap a Spring Boot application. We have two alternatives equally easy to do that. The first one is to use the Spring Initilizr website provided by Pivotal. The second options is to clone this GitHub repository and check out the part1 branch.
Bootstrapping with Spring Initilizr
If we choose to bootstrap our application with Spring Initilizr, we will need to fill the form available with the following values:
- Generate a Gradle Project with Java and Spring Boot 2.0.0.
- Project Metadata Group: com.
- Project Metadata Artifact: questionmarks.
- Selected Dependencies: let's leave this empty.
Note that although during this blog post we will use Gradle, we could easily use Maven instead. Let's just keep in mind that if we choose Maven Project the dependency configuration will be different. Besides that, the Spring Boot version does not need to be 1.5.6. The examples here must probably work with older and newer versions.
After that we just need to import the new Spring Boot project in our preferred IDE (Integrated Development Environment).
Importing Dependencies
Now that we have our basic Spring Boot application set, we can change our dependency management tool configuration (Gradle) to import the libraries that we will use. To do that, let's open the ./build.gradle file and change it as follows:
// everything else ...

dependencies {
  compileOnly('org.projectlombok:lombok:1.16.20')
  compile('org.springframework.boot:spring-boot-starter')
  compile('org.springframework.boot:spring-boot-starter-web')
  compile('org.springframework.boot:spring-boot-starter-data-jpa')
  compile('org.liquibase:liquibase-core')
  runtime('org.postgresql:postgresql:42.2.1')
  testCompile('org.springframework.boot:spring-boot-starter-test')
}
The changes made in this file added:
- A compile only dependency to Project Lombok, which will make our code look cleaner.
- A compile dependency to Spring Boot Web Starter, which facilitates the development of RESTful APIs and adds a transitive dependency to Java Bean Validation.
- A compile dependency to Spring Data JPA, which gives us Hibernate.
- A compile dependency to Liquibase, which will help us manage the database.
- A runtime dependency to PostgreSQL JDBC Driver, which will enable Hibernate to communicate with the database.
Mapping Entities with JPA
As we already have all the dependencies properly set on our application, let's start creating the entities (classes) that we want JPA/Hibernate to manage. We will create five entities. The first one will be called Exam and we will create it in a new package called com.questionmarks.model with the following code:
// ./src/main/java/com/questionmarks/model/Exam.java file

package com.questionmarks.model;

import lombok.Data;

import javax.persistence.Entity;
import javax.persistence.GeneratedValue;
import javax.persistence.GenerationType;
import javax.persistence.Id;
import javax.validation.constraints.NotNull;

@Data
@Entity
public class Exam {
    @Id
    @GeneratedValue(strategy = GenerationType.IDENTITY)
    private long id;

    @NotNull
    private String title;

    @NotNull
    private String description;
}
This class, although quite small and simple, has some interesting characteristics. The main one, for those who are not familiar with Lombok, is the @Data annotation. As explained by the documentation, @Data is a convenient shortcut annotation that bundles the features of @ToString, @EqualsAndHashCode, @Getter, @Setter and @RequiredArgsConstructor together. In other words, @Data generates all the boilerplate that is normally associated with simple POJOs (Plain Old Java Objects) and beans: getters for all fields, setters for all non-final fields, and appropriate toString, equals and hashCode implementations that involve the fields of the class, and a constructor that initializes all final fields, as well as all non-final fields with no initializer that have been marked with @NonNull, in order to ensure the field is never null.
“Avoid Plain Old #java Objects boilerplate with Lombok”
Tweet This
Besides this somewhat magical annotation, we also:
- Added
@Entityto mark this class as an entity that will be managed by JPA/Hibernate. - Added
@Idto indicate that theidproperty is the primary key of this entity. - Added
@GeneratedValuewith theGenerationType.IDENTITYstrategy to indicate that the primary key value will be assigned by the persistence provider (i.e. PostgreSQL). - Added
@NotNullto bothtitleanddescriptionproperties to avoid persisting empty data for these fields.
Most of the annotations used in the Exam entity are also going to be used in the other entities, as they provide the basis for JPA/Hibernate to function. The next entity that we are going to create will be called Question. Let's create this class inside the com.questionmarks.model package with the following code:
// ./src/main/java/com/questionmarks/model/Question.java file

package com.questionmarks.model;

import lombok.Data;

import javax.persistence.Entity;
import javax.persistence.GeneratedValue;
import javax.persistence.GenerationType;
import javax.persistence.Id;
import javax.persistence.JoinColumn;
import javax.persistence.ManyToOne;
import javax.validation.constraints.NotNull;

@Data
@Entity
public class Question {
    @Id
    @GeneratedValue(strategy = GenerationType.IDENTITY)
    private long id;

    @NotNull
    @ManyToOne
    @JoinColumn(name = "exam_id")
    private Exam exam;

    private long order;

    @NotNull
    private String description;
}
Besides the annotations that we already covered while creating the Exam entity, Question makes use of two new annotations:
@ManyToOneindicates to JPA/Hibernate that Many questions can exist ToOne exam.@JoinColumnindicates that there will be a column calledexam_id, in the table that supportsQuestion, to reference the exam that owns this question.
This basically means that an exam will have many questions and that there will be a foreign key in the question table that points to the exam. Soon we will create these tables and these relationships in our database with the help of Liquibase.
The third entity that we will map is Alternative. As we are developing an application that provides multiple choice questions, we need to map these choices (alternatives) to keep track of which is the right one and also which alternative the user chooses while answering a question. Let's create the Alternative class in the com.questionmarks.model package with the following code:
// ./src/main/java/com/questionmarks/model/Alternative.java file

package com.questionmarks.model;

import lombok.Data;

import javax.persistence.Entity;
import javax.persistence.GeneratedValue;
import javax.persistence.GenerationType;
import javax.persistence.Id;
import javax.persistence.JoinColumn;
import javax.persistence.ManyToOne;
import javax.validation.constraints.NotNull;

@Data
@Entity
public class Alternative {
    @Id
    @GeneratedValue(strategy = GenerationType.IDENTITY)
    private long id;

    @NotNull
    @ManyToOne
    @JoinColumn(name = "question_id")
    private Question question;

    private long order;

    @NotNull
    private String description;

    private boolean correct;
}
This class doesn't use any new annotation, or any new feature. It simply uses the @Data annotation to avoid the boilerplate code, the JPA annotations to mark it as a managed entity with a primary key, and the @ManyToOne along with @JoinColumn to indicate that many alternatives may exist to a single question.
Both the Alternative and Question entities have two properties in common. A text (String) property to hold the description of the alternative/question, and a numerical (long) order that defines on what order the alternative will be shown in the question, or the question will be shown in the exam. Besides that, Alternative has a boolean property called correct to indicate if it is the correct answer or not.
The fourth entity that we will create is going to be User. We will create this class in the com.questionmarks.model package with the following code:
// ./src/main/java/com/questionmarks/model/User.java file

package com.questionmarks.model;

import lombok.Data;

import javax.persistence.Entity;
import javax.persistence.Id;

@Data
@Entity
public class User {
    @Id
    private String id;
}
Contrastingly to the other entities that we have created, User does not have a numerical (long) id, but a textual (String) primary key. Besides that it doesn't have usual properties like email, name, and password. These unusual characteristics have an explanation. As we don't want to handle sensitive data and we don't want to waste valuable time trying to write secure authentication mechanisms, we are going to use Auth0 to manage user authentication for us. Therefore, all we will have to do is to persist a unique id that will be sent for us through JWTs (JSON Web Tokens).
This approach will free us to focus on the core functionality while we rest assured that one of the most critical parts of our application (security and authentication) will be supported by a great team of experts: Auth0!
Finally, the last entity that we will create will be called Attempt. This class will represent the attempts that users make to answer a question.
// ./src/main/java/com/questionmarks/model/Attempt.java file

package com.questionmarks.model;

import lombok.Data;

import javax.persistence.Entity;
import javax.persistence.GeneratedValue;
import javax.persistence.GenerationType;
import javax.persistence.Id;
import javax.persistence.JoinColumn;
import javax.persistence.ManyToOne;
import javax.validation.constraints.NotNull;
import java.util.Date;

@Data
@Entity
public class Attempt {
    @Id
    @GeneratedValue(strategy = GenerationType.IDENTITY)
    private long id;

    @NotNull
    @ManyToOne
    @JoinColumn(name = "user_id")
    private User user;

    @NotNull
    @ManyToOne
    @JoinColumn (name = "alternative_id")
    private Alternative alternative;

    @NotNull
    private Date date;

    private boolean correct;
}
Again, nothing particularly new about the implementation of this class. The only perceptible difference for the other entities is that this one has two properties marked as @ManyToOne. Since many attempts will be made by one user, and that these attempts will refer to different alternatives, we annotated both properties with @ManyToOne. Besides that we also created a property to hold when the attempt was made (date) and created a boolean property called correct to indicate if the user answered the question correctly or not. With these properties we will be able to, in the future, provide some nice charts and some intelligence to our users.
As this was the last entity that we needed to create, we can now focus on creating the database schema that will support our application. We will solve this question by using Liquibase.
Managing the Database Schema with Liquibase
To manage the database structure of our application and to keep it synced with the entities that compose our system, we will use Liquibase. What is great about this tool is that it supports a wide variety of languages to manage the schema. For example, we can define and refactor the database by using XML, YAML, JSON, and SQL formats. Furthermore, Spring Boot provides a great support for Liquibase as we will see in this section.
“Liquibase facilitates database migrations on Spring Boot applications.”
Tweet This
Enough said, let's focus on solving the problem. First of all, we need to configure the database connection on our Spring Boot application. Spring Boot will provide this configuration both for JPA/Hibernate and for Liquibase. The properties to communicate with the database will be set in the ./src/main/resources/application.properties file:
spring.datasource.url=jdbc:postgresql://localhost/questionmarks
spring.datasource.username=postgres
spring.datasource.password=mysecretpassword
spring.datasource.driver-class-name=org.postgresql.Driver

spring.jpa.database-platform=org.hibernate.dialect.PostgreSQL9Dialect
spring.jpa.properties.hibernate.temp.use_jdbc_metadata_defaults = false
Note: The last two properties on the code snippet above were added to suppress an annoying exception that occurs when JPA (Hibernate) tries to verify PostgreSQL CLOB feature.
The first property, spring.datasource.url, defines the address of our database. As we are running a dockerized PostgreSQL container and are bridging the default PostgreSQL port between our machine and the Docker container, we can reach the database by passing jdbc:postgresql://localhost/questionmarks. The second property defines the user that will communicate with the database, postgres in this case. The third property defines mysecretpassword as the password for postgres (the same that we passed when creating our dockerized PostgreSQL container). The last property defines the org.postgresql.Driver class as the driver responsible for handling the communication.
With these properties set, we can work on the Liquibase configuration. This will be an easy task, we are simply going to tell Liquibase to apply all the changesets available in a specific folder. To do that let's create a master Liquibase file called db.changelog-master.yaml in the src/main/resources/db/changelog/ folder. We will probably need to create the db folder and its child changelog as they are not provided by Spring Boot. The master file will have the following content:
databaseChangeLog:
    - includeAll:
        path: db/changelog/changes/
Note that the path value provided is relative to src/main/resources, and therefore we will need to create a folder called changes inside src/main/resources/db/changelog/. In this new folder we are going to create a new file called v0001.sql. This SQL file will contain the commands to create the tables that will support the entities of our application:
create table "user" (
  id varchar(255) not null,
  name varchar(50) not null,
  primary key (id)
);

create table exam (
  id bigserial not null,
  title varchar(50) not null,
  description varchar(512) not null,
  primary key (id)
);

create table question (
  id bigserial not null,
  exam_id bigint not null references exam (id),
  question_order bigint not null,
  description text not null,
  primary key (id)
);

create table alternative (
  id bigserial not null,
  question_id bigint not null references question (id),
  alternative_order bigint not null,
  description text not null,
  correct boolean not null,
  primary key (id)
);

create table attempt (
  id bigserial not null,
  user_id varchar(255) not null references "user" (id),
  alternative_id bigint not null references alternative (id),
  correct boolean not null,
  date timestamp without time zone not null,
  primary key (id)
);
That was the last change that we needed to make in our application to make Liquibase responsible for running refactorings in our database. Running our application now, through the IDE or through the ./gradlew bootRun, will result in the following output:
...
2017-08-18 19:16:20 INFO -- [main] liquibase : classpath:/db/changelog/db.changelog-master.yaml: db/changelog/changes/v0001.sql::raw::includeAll: Custom SQL executed
2017-08-18 19:16:20 INFO -- [main] liquibase : classpath:/db/changelog/db.changelog-master.yaml: db/changelog/changes/v0001.sql::raw::includeAll: ChangeSet db/changelog/changes/v0001.sql::raw::includeAll ran successfully in 43ms
...
2017-08-18 19:16:22 INFO -- [main] app       : Started ServerApplication in 5.032 seconds (JVM running for 5.989)
Therefore, as we can see, everything worked as expected. Liquibase managed to apply the schema defined in the v0001.sql, and the application started successfully. This means that Spring Boot was able to run the application and that JPA/Hibernate found the tables needed to support our entities.
Aside: Securing Spring APIs with Auth0
Securing Spring Boot APIs with Auth0 is easy and brings a lot of great features to the table. With Auth0, we only have to write a few lines of code to get solid identity management solution, single sign-on, support for social identity providers (like Facebook, GitHub, Twitter, etc.), and support for enterprise identity providers (like Active Directory, LDAP, SAML, custom, etc.).
In the following sections, we are going to learn how to use Auth0 to secure APIs written with Spring Boot.
Creating the API
First, we need to create an API on our free Auth0 account. To do that, we have to go to the APIs section of the management dashboard and click on "Create API". On the dialog that appears, we can name our API as "Contacts API" (the name isn't really important) and identify it as https://contacts.blog-samples.com (we will use this value later).
Registering the Auth0 Dependency
The second step is to import a dependency called auth0-spring-security-api. This can be done on a Maven project by including the following configuration to pom.xml (it's not harder to do this on Gradle, Ivy, and so on):
<project ...>
    <!-- everything else ... -->
    <dependencies>
        <!-- other dependencies ... -->
        <dependency>
            <groupId>com.auth0</groupId>
            <artifactId>auth0-spring-security-api</artifactId>
            <version>1.0.0-rc.3</version>
        </dependency>
    </dependencies>
</project>
Integrating Auth0 with Spring Security
The third step consists of extending the WebSecurityConfigurerAdapter class. In this extension, we use JwtWebSecurityConfigurer to integrate Auth0 and Spring Security:
package com.auth0.samples.secure;

import com.auth0.spring.security.api.JwtWebSecurityConfigurer;
import org.springframework.beans.factory.annotation.Value;
import org.springframework.context.annotation.Configuration;
import org.springframework.security.config.annotation.method.configuration.EnableGlobalMethodSecurity;
import org.springframework.security.config.annotation.web.builders.HttpSecurity;
import org.springframework.security.config.annotation.web.configuration.EnableWebSecurity;
import org.springframework.security.config.annotation.web.configuration.WebSecurityConfigurerAdapter;

@Configuration
@EnableWebSecurity
@EnableGlobalMethodSecurity(prePostEnabled = true)
public class SecurityConfig extends WebSecurityConfigurerAdapter {
    @Value(value = "${auth0.apiAudience}")
    private String apiAudience;
    @Value(value = "${auth0.issuer}")
    private String issuer;

    @Override
    protected void configure(HttpSecurity http) throws Exception {
        JwtWebSecurityConfigurer
                .forRS256(apiAudience, issuer)
                .configure(http)
                .cors().and().csrf().disable().authorizeRequests()
                .anyRequest().permitAll();
    }
}
As we don't want to hard code credentials in the code, we make SecurityConfig depend on two environment properties:
auth0.apiAudience: This is the value that we set as the identifier of the API that we created at Auth0 (https://contacts.blog-samples.com).auth0.issuer: This is our domain at Auth0, including the HTTP protocol. For example:https://blog-samples.auth0.com/.
Let's set them in a properties file on our Spring application (e.g. application.properties):
auth0.issuer:https://blog-samples.auth0.com/
auth0.apiAudience:https://contacts.blog-samples.com/
Securing Endpoints with Auth0
After integrating Auth0 and Spring Security, we can easily secure our endpoints with Spring Security annotations:
package com.auth0.samples.secure;

import com.google.common.collect.Lists;
import org.springframework.security.access.prepost.PreAuthorize;
import org.springframework.web.bind.annotation.GetMapping;
import org.springframework.web.bind.annotation.PostMapping;
import org.springframework.web.bind.annotation.RequestBody;
import org.springframework.web.bind.annotation.RequestMapping;
import org.springframework.web.bind.annotation.RestController;

import java.util.List;

@RestController
@RequestMapping(value = "/contacts/")
public class ContactController {
    private static final List<Contact> contacts = Lists.newArrayList(
            Contact.builder().name("Bruno Krebs").phone("+5551987654321").build(),
            Contact.builder().name("John Doe").phone("+5551888884444").build()
    );

    @GetMapping
    public List<Contact> getContacts() {
        return contacts;
    }

    @PostMapping
    public void addContact(@RequestBody Contact contact) {
        contacts.add(contact);
    }
}
Now, to be able to interact with our endpoints, we will have to obtain an access token from Auth0. There are multiple ways to do this and the strategy that we will use depends on the type of the client application we are developing. For example, if we are developing a Single Page Application (SPA), we will use what is called the Implicit Grant. If we are developing a mobile application, we will use the Authorization Code Grant Flow with PKCE. There are other flows available at Auth0. However, for a simple test like this one, we can use our Auth0 dashboard to get one.
Therefore, we can head back to the APIs section in our Auth0 dashboard, click on the API we created before, and then click on the Test section of this API. There, we will find a button called Copy Token. Let's click on this button to copy an access token to our clipboard.
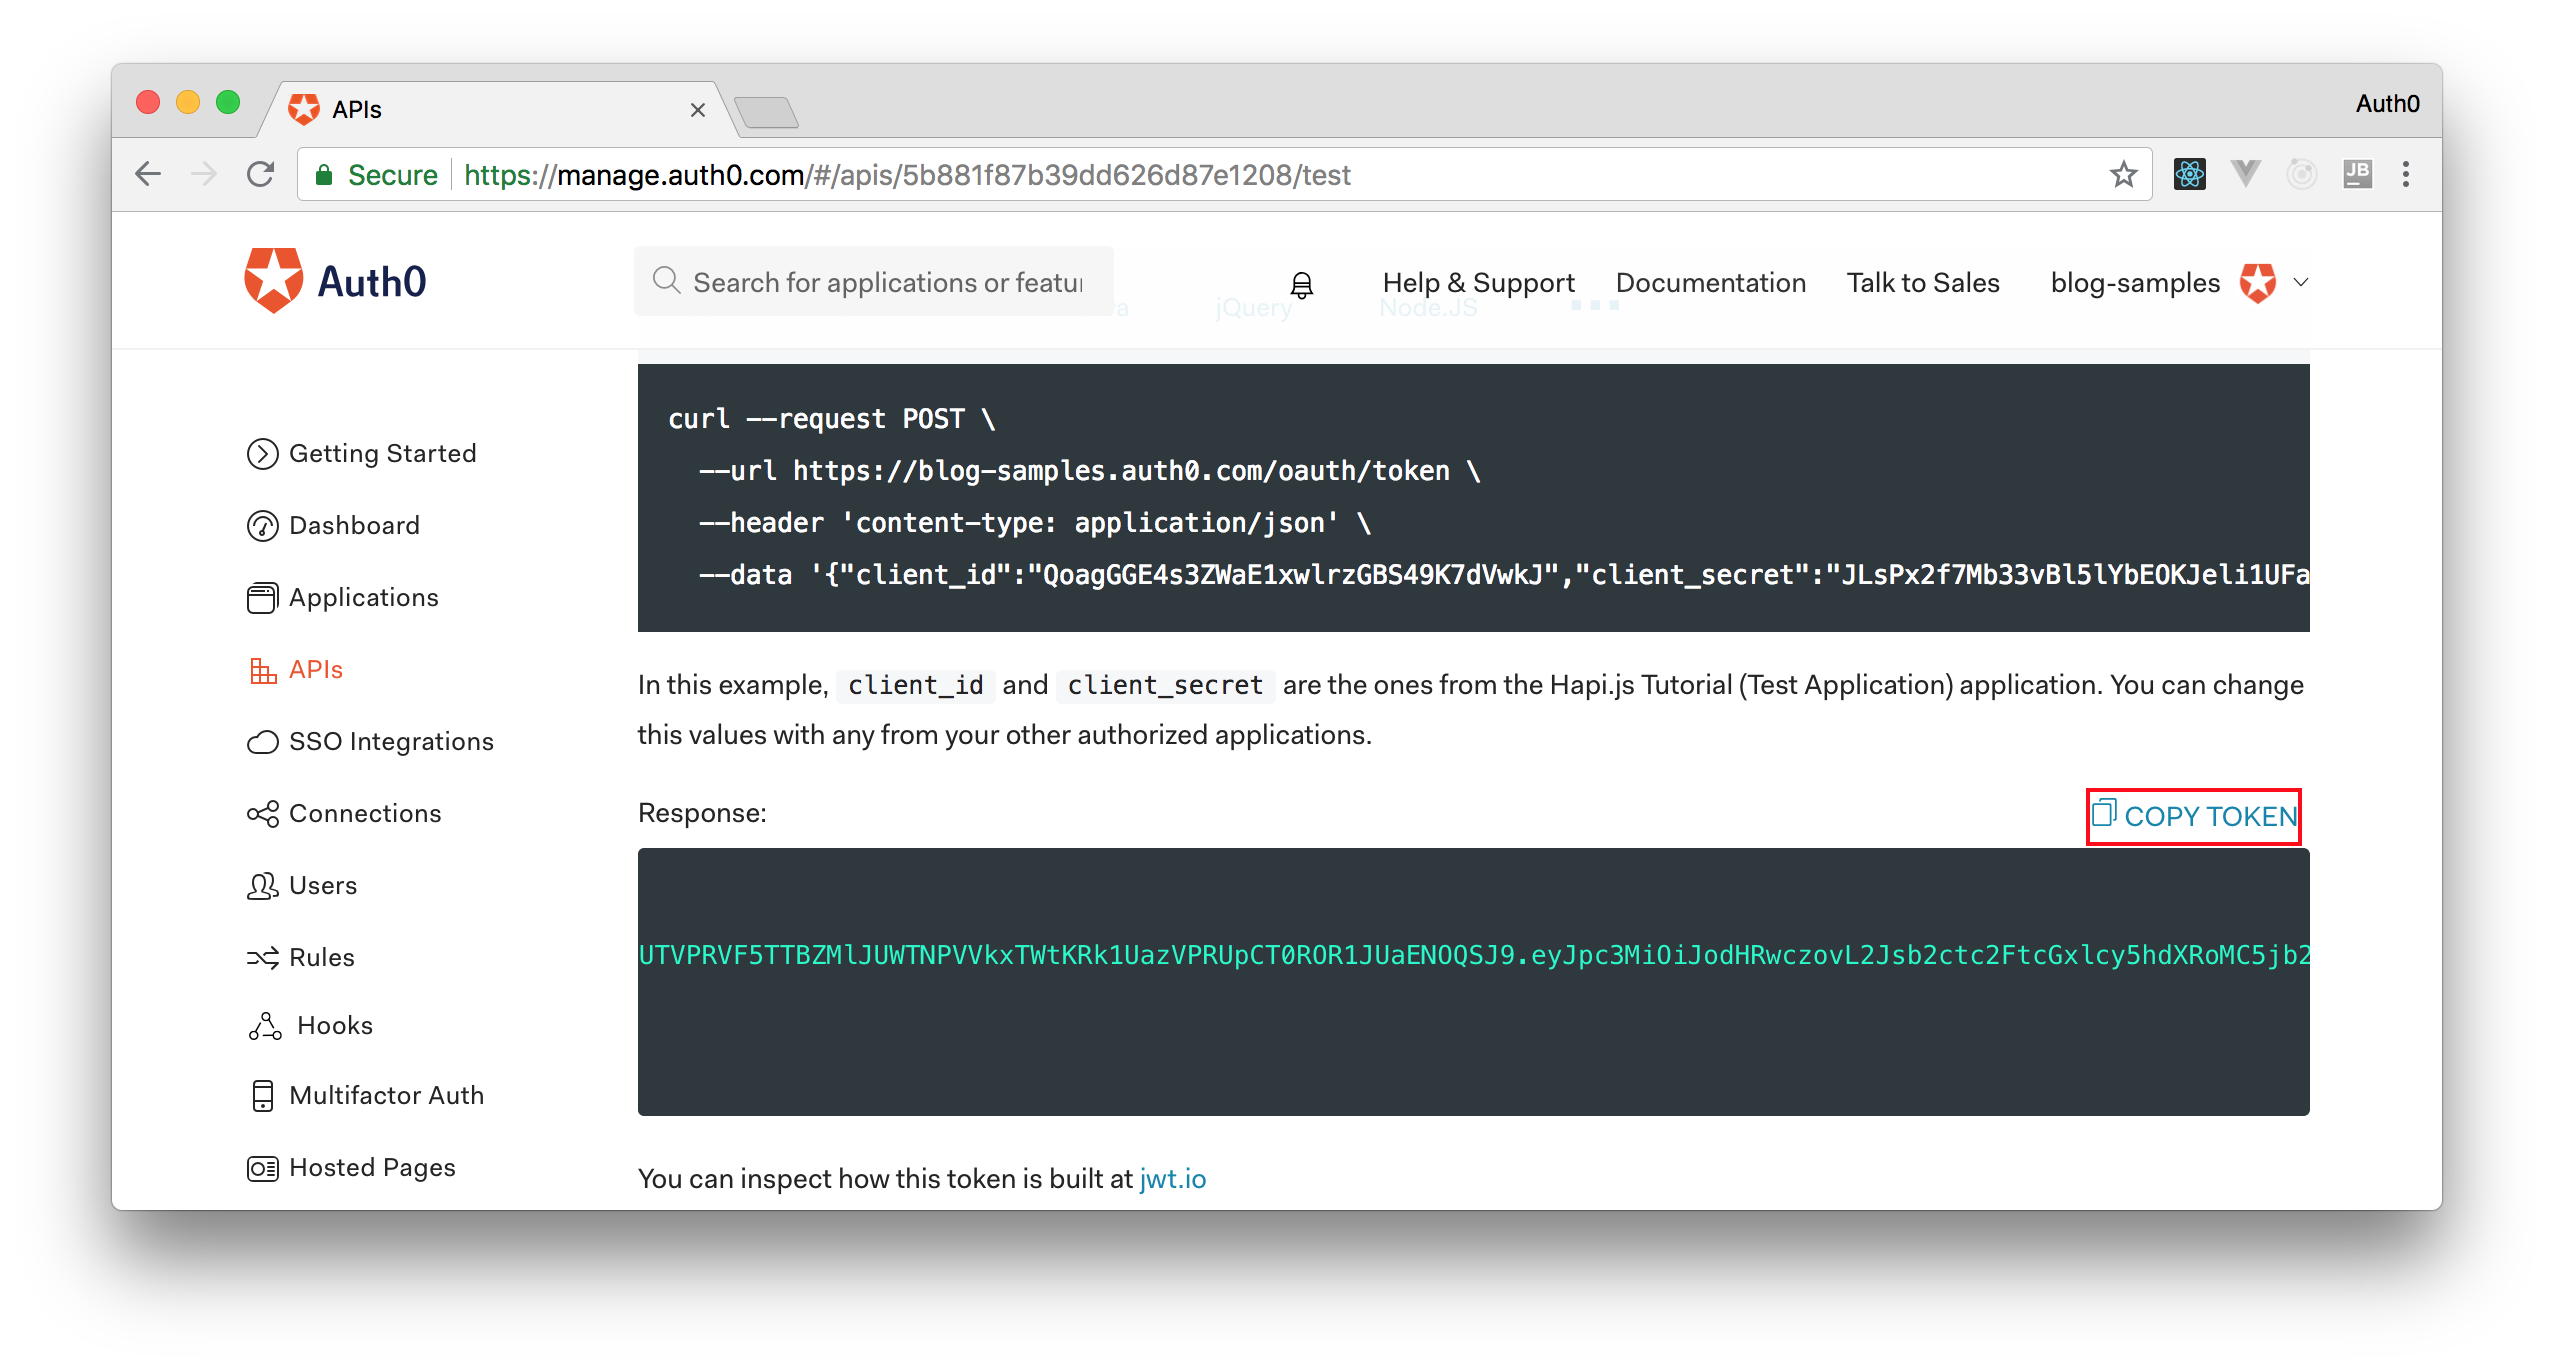
After copying this token, we can open a terminal and issue the following commands:
# create a variable with our token
ACCESS_TOKEN=<OUR_ACCESS_TOKEN>

# use this variable to fetch contacts
curl -H 'Authorization: Bearer '$ACCESS_TOKEN http://localhost:8080/contacts/
Note: We will have to replace
<OUR_ACCESS_TOKEN>with the token we copied from our dashboard.
As we are now using our access token on the requests we are sending to our API, we will manage to get the list of contacts again.
That's how we secure our Node.js backend API. Easy, right?
Next Steps: Defining a RESTful API and Querying the Database
So far, we have defined five entities that will hold the data that flows on our application. We also integrated PostgreSQL, with the help of Spring Data JPA, to persist this data and configured Liquibase to automatically run scripts that keep our database synced up with the entities structure. What we need now is to start defining the RESTful endpoints of our API that will support external clients (e.g. web application and iOS/Android mobile apps). This feature will be addressed in another article that will be released soon. Stay tuned!
About the author

Bruno Krebs
R&D Content Architect (Auth0 Alumni)