
TL;DR: In this article, you will learn how an API gateway can help you retaining API compatibility with old clients while evolving the product according to the new needs of your business. If needed, you can find the code shown here in this GitHub repository.
“Learn how to keep your APIs backward compatible while being able to implement new features, fix bugs, and so on.”
Tweet This
Why Do I Need Backward-Compatible APIs?
Systems evolve continuously, and so do their WebAPIs. As they represent the interface for external clients to interact with your system, they're the first line reflecting changes in your organization.
Such API changes can happen for a number of reasons. Technological advancements, change in the line of business, important bug fixes, and so on.
Chances are these needs can end up introducing breaking changes in your WebAPI, which in turn means breaking your clients. Usually, to make these clients operational again, you will need to make changes to their source code and you will need to release new versions of them.
Sometimes, changes are inevitable and you need to deal with them in a way or in another. However, there's an entire class of problems that can be handled in a different way rather than breaking your API.
Among the possible solutions, you can:
- Use a Hypermedia API that, with the forewords of putting the understanding in the runtime instead of sharing it ahead of the time, is prepared by definition to handle changes. Clients, if correctly coded, can handle such intrinsic changes in a non-breaking way and adjust the user experience accordingly.
- Employ an API Gateway to retain the old compatibility while rolling out the new changes. This is a simple, yet effective, way to mask the internal changes of your services while keeping the same interface. In such way, you can extend the runaway of your API while evolving your services. Think about it as the WebAPI version of the adapter pattern.
In this article, you're going to explore the second approach. However, keep in mind that Hypermedia APIs are a good solution and that big companies have been employing such approach for ages.
Express Gateway to the Help
It turns out Express Gateway is a perfect candidate for such task. In this example, you will learn two important things:
- how you can change the shape of a request's body coming into a service;
- and how you can modify the response body to keep the same interface exposed to the clients.
Depicting the Problem
Imagine a simple use case where keeping an API compatibility with the clients is important (probably any note-worthy app needs this). Suppose you have a service, coded by your internal development team, that exposes an API able to return a customer by its ID on HTTP GET requests. The response would be similar to this:
{
  "customerId": "123456789",
  "name": "Clark",
  "surname": "Kent"
}
Also, your API would accept new customers with a POST request using the following payload:
{
  "name": "Clark",
  "surname": "Kent"
}
This operation would then return the created customer with a generated customerId and the operator that created such user:
{
  "customerId": "123456",
  "createdBy": "vncz"
}
Suppose now that, given your business is growing, you decide that it makes sense to replace your homemade customer service with a third-party cloud service that's offering better customer management capabilities that perfectly fits your company needs.
Most likely, the offered API, as well as the provided features, will differ in multiple parts. For example, the URL space is going to be different as well as the accepted and returned payloads.
In this example, suppose the new service has an endpoint on /v1/cust (instead of /customers) and, instead of accepting a name and surname properties, it requires a unique fullname property. Also, as it's an external service, it does not include any createdBy property, as it's a property that exists exclusively in your system.
While these changes most likely make sense for your internal clients (due to business requirements for example), your existing third-party clients do not care that much about this change. So, while willing to migrate at a certain point in the future, flipping directly the switch would not be an option.
Keeping the Legacy API Intact Using Express Gateway
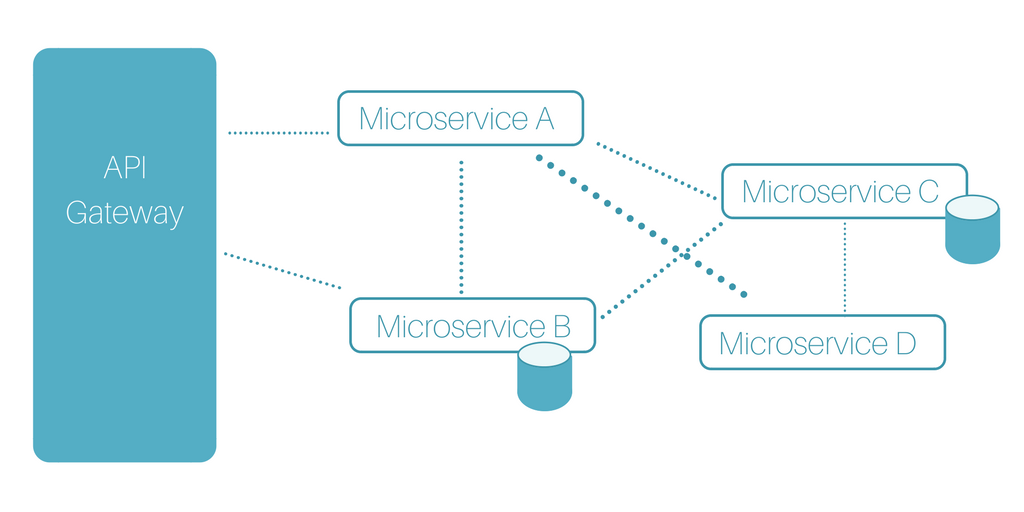
It turns out that an API Gateway can solve this problem for you. Being an intermediate layer between the public interface AND the internal services, an Express Gateway can manipulate the requests and the responses during their journey.
Here's what you would need to do to set up a gateway:
- You would need to configure the
proxypolicy so that the request to the old endpoint get routed to the new, correct internal services. - You would need to configure the
bodyModifierpolicy to modify the request's body so that the new customer service can consume it. In the same way, you would use the same policy this time to modify the response object to make sure thecreatedByproperty is correctly added.
Installing Express Gateway
To solve these problems with Express Gateway, you would install and use a beta version of the framework. This version will most likely land in the master branch (thus as an official version) soon (the team supporting Express Gateway is still in the process of discussing some internal requirements, so they weren't able to make it happen officially yet).
npm install expressgateway/express-gateway#feat/proxy-events
Set up Pipelines to Proxy Objects Back and Forth
Then, after installing this beta version, you would set up two pipelines that would proxy the requests to the new /cust/v1 endpoint:
apiEndpoints:
  customers:
    path: '/customers*'
serviceEndpoints:
  v1Cust:
    url: 'https://cool.Cloud.service/v1/cust'
policies:
  - proxy
  - bodyModifier
pipelines:
  customers:
    apiEndpoints:
      - customers
    policies:
      - proxy:
        - action:
            serviceEndpoint: v1Cust
Using Express Gateway to Change the Request and Response Body
After that, you would use the bodyModifier policy to modify request/response payloads so they conform to the new service API.
      - bodyModifier:
        - action:
            request:
              add:
                - name: fullname
                  value: "req.body.name + ' ' + req.body.surname"
              remove:
                - name: name
                - name: surname
            response:
              add:
                - name: createdBy
                  value: "req.user.id"
It should be easy to understand what's going on in the configuration above. This is concatenating the name and surname properties from the current request body and forming a new fullname property out of it. Once that's done, it removes these properties as they're not required by the new service.
Then, this configuration is performing a similar task for the response. That is, it is adding back the createdBy property based on the current user registered in the gateway.
If you put your system up now, you would be able to test the new features with the following command:
curl -X POST http://localhost:9876/customers/ -H "Content-Type: application/json" -d '{"name":"Clark", "surname": "Kent"}'
The system, despite the code changes in the internal service, would still be working (and, more importantly, responding) in the same way it did before.
Aside: Configure Express Gateway to use Auth0 Identity Management
Express Gateway and Auth0 play very well together when it comes to security.
Let's now configure Auth0 to work as our user management system.
With Auth0, we only have to write a few lines of code to get solid identity management solution, single sign-on, support for social identity providers (like Facebook, GitHub, Twitter, etc.), and support for enterprise identity providers (Active Directory, LDAP, SAML, custom, etc.).
If you don't already have an Auth0 account, sign up for a free one now.
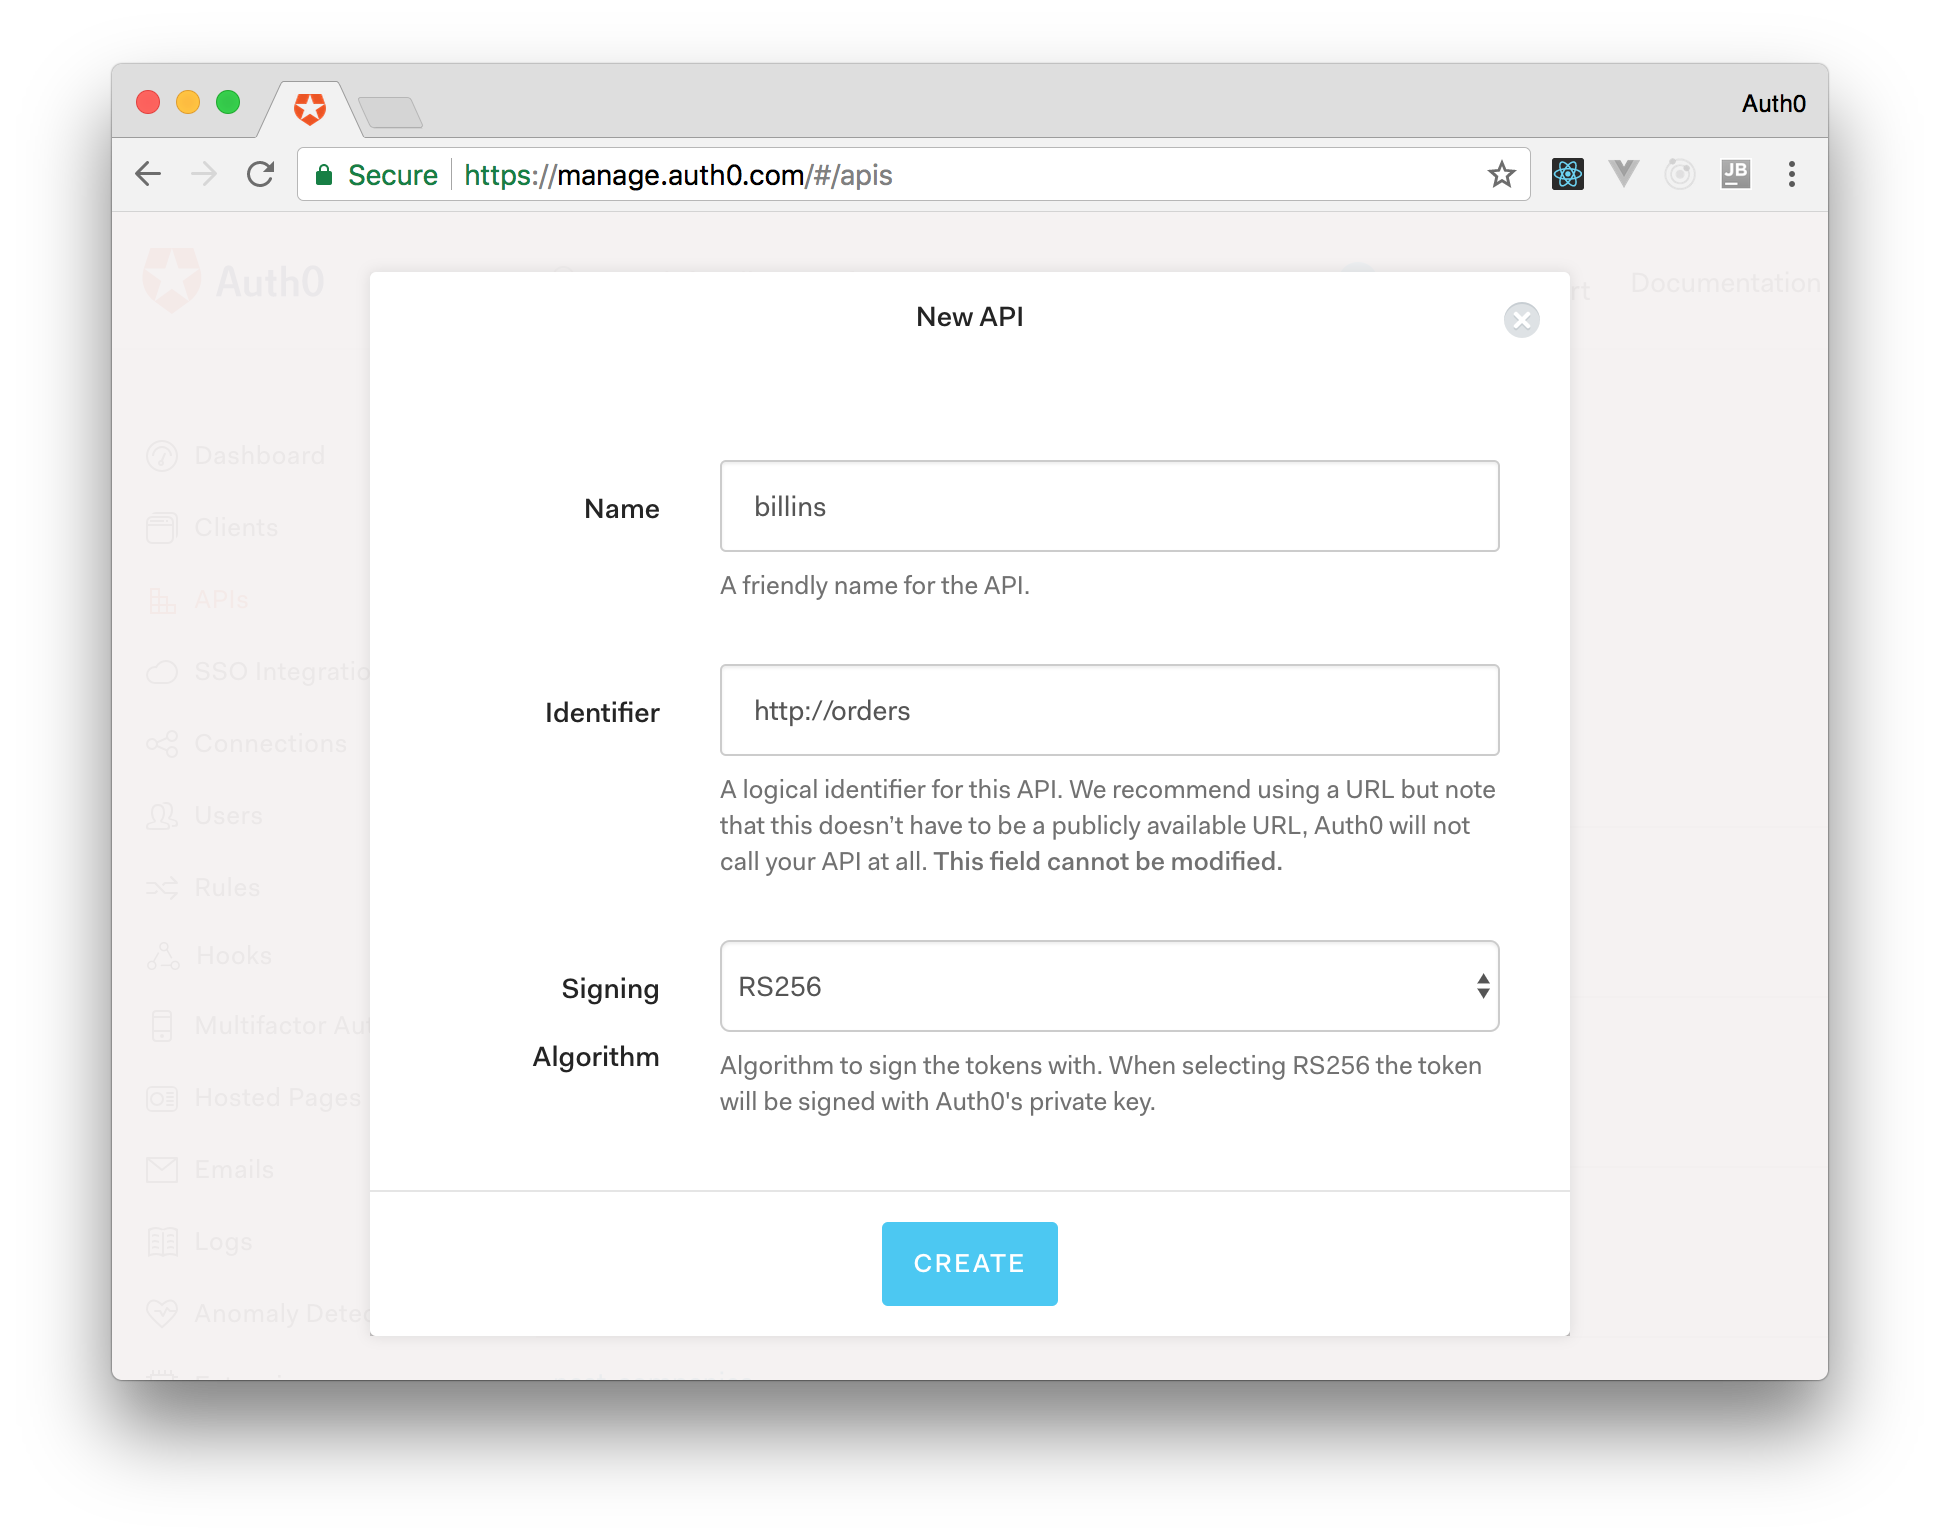
From the Auth0 management dashboard, click on the APIs menu item, and then on the Create API button. You will need to give your API a name and an identifier. The name can be anything you choose, so make it as descriptive as you want. The identifier will be used to identify your API, this field cannot be changed once set.
For our example, I'll name the API billings and identify it as http://orders. I'll also leave the signing algorithm as RS256 and click on the Create API button.
Now, point your browser to https://yourAPI.auth0.com/pem (where yourAPI is the Auth0 domain that you chose when creating your account) and download the public key file.
This is the key that we will use to verify that the JSON Web Tokens (JWTs) issued by Auth0 are valid. Save it as pubKey.pem and place it in the same directory specified in secretOrPublicKeyFile parameter of the jwt policy (that is, in a directory called key in the project root).
The API Gateway has now been configured correctly to handle the scenarios.
Enable JWT verification in Express Gateway
Express Gateway can be configured to validate tokens provided by Auth0 by installing the JWT policy in any of the pipelines.
policies:
  # Other policies
  - jwt:
      - action:
          secretOrPublicKeyFile: ./key/pubKey.pem
          checkCredentialExistence: false
Test Drive
Start the gateway using npm start in the project root. Once running, let's try to issue a couple of requests to it:
$ curl http://localhost:8080
$ Unauthorized
You can see that the first request has been denied with Unauthorized status. That's because we didn't provide any JWT with the request, so it didn't go through.
Now grab any HTTP client and let's configure it to start an OAuth 2.0 authorization process against Auth0. We can grab all the necessary parameters going on Applications -> Billings (Test Application) -> Settings
In my case, I am going to use curl, but you can use the client you prefer:
curl --request POST \
  --url https://{AUTH0_DOMAIN}.auth0.com/oauth/token \
  --header 'content-type: application/json' \
  --data '{
    "client_id":"{AUTH0_CLIENT_ID}",
    "client_secret":"{AUTH0_CLIENT_SECRET}",
    "audience":"http://orders",
    "grant_type":"client_credentials"
}'
Note: Make sure to replace all the placeholders with real values provided by Auth0.
Now, by simply copying the access_token attribute from the response, we will be able to communicate with the API through Express Gateway (you can verify the returned token by using JWT.io). This is the token to be used in order to access the protected resource. So, just try to issue requests making sure that the token is now sent as a Bearer Authorization to the endpoint. The response should hopefully be 200.
export JWT="ey...the-rest-of-the-token"
curl -H "Authorization: Bearer "$JWT http://localhost:8080
We made it! Now all the request that go in any pipelines using the JWT policy will be checked and verified.
Conclusions
It is important to note that this approach would keep the whole object in memory and would be taking the burden of parsing it. In case of huge payloads (several MBs), a more efficient way would be to parse the content as a stream, using JSONStream for example. This article won't explore this solution, but it should be the way to go in case you're expecting huge JSON objects. For small payloads the JSON parsing, although sync, the default solution wouldn't take more than 1ms.
“Tools like Express Gateway can be life savers when developing apps based on the microservice approach.”
Tweet This
About the author

Vincenzo Chianese
API Architect