
Intro
State management is a key component when building applications. There are various approaches by which we can manage the state in an Angular application, each with its pros and cons. This blog post will focus on using NgRx as our state management solution. We will look at how you can use NgRx to manage your application's state by building a Recipe Admin Dashboard application. We will also learn how to secure the application using Auth0 and how it works with NgRx.
What Is Ngrx
NgRx is a framework for building reactive applications in Angular. NgRx is inspired by the Redux pattern - unifying the events in your application and deriving state using RxJS. At a high level, NgRx stores a single state and uses actions to express state changes. NgRx excels in managing complex states, making it ideal for applications with a lot of user interactions and multiple data sources.
How Does Ngrx Work
NgRx is made up of 5 main components - Store, Actions, Reducers, Selectors, and Effects.
NgRx uses the Redux concept of unidirectional data flow, where all application data goes through the same lifecycle. This unidirectional data flow makes the application's state more predictable and thus easier to understand. This flow only applies to the state management layer and is not to be confused with the unidirectional data flow of the presentation layer. The following diagram shows the state management lifecycle in NgRx.
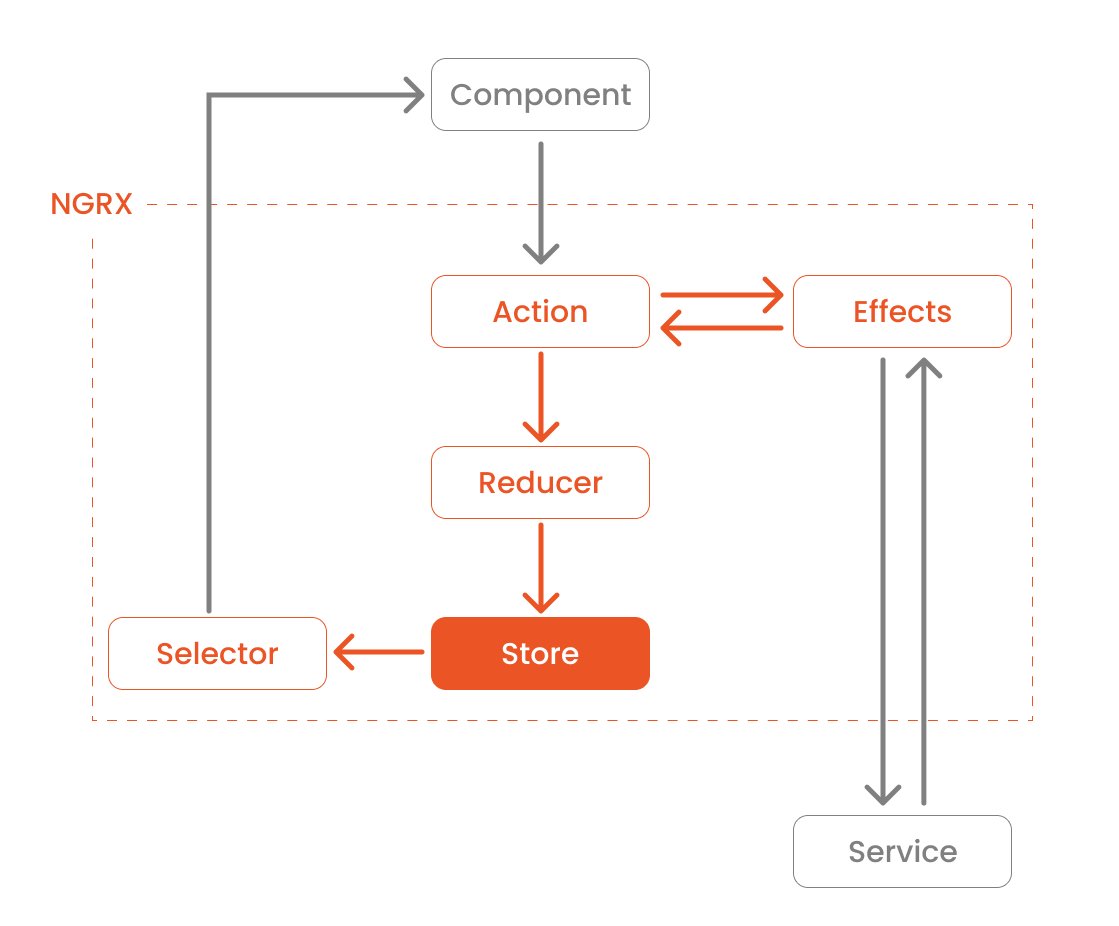
Store
You can think of this as a client-side database. The Store in NgRx acts as the application's single source of truth. It reflects the current state of the app.
Actions
Actions express unique events that happen in our application. These events range from application lifecycle events, user interactions, to network requests. Actions are how the application communicates with NgRx to tell it what to do.
Reducers
Reducers are responsible for handling transitions between states. Reducers react to the Actions dispatched and executes a pure function to update the Store. Pure functions are functions that are predictable and have no side effects. Given the same set of inputs, a pure function will always return the same set of outputs.
Selectors
Selectors are pure functions for getting slices of the state from the Store. Selectors are how our application can listen to state changes.
Effects
Effects handle the side effects of each Action. These side effects range from communicating with an external API via HTTP when a certain Action is dispatched to dispatching another Action to update another part of the State.
Prerequisites
Angular requires an active LTS or maintenance LTS version of Node.js. Angular applications also depend on npm packages for many features and functions. To download and install npm packages, you need an npm package manager such as npm or yarn.
This project has a server-side component to it that has to run in parallel when running the Frontend. Follow the instructions in the Api Express Typescript Menu repo. You can read more about setting up the server-side with Auth0 in this blog post.
This tutorial focuses on how to use Auth0 with NgRx. For more information on setting up Auth0 for Angular applications, follow the instructions on the README or refer to this blog post.
Getting Started Quickly
I created a demo application with the basic structure and components to help you implement the NgRx related part.
Clone the demo app and check out its starter branch:
git clone -b starter git@github.com:auth0-developer-hub/spa_angular_typescript_dashboard.git
Once you clone the repo, make spa_angular_typescript_dashboard your current directory:
cd spa_angular_typescript_dashboard
Install the project's dependencies:
npm i
Run the project locally:
npm run start
Devtools
You can use the redux devtools extension for Chrome or Firefox for debugging store-related operations.
To use this extension with NgRx, you'll need to add NgRx's devtools dependency to our project. You can do this using either npm or Angular's CLI.
Using npm
npm install @ngrx/store-devtools --save
Using Angular's CLI
To use the Angular CLI, you will need to have the CLI installed globally. Refer to instructions on the Angular docs for how to set this up.
ng add @ngrx/store-devtools@latest
Import the StoreDevToolsModule in our AppModule and configure it based on your project's requirements. For this tutorial, you'll be using their default configuration. Open app.module.ts and add the following code 👇
// src/app/app.module.ts

import { BrowserModule } from "@angular/platform-browser";
import { NgModule } from "@angular/core";
import { HttpClientModule, HTTP_INTERCEPTORS } from "@angular/common/http";
import { AuthHttpInterceptor, AuthModule } from "@auth0/auth0-angular";

// ✨ New 👇
import { StoreDevtoolsModule } from "@ngrx/store-devtools";

import { AppRoutingModule } from "./app-routing.module";
import { AppComponent } from "./app.component";
import { NavBarModule } from "./shared";
import { environment } from "src/environments/environment";
import { reducers, metaReducers } from "./core/state";
import { UserEffects } from "./core/state/user";
import { MenusEffects } from "./core/state/menus";

@NgModule({
  imports: [
    BrowserModule,
    HttpClientModule,
    AuthModule.forRoot({
      ...environment.auth,
      httpInterceptor: {
        allowedList: [
          `${environment.serverUrl}/api/menu/items`,
          `${environment.serverUrl}/api/menu/items/*`,
        ],
      },
    }),
    AppRoutingModule,
    NavBarModule,

    // ✨ New 👇
    StoreDevtoolsModule.instrument({
      maxAge: 25,
      logOnly: environment.production,
    }),
  ],
  declarations: [AppComponent],
  bootstrap: [AppComponent],
  providers: [
    {
      provide: HTTP_INTERCEPTORS,
      useClass: AuthHttpInterceptor,
      multi: true,
    },
  ],
})
export class AppModule {}
If you used Angular's CLI to add NgRx devtools, this part might have been updated automatically.
Running the App and turning on Devtools
After following the steps in this section, you should see an option to activate Redux Devtools in your toolbar when you run the app. Once activated, you should see a window with an interface similar to the image below.
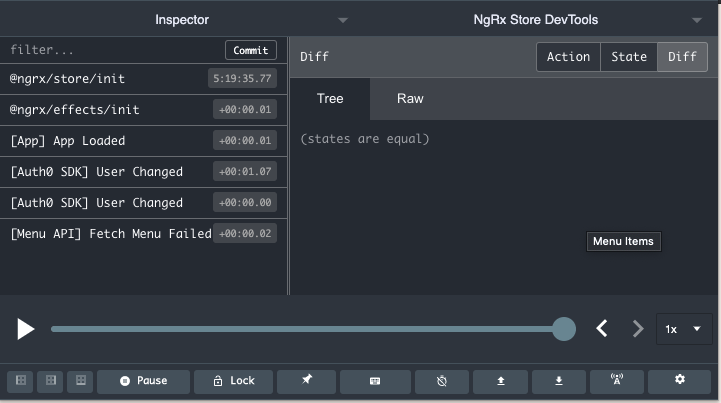
You can learn more about these features from their official documentation.
Install NgRx
You can either use npm or Angular's CLI to install NgRx dependencies.
Using npm
npm install @ngrx/store --save
Using Angular's CLI
ng add @ngrx/store@latest
You will also be using NgRx's Effects to handle your store's side effects. Let's add that dependency.
Using npm
npm install @ngrx/effects --save
Using Angular's CLI
ng add @ngrx/effects@latest
At the time this post was written, the latest NgRx store and effects version was
12.2.0, which will be the version we will be using throughout the tutorial.
Architecture
At its core, the app is an admin dashboard where the logged-in user can add, edit, and delete a menu item. The logged-in user will perform all the operations or a subset of it depending on their permissions. You will use NgRx to manage the state updates and user/server related events.
You will create two Stores for our application:
- menus: to manage menu related functionalities (CRUD operations)
- user: to manage user-related functionalities such as authentication using Auth0
You will also split each part of the Store into individual files to make it easier to follow throughout the tutorial.
Let's first start by creating the following folder structure in our core directory (you will be updating each file as we discuss each section):
|- src/app/core
    |- state
        |- menus
            |- menus.actions.ts
            |- menus.effects.ts
            |- menus.reducer.ts
            |- menus.selector.ts
            |- menus.state.ts
            |- index.ts
        |- user
            |- user.actions.ts
            |- user.effects.ts
            |- user.reducer.ts
            |- user.selector.ts
            |- user.state.ts
            |- index.ts
        |- core.state.ts
        |- core.reducer.ts
        |- index.ts
The starter app is using a
BehaviorSubjectinmenu-state.service.tsto manage it's state. This tutorial will walk you through migrating that to NgRx.
Menus State Management
Create Menus State
Let's start with creating the state object for menus. Open menus.state.ts and add the following code 👇
// src/app/core/state/menus/menus.state.ts

import { MenuItem } from "../../models";

export interface MenusState {
  menuItems: MenuItem[];
}

export const initialState: MenusState = {
  menuItems: [],
};
Let's also create a barrel export in our menus folder. Create index.ts and add the following code 👇
// src/app/core/state/menus/index.ts

export * from "./menus.state";
The interface MenusState defines the type of object Menu's state will have. The initialState, on the other hand, represents the initial state of the state object when the store is first initialized.
Create Core State
To be able to access MenusState from our Store, you will need to add it to your CoreState's state object. Open core.state.ts and add the following code 👇
// src/app/core/state/core.state.ts

import { MenusState } from "./menus";

export interface State {
  menus: MenusState;
}
Create Menus Action
Next, you will need to define what Actions you need to handle. We will be following the Good Action Hygiene principle when writing our Actions.
On a high level, Good Action Hygiene recommends thinking of Actions as events instead of commands. Instead of addMenuItem as the Action, use addMenuItemFormSubmitted. This pattern also encourages dispatching specific Action instead of reusing the same Action and including the source as part of the Action type. The image below shows the anatomy of an Action's type.

Following this pattern makes it easier to debug as you have distinct Actions from each source. This lets you immediately know what event has just taken place and where it came from with a quick look at the devtools.
You can learn more about Good Action hygiene in this blog post by Sameera Perera and Mike Ryan's talk at ng-conf 2018.
Let's start with user-initiated Actions. This would include adding a new menu item, updating an existing menu item, and deleting a current menu item. Open menus.actions.ts and add the following code 👇
// src/app/core/state/menus/menus.actions.ts
import { createAction, props } from "@ngrx/store";
import { BaseMenuItem, MenuItem } from "../../models";

export const addMenuItemFormSubmitted = createAction(
  "[Add Menu Page] Add Menu Item Form Submitted",
  props<{ menuItem: BaseMenuItem }>()
);

export const editMenuItemFormSubmitted = createAction(
  "[Edit Menu Page] Edit Menu Item Form Submitted",
  props<{ menuItem: MenuItem }>()
);

export const deleteMenuItemInitiated = createAction(
  "[Delete Menu Page] Delete Menu Item Initiated",
  props<{ menuId: string }>()
);
You will need to fetch the menus from our API as the app load. Let's add an appLoaded Action that will be dispatched when the app loads. Open menus.actions.ts and add the following code 👇
// src/app/core/state/menus/menus.actions.ts
import { createAction, props } from "@ngrx/store";
import { BaseMenuItem, MenuItem } from "../../models";

// ✨ New 👇
export const appLoaded = createAction("[App] App Loaded");

export const addMenuItemFormSubmitted = createAction(
  "[Add Menu Page] Add Menu Item Form Submitted",
  props<{ menuItem: BaseMenuItem }>()
);

export const editMenuItemFormSubmitted = createAction(
  "[Edit Menu Page] Edit Menu Item Form Submitted",
  props<{ menuItem: MenuItem }>()
);

export const deleteMenuItemInitiated = createAction(
  "[Delete Menu Page] Delete Menu Item Initiated",
  props<{ menuId: string }>()
);
Let's continue to other API-related Actions. Since calling an API could either succeed or fail, let's add success and fail handlers for each API-related Action.
You could do success and error handling in several different ways. What I'm showing you is just one way you could do this.
Open menus.actions.ts and add the following code 👇
// src/app/core/state/menus/menus.actions.ts

import { createAction, props } from "@ngrx/store";
import { BaseMenuItem, MenuItem } from "../../models";

export const appLoaded = createAction("[App] App Loaded");

// ✨ New 👇
export const fetchMenuSuccess = createAction(
  "[Menu API] Fetch Menu Success",
  props<{ menuItems: MenuItem[] }>()
);

// ✨ New 👇
export const fetchMenuFailed = createAction(
  "[Menu API] Fetch Menu Failed",
  props<{ error: any }>()
);

export const addMenuItemFormSubmitted = createAction(
  "[Add Menu Page] Add Menu Item Form Submitted",
  props<{ menuItem: BaseMenuItem }>()
);

// ✨ New 👇
export const addMenuItemSuccess = createAction(
  "[Menu API] Add Menu Item Success"
);

// ✨ New 👇
export const addMenuItemFailed = createAction(
  "[Menu API] Add Menu Item Failed",
  props<{ error: any }>()
);

export const editMenuItemFormSubmitted = createAction(
  "[Edit Menu Page] Edit Menu Item Form Submitted",
  props<{ menuItem: MenuItem }>()
);

// ✨ New 👇
export const editMenuItemSuccess = createAction(
  "[Menu API] Edit Menu Item Success",
  props<{ menuItem: MenuItem }>()
);

// ✨ New 👇
export const editMenuItemFailed = createAction(
  "[Menu API] Edit Menu Item Failed",
  props<{ error: any }>()
);

export const deleteMenuItemInitiated = createAction(
  "[Delete Menu Page] Delete Menu Item Initiated",
  props<{ menuId: string }>()
);

// ✨ New 👇
export const deleteMenuItemSuccess = createAction(
  "[Menu API] Delete Menu Item Success",
  props<{ menuId: string }>()
);

// ✨ New 👇
export const deleteMenuItemFailed = createAction(
  "[Menu API] Delete Menu Item Failed",
  props<{ error: any }>()
);
Let's also add this to the barrel export. Open index.ts and add the following code:
// src/app/core/state/menus/index.ts

export * from "./menus.state";

// ✨ New 👇
export * from "./menus.actions";
Update Application to Use Menu Actions
You will now update the current implementation in our application with these Actions for any state-related operations. You do this by injecting NgRx's Store in the component and calling its dispatch function with the Action you want to execute.
Starting with appLoaded, as this is called when the application first loads, let's add this to your AppComponent's ngOnInit. Open app.component.ts and add the following code 👇
// src/app/app.component.ts

import { Component } from "@angular/core";
// ✨ New 👇
import { Store } from "@ngrx/store";
import { appLoaded } from "./core/state/menus";

@Component({
  selector: "app-root",
  templateUrl: "./app.component.html",
  styleUrls: ["./app.component.scss"],
})
export class AppComponent {
  title = "spa-angular-typescript-dashboard";

  // ✨ New 👇
  constructor(private store: Store) {}

  ngOnInit(): void {
    // ✨ New 👇
    this.store.dispatch(appLoaded());
  }
}
Moving on to adding a menu item. Open add-item.component.ts and add the following code 👇
// src/app/features/menu/add-item/add-item.component.ts

import { Component } from "@angular/core";
import { Location } from "@angular/common";
import { BaseMenuItem } from "src/app/core";

// ✨ New 👇
import { Store } from "@ngrx/store";
import { addMenuItemFormSubmitted } from "src/app/core/state/menus";

const MenuItemPlaceholder: BaseMenuItem = {
  name: "French Fries",
  price: "299.00",
  tagline: "Crispy goodness",
  description:
    "A plate of light and crispy French fries using Idaho potatoes and peanut oil",
  image:
    "https://as2.ftcdn.net/jpg/02/13/18/09/500_F_213180964_DfqvRIHj0D3t9duYUROXuQ011AgVJIaM.jpg",
  calories: 410,
  category: "sides",
};

@Component({
  selector: "app-add-item",
  templateUrl: "./add-item.component.html",
  styles: [
    `
      :host {
        width: 100%;
        height: 100%;
      }
    `,
  ],
})
export class AddItemComponent {
  menuItem = MenuItemPlaceholder;
  constructor(
    private location: Location,
    // ✨ New 👇
    private store: Store
  ) {}

  submit(menu: BaseMenuItem): void {
    // ✨ New 👇
    this.store.dispatch(
      addMenuItemFormSubmitted({
        menuItem: menu,
      })
    );
  }

  cancel(): void {
    this.location.back();
  }
}
Deleting a menu item. Open delete-item.component.ts and add the following code 👇
// src/app/features/menu/delete-item/delete-item.component.ts

import { Component } from "@angular/core";
import { Location } from "@angular/common";
import { ActivatedRoute, Router } from "@angular/router";
import { map, switchMap } from "rxjs/operators";
import { MenusStateService } from "src/app/core";

// ✨ New 👇
import { Store } from "@ngrx/store";
import { deleteMenuItemInitiated } from "src/app/core/state/menus";

@Component({
  selector: "app-delete-item",
  templateUrl: "./delete-item.component.html",
  styleUrls: ["./delete-item.component.scss"],
})
export class DeleteItemComponent {
  menuItemId$ = this.activatedRoute.params.pipe(map((params) => params.id));
  menuItem$ = this.menuItemId$.pipe(
    switchMap((id) => this.menusStateService.selectMenuItem$(id))
  );

  constructor(
    private activatedRoute: ActivatedRoute,
    private location: Location,
    private router: Router,
    private menusStateService: MenusStateService,
    // ✨ New 👇
    private store: Store
  ) {}

  deleteMenuItem(id: string): void {
    // ✨ New 👇
    this.store.dispatch(deleteMenuItemInitiated({ menuId: id }));
  }

  cancel(): void {
    this.back();
  }

  back(): void {
    this.location.back();
  }

  navigateHome(): void {
    this.router.navigate(["/menu"]);
  }
}
Editing an existing menu item. Open edit-item.component.ts and add the following code 👇
// src/app/features/menu/edit-item/edit-item.component.ts

import { Component } from "@angular/core";
import { Location } from "@angular/common";
import { ActivatedRoute } from "@angular/router";
import { map, switchMap, tap } from "rxjs/operators";
import { BaseMenuItem, MenusStateService } from "src/app/core";

// ✨ New 👇
import { Store } from "@ngrx/store";
import { editMenuItemFormSubmitted } from "src/app/core/state/menus";

@Component({
  selector: "app-edit-item",
  templateUrl: "./edit-item.component.html",
  styles: [
    `
      :host {
        width: 100%;
        height: 100%;
      }
    `,
  ],
})
export class EditItemComponent {
  menuItemId$ = this.activatedRoute.params.pipe(map((params) => params.id));
  menuItem$ = this.menuItemId$.pipe(
    tap((id) => (this._id = id)),
    switchMap((id) => this.menusStateService.selectMenuItem$(id))
  );

  private _id: number;

  constructor(
    private activatedRoute: ActivatedRoute,
    private location: Location,
    private menusStateService: MenusStateService,
    // ✨ New 👇
    private store: Store
  ) {}

  cancel(): void {
    this.location.back();
  }

  submit(menu: BaseMenuItem): void {
    // ✨ New 👇
    this.store.dispatch(
      editMenuItemFormSubmitted({
        menuItem: {
          ...menu,
          id: this._id.toString(),
        },
      })
    );
  }
}
Create Menu Selectors
Before creating selectors for slices of the menu state, you must create a feature selector for menus to access the state object we defined in the States section. Open menus.selector.ts and add the following code 👇
// src/app/core/state/menus/menus.selector.ts

import { createFeatureSelector, createSelector } from "@ngrx/store";
import { MenusState } from "./menus.state";

export const selectMenus = createFeatureSelector<MenusState>("menus");
You can use the createSelector method to select slices of the feature state using the feature selector. For menus, you only have one entry in our object which is menuItems. Let's create a selector to access that by returning state.menuItems. Open menus.selector.ts and update it with the following code 👇
// src/app/core/state-ngrx/menus/menus.selector.ts

import { createFeatureSelector, createSelector } from "@ngrx/store";
import { MenusState } from "./menus.state";

export const selectMenus = createFeatureSelector<MenusState>("menus");

// ✨ New 👇
export const selectMenuItems = createSelector(
  selectMenus,
  (state: MenusState) => state.menuItems
);
For pages like Menu Details, Edit Menu and Delete Menu, you'll need to access a specific menu item from the Store. You can do this by passing the menu's id as a prop to our selector and searching through our array of menu items. Open menus.selector.ts and add the following code 👇
// src/app/core/state-ngrx/menus/menus.selector.ts

import { createFeatureSelector, createSelector } from "@ngrx/store";
import { MenusState } from "./menus.state";

export const selectMenus = createFeatureSelector<MenusState>("menus");

export const selectMenuItems = createSelector(
  selectMenus,
  (state: MenusState) => state.menuItems
);

// ✨ New 👇
export const selectMenuItem = (props: { id: string }) =>
  createSelector(selectMenuItems, (menuItems) =>
    menuItems.find((menuItem) => menuItem.id === props.id)
  );
Let's also add the selector to the barrel export. Open index.ts and add the following code 👇
// src/app/core/state/menus/index.ts

export * from "./menus.state";
export * from "./menus.actions";

// ✨ New 👇
export * from "./menus.selector";
Update Application to Use Menu Selectors
Similar to what you did with Actions, let's update the application to get data required by the components using NgRx Selectors. You can use Selectors by injecting NgRx's Store and calling it's select function passing in the selector's name, which returns the slice of the state that we need.
Starting with the main dashboard, open menu-items.component.ts and add the following code 👇
// src/app/features/menu/menu-items/menu-items.component.ts

import { Component } from "@angular/core";
import { ActivatedRoute, Router } from "@angular/router";
import { RolesService } from "src/app/core";

// ✨ New 👇
import { Store } from "@ngrx/store";
import { selectMenuItems } from "src/app/core/state/menus";

@Component({
  selector: "app-menu-items",
  templateUrl: "./menu-items.component.html",
  styles: [
    `
      :host {
        width: 100%;
        height: 100%;
      }
    `,
  ],
})
export class MenuItemsComponent {
  // ✨ New 👇
  menuItems$ = this.store.select(selectMenuItems);
  isAdmin$ = this.rolesService.isAdmin$;

  constructor(
    private router: Router,
    private activatedRoute: ActivatedRoute,
    private rolesService: RolesService,
    // ✨ New 👇
    private store: Store
  ) {}

  addMenuItem(): void {
    this.router.navigate(["add"], { relativeTo: this.activatedRoute });
  }
}
Moving on to the Menu Details page. Here, we only need a specific menu's data. Instead of using the selectMenuItems, you will use selectMenuItem and pass in the menu id from the route parameters. Open menu-item.component.ts and add the following code 👇
// src/app/features/menu/menu-item/menu-item.component.ts

import { Component } from "@angular/core";
import { Location } from "@angular/common";
import { ActivatedRoute, Router } from "@angular/router";
import { map, switchMap } from "rxjs/operators";
import { RolesService } from "src/app/core";

// ✨ New 👇
import { Store } from "@ngrx/store";
import { selectMenuItem } from "src/app/core/state/menus";

@Component({
  selector: "app-menu-item",
  templateUrl: "./menu-item.component.html",
  styleUrls: ["./menu-item.component.scss"],
})
export class MenuItemComponent {
  menuItemId$ = this.activatedRoute.params.pipe(map((params) => params.id));

  // ✨ New 👇
  menuItem$ = this.menuItemId$.pipe(
    switchMap((id) => this.store.select(selectMenuItem({ id: id })))
  );
  isAdmin$ = this.rolesService.isAdmin$;

  constructor(
    private activatedRoute: ActivatedRoute,
    private router: Router,
    private location: Location,
    private rolesService: RolesService,
    // ✨ New 👇
    private store: Store
  ) {}

  back(): void {
    this.location.back();
  }

  navigateTo(url: string): void {
    this.router.navigateByUrl(`${this.router.url}/${url}`);
  }
}
Delete Menu Item Component, open delete-item.component.ts and add the following code 👇
// src/app/features/menu/delete-item/delete-item.component.ts

import { Component } from "@angular/core";
import { Location } from "@angular/common";
import { ActivatedRoute, Router } from "@angular/router";
import { map, switchMap } from "rxjs/operators";
import { Store } from "@ngrx/store";
import {
  deleteMenuItemInitiated,
  // ✨ New 👇
  selectMenuItem,
} from "src/app/core/state/menus";

@Component({
  selector: "app-delete-item",
  templateUrl: "./delete-item.component.html",
  styleUrls: ["./delete-item.component.scss"],
})
export class DeleteItemComponent {
  menuItemId$ = this.activatedRoute.params.pipe(map((params) => params.id));

  // ✨ New 👇
  menuItem$ = this.menuItemId$.pipe(
    switchMap((id) => this.store.select(selectMenuItem({ id: id })))
  );

  constructor(
    private activatedRoute: ActivatedRoute,
    private location: Location,
    private router: Router,
    private store: Store
  ) {}

  deleteMenuItem(id: string): void {
    this.store.dispatch(deleteMenuItemInitiated({ menuId: id }));
    this.navigateHome();
  }

  cancel(): void {
    this.back();
  }

  back(): void {
    this.location.back();
  }

  navigateHome(): void {
    this.router.navigate(["/menu"]);
  }
}
And finally, Edit Menu Item. Open edit-item.component.ts and add the following code 👇
// src/app/features/menu/edit-item/edit-item.component.ts

import { Component } from "@angular/core";
import { Location } from "@angular/common";
import { ActivatedRoute } from "@angular/router";
import { map, switchMap, tap } from "rxjs/operators";
import { BaseMenuItem } from "src/app/core";
import { Store } from "@ngrx/store";
import {
  editMenuItemFormSubmitted,
  // ✨ New 👇
  selectMenuItem,
} from "src/app/core/state/menus";

@Component({
  selector: "app-edit-item",
  templateUrl: "./edit-item.component.html",
  styles: [
    `
      :host {
        width: 100%;
        height: 100%;
      }
    `,
  ],
})
export class EditItemComponent {
  menuItemId$ = this.activatedRoute.params.pipe(map((params) => params.id));

  // ✨ New 👇
  menuItem$ = this.menuItemId$.pipe(
    tap((id) => (this._id = id)),
    switchMap((id) => this.store.select(selectMenuItem({ id: id })))
  );

  private _id: number;

  constructor(
    private activatedRoute: ActivatedRoute,
    private location: Location,
    private store: Store
  ) {}

  cancel(): void {
    this.location.back();
  }

  submit(menu: BaseMenuItem): void {
    this.store.dispatch(
      editMenuItemFormSubmitted({
        menuItem: {
          ...menu,
          id: this._id.toString(),
        },
      })
    );
    this.location.back();
  }
}
Create Menus Reducer
The reducer is where the state will be transformed based on the actions. For example, deleting a menu item will remove that item from the state, resulting in the UI getting updated to reflect that change.
We will modify the Store when we receive a successful response when fetching the menu items data, editing a menu item successfully, and deleting a menu item successfully. Open menus.reducer.ts and add the following code 👇
// src/app/core/state/menus/menus.reducer.ts

import { Action, createReducer, on } from "@ngrx/store";
import * as MenusActions from "./menus.actions";
import { initialState, MenusState } from "./menus.state";

const menusReducer = createReducer(
  initialState,
  on(MenusActions.fetchMenuSuccess, (state, { menuItems }) => ({
    ...state,
    menuItems: menuItems,
  })),
  on(MenusActions.editMenuItemSuccess, (state, { menuItem }) => {
    const menuItemIndex = state.menuItems.findIndex(
      (item) => item.id === menuItem.id
    );
    const updatedMenuItems = [...state.menuItems];
    updatedMenuItems[menuItemIndex] = menuItem;
    return {
      ...state,
      menuItems: updatedMenuItems,
    };
  }),
  on(MenusActions.deleteMenuItemSuccess, (state, { menuId }) => {
    const menuItemIndex = state.menuItems.findIndex(
      (item) => item.id === menuId
    );
    const updatedMenuItems = [...state.menuItems];
    updatedMenuItems.splice(menuItemIndex, 1);
    return {
      ...state,
      menuItems: updatedMenuItems,
    };
  })
);

export function reducer(state: MenusState | undefined, action: Action) {
  return menusReducer(state, action);
}
Let's break this down. on refers to the listener, and the passed-in parameters are the action that it listens to and what function to execute when that action is executed.
Take the first one, for example, MenusActions.fetchMenuSuccess refers to the action that, when dispatched, will execute the function that is passed in as the second parameter. The function in the second parameter contains the logic to update the current state based on said Action and returns the modified state.
Create Core Reducer
To use Menu's Reducer, you will need to add the reducer to the ActionReducerMap that will be used to initialize the StoreModule. Open core.reducer.ts and add the following code 👇
// src/app/core/state/core.reducers.ts

import { ActionReducerMap, MetaReducer } from "@ngrx/store";
import { State } from "./core.state";
import * as MenusReducer from "./menus/menus.reducer";

export const reducers: ActionReducerMap<State> = {
  menus: MenusReducer.reducer,
};

export const metaReducers: MetaReducer<State>[] = [];
Create a barrel export for our state directory with the following contents 👇
// src/app/core/state/index.ts

export * from "./core.state";
export * from "./core.reducer";
Configure Store Module
Initialize the StoreModule passing the reducers and metaReducers in our core.reducers.ts defined in the previous section. Open app.module.ts and add the following code 👇
// src/app/app.module.ts

import { BrowserModule } from "@angular/platform-browser";
import { NgModule } from "@angular/core";
import { HttpClientModule, HTTP_INTERCEPTORS } from "@angular/common/http";
import { AuthHttpInterceptor, AuthModule } from "@auth0/auth0-angular";
import { StoreDevtoolsModule } from "@ngrx/store-devtools";

import { AppRoutingModule } from "./app-routing.module";
import { AppComponent } from "./app.component";
import { NavBarModule } from "./shared";

// ✨ New 👇
import { StoreModule } from "@ngrx/store";
import { reducers, metaReducers } from "./core/state";

@NgModule({
  imports: [
    BrowserModule,
    HttpClientModule,
    AuthModule.forRoot({
      ...environment.auth,
      httpInterceptor: {
        allowedList: [
          `${environment.serverUrl}/api/menu/items`,
          `${environment.serverUrl}/api/menu/items/*`,
        ],
      },
    }),
    AppRoutingModule,
    NavBarModule,
    StoreDevtoolsModule.instrument({
      maxAge: 25,
      logOnly: environment.production,
    }),

    // ✨ New 👇
    StoreModule.forRoot(reducers, {
      metaReducers,
    }),
  ],
  declarations: [AppComponent],
  bootstrap: [AppComponent],
  providers: [
    {
      provide: HTTP_INTERCEPTORS,
      useClass: AuthHttpInterceptor,
      multi: true,
    },
  ],
})
export class AppModule {}
Checkpoint: You should see a list of menu items on your dashboard and navigating to the menu details page/edit/delete should display more information about each menu item. Only authenticated users with a
menu-adminrole can navigate to the create, update, and delete menu items part of the application. Themenu-adminrole bundles the necessary permissions to execute these write operations. Read more on how to configure role-based access control (RBAC) and how to create an admin user for this application in this blogpost
Create Menus Effects
As explained at the beginning of the post, Effects are where side effects of the Action are handled. For Menus, this will mostly be making an HTTP request to get data from the server or perform other CRUD operations.
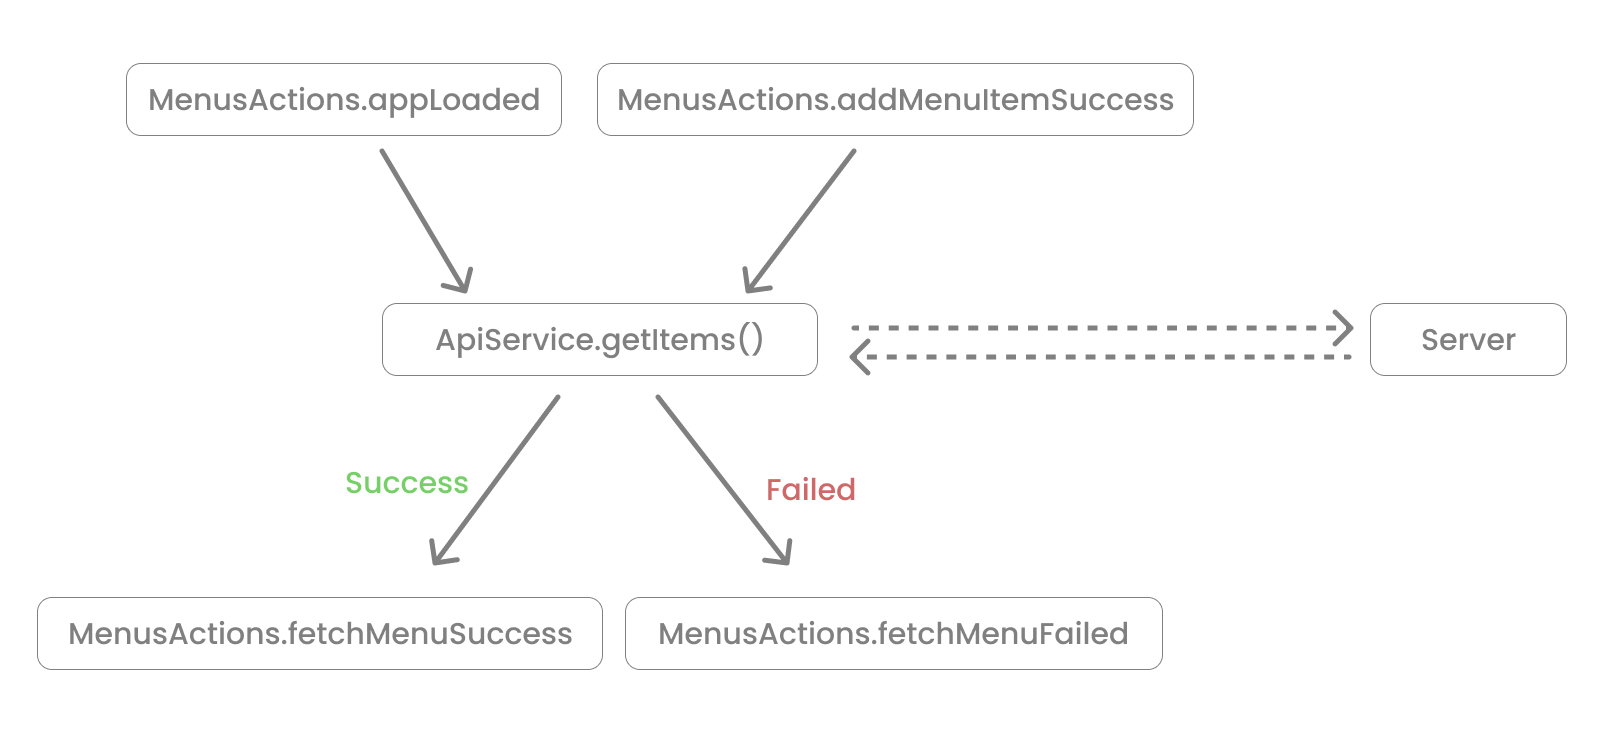
Let's start with a simple effect that handles fetching the menu items from the API and updating the store with new data. Since this logic needs to be executed when the app loads and a new menu item is added successfully, you will pass in 2 actions - MenusActions.appLoaded.type and MenusActions.addMenuItemSuccess. You will then switchMap to the apiService to get the menu items. If it's successful, dispatch the fecthMenuSuccess action with the menu items returned from the API which will update the store with this new data. If unsuccessful, it will jump to the catchError block, which dispatches the fetchMenuFailed action with the error thrown.
Tip: add your
catchErrorto the inner observable in yourswitchMapinstead of on the main observable to prevent the action stream from being closed when an error is thrown
Open menus.effects.ts and add the following code 👇
// src/app/core/state/menus/menus.effects.ts

import { Injectable } from "@angular/core";
import { Actions, createEffect, ofType } from "@ngrx/effects";
import { of } from "rxjs";
import { switchMap, map, catchError } from "rxjs/operators";
import { ApiService } from "../../services";
import * as MenusActions from "./menus.actions";

@Injectable()
export class MenusEffects {
  constructor(private actions$: Actions<any>, private apiService: ApiService) {}

  fetchMenus$ = createEffect(() =>
    this.actions$.pipe(
      // you can pass in multiple actions here that will trigger the same effect
      ofType(MenusActions.appLoaded.type, MenusActions.addMenuItemSuccess),
      switchMap(() =>
        this.apiService.getItems().pipe(
          map((menuItems) =>
            MenusActions.fetchMenuSuccess({ menuItems: menuItems })
          ),
          catchError((error) =>
            of(MenusActions.fetchMenuFailed({ error: error }))
          )
        )
      )
    )
  );
}
Following the same logic, let's create effects for addMenu, editMenu, and deleteMenu. Open menus.effects.ts and update it with the following code 👇
// src/app/core/state/menus/menus.effects.ts

import { Injectable } from "@angular/core";
// ✨ New 👇
import { Location } from "@angular/common";
// ✨ New 👇
import { Router } from "@angular/router";
import { Actions, createEffect, ofType } from "@ngrx/effects";
import { of } from "rxjs";
import { switchMap, map, tap, catchError } from "rxjs/operators";
import { ApiService } from "../../services";
import * as MenusActions from "./menus.actions";

@Injectable()
export class MenusEffects {
  constructor(
    // ✨ New 👇
    private router: Router,
    // ✨ New 👇
    private location: Location,
    private actions$: Actions<any>,
    private apiService: ApiService
  ) {}

  fetchMenus$ = createEffect(() =>
    this.actions$.pipe(
      ofType(MenusActions.appLoaded.type, MenusActions.addMenuItemSuccess),
      switchMap(() =>
        this.apiService.getItems().pipe(
          map((menuItems) =>
            MenusActions.fetchMenuSuccess({ menuItems: menuItems })
          ),
          catchError((error) =>
            of(MenusActions.fetchMenuFailed({ error: error }))
          )
        )
      )
    )
  );

  // ✨ New 👇
  addMenu$ = createEffect(() =>
    this.actions$.pipe(
      ofType(MenusActions.addMenuItemFormSubmitted.type),
      switchMap((action) =>
        this.apiService.addItem(action.menuItem).pipe(
          tap(() => this.router.navigate(["/menu"])),
          map(() => MenusActions.addMenuItemSuccess()),
          catchError((error) =>
            of(MenusActions.addMenuItemFailed({ error: error }))
          )
        )
      )
    )
  );

  // ✨ New 👇
  editMenu$ = createEffect(() =>
    this.actions$.pipe(
      ofType(MenusActions.editMenuItemFormSubmitted.type),
      switchMap((action) =>
        this.apiService.updateItem(action.menuItem).pipe(
          tap(() => this.location.back()),
          map(() =>
            MenusActions.editMenuItemSuccess({ menuItem: action.menuItem })
          ),
          catchError((error) =>
            of(MenusActions.editMenuItemFailed({ error: error }))
          )
        )
      )
    )
  );

  // ✨ New 👇
  deleteMenu$ = createEffect(() =>
    this.actions$.pipe(
      ofType(MenusActions.deleteMenuItemInitiated.type),
      switchMap((action) =>
        this.apiService.deleteItem(action.menuId).pipe(
          tap(() => this.router.navigate(["/menu"])),
          map(() =>
            MenusActions.deleteMenuItemSuccess({ menuId: action.menuId })
          ),
          catchError((error) =>
            of(MenusActions.deleteMenuItemFailed({ error: error }))
          )
        )
      )
    )
  );
}
Tip: You can add the following effect if you want to listen to every action that gets dispatched for debugging purposes (more on debugging in the devtools section) 👇
init$ = createEffect(
  () => this.actions$.pipe(tap((action) => console.log(action))),
  { dispatch: false }
);
Add menus-effects to menu directory's barrel export. Open index.ts and add the following code 👇
// src/app/core/state/menus/index.ts

export * from "./menus.state";
export * from "./menus.actions";
export * from "./menus.selector";

// ✨ New 👇
export * from "./menus.effects";
Configure Effects Module
You will then need to initialize NgRx's EffectsModule passing in all your feature Effects (in our case, just the MenusEffects for now). Open app.module.ts and add the following code 👇
// src/app/app.module.ts

import { BrowserModule } from "@angular/platform-browser";
import { NgModule } from "@angular/core";
import { HttpClientModule } from "@angular/common/http";
import { StoreDevtoolsModule } from "@ngrx/store-devtools";
import { StoreModule } from "@ngrx/store";

// ✨ New 👇
import { EffectsModule } from "@ngrx/effects";

import { AppRoutingModule } from "./app-routing.module";
import { AppComponent } from "./app.component";
import { NavBarModule } from "./shared";
import { reducers, metaReducers } from "./core/state";

// ✨ New 👇
import { MenusEffects } from "./core/state/menus";

@NgModule({
  imports: [
    BrowserModule,
    HttpClientModule,
    AppRoutingModule,
    NavBarModule,
    StoreDevtoolsModule.instrument({
      maxAge: 25,
      logOnly: environment.production,
    }),
    StoreModule.forRoot(reducers, {
      metaReducers,
    }),
    // ✨ New 👇
    EffectsModule.forRoot([MenusEffects]),
  ],
  declarations: [AppComponent],
  bootstrap: [AppComponent],
  providers: [
    {
      provide: HTTP_INTERCEPTORS,
      useClass: AuthHttpInterceptor,
      multi: true,
    },
  ],
})
export class AppModule {}
Checkpoint: Executing any CRUD operations such as adding a new menu item and editting or deleting an existing menu item should make an API call to update the server's database and also update the app's state. Only authenticated users with a
menu-adminrole can create, update, and delete menu items. Themenu-adminrole bundles the necessary permissions to execute these write operations. Read more on how to configure role-based access control (RBAC) and how to create an admin user for this application in this blogpost
About the author

William Juan
Frontend Developer