Blazor WebAssembly allows you to build Single-Page Applications (SPA) using C# and the .NET platform. To run, your application is sent directly to the user's browser without any server-side manipulation. This type of application is called static web application. You can publish your Blazor WebAssembly application by using any standard web server. However, you can use Azure Static Web Apps (Azure SWA), which provides additional and specific support for SPAs. In this article, you'll learn about Azure SWA's support for authentication and how to use it in your Blazor WebAssembly app to integrate Auth0.
Before Starting
This article assumes that you have some knowledge of the Blazor framework and how to integrate authentication into Blazor applications. If not, you can learn about these topics by reading the following articles:
To run and test the sample application, make sure you have the latest .NET SDK installed on your machine.
You will also need an Auth0 account. If you don't already have one, you can sign up for free.
You will need an Azure account with Standard Plan to use custom authentication.
Finally, you need Azure SWA CLI to emulate Azure SWA on your local machine and deploy your application to Azure SWA.
Azure SWA and Authentication
As mentioned above, Azure SWA allows you to host static content in the cloud. However, this service is not just a static web server. It also provides you with additional services such as support for serverless APIs based on Azure Functions, integration with GitHub for building and deployment, staging environments, etc. It also includes authentication support.
Login and logout endpoints
Azure SWA provides built-in support for authentication with three Identity providers: GitHub, Twitter, and Azure Active Directory (Azure AD). This means that your static application doesn't have to deal with OpenID Connect to authenticate your users. Azure SWA exposes a few endpoints in the form of /.auth/login/<IdProvider> and /.auth/logout for login and logout, respectively. The <IdProvider> placeholder stands for the specific Identity provider you want to use.
In summary, the following authentication endpoints are already available in your Azure SWA instance:
| Id Provider | Authentication endpoint |
|---|---|
| GitHub | /.auth/login/github |
/.auth/login/twitter | |
| Azure AD | /.auth/login/aad |
So, if your application includes a link to one of these endpoints, when the user clicks on the link, they will be redirected to the Identity provider's login page for authentication. No special OIDC library or other configuration is required!
User data endpoint
In addition, Azure SWA provides your application with another endpoint to retrieve the current user's information: /.auth/me. This endpoint returns a JSON object with a structure similar to the following:
{
  "identityProvider": "github",
  "userId": "q31bt64ya7i50d367b2905e3b8182fc5b",
  "userDetails": "johnny",
  "userRoles": ["anonymous", "authenticated"],
  "claims": [{
    "typ": "job",
    "val": "Developer"
  }]
}
As you can see, this JSON contains information about the Identity provider, the username (userDetails), the user's roles, and any other claim associated with the current user. By default, all users have the anonymous role, which allows them to access any public page. After authentication, the user also gets the built-in authenticated role. See the Microsoft documentation to learn how to add and use your own custom roles.
Once your application user is authenticated, you can make a request to that endpoint to get the user's details.
Blazor WebAssembly and Azure SWA Authentication
Based on the Azure SWA authentication infrastructure, you now know that supporting authentication in your SPA is as simple as calling these endpoints. This is true regardless of the technology your SPA is built on. In the case of Blazor WebAssembly, you can get rid of the Microsoft.AspNetCore.Components.WebAssembly.Authentication package to add authentication support. However, this package provides the benefit of automatically mapping the result of the authentication to a principal. It also provides an authentication state that you can rely on to make authorization decisions. This allows you to use all the authorization components that make your life easier, such as <AuthorizeView> and <AuthorizeRouteView>. How can you take advantage of the Azure SWA authentication support without giving up the convenience of authorization components? Simple: create a custom authentication state provider.
Create a custom authentication state provider
Your custom authentication state provider will have the task of building a principal from the response given by the /.auth/me endpoint. To start defining it, create a folder named SwaAuthenticationStateProvider in the root folder of your Blazor project and add a ClientPrincipal.cs file with the following content:
// SwaAuthenticationStateProvider/ClientPrincipal.cs

using System.Security.Claims;
public class ClientPrincipal
{
    public string IdentityProvider { get; set; }
    public string UserId { get; set; }
    public string UserDetails { get; set; }
    public IEnumerable<string> UserRoles { get; set; }
    public IEnumerable<Dictionary<String, String>> Claims { get; set; }
}
The ClientPrincipal class defines a model for the principal that represents the authenticated user. Its properties map to the properties of the JSON object returned by the /.auth/me endpoint.
Then, add another file named AuthenticationData.cs with the following content:
// SwaAuthenticationStateProvider/AuthenticationData.cs

public class AuthenticationData
{
    public ClientPrincipal ClientPrincipal { get; set; }
}
This class is just a support class that helps capture the response from the /.auth/me endpoint, as you will see in a moment.
The actual authentication state provider is implemented by the following class:
// SwaAuthenticationStateProvider/SwaAuthenticationStateProvider.cs

using System.Security.Claims;
using Microsoft.AspNetCore.Components.Authorization;
using System.Net.Http.Json;

public class SwaAuthenticationStateProvider : AuthenticationStateProvider
{
  private readonly HttpClient _httpClient;
  private readonly AuthenticationState _anonymousUser;

  public SwaAuthenticationStateProvider(HttpClient httpClient)
  {
    _httpClient = httpClient;
    _anonymousUser = new AuthenticationState(new ClaimsPrincipal(new ClaimsIdentity()));
  }

  public override async Task<AuthenticationState> GetAuthenticationStateAsync()
  {
    try
    {
      var authenticationData = await _httpClient.GetFromJsonAsync<AuthenticationData>("/.auth/me");
      var principal = authenticationData!.ClientPrincipal;

      if (principal == null || string.IsNullOrWhiteSpace(principal.IdentityProvider))
        return _anonymousUser;

      principal.UserRoles = principal.UserRoles?.Except(new[] { "anonymous" }, StringComparer.CurrentCultureIgnoreCase).ToList();

      if (!principal.UserRoles?.Any() ?? true)
      {
        return _anonymousUser;
      }

      var identity = new ClaimsIdentity(principal.IdentityProvider);
      identity.AddClaim(new Claim(ClaimTypes.NameIdentifier, principal.UserId));
      identity.AddClaim(new Claim(ClaimTypes.Name, principal.UserDetails));
      identity.AddClaims(principal!.UserRoles!.Select(r => new Claim(ClaimTypes.Role, r)));
      identity.AddClaims(principal!.Claims!.Select(c => new Claim(c["typ"], c["val"])));

      return new AuthenticationState(new ClaimsPrincipal(identity));
    }
    catch
    {
      return _anonymousUser;
    }
  }
}
In short, the SwaAuthenticationStateProvider class inherits from AuthenticationStateProvider and overrides the GetAuthenticationStateAsync() method.
Notice how the class constructor gets an HttpClient instance to make requests to the Azure SWA endpoint. The constructor also creates a default empty principal to represent the anonymous user. The anonymous user is returned if there is a problem getting the authenticated user.
The GetAuthenticationStateAsync() calls the /.auth/me endpoint, creates the principal for the user based on the endpoint response, and creates an AuthenticationState instance based on that principal.
Register the custom authentication state provider
Once you have created your custom authentication state provider, you need to register it in the Program.cs file of your Blazor WebAssembly application:
// Program.cs

// ...existing code...

builder.Services.AddScoped(sp => new HttpClient { BaseAddress = new Uri(builder.HostEnvironment.BaseAddress) });

//👇 new code
builder.Services
  .AddAuthorizationCore()
  .AddScoped<AuthenticationStateProvider, SwaAuthenticationStateProvider>();
// 👆 new code

await builder.Build().RunAsync();
That's it! Now you can use all the authorization features that Blazor offers you.
A specific project implementing the custom authentication state provider for SWA and its related NuGet package exist. However, at the time of writing, this project is still in preview and it doesn't seem to be actively supported at the moment. So, I decided to create an authentication state provider instead of relying on this package, since it's pretty easy.
Test Authentication with Azure SWA CLI
It's time to see how Azure SWA authentication support works. To get straight to the point, I have created a ready-to-run Blazor WebAssembly application for you. You can grab it from GitHub by running the following command in a terminal window:
git clone -b github-authn https://github.com/auth0-blog/blazor-wasm-azure-swa.git
The application implements the classic weather forecast application using GitHub as its Identity provider.
Meet the sample application
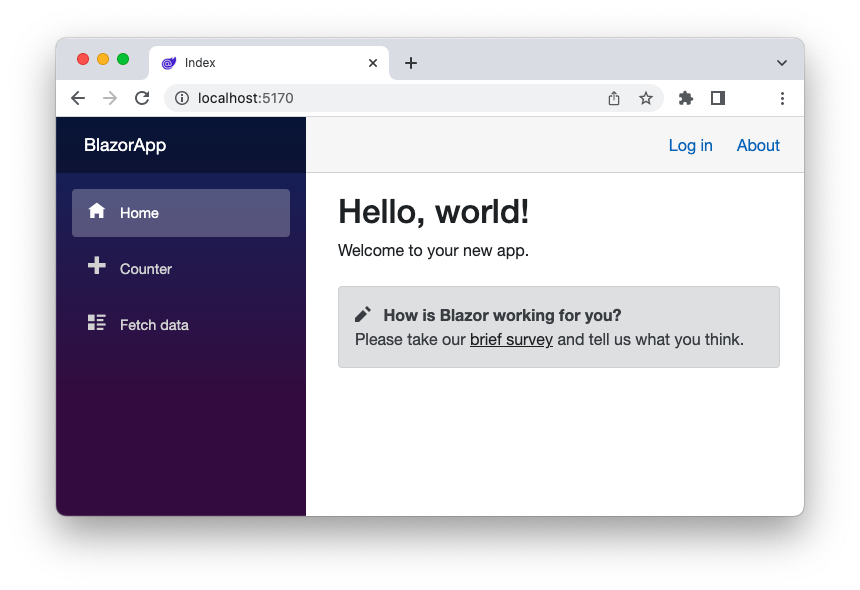
Once you have downloaded the sample application, run it with the dotnet run command. Then point your browser to the http://localhost:5170 address and you will see a home page like the following:
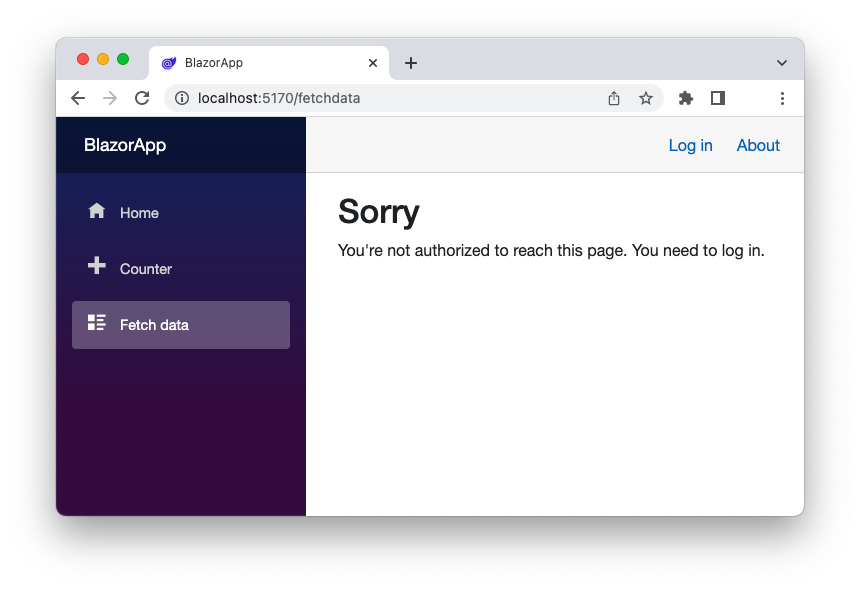
If you click the Counter menu item, you can see and interact with its content. If you click the Fetch data menu item, you will see a message saying that you need to log in to see the contents of the page:
So, let's log in to the application by clicking the Log in link in the top right corner.
Actually, you are not able to log in. A weird message tells you that "there is nothing at this address":
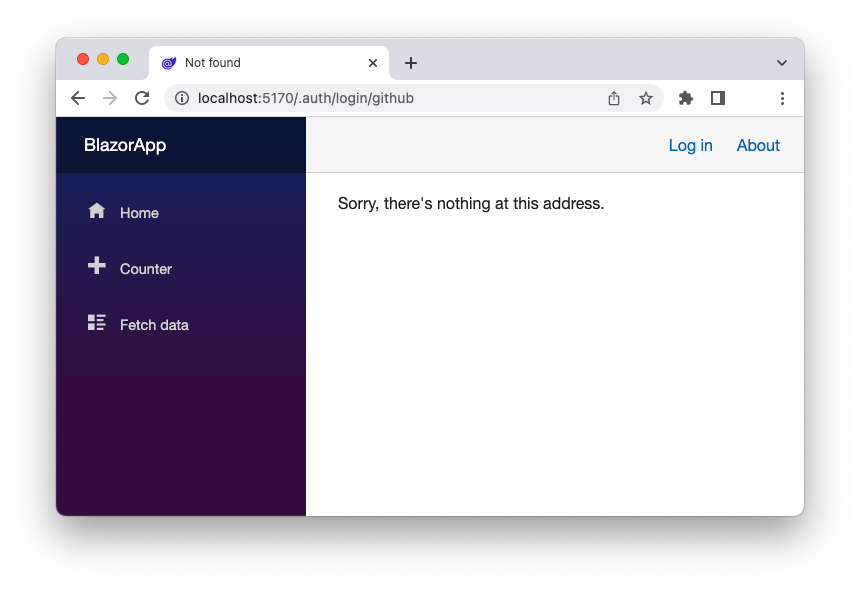
This actually makes sense. The /.auth/* endpoints are provided by Azure SWA, but you run the application on your machine.
Emulate Azure SWA with Azure SWA CLI
You don't need to deploy to Azure SWA to test your SWA integration. You can use the Azure SWA CLI to emulate the SWA environment on your machine. Install this tool on your machine by running the following command in a terminal window:
npm install -g @azure/static-web-apps-cli
This command installs the tool globally so that you can use it anywhere on your machine.
Now, make sure that your Blazor WebAssembly application is stopped. If you haven't changed anything, it should be listening to the http://localhost:5170 address. Run the following command in the root folder of the application:
swa start http://localhost:5170 --run "dotnet run"
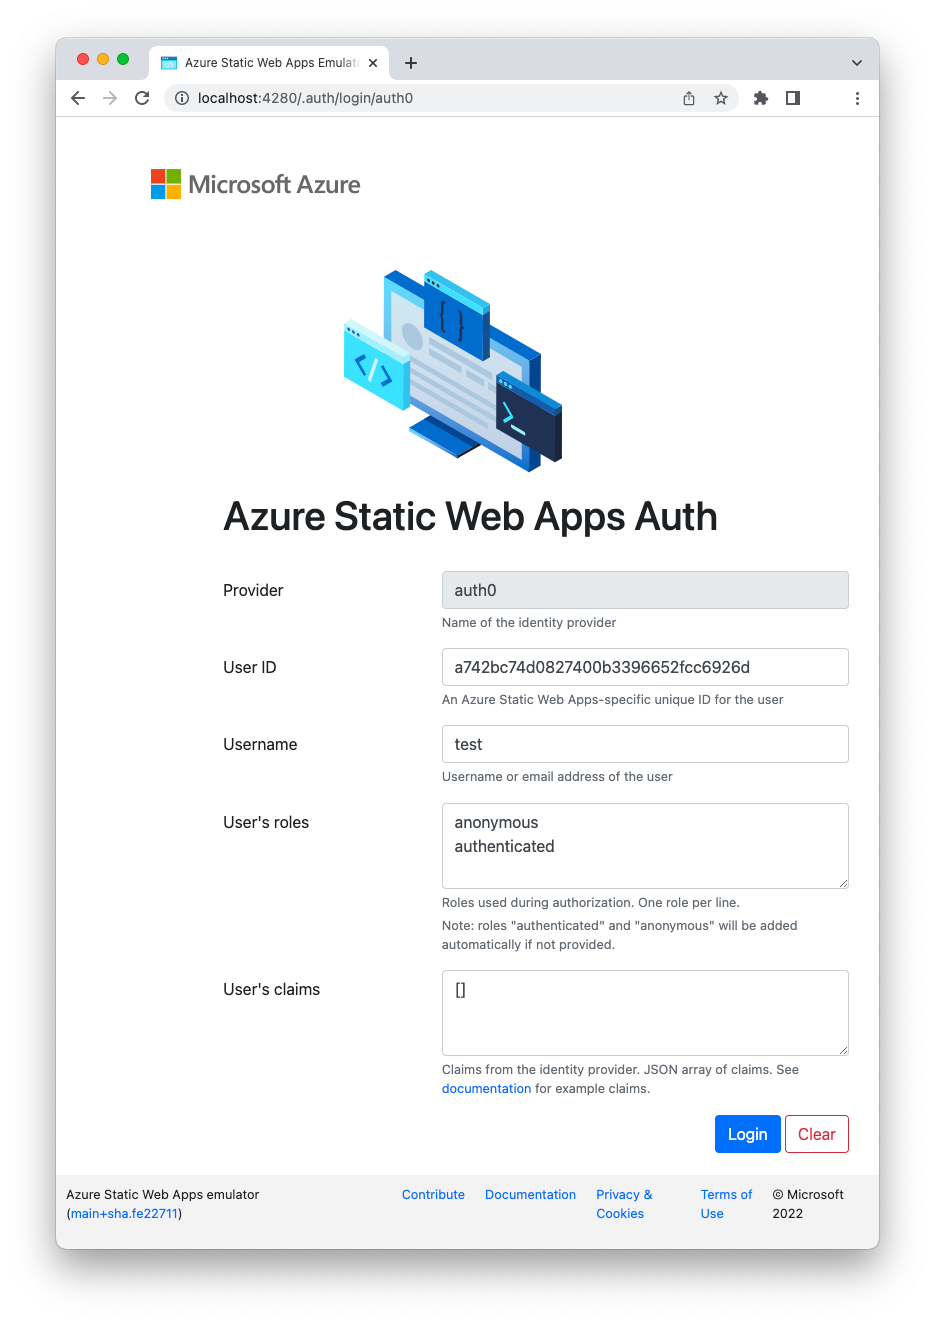
This command starts the Blazor development server and creates a proxy listening on the http://localhost:4280 address. The proxy emulates the Azure SWA environment on your machine. So, point your browser to the http://localhost:4280 address and you will see the sample app UI again. Now try to log in by clicking the Log in link and you will access the following page:
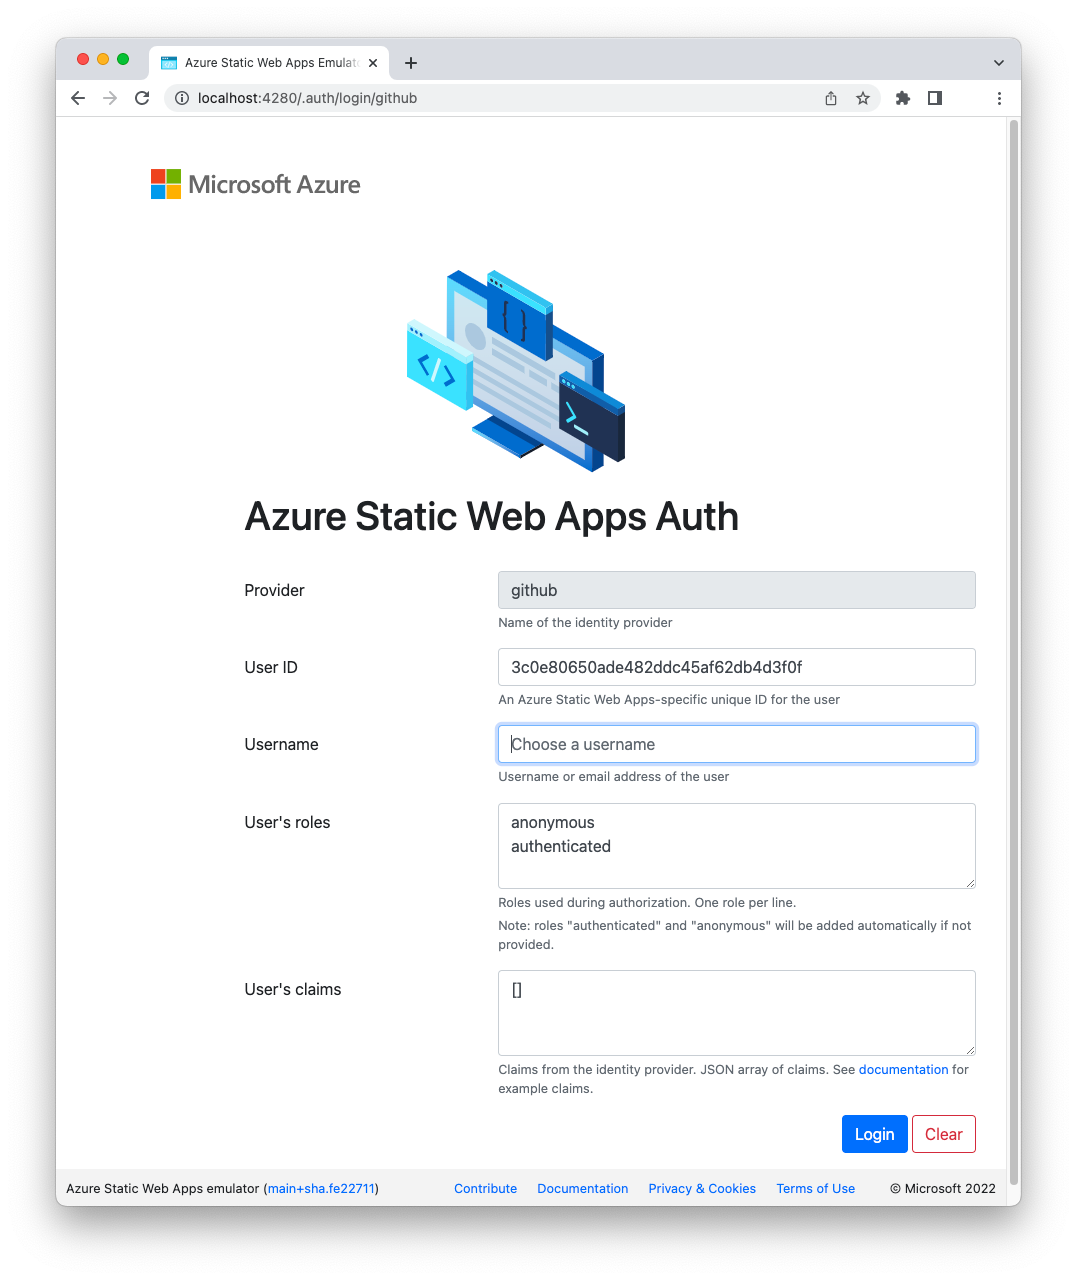
This is not the GitHub login page, of course. This is just a page that allows you to simulate the authentication of a user. In the form shown here, you can enter a username, its associated roles, and any claims you want to test. Try simply adding a username, such as test, and click the Login button.
You will be redirected to the home page of the Blazor app and, this time, you will be able to access the Fetch data page:
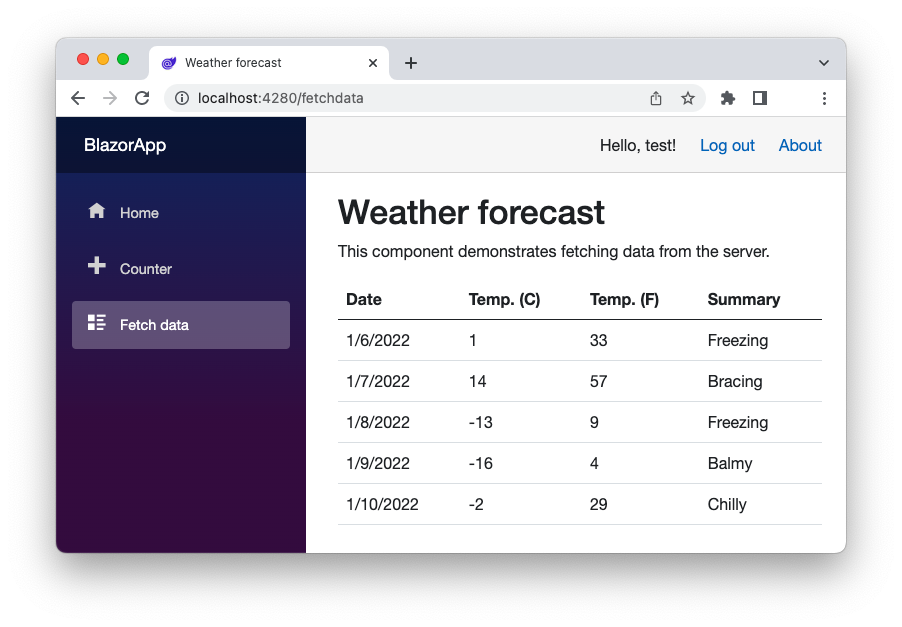
Note the username that appears near the Log out link in the upper right corner of the page.
Auth0 as a Custom Authentication Provider
This is awesome, but where does Auth0 fit in? I mean, the authentication integration described so far refers to GitHub as the Identity provider, and Azure SWA also supports Twitter and Azure AD out of the box. How can you use Auth0 as your app's Identity provider? You need to define a custom authentication provider.
⚠️ To create a custom authentication provider, you need the Standard Plan of Azure SWA. ⚠️
Register your app with Auth0
The first step is to register your application with Auth0 in order to let Auth0 know about your application.
Although your Blazor WebAssembly app is a Single Page Application, you will register it with Auth0 as a regular web app. The reason for this is that the Blazor WebAssembly + Azure SWA combo needs to be considered. Azure SWA implements a sort of Backend For Frontend (BFF) architecture for your Blazor application, so your app doesn't actually deal with tokens at all, but the Azure SWA infrastructure does that on behalf of your application.
If you want to learn more about BFF, read this article.
Access the Auth0 dashboard to register your Blazor application. If you don't have an Auth0 account, you can sign up for a free one now.
Once in the dashboard, go to the Applications section and follow these steps:
- Click Create Application.
- Enter a friendly name for your application (for example, My Blazor WASM app) and select Regular Web Applications as the application type.
- Finally, click the Create button.
These steps will make Auth0 aware of your Blazor application and will allow you to control access.
After the application is registered, go to the Settings tab and take note of your Auth0 domain, client ID, and client secret. You will use them soon.
Then, in the same form, enter the value http://localhost:4280/.auth/login/auth0/callback in the Allowed Callback URLs field and the value http://localhost:4280/.auth0/logout/auth0/callback in the Allowed Logout URLs field. The first value tells Auth0 which URL to call back after the user authentication. The second value tells Auth0 which URL to redirect a user to after they log out.
Note that you specify the Azure SWA CLI proxy port here, not the Blazor development server port.
Also, note that you have specified auth0 within the allowed URLs. This is the identifier of the custom authentication provider that you are about to define.
Click the Save Changes button to apply them.
Configure Auth0 as your authentication provider
To create a custom authentication provider for Azure SWA, start by adding a file named staticwebapp.config.json to the wwwroot folder of your Blazor WebAssembly project. This file allows you to control many settings for your application, but we will only focus on the authentication support.
Add the following content to your staticwebapp.config.json file:
{
  "auth": {
    "identityProviders": {
      "customOpenIdConnectProviders": {
        "auth0": {
          "registration": {
            "clientIdSettingName": "<AUTH0_CLIENT_ID>",
            "clientCredential": {
              "clientSecretSettingName": "<AUTH0_CLIENT_SECRET>"
            },
            "openIdConnectConfiguration": {
              "wellKnownOpenIdConfiguration": "https://<AUTH0_DOMAIN>/.well-known/openid-configuration"
            }
          },
          "login": {
            "nameClaimType": "http://schemas.xmlsoap.org/ws/2005/05/identity/claims/name",
            "scopes": ["openid","profile"]
          }
        }
      }
    }
  }
}
This configuration defines the auth0 key as the identifier for Auth0 as your custom authentication provider. This is the key that we used for the allowed URLs in the Auth0 dashboard, and it's the key that enables the login endpoint in the Azure SWA infrastructure. In other words, the login endpoint for Auth0 will be /.auth/login/auth0, similar to the predefined authentication providers.
In the registration section of the configuration you will need to provide the data from your registration with Auth0. Replace the <AUTH0_CLIENT_ID>, <AUTH0_CLIENT_SECRET>, and <AUTH0_DOMAIN> with the values you got from the Auth0 dashboard.
The login section of the configuration file allows you to specify additional settings to be considered at login time. In this case, you specify the scopes that allow you to get the user's profile and the type that allows you to correctly map the name claim.
Change the login endpoint
You need to do one last step before testing your app. Open the Login.razor file in the Shared folder and replace the GitHub login endpoint with the new Auth0 login endpoint, as shown below:
<AuthorizeView>
  <Authorized>
    Hello, @context.User.Identity.Name!
    <a href="/.auth/logout?post_logout_redirect_uri=/">Log out</a>
  </Authorized>

  <NotAuthorized>
    <a href="/.auth/login/auth0">Log in</a>
  </NotAuthorized>
</AuthorizeView>
This change directs the browser to the Auth0 login endpoint in the Azure SWA infrastructure following the pattern /.auth/login/<IdProvider>. But you can do better. You can make your code independent of the specific provider by adding a few rewriting rules to your staticwebapp.config.json file, as shown below:
{
  "auth": {
    // ...your custom authentication provider configuration...
  },
  "routes": [
    {
      "route": "/login",
      "rewrite": "/.auth/login/auth0"
    },
    {
      "route": "/logout",
      "rewrite": "/.auth/logout"
    },
    {
      "route": "/.auth/login/github",
      "statusCode": 404
    },
    {
      "route": "/.auth/login/twitter",
      "statusCode": 404
    },
    {
      "route": "/.auth/login/aad",
      "statusCode": 404
    }
  ]
}
This new routes element does more than just replace the /.auth/login/auth0 endpoint with /login and /.auth/logout with /logout. It also prevents your app from using the other predefined authentication providers. After all, you can enable them through Auth0's social connections.
The final code for your Login.razor component will look like this:
<AuthorizeView>
  <Authorized>
    Hello, @context.User.Identity.Name!
    <a href="/logout?post_logout_redirect_uri=/">Log out</a>
  </Authorized>

  <NotAuthorized>
    <a href="/login">Log in</a>
  </NotAuthorized>
</AuthorizeView>
That's all! Your Blazor Web Assembly application is ready to run on Azure SWA with Auth0 as the authentication provider.
Now that you have mapped the
/.auth/login/*and/.auth/logout/*endpoints to/loginand/logout, you might be tempted to update the allowed callback and logout URLs in the Auth0 dashboard as well. Don't do this! Internally, the login flow uses the predefined URL templates.
Test Auth0 login locally
Now, launch your application locally through the Azure SWA CLI proxy as you did before. This time you will see the emulated login page with Auth0 as the authentication provider instead of GitHub:
Keep in mind that this is only an emulation. There is no actual interaction with Auth0 during the authentication process. To test that the integration actually works, you will need to deploy your application to Azure SWA.
Deploy to Azure SWA
There are several ways to deploy a static web app to Azure SWA. In this article, you will use the Azure SWA CLI to keep things simple.
Create a Static Web App resource
First, create a Static Web App resource in the Azure portal.
Select Create a Resource, search and select Static Web App, and then click the Create button. Fill out the form that appears to create the resource, as shown in the following example:
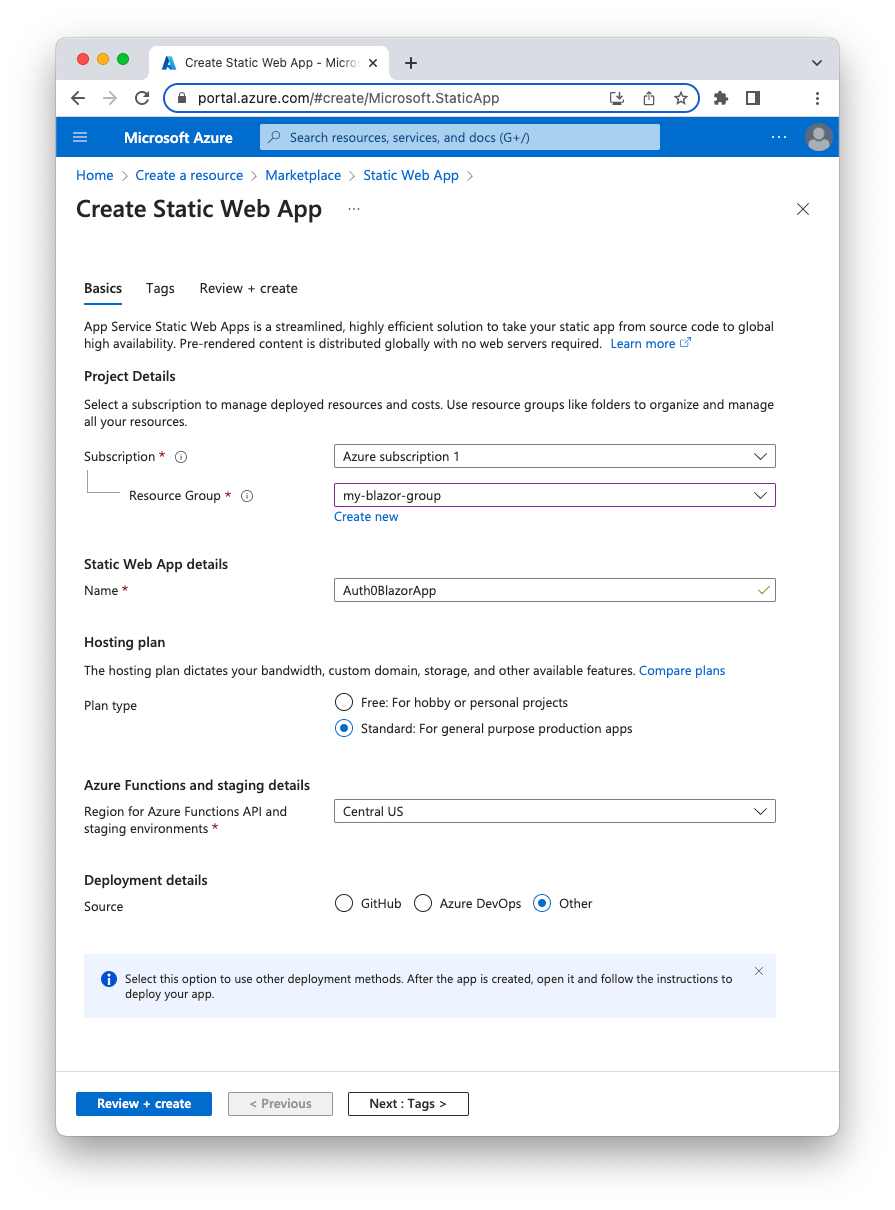
In this form, you select your Azure subscription and resource group, and provide a friendly name for your Static Web App. Note that you need to select the Standard Plan in order to use custom authentication. Also, you select Other as the deployment source because you will be using Azure SWA CLI.
Continue until you reach the Review+Create tab and click the Create button. After a few seconds, your resource management dashboard will appear.
Define your Azure settings
Best practices suggest that you do not store sensitive data in configuration files when you publish your application. Therefore, select Configuration from the left menu of your Azure SWA dashboard. On the Application settings tab, define the AUTH0_CLIENT_ID and AUTH0_CLIENT_SECRET settings with the values that you get from the Auth0 dashboard.
Your Application settings page should show two rows, one for the AUTH0_CLIENT_ID and another forAUTH0_CLIENT_SECRET, like the following picture:

Click the Save button to save these settings.
Then, replace the actual values in the staticwebapp.config.json file with the application setting names you just defined. Your configuration file should look like the following:
{
  "auth": {
    "identityProviders": {
      "customOpenIdConnectProviders": {
        "auth0": {
          "registration": {
            "clientIdSettingName": "AUTH0_CLIENT_ID",
            "clientCredential": {
              "clientSecretSettingName": "AUTH0_CLIENT_SECRET"
            },
            "openIdConnectConfiguration": {
              "wellKnownOpenIdConfiguration": "https://<AUTH0_DOMAIN>/.well-known/openid-configuration"
            }
          },
          "login": {
            "nameClaimType": "http://schemas.xmlsoap.org/ws/2005/05/identity/claims/name",
            "scopes": ["openid","profile"]
          }
        }
      }
    }
  }
}
Note that the
<AUTH0_DOMAIN>placeholder here doesn't represent an application setting here. It's the actual value for your Auth0 domain.
Your application settings are configured.
Build your Blazor WebAssembly app for release
Before deploying your Blazor WebAssembly app, you need to build it for release. Run the following command in the root folder of your app's project:
dotnet publish -c Release
When the build is complete, the name of the folder containing the content to be published will be displayed on the screen. Unless otherwise specified, it should be bin/Release/net7.0/publish/. You will refer to this folder as the publishing folder for the remainder of this article.
Get the deployment token
To deploy your Blazor Assembly app to Azure SWA using Azure SWA CLI, you need a deployment token. You can get your deployment token by clicking the Manage deployment token from your Azure SWA dashboard Overview. Copy the deployment token by using the corresponding button.
Deploy with Azure CLI
Once you have copied the token from the dashboard, run the following command in the root folder of your project:
swa deploy ./bin/Release/net7.0/publish/wwwroot --deployment-token YOUR_DEPLOYMENT_TOKEN
Adapt the publishing folder to your own and replace the YOUR_DEPLOYMENT_TOKEN with your own deployment token.
Please, see the official documentation for other ways to deploy your static web application.
Change the Auth0 configuration
Once the deployment process is complete, you will see on the screen the URL where you can browse your application. You will need this URL not only to navigate to your published Blazor WebAssembly application, but also to reconfigure your application in the Auth0 dashboard.
Previously, you specified http://localhost:4280 as the base address for your allowed URLs in the Auth0 dashboard. Now you need to add the new Allowed Callback and Allowed Logout URLs using the URL where your application is published as the base address.
For example, if https://gentle-dog-1d2f13b03-preview.westeurope.3.azurestaticapps.net is the URL where your app was published, you will add the value https://gentle-dog-1d2f13b03-preview.westeurope.3.azurestaticapps.net/.auth/login/auth0/callback to the Allowed Callback URLs field and the value https://gentle-dog-1d2f13b03-preview.westeurope.3.azurestaticapps.net/.auth0/logout/auth0/callback to the Allowed Logout URLs field.
Test your app
You are ready to test your Blazor WebAssembly application integrated with Auth0 as its authentication provider. Point your browser to the publishing URL and navigate. If everything works as expected, you should be able to log in to your application using the Auth0 Universal Login page.
Leverage Auth0's authentication and authorization services in your .NET applications.
DOWNLOAD THE FREE EBOOK
Summary
Let's quickly recap what you've learned in this article.
You have discovered that Azure SWA is more than just a hosting service for static content. Among other things, it provides you with authentication support for a few predefined authentication providers. Basically, Azure SWA provides your application with some endpoints that allow users to log in, log out, and get the user profile.
You used a Blazor WebAssembly application to experiment with using GitHub as your authentication provider. You needed to define a custom authentication state provider in order to take advantage of the Blazor authorization components, and you used the Azure SWA CLI to emulate the Azure SWA infrastructure locally on your machine.
After these experiments, you learned how to define Auth0 as your custom authentication provider, and you used it in your Blazor application. After the local testing, you prepared your Azure SWA environment and deployed your Blazor app to verify the actual Auth0 integration.
You can download the final version of the Blazor WebAssembly application from this GitHub repository.
About the author

Andrea Chiarelli
Principal Developer Advocate
I have over 20 years of experience as a software engineer and technical author. Throughout my career, I've used several programming languages and technologies for the projects I was involved in, ranging from C# to JavaScript, ASP.NET to Node.js, Angular to React, SOAP to REST APIs, etc.
In the last few years, I've been focusing on simplifying the developer experience with Identity and related topics, especially in the .NET ecosystem.