User Login
Auth0 provides a Lock widget which serves as a login component for your application, meaning that you do not have to implement your own login screen. The Lock widget seamlessly integrates with all of the connections you configure inside your , whether they be database, social or enterprise connections. There are a number of different ways in which you can implement a Login screen using a web application and Auth0:- Hosted Lock: Use an instance of the Lock widget which is hosted on the Auth0 infrastructure.
- Embedded Lock: Embed the Lock widget inside a web page of your application. You have some customization options for the actual Lock widget and full control over the rest of the HTML on the page.
- Custom UI: Develop a completely custom web page for the login screen. The custom HTML form will post back to your server which will, in turn, authenticate the user using the Authentication API. For more information on when to use a Custom UI, refer to Customize Classic Login Pages with Lock or SDK.
Automate Home Realm Discovery (HRD)
By default, Lock will display all the connections available for login. Selecting the appropriate from multiple options is called Home Realm Discovery (HRD). In our case, the options are either authenticating with Active Directory (for company employees) or using email/password for our database connection (external contractors). You may however want to avoid that first step, where the user needs to choose the Identity Provider (IdP), and have the system identify it instead of asking every time. Lock offers you the following options:-
Identify the IdP programmatically: When you initiate an authentication transaction with Auth0 you can optionally send a
connectionparameter. This value maps directly with any connection defined in your dashboard. When using the Hosted version of Lock by calling the/authorizeendpoint, you can pass along aconnectionquery string parameter containing the name of the connection. Alternatively, if you are using Embedded Lock, this is as simple as writingauth0.show({connections: ['{yourConnection}']});.- There are multiple practical ways of getting the
connectionvalue. One of them is to use vanity URLs: for example, company employees will usehttps://internal.yoursite.com, while external contractors will usehttps://external.yoursite.com.
- There are multiple practical ways of getting the
-
Use email domains: Lock can use email domains as a way of routing authentication requests. Enterprise connections in Auth0 can be mapped to
domains. If a connection has this setup, then the password textbox gets disabled automatically when typing an email with a mapped domain. Note that you can associate multiple domains to a single connection.
Session Management
When talking about managing sessions, there are typically three layers of sessions we need to consider:- Application Session: The first is the session inside the application. Even though your application uses Auth0 to authenticate users, you will still need to keep track of the fact that the user has logged in to your application. In a normal web application this is achieved by storing information inside a cookie.
- Auth0 session: Next, Auth0 will also keep a session and store the user’s information inside a cookie. Next time when a user is redirected to the Auth0 Lock screen, the user’s information will be remembered.
- Identity Provider session: The last layer is the Identity Provider, for example Facebook or Google. When you allow users to sign in with any of these providers, and they are already signed into the provider, they will not be prompted to sign in. They may simply be required to give permissions to share their information with Auth0 and in turn your application.
How do I control the duration of the user’s local application session? Can I drive that from Auth0?
The web app has full control over the user’s local application session. How this is done usually depends on the web stack being used (for example, ASP.NET). Regardless, all approaches ultimately use one or more cookies to control the session. The developer can choose to use the expiration of the JWT ID Token returned by Auth0 to control their session duration or ignore it completely. Some developers store the ID Token itself in session state and end the user’s session when it has expired.The reason why you would use the expiration of the token to determine the expiration of the local session is because it gives you centralized control of the duration of a user session from the Auth0 Dashboard.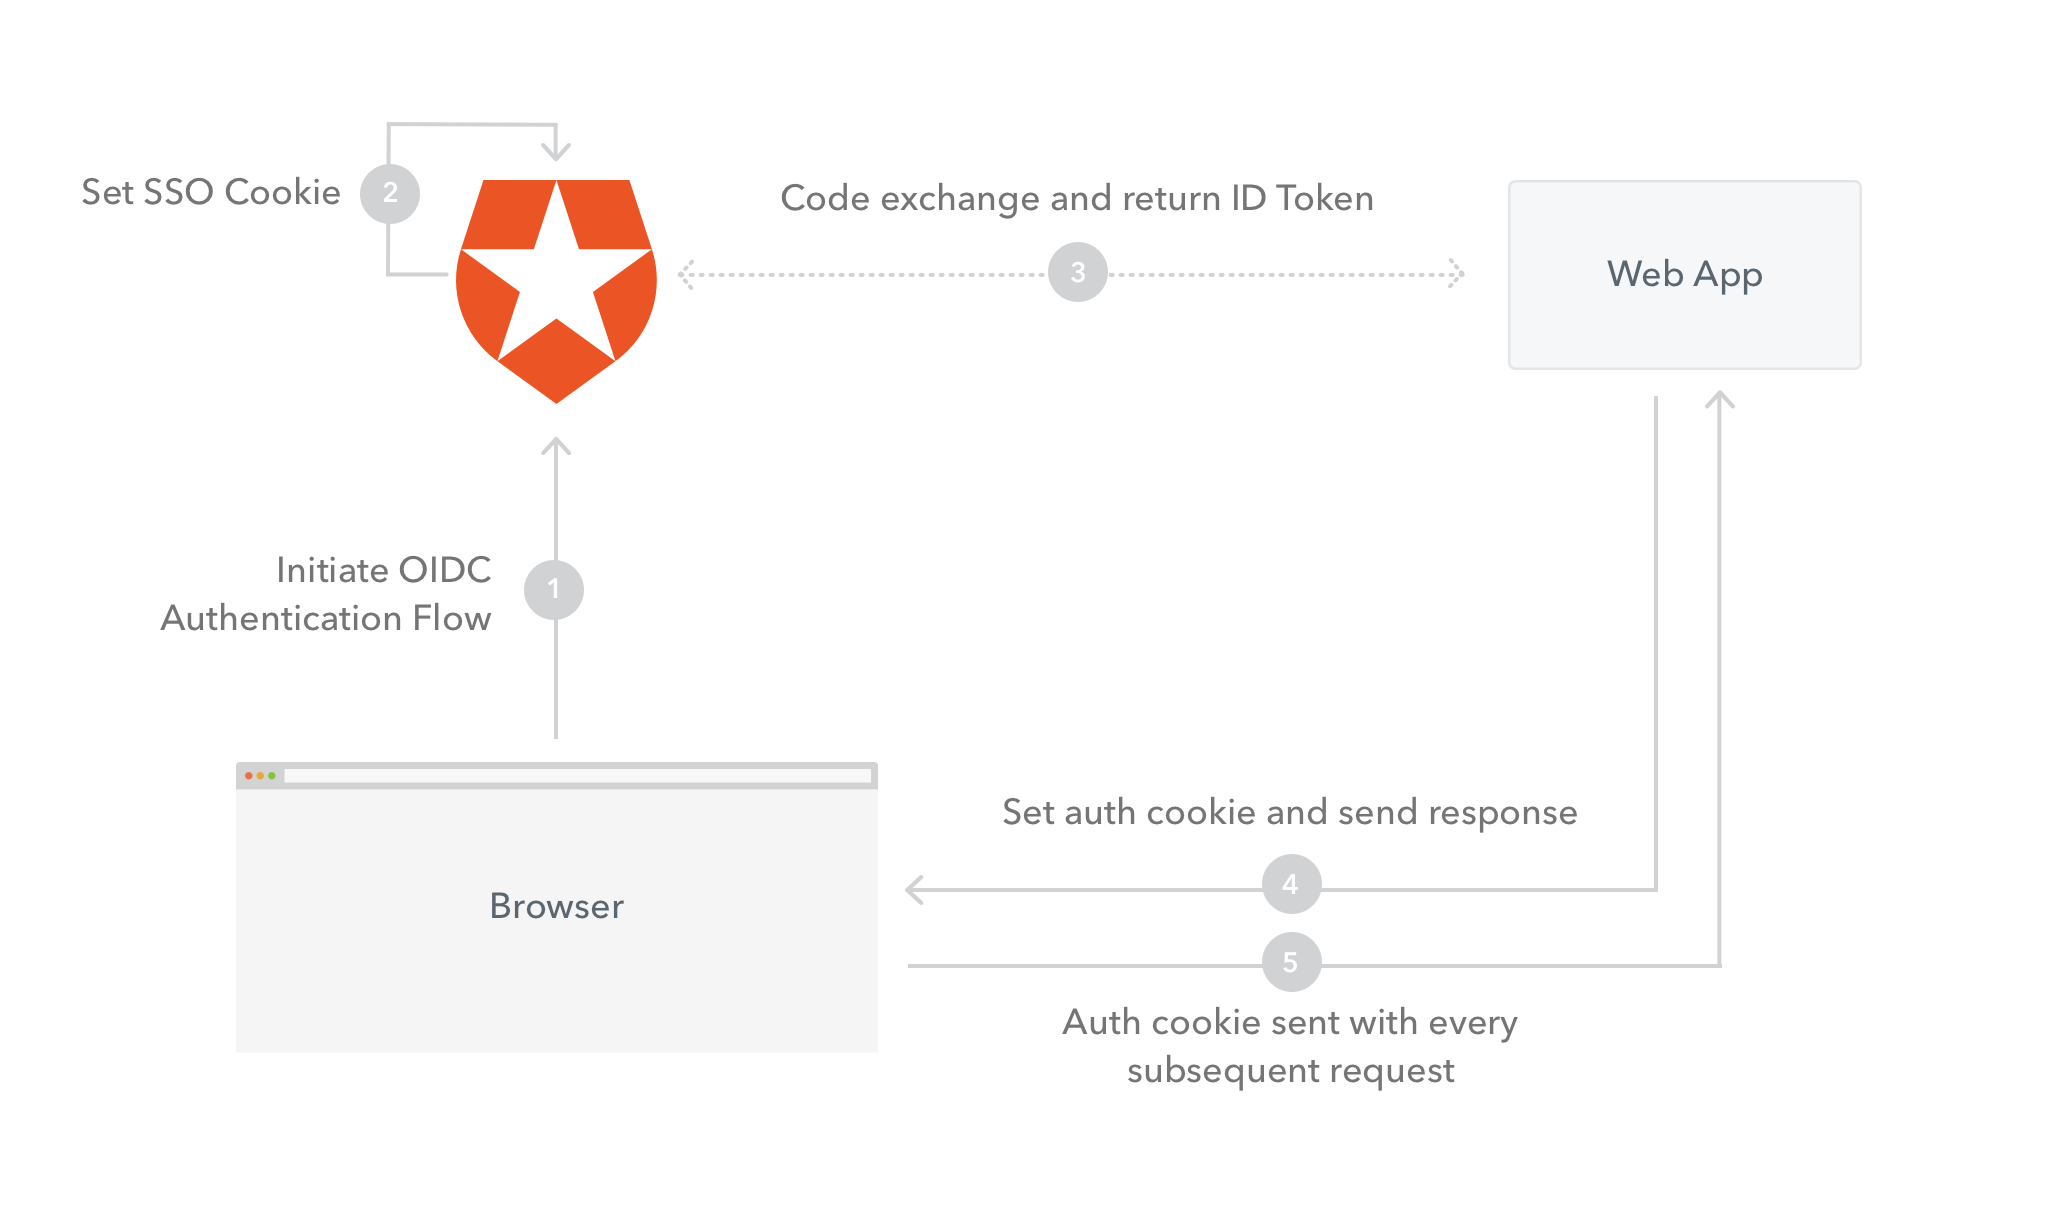
- Initiate OIDC Authentication Flow: The user’s browser will send a request to Auth0 to initiate the OIDC flow.
- Set SSO Cookie: Auth0 will set a cookie to store the user’s information.
- Code exchange and return ID Token: Auth0 will make a request back to the web server and return the code. The web server will exchange the code for an ID Token.
- Set auth cookie and send response: The web server will send a response back to the browser and set the application authentication cookie to store the user’s session information.
- Auth cookie sent with every subsequent request: The application authentication cookie will be sent on every subsequent request as proof that the user is authenticated.
How does Auth0’s SSO session impact the application’s session?
Auth0 manages its own single-sign-on session. Applications can choose to honor or ignore that SSO session when it comes to maintaining their own local session. The Lock widget even has a special feature where it can detect if an Auth0 SSO session exists and ask the user if they wish to log in again as that same user.
User Logout
When logging the user out, you will once again need to think about the three layers of sessions which we spoke about before:- Application Session: You need to log out the user from your Web Application, by clearing their session.
- Auth0 session: You need to log out the user from Auth0. To do this you redirect the user to
https://{yourDomain}/v2/logout. Redirecting the user to this URL clears all cookies set by Auth0 for the user. - Identity Provider session: Although this is not common practice, you can force the user to log out from the Identity Provider used, for example Facebook or Google. To do this add a
federatedquery string parameter to the logout URL:https://{yourDomain}/v2/logout?federated.
returnTo query string parameter with the target URL as the value: https://{yourDomain}/v2/logout?returnTo=http://www.example.com. Note, that you will need to add the returnTo URL as an Allowed Logout URLs. For more information on how to implement this refer to: Logout.
The logout flow (not including federated logout) is as follows:
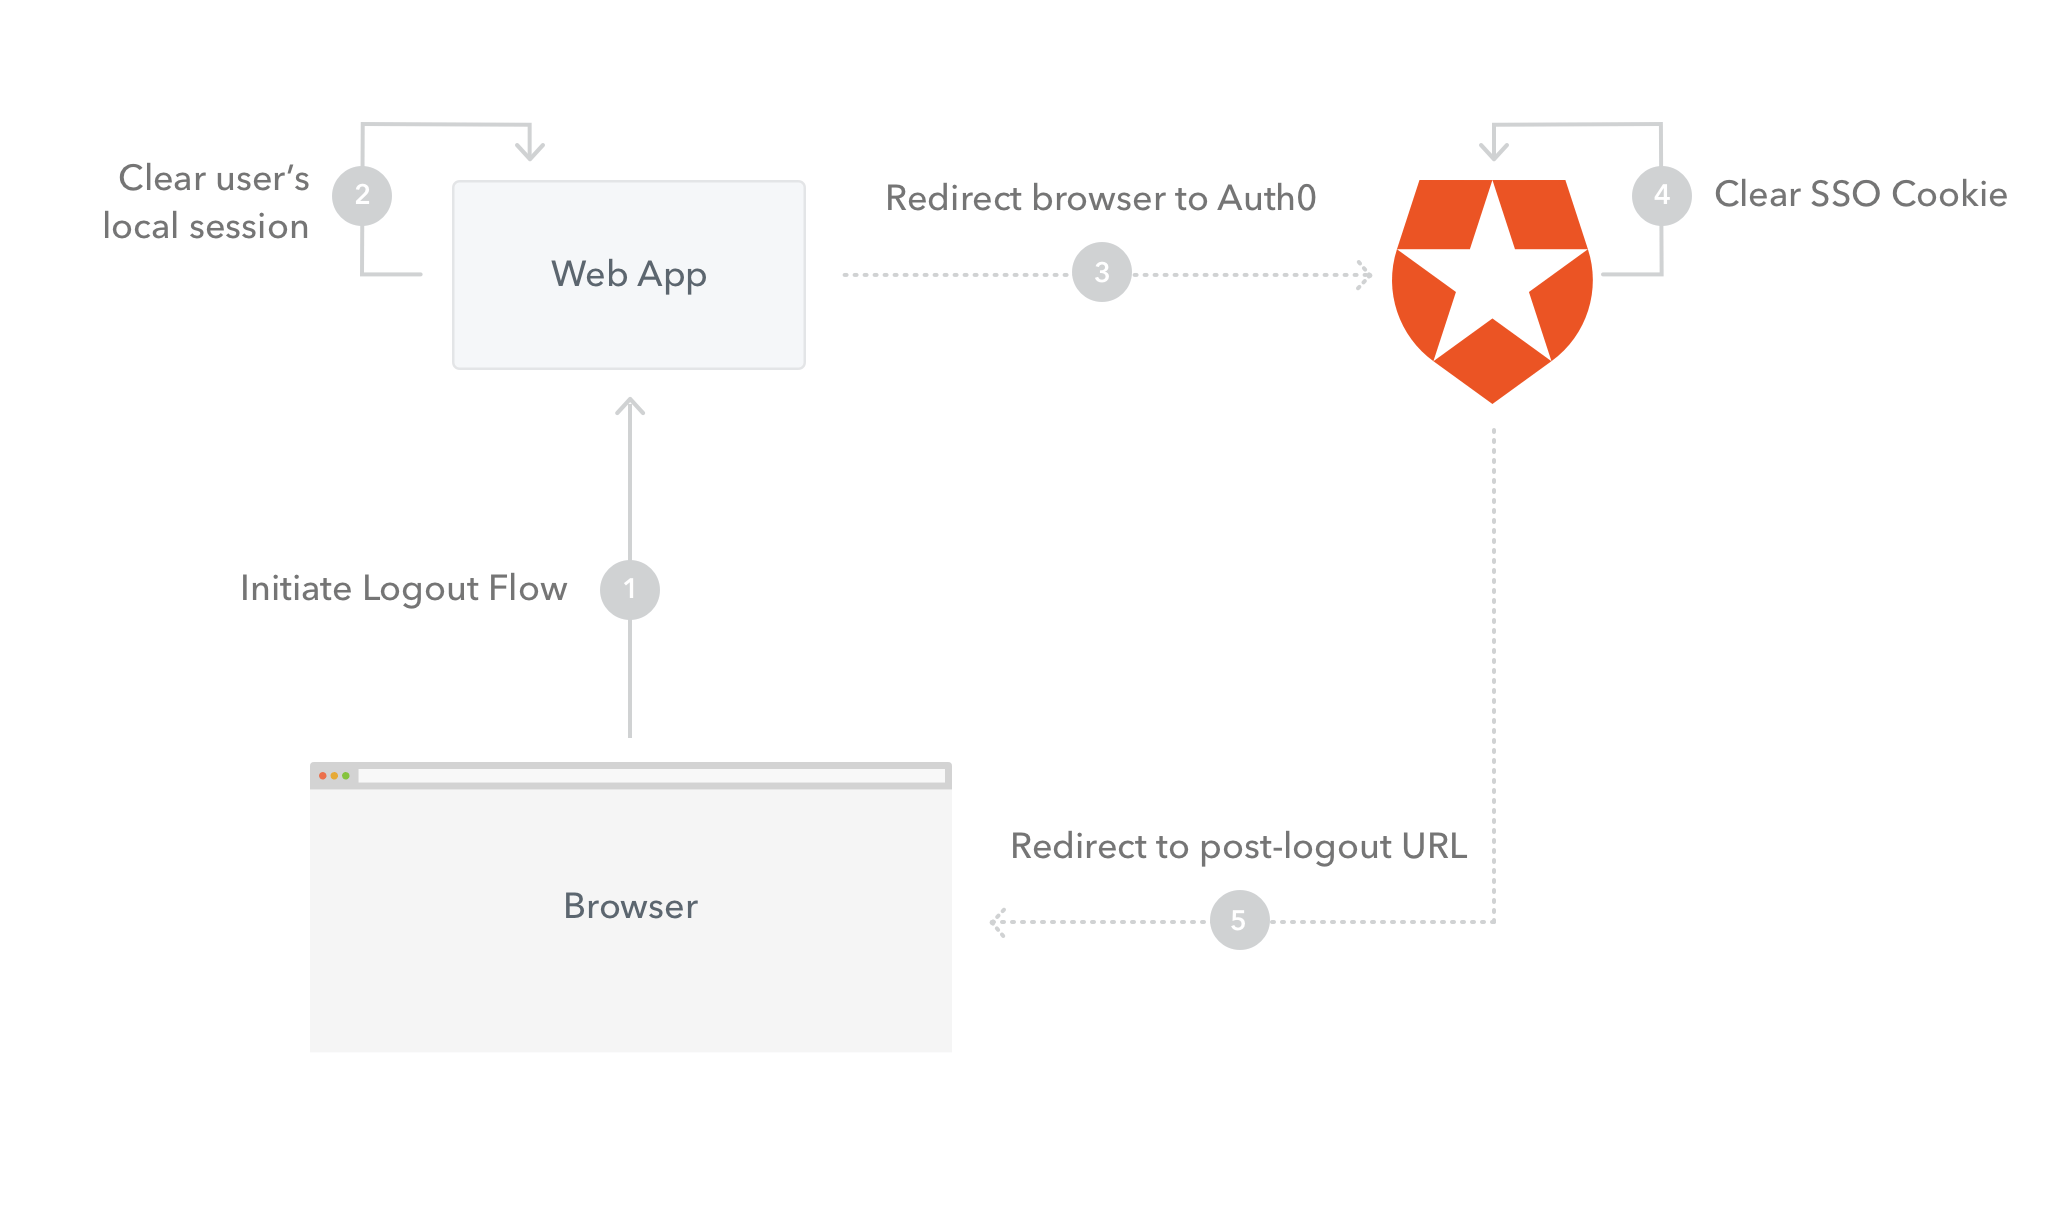
- Initiate Logout Flow: The logout flow will be initiated from the browser, for example by the user clicking a Logout link. A request will be made to the web server.
- Clear user’s local session: The user’s Application Session / Cookie will be cleared.
- Redirect browser to Auth0 Logout: The user’s browser will be redirected to the Auth0 Logout URL.
- Clear SSO Cookie: Auth0 will clear the user’s SSO Cookie.
- Redirect to post-logout URL: Auth0 will return a redirect response and redirect the user’s browser to the
returnToquery string parameter.
Access Control
Authorization refers to the process of determining what actions a user can perform inside your application. You can either implement authorization directly inside your application, independently of Auth0, or use one of the available ways to retrieve the user authorization levels, put them as authorization claims inside the and validate these claims inside your application, once you retrieve the token, to control access. There are various ways in which you can retrieve and set the user authorization claims when using Auth0:- By configuring and using the Auth0 Authorization Extension.
- By using Active Directory groups. These can be used in combination with the Authorization Extension by mapping Active Directory Groups to Groups you define using the Authorization extension.
- Add metadata to the user’s profile by making use of rules.
- By calling an external services from inside a rule.
Authorization extension
At this point in time the authorization extension is primarily designed to enforce coarse-grained authorization, for example to control access to an application based on a user’s group membership. It is not necessarily designed to control fine-grained access (such as whether a user can perform a specific action inside the application), even though this is how we are utilizing it in this instance.
Admin group which will allow them to approve timesheets. The Authorization Extension allows for mapping groups to existing group membership.
All timesheet administrators will be assigned to the Timesheet Administrators group on Active Directory, which will be automatically mapped to the Admin group inside the Timesheet Application.
When you install the Authorization Extension, it creates a rule in the background, which does the following:
- Determine the user’s group membership.
- Store the user’s group membership info as part of the
app_metadata. - Add the user’s group membership to the outgoing token.
- Verify that the user has been granted access to the current application.
Install the Authorization Extension
To install the Authorization extension navigate to the Extensions view of your Auth0 Dashboard, and select and install the Auth0 Authorization extension. Once installed, you will see the app listed under Installed Extensions. When you click on the link to open the extension for the first time, you will be prompted to provide permission for the extension to access your Auth0 account. If you do so, you will be redirected to the Authorization Dashboard. Once on the Authorization Dashboard, navigate to Groups in the navigation menu, and create a new group called Admin.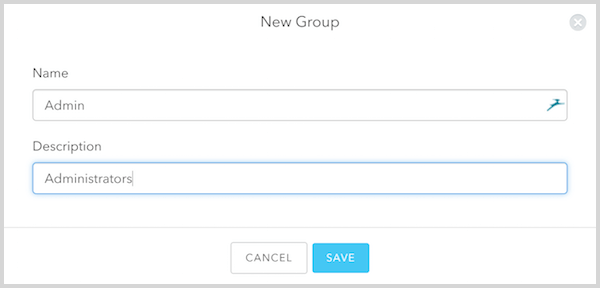
Timesheet Admins groups to the Admin group you just created.

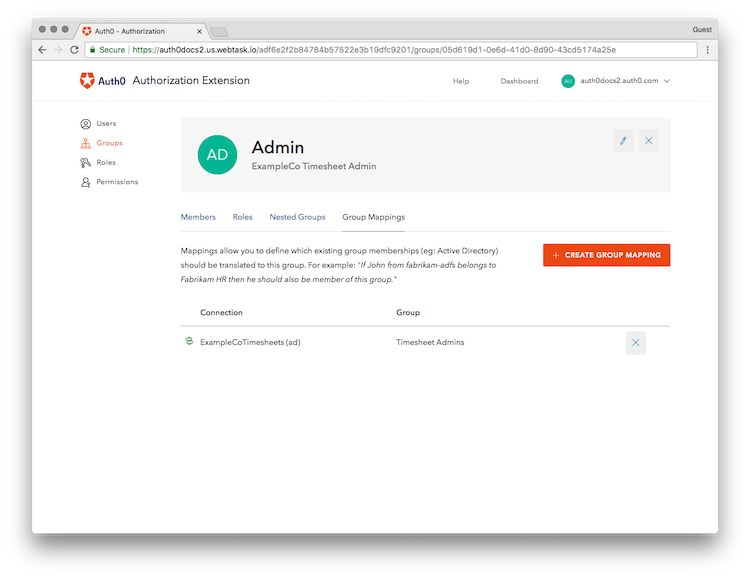
Timesheet Admins group in Active Directory, and those users will be automatically mapped to the Admin group inside our application.
For more information refer to the Authorization Extension documentation.
Enforce permissions in your application
When you installed the Authorization Extension, it also created an Auth0 rule which will add anauthorization claim with all the authorization related settings for a particular user. The groups for a user will be added as a sub-claim of the authorization claim called groups and all the groups a user belongs to will be added as an array to this claim. This is an example of what JSON payload of a ID Token may look like with the groups listed:
authorization claim. You can then store these groups, along with other user information inside the user’s session, and subsequently query these to determine whether a user has permissions to perform a certain action based on their group membership.
See the implementation in ASP.NET Core.