Identity Management
ExampleCo decided to use Auth0 as their Identity as a Service (IDaaS) provider. The reasoning behind this decision was that the company did not want to commit resources on training, implementation and maintenance of identity and access management. Furthermore, the company plans on building into this solution in the future, possibly adding a mobile native app and an API to push approved timesheets to their internal systems. Auth0 provides the flexibility to incorporate such changes in their architecture with minimum effort.Identity-as-Service (“IDaaS”) is a cloud-based service for identity and access management. The offered services often include Single Sign-on (SSO), federated identity, password management, and more.
Which protocol to use
The next decision has to do with which protocol to use, with Connect (OIDC) or .Auth0 implements proven, common and popular identity protocols, both for consumer oriented web products (OAuth 2.0, OAuth 1.0, OpenID) and for enterprise deployments (SAML, WS-Federation, LDAP). You have complete freedom to use the one that best meets your business needs.
OAuth vs OpenID Connect (OIDC)
OAuth 2.0 and OpenID Connect (OIDC) are often mistaken for the same thing, but this is not exact. OAuth 2.0 is a protocol that lets you authorize one website (the consumer or application) to access your data from another website (the resource server or provider). For example, you want to authorize a website to access some files from your Dropbox account. The website will redirect you to Dropbox which will ask you whether it should provide access to your files. If you agree the website will be authorized to access your files from Dropbox. At the core, OAuth 2.0 is about resource access and sharing. OpenID Connect, on the other hand, is a simple identity layer built on top of the OAuth 2.0 protocol. It gives you one login for multiple sites. Each time you need to log in to a website using OIDC, you are redirected to your OpenID site where you login, and then taken back to the website. At the core, OIDC is concerned with user authentication.Authentication Flow
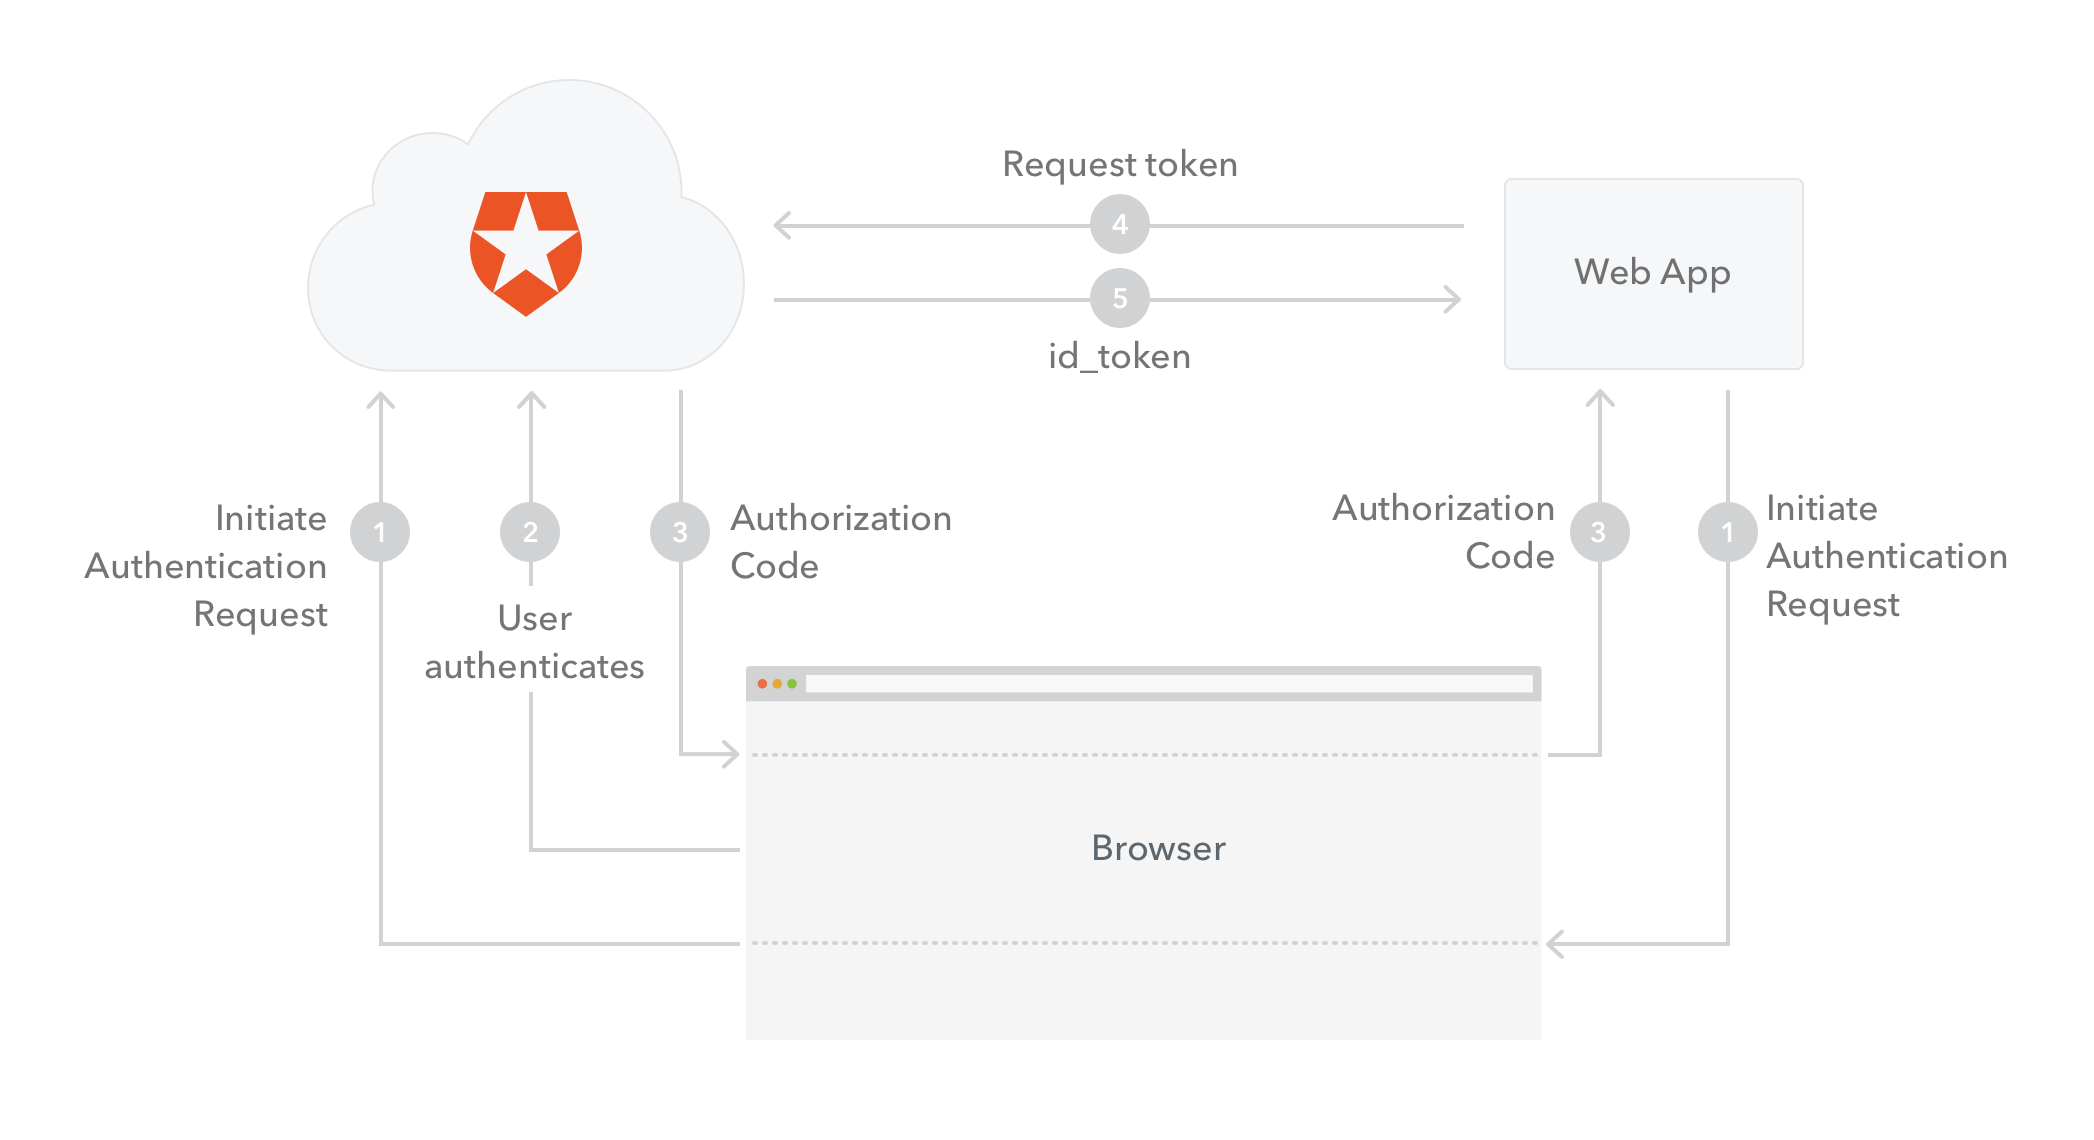
OpenID Connect supports more than one flow for authentication. Since our scenario involves a regular web app we will use the Authorization Code Flow. The flow goes as follows:- The web app (called the Client in OIDC terms) initiates the authentication request by redirecting the user-agent (browser) to Auth0 (the Authorization Server in OIDC terms).
- Auth0 authenticates the user (via the user-agent). The first time the user goes through this flow a consent page will be shown where the permissions that will be given to the Application are listed (for example, post messages, list contacts). The user logs in to the service (unless they are already logged in) and authorizes the application access.
- Assuming the user grants access, Auth0 redirects the user-agent back to the Application, along with an authorization code in the query string.
- The Application sends the authorization code to Auth0, along with the application credentials (client_id and client_secret), and asks for a token.
- Auth0 authenticates the Application (using the client_id and client_secret) and validates the authorization code. If valid, Auth0 responds back with an ID Token.
Form Post Response Mode
Another option is to use the OAuth 2.0 Form Post Response Mode withresponse_type=id_token&response_mode=form_post. Due to the response_type=id_token request parameter, the response contains the ID Token directly, instead of the authorization code, while the response_mode=form_post encodes the ID Token with the rest of the Authorization Response parameters as HTML form values that are auto-submitted in the User Agent. This way you can have an optimized authentication flow (no need to exchange the code for an ID Token), however you have to make sure that it is supported by the technology you are using to implement your app (ASP .NET Core middleware does support it). For more details refer to the OAuth 2.0 Form Post Response Mode specification.id_token in code samples) is a JSON Web Token (JWT) that contains identity data. It is consumed by the application and used to get user information like the user’s name, email, and so forth, typically used for UI display.
More on tokens
Tokens are alphanumeric strings used in token-based authentication. They allow users to authenticate with a username and password once and get a token in return which they can use from that point on. They have a limited lifetime duration.JSON Web Tokens (JWTs) are tokens that conform to the JSON Web Token Standard and contain information about an identity in the form of claims. They are self-contained in that it is not necessary for the recipient to call a server to validate the token. JWTs can be signed using a secret (with the HMAC algorithm) or a public/private key pair using RSA. You can find more information on JWT here.The ID Token, which is a JWT, conforms to an industry standard (IETF RFC 7519) and contains three parts: A header, a body and a signature.- The header contains the type of token and the hash algorithm used on the contents of the token.
- The body, also called the payload, contains identity claims about a user. There are some claims with registered names, for things like the issuer of the token, the subject of the token (who the claims are about), and the time of issuance. Any number of additional claims with other names can be added, though care must be taken to keep the JWT within the browser size limitations for URLs.
- The signature is used by the recipient of a JWT to validate the integrity of the information conveyed in the JWT.
How to validate an ID Token
The validation of an ID Token requires several steps:- If the ID Token is encrypted, decrypt it using the keys and algorithms that the Application specified.
- The Issuer Identifier for the OpenID Provider must match the value of the
iss(issuer) claim. - The
aud(audience) claim should contain the Application’sclient_idvalue. The ID Token must be rejected if the ID Token does not list the Application as a valid audience, or if it contains additional audiences not trusted by the Application. - If the ID Token contains multiple audiences, the Application should verify that an
azpclaim is present. - If an
azp(authorized party) claim is present, the Application should verify that itsclient_idis the claim value. - The Application must validate the signature of ID Tokens according to JWS using the algorithm specified in the JWT
algheader parameter. The Application must use the keys provided by the Issuer. - The
algvalue should be the default ofRS256or the algorithm sent by the Application in theid_token_signed_response_algparameter during registration. - If the JWT
algheader parameter uses a MAC based algorithm such asHS256,HS384, orHS512, the octets of the UTF-8 representation of theclient_secretcorresponding to theclient_idcontained in theaud(audience) claim are used as the key to validate the signature. For MAC based algorithms, the behavior is unspecified if theaudis multi-valued or if anazpvalue is present that is different than theaudvalue. - The current time must be before the time represented by the
expclaim. - The
iatclaim can be used to reject tokens that were issued too far away from the current time, limiting the amount of time that nonces need to be stored to prevent attacks. The acceptable range is Application specific. - If a
noncevalue was sent in the Authentication Request, anonceclaim must be present and its value checked to verify that it is the same value as the one that was sent in the Authentication Request. The Application should check thenoncevalue for replay attacks. The precise method for detecting replay attacks is Application specific. - If the
acrclaim was requested, the Application should check that the asserted claim value is appropriate. - If the
auth_timeclaim was requested, either through a specific request for this claim or by using themax_ageparameter, the Application should check theauth_timeclaim value and request re-authentication if it determines too much time has elapsed since the last End-User authentication.
If you store ID Tokens on your server, you must do so securely.