Use cases
Use the M2M onboarding path if you:- Support service-to-service communications
- Have scheduled jobs or cron tasks running on servers that need to access protected resources or APIs
- Allow IoT devices to communicate with backend services or APIs
- Have an API layer that needs to communicate with other API layers without user involvement or after a user token has expired
- Have a privileged API that may need to be called before a user has authenticated (i.e. from an Action or custom database script in your Auth0 tenant)
- Use an API Gateway to manage backend services
- Use or support non-interactive applications or other tooling not involving human interaction such as daemons or backend services
These services will still need an M2M access token for authentication.
How to use this guide
This guide is a pathway to create your M2M implementation in Auth0. We provide considerations, best practices, and concepts you should review.- In Architecture, we advise you to configure Auth0 to support your Software Development Life Cycle and existing infrastructure.
- In Create an account, we provide instructions to create your API instance in Auth0 and an application to support the authentication flow (or grant) needed for machine-to-machine authentication.
- In Authentication, we walk through the grant you need to use for authentication as well as and permissions (or scopes) you can set.
- In Branding, we advise you where to find information on how to configure depending on how you plan to manage certificates.
- In Deployment Automations, you can read about our tooling to assist with deployment.
- In Quality Assurance, you can learn more about unit testing, and the readiness checks we provide in .
Architecture
Before you configure your Auth0 account and tenant, or the groups and structures of your Auth0 services, create a map of your existing infrastructure so you can best leverage Auth0’s capabilities in your existing ecosystem. As mentioned in common scenarios, you may have other non-interactive technologies in your application domain, network domain, or M2M device domain to consider before you configure Auth0. To review an example M2M scenario, read Server + API. To attempt a hands-on lab working with Node and test API deployment, visit our GitHub repository. You may want to create a visualization of your current tech stack as well as plan how Auth0 fits in with your current Software Development Lifecycle (SDLC). This can help you determine how many tenants you may need.Considerations
Before you create a new account or configure your first tenant, you may want to consider:-
How you partition or group your APIs to call specific endpoints.
- This may determine the audience and other claims on access tokens.
-
Any third-party consumers to your resource may request an access token for each call. Excessive calls could affect your rate limit.
- You can use an API Gateway to limit the number of access tokens a third-party can request. To learn more about API Gateways and Auth0, read Configure an Identity Provider in Access Gateway.
Create an account
Now that you have a plan for your architecture, you’ll configure your Auth0 account and tenants. When you sign up for Auth0 services, you will create your first tenant. This is where you configure Auth0 assets, services, and resources. Sign up to start.Before you start
In the Auth0 Dashboard or with the Auth0 Management API, create:
- An API to represent your API
- An M2M application to use the Client Credential Flow
- Your tenant name has a role in your Auth0 domain. Before you determine a name, you should review tenant characteristics.
- Which Auth0 features you need for your use case. Some features are only available on Professional and Enterprise plans.
- Determine if you need to support multiple environments, such as development, staging, and production. To learn more, read Set Up Multiple Environments.
- If you have a use case involving thirty-party applications you want to register in a tenant, you can use Dynamic Application Registration based on the OIDC Client Registration specification.
Provision a tenant
Now that you have a plan for your architecture, you’ll configure your Auth0 account and .Register an API
In this section, create your API in Auth0.You can always update your API in Auth0 Dashboard or by calling the Management API Update a resource server endpoint.
- Auth0 Dashboard
- Management API
Start by creating an instance in the Auth0 Dashboard for your APIs.
- Follow instructions to register your API.
Associate an application
You need to create an association between your application and your API so your application can request access tokens from it. You will learn more about client grants in the Authentication section.Auth0’s API has multiple settings you may need to review before you configure. To learn more, read API Settings.
- Auth0 Dashboard
- Management API
If you create your API in the Dashboard, Auth0 automatically generates a test application and associates it with your API.
- Navigate to Auth0 Dashboard > Applications.
-
Select the test M2M test application created when you created your API.
You can create another application for development or production later by following the instructions on Register Machine-to-Machine Applications.
- Switch to the API view, and then locate the API you’d like to enable for this application.
- Enable the Authorize toggle, and then select the arrow button on the right to expand the card.
-
Select Update.
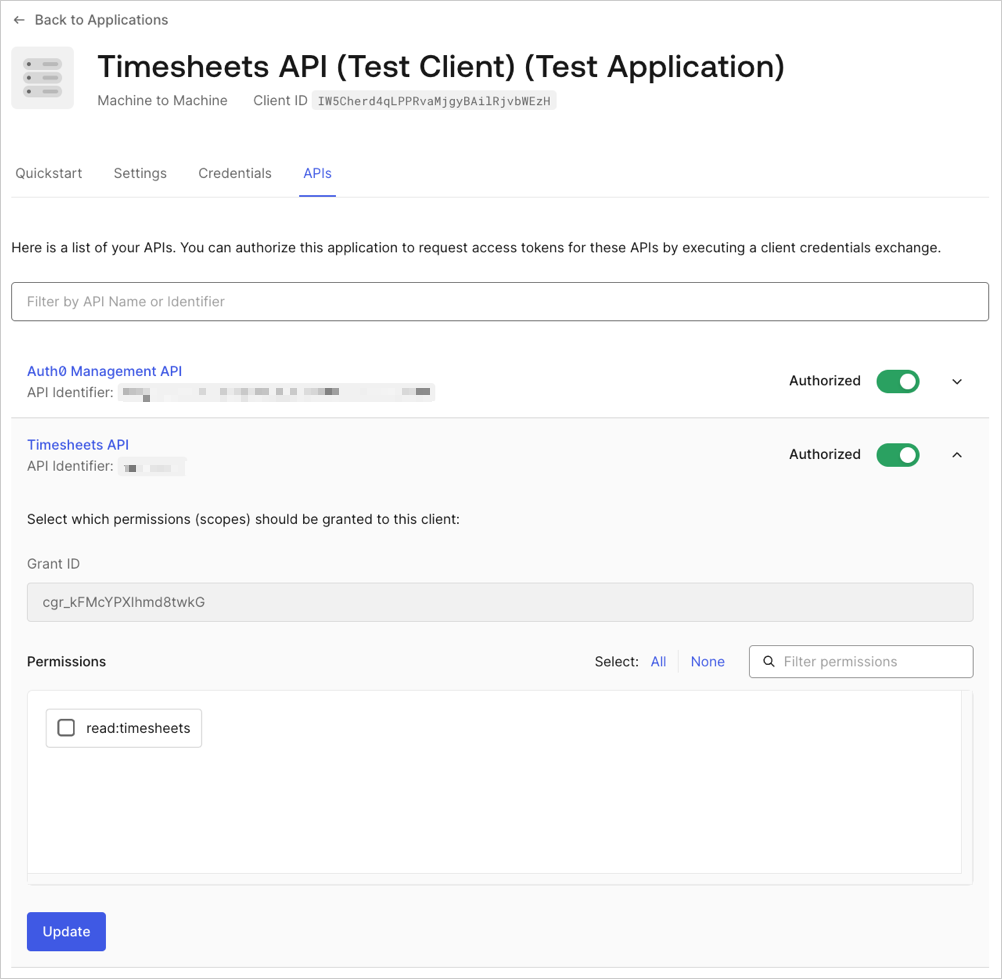 In this view, you can select the drop-down and choose the scopes you want to add. We will learn more about scopes when discussing access tokens under the Authentication section.
Authentication
When calling one API from another API, or from any situation where there is no authenticated user context, you need a way to authorize the application instead of a user. This is a one step process where the application is authenticated (using aclient_id and client_secret) and then authorized in one call.
For non-interactive applications or services to authentication, you must select a client grant, or authentication flow. The Client Credentials Flow does not require human interaction and is best suited for M2M applications.
Before you start
In Auth0 Dashboard or Management API, you will:
- Set your application to use the Client Credentials Flow
- Update the scopes for your M2M access tokens
- Review the Client Credentials Flow for machine-to-machine authentication. This is the workflow for non-interactive authentication and authorization.
- Determine the level of access for your APIs. This helps determine what scopes, or permissions, you will configure when you create your API.
Configure the Client Credential Flow
You can use the Auth0 Dashboard or to set the authentication flow to provide a client credential in exchange for an access token. Follow the instructions on Update Grant Types to use Auth0 Dashboard or Management API.M2M access tokens
In token-based authentication, non-interactive clients provideclient_id and client_secret in a call to the Authentication API token endpoint to get an access token. This access token permits access to your protected API.
The default profile, or format, is the Auth0 token profile associated with two token profiles. You can choose to change the token profile to RFC 9068. To learn more, read Access Token Profiles. To verify the token is valid, your API will check the Signing Algorithms. The default is RSA256, a key-based algorithm.
Auth0 supports other client authentication methods besides providing Client ID and Client Secret as credentials. These methods, including our recommendation of Private Key JWT for M2M configurations, are available with an Enterprise plan. To learn more, read Application Credentials.
Example
A request to the/oauth/token endpoint should be similar to the sample below:
The response should be similar to the sample below:
Token expiration
Your access tokens have a limit for how long the token is valid. Since your communications are on the back-channel, you cannot use to extend sessions, and should consider configuring your access tokens with a 1-hour expiration time. You may need to strike your own balance between security and performance for your specific environment. To learn more, read Update Access Token Lifetime.Scopes
Before any non-interactive clients or services call your API, you need to define the permissions or Scopes your API allows. You can set the scopes in Auth0 Dashboard to include in your authentication request to Authentication API. To read more examples of ways to use API scopes, read API Scopes. To configure scopes, follow the instructions on Add API Permissions for Auth0 Dashboard or use the sample provided for Management API.To add custom claims to an access token, you can use the Actions Machine-to-Machine Flow. To learn more, read Machine to Machine Flow.
Branding
Even if you service non-interactive clients or services working on the back-channel, you can still customize your experience to align with the look and feel of your existing brand.Custom domains
Auth0 supports the use of custom domains when you call the/authorize endpoint to request access tokens.
M2M Onboarding - custom domains
In Auth0 Dashboard, you must:
- Register and verify your domain before you can use it with your Auth0 services.
- Determine if you want to manage your own certificate or use an Auth0 managed certificate. To learn more about certificates, read Certificate management options.
- Verify the TLS (SSL) version and cipher you want to use for self-managed certificates is supported by Auth0. To learn more, read TLS (SSL) Versions and Ciphers.
-
To configure your custom domain with Auth0-managed certificates, follow the instructions on Configure Custom Domains with Auth0-Managed Certificates.
-
If you want to manage your own certificates, follow the instructions on Configure Custom Domains with Self-Managed Certificates.
You must have an Enterprise subscription to manage certificates in your custom domain. To learn more, read Auth0 Pricing and Login.
-
If you want to manage your own certificates, follow the instructions on Configure Custom Domains with Self-Managed Certificates.
- Review API configuration with custom domains. You may need to adjust your API settings to incorporate a custom domain.
Deployment Automation
Auth0 provides support for a couple of different options when it comes to the deployment automation approaches you can use, and each can be used in conjunction with the other.Best Practice
However you configure deployment automation, we’d recommend you unit test your custom code and Actions prior to deployment, and run some integration tests against your tenant post-deployment too.
Deploy CLI Tool
As recommended under the Architecture section, you should have Auth0 tenants for development, test, and production. These tenants should share identical configurations for quality checks and testing; however, you may be faced with errors as a result of mismatched configurations between your environments. For example, each environment will have different and . To mitigate these mismatch errors, you can use the Deploy CLI Tool to help you integrate your Auth0 instance with your existing CI/CD pipeline. With dynamic keyword replacement, you can replace environmental variables on tenants sharing similar configurations. To learn more, read Deploy CLI Tool and Keyword Replacement.Actions Real-time Logs
Actions Real-time Logs displays all logs for custom cSode in real-time, includingconsole.log output and other exceptions. If you are using Auth0 Actions or other custom logic, you can use this extension to debug and troubleshoot. To learn more about installation and configuration, read Actions Real-time Logs.
Quality Assurance
Quality Assurance is important in identifying issues before you go live. Depending on the nature of your project, there are several different types of quality assurance testing that you’re going to want to consider as part of your integration with Auth0:- How will your APIs perform when subjected to unexpected production loads?
- How will your rate limits be affected by third-party applications?
Unit testing
Unit testing is verifying units of extensibility, like Auth0 Actions. If you are using custom code we recommend using a test framework (such as Mocha) to test the additional code before deployment.Mock testing
In a balance between Auth0’s load testing policy and the desire to load test, it is common practice to create a mock test of Auth0’s endpoints. This is a valuable practice in order to ensure that your configuration works with your expected interfaces without having to restrict your testing, and tools such as MockServer, JSON Server, or even Postman can be used to assist.Deployment
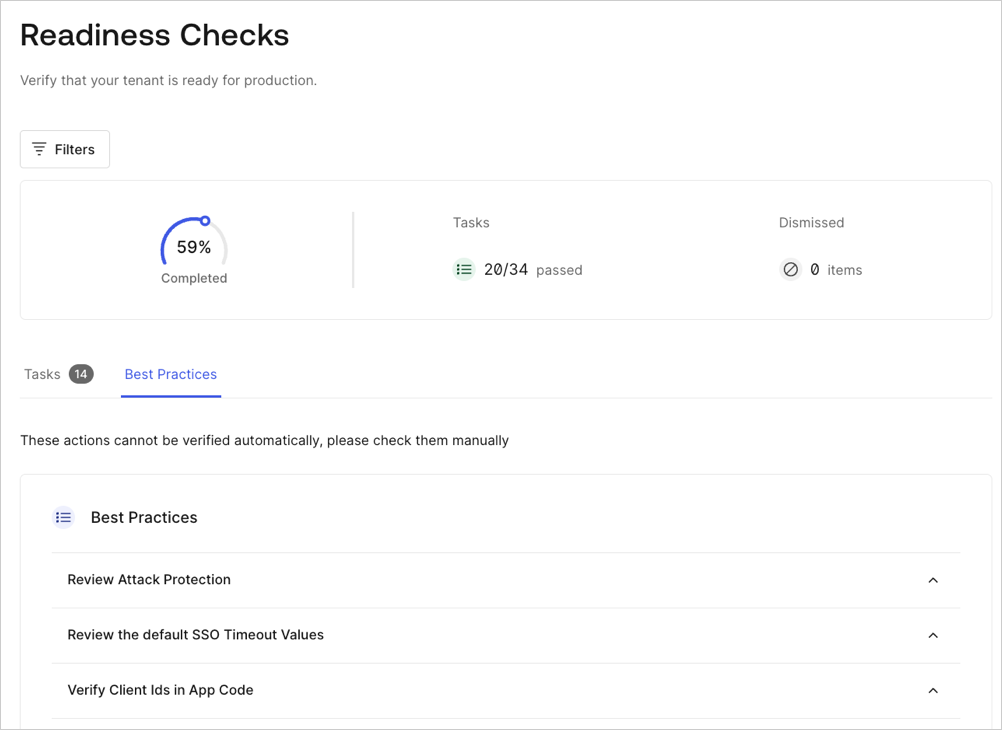
Our Deploy and Monitor section provides guidance for deployment best practices. We advise your review Pre-Deployment Checks, especially the built-in Auth0 Dashboard Readiness Checks. To review the Readiness Check, select the drop-down menu below your tenant name and environmental tag at Auth0 Dashboard > Run Readiness Checks.