
Introducing the Okta Spring Boot Starter
In this quick tutorial, you will learn how to add authentication to your Java Spring Boot application using the Okta Spring Boot Starter with Auth0 as the Identity Provider (IdP). The Okta Spring Boot Starter makes adding authentication to your Spring Boot application easy and configures the required classes and best practices, so you don't have to worry about them. The starter uses the OAuth 2.0 and OpenID Connect protocols to authenticate users. The starter is compatible with Spring Boot 3.0 and above. You can use the starter with Okta and Auth0 as the IdP starting from version 3.0.3.
Prerequisites
Before you get started, you will need the following:
- Java 17 or higher. You can use SDKMAN! to install Java if you don't have it already.
- A free Auth0 account. Sign up if you don't have one already.
- The Auth0 CLI. Install the CLI if you don't have it and log in to your Auth0 account using the
auth0 logincommand.
Create a Spring Boot Application
Create a new Spring Boot application using the Spring Initializr. You can use the web version or the curl command below. Use the default for most of the options. For the dependencies, select web, thymeleaf, and okta. For the build tool, select Gradle.
curl https://start.spring.io/starter.tgz \
  -d bootVersion=3.1.0 \
  -d javaVersion=17 \
  -d dependencies=web,thymeleaf,okta \
  -d type=gradle-project \
  -d baseDir=auth0-sample \
 | tar -xzvf -
You can also use the Spring Boot CLI to create the application using the following command:
spring init \
   -b 3.1.0 \
   --build gradle -t gradle-project \
   -l java -j 17 \
   -p jar \
   -d web,thymeleaf,okta
The web dependency provides Spring Web MVC with basic HTTP REST functionality. The thymeleaf dependency provides the Thymeleaf templating engine with which you will build the web pages. The okta dependency provides the Okta Spring Boot Starter, which provides the required dependencies and configuration to add OIDC authentication to your application.
Add a Web Controller
Open the created starter application in your favorite IDE. Add a simple web controller to the application. Create a new file src/main/java/com/example/demo/HomeController.java with the following content:
package com.example.demo;

import org.springframework.stereotype.Controller;
import org.springframework.web.bind.annotation.GetMapping;

@Controller
public class HomeController {
    @GetMapping("/")
    String home() {
        return "home";
    }
}
This controller will handle requests to the / path and render the home template. Create a template using Thymeleaf that uses Tailwind CSS for styling. Add a new file, src/main/resources/templates/home.html, with the following content:
<html xmlns:th="http://www.thymeleaf.org">
  <head>
    <title>Home</title>
    <meta charset="utf-8" />
    <meta http-equiv="X-UA-Compatible" content="IE=edge" />
    <meta name="viewport" content="width=device-width, initial-scale=1" />

    <script src="https://cdn.tailwindcss.com"></script>
  </head>
  <body id="samples">
    <div class="relative flex min-h-screen flex-col justify-center overflow-hidden bg-gray-50 py-2">
      <div class="relative bg-white p-8 shadow-xl ring-1 ring-gray-900/5 sm:mx-auto sm:rounded-lg">
        <div class="mx-auto">
          <div class="divide-y divide-gray-300/50">
            <div class="space-y-6 py-8 text-base leading-7 text-gray-600">
              <h2 class="text-3xl font-bold">
                Auth0 Universal Login + Spring Boot Example
              </h2>
            </div>
          </div>
        </div>
      </div>
    </div>
  </body>
</html>
If you run the application using ./gradlew bootRun, you will see a login page from the Okta Spring Boot starter instead of your home screen. This is OK, and you will be able to configure this soon. You can comment out the okta-spring-boot-starter dependency in the build.gradle file if you want to run the application at this point.
Configure OIDC authentication with Auth0
Let us configure the application to use Auth0 as the IdP. You can use the Auth0 CLI to create a new application. Run the following command to create a new application:
auth0 apps create \
  --name "Auth0 Spring Boot Sample" \
  --description "Auth0 Spring Boot Sample" \
  --type regular \
  --callbacks http://localhost:8080/login/oauth2/code/okta \
  --logout-urls http://localhost:8080 \
  --reveal-secrets
The --type option specifies that you use a regular web application. The --callbacks option specifies the callback URL for the application. The --logout-urls option specifies the logout URL for the application. The --reveal-secrets option will display the client secret in the output. You can also use the auth0 apps update command to update the application with the callback and logout URLs.
Note down the Auth0 issuer (for example, https://dev-12345678.us.auth0.com/), CLIENT ID, and CLIENT SECRET from the output. You will use these values in the next step.
Configure the Spring Boot application
Configure the application by updating the src/main/resources/application.properties file with the following content:
# trailing `/` is important for issuer URI
okta.oauth2.issuer=https://YOUR_AUTH0_ORG_URI/
okta.oauth2.client-id=YOUR_AUTH0_CLIENT_ID
NOTE: The client secret is not added in this file since the file will be committed to git, and it will expose your client secret. You can use the
OKTA_OAUTH2_CLIENT_SECRETenvironment variable to provide the client secret securely. You can executeOKTA_OAUTH2_CLIENT_SECRET=YOUR_AUTH0_CLIENT_SECRET ./gradlew bootRunto run the application with the environment variable.
Create a new class src/main/java/com/example/demo/SecurityConfiguration.java with the following content:
package com.example.demo;

import org.springframework.beans.factory.annotation.Value;
import org.springframework.context.annotation.Bean;
import org.springframework.context.annotation.Configuration;
import org.springframework.security.config.annotation.method.configuration.EnableMethodSecurity;
import org.springframework.security.config.annotation.web.builders.HttpSecurity;
import org.springframework.security.web.SecurityFilterChain;
import org.springframework.security.web.authentication.logout.LogoutHandler;
import org.springframework.security.web.util.matcher.AntPathRequestMatcher;
import java.io.IOException;

@Configuration
@EnableMethodSecurity(securedEnabled = true)
public class SecurityConfiguration {

    @Value("${okta.oauth2.issuer}")
    private String issuer;
    @Value("${okta.oauth2.client-id}")
    private String clientId;

    LogoutHandler oidcLogoutHandler() {
        return (request, response, authentication) -> {
            try {
                response.sendRedirect(issuer + "v2/logout?client_id=" + clientId + "&returnTo=http://localhost:8080/");
            } catch (IOException e) {
                throw new RuntimeException(e);
            }
        };
    }

    @Bean
    public SecurityFilterChain configure(HttpSecurity http) throws Exception {
        http.authorizeHttpRequests((requests) -> requests
            // allow anonymous access to the root page
            .requestMatchers("/").permitAll()
            // authenticate all other requests
            .anyRequest().authenticated());
        // configure logout handler
        http.logout(logout -> logout.logoutRequestMatcher(new AntPathRequestMatcher("/logout"))
                .addLogoutHandler(oidcLogoutHandler()));
        // enable OAuth2/OIDC
        http.oauth2Login(withDefaults());

        return http.build();
    }
}
The oidcLogoutHandler() method configures the logout redirect URL for the application. The configure() method configures the application to use OAuth 2.0 and OIDC authentication using Spring Security.
Next, add the thymeleaf-extras-springsecurity6 dependency to the dependencies section of the build.gradle file:
dependencies {
    ...
    implementation 'org.thymeleaf.extras:thymeleaf-extras-springsecurity6:3.1.1.RELEASE'
}
Next, add the following snippet to the src/main/resources/templates/home.html file to add login/logout buttons and welcome messages:
<div class="space-y-6 py-8 text-base leading-7 text-gray-600">
    <h2 class="text-3xl font-bold">Auth0 Universal Login + Spring Boot Example</h2>
    <div th:unless="${#authorization.expression('isAuthenticated()')}">
        <p>Hello!</p>
        <p>If you're viewing this page, then you have successfully configured and started this example
            server.</p>
        <p>This example shows you how to use the
            <a href="https://github.com/okta/okta-spring-boot" class="text-blue-500">Okta Spring Boot
            Starter</a> to add the Authorization Code Flow using Auth0 to your application.</p>
        <p>When you click the login button below, you will be redirected to the login page on your Auth0
            org. After you authenticate, you will be returned to this application.</p>
    </div>

    <div th:if="${#authorization.expression('isAuthenticated()')}">
        <p>Welcome home,
            <span th:text="${#authentication.principal.attributes['name']}">Joe Coder</span>!</p>
        <p>You have successfully authenticated against your Auth0 org, and have been redirected back to
            this application.</p>
        <p>Visit the <a th:href="@{/profile}">Profile</a> page in this application to view the
            information retrieved with your OAuth Access Token.</p>
    </div>
</div>
<div class="pt-8 text-base font-semibold leading-7">
    <form method="get" th:action="@{/oauth2/authorization/okta}"
            th:unless="${#authorization.expression('isAuthenticated()')}">
        <button class="bg-blue-500 hover:bg-blue-700 text-white font-bold py-2 px-4 rounded-full leading-6"
                type="submit">Login
        </button>
    </form>
    <form method="post" th:action="@{/logout}" th:if="${#authorization.expression('isAuthenticated()')}"
            class="d-flex" style="margin-block-end: inherit">
        <input type="hidden" th:name="${_csrf.parameterName}" th:value="${_csrf.token}"/>
        <button class="bg-red-500 hover:bg-red-700 text-white font-bold py-2 px-4 rounded-full leading-6"
                type="submit">Logout
        </button>
        <a th:href="@{/profile}" class="bg-blue-500 hover:bg-blue-700 text-white font-bold py-2 px-4 rounded-full leading-6">Profile</a>
    </form>
</div>
The th:if and th:unless attributes are used to display the login/logout buttons and welcome messages based on the user authentication status using the Spring Security SpEL expressions.
Run the application
To run the application, execute the following command:
OKTA_OAUTH2_CLIENT_SECRET=YOUR_AUTH0_CLIENT_SECRET ./gradlew bootRun
The application should start successfully, and you should see the following output:
...

2023-03-09T18:37:27.829+01:00  INFO 120974 --- [           main] o.s.b.w.embedded.tomcat.TomcatWebServer  : Tomcat started on port(s): 8080 (http) with context path ''
2023-03-09T18:37:27.834+01:00  INFO 120974 --- [           main] com.example.demo.DemoApplication         : Started DemoApplication in 1.876 seconds (process running for 2.019)
Navigate to http://localhost:8080 in your browser. You should see the login button.
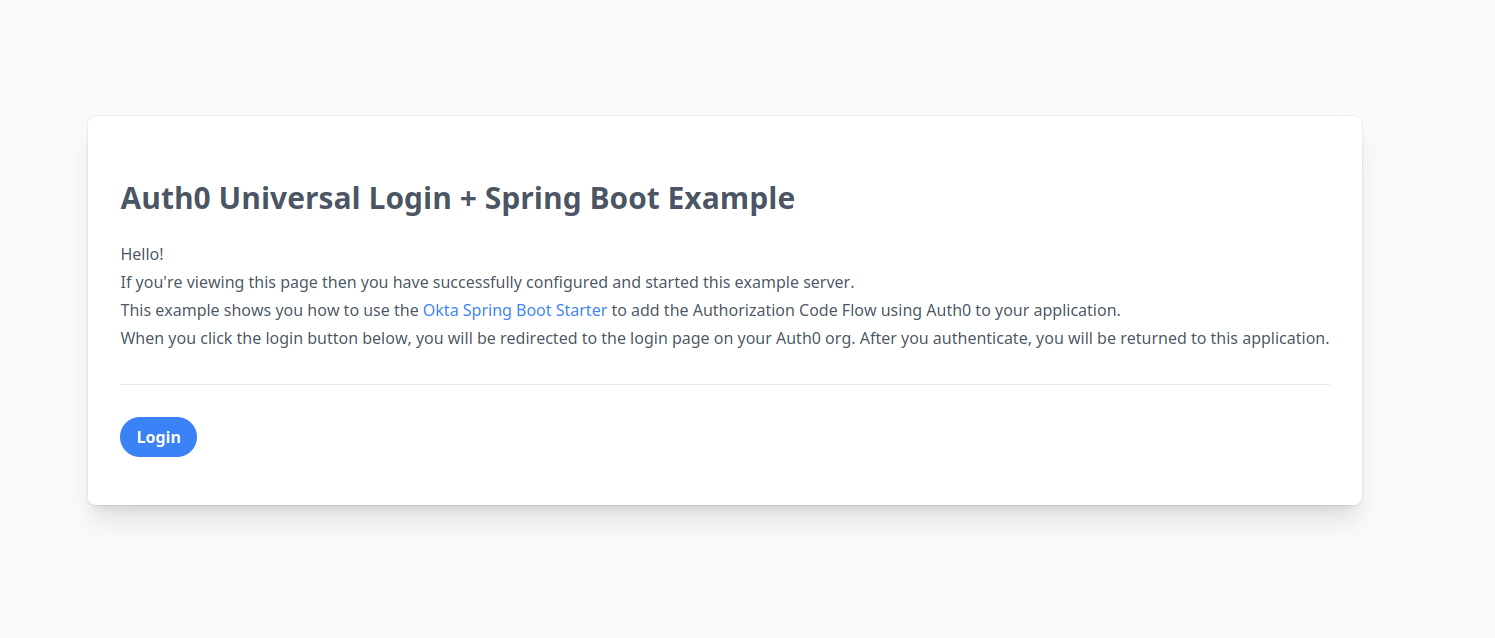
Click on the Login button to be redirected to the Auth0 login page. Once you log in with your Auth0 credentials, you should be redirected back to the application and see the welcome message.
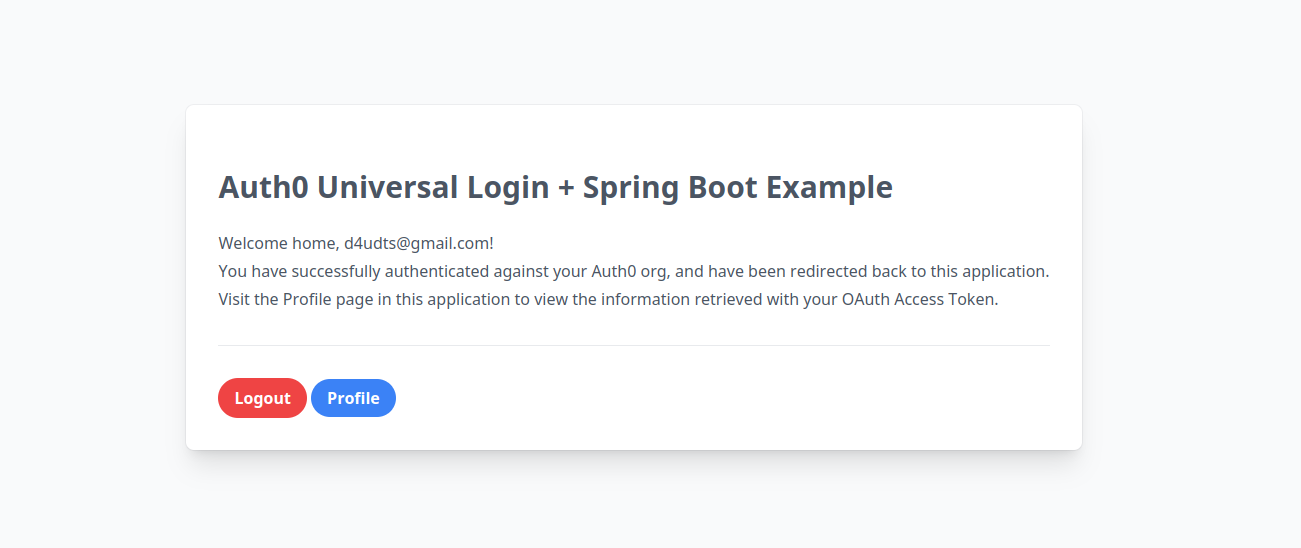
You should also be able to log out by clicking the logout button.
Add a Profile Page
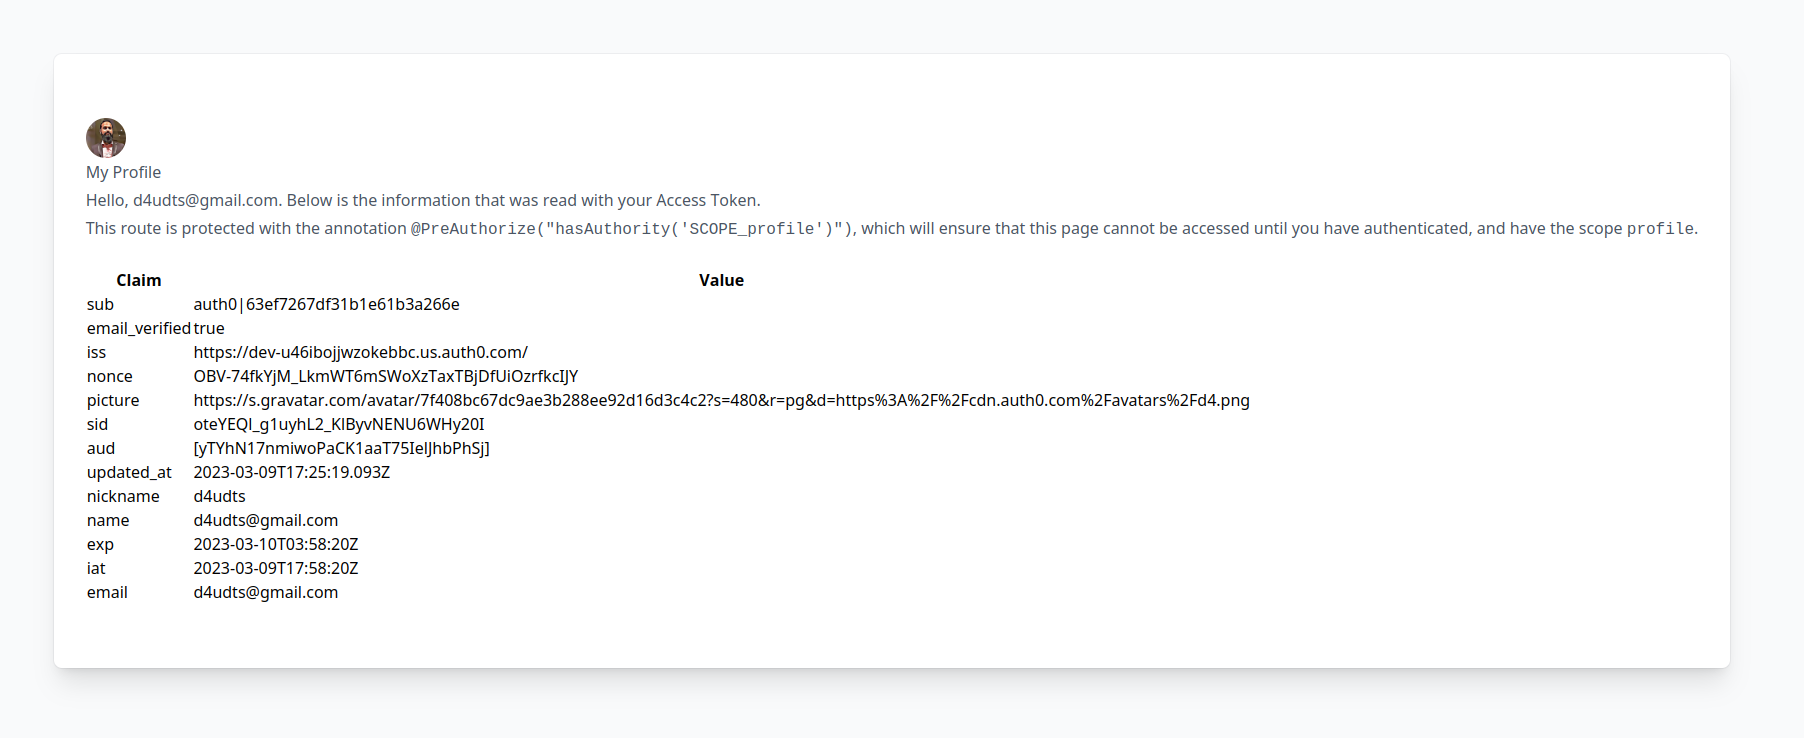
Now that you have successfully configured the application to use Auth0 for authentication, let's add a profile page to display the information retrieved from the Auth0 /userinfo endpoint. The starter automatically retrieves info from this endpoint.
Add the following snippet to the src/main/java/com/example/demo/HomeController.java file:
@GetMapping("/profile")
@PreAuthorize("hasAuthority('SCOPE_profile')")
ModelAndView userDetails(OAuth2AuthenticationToken authentication) {
    return new ModelAndView("profile", Collections.singletonMap("details", authentication.getPrincipal().getAttributes()));
}
The @PreAuthorize("hasAuthority('SCOPE_profile')") annotation ensures that the /profile route cannot be accessed until you have authenticated and have the scope profile in your claims. The userDetails method retrieves the user information from the OAuth2AuthenticationToken and passes it to the profile.html template.
Add the following imports to the src/main/java/com/example/demo/HomeController.java file:
import org.springframework.security.access.prepost.PreAuthorize;
import org.springframework.security.oauth2.client.authentication.OAuth2AuthenticationToken;
import org.springframework.web.servlet.ModelAndView;
Now create a new file, src/main/resources/templates/profile.html and add the following snippet:
<html xmlns:th="http://www.thymeleaf.org">
<head>
    <title>Home</title>
    <meta charset="utf-8"/>
    <meta http-equiv="X-UA-Compatible" content="IE=edge"/>
    <meta name="viewport" content="width=device-width, initial-scale=1"/>

    <script src="https://cdn.tailwindcss.com"></script>
</head>
<body id="samples">

<div class="relative flex min-h-screen flex-col justify-center overflow-hidden bg-gray-50 py-2">
    <div class="relative bg-white p-8 shadow-xl ring-1 ring-gray-900/5 sm:mx-auto sm:rounded-lg">
        <div class="mx-auto">
            <div class="divide-y divide-gray-300/50">
                <div class="space-y-6 py-8 text-base leading-7 text-gray-600">
                    <div>
                        <img class="w-10 h-10 rounded-full" th:src="${details['picture']}" alt="Rounded avatar">
                        <h2>My Profile</h2>
                        <p>Hello, <span th:text="${#authentication.principal.attributes['name']}">Joe Coder</span>.
                            Below is the information that was read with your
                            <a href="https://developer.okta.com/docs/api/resources/oidc.html#get-user-information">Access
                                Token</a>.
                        </p>
                        <p>This route is protected with the annotation
                            <code>@PreAuthorize("hasAuthority('SCOPE_profile')")</code>,
                            which will ensure that this page cannot be accessed until you have authenticated and have
                            the scope <code>profile</code>.</p>
                    </div>

                    <table class="table table-striped">
                        <thead>
                        <tr>
                            <th>Claim</th>
                            <th>Value</th>
                        </tr>
                        </thead>
                        <tbody>
                        <tr th:each="item : ${details}">
                            <td th:text="${item.key}">Key</td>
                            <td th:id="${'claim-' + item.key}" th:text="${item.value}">Value</td>
                        </tr>
                        </tbody>
                    </table>
                </div>
            </div>
        </div>
    </div>
</div>
</body>
</html>
Restart the application and navigate to http://localhost:8080/profile. You should see the profile page.
You have successfully configured a Spring Boot application to use Auth0 for authentication. Congrats!
Use the application as a resource server
Let's go further and use the application as a resource server.
First, add the below snippet to the end of the configure method in src/main/java/com/example/demo/SecurityConfigurations.java file:
...
// enable Resource Server for API access
http.oauth2ResourceServer(oauth2ResourceServer -> oauth2ResourceServer.jwt(withDefaults()));

return http.build();
Next, add a new Rest Controller, src/main/java/com/example/demo/ResourceController.java, with the following code
package com.example.demo;

import org.springframework.security.core.annotation.AuthenticationPrincipal;
import org.springframework.security.oauth2.jwt.Jwt;
import org.springframework.web.bind.annotation.GetMapping;
import org.springframework.web.bind.annotation.RestController;

@RestController
public class ResourceController {
    @GetMapping("/hello")
    String sayHello(@AuthenticationPrincipal Jwt jwt) {
        return String.format("Hello, %s!", jwt.getSubject());
    }
}
The @AuthenticationPrincipal annotation injects the Jwt object into the sayHello method. The Jwt object contains the claims from the access token.
Add the audience property, for example https://dev-12345678.us.auth0.com/api/v2/, to the src/main/resources/application.properties file:
okta.oauth2.audience=YOUR_AUTH0_ORG_URI/api/v2/
Restart the application and try to CURL http://localhost:8080/hello. You should see a 401 error message.
curl -i http://localhost:8080/hello

HTTP/1.1 401
Set-Cookie: JSESSIONID=CC2260CB52A514AEE7DFC326A0CAFE92; Path=/; HttpOnly
WWW-Authenticate: Bearer
X-Content-Type-Options: nosniff
X-XSS-Protection: 0
Cache-Control: no-cache, no-store, max-age=0, must-revalidate
Pragma: no-cache
Expires: 0
X-Frame-Options: DENY
Content-Length: 0
Date: Thu, 09 Mar 2023 18:33:53 GMT
Now let's create a token to access this API using the Auth0 CLI.
auth0 test token -a YOUR_AUTH0_ORG_URI/api/v2/ # for example https://dev-12345678.us.auth0.com/api/v2/
Save the access token as an environment variable and try to access the API again using the token.
TOKEN=YOUR_ACCESS_TOKEN

curl -i --header "Authorization: Bearer $TOKEN" http://localhost:8080/hello
You can also use HTTPie or xh instead of curl.
And that's it! You have successfully configured a Spring Boot application to use Auth0 as a resource server.
You can find the complete code from this tutorial on GitHub.
In these blog posts, you can learn more about using the Okta Spring Boot starter.
- Build a Beautiful CRUD App with Spring Boot and Angular
- Build a Simple CRUD App with Spring Boot and Vue.js
- Use React and Spring Boot to Build a Simple CRUD App
You can also sign up for our newsletter to stay updated on everything Identity and Security.
About the author

Deepu K Sasidharan
Principal Developer Advocate