

TL;DR: This tutorial will show you how to integrate authentication and authorization in a .NET Core microservice scenario based on gRPC. You will go through the process of protecting the server endpoints and will learn how to authorize a gRPC client to make requests to it. The full code of the final project is available at this GitHub repository.
The gRPC Framework
Lately, gRPC is becoming quite popular since it allows you to build high performance distributed systems. Initially designed by Google to optimize communication within their internal service infrastructure, it is now an open-source project available for most common programming languages: from Java to Python, to PHP, to C#. In a nutshell, gRPC is a Remote Procedure Call framework (RPC framework) based on the HTTP/2 protocol to transport binary messages and on the Protocol Buffers, also known as Protobuf, to define service contracts. A mandatory requirement for a gRPC service is to accept only secure gRPC connections, such as TLS connections.
Starting from .NET Core 3.0, Microsoft supports gRPC natively, so .NET Core developers can leverage this framework to build efficient microservices. The tutorial Implementing Microservices with gRPC and .NET Core 3.0 introduces you to the basics of using this framework with .NET Core. It shows you how to create a simple microservice that evaluates whether a customer is entitled to receive credit for a given amount and a client that makes requests to it.
In this tutorial, you will take that project and will secure the communication between the client and the server by using Auth0.
Prerequisites
As a first step, ensure you have .NET Core 3.1 SDK installed on your machine. You can check this by running the following command in a terminal window:
dotnet --versionIf you get the value 3.1.100 or above, then your environment is ready to start this project. Otherwise, download the .NET Core 3.1 SDK and install it on your machine.
If you have the latest version of Visual Studio, you already have the .NET Core 3.1 SDK installed.
If this is the very first time you run an HTTP-based .NET Core application on your machine, you have to trust the HTTPS development server certificate. You can do this by running the following command in a terminal window:
dotnet dev-certs https --trustNow that you trusted the TLS/SSL certificate, you can download the initial project from GitHub by typing the following command:
git clone -b starting-point --single-branch https://github.com/auth0-blog/secure-grpc-dotnetThis command will clone only the starting-point branch of the repository in your machine. This branch contains the complete code of the gRPC server and its client, built in the gRPC tutorial mentioned above. After cloning the repository, you will find a secure-grpc-dotnet folder on your machine. In this folder, you have:
- the
CreditRatingServicefolder: it contains the .NET Core project for the gRPC server - the
CreditRatingClientfolder: it contains the project for the client.
You are now going to modify these projects to use Auth0 authentication and authorization features. If you want more details about the implementation of the client and the server, please check the gRPC tutorial.
The Authentication and Authorization Scenario
The gRPC server implementation you downloaded from GitHub accepts requests from any gRPC client. As said, the goal of this tutorial is to secure the gRPC server so that only authorized gRPC clients can make requests to check whether a customer can receive credit.
Auth0 provides you with an easy way to integrate authentication and authorization in your applications. However, it is very important to identify the correct scenario that applies to your system. Your system's scenario requires you to choose the right flow for authentication and authorization.
The scenario depicted by the two projects that implement the gRPC client and server is a microservice scenario. In this context, the two applications run autonomously without user interaction, even if the initial request would be originated by a user.
In the specific case, the gRPC client is a console application that needs to be run by a user. However, this choice has been made for simplicity. In a production environment, the client could be a running process without user interaction.
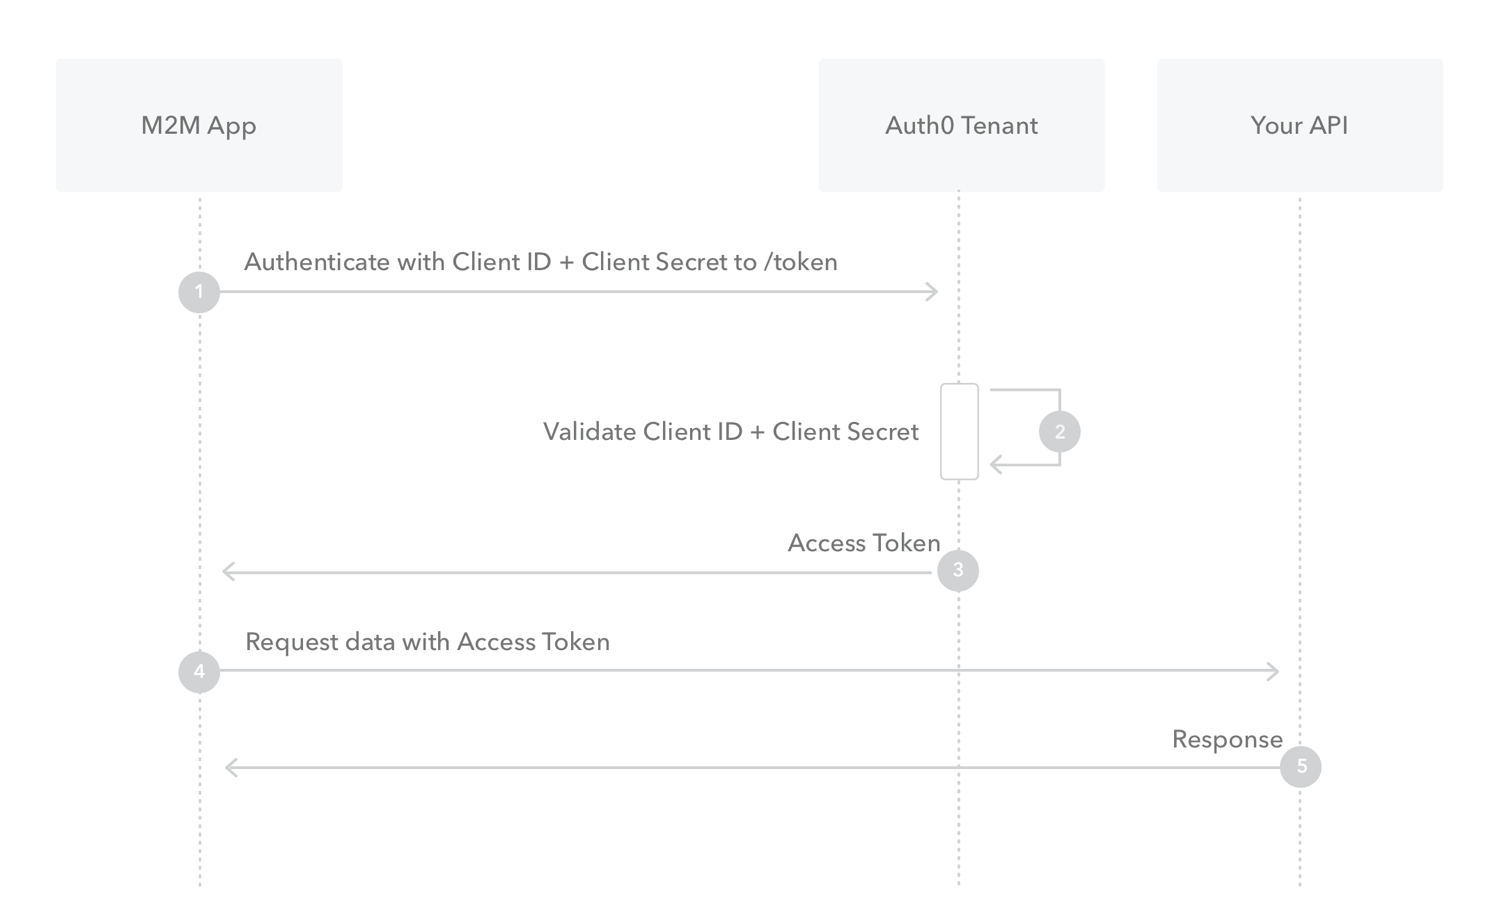
So, in the system you are going to secure, the client and the server act autonomously, not on behalf of a user. They are meant to run on the server side, so both applications are not publicly accessible. This is very important since the fact that they are not publicly accessible lets you delimit the security risks they can come across. In other words, this is what is called a machine-to-machine (M2M) scenario. In this case, the flow you are going to use is the Client Credentials Flow. With this flow, the client is authenticated and authorized per se, not on behalf of a user.
The following diagram summarizes the interactions between the client (M2M App), the server (Your API), and the authorization server (Auth0 Tenant) in this flow.
With this scenario in mind, you are ready to arrange the two projects to support the Client Credentials Flow.
"Learn how to secure your gRPC microservices in .NET Core."
Tweet This

Securing the gRPC Server
Start securing the microservice system by protecting the gRPC server from unauthorized accesses. You will achieve this objective by registering the server with Auth0 and applying a few changes to the CreditRatingService project.
Register the server with Auth0
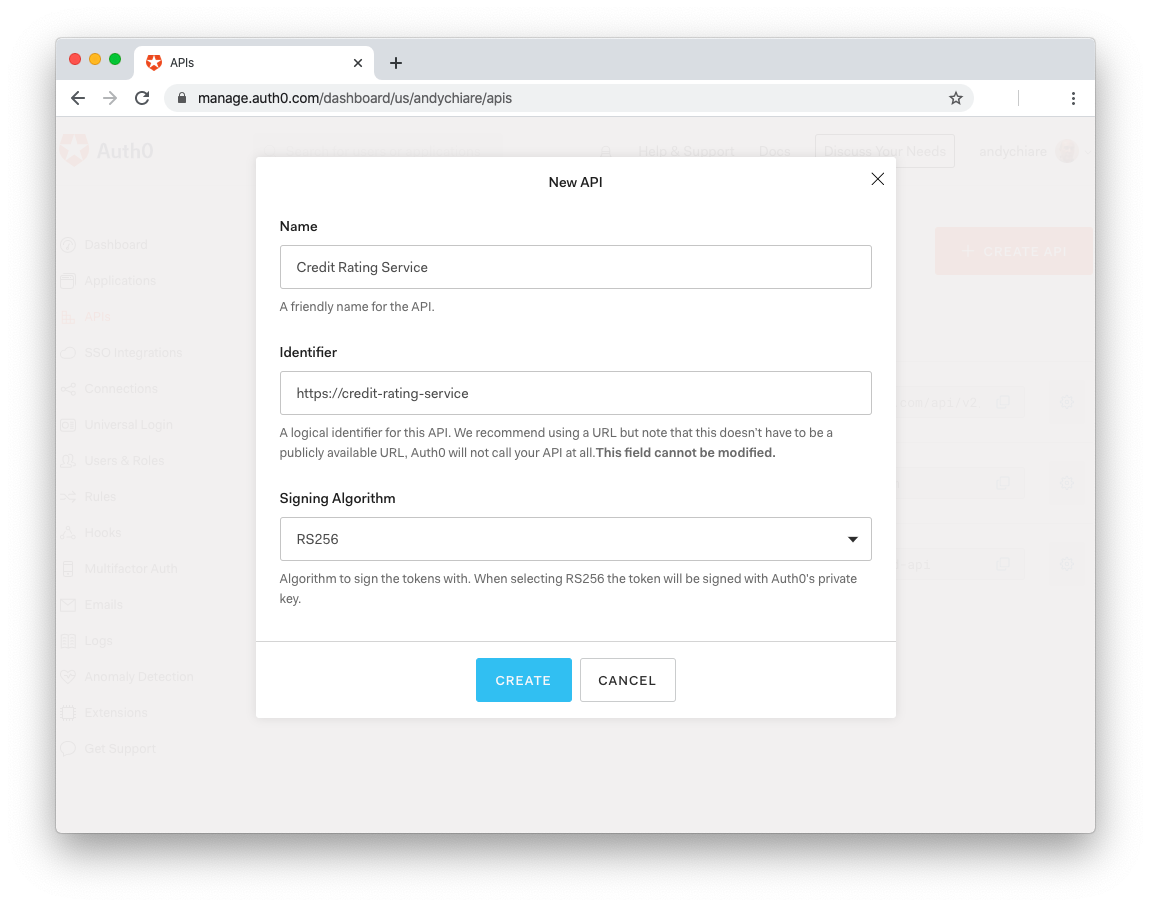
So, to register the gRPC server with Auth0, access the Auth0 Dashboard. If you don't have an Auth0 account, you can sign up for a free Auth0 account here. Then, move to the API section of the Dashboard and follow these steps:
Click on Create API
Provide a friendly name for your API (for example, Credit Rating Service) and a unique identifier in the URL format (for example, https://credit-rating-service), as shown in the following picture:
Leave the signing algorithm to RS256 and click the Create button
These steps make Auth0 aware of your server and will allow you to control access.
While you are in the Auth0 Dashboard, take note of your Auth0 domain, you will need it soon. This is a string in the form
YOUR-TENANT-NAME.auth0.comwhereYOUR-TENANT-NAMEis the name you provided when you created your account with Auth0. For more information, check the documentation.
Configure the server application
Now, you need to configure your gRPC server with the parameters provided by Auth0. So, move into the CreditRatingService folder under the secure-grpc-dotnet folder. Here, open the appsettings.json configuration file and replace its content with the following:
{
  "Logging": {
    "LogLevel": {
      "Default": "Warning",
      "Microsoft.Hosting.Lifetime": "Information"
    }
  },
  "AllowedHosts": "*",
  "Kestrel": {
    "EndpointDefaults": {
      "Protocols": "Http2"
    }
  },
  "Auth0": {
    "Domain": "YOUR_AUTH0_DOMAIN",
    "Audience": "YOUR_UNIQUE_IDENTIFIER"
  }
}
Replace the YOUR_AUTH0_DOMAIN placeholder with your Auth0 domain, matching the format YOUR-TENANT-NAME.auth0.com, and the YOUR_UNIQUE_IDENTIFIER placeholder with the value you provided as a unique identifier of your API.
Integrate the server with Auth0
In order to interact with the Auth0 authorization services, your server needs to be able to handle tokens in the JWT (JSON Web Token) format.
Interested in getting up-to-speed with JWTs as soon as possible?
Download the free ebook
You can accomplish this by installing the Microsoft.AspNetCore.Authentication.JwtBearer library. So, still in the CreditRatingService folder, type the following command in a terminal window:
dotnet add package Microsoft.AspNetCore.Authentication.JwtBearerAfter a few seconds, the package is installed, and you are ready to make changes to the server's code so that it will support authentication and authorization. For this purpose, open the Startup.cs file and replace the using section with the following:
// CreditRatingService/Startup.cs

using Microsoft.AspNetCore.Builder;
using Microsoft.AspNetCore.Hosting;
using Microsoft.AspNetCore.Http;
using Microsoft.Extensions.DependencyInjection;
using Microsoft.Extensions.Hosting;
using Microsoft.Extensions.Configuration;
using Microsoft.AspNetCore.Authentication.JwtBearer;

namespace CreditRatingService
{
  // ... leave the rest untouched ...
}
Compared to the previous version, you added references to Microsoft.Extensions.Configuration and Microsoft.AspNetCore.Authentication.JwtBearer. The former provides functionalities to access the configuration file, and the latter enables you to use the JWT package that just installed.
To enable the gRPC server to read data from the configuration file, add the Configuration property and the Startup() constructor to the Startup class, as shown below:
// CreditRatingService/Startup.cs

using Microsoft.AspNetCore.Builder;
using Microsoft.AspNetCore.Hosting;
using Microsoft.AspNetCore.Http;
using Microsoft.Extensions.DependencyInjection;
using Microsoft.Extensions.Hosting;
using Microsoft.Extensions.Configuration;
using Microsoft.AspNetCore.Authentication.JwtBearer;

namespace CreditRatingService
{
  public class Startup
  {
    public IConfiguration Configuration { get; }

    public Startup(IConfiguration configuration)
    {
        Configuration = configuration;
    }

    // ... leave the rest untouched ...
  }
}
These changes allow your server to automatically load in the Configuration property the parameters you saved in the appsettings.json file.
Now, you have to configure authentication and authorization for the server. Still in the Startup.cs file, replace the ConfigureServices() method with the following code:
// CreditRatingService/Startup.cs

// ... leave the rest untouched ...

public void ConfigureServices(IServiceCollection services)
{
  services.AddAuthentication(options =>
  {
    options.DefaultAuthenticateScheme = JwtBearerDefaults.AuthenticationScheme;
    options.DefaultChallengeScheme = JwtBearerDefaults.AuthenticationScheme;
  }).AddJwtBearer(options =>
  {
    options.Authority = $"https://{Configuration["Auth0:Domain"]}/";
    options.Audience = Configuration["Auth0:Audience"];
  });
  services.AddAuthorization();
  services.AddGrpc();
}

// ... leave the rest untouched ...
With the code you added to the ConfigureServices() method, you are registering the authentication and authorization services to the dependency system. Regarding the authentication service, you are passing the configuration parameters that state you are using the JWT-based authentication and provide the Auth0 configuration data.
At this point, you need to add authentication and authorization middlewares to the application. Change the Configure() method so that it looks like the following:
// CreditRatingService/Startup.cs

// ... leave the rest untouched ...

public void Configure(IApplicationBuilder app, IWebHostEnvironment env)
{
  if (env.IsDevelopment())
  {
    app.UseDeveloperExceptionPage();
  }

  app.UseRouting();

  app.UseAuthentication();    //new statement
  app.UseAuthorization();        //new statement

  app.UseEndpoints(endpoints =>
  {
    endpoints.MapGrpcService<CreditRatingCheckService>();

    endpoints.MapGet("/", async context =>
    {
      await context.Response.WriteAsync("Communication with gRPC endpoints must be made through a gRPC client. To learn how to create a client, visit: https://go.microsoft.com/fwlink/?linkid=2086909");
    });
  });
}

// ... leave the rest untouched ...
The two newly added statements must be located in that specific position, just after app.UseRouting() and before app.UseEndpoints(). Also, they must be added in the order shown above. A different position or order could cause unexpected behaviors.
Protecting the server endpoint
Now you are ready to protect the endpoint of your gRPC server. So, move into the Services folder and open the CreditRatingService.cs file. In the using section of this file, add a reference to the Microsoft.AspNetCore.Authorization namespace. The resulting using section should look like the following:
// CreditRatingService/Services/CreditRatingService.cs

using System;
using System.Collections.Generic;
using System.Threading.Tasks;
using Grpc.Core;
using Microsoft.Extensions.Logging;
using Microsoft.AspNetCore.Authorization;

namespace CreditRatingService {
  // ... leave the rest untouched ...
}
Finally, add the Authorize attribute to the CheckCreditRequest() method of the CreditRatingCheckService class, as shown below:
// Services/CreditRatingService.cs

// ... leave the rest untouched ...

[Authorize]
public override Task<CreditReply> CheckCreditRequest(CreditRequest request, ServerCallContext context)
{
  return Task.FromResult(new CreditReply
  {
    IsAccepted = IsEligibleForCredit(request.CustomerId, request.Credit)
  });
}

// ... leave the rest untouched ...
Your gRPC server is protected! You can test it by making the client interact with the server.
In the CreditRatingService folder, launch the dotnet run command from a terminal window to run the gRPC server. In another terminal window, move into the CreditRatingClient folder and launch the dotnet run command to run the gRPC client.
In the client's terminal window, you should get an error like the following:
Unhandled exception. Grpc.Core.RpcException: Status(StatusCode=Unauthenticated, Detail="Bad gRPC response. HTTP status code: 401")
   at CreditRatingClient.Program.Main(String[] args) in /Projects/secure-grpc-dotnet/CreditRatingClient/Program.cs:line 25
   at CreditRatingClient.Program.<Main>(String[] args)
This confirms that the server endpoint is protected, and the client is not authorized to make requests.
"Integrating authorization in your gRPC-based microservice is straightforward with Auth0."
Tweet This
Securing the gRPC Client
To enable the gRPC client application to make requests to the server, you need to register it with Auth0 and arrange its code so that it can be authenticated and authorized.
Register the client with Auth0
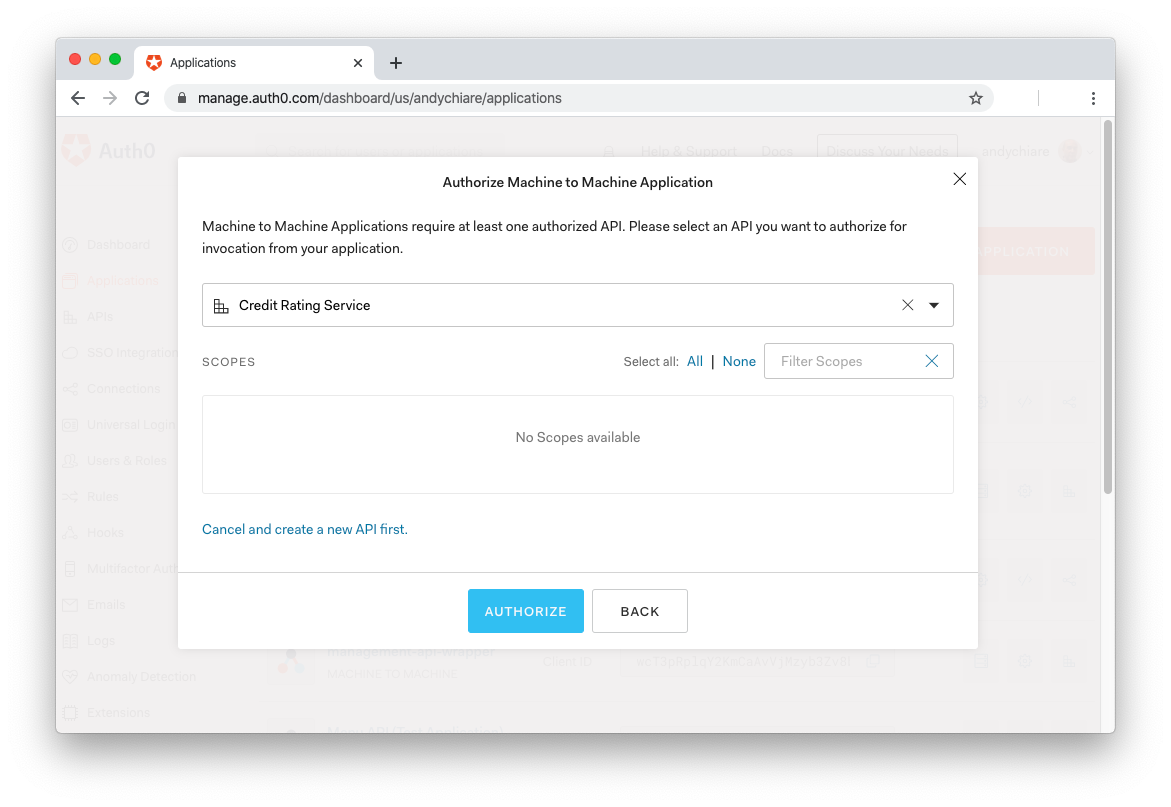
Similar to what you did with the server, you have to access the Auth0 Dashboard and follow these steps to register your gRPC client:
Move to the Applications section and click on Create Application
Provide a descriptive name for the application (for example, Credit Rating Client), select Machine-To-Machine as the application type, and click Create
In the next screen, select the name of the API you registered for the gRPC server (for example, Credit Rating Service) as shown in the following picture:
Finally, click Authorize.
Your gRPC client is now registered with Auth0.
While you are in the Auth0 Dashboard, move into the Settings tab and take note of the Client ID and Client Secret generated for your application. You will use them to authenticate your client.
Configure the client application
Now you are ready to configure the client side to leverage the gRPC authentication and authorization. Move into the CreditRatingClient folder and add a new file named appsettings.json with the following content:
{
  "Auth0": {
    "Domain": "YOUR_AUTH0_DOMAIN",
    "Audience": "YOUR_UNIQUE_IDENTIFIER",
    "ClientId": "YOUR_CLIENT_ID",
    "ClientSecret": "YOUR_CLIENT_SECRET"
  }
}
Replace the YOUR_AUTH0_DOMAIN placeholder with your Auth0 domain and the YOUR_UNIQUE_IDENTIFIER placeholder with the value you provided as a unique identifier of your API. These are the same values you used to configure the server. Also, replace the YOUR_CLIENT_ID and YOUR_CLIENT_SECRET placeholders with the Client ID and Client Secret values you got when registered the gRPC client.
You are going to store the gRPC client credentials in the
appsettings.jsonfile. Be aware that you can do this just because the scenario of your system is a machine-to-machine scenario.Remember: never store credentials in a publicly accessible client.
To include the configuration file in the set of artifacts of the building process, open the CreditRatingClient.csproj file and add a new item group for the appsettings.json file, as shown in the following example:
<!-- CreditRatingClient/CreditRatingClient.csproj -->
<Project Sdk="Microsoft.NET.Sdk">
<!-- ... leave the rest untouched ... -->
  <ItemGroup>
    <None Update="appsettings.json">
      <CopyToOutputDirectory>PreserveNewest</CopyToOutputDirectory>
    </None>
  </ItemGroup>
</Project>
At this point, you need to load these configuration parameters in the gRPC client. For this purpose, in the CreditRatingClient folder, run the following commands in a terminal window:
dotnet add package Microsoft.Extensions.Configuration
dotnet add package Microsoft.Extensions.Configuration.FileExtensions
dotnet add package Microsoft.Extensions.Configuration.Json
These commands add the configuration libraries to your project. Then, open the Program.cs file and add a reference to the System.IO and Microsoft.Extensions.Configuration namespaces, and the GetAppSettings() method, as shown in the following:
// CreditRatingClient/Program.cs

using System;
using System.Threading.Tasks;
using CreditRatingService;
using Grpc.Net.Client;
using System.Runtime.InteropServices;
using System.IO;
using Microsoft.Extensions.Configuration;

namespace CreditRatingClient
{
  class Program
  {
    static async Task Main(string[] args)
    {
      // ... leave the rest untouched ...
    }

    static IConfiguration GetAppSettings()
    {
      var builder = new ConfigurationBuilder()
       .SetBasePath(Directory.GetCurrentDirectory())
       .AddJsonFile("appsettings.json");

      return builder.Build();
    }
  }
}
Getting an access token from Auth0
The next step to enable your gRPC client to make requests to the server is to get an access token from the Auth0 authorization server. An access token is a string demonstrating that an application is enabled to access an API. So, having an access token and providing it to the gRPC server, your client can prove to be authorized to make requests.
You can request an access token from Auth0 by using the Auth0 Authentication API SDK. This package simplifies the interaction with the Auth0 authorization server by providing many helpful classes. To install it in the client project, make sure you're in the CreditRatingClient folder and run the following command in a terminal window:
dotnet add package Auth0.AuthenticationApiThen, add the GetAccessToken() method to the Program class as defined in the following:
// CreditRatingClient/Program.cs

// ... using section ...

namespace CreditRatingClient
{
  class Program
  {
    // ... leave the rest untouched ...

    static async Task<string> GetAccessToken()
    {
      var appAuth0Settings = GetAppSettings().GetSection("Auth0");
      var auth0Client = new AuthenticationApiClient(appAuth0Settings["Domain"]);
      var tokenRequest = new ClientCredentialsTokenRequest()
      {
        ClientId = appAuth0Settings["ClientId"],
        ClientSecret = appAuth0Settings["ClientSecret"],
        Audience = appAuth0Settings["Audience"]
      };
      var tokenResponse = await auth0Client.GetTokenAsync(tokenRequest);

      return tokenResponse.AccessToken;
    }
  }
}
The GetAccessToken() method gets the Auth0 configuration parameters from the appsettings.json file and uses them to instantiate a client for the Auth0 API (auth0Client) and a request for a token to be used with the Client Credentials flow (tokenRequest). Then, it sends the request to the authorization server and gets the access token from the response. This is the value returned by the method.
To make this method work, you need to integrate the using section with a few additions that end up to get the following result:
// CreditRatingClient/Program.cs

using System;
using System.Threading.Tasks;
using CreditRatingService;
using Grpc.Net.Client;
using System.Runtime.InteropServices;
using System.IO;
using Microsoft.Extensions.Configuration;
using Grpc.Core;
using Auth0.AuthenticationApi;
using Auth0.AuthenticationApi.Models;

namespace CreditRatingClient
{
    // ... leave the rest untouched ...
}
Calling the protected gRPC endpoint
At this point, you have all you need to make your request to the gRPC server. You simply need to replace the Main() method with the following:
// CreditRatingClient/Program.cs

// ... leave the rest untouched ...

namespace CreditRatingClient
{
  class Program
  {
    // ... leave the rest untouched ...

    static async Task Main(string[] args)
    {
      var serverAddress = "https://localhost:5001";

      if (RuntimeInformation.IsOSPlatform(OSPlatform.OSX))
      {
        AppContext.SetSwitch(
            "System.Net.Http.SocketsHttpHandler.Http2UnencryptedSupport", true);
        serverAddress = "http://localhost:5000";
      }

      var channel = GrpcChannel.ForAddress(serverAddress);
      var client = new CreditRatingCheck.CreditRatingCheckClient(channel);
      var creditRequest = new CreditRequest { CustomerId = "id0201", Credit = 7000 };

      var accessToken = await GetAccessToken();
      var headers = new Metadata();
      headers.Add("Authorization", $"Bearer {accessToken}");

      var reply = await client.CheckCreditRequestAsync(creditRequest, headers);

      Console.WriteLine($"Credit for customer {creditRequest.CustomerId} {(reply.IsAccepted ? "approved" : "rejected")}!");
      Console.WriteLine("Press any key to exit...");
      Console.ReadKey();
    }

    // ... leave the rest untouched ...
  }
}
You create a gRPC channel for the address of the gRPC server (ensure that your server is listening to the same address you are putting here). Then, you create a client on that channel and prepare the request to send. You also get an access token from Auth0 and create the Authorization header containing the token. Finally, you send the request along with the header to the gRPC server, get the response, and show it on the console.
You may notice that at the beginning of the method, there is a check on the current operating system. This check is needed to work around a known issue with TLS support that affects macOS and older Windows versions. Keep in mind that this workaround should only be used in the development environment.
To test the interaction between the gRPC client and the server, ensure that the server is up and running and then, in the CreditRatingClient folder, launch the dotnet run command in a terminal window.
This time, you should get the following message as a result:
Credit for customer id0201 approved!
Press any key to exit...
In this simple example, the GetAccessToken() method requests an access token from Auth0. This leads to a network request each time your application needs the access token. Actually, once you receive an access token from Auth0, you can reuse it as long as it has not expired, and the audience remains the same.
This means that a production-ready application should implement a caching mechanism for the access token, avoiding unnecessary network roundtrips.
Creating an authorized channel
The solution you applied so far works fine. However, in a more complex application where you need to make multiple requests to a gRPC server, you have to attach the access token via the Authorization header to each request. This may be annoying and make the code too verbose.
Alternatively, you can centralize the access token addition by creating an authorized channel. Once created, the authorized channel automatically includes the access token as a header in each gRPC request.
The authorized channel needs a secure connection (TLS) as a mandatory requirement. Due to the issue mentioned above, you cannot use this approach in macOS or older Windows machines.
To use an authorized channel, add the CreateAuthorizedChannel() method to the Program class in the Program.cs file, as shown below:
// CreditRatingClient/Program.cs

// ... leave the rest untouched ...

namespace CreditRatingClient
{
  class Program
  {
    // ... leave the rest untouched ...

    private async static Task<GrpcChannel> CreateAuthorizedChannel(string address)
    {
      var accessToken = await GetAccessToken();

      var credentials = CallCredentials.FromInterceptor((context, metadata) =>
        {
          if (!string.IsNullOrEmpty(accessToken))
          {
            metadata.Add("Authorization", $"Bearer {accessToken}");
          }
          return Task.CompletedTask;
        });

        var channel = GrpcChannel.ForAddress(address, new GrpcChannelOptions
          {
            Credentials = ChannelCredentials.Create(new SslCredentials(), credentials)
          });
        return channel;
      }
    }
}
This method takes the server address as a parameter, gets the access token from Auth0, and creates the call credentials from that token. Then, it creates a gRPC channel based on the server address and the created credentials. The resulting channel is returned to the caller.
Having the opportunity to create an authorized channel, the Main() method becomes as follows:
static async Task Main(string[] args)
{
  var channel = await CreateAuthorizedChannel("https://localhost:5001");
  var client = new CreditRatingCheck.CreditRatingCheckClient(channel);
  var creditRequest = new CreditRequest { CustomerId = "id0201", Credit = 7000 };
  var reply = await client.CheckCreditRequestAsync(creditRequest);

  Console.WriteLine($"Credit for customer {creditRequest.CustomerId} {(reply.IsAccepted ? "approved" : "rejected")}!");
  Console.WriteLine("Press any key to exit...");
  Console.ReadKey();
}
As you can see, the code is more compact than before. You simply create an authorized channel, build the client and the request, and send it to the server.
"Using an authorized gRPC channel in .NET Core keeps your code compact and clear."
Tweet This
Summary
In this tutorial, you learned that the Client Credentials Flow is the best fit in a microservice scenario. With this knowledge, you leveraged Auth0 to implement this flow with .NET Core microservices that use gRPC to communicate. With a practical approach, you discovered how to protect the server endpoint and authorize the client to make requests to it.
You can find the full source code of developed throughout the tutorial in this GitHub repository.


