TL;DR: In this tutorial, you will learn what gRPC is and how you can use it in .NET Core 3.1 to build efficient microservices. Throughout the tutorial, you will build a service and a client that will introduce you to the details of using gRPC in C#. You can find the full code of the final project in this GitHub repository.
What is gRPC?
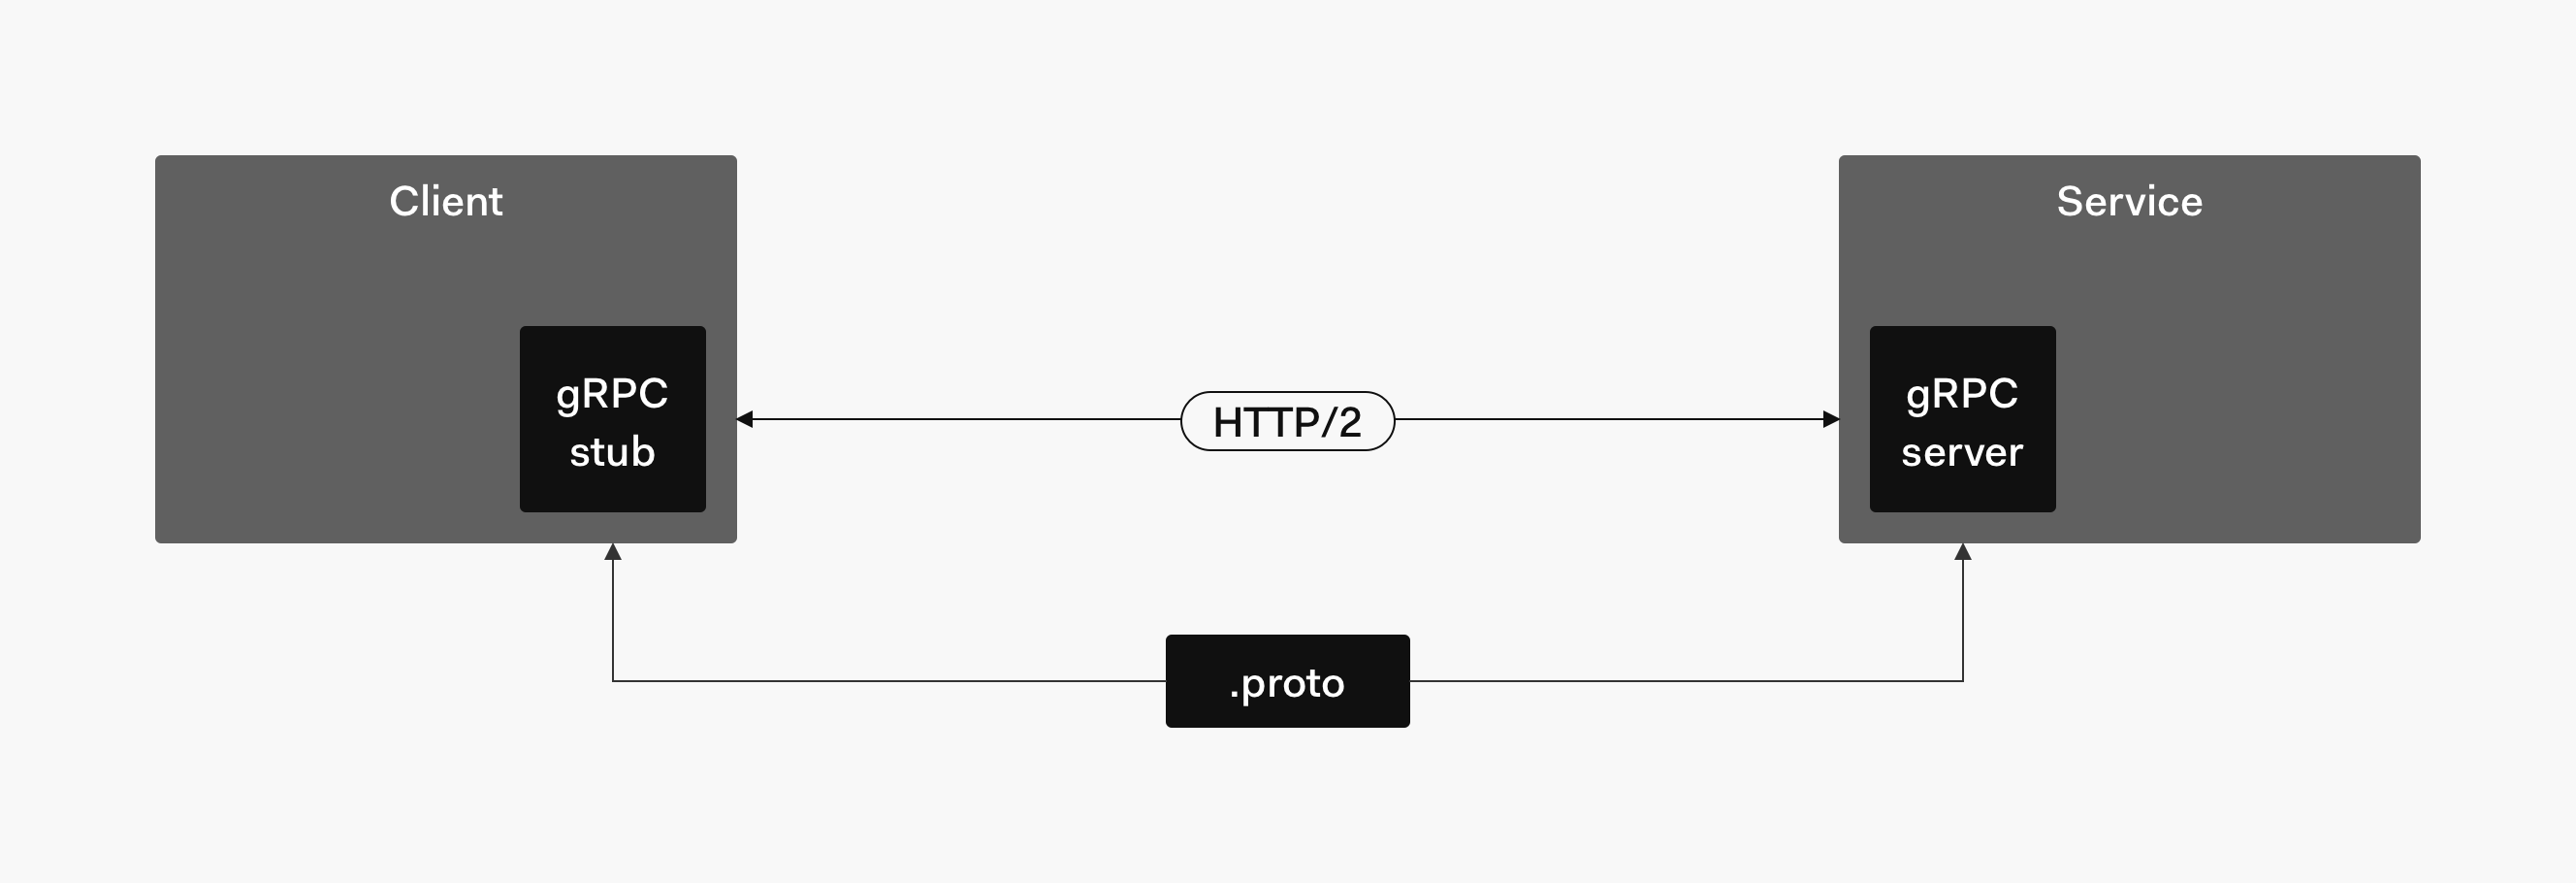
gRPC is a framework to efficiently connect services and build distributed systems. Initially designed by Google, it is now an open-source project promoting the Remote Procedure Call (RPC) model for communication between services. It is focused on high performance and uses the HTTP/2 protocol to transport binary messages. It also relies on the Protocol Buffers language to define service contracts. Protocol Buffers, also known as Protobuf, allow you to define the interface to be used in service to service communication independently from the programming language. Many tools for the most common programming languages are available to translate these Protobuf interfaces into code.
The gRPC framework allows developers to create services that can communicate with each other efficiently and independently from their preferred programming language. Once you define a contract with Protobuf, this contract can be used by each service to automatically generate the code that sets up the communication infrastructure. This aspect simplifies the creation of services interaction and, together with the high performance, makes gRPC the ideal framework to create microservices.
Also, gRPC comes with four different types of RPC:
- Unary RPC: this is the simplest form of RPC. In this case, the client sends a request message to the server and receives a response.
- Server streaming RPC: in this scenario, the client sends a request message to the server and receives a sequence of responses.
- Client streaming RPC: this is the case where the client sends a sequence of messages and receives a single response from the server.
- Bidirectional streaming RPC: in this case, the client and the server exchange messages in both directions.
The following diagram summarizes the overall architecture of a basic gRPC-based system:
HTTP Web APIs and gRPC
Since gRPC is so efficient and handy, why has it not replaced the well-known HTTP Web API technology?
There are a couple of factors to take into account. The Web APIs, especially if inspired by the REST architecture, rely on a different programming model. The gRPC framework proposes the RPC model, which is a model where a client invokes a remote procedure that will be executed on the server. Standard Web APIs are based on a resource-oriented approach, which is a model where a client requests a resource representation and applies simple CRUD operations on these resources.
In addition, Web APIs are based on the HTTP protocol, while gRPC uses HTTP/2. Also, data exchanged by Web APIs are usually textual, human-readable (typically JSON), while gRPC uses a compact binary format. The interaction model in Web APIs is client-server, while gRPC supports multiple models: from client-server to bidirectional streaming. Finally, Web APIs support browsers, while gRPC don't.
In short, Web APIs and gRPC use different models for communication and have different use-cases. So, both technologies will continue to coexist in the next years.
gRPC and .NET Core
Before the .NET Core 3.0 release, you could use gRPC in your C# applications by using the Grpc.Core library. It basically is a C# wrapper around the gRPC Core library written in C. It wasn't playing very well with Kestrel and other managed code libraries like HttpClient. You also didn't have any project template helping you to quickly set up your application with gRPC support.
Starting from .NET Core 3.0, you can leverage the grpc-dotnet library, entirely written in managed code and well-integrated with the .NET platform. It also provides you with a specific project template that helps you to set up your application very quickly, as you will see in this tutorial.
Moving forward, you will learn how to use gRPC in .NET Core 3.1 by building a simple service and a client communicating through the unary RPC model.
“Learn what gRPC is and how to use it to build microservices in .NET Core 3.1.”
Tweet This
Prerequisites
Before starting, ensure you have installed the .NET Core 3.1 SDK by typing the following command in a terminal window:
dotnet --version
You should get as a result the value 3.1.100 or above. If you don't, you should download the .NET Core 3.1 SDK and install it on your machine.
Note: If you have the latest version of Visual Studio, you have .NET Core 3.1 SDK bundled.
Creating a gRPC Service
The application you are going to build in this tutorial is a microservice that evaluates whether a customer is entitled to receive credit for a given amount. Later on, you will also build a client that makes a request to this service.
Start by creating a folder, say grpc-dotnet, that will contain the two projects you will create in this tutorial. Move into this folder and create the server project by typing the following command in a terminal window:
dotnet new grpc -o CreditRatingService
This command creates a sample project in a newly created CreditRatingService folder by using the .NET Core gRPC template. You are going to change the content of this project in a moment.
Defining the contract
The first step in the creation of your microservice is the definition of the contract, which is the interface exposed by your service to accept requests of customer evaluation. As said before, in the gRPC framework, this interface is defined through Protobuf. In particular, this definition is hosted in a .proto file.
So, move into the CreditRatingService/Protos folder and remove the greet.proto file. Then, add a new file named credit-rating-service.proto in the same folder and put the following content into it:
// Protos/credit-rating-service.proto

syntax = "proto3";

option csharp_namespace = "CreditRatingService";

package CreditRating;

service CreditRatingCheck {
  rpc CheckCreditRequest (CreditRequest) returns (CreditReply);
}

message CreditRequest {
  string customerId = 1;
  int32 credit = 2;
}

message CreditReply {
  bool isAccepted = 1;
}
The first two rows of the .proto file declare the Protobuf syntax version you want to use and the C# namespace where the interface will be implemented into. Then you define the CreditRating package. The package specifier prevents name clashes between protocol message types.
The subsequent items in the .proto file define the RPC service interface and two message types.
The RPC service interface is named CreditRatingCheck and contains an item marked with the rpc keyword. Think of it as a class with its methods. So, if your service exposes multiple functionalities, you will have multiple rpc definitions. Each rpc definition consists of a name, a list of input types and an output type. In the example above, you define an rpc named CheckCreditRequest that expects a message of type CreditRequest and returns a message of type CreditReply. Both these message types are defined below the service definition.
The message declarations define the structure of a message composed of a list of fields with the respective type. You can use scalar types, enumerations, or other message types as the type of each field. Also, you can see that each field has a unique number assigned. These numbers are used to identify your fields in the messages once they are converted into the binary format. You should not change these numbers once your application is operative. In the example above, you have defined a CreditRequest message composed of the customer identifier and the requested credit, and the CreditReply message containing just a boolean value that communicates whether the credit has been accepted or not.
Once your contract is defined, you need to make your application aware of this .proto file. So, update the CreditRatingService.csproj file by replacing its content with the following:
<!-- CreditRatingService.csproj -->
<Project Sdk="Microsoft.NET.Sdk.Web">
  <PropertyGroup>
    <TargetFramework>netcoreapp3.1</TargetFramework>
  </PropertyGroup>
  <ItemGroup>
    <Protobuf Include="Protos\credit-rating-service.proto" GrpcServices="Server" />
  </ItemGroup>
  <ItemGroup>
    <PackageReference Include="Grpc.AspNetCore" Version="2.23.2" />
  </ItemGroup>
</Project>
Here, the relevant part is the presence of the Protobuf element that references the .proto file you just created and assigns the value Server to the GrpcServices attribute. This information allows the build system to generate the C# code needed to support the basic infrastructure for gRPC communication. In particular, it will generate the code needed for the server side.
“The gRPC framework allows you to define a contract-based distributed system.”
Tweet This
Implementing the service
After defining the contract, implement your service without worrying about the communication layer. You simply move into the Services folder, rename the GreeterService.cs file to CreditRatingService.cs, and replace its content with this code:
// Services/CreditRatingService.cs

using System;
using System.Collections.Generic;
using System.Threading.Tasks;
using Grpc.Core;
using Microsoft.Extensions.Logging;

namespace CreditRatingService
{
    public class CreditRatingCheckService: CreditRatingCheck.CreditRatingCheckBase
    {
        private readonly ILogger<CreditRatingCheckService> _logger;
        private static readonly Dictionary<string, Int32> customerTrustedCredit = new Dictionary<string, Int32>()
        {
            {"id0201", 10000},
            {"id0417", 5000},
            {"id0306", 15000}
        };
        public CreditRatingCheckService(ILogger<CreditRatingCheckService> logger)
        {
            _logger = logger;
        }

        public override Task<CreditReply> CheckCreditRequest(CreditRequest request, ServerCallContext context)
        {
            return Task.FromResult(new CreditReply
            {
                IsAccepted = IsEligibleForCredit(request.CustomerId, request.Credit)
            });
        }

        private bool IsEligibleForCredit(string customerId, Int32 credit) {
            bool isEligible = false;

            if (customerTrustedCredit.TryGetValue(customerId, out Int32 maxCredit))
            {
                isEligible = credit <= maxCredit;
            }

            return isEligible;
        }
    }
}
Here you are implementing the CreditRatingCheckService class by inheriting from the CreditRatingCheck.CreditRatingCheckBase class. This base class is generated at build time from the data contained in the .proto file. In the specific case, it is built from the CreditRatingCheck service definition, and it ensures that all the gRPC communication infrastructure is available to your implementation.
As you can see, the CheckCreditRequest() method is nothing more than the implementation of the rpc definition in the .proto file. It uses the CreditRequest and the CreditReply types based on the message definitions of the contract. The credit request evaluation is actually implemented by the IsEligibleForCredit() private method. Of course, it simulates the evaluation by simply comparing the requested credit with the maximum allowed credit for that customer in the customerTrustedCredit dictionary.
After the service implementation, it's time to integrate it into the gRPC infrastructure. Open the Startup.cs file and replace its content with the following:
// Startup.cs

using Microsoft.AspNetCore.Builder;
using Microsoft.AspNetCore.Hosting;
using Microsoft.AspNetCore.Http;
using Microsoft.Extensions.DependencyInjection;
using Microsoft.Extensions.Hosting;

namespace CreditRatingService
{
    public class Startup
    {
        public void ConfigureServices(IServiceCollection services)
        {
            services.AddGrpc();
        }

        public void Configure(IApplicationBuilder app, IWebHostEnvironment env)
        {
            if (env.IsDevelopment())
            {
                app.UseDeveloperExceptionPage();
            }

            app.UseRouting();

            app.UseEndpoints(endpoints =>
            {
                endpoints.MapGrpcService<CreditRatingCheckService>();

                endpoints.MapGet("/", async context =>
                {
                    await context.Response.WriteAsync("Communication with gRPC endpoints must be made through a gRPC client.");
                });
            });
        }
    }
}
The ConfigureServices() method of the Startup class adds gRPC to the application services. In the Configure() method, you find the definition of the endpoints. Notice how the MapGrpcService() method maps the CreditRatingCheckService class implementation to the gRPC infrastructure.
Now, move in the root folder of the project and run the service by typing the following command in your terminal window:
dotnet run
Note: If you get an error right after running the service, don't worry. It will be addressed in a moment.
As a .NET Core developer, you know that this command builds your project, if needed, and runs it. During the building step, it will use the gRPC tools included in the Grpc.AspNetCore package to generate the C# code needed to manage gRPC communication. If you take a look at the obj/Debug/netcoreapp3.1 folder, you will find among the other stuff the CreditRatingService.cs file and the Credit-rating-serviceGrpc.cs file. The former file contains the class definition for the gRPC messages, while the latter file defines the base classes for the service. You don't need to edit these files (and you should not since they are regenerated when the .proto file changes)
If all is going as expected, your first gRPC-based service is running. Of course, to interact with this service and test if it is working as expected, you need a gRPC client. This is what you are going to build in the next section.
Troubleshooting the service start
When starting your gRPC service, you may experience an error like the following:
 Microsoft.AspNetCore.Server.Kestrel[0]
      Unable to start Kestrel.
System.IO.IOException: Failed to bind to address https://localhost:5001.
 ---> System.AggregateException: One or more errors occurred. (HTTP/2 over TLS is not supported on macOS due to missing ALPN support.) (HTTP/2 over TLS is not supported on macOS due to missing ALPN support.)
 ---> System.NotSupportedException: HTTP/2 over TLS is not supported on macOS due to missing ALPN support.
This is a known issue that affects macOS and older Windows versions. It happens because Kestrel, the integrated Web server used by ASP.NET, doesn't support HTTP/2 with TLS on these operating systems. TLS is one of the constraints underlying the gRPC framework. To be compliant with this constraint, the .NET Core gRPC project template uses TLS by default. So, a possible workaround for this issue in those operating systems is using HTTP/2 without TLS.
Note: You should disable TLS support in your gRPC service only during development.
So, open the Program.cs file and replace its content with the following code:
// Program.cs

using Microsoft.AspNetCore.Hosting;
using Microsoft.Extensions.Hosting;
using Microsoft.AspNetCore.Server.Kestrel.Core;
using System.Runtime.InteropServices;

namespace CreditRatingService
{
    public class Program
    {
        public static void Main(string[] args)
        {
            CreateHostBuilder(args).Build().Run();
        }

       public static IHostBuilder CreateHostBuilder(string[] args) =>
            Host.CreateDefaultBuilder(args)
                .ConfigureWebHostDefaults(webBuilder =>
                {
                    if (RuntimeInformation.IsOSPlatform(OSPlatform.OSX)) {
                     webBuilder.ConfigureKestrel(options =>
                     {
                         // Setup a HTTP/2 endpoint without TLS.
                         options.ListenLocalhost(5000, o => o.Protocols =
                             HttpProtocols.Http2);
                     });
                    }
                    webBuilder.UseStartup<Startup>();
                });
    }
}
Compared to the original version, here you imported the Microsoft.AspNetCore.Server.Kestrel.Core and the System.Runtime.InteropServices namespaces. Also, when the current operating system is OSX, you are forcing Kestrel to use just the HTTP/2 protocol. Note that the options.ListenLocalhost() method sets the listening port to 5000.
Of course, the gRPC client that will communicate with this server will not use TLS as well.
Creating a gRPC Client
Now you are ready to build the gRPC client that will consume the service you implemented in the previous section. Move into the grpc-dotnet folder and type the following command in your terminal window:
dotnet new console -o CreditRatingClient
This command creates a standard console application in a newly created CreditRatingClient folder. So, in this case, you are not using any special project template.
Now, move into the CreditRatingClient folder and add the needed dependencies by running the following commands:
dotnet add CreditRatingClient.csproj package Grpc.Net.Client
dotnet add CreditRatingClient.csproj package Google.Protobuf
dotnet add CreditRatingClient.csproj package Grpc.Tools
The Grpc.Net.Client package provides basic classes to build a gRPC client, while the Google.Protobuf library allows your application to manage Protocol Buffers.
The Grpc.Tools package compiles .proto files into C# code. It is responsible for generating the code that sets up the basic infrastructure for gRPC communication. This package is only required at build time and should not be included in the generated output of the build process. For this reason, the installation process marks the reference to the Grpc.Tools package with the PrivateAssets attribute.
Using the contract
Your client will communicate with the gRPC service you have just built. So, your client needs to know the details about how to invoke the remote procedure provided by the service, which data type to pass, and which data type to expect as a result.
You can gather all this information by using the contract you've already defined in the .proto file on the server side. So, create a Protos folder in the CreditRatingClient folder. Then, copy the credit-rating-service.proto file from the Protos folder of the gRPC service to this new Protos folder of the gRPC client project.
After this operation, edit the CreditRatingClient.csproj project file in the gRPC client project and add an item group with a Protobuf element pointing to the credit-rating-service.proto file. The final result should be as follows:
<!-- CreditRatingClient.csproj -->
<Project Sdk="Microsoft.NET.Sdk">
  <PropertyGroup>
    <OutputType>Exe</OutputType>
    <TargetFramework>netcoreapp3.1</TargetFramework>
  </PropertyGroup>
  <ItemGroup>
    <PackageReference Include="Google.Protobuf" Version="3.10.1" />
    <PackageReference Include="Grpc.Net.Client" Version="2.25.0" />
    <PackageReference Include="Grpc.Tools" Version="2.25.0">
      <IncludeAssets>runtime; build; native; contentfiles; analyzers; buildtransitive</IncludeAssets>
      <PrivateAssets>all</PrivateAssets>
    </PackageReference>
  </ItemGroup>
  <ItemGroup>
    <Protobuf Include="Protos\credit-rating-service.proto" GrpcServices="Client" />
  </ItemGroup>
</Project>
Note that, in this case, the Protobuf element has the GrpcServices attribute with the Client value. This makes the build system generate the C# code needed for the client side of your gRPC system. This client-side code is usually known as stub.
You can force the generation of the namespace and the types from the .proto file by running the following command:
dotnet build
As you saw for the service, here you will also find the generated source code in the obj/Debug/netcoreapp3.1 folder.
Note: You don't need to build your project at this step. The gRPC infrastructure code will be generated anyway when you will run your client. However, it could be useful to build the project now so you can take advantage of the code completion and all other contextual suggestions from your IDE.
To implement the logic of your gRPC client, edit the Program.cs file and replace its content with this code:
// Program.cs

using System;
using System.Threading.Tasks;
using CreditRatingService;
using Grpc.Net.Client;

namespace GrpcGreeterClient
{
    class Program
    {
        static async Task Main(string[] args)
        {
            // The port number(5001) must match the port of the gRPC server.
            var channel = GrpcChannel.ForAddress("https://localhost:5001");
            var client =  new CreditRatingCheck.CreditRatingCheckClient(channel);
            var creditRequest = new CreditRequest { CustomerId = "id0201", Credit = 7000};
            var reply = await client.CheckCreditRequestAsync(creditRequest);

            Console.WriteLine($"Credit for customer {creditRequest.CustomerId} {(reply.IsAccepted ? "approved" : "rejected")}!");
            Console.WriteLine("Press any key to exit...");
            Console.ReadKey();
        }
    }
}
This code creates a gRPC channel on port 5001 of the current machine. This is the default port also used on the server side. This channel is passed to the constructor of the CreditRatingCheckClient class, which is the actual gRPC client. Then, a message of type CreditRequest is created with the values for the specific request to be sent to the service. Finally, this message is sent to the remote service by invoking the CheckCreditRequestAsync() method of the gRPC client.
You get the response from the service in the reply message and use its IsAccepted property to display the appropriate message on the console.
“.NET Core 3.1 provides you with native support to the gRPC framework.”
Tweet This
Client and Server in Action
At this point, you have both the service and the client ready to communicate. So, ensure that your gRPC service is running. Open a new terminal window, move into the CreditRatingClient folder, and launch your gRPC client by typing the following command:
dotnet run
In your terminal window, you should see the following message:
Credit for customer id0201 approved!
Press any key to exit...
This means that your client sent a request to your service and got the expected response.
You can try to change the parameters of the request to get different responses.
Troubleshooting the client start
If you needed to disable TLS in your gRPC service because of the issue reported above, you will get the following error when your client attempts to call your service:
Unhandled exception. Grpc.Core.RpcException: Status(StatusCode=Internal, Detail="Error starting gRPC call: Connection refused")
   at GrpcGreeterClient.Program.Main(String[] args) in /Users/andreachiarelli/Documents/Playground/grpc-dotnet/CreditRatingClient/Program.cs:line 17
   at GrpcGreeterClient.Program.<Main>(String[] args)
This happens because, as said before, gRPC requires encrypted connections, but your service doesn't support TLS. You need to disable TLS also on your client by applying a little change to its code.
Open the Program.cs file and replace its content with the following:
// Program.cs

using System;
using System.Threading.Tasks;
using CreditRatingService;
using Grpc.Net.Client;
using System.Runtime.InteropServices;

namespace CreditRatingClient
{
    class Program
    {
        static async Task Main(string[] args)
        {
            var serverAddress = "https://localhost:5001";

            if (RuntimeInformation.IsOSPlatform(OSPlatform.OSX)) {
                // The following statement allows you to call insecure services. To be used only in development environments.
                AppContext.SetSwitch(
                    "System.Net.Http.SocketsHttpHandler.Http2UnencryptedSupport", true);
                serverAddress = "http://localhost:5000";
            }

            var channel = GrpcChannel.ForAddress(serverAddress);
            var client =  new CreditRatingCheck.CreditRatingCheckClient(channel);
            var creditRequest = new CreditRequest { CustomerId = "id0201", Credit = 7000};
            var reply = await client.CheckCreditRequestAsync(creditRequest);

            Console.WriteLine($"Credit for customer {creditRequest.CustomerId} {(reply.IsAccepted ? "approved" : "rejected")}!");
            Console.WriteLine("Press any key to exit...");
            Console.ReadKey();
        }
    }
}
The first difference is the import of the System.Runtime.InteropServices namespace, as you did on the server side. This namespace enables you to check if the current operating system is OSX. In this case, the AppContext.SetSwitch() statement disables TLS support and you assign a different value to the serverAddress variable. The new address uses the HTTP protocol on port 5000, the default port for insecure communications in Kestrel.
Note: Remember that you should disable TLS only during development.
Aside: Securing ASP.NET Core with Auth0
Securing ASP.NET Core applications with Auth0 is easy and brings a lot of great features to the table. With Auth0, you only have to write a few lines of code to get a solid identity management solution, single sign-on, support for social identity providers (like Facebook, GitHub, Twitter, etc.), and support for enterprise identity providers (like Active Directory, LDAP, SAML, custom, etc.).
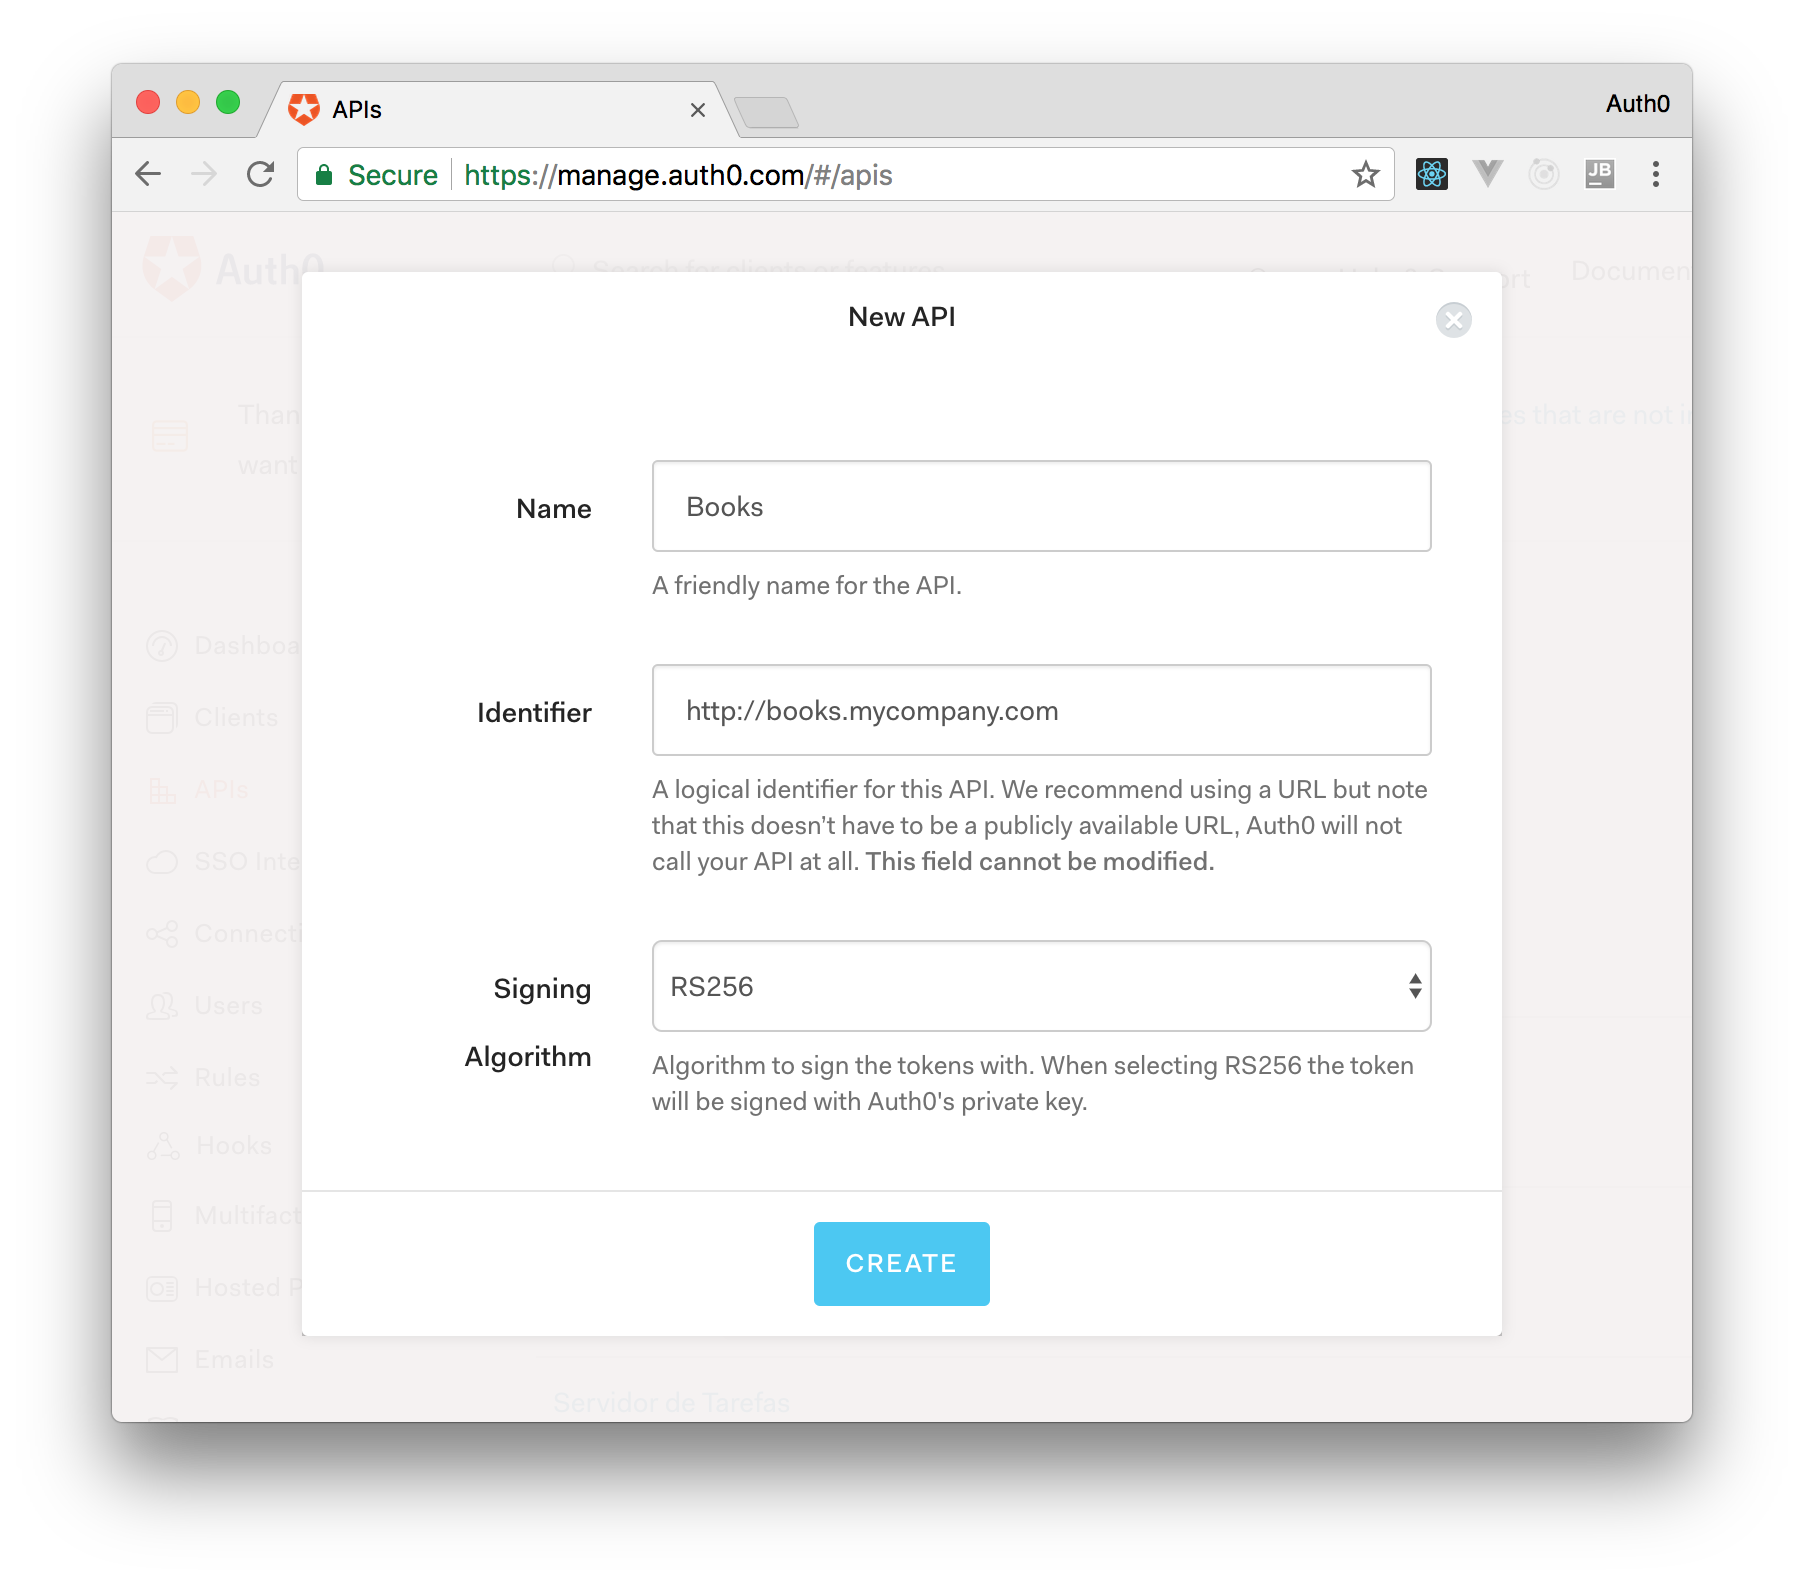
On ASP.NET Core, you need to create an API in your Auth0 Management Dashboard and change a few things on your code. To create an API, you need to sign up for a free Auth0 account. After that, you need to go to the API section of the dashboard and click on "Create API". On the dialog shown, you can set the Name of your API as "Books", the Identifier as "http://books.mycompany.com", and leave the Signing Algorithm as "RS256".
After that, you have to add the call to services.AddAuthentication() in the ConfigureServices() method of the Startup class as follows:
string authority = $"https://{Configuration["Auth0:Domain"]}/";
string audience = Configuration["Auth0:Audience"];

services.AddAuthentication(options =>
{
  options.DefaultAuthenticateScheme = JwtBearerDefaults.AuthenticationScheme;
  options.DefaultChallengeScheme = JwtBearerDefaults.AuthenticationScheme;
}).AddJwtBearer(options =>
{
  options.Authority = authority;
  options.Audience = audience;
});
In the body of the Configure() method of the Startup class, you also need to add an invocation to app.UseAuthentication() and app.UseAuthorization() as shown below:
app.UseRouting();
app.UseAuthentication();
app.UseAuthorization();
app.UseEndpoints(endpoints =>
{
    endpoints.MapControllers();
});
Make sure you invoke these methods in the order shown above. It is essential so that everything works properly.
Finally, add the following element to the appsettings.json configuration file:
{
  "Logging": {
    // ...
  },
  "Auth0": {
    "Domain": "YOUR_DOMAIN",
    "Audience": "YOUR_AUDIENCE"
  }
}
Note: Replace the placeholders
YOUR_DOMAINandYOUR_AUDIENCEwith the actual values for the domain that you specified when creating your Auth0 account and the Identifier you assigned to your API.
Summary
In this tutorial, you learned what gRPC is and how to use it to build a service and a client by leveraging the native support of .NET Core 3.1. Following the tutorial, you've defined an RPC contract by using a .proto file and have used it to build the gRPC infrastructure for both the service and the client. This allows you to just concentrate on the business logic of your client and your service.
You can find the full source code of the gRPC client and service in this GitHub repository.
About the author

Andrea Chiarelli
Principal Developer Advocate
I have over 20 years of experience as a software engineer and technical author. Throughout my career, I've used several programming languages and technologies for the projects I was involved in, ranging from C# to JavaScript, ASP.NET to Node.js, Angular to React, SOAP to REST APIs, etc.
In the last few years, I've been focusing on simplifying the developer experience with Identity and related topics, especially in the .NET ecosystem.