
Sometimes you don't need a framework like Angular or React to demonstrate an idea or concept in JavaScript. You just want a framework-agnostic, plain JavaScript development environment to play around with things like web workers, service workers, new JavaScript constructs, or IndexedDB, for example. In this blog post, you are going to learn how to quickly prototype plain JavaScript apps using webpack 4 to create such environment with zero config and low development overhead.
Webpack is a leading static module bundler for frontend apps. It is used by tools such as create-react-app to quickly scaffold frontend projects. According to the webpack documentation, since version 4.0.0, webpack doesn't require a configuration file to bundle your projects; however, the module bundler remains highly configurable to meet the increasing complexity of your projects down the line.
“With webpack 4 zero config, you can stop scratching your head on how to spin a JavaScript app quickly and avoid overengineering a quick proof of concept using a framework when JavaScript is enough.”
Tweet This
You can find the final version of this exercise on the webpack-prototype repo on GitHub. However, I encourage you to read on and build the webpack app prototype gradually to better understand the heavy lifting that webpack is doing for you.

Setting Up Zero Config Webpack 4
Head to your terminal and make a directory where you want to store your learning project your current working directory. Then, create a folder named webpack-prototype and make it your current working directory. You can do this easily with the following command:
mkdir webpack-prototype && cd webpack-prototype
This line of commands creates the
webpack-prototypedirectory and then makes it the current working directory.
Once there, create a new NPM project and install webpack locally along with the webpack-cli:
npm init -y
npm install webpack webpack-cli --save-dev
webpack-cliis the tool used to run webpack on the command line.
Next, create a simple file structure under this directory that resembles the following:
webpack-prototype
  |- package.json
  |- /dist
    |- index.html
  |- /src
    |- index.js
package.json is already provided to you when you created the NPM project.
By default, webpack 4 will look for a src/index.js file to use as an entry point. The entry point tells webpack which module it should use to start building its internal dependency graph. From this module, webpack can infer which other modules or libraries the application depends on and include them in your bundle.

Also, webpack uses dist/index.html as the default main HTML file for your application where the generated bundle will be automatically injected.
Thus, the src directory holds all of your application source code (the code that you'll create from scratch, write, delete, edit, and so on). The dist directory is the distribution directory for the application. This directory holds code that has been minimized and optimized by webpack. In essence, the dist directory holds the webpack output that will be loaded in the browser once the application is run.
You can create these files quickly by issuing the following commands:
macOS / Linux:
mkdir src dist && touch dist/index.html src/index.js
Windows:
mkdir src dist && echo.> dist/index.html && echo.> src/index.js
mkdir is used to create directories across operating systems. However, touch is only available in Unix and Unix-like operating systems. echo is a Windows equivalent of touch. echo. creates a file with one empty line in it.
Open the project in your preferred IDE or code editor.
You can run
code .orwebstorm .to open the current working directory if you have installed the command line tools for Visual Studio Code or WebStorm.
Give some life to dist/index.html by adding the following code:
<!DOCTYPE html>
<html lang="en">
<head>
    <meta charset="UTF-8">
    <title>Webpack Prototype</title>
</head>
<body>
  <script src="main.js"></script>
</body>
</html>
Within the <body> tag, you load a main.js file through a <script> tag; however, you have not created such file:
<script src="main.js"></script>
No worries. main.js will be created automatically for you by webpack once it creates your project bundle.
As a precaution, to prevent publishing your code to NPM by accident, open package.json and do the following:
- Add
"private": true,as a property. - Delete the
"main": "index.js",line.
package.json should look like this:
{
  "name": "webpack-prototype",
  "version": "1.0.0",
  "description": "",
  "private": true,
  "scripts": {
    "test": "echo "Error: no test specified" && exit 1"
  },
  "keywords": [],
  "author": "",
  "license": "ISC",
  "devDependencies": {
    "webpack": "^4.25.1",
    "webpack-cli": "^3.1.2"
  }
}
Now, give some life to src/index.js. For now, add a simple message on the screen:
// src/index.js

const createElement = message => {
  const element = document.createElement("div");
  element.innerHTML = message;
  return element;
};

document.body.appendChild(createElement("Webpack lives."));
Finally, to test everything is working as intended, you need to create a bundle. This can be done by issuing the following command:
npx webpack
Using npx, you can emulate the same behavior of the global installation of webpack but without the actual global installation. npx uses the local version of webpack you installed earlier.
If you have
npm >= 5.2installed in your system, you havenpxavailable.
However, running this command from the command line is not efficient or too memorable. A better approach is to create a build NPM script in package.json which does the same thing as npx webpack:
{
  "name": "webpack-prototype",
  "version": "1.0.0",
  "description": "",
  "private": true,
  "scripts": {
    "test": "echo "Error: no test specified" && exit 1",
    "build": "webpack"
  },
  "keywords": [],
  "author": "",
  "license": "ISC",
  "devDependencies": {
    "webpack": "^4.25.1",
    "webpack-cli": "^3.1.2"
  }
}
Now, you can run npm run build instead which is a more familiar command for JavaScript developers.
Running webpack does the following:
- Use
src/index.jsas the entry point. - Generate
dist/main.jsas the webpack output.
Notice that there is a warning when you build your app:
WARNING in configuration. The 'mode' option has not been set. You'll learn soon about this in this blog post.
Verify that the bundle was created correctly by doing the following:
- Open the
distdirectory. Do you see themain.jsfile there? If yes, the output worked. - If you are curious, open
main.js. Observe the file consists of a highly minimized one-line of JavaScript code. - Open
dist/index.htmlin the browser. You should seeWebpack lives.printed on the screen.
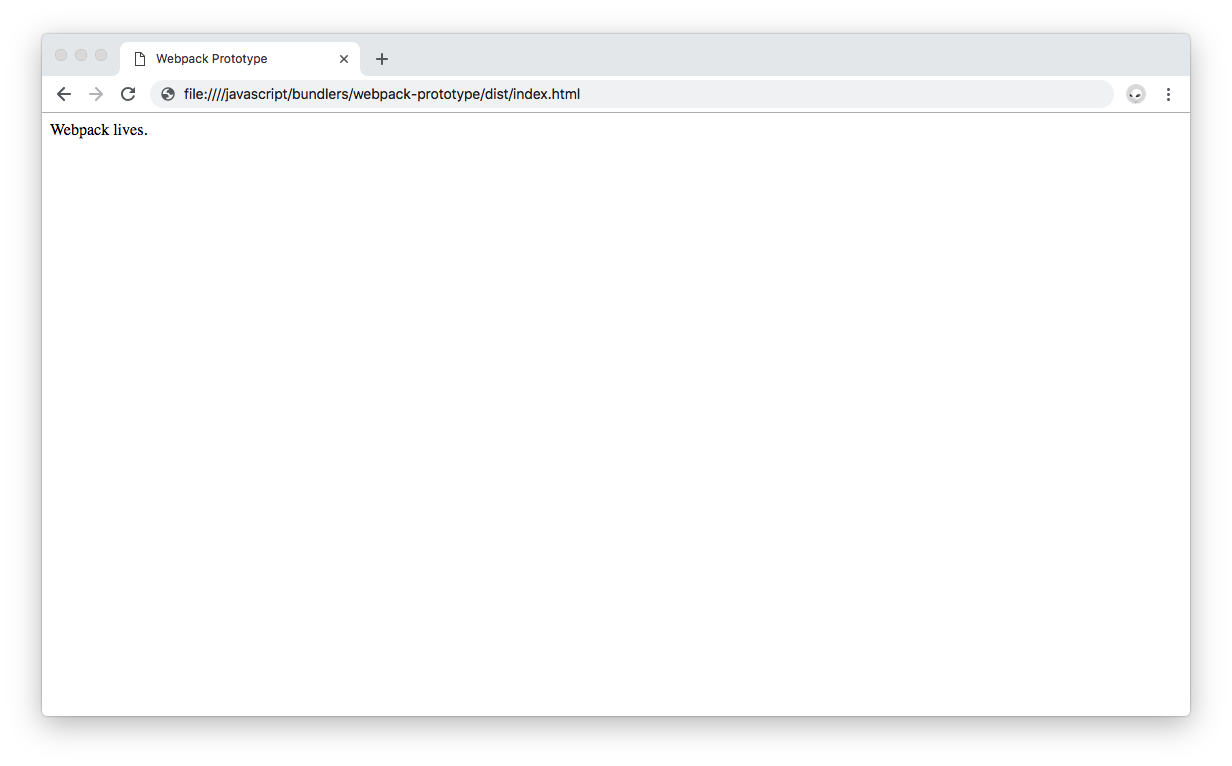
To open
dist/index.html, find the file through the file system and double-click it. Your default browser should then open the file.
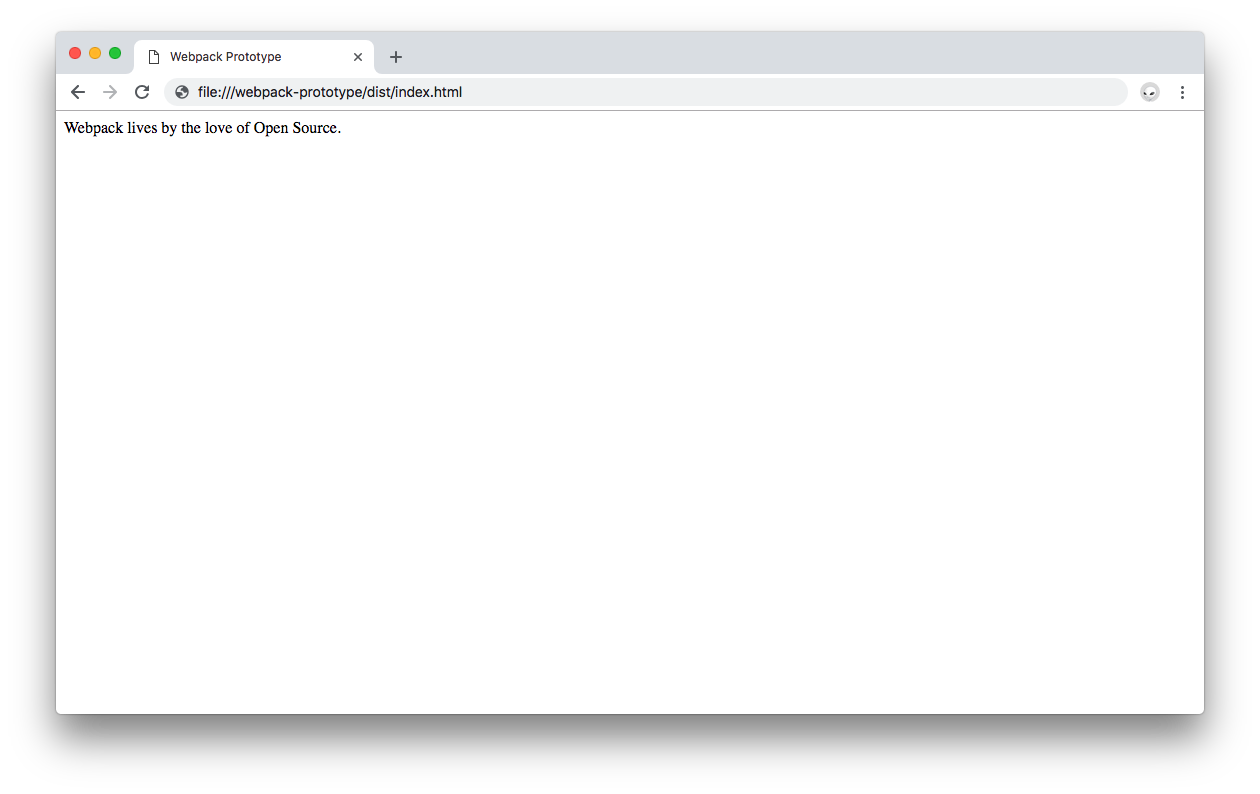
Change the message string in src/index.js to the following:
// src/index.js

const createElement = message => {
  const element = document.createElement("div");
  element.innerHTML = message;
  return element;
};

document.body.appendChild(
  createElement("Webpack lives by the love of Open Source.")
);
Reload the browser tab presenting index.html. Notice that the printed message doesn't change. For it to change, you need to update your output bundle. To do this, you'll need to execute npm run build again to re-create the bundle and then refresh the page. Run the command and refresh the page. Webpack lives by the love of Open Source. should now be shown on the screen.
This is not optimal. What you want is Hot Module Replacement to exchange, add, or remove modules while an application is running and without requiring a full reload.
What are the benefits of enabling Hot Module Replacement for you as a developer?
- During a full reload, the state of your application is lost. HRM lets you retain your app state.
- By only updating what has changed in the app, you can save time.
- Changes in your source CSS and JavaScript files are shown in the browser instantaneously which closely resembles an update done directly through the browser's dev tools.
To enable HRM, follow this steps:
- Install
webpack-dev-serverwhich provides you with a simple web server with the ability to live-reload your app:
npm install webpack-dev-server --save-dev
- Create a
start:devNPM script withinpackage.json:
{
  "name": "webpack-prototype",
  "version": "1.0.0",
  "description": "",
  "private": true,
  "scripts": {
    "test": "echo "Error: no test specified" && exit 1",
    "build": "webpack",
    "start:dev":
      "webpack-dev-server --mode development --content-base dist/ --open --hot"
  },
  "keywords": [],
  "author": "",
  "license": "ISC",
  "devDependencies": {
    "webpack": "^4.25.1",
    "webpack-cli": "^3.1.2",
    "webpack-dev-server": "^3.1.10"
  }
}
That start:dev NPM script is a mouthful. What's it doing?
{
  // ...
  "scripts": {
    // ...
    "start:dev":
      "webpack-dev-server --mode development --content-base dist/ --open --hot"
  }
  // ...
}
webpack-dev-server: Runs the webpack dev server.
--mode development: The mode configuration option tells webpack to use its built-in optimizations accordingly. development produces a much more readable output than production. If you leave this option out, the default option is production. You may also set it to none which disables any default behavior.
Learn more about the differences between the webpack
developmentandproductionmodes here.
--content-base dist/: Tells the dev server from where to serve your static content. By default, webpack-dev-server will serve the files in the current directory. However, in this case, you want the content to be served from dist/ where your index.html file is.
--open: Opens the default app url in the system's default browser. Here, it's http://localhost:8080/.
--hot: Enables Hot Module Replacement by adding the HotModuleReplacementPlugin and switching the server to hot mode.
- Run the webpack dev server:
npm run start:dev
Your default browser will open up, load http://localhost:8080/, and present you with your app again.
Do something crazy: stop the webpack-dev-server, delete the main.js file that was created earlier under the dist directory, and execute npm run start:dev again. The default browser will open again and you will see the message printed on the screen. How is that possible if you deleted main.js?
webpack-dev-server watches your source files and re-compiles your bundle when those file change. However, this modified bundle is served from memory at the relative path specified in publicPath. It is not written under your dist directory. If a bundle already exists at the same URL path, by default, the in-memory bundle takes precedence. This is all taken care of automagically by specifying this line on your index.html:
<script src="main.js"></script>
That's it! You can now add more complex code to src/index.js or import other modules to it. Webpack will build its internal dependency graph and include all these in your final bundle. Try that out!
Importing Modules Using Zero Config Webpack
Create another module that adds another element to the DOM. Under src, create banner.js:
macOS / Linux:
touch src/banner.js
Windows:
echo.> src/banner.js
Open this file and populate it with this:
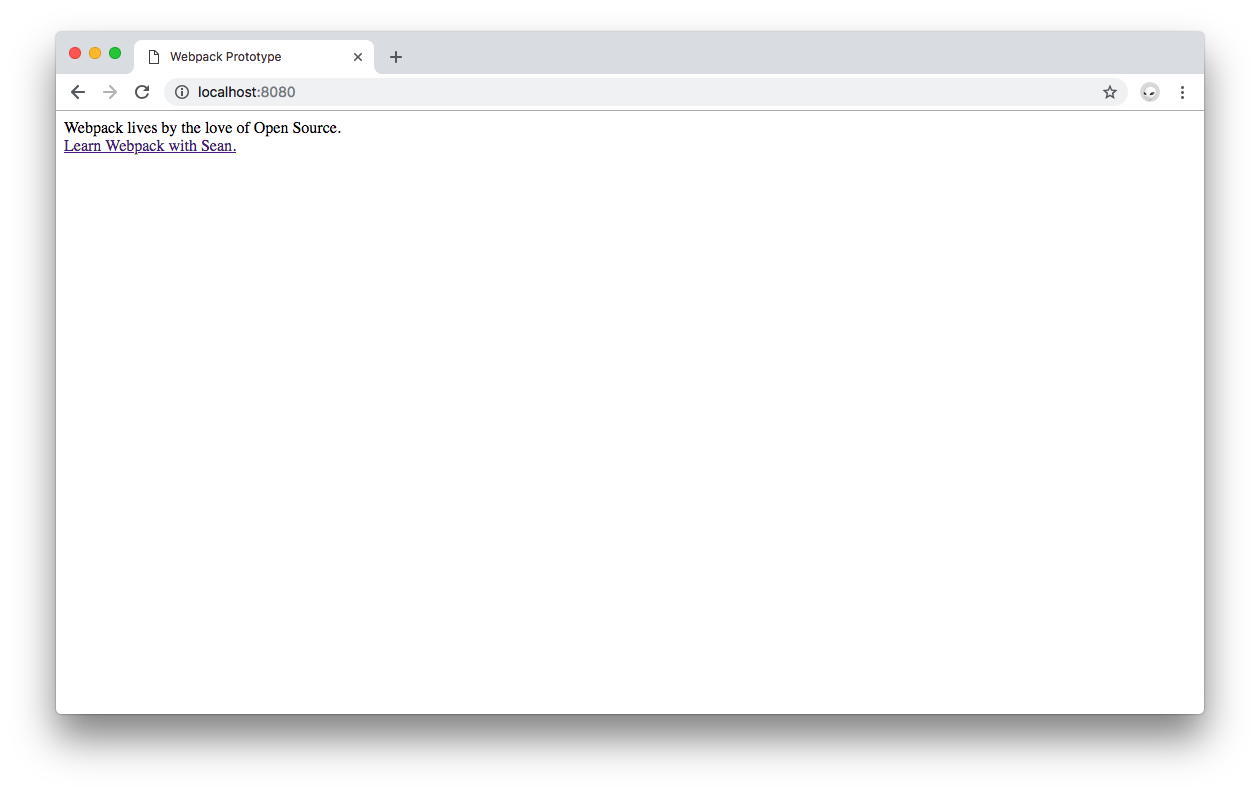
// src/banner.js

const createBanner = () => {
  const link = document.createElement("a");
  link.innerHTML = "Learn Webpack with Sean.";
  link.href = "https://webpack.academy/";
  link.target = "_blank";
  return link;
};

export default createBanner;
Save the changes made to src/banner.js.
Then update src/index.js as follows:
// src/index.js

import createBanner from "./banner.js";

const createElement = message => {
  const element = document.createElement("div");
  element.innerHTML = message;
  return element;
};

document.body.appendChild(
  createElement("Webpack lives by the love of Open Source.")
);

document.body.appendChild(createBanner());
Save the changes made to src/index.js. Look at the browser. You'll now see the message Webpack lives by the love of Open Source. and a Learn Webpack with Sean hyperlink under it which on click takes you to the Webpack Learning Academy, a comprehensive webpack learning resource by Sean Larkin.
The same principle can be applied to any modules installed in your project through npm. For example, if you want to use lodash, simply execute npm install --save lodash and import it in any file that needs it:
npm install --save lodash
Update src/banner.js as follows:
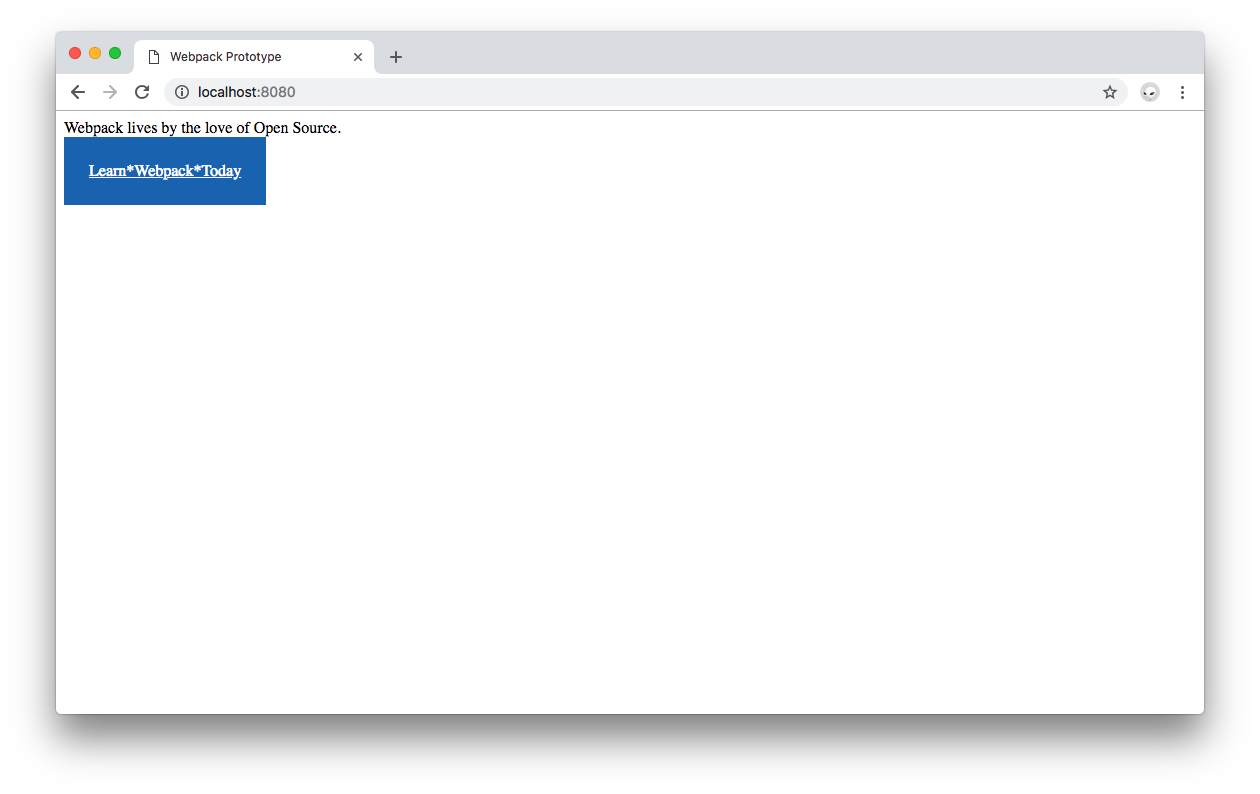
// src/banner.js

import _ from "lodash";

const createBanner = () => {
  const link = document.createElement("a");
  link.innerHTML = _.join(["Learn", "Webpack", "Today"], "*");
  link.href = "https://webpack.academy/";
  link.target = "_blank";
  return link;
};

export default createBanner;
Recall that when importing local modules you use
./relative-path-to-moduleas the module path. When importing NPM modules you usenpm-module-nameas the module path.
Save the changes on src/banner.js and look at the hyperlink in the browser update itself to look very 90's Retro: Learn*Webpack*Today.

What about CSS?
Adding CSS Stylesheets to Zero Config Webpack
Does adding CSS files work the same as adding JavaScript modules? Find out! You can make the current page look prettier as follows:
- Under
src, createbanner.css:
macOS / Linux:
touch src/banner.css
Windows:
echo.> src/banner.css
- Open
src/banner.cssand populate it with the following:
/* src/banner.css */

.banner {
  position: fixed;

  background: #1a6db9;
  color: white;

  padding: 25px;
}
Save the changes made to src/banner.css.
Next update src/banner.js to import banner.css and add the banner class to the <a> banner element:
// src/banner.js

import _ from "lodash";

import "./banner.css";

const createBanner = () => {
  const link = document.createElement("a");
  link.innerHTML = _.join(["Learn", "Webpack", "Today"], "*");
  link.href = "https://webpack.academy/";
  link.target = "_blank";
  link.classList = "banner";
  return link;
};

export default createBanner;
Save src/banner.js and... you get the following error in the command line:
ERROR in ./src/banner.css 3:0
Module parse failed: Unexpected token (3:0)
You may need an appropriate loader to handle this file type.
A solution could be to move banner.css to the dist folder and call it from index.html using a <link> tag:
<!DOCTYPE html>
<html lang="en">

<head>
  <meta charset="UTF-8">
  <title>Webpack Prototype</title>

  <link rel="stylesheet" type="text/css" href="banner.css">
</head>

<body>
  <script src="main.js"></script>
</body>

</html>
This certainly works but you'll lose live reloading for that CSS file. Any changes made to dist/banner.css would require you to refresh the browser. As discussed earlier, that's not optimal. What can be done? Create a minimal configuration file to use a webpack loader to handle loading CSS files.
Extending Zero Config Webpack with Minimal Configuration
Under the root directory, create a webpack.config.js file:
macOS / Windows:
touch webpack.config.js
Windows:
echo.> webpack.config.js
In order to import a CSS file from within a JavaScript module using webpack, you need to install and add the style-loader and css-loader to the module configuration that will live within webpack.config.js. You can do that by following these steps:
- Install
style-loaderandcss-loader:
npm install --save-dev style-loader css-loader
- Once those two packages are installed, update
webpack.config.js:
// webpack.config.js

module.exports = {
  module: {
    rules: [
      {
        test: /.css$/,
        use: ["style-loader", "css-loader"]
      }
    ]
  }
};
The
modulerulesuse a regular expression to test which files it should look for and provide to the loaders specified underuse. Any file that has a.cssextension is served to thestyle-loaderand thecss-loader.
Save the changes on
webpack.config.js.Finally, you need to tell
webpack-dev-serverto usewebpack.config.jsas the configuration file through the--configoption. You do that by adding the--config webpack.config.jsoption to thestart:devNPM script present inpackage.json:
{
  "name": "webpack-prototype",
  "version": "1.0.0",
  "description": "",
  "private": true,
  "scripts": {
    "test": "echo "Error: no test specified" && exit 1",
    "build": "webpack",
    "start:dev":
      "webpack-dev-server --mode development --content-base dist/ --open --hot --config webpack.config.js"
  },
  "keywords": [],
  "author": "",
  "license": "ISC",
  "devDependencies": {
    "css-loader": "^1.0.1",
    "style-loader": "^0.23.1",
    "webpack": "^4.25.1",
    "webpack-cli": "^3.1.2",
    "webpack-dev-server": "^3.1.10"
  },
  "dependencies": {
    "lodash": "^4.17.11"
  }
}
- Save the changes made on
package.json.
Stop the webpack-dev-server and execute npm run start:dev again. Observe that now the 90's Retro banner has a blue background, padding, and white text:
You can use this configuration file to add any other loaders you may need to address needs such as compiling SCSS to CSS, transpiling JavaScript, loading image assets, and many more. There are lots of webpack loaders to address different project tasks. Check the full webpack loader list.
“Learn how to create a minimal configuration extension to Webpack Zero Config to handle loading CSS files easily.”
Tweet This
For good measure, let's try loading images into our files as they are oftentimes part of a prototype.
A much better approach is to use images from a CDN.
Loading Images Using Webpack 4
Start by downloading the logo of webpack available here. Save it as webpack-logo.png and move it to the src directory.
Update src/index.js to import the image as follows:
// src/index.js

import createBanner from "./banner.js";

import WebpackImg from "./webpack-logo.png";

const createElement = message => {
  const element = document.createElement("div");
  element.innerHTML = message;
  return element;
};

document.body.appendChild(
  createElement("Webpack lives by the love of Open Source.")
);

document.body.appendChild(createBanner());
Save the file. As you may be thinking, an error is shown in the command line about this type of file, a PNG image, not being able to be loaded:
ERROR in ./src/webpack-logo.png 1:0
Module parse failed: Unexpected character '�' (1:0)
You may need an appropriate loader to handle this file type.
As with CSS, you need an image loader. Follow these steps to add it to your webpack module:
- Install the
file-loaderwebpack loader:
npm install --save-dev file-loader
- Add a new rule to
moduleruleswithinwebpack.config.js:
// webpack.config.js

module.exports = {
  module: {
    rules: [
      {
        test: /.css$/,
        use: ["style-loader", "css-loader"]
      },
      {
        test: /.(png|svg|jpg|jpeg|gif)$/,
        use: ["file-loader"]
      }
    ]
  }
};
This time the regular expression in the rule test is looking for files that have popular image file extensions, such as .png and .jpeg.
- Restart the webpack dev server.
The file loading error is now gone.
- Update
src/index.jsto make use the of the image:
// src/index.js

import createBanner from "./banner.js";

import WebpackImg from "./webpack-logo.png";

const createElement = message => {
  const element = document.createElement("div");
  element.innerHTML = message;
  return element;
};

const createImage = image => {
  const element = document.createElement("div");
  const imageElement = new Image();
  imageElement.src = image;
  element.appendChild(imageElement);
  return element;
};

document.body.appendChild(
  createElement("Webpack lives by the love of Open Source.")
);

document.body.appendChild(createBanner());
document.body.appendChild(createImage(WebpackImg));
Take a look at the browser. The webpack logo now loads on the screen:
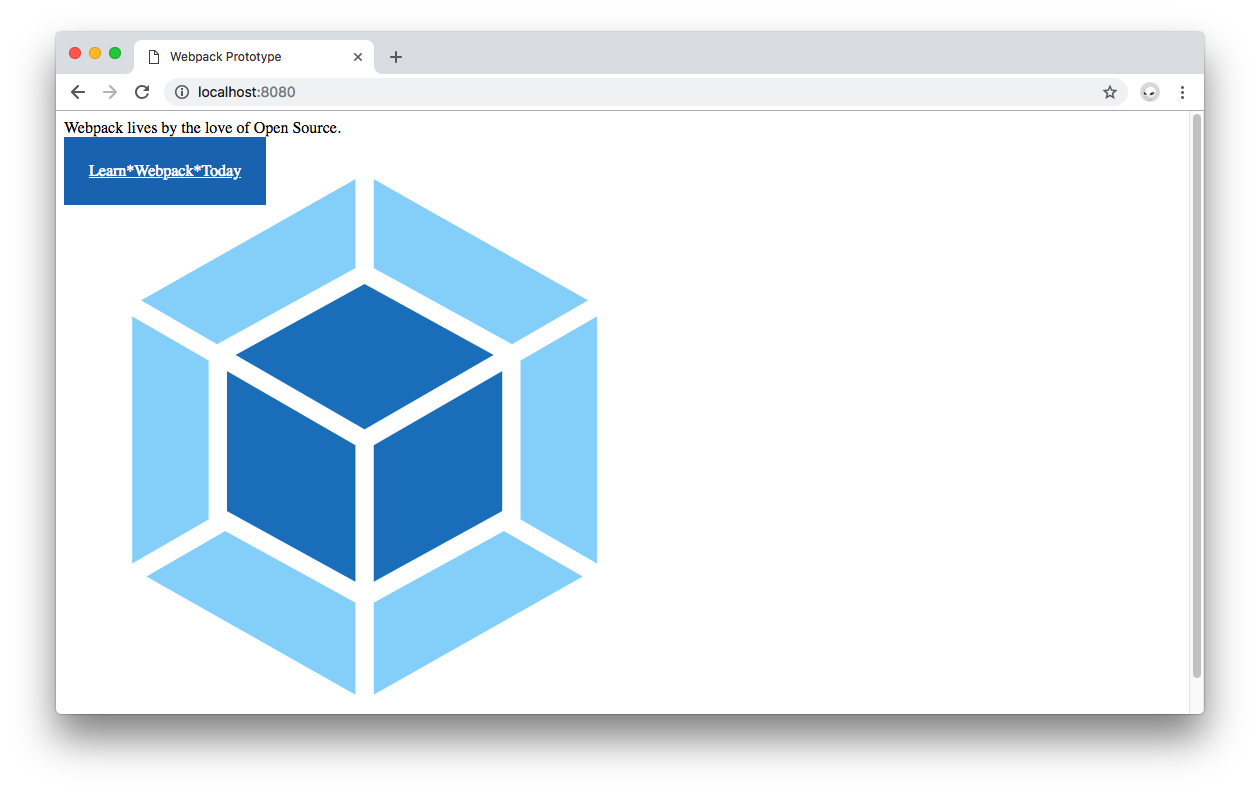
Your Webpack Zero Config configuration extension now includes the ability to load images. The config file still remains minimal, lightweight, and easy to understand.
Building a JavaScript App with Webpack 4
As a final note of this process, once you want to build your app again, simply execute npm run build.
The images imported into JavaScript modules will be processed and added to the dist output directory. Any image variables will have the final URL of that post-processing image, which may look like this:
dist/e5e245191fd9c9812bc78bd0cea9a12c.jpeg
You can also use your images within CSS files to add them as element backgrounds, for example.
Conclusion
For a simple and quick JavaScript prototype, JavaScript, CSS, and image assets are plenty to get a lot done. You are now empowered with knowledge on how to use webpack 4 to create a development environment for JavaScript projects with zero config needed. If the project requires CSS, you can extend the zero config to use CSS and file loaders to create beautiful JavaScript apps fast. As an alternative, if you prefer to, feel free to use cloud environments that use webpack 4 such as StackBlitz.
You can find a polished version of this exercise on the webpack-prototype repo on GitHub. The final version uses Google Fonts and an improved structure to create a much better looking webpack banner using webpack!
Aside: Auth0 Authentication with JavaScript
At Auth0, we make heavy use of full-stack JavaScript to help our customers to manage user identities, including password resets, creating, provisioning, blocking, and deleting users. Therefore, it must come as no surprise that using our identity management platform on JavaScript web apps is a piece of cake.
Auth0 offers a free tier to get started with modern authentication. Check it out, or sign up for a free Auth0 account here!
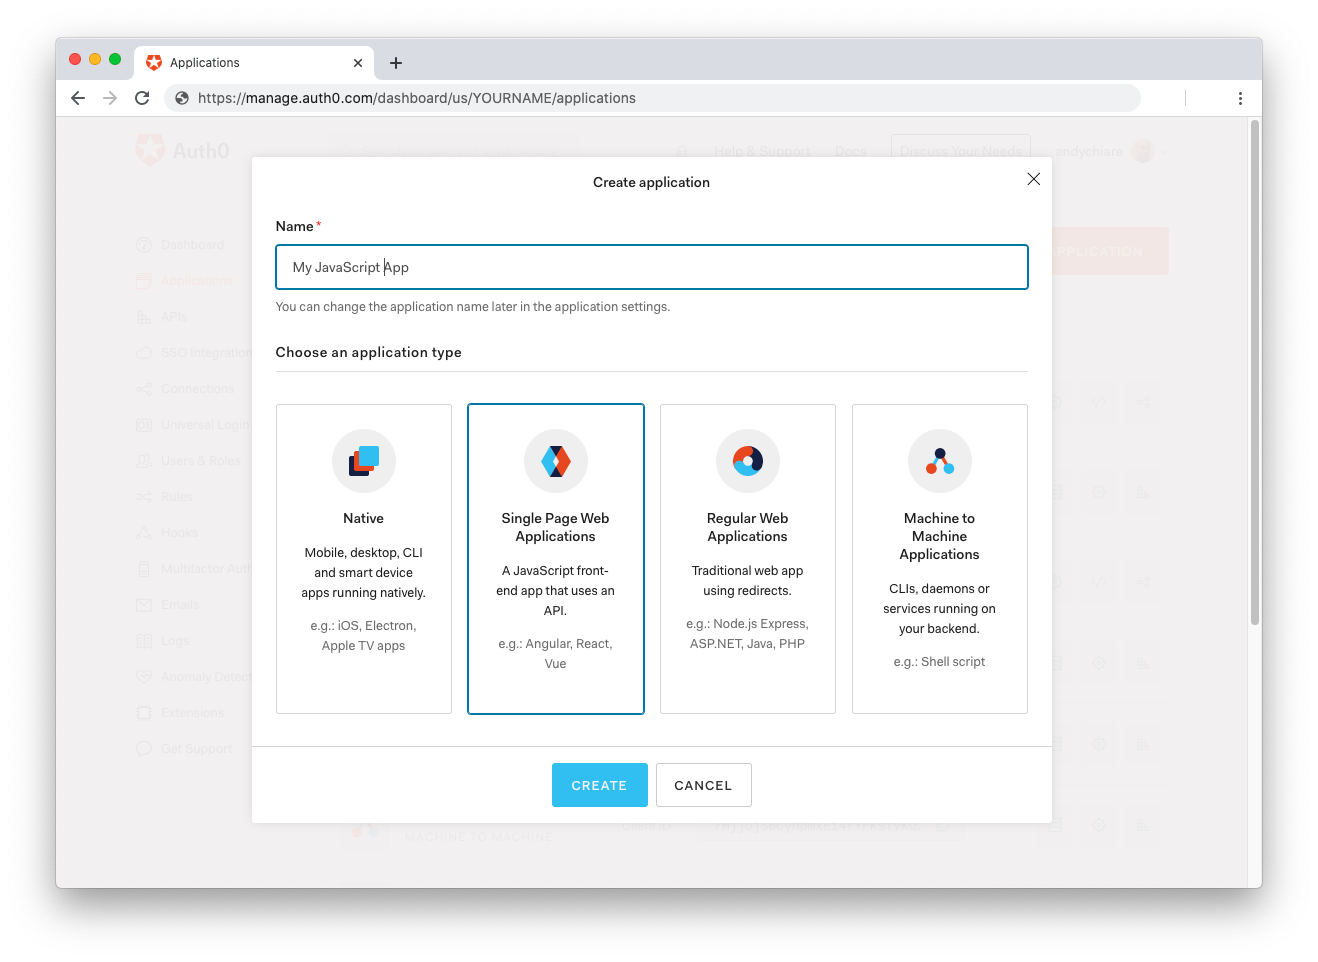
Then, go to the Applications section of the Auth0 Dashboard and click on "Create Application". On the dialog shown, set the name of your application and select Single Page Web Applications as the application type:
After the application has been created, click on "Settings" and take note of the domain and client id assigned to your application. In addition, set the Allowed Callback URLs and Allowed Logout URLs fields to the URL of the page that will handle login and logout responses from Auth0. In the current example, the URL of the page that will contain the code you are going to write (e.g. http://localhost:8080).
Now, in your JavaScript project, install the auth0-spa-js library like so:
npm install @auth0/auth0-spa-js
Then, implement the following in your JavaScript app:
import createAuth0Client from '@auth0/auth0-spa-js';

let auth0Client;

async function createClient() {
  return await createAuth0Client({
    domain: 'YOUR_DOMAIN',
    client_id: 'YOUR_CLIENT_ID',
  });
}

async function login() {
  await auth0Client.loginWithRedirect();
}

function logout() {
  auth0Client.logout();
}

async function handleRedirectCallback() {
  const isAuthenticated = await auth0Client.isAuthenticated();

  if (!isAuthenticated) {
    const query = window.location.search;
    if (query.includes('code=') && query.includes('state=')) {
      await auth0Client.handleRedirectCallback();
      window.history.replaceState({}, document.title, '/');
    }
  }

  await updateUI();
}

async function updateUI() {
  const isAuthenticated = await auth0Client.isAuthenticated();

  const btnLogin = document.getElementById('btn-login');
  const btnLogout = document.getElementById('btn-logout');

  btnLogin.addEventListener('click', login);
  btnLogout.addEventListener('click', logout);

  btnLogin.style.display = isAuthenticated ? 'none' : 'block';
  btnLogout.style.display = isAuthenticated ? 'block' : 'none';

  if (isAuthenticated) {
    const username = document.getElementById('username');
    const user = await auth0Client.getUser();

    username.innerText = user.name;
  }
}

window.addEventListener('load', async () => {
  auth0Client = await createClient();

  await handleRedirectCallback();
});
Replace the
YOUR_DOMAINandYOUR_CLIENT_IDplaceholders with the actual values for the domain and client id you found in your Auth0 Dashboard.
Then, create your UI with the following markup:
<p>Welcome <span id="username"></span></p>
<button type="submit" id="btn-login">Sign In</button>
<button type="submit" id="btn-logout" style="display:none;">Sign Out</button>
Your application is ready to authenticate with Auth0!
Check out the Auth0 SPA SDK documentation to learn more about authentication and authorization with JavaScript and Auth0.
About the author

Dan Arias
Software Engineer (Auth0 Alumni)