By Luciano Balmaceda
This tutorial demonstrates how to add authorization to a Django REST Framework API.We recommend that you log in to follow this quickstart with examples configured for your account.New to Auth0? Learn how Auth0 works and read about implementing API authentication and authorization using the OAuth 2.0 framework.
Configure Auth0 APIs
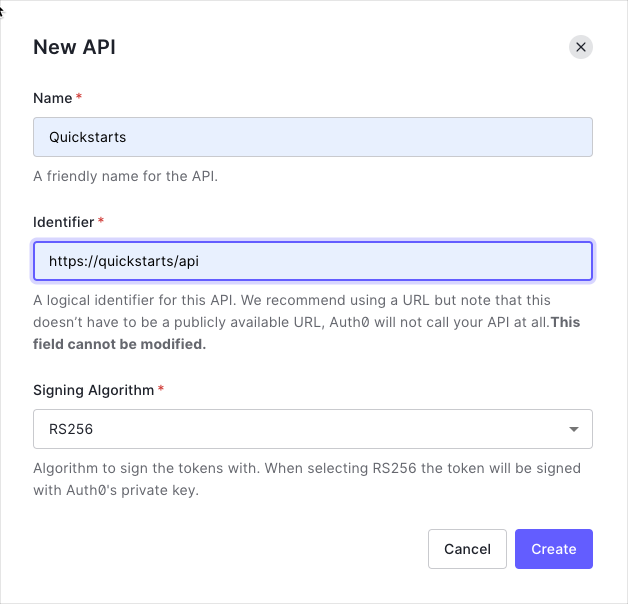
Create an API
In the APIs section of the Auth0 dashboard, click Create API. Provide a name and an identifier for your API, for example,https://quickstarts/api. You will use the identifier as an audience later, when you are configuring the Access Token verification. Leave the Signing Algorithm as RS256.
Define permissions
Permissions let you define how resources can be accessed on behalf of the user with a given access token. For example, you might choose to grant read access to themessages resource if users have the manager access level, and a write access to that resource if they have the administrator access level.
You can define allowed permissions in the Permissions view of the Auth0 Dashboard’s APIs section.
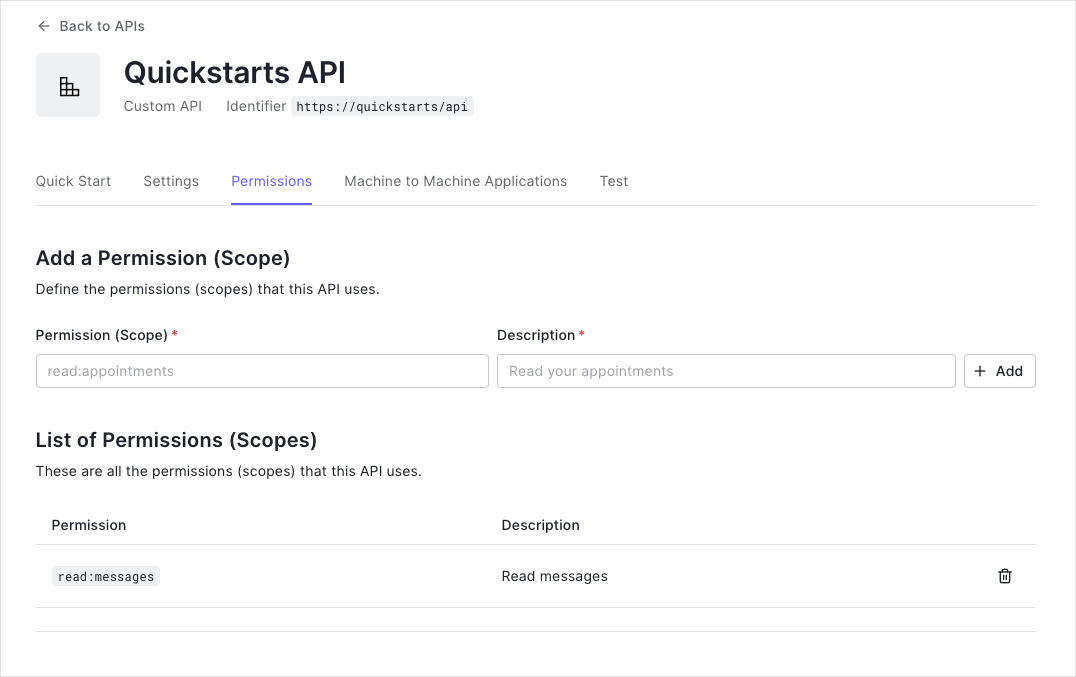
This example uses the
read:messages scope.- How to check for a JSON Web Token (JWT) in the
Authorizationheader of an incoming HTTP request. - How to check if the token is valid, using the JSON Web Key Set (JWKS) for your Auth0 account. To learn more about validating Access Tokens, see Validate Access Tokens.
Setup the Django Application
Install dependencies
Add the following dependencies to yourrequirements.txt and run pip install -r requirements.txt.
Create a Django project
This guide assumes you already have a Django application set up. If that is not the case, follow the steps in the Django Tutorial. The sample project was created with the following commands:Add a Django remote user
You need to define a way to map the username from the Access Token payload to the Django authentication system user. AddRemoteUserMiddleware middleware component after AuthenticationMiddleware to middleware list.
ModelBackend and RemoteUserBackend to the Authentication Backends.
utils.py file in your application’s folder and define a function that maps the sub field from the access_token to the username. Then, the authenticate method from RemoteUserBackend will create a remote user in the Django authentication system and return a User object for the username.
Validate Access Tokens
Thesettings.py file contains the configuration of the Django project.
Add rest_framework app to the INSTALLED_APPS entry.
JSONWebTokenAuthentication to Django REST framework’s DEFAULT_AUTHENTICATION_CLASSES.
JWT_AUTH variable.
Set the JWT_AUDIENCE to your API identifier and the JWT_ISSUER to your Auth0 domain. By default, those values will be retrieved from the .env file.
Create the function to fetch the JWKS from your Auth0 account to verify and decode the incoming Access Token.
Validate scopes
Add the following methods to theviews.py file to create a decorator that will check the granted scopes from the access_token.
Protect API Endpoints
The routes shown below are available for the following requests:GET /api/public: available for non-authenticated requestsGET /api/private: available for authenticated requests containing an access token with no additional scopesGET /api/private-scoped: available for authenticated requests containing an access token with theread:messagesscope granted
views.py add public and private endpoints. Add the @api_view decorator to all the endpoints to indicate that the method requires authentication. Lastly, add the decorator @permission_classes([AllowAny]) to the public endpoint to accept unauthenticated requests.
requires_scope decorator in the methods that require specific scopes granted. The method below requires the read:messages scope granted.
Add URL mappings
In previous steps, we added methods to theviews.py file. We need to map those methods to URLs.
Django has a URL dispatcher that lets you map URL patterns to views.
Create the file urls.py in your application folder. Add the URL patterns.
urls.py file. Add a reference to your application’s urls.py file.